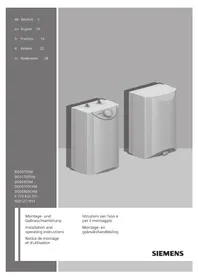
DO10802 - Boiler SIEMENS - Free user manual and instructions
Find the device manual for free DO10802 SIEMENS in PDF.
User questions about DO10802 SIEMENS
0 question about this device. Answer the ones you know or ask your own.
Ask a new question about this device
Download the instructions for your Boiler in PDF format for free! Find your manual DO10802 - SIEMENS and take your electronic device back in hand. On this page are published all the documents necessary for the use of your device. DO10802 by SIEMENS.
USER MANUAL DO10802 SIEMENS
operating instructions
This appliance is intended for domestic use or for household-based, non-commercial applications. Household-based applications include, e.g. usage in employees catering facilities for shops, offices, agricultural and other commercial operations, as well as usage by guests of guest houses, small hotels and similar residential establishments.
Install and operate the appliance as described in the text and illustrations. We do not accept liability for damage resulting from failure to heed these instructions.
This appliance is intended for use up to an altitude of 2000m above sea level.
The appliance may only be installed and stored in a frost-free room (due to residual water).
Risk of electric shock! If an fault occurs, immediately disconnect the plug from the power supply! Immediately shut off the cold water supply to the appliance should it leak.
The appliance may only be connected and put into operation by qualified professional.
To avoid potential sources of danger, repairs and maintenance may only be undertaken by a suitably qualified specialist.
Shut off the water supply before connecting the appliance. Do not insert the plug into the mains socket.
Caution! Fill the appliance with water first, then insert the mains plug, otherwise the resettable safety temperature limitation will trip.
Observe the statutory regulations as well as the connection regulations of the electrical and water utility companies.
Only connect the appliance to a correctly earthed electrical socket. Do not use extension cables.
Disconnect the power supply before opening the appliance.
The appliance may not be powered via an external switching device such as a timer switch in order to exclude the danger of an unintentional reset of the safety temperature limitation in the event of a fault.
The connection cable may not make contact with hot components. This can damage the insulation.
If the electrical connection cable of this appliance is damaged, it may only be replaced by one of our authorised customer service representatives in order to avoid potential sources of danger. The plug must be removed from the mains before replacement.
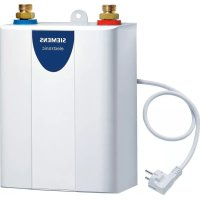
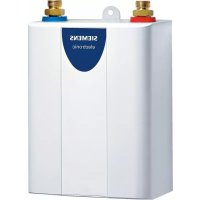
The small water heater is only suitable for use with an open (unpressurised) and a single tap connection. The warm water outlet is used for pressure compensation and may only be connected to suitable fittings (Order No. BZ 13051 or BZ 13061 for undersink appliances or AM 010100 for oversink appliances).
The tap outlet must always remain free. Do not use perlators (diffusers) or shower taps.
This appliance can be used by children aged 8 years and older as well as by persons with diminished bodily, sensory or mental perception, or those who lack knowledge or experience, if they are monitored or have received instruction concerning use and comprehend the possible dangers that can result. Children may not play with the appliance. Cleaning and maintenance by the user may not be performed by unsupervised children.
Keep children away from the appliance.
Please monitor children to ensure that they do not play with the appliance.
The warm water pipe may be hot. Please inform and instruct children appropriately.
Do not use aggressive or abrasive cleaning detergents!
Do not use a steam cleaner.
Congratulations on purchasing this Siemens appliance. You have acquired a top-quality product, which will give you a lot of enjoyment.
Please read this installation and operating instruction manual carefully, then act accordingly! Store for future reference.
Installation (for the qualified professional)
Unpacking
Inspect the new appliance for transport damage!
Please dispose of the packaging, and if applicable, the old appliance in an environmentally-friendly manner.
Install the small water heater as shown in the illustrations. Observe the instructions in the text.
The illustrations can be found in the centre of the instruction manual.

Scope of delivery/Dimensions
Undersink appliance DO10702

Water connection
Caution!
Do not allow the existing tap mixer to become calcified. A reduced flow rate will ruin the water heater.

Wall mounting
For mounting without the wall hooks, observe the different dimensions!

Screwing on the Connection Hoses
Fit the sealing gasket.
Place the sleeve nuts onto the threads and screw on by hand.
- Tighten the screw fitting.
Hold the threaded fittings on the water heater with a spanner. Do not lubricate the thread!
After the unit has been used to heat water a few times, retighten the screw fitting.
Replacement for a damaged threaded fitting is available from customer service.
Oversink appliance DO10802

Wall mounting
For mounting without the wall hooks, observe the different dimensions!

Connecting the tap mixer

Water connection
Caution!
Do not allow the existing tap mixer to become calcified. A reduced flow rate will ruin the water heater.
Insert the connection pipes into the tap mixer.
Hang the water heater on the wall.
Screw the connection pipes onto the heater and the tap mixer. Hold the threaded fittings on the heater with a spanner. Do not lubricate the thread!

First start-up
Electrical connection
Important: Do not insert the plug into the mains socket yet.
DO10702 only:
Open the corner valve.
Completely fill the heater's reservoir with water.
Set the flow on the corner valve:
10-litre unit: 10 l/min = 1 l in 6 seconds
DO10802 only:
Set the flow with the adjustment screw on the tap mixer: 10-litre unit: 10l / min = 1 in 6 seconds
Only then insert the plug into the mains socket.
Checking the heating
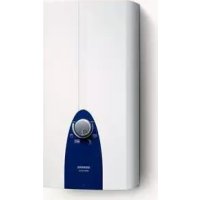
Turn the rotary selector switch to "III" (approx. 85^ ).
Monitor the heating process until the pilot lamp switchesoff. Heating time: 10-litre unit:25-35 minutes
Check the temperature.
Caution: If the safety temperature limitation has switched off the small water heater, unplug the mains plug, open the warm water tap and allow approx. 4 litres of water to flow. Then plug the mains plug back in. The appliance is ready again for operation.
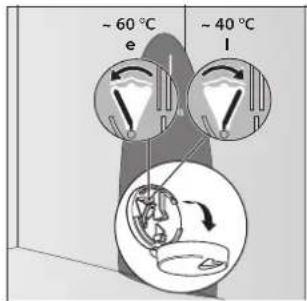
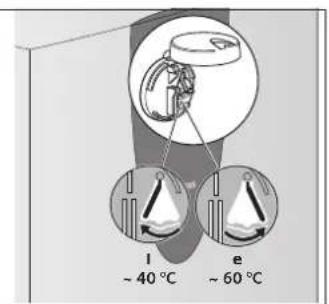
Limitation of the water temperature
The temperature of the water leaving the tap for the small water heater can be mechanically set to stage "1" (approx. 40^ ) or stage "e" (approx. 60^ ).
Information on temperature limiting can be found in the operatinginstructions.
Saving energy
Turn the rotary selector switch to "e".
Hand over the installation and operating instructions to the user and explain how the appliance operates.
Technical data
| Type DO10702 DO10802 | |||
| Rated output [kW] 2.2 2.2 | |||
| Rated capacity | [1] | 10.0 | 10.0 |
| Mixed water quantities 40°C (15°C/85°C) / (15°C/85°C) | [1] | 19/28 | 19/28 |
| Variable temperature adjustment up to | [°C] | 85 | 85 |
| Stand-by power consumption at 65°C/24 h | [kWh/d] | 0.3 | 0.3 |
| Electrical connection | [V] | 220-240 | 220-240 |
| Heat-up time to 60°C (supply temperature 12°C) | [min] | 16 | 16 |
| Fuse protection | [A] | 10 | 10 |
| Water connection | [mm (")] | 17.2 (G 3/8A) | 21.3 (G 1/2A) |
| Maximum flow | [l/min] | 10 | 10 |
| Cable length | [m] | 0.7 0.7 | |
| Dimensions (Height x Width x Depth) | [mm] | 460 x 295 x 285 | 461 x 295 x 285 |
| Weight, filled | [kg] | 13.7 | 13.7 |
| Energy efficiency class | A | A | |
| Load profile | XXS | XXS | |
| Annual energy consumption | [kWh] | 486 | 490 |
| Daily energy consumption | [kWh] | 2.360 | 2.410 |
| Sound power level | [dB] | 15 | 15 |
| Hot water heating energy efficiency | [%] | 36.5 | 35.9 |
Usage (for the customer)
Before using the appliance, please read the instructions carefully and observe them!
Important: The appliance may never be exposed to frost!

Risk of electric shock!
If a fault occurs, immediately disconnect the plug from the power supply!
Immediately shut off the cold water supply to the appliance should it leak.
Please read and observe the detailed safety instructions at the start of these instructions!
Operating the appliance
The small water heater heats and stores drinking water up to approx. 85^
The warm water outlet of the small water heater serves for pressure equalisation and my be connected only to the pressureless batteries BZ 13051 or BZ 13061 (below basin) or AM 010100 (above basin).
Setting the water temperature
The outlet temperature can be limited to approx. 40^ (Position "l") or approx. 60^ (Position "e").
The rotary selector switch also switches on the heating system.
Position:
Cold
Frost protection
Approx. 40^ (soft lock-in)
e Conserve energy approx. 60^ (soft lock-in)
III Hot water approx. 85^
During heating, the pilot lamp lights and expansion water drips from the outlet.
The appliance with be covered more quickly with limescale at higher temperatures.
Tip: Set the rotary selector switch to "e" to operate the appliance economically and to reduce the effects of limescale.
en
Limitation of the water temperature
Limit the outlet temperature to avoid scalding with hot water:
Set the rotary selector switch to "●".
Open the cover of the rotary selector switch.
Select between "I" = approx. 40^ or "e" = approx. 60^ .
Close the cover.
DO..8..
DO..7..
Switching off
Set the rotary selector switch to "●". The heating is switched off.
Cleaning
Do not use aggressive or abrasive cleaning detergents!
Do not use a steam cleaner.
Clean appliance externally with a mild cleaning agent.
Dscaling
Descale the outlet pipe with commercially available descending agent or vinegar.
Please observe the manufacturers warnings when.
descaling.
If the water flows significantly slower when the tap is fully opened, the small water heater and tap should be descaled by a specialist. Otherwise, a pressure that is higher than allowed can be produced.
Fault
Set the rotary selector switch to "e" and disconnect the mains plug if the water is no longer being heated. Open the hot water tap and allow approx. 4 litres of water to run through. Then reconnect the mains plug.
Maintenance and repair work should only be performed by a qualified professional.

Disconnect the power supply before opening the appliance!
Customer Service
In order to avoid unnecessary costs for a customer service call, ensure that an operating mistake has not caused the situation or that a blown fuse has caused the fault.
We ask you to always provide the E-No. and the FD-No. of your appliance when calling in a customer service engineer. You will find the number near both water connection nozzles of the small water heater.
Disposal
This appliance is labelled in accordance with European Directive 2012/19/EU concerning used electrical and electronic appliances (waste electrical and electronic equipment - WEEE).
The guideline determines the framework for the return and recycling of used appliances as applicable throughout the EU.
Please ask your specialist retailer about current disposal facilities.
Guarantee
The guarantee conditions for this appliance are as defined by our representative in the country in which it is sold. Details regarding these conditions can be obtained from the dealer, from whom the appliance was purchased, or directly from our representative in the country. Furthermore, the guarantee conditions can also be found on the Internet at the website address stated. The bill of sale or receipt must be produced when making any claims under the terms of this guarantee.
Sous reserve de modifications.
European Trade Center Building, 5th floor
1784 Sofia
Tel.: 02 892 90 47
Fax:028787972
mailto:informacia.servis-bq@bshg.com
www.siemens-home.bg
CH Schweiz, Suisse, Svizzera, Switzer
BSH Hausgeräte AG
Central Branch Service
17 km E.O. Athinon-Lamias &
Potamou 20
14564 Kifisia
Unit 1 & 2, 3rd Floor
North Block, Skyway House
3 Sham Mong Road
Tai Kok Tsui, Kowloon
Hong Kong
Tel.: 2565 6151
Fax: 2565 6681
mailto:siemens.hk.service@bshg.com
www.siemens-home.com.hk
HR Hrvatska, Croatia
BSH kučni uredaji d.o.o.
Kneza Branimira 22
10000 Zagreb
Tel.: 016403609
Fax:016403603
mailto:informacije.servis-hr@bshg.com
www.siemens-home.com/hr
LU Luxembourg
www.siemens-home.com/lu
ME Crna Gora, Montenegro
Elektronika komerc
UI.Slobode 17
84000 Bijelo Polje
Tel./Fax: 050 432 575
Mobil: 069324812
mailto:ekobosch.servis@t-com.me
MK Macedonia,Makeonna
GORENEC
Jane Sandanski 69 lok.3
1000 Skopje
Tel.: 022 454 600
Mobil:070 697 463
mailto:gorenec@yahoo.com
PH Philippines
Hafele Philippines, Incorporated
Levi Mariano Avenue, Brgy. Ususan,
Taguig City 1632
Metro Manila
Tel.: 0842 3353
Fax:05713662
mailto:siemens-home@hafele.com.ph
PL Polska, Poland
TH Ratcha Anachak Thai,
BSH Home Appliances Limited
2034/1-5 Ital Thai Building,
1st Floor, New Petchburi Road
Bangkapi, Huaykwang,
Bangkok, 10310
Tel:027697970
Fax:02769797
Service Call Center 02 351 8995
Spareparts 02 769 7975
www.siemens-home.com/th
TR Türkiye, Turkey
BSH Ev Aletleri Sanayi
ve Ticaret A. S.
Fatih Sultan Mehmet Mahallesir
Balkan Caddesi No: 51
34771 Umraniye, Istanbul
Tel.: 02164446688*
Fax: 0 216 528 9188
mailto:careline.turkey@bshg.com
www.siemens-home.com/tr
^* Cagli merkezini sabit hatlardan aramanin
bedeli sehir icücretlendirme, Cep
telefonlarindan isekullanan tarifeye gore