
Series 2200 EP2235 - Coffee maker PHILIPS - Free user manual and instructions
Find the device manual for free Series 2200 EP2235 PHILIPS in PDF.

| Product type | Fully automatic coffee maker |
| Brand | Philips |
| Model | Series 2200 EP2235 |
| Dimensions (W x H x D) | 246 x 372 x 433 mm |
| Weight | 7 to 7.5 kg |
| Power supply | 230 V, 50 Hz, 1450 W (estimated) |
| Water tank capacity | 1.8 L |
| Bean hopper capacity | 275 g |
| Coffee grounds container capacity | 12 servings |
| LatteGo capacity | 250 ml (depending on model) |
| Adjustable spout height | 85 - 145 mm |
| Number of grind settings | 12 |
| Aroma intensity levels | 3 |
| Adjustable coffee temperature | Yes (3 levels) |
| AquaClean water filter | Yes (optional, reduces descaling) |
| Main functions | Espresso, lungo, coffee, americano, cappuccino, latte macchiato, hot water, steam (depending on model) |
| Water hardness setting | Yes (4 levels) |
| Volume programming | Yes (maximum quantity per beverage) |
| Auto off timer | 15/30/60/180 minutes |
| Removable brewing group | Yes |
| Cleaning | Automatic rinse cycle, group cleaning, descaling (30 min) |
| Warranty | 2 years (Philips standard) |
Frequently Asked Questions - Series 2200 EP2235 PHILIPS
User questions about Series 2200 EP2235 PHILIPS
0 question about this device. Answer the ones you know or ask your own.
Ask a new question about this device
Download the instructions for your Coffee maker in PDF format for free! Find your manual Series 2200 EP2235 - PHILIPS and take your electronic device back in hand. On this page are published all the documents necessary for the use of your device. Series 2200 EP2235 by PHILIPS.
USER MANUAL Series 2200 EP2235 PHILIPS
800 series 1200 series 2200 series 3200 series
ENUSERMANUAL
DA BRUGERVEJLEDNING
Adjusting machine settings 9
Removing and inserting the brew group 11
Cleaning and maintenance 12
AquaClean water filter 14
Setting the water hardness 16
Dscaling procedure (30 min.) 16
Ordering accessories 17
Troubleshooting 17
Technical specifications 23
Machine overview (Fig. A)
A1 Control panel A10 Data label with type number
| A2 Cup holder A11 Water tank | |
| A3 Pre-ground coffee compartment A12 Hot water spout | |
| A4 Lid of bean hopper A13 Coffee grounds container | |
| A5 Adjustable coffee spout | A14 Front panel of coffee grounds container |
| A6 Grind setting knob | A15 Drip tray cover |
| A7 Coffee bean hopper | A16 Drip tray |
| A8 Brew group | A17 'Drip tray full' indicator |
| A9 Service door | |
| Accessories | |
| A18 Classic milk frother (specific types only) | A19 LatteGo (milk container) (specific types only) |
Control panel (Fig. B)
Refer to figure B for an overview of all buttons and icons. Below you find the description.
i Some of the buttons/icons are for specific types only.
B1 On/off button B7 Warning icons
B2 Drink icons* B8 Start light
B3 Aroma strength/pre-ground coffee icon B9 Start/stop button
B4 Drink quantity icon B10 Calc / Clean icon
B5 Milk quantity icon (specific types only) B11 AquaClean icon
B6 Coffee temperature icon (specific types only)
- Drink icons: espresso, espresso lungo, coffee, americano, cappuccino, latte macchiato, hot water, steam (specific types only)
Introduction
Congratulations on your purchase of a Philips fully automatic coffee machine! To fully benefit from the support that we offer, please register your product at www.home.id.
Read the separate safety booklet carefully before you use the machine for the first time and save it for future reference.
Before first use, rinse with hot water all removable accessories destined to come into contact with water or milk. To help you get started and to get the best out of your machine, we offer support in multiple ways. In the box you can find:
1 The quick start guide with picture-based usage instructions and information on cleaning and maintenance.
2 The separate safety booklet with instructions on how to use the machine in a safe way.
3 For online support (this extended user manual, frequently asked questions, videos, etc.), scan the QR code on the cover of this booklet to download the HomeID app, or visit www.home.id/support.
There are multiple versions of this espresso machine, which all have different features. Each version has its own type number. You can find the type number on the data label on the inside of the service door (see fig A9).
This machine has been tested with coffee. Although it has been carefully cleaned, there may be some coffee residues left. We guarantee, however, that the machine is absolutely new.
The machine automatically adjusts the amount of ground coffee that is used to make the best-tasting coffee. You should brew 5 coffees initially to allow the machine to complete its self-adjustment.
Make sure you rinse the LatteGo (milk container) or the classic milk frother before first use.
Before first use
1. Setting up the machine
After you have switched on the machine, some water may be dispensed from the hot water spout or coffee spout. This is normal.

2. Activating the AquaClean water filter (5 min.)
i AquaClean water filter is not by-packed in all models: you can purchase it at your local retailer or on www.home-appliances.philips/parts-accessories. Availability varies per country.
For more information see chapter 'AquaClean water filter'.
3. Setting the water hardness
See chapter 'Setting the water hardness' for step-by-step instructions. The default water hardness setting is 4: hard water.

4. Assembling LatteGo (specific types only)
5. Assembling the classic milk frother (specific types only)
Brewing drinks
General steps
1 Fill the water tank with tap water and fill the bean hopper with beans.
2 Press the on/off button to switch on the machine.
- The machine starts heating up and performs the automatic rinsing cycle. During heating up, the lights in the drinks icons light up and go out slowly one by one.
- When all lights in the drink icons light up continuously, the machine is ready for use.
3 Place a cup under the coffee dispensing spout. Slide the coffee dispensing spout up or down to adjust its height to the size of the cup or glass you are using (Fig. 1).
Personalizing drinks
This machine allows you to adjust the settings of a drink to your own preference. After selecting a drink you can:
1 Adjust the aroma strength by tapping the aroma strength icon (Fig. 2). There are 3 strengths, the lowest is the mildest and the highest is the strongest.
2 Adjust the drink quantity by tapping the drink quantity (Fig. 3) and/or the milk quantity icon (specific types only). There are 3 quantities: low, medium and high.
i You can also adjust the coffee temperature to your own preference (see 'Adjusting the coffe temperature').
Brewing coffee with beans
1 To brew a coffee, tap the drink icon of your choice.
The aroma strength and quantity lights go on and show the previously selected setting.
- You can now adjust the drink to your preferred taste (see 'Personalizing drinks').
2 Press the start/stop button.
The light in the drink icon flashes while the drink is being dispensed.
1 Specific types only: An americano is made of espresso and water. When you brew an americano, the machine first dispenses an espresso and then water.
3 To stop dispensing coffee before the machine is finished, press the start/stop button again.
To brew 2 coffees at the same time, tap the drink icon twice. The 2x light lights up.
Brewing milk-based drinks with LatteGo (milk container)
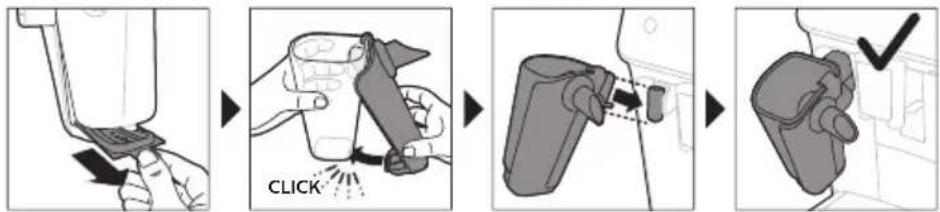
LatteGo consists of a milk container, a frame and a storage lid. To avoid leakage, make sure the frame and the milk container are properly assembled before you fill the milk container.
1 To assemble LatteGo, first insert the top of the milk container under the hook at the top of the frame (Fig. 4). Then press home the bottom part of the milk container. You hear a click when it locks into place (Fig. 5).
Note: Make sure that the milk container and the frame are clean before you connect them.
2 Slightly tilt LatteGo and put it on the hot water spout (Fig. 6). Then press it home until it locks into place (Fig. 7).
3 Fill LatteGo with milk up to the level indicated on the milk container for the drink you are brewing (Fig. 8). Do not fill the milk container beyond the maximum indication.
If you have personalized the milk quantity, you may need to fill the milk container with more or less milk than indicated for this drink on LatteGo.
Always use milk coming directly from the fridge for optimal results.
4 Place a cup on the drip tray.
5 Tap the milk-based drink icon of your choice.
- You can now adjust the drink to your own preference (see 'Personalizing drinks').
6 Press the start/stop button.
- The light in the drink icon flashes while the drink is being dispensed. When you brew a cappuccino or latte macchiato, the machine first dispenses milk and then coffee.
- To stop dispensing milk before the machine has dispensed the preset amount, press the start/stop button.
7 To stop dispensing the complete drink (milk and coffee) before the machine is finished, press and hold the start/stop button.
Frothing milk with classic milk frother
Always use milk coming directly from the fridge for the best foam quality.
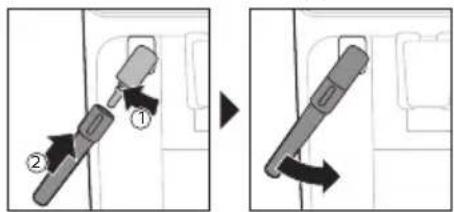
1 Tilt the black silicone handle on the machine to the left and slide the milk frother onto it (Fig. 9).
2 Fill a milk jug with with approx. 100 ml milk for cappuccino and approx. 150 ml milk for latte macchiato.
3 Insert the milk frother approx. 1 cm into the milk.
4 Tap the steam icon (Fig. 10).
The light in the steam icon goes on and the start light starts pulsing.
5 Press the start/stop button to froth the milk (Fig. 11).
The machine starts heating up, steam is forced into the milk and the milk is frothed.
6 When the milk foam in the milk jug has reached the required volume, press the start/stop button again to stop frothing milk.
i Never froth milk longer than 90 seconds. The frothing automatically stops after 90 seconds.
i You do not have to move the milk jug during milk frothing to get the best milk froth quality.
Brewing coffee with pre-ground coffee
You can choose to use pre-ground coffee instead of beans, for example if you prefer a different coffee variety or decaffeinated coffee.
1 Press the on/off button to switch on the machine and wait until it is ready for use.
2 Open the lid of the pre-ground coffee compartment and pour 3 tea spoons of coffee powder (about 8g ) into it (Fig. 12). Then close the lid.
3 Place a cup under the coffee dispensing spout.
4 Select a single drink.
5 Press the aroma strength icon for 3 seconds (Fig. 13).
The pre-ground coffee light goes on and the start light starts pulsing.
6 Press the start/stop button.
7 To stop dispensing coffee before the machine is finished, press the start/stop button again.
i With pre-ground coffee you can only brew one coffee at a time.
i Pre-ground coffee is not a setting that is saved as a previous selected strength setting. Each time you want to use pre-ground coffee, you need to press the aroma strength icon for 3 seconds.
i When you select pre-ground coffee, you cannot select a different aroma strength.
Dispensing hot water
1 If attached, remove LatteGo or the milk frother.
2 Tap the hot water icon (Fig. 14).
The drink quantity lights go on and show the previous selected drink setting for hot water.
3 Adjust the hot water quantity to your preference by tapping the drink quantity icon (Fig. 3).
4 Press the start/stop button.
The light in the hot water icon flashes and hot water is dispensed from the hot water spout (Fig. 15).
5 To stop dispensing hot water before the machine is finished, press the start/stop button again.
Adjusting machine settings
Adjusting the stand-by time
1 Press the on/off button to switch off the machine.
2 When the machine is switched off: press and hold the Calc / Clean icon (Fig. 16) until the Calc / Clean light and the Aroma strength lights go on (Fig. 17).
3 Tap the Aroma strength icon to select the required stand-by time: 15, 30, 60 or 180 minutes. Respectively 1, 2, 3 or 4 lights of the Aroma strength icon light up.
4 When you have finished setting the stand-by time, press the start/stop button. The machine switches off.
5 Press the on/off button to switch on the machine again.
Programming the highest default setting of your drinks
The machine has 3 default settings for each drink: low, medium, high. You can only adjust the quantity of the highest setting. The new quantity can be stored as soon as the start light starts to pulse.
Before you start programming the quantity of a milk drink, assemble LatteGo and pour milk in it.
1 To adjust the highest quantity setting, press and hold the icon of the drink you want to adjust for 3 seconds.
- The upper light of the drinks quantity icon and the upper light of the milk quantity icon (specific types only) starts to pulse and the start/stop button starts to pulse, indicating that you are in programming mode.
2 Press the start/stop button. The machine starts to brew the selected beverage.
- The start light lights up continuously at first. When the machine is ready to store the adjusted volume, the start/stop light starts to pulse.
3 Press the start/stop button again when the cup contains the desired quantity of coffee or milk.
- In case of cappuccino or latte macchiato, first the milk will be dispensed. Press the start/stop button when the cup contains the desired milk quantity. The machine automatically starts dispensing the coffee. Press the start/stop button again when the cup contains the desired quantity.
After you have programmed the new highest default quantity for a drink, the machine will dispense this new amount each time you select the highest quantity of this drink.
i You can only adjust the highest default quantity level.
i If you want to go back to the default quantity settings, see 'Restoring factory settings'.
Adjusting the coffee temperature
Machines without temperature icon
1 Press the on/off button to switch off the machine.
2 When the machine is switched off: press and hold the coffee quantity icon until the lights in this icon go on (Fig. 18).
3 Tap the quantity icon to select the required temperature: normal, high or max.
- Respectively 1, 2 or 3 lights are on.
4 When you have finished setting the coffee temperature, press the start/stop button.
5 Press the on/off button to switch on the machine again.
i If you do not switch off the machine yourself, it will switch off automatically after some time.
Machines with temperature icon (EP3221 only)
1 Tap the coffee temperature icon repeatedly to select the desired temperature.
Restoring factory settings
The machine offers you the possibility to restore the drinks default settings at any moment.
1 You can only restore the default settings when the machine is switched off.
1 Press the on/off button to switch the machine off.
2 Press and hold the espresso icon for 3 seconds.
- The middle lights in the drink setting icons light up. The start/stop light starts to pulse, indicating that the settings are ready to be restored.
3 Press the start/stop button to confirm you want to restore the settings.
4 Press the on/off button to switch on the machine again.
Adjusting grinder settings
You can change the coffee strength with the grind setting knob inside the bean container. The lower the grind setting, the finer the coffee beans are ground and the stronger the coffee. There are 12 different grind settings you can choose from.
The machine has been set up to get the best taste out of your coffee beans. Therefore we advise you not to adjust the grind setting until you have brewed 100-150 cups (approx. 1 month of use).
i You can only adjust the grind settings when the machine is grinding coffee beans. You need to brew 2 to 3 drinks before you can taste the full difference.
Do not turn the grind setting knob more than one notch at a time to prevent damage to the grinder.
1 Place a cup under the coffee dispensing spout.
2 Open the lid of the coffee bean hopper.
3 Tap the espresso icon and then press the start/stop button.
4 When the grinder starts grinding, press down the grind setting knob and turn it to the left or right. (Fig. 19)
Deactivate the beeps of the control panel
1 Press the on/off button to switch off the machine.
2 When the machine is switched off, tap and hold the coffee icon (espresso lungo icon for EP3221) until the light in the icon goes on. The start light starts flashing.
3 Tap the coffee icon again to deactivate the beeps of the control panel. The light in the coffee icon goes out.
4 Press the start/stop button to confirm your choice.
5 Press the on/off button to switch on the machine again. The beeps of the control panel have now been deactivated.
Note: If the light in the coffee icon does not go on after tapping and holding the icon, this means that the beeps of the control panel already have been deactivated. To activate them again, tap the icon again and confirm by pressing the start/stop button.
The beeps in the on/off button and in the start/stop button cannot be deactivated.
Removing and inserting the brew group
Go to www.home.id/support for detailed video instructions on how to remove, insert and clean the brew group.
Removing the brew group from the machine
1 Switch off the machine.
2 Remove the water tank and open the service door (Fig. 20).
3 Press the PUSH handle (Fig. 21) and pull at the grip of the brew group to remove it from the machine (Fig. 22).
Reinserting the brew group
Before you slide the brew group back into the machine, make sure it is in the correct position.
1 Check if the brew group is in the correct position. The arrow on the yellow cylinder on the side of the brew group has to be aligned with the black arrow and N (Fig. 23).
- If they are not aligned, push down the lever until it is in contact with the base of the brew group (Fig. 24).
2 Slide the brew group back into the machine along the guiding rails on the sides (Fig. 25) until it locks into position with a click (Fig. 26). Do not press the PUSH button.
3 Close the service door and place back the water tank.
Cleaning and maintenance
Regular cleaning and maintenance keeps your machine in top condition and ensures good-tasting coffee for a long time with a steady coffee flow.
Consult the table below for a detailed description on when and how to clean all detachable parts of the machine. You can find more detailed information and video instructions in the HomeID app and on www.home.id/support. See figure D for an overview of which parts can be cleaned in the dishwasher.
Detachable parts
When to clean How to clean
| Brew group Weekly Remove the brew group from the machine (see 'Removing and inserting the brew group'). Rinse it under the tap (see 'Cleaning the brew group under the tap'). | ||
| Monthly Clean the brew group with the Philips coffee oil remover tablet (see 'Cleaning the brew group with the coffee oil remover tablets'). | ||
| Classic milk frother After every use First dispense hot water with the milk frother attached to the machine for thorough cleaning. Then remove the milk frother from the machine and disassemble it. Clean all parts under the tap or in the dishwasher. | ||
| Pre-ground coffee compartment | Check the pre-ground coffee compartment weekly to see if it is clogged. | Unplug the machine and remove the brew group. Open the lid of the pre-ground coffee compartment and insert the spoon handle into it. Move the handle up and down until the clogged ground coffee falls down (Fig. 27). Go to www.home.id/support for detailed video instructions. |
| Coffee grounds container | Empty the coffee grounds container when prompted by the machine. Clean it weekly. | Remove the coffee grounds container while the machine is switched on. Rinse it under the tap with some washing-up liquid or clean it in the dishwasher. The front panel of the coffee grounds container is not dishwasher-safe. |
| Drip tray Empty the drip tray daily or as soon as the red 'drip tray full' indicator pops up through the drip tray (Fig. 28). Clean the drip tray weekly. | Remove the drip tray (Fig. 29) and rinse it under the tap with some washing-up liquid. You can also clean the drip tray in the dishwasher. The front panel of the coffee grounds container (fig. A13) is not dishwasher-safe. | |
| LatteGo After every use Rinse LatteGo under the tap or clean it in the dishwasher. | ||
| Lubrication of the brew group | Every 2 months Consult the lubrication table and lubricate the brew group with the Philips grease (see 'Lubricating the brew group'). | |
| Water tank Weekly Rinse the water tank under the tap. | ||
Cleaning the brew group
Regular cleaning of the brew group prevents coffee residues from clogging up the internal circuits. Visit www.home.id/support for support videos on how to remove, insert and clean the brew group.
Cleaning the brew group under the tap
1 Remove the brew group (see 'Removing and inserting the brew group').
2 rinse the brew group thoroughly with water. Carefully clean the upper filter (Fig. 30) of the brew group.
3 Let the brew group air-dry before you place it back. Do not dry the brew group with a cloth to prevent fibers from collecting inside the brew group.
Cleaning the brew group with the coffee oil remover tablets
Only use Philips coffee oil remover tablets.
1 Put a cup under the coffee spout. Fill the water tank with fresh water.
2 Put a coffee oil remover tablet in the pre-ground coffee compartment.
3 Tap the coffee icon and then press the aroma strength icon for 3 seconds to select the pre-ground coffee function (Fig. 2).
4 Do not add pre-ground coffee. Press the start/stop button to start the brewing cycle. When half a cup of water has been brewed, unplug the machine.
5 Let the coffee oil remover solution act for at least 15 minutes.
6 Insert the mains plug back into a wall socket and switch on the machine to complete the brewing cycle. Empty the cup.
7 Remove the water tank and open the service door. Remove the brew group (see 'Removing the brew group from the machine') and rinse it thoroughly under the tap.
8 Reinsert the brew group and water tank and place a cup under the coffee spout.
9 Tap the coffee icon and then press the aroma strength icon for 3 seconds to select the pre-ground coffee function (Fig. 2). Do not add pre-ground coffee. Press the start/stop button to start the brewing cycle. Repeat this twice. Empty the cup.
Lubricating the brew group
Lubricate the brew group every 2 months, to ensure that the moving parts continue to move smoothly.
1 Apply a thin layer of grease on the piston (grey part) of the brew group (Fig. 31).
2 Apply a thin layer of grease around the shaft (yellow part) in the bottom of the brew group (Fig. 32).
3 Apply a thin layer of grease to the rails on both sides (Fig. 33).
Cleaning LatteGo (milk container)
Cleaning LatteGo after every use
1 Remove LatteGo from the machine (Fig. 34).
2 Pour out any remaining milk.
3 Press the release button and remove the milk container from the frame of LatteGo (Fig. 35).
4 Clean all parts in the dishwasher or under the tap with lukewarm water and some washing-up liquid.
Cleaning the classic milk frother
Cleaning the classic milk frother after every use
Clean the milk frother each time you use it for hygiene reasons and to avoid the build-up of milk residues.
1 Place a cup under the milk frother.
2 Tap the steam icon and then press the start/stop button to start dispensing steam and to remove any milk that may be left inside the milk frother.
3 To stop dispensing steam after a few seconds, press the start/stop button again.
4 Clean the milk frother with a damp cloth.
Daily cleaning of the classic milk frother
1 Let the milk frother cool down completely.
2 Tilt the milk frother to the left (Fig. 36) and remove both the metal part and the silicone part (Fig. 37).
3 Disassemble the two parts (Fig. 38) and rinse them with fresh water or clean them in the dishwasher. Make sure that the small hole on the metal tube (Fig. 39) is completely clean and not clogged by milk residues.
4 Reassemble the two milk frother parts and reattach the milk frother to the machine.
Aquaclean water filter
Your machine is AquaClean enabled. You can place the AquaClean water filter in the water tank to preserve the taste of your coffee. It also diminishes the need for descaling by reducing limescale build-up in your machine. AquaClean water filter is not by-packed in all models: you can purchase it at your local retailer* or on www.home-appliances.philips/parts-accessories.
i *Availability varies per country.
Aquaclean icon and light
Your machine is equipped with an AquaClean water filter light (Fig. 40) to indicate the status of the filter. Use the table below to see what actions are required when the light is on or when it is flashing.
| Aquac Clean | When you use the machine for the first time, the AquaClean light starts flashing orange. This indicates that you can start using the AquaClean water filter. If you do not activate an AquaClean water filter, the light will switch off automatically after a while. |
| Aquac Clean | Once you have installed the filter and activated it with the AquaClean icon, the AquaClean light turns blue to confirm that the AquaClean water filter is active. |
| Aquac Clean | When the filter is exhausted, the AquaClean light starts flashing orange again to remind you to replace the filter with a new one. |
| Aquac Clean | When the orange AquaClean light is off, you can still activate an AquaClean filter, you will need to descale the machine first. |
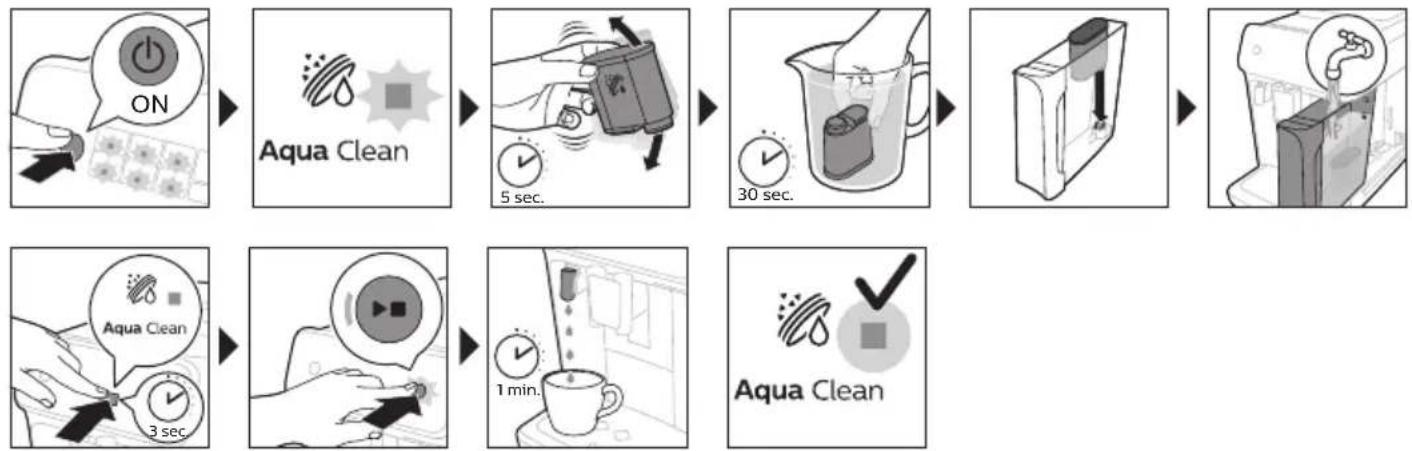
Activating the AquaClean water filter (5 min.)
The machine does not automatically detect that a filter has been placed in the water tank. Therefore you need to activate each new AquaClean water filter that you install with the AquaClean icon.
When the orange AquaClean light is off, you can still activate an AquaClean water filter, but you will need to descale the machine first.
i Your machine has to be completely limescale-free before you start to use the AquaClean water filter.
Before activating the AquaClean water filter, it has to be prepared by soaking it in water as described below. If you don't do this, air might be drawn into the machine instead of water, which makes a lot of noise and prevents the machine from being able to brew coffee.
1 Make sure that the machine is switched on.
2 Shake the filter for about 5 seconds (Fig. 41).
3 Immerse the filter upside down in a jug with cold water and shake/press it (Fig. 42).
4 The filter is now prepared for use and can be inserted into the water tank.
5 Insert the filter vertically onto the filter connection in the water tank. Press it down to the lowest possible point (Fig. 43).
6 Fill the water tank with fresh water and place it back into the machine.
7 If attached, remove the LatteGo.
8 Place a bowl under the hot water spout/milk frother.
9 Press the AquaClean icon for 3 seconds (Fig. 44). The start light starts to pulse.
10 Press the start/stop button to start the activation process.
11 Hot water will be dispensed from the hot water spout/milk frother (3 min.).
12 When the activation process is finished, the blue AquaClean light goes on to confirm that the AquaClean water filter has been activated correctly.
Replacing the AquaClean water filter (5 min.)
After 95 liters of water have flowed through the filter, the filter will cease to work. The AquaClean light turns orange and starts to flash to remind you to replace the filter. As long as it flashes, you can replace the filter without having to descale the machine first. If you do not replace the AquaClean water filter, the orange light will go out eventually. In that case you can still replace the filter but you first need to descale the machine.
When the orange AquaClean light flashes:
1 Take out the old AquaClean water filter.
2 Install a new filter and activate it as described in chapter 'Activating the AquaClean water filter (5 min)'.
i Replace the AquaClean water filter at least every 3 months, even if the machine does not yet indicate that replacement is required.
Deactivating the AquaClean reminder
If you do not want to use Philips AquaClean water filters anymore, you can always deactivate the AquaClean reminders (AquaClean light flashing orange):
1 Press the on/off button to switch off the machine.
2 When the machine is switched off, press and hold the AquaClean icon until the light in this icon goes on. The start light starts flashing.
3 Tap the AquaClean icon again to deactivate the reminders. The light in the AquaClean icon goes off.
4 Press the start/stop button to confirm your choice.
5 Press the on/off button to switch on the machine again. The AquaClean reminders are now deactivated.
Note: The activation of a new AquaClean filter will automatically re-activate the AquaClean reminders.
Setting the water hardness
We advise you to adjust the water hardness to the water hardness in your region for optimal performance and a longer lifetime of the machine. This also prevents you from having to descale the machine too often. The default water hardness setting is 4: hard water.
Set the machine to the correct water hardness:
1 Press the on/off button to switch off the machine.
2 When the machine is switched off, tap and hold the aroma strength icon until all lights in the icon go on (Fig. 2).
3 Tap the aroma strength icon 1, 2, 3 or 4 times. The number of lights that are on should be the same as the number of the water hardness table.
4 When you have set the correct water hardness, press the start/stop button.
i Since you only set the water hardness once, the aroma strength function is used to select the water hardness. This does not affect the aroma strength of the drinks you make afterwards.
Dscaling procedure (30 min.)
To clean and descale the machine, we recommend to use the Philips maintenance products if available in your country. Under no circumstances should you use a descaler based on sulfuric acid, hydrochloric acid, sulfamic or acetic acid (vinegar) as this may damage the water circuit in your machine and not dissolve the limescale properly. Failure to descale the appliance will also void your warranty. You can buy Philips descaling solution in the online shop at https://www.home-appliances.philips/parts-accessories.
When the Calc / Clean light starts to flash slowly, you need to descale the machine.
1 Make sure that the machine is switched on.
2 If attached remove LatteGo or milk frother.
3 Remove the drip tray and the coffee grounds container, empty them and put them back into place.
4 Remove the water tank and empty it. Then remove the AquaClean water filter.
5 Pour the whole bottle of Philips descaler in the water tank and then fill it with water up to the Calc / Clean indication (Fig. 45). Then place it back into the machine.
6 Place a large container (1.5 l) under the coffee dispensing spout and the water spout.
7 Press the Calc / Clean icon for 3 sec. and then press the start/stop button.
8 The first phase of the descending procedure starts. The descending procedure lasts approx. 30 minutes and consists of a descending cycle and a rinsing cycle. During the descending cycle the Calc / Clean light flashes to show that the descending phase is in progress.
9 Let the machine dispense the descending solution until the display reminds you that the water tank is empty.
10 Empty the water tank, rinse it and then refill it with fresh water up to the Calc / Clean indication.
11 Empty the container and place it back under the coffee dispensing spout and the water spout. Press the start/stop button again.
12 The second phase of the descending cycle, the rinsing phase, starts and lasts 3 minutes. During this phase the lights on the control panel go on and off to show that the rinsing phase is in progress.
13 Wait until the machine stops dispensing water. The descending procedure is finished when the machine stops dispensing water.
14 The machine will now heat up again. When the lights in the drink icons light up continuously, the machine is ready for use again.
15 Install and activate a new AquaClean water filter in the water tank (see 'Activating the AquaClean water filter (5 min.)').
- When the descending procedure is finished, the AquaClean light flashes for a while to remind you to install a new AquaClean water filter.
Tip: Using the AquaClean filter reduces the need for descaling!
What to do if the descending procedure is interrupted
You can exit the descending procedure by pressing the on/off button on the control panel. If the descending procedure is interrupted before it is completely finished, do the following:
1 Empty and rinse the water tank thoroughly.
2 Fill the water tank with fresh water up to the Calc / Clean level indication and switch the machine back on. The machine will heat up and perform an automatic rinsing cycle.
3 Before brewing any drinks, perform a manual rinsing cycle. To perform a manual rinsing cycle, first dispense half a water tank of hot water by repeatedly tapping the hot water icon (Fig. 14) and then brew 2 cups of pre-ground coffee without adding ground coffee.
If the descending procedure was not completed, the machine will require another descending procedure as soon as possible.
Ordering accessories
To clean and descale the machine, we advise you to use the Philips maintenance products such as descending solution, AquaClean water filter and coffee oil remover tablets if available in your country. These products can be purchased from your local retailer, from the authorized service centers or online at https://www.home-appliances.philips/parts-accessories. To find a full list of spare parts online, enter the model number of your machine. You can find the model number on the inside of the service door.
i Brita-filters are not compatible with this machine.
Troubleshooting
This chapter summarizes the most common problems you could encounter with the machine. Support videos and a complete list of frequently asked questions are available on www.home.id/support. If you are unable to solve the problem, contact the Consumer Care Center in your country. For contact details, see the warranty leaflet.
Warning icons
| Warning icon | Solution |
| A | The 'water tank empty' light is on - The water tank is almost empty. Fill the water tank with fresh water to the maximum level indication. - The water tank is not in place. Place back the water tank. |
| C | The 'empty coffee grounds container' light is on - The coffee grounds container is full. Remove and empty the coffee grounds container while the machine is switched on. Wait at least 5 seconds before you reinsert the container. |
| A | The alarm light is on - The coffee grounds container and/or the drip tray is not in place or not placed correctly. Place back the coffee grounds container and/or the drip tray and make sure they are in the correct position. - The service door is open. Remove the water tank and make sure the service door is closed. |
| A | The alarm light is flashing - The brew group is not in place or not placed correctly. Remove the brew group and make sure it is locked into place. See chapter 'Removing and inserting the brew group' for step-by-step instructions. - The brew group is blocked. Remove the brew group and rinse it with water under the tap. Then lubricate the brew group and place it back into the machine. See chapter 'Cleaning and maintenance' for step-by-step instructions. |
| A | The alarm light is on and the start light flashes. Some air is trapped inside the machine. To release the air from the machine, fill the water tank with water, place a cup under the classic milk frother and press the flashing start/stop button. Be careful: small jets of hot water will be dispensed from the classic milk frother to release the air. |
| Aqua Clean | Aquaclean light is flashing: place or replace the AquaClean water filter and activate it. See chapter 'Aquaclean water filter' for step-by-step instructions. |
| Calc / clean | Descaling light is flashing slowly: Descale the machine (see 'Descaling procedure (30 min.)'). |
| The lights in the drink icons light up and go out one by one. The machine is heating up and/or trying to release the air that was drawn into the machine. Wait until all drink lights light up continuously. | |
| The lights of all warning icons are flashing. Reset the machine by unplugging it and plugging it back in. Before switching the machine back on, follow these steps: - Remove the AquaClean water filter from the water tank. - Place back the water tank. Push it into the machine as far as possible to make sure it is in the right position. - Open the lid of the pre-ground coffee compartment and check if this is clogged with coffee powder. To clean it, insert a spoon handle into the pre-ground coffee compartment and move the handle up and down until the clogged ground coffee falls down (Fig. 27). Remove the brew group and remove all ground coffee that has fallen down. Place back the clean brew group. - Switch the machine back on. If the problem is solved the AquaClean filter was not prepared well. Prepare the AquaClean filter before placing it back by following steps 1 and 2 in chapter 'Activating the AquaClean water filter (5 min)… If the lights continue to flash, the machine could be overheated. Switch the machine off, wait 30 minutes and switch it on again. If the lights are still flashing, contact the Consumer Care Center in your country. For contact details, see the international warranty leaflet. |
Troubleshooting table
This chapter summarizes the most common problems you could encounter with the machine. Support videos and a complete list of frequently asked questions are available on www.home.id/support. If you are unable to solve the problem, contact the Consumer Care Center in your country. For contact details, see the warranty leaflet.
Problem Cause Solution
| The drip tray fills up quickly. | This is normal. The machine uses water to rinse the internal circuit and brew group. Some water flows through the internal system directly into the drip tray. | Empty the drip tray daily or as soon as the red 'drip tray full' indicator pops up through the drip tray cover. Tip: place a cup under the dispensing spout to collect rinsing water that comes out of it. |
| The 'empty coffee grounds container' light remains on. | You emptied the coffee grounds container while the machine was switched off. | Always empty the coffee grounds container while the machine is switched on. Remove the coffee grounds container, wait at least 5 sec. and then insert it again. |
| The machine prompts to empty the coffee grounds container even though the container is not full. | The machine did not reset the counter the last time you emptied the coffee grounds container. | Always wait approx. 5 seconds when you place back the coffee grounds container. In this way the coffee grounds counter will be reset to zero. |
Problem Cause Solution
| Always empty the coffee grounds container while the machine is switched on. If you empty the coffee grounds container when the machine is switched off, the coffee grounds counter won't reset. | ||
| The coffee grounds container is too full and the 'empty coffee grounds container' light did not go on. | You removed the drip tray without emptying the grounds container. | When you remove the drip tray, also empty the coffee grounds container even if it contains only a few coffee pucks. In this way the coffee grounds counter will be reset to zero, re-starting to correctly count the coffee pucks. |
| I cannot remove the brew group. | The brew group is not in the correct position. | Reset the machine in the following way: close the service door and place back the water tank. Switch the machine off and back on again. Try again to remove the brew group. See chapter 'Removing and inserting the brew group' for step by step instructions. |
| I cannot insert the brew group. | The brew group is not in the correct position. | Reset the machine in the following way: close the service door and place back the water tank. Leave the brew group out. Switch the machine off and unplug it. Wait for 30 sec. and then plug the machine back in and switch it on. Then put the brew group in the correct position and reinsert it into the machine. See chapter 'Removing and inserting the brew group' for step by step instructions. |
| The coffee is watery. The brew group is dirty or needs to be lubricated. | Remove the brew group (see 'Removing the brew group from the machine'), rinse it under the tap and leave it to dry. Then lubricate the moving parts (see 'Lubricating the brew group'). | |
| The machine is performing its self-adjustment procedure. This procedure is started automatically when you use the machine for the first time, when you change to another type of coffee beans or after a long period of non-use. | Brew 5 cups of coffee initially to allow the machine to complete its self-adjustment procedure. | |
| The grinder is set to a too coarse setting. | Set the grinder to a finer (lower) setting. Brew 2 to 3 drinks to taste the full difference. | |
| The coffee is not hot enough. | The temperature is set too low. Set the temperature to the maximum (see 'Adjusting the coffee temperature'). | |
Problem Cause Solution
| A cold cup reduces the temperature of the drink. | Preheat the cups by rinsing them with hot water. | |
| Adding milk reduces the temperature of the drink. | Regardless of whether you add hot or cold milk, adding milk always reduces the temperature of the coffee. Preheat the cups by rinsing them with hot water. | |
| Coffee does not come out or coffee comes out slowly. | The AquaClean water filter was not prepared properly for installation. | Remove the AquaClean water filter and try to brew a coffee again. If this works, make sure that you have prepared the AquaClean water filter properly before you place it back. See chapter 'AquaClean water filter' for step-by-step instructions. |
| After a long period of non-use, you need to prepare the AquaClean water filter for use again and then place it back. See step 1 - 3 of chapter 'Activating the AquaClean water filter'. | ||
| The AquaClean water filter is clogged. | Replace the AquaClean water filter every 3 months. A filter that is older than 3 months can become clogged. | |
| The grinder is set to a too fine setting. | Set the grinder to a coarser (higher) setting. Note that this will impact the coffee taste. | |
| The brew group is dirty. Remove the brew group and rinse it under the tap (see 'Cleaning the brew group under the tap'). | ||
| The coffee dispensing spout is dirty. | Clean the coffee dispensing spout and its holes with a pipe cleaner or needle. | |
| The pre-ground coffee compartment is clogged | Switch off the machine and remove the brew group. Open the lid of the pre-ground coffee compartment and insert the spoon handle into it. Move the handle up and down until the clogged ground coffee falls down (Fig. 27). | |
| The machine circuit is blocked by limescale. | Descale the machine. Always descale the machine when the descaling light starts to flash. | |
| The machine grinds the coffee beans, but coffee does not come out. | The pre-ground coffee compartment is clogged. | Switch off the machine and remove the brew group. Open the lid of the pre-ground coffee compartment and insert the spoon handle into it. Move the handle up and down until the clogged ground coffee falls down (Fig. 27). |
Problem Cause Solution
| The milk does not froth. Machines with LatteGo: LatteGo is incorrectly assembled. | Make sure that the milk container is properly assembled to the frame of LatteGo ('click'). | |
| Machines with LatteGo: the milk container and/or frame of LatteGo are dirty. | Disassemble LatteGo and rinse both parts under the tap or clean them in the dishwasher (see 'Cleaning LatteGo after every use'). | |
| Machines with classic milk frother: the milk frother is dirty. | Thoroughly clean the milk frother (see 'Cleaning the classic milk frother'). | |
| The type of milk used is not suitable for frothing. | Different types of milk result in different amounts of froth and different froth qualities. We have tested the following milk types which proved to deliver a good milk froth result: semi-skimmed or full-fat cow's milk and lactose-free milk. | |
| Milk is leaking from the bottom of the LatteGo milk container. | The frame and the milk container are not assembled properly. | First insert the top of the milk container under the hook at the top of the frame. Then press the bottom part of the container. You hear a click when it locks into place. |
| The machine seems to be leaking. | The machine uses water to rinse the internal circuit and brew group. This water flows through the internal system directly into the drip tray. This is normal. | Empty the drip tray every day or as soon as the 'drip tray full' indicator pops up through the drip tray cover. Tip: Place a cup under the dispensing spout to collect rinsing water and reduce the amount of water in the drip tray. |
| The drip tray is too full and has overflowed which makes it look like the machine is leaking. | Empty the drip tray every day or as soon as the 'drip tray full' indicator pops up through the drip tray cover. | |
| The water tank is not fully inserted and air is drawn into the machine. | Make sure the water tank is in the correct position: remove it and insert it again pushing it as far as possible. | |
| The brew group is dirty/clogged. Rinse the brew group. | ||
| The machine is not placed on a horizontal surface. | Place the machine on a horizontal surface so that the drip tray does not overflow and the 'drip tray full' indicator works properly. | |
| The water tank is not fully inserted and air is drawn into the machine. | Make sure the water tank is in the correct position: remove it and insert it again pushing it as far as possible. | |
Problem Cause Solution
| I cannot activate the AquaClean water filter and the machine asks for descending. | The filter has not been installed or replaced in time after the AquaClean water filter light started to flash. This means your machine is not completely limescale free. | Descale your machine first and then install the AquaClean water filter. |
| The new water filter does not fit. | You are trying to install another filter than the AquaClean water filter. | Only the AquaClean water filter fits into the machine. |
| The rubber ring on the AquaClean water filter is not in place. | Place back the rubber ring on the AquaClean water filter. | |
| The machine is making a loud noise. | It is normal that your machine makes noise during use. | If the machine starts to make a different kind of noise, clean the brew group and lubricate it (see 'Lubricating the brew group'). |
| The AquaClean water filter was not prepared properly and air is now drawn into the machine. | Remove the AquaClean water filter from the water tank and properly prepare it for use before you place it back. See chapter 'AquaClean water filter' for step-by-step instructions. | |
| The water tank is not fully inserted and air is drawn into the machine. | Make sure the water tank is in the correct position: remove it and insert it again pushing it as far as possible. |
Technical specifications
The manufacturer reserves the right to improve the technical specifications of the product. All the preset quantities are approximate.
Description Value
| Size (w x h x d) 246 x 372 x 433 mm |
| Weight 7 - 7.5 kg |
| Power cord length 800-1200 mm |
| Water tank 1.8 litres, removable |
| Coffee bean hopper capacity 275 g |
| Coffee grounds container capacity 12 pucks |
| LatteGo (milk container) capacity 250 ml |
| Adjustable spout height 85-145 mm |
| Nominal voltage - Power rating - Power supply See data label on inside of service door (fig. A9) |
Obsah
Prehled pristroje (obr. A) 24
Ovladacipanel (obrazekB) 24
Uvod 25
www.home.id/support.
Aquaclean-vannfilter
Maskinen din er klargjort for AquaClean. AquaClean-vannfilteret kan plasseres i vanntanken for a bevec kaffesmaken. Det reduserer ogsa behovet for avkalking ved a redusere kalkavleiring i maskinen. AquaCleanvannfilteret er ikke inkludert i alle modeller: Du kan kjpe det hos din lokale forhandler* eller på www.home-appliances.philips/parts-accessories.
Adverselik- Løsning on
Personalizar as bebidas
Encomendar acessórios
https://www.home-appliances.philips/parts-accessories.
Vodni filter AquaClean
IapaoKeuun afoyaalou u e to klaoikó 5apntma yia afoya
Tia tn 3eIiotn noIOTnTa aphiou, xnooioieiTe npoua anuthetaiaac ao to yuyeo.
A1 KoHTpOJIeH nAneI A10 EtNKeT c DaHHn c Homep Ha TIn
A2Дьржач haаи A11 Pe3epBoap 3a BOna
A3 OTeJenHe 3a npEiBapnteJIHo cMJIHO kafe A12 HakpaHnK 3a ropeua Boda
A4 Kanak Ha cba 3a Kafe Ha 3bpHa A13 CbD 3a yTaKaOT Kafe
A5 Perynilpyem HaKpaHnK 3a KaΦe A14 PpeH nAnel Ha cBda 3a yTaɪKa oT KaΦe
A6 PerylaTop 3a HacTpoiKa Ha cTepeHTa Ha CMUJIaHe
A7 CbД 3a KaΦe Ha 3bPHa
A8БLOK3a npnroTbHe
A9 CepBn3Ha BpaTnUka
A16 Tabnka 3a otcekdahe
A15 KaNaK Ha TaBnUkKaTa 3a OTuexJaHe
A17 INHnKaTOp 3a ,NbJIHa TaBnUka 3a OTcExJaHe"
Akcecoapn
A18 Klaucyecka npictaBka 3a pa3neHbaHe Ha MlraKO (camo 3a onpeJeIeH moJeI)
A19 LatteGo (cBД 3a Мяко) (camo 3a onpeДeLEHМоДELN)
KoHTpOJen pAneI (ΦnR. B)
BnKTe qnIpya B 3a n3rIeN Ha BCnUKN 6yToHn N IKOH. No-dOly Iue HamepuTe OnncAhnETo.
HЯkon OT 6yToHnTe/IKoHnTe ca cmo 3a onpeJeHn TInOBe.
B1 ByToH 3a BkJ./n3KJI. B7 PpeDynpeIteJHn IkoHn
B2 IkoHn 3a HannTKn* B8 CBeTJInHeH INdNkAToP 3a HaayAo
B3 IkoHa 3a cnla Ha apomata/npeIbapntelHo cmJrHO KaΦe
B9 CtapT/cTo 6yTo
B4 IkoHa 3a KOJIueCTBO Ha HApNTkTa B10 IkoHa 3a HaKIn/NoUcTbaHe
B5 IkoHa 3a KOJInuEcTBo MJIaKO (cAmO 3a OnpeJeIeHIMoJIeJI)
B11 IkoHa AquaClean
B6 IkoHa 3a TeMpepaTpya Ha KafeTo (cAmo 3a OnpedeJeHm MoJeHn)
* IkoHn 3a Hapntkn: ecnpco, nbIro ecnpco, kafe, amepnkaho, kanyuHNO, naTe MaKnaTo, ropeua Boda, npapa (camo 3a onpeJeHn moeHn)
BbVeJeHne
PnroTbIe Ha Kafe OT npeBapntelHo cMJIHO KaFe
Ioo jeelan He moxe Te da n3no3BaTe npedBapntelHo cMnaHO Kafe BmecTo Kafe Ha 3bPHa, HApnMpE, aKo npedNoHTate npy Brn KaFe nn6e3KofoHOBo Kafe.
1 HaTncheTe 6yToHa 3a BkN./n3Kn., 3a nDa BkIIOuHTe MaunHaTa, n n3uaKaIte da 6bJe roTOBa 3a n3NoJ3BaHe.
2 OToBopeTe KaNaka Ha oTdeJeHHeTo 3a npEiBapnteJHo cMnHaHO KaFe i CunTe B Hero 3 yaeHn JbXnUKN KaFe Ha npax (okOIo 8 r) (Φur. 12). CneI ToBa 3aTBopeTe KaNaka.
3 NocTaBeTe yawa noi cyuypa 3a kafe.
4 136epete eHNHnHa HAnNTka.
5 HaTnchTe NkOHaTa 3a cnla Ha apomata 3a 3 cekyHn (Φnrg. 13).
- INHДИКaTOPHaTа CBETnHa 3a npeDbapnteJIHo CMJrHO KaΦe CBETBa, a INHДИKaTOPHaTа CBETnHa 3a CTapTnpaHe 3aNoUb Da nJcUpa.
6 Hattchete 6yToHa 3aTapT/CTon.
7 3a da cnpete haIINBaHeTo Ha Kafe, npedn MaunHaTa da e npNKJIOUHna, HATNCHeTe 6yToHa 3a CTAPT/CTON THOBO.
C npEiBapuTeJHO CMJIaHO KaFe MoKeTe Da pIurTOBraTe CaMO NO eIHO KaFe HaBeiHbX.
I IpeBapnteHNO cMnHOTo Kahe He e HactpoiKa, KOaTO ce 3aIncBa KaTo npexOJHO n36paHa HactpoiKa 3a cnlaTa. BceKn PbT, KOrato NCKaTe Da n3noJ3BaTe npEBApnteJIHo cMnH0 Kafe, Tp86Ba da HaTnCHHe TE NKOHATA 3a cnla Ha apomata 3a 3 cekyn.
i Korato n36peTe npedBapuTeHNo cMnaHO kafe, He moKeTe da n36peTe npyra cnla Ha apomata.
Пускане на горецьда
1 Ako e noctabeHo, otCTpaHeTe LatteGo nI npuctaBkata 3a pa3neHbAHe Ha MIAKOto.
2ДokocheteиkoHaTa(ФИr.14)3a ropeua BOJa.
CBeTINHHnTe INHnKATOpn 3a KOJIuYeCTBOTO Ha HAnITKaTa Ce BKJIIOUyBaT IN NOKa3BaT NOcIeNHO n36paHaTa NaCTpoiKa 3a HAnITKa C rOpeuza BODa.
3 3aIte KOJIueCTBOTo ropeuBa BOda cnpoei npenouHTAHnra cn, KaTO dOKoCHeTe IKOHata (Our. 3) 3aKOJIueCTBO Ha HAnrTkata.
4 HaTnchete 6yToHa 3a cApT/cToN.
- CbETnHHnT nHnKaTOp B nKoHaTa 3a ropeuBa BOda cBeTba n OT yUypa (ΦnI. 15) 3a ropeua BOda NOTnHa rOpeuA BOda.
5 3a da cnpete haIINBaHeTo Ha ropeu a BODa, npedn MaunHaTa da e npNKIOUHna, HATNCHeTe 6yToHa 3a CTAPT/CTON THOBO.
PereylnpaeHaHacTpoKteHaMaunHaTa
PereylnpaHe Ha BpeMeTo 3a RotOBHOCT
1 HatncheTe 6yToHa 3a BKn./n3Kn., 3a da n3KJIIOUHTe MaunHaTa.
2 Korato MaunHaTa e n3KIOueHa: HaTnCHeTe 3aApbXe IKOHaTa (Φnrg. 16) Calc / Clean,doKaTo JAMnUKNte 3a „Calc / Clean" n „Cnla Ha apomata" cBeThat (Φnr. 17).
3Дokocheteикohata 3a cnlaTHa apomata,3a da n36epeTe Heo6xOIMOTO BpeMe Ha roTOBHOCT:15,30, 60 nnn 180 mnhyn.PecneKtNBHo CBeTBat 1,2,3 nnn 4 lamnukn Ha nkohata 3a cnlaHa apomata.
4 Korato cTe roTOBn c HacTpoiBaHeTo Ha BpeMeTo Ha roTOBHOCT, HaTncHeTe 6yToHa cTapT/cToI. MaunHata ce n3KJIIOUba.
5 Hatnchete 6yToHa 3a BkJIOUBaHe/13KJIIOUBaHe, 3a Da BKJIOUHTe MaunHaTa OTHOBO.
IporpamnpaHe Ha Hau-rolMaTa HacTroPKa nO npda36npaHe 3a BaUInTe HAnITKn
Maushnata pa3nojara c 3 NaCTPOKNI NO noDpa36upahe 3a Bcra Ka HnNTka: Hncka, cpeHa, Bucoka. Moxete Da perynapate camo KOnueCTBOTo Ha nai-rotJMaTa HacTPOkA. HoBTo KOJIueCTBO Moxe da ce cbXpaHn BeDHara 10m CBETINHHNt INdNKaTOP 3a CTAP 3aNoUHe da NpLcnpa.
i IpeNi da 3aOnuHete da 3aDaBaTe KOJIInueCTBOTO Ha HAnNTKaTa C MIAKO, crIIOBeTe LatteGo n HaneiTe MJIaKO B Hero.
1 3a da perylnipate NaB-BnCOKaTa NaCTpoiKa 3a KOJIueCTBO, HATNCHeTe N 3aIpbjXte NKoHaTa 3a NaHTkata, KOrTo NCKaTe Da perylnipate, 3a 3ceKuHdN.
- TopHata INДИКATOPHa CBETInHa Ha IKOHATA 3a KOJIynchCTBO Ha HAnITKaTа, KaKTo I ROpHaTa INДИKATOPHa CBETInHa Ha IKOHATA 3a KOJIynchCTBO Ha MЛЯKOTO (cAmO 3a onpeJeHn MoDEJI) 3anOuBa Da nUncipa. ByTOhBT 3a CTapT/CTonbIe0 3anOuBa Da nUncipa, 3a Da nOKaKe, Ye cTe B peKIM Ha npOrpamnpaHe.
2 Hatnche 6byToHa 3a aapt/cton. MaunHata 3anOyBa da nprirotBra n36paHaTa Hanntka.
- INHДИКаTOPHaTа CBETЛинa 3a CTapТираHe OTнЧаNo CBETи HENpeKьСhaTo. Korato MaшинaTe e rOTOBa Дa CBxpaHn 3aДaDEHnЯ OБem, CBETЛинHnYr INHДИКaTOp 3a CTapT/CTon 3aNoчВa Дa pyJcNpa.
3 HaTnCHeTe 6yToHa 3a cTapT/CTOn HOBO, KOraTO YaWata CbIbpxKa JeNaHOTo KOJIuYeCTBO KaΦe IJIM MJIaKO.
- Ako npiroTbTe KaIyHIO nII NaTe MaKaHTo, nbpBO ue 6bJe HaJIrTO MIAKO. HATncHete 6yToHa 3a CTapT/CTOnKorato Yauata CbIbpxka XeJahOTo KOJIueCTBO MIAKO.MaunHaTa 3aNoUba aBTOMaTHNO da HAIINBA KaΦeTO. HATncHete 6yToHa 3a CTapT/CTOnDTHOBO, KOrato Yauata CbIbpxka XeJahOTo KOJIueCTBO.
Cne KaTO CTe npOrpaMnpaHIO HOBO T HAI-ROJMO KOJIueCTBO NO NODpa36uPAHe 3a DaJeHa HAnNTKa, MaINHaTa Ue HANBa 3aJaDeHOTO HOBO KOJIueCTBO BCEKN PbT, KOraTO n36epeTe HAI-ROJMAOTO KOJIueCTBO OT Ta3N HApNTKa.
i Moxete da perylnpate cmo Hau-Bucokoto HnBO 3a KOJIueCTBO IIO NOpa36npaHe.
i Ako nckaTe da ce BbPHeTe o6paTHo KbM HacTpoKnTe c KOJIuYeCTBa NO noJa3bnpaHe, BIXTe "Bb3ctaHOBraVe Ha cTaHdApTHnTe fapuHn HacTPOKn".
OrIyucix KHOJOK i 3HaayKIB nB. Ha pnc. B. Ix onnc HabeJeHO HnXue.
| i Певни Кнорки та з havки влше на okремix м odeях. | |
| B1 Кнорka "Увимк./Вимк." B7 Пореджуалын 3нчки | |
| B2 3нachи наюв* B8 Иndидах поатку | |
| B3 3нachok мiocст/пореднызменю кави B9 Рочаток/ztунинья Кнорka | |
| B4 3нachok ob' emу наю B10 3нachok Calc/Clean (Видальеня наку) | |
| B5 3нachok ob' emу молoka (лише ддя okремix мodeел) | B11 3нachok AquaClean |
| B6 3нachok Temператури кави (лише ддя okремix мodeел) | |
- 3начки наоов: ecnpсо, ecnpсо Лунно, 3Вичайна кава, amepикано,kanушио, naTe MaKiato, rapячвoda,napa (лпше дд орөмх морел徳).
Bctyn
BitaemBoac i3 kynibIeIO NOBHeCTU aBTOMaTuHoi KaBOMaunn Philips! Uo6 cnoBHa KopncTyBaTnca BCima nocnyramn NiTpumKn, kI M N npOnOHcMo, 3apeCtpyTe CbiN npOdyKT Ha caTI www.home.id.
Ipeed nepuM BnKOpNCTaHnM KaBOMaunn yBaXHo npOHTaTe Okpemy 6poUpy 3 Texhikn 6e3neKn Ta 36epiraTe ii IJMaB6yTHbOi DOBiKn.
Ipeed nepshm BnKOpntaHHm npomHte rapyO BOIOBO 3HIMHi akceCyapn, kki KOHTaKTyOTb i3 BOIO a6o MoLokOM. Lio6 donomortn Bam noatp o60ty makcmaJIbHO eΦeKTHBHO BnKOpncToByBaTn KaBOMaINHy, MnpOnOHyEmo NiIDtpmMky B KInbKOx fOpMaTax. BynaKOBci 3HaxOJaTbc:
1 Noci6HnK KopnctyBaHa 3 rpaΦiUHMn iHCTpyKzIaMn 3 BnKOpNCTaHHa iHΦopMaciEIO npo OunueneHHa KaBOMaUnHn Ta IOrJaD 3a HeU.
2 Okpema 6poWypa 3 iHctpyKziamMn 5oO 6e3neuHoro BnKOpncTaHHKaBOMaunHn.
3 Lio6 otpnmatni ndpnmky onnaH (cei pozwnpeHH noci6nK KopncTybau, biNobiiHa nouHpeHi 3aHTAHn, BiJeO ToIO), 3ickaHyTe QR-KoJ Ha o6klaanHc iic6poWypn 3aBaHTaXte DoaTOK HomelD a60 nepeiNb Ha cToPiKy www.home.id/support.
i Icnye 6araTo Bepciu ci ecpceo-Maunn, kki Biip3HraTbcHa6Opom fynKci. KoxHa BepciMa cBi Homep apTKyJa. Homep apTKyJa moxHa 3haTn Ha iHopmauiHn eTuKeTci, 0o po3TaWobHa Ha BHyTp1wHi CTOpOHi DBePrtIg oBcyroByBaHHa (DInB.pnc.A9).
i zu kabomauhy 6yilo nepebipeno 7naxom npirotoybaHHa KaBn. Notim ii 6ylo peTeIbHO ouuueHo, npote B HiM MOrIaIIuHTncs CJIiN KaBn. Ondak Mu rapaHTyEmo, 0o Bu npud6aIIu a6coJIOTHO HOBy KaBOMauHy.
KabomauHa aBTOMaTuHNo HaJaTuBye o6'Em KaOBHX 3epeH dIy npiroTyBaHHa HAcMaunoi KaBn. Cnoatky notpi6Ho 3aBepuHTn aBTOMaTuHne HaJaTuBaHHa KabOMaunHn, 3BaPbUHN 5 nopui KaBn. Ipeed nepuM BHKOpncTahHm npomHte LatteGo (moLouHa cNcTeMa 3 2 qactn) abo KlaCnuHn cnHIOBaMoloka.
6 HaTnchItb KhoNky noatKy/3ynHHeHHa
- Iндикатор на значку habоь 6лmae пд уac 3лваньня habою.Яksв bбжаerte nprirotybatn KaNYuHNo a60 late makiato, kabOMaunHa cNoouaTKу habNBae MOJOKO, a NOTIM - KabY.
- Ⅲo6 npinnHnTn noauy moloka, nepu hix KaBOMaunHa 3iIe nepedyctaHOBneHn o6'Em, HATNCITb KONKy NOaTKy/3ynHeHHra
7 7 npnnnntnoauy roTOBOro hanoIO (KaBn 3 MoNOKOM), nepH iIX KaBOMaunHa 3aBepHTb npnroTyBaHHra, HATNCHTb iyTpmyte KONky NOaTKy/3ynHeHHra.
CπiHeHЯ MOLOKa 3a DoPOMOHO KJaacnUHO cPiHHOBaHa MOLOKa
Ioo6do8rtnHaikpaaoro cniHOBaHHra3abXnBnKOpncOByTe MoIOKO 3 XoJOnJIbHNka.
1 Haxnilitb cOpHy cniliKHOby pykU Ha KaBOMaunHi IiBOpyu i NocyHbTe cNIOJBau MoJoka Ha Hei (MaJ. 9).
2 3anobHitb rIeK moLokom npu6n3Ho ha 100 mI dIy KaNyUHO ta npu6n3Ho ha 150 mI dIy IaTe MaKiato.
3 3aHypTe cniHIOBaU y MoIOKo npu6n3HO Ha 1 cm.
4 HaTnchItb 3Haayok (MaI.10) napn.
- IHHaKApHa 3HaKy npn 3aRopTbCra, a IHaKaToP noaTky 6JImaE.
5 HaTnCHiTiB KhoNkY noaTkY/3ynHHeHHr o6 cniHHTm MoJOKo (MaI. 11).
KabomamaHa nounHae HarpiBaTncb,napaHarHiTaETbcB MOLOKO,IBOHO NiHTbcra.
6 Konno monoHa nHa y rneuky dna moIoka doCraHnO o6'Emy, 3HOBy hATNCiB KHONky noaTKy/3ynHeHHra,06 3ynHnTn CnIHOBaHHa MOIoka.
Hikon He cnHIOte MOLOKo IOBwe 90 cekyHd. CnHOBaHHaBTOMaTHHO BmNkaetbcaye3 90 cekyHd.
1 Lio6 OTPmuTn cniHeHe MOLOKO HauBnOoi kOcTi, He pyxaIte rIeK IJIa MOLOKa nIq vac cniHBOAHN.
ПригOTуВаHHЯ Кави 3 РОпeрeньо 3МeЛeнх 3epeH
3amictb KaBOBnX 3epeH MoXHa Bn6paTn NonepeHbO 3MeJeHy KaBy, HapnKnaI, kUo BV BiJaTe nepeBary iHOMy copTy KaBn a6o KaBi 6e3 KoFeiHy.
1 HaTnCHiTB KhONkY "YBIMK./BUMK.", 06 yBIMKHyTN KaBOMaunHy, i3aueKaITe, DOKN BOHa NiIroTyETbcra do po6Otn.
2 Biinkpnite Kpnshky BiDciky dny nonepedhbo 3MeJeHO KaBn HacnPte B HbOro 3 YaHni loxKn KaBOBOro nopoukky (npnbln3no 8r) (MaI.12).PiCna cbo ro 3akpnite Kpnshky.
3 NocTaBTe yawKy niD By3OJ noaui KaBN.
4 Bn6epitb oDnH Hani.
5 HaTnchIb 3HaoyokMiucHocTi Ha 3 cekyHn (MaI.13).
IHHkaTOp 3NaUka nonepedHbO 3MeJeHoKabN 3aRopEbC, aIHnKaTOp noaTky 6JIMae.
6 HaTnchItb KhoNky NoayTk/3ynHHeHH
7 706 npnnnntnoaay kabn, nepu hix kaBOMaunHa 3aBepuNTb npiroTyBaHHra, 3HOBy HaTNCHTb KHONKy noatky/3yynHeHHra
i 3 nonepedHbO 3MeJeHoI KaBn MoXHa npiroTyBaTn IInse OndHy nopciIO KabN 3a Odn pa3.
1 HanahtybaHH nonepedHbO 3meJeHOi Kabn He 36epiraTbcra JK nonepedHbo Bn6paHe halaHTyBaHH mIucHcti. Uop3y, KOnBn Bn 6aXaTe npiroTuBaTH nonepedHbO 3MeJeHy Kaby, Tpe6a HaTncHyTN 3HaQOK miuHcTI npotrrom 3cekynd.
i Kaio Bn6paHIO nonepaHbO 3MeJeHy Kaby, BN He 3MOXeTe Bn6paTu IHsy MiucHicTb.
Ponaua rapyoi BOn
1 YKIO nID'EDHaHO LatteGo a6o cniHOBaMOnoka, BnMiTb Noro.
2 Hatachitb 3Haayok rapaoyoB Odo (MaI.14).
IHHaKATOpN 6'My HanoIO 3aropTbCra Ta NOKa3YOTb nonepdHbO Bn6paHe HaJaTuBaHnIra rapyoI BOi.
3 HanaTye o6'em rapiyo BODn 3a BlaCHmBnoObaHHaMn,HaTNCyBUn 3HaoyoK o6'Emy HanoIO (MaI.3).
4 HaTnchItb KhoNky NooyTk/3ynHHeHHa
-Блима€ iHДиКaTOp Ha 3HaUky rapaoyoI BODn, i rapa YA BODa 3ЛиBaETbc8 3 By3na noJaYi rapaoyoi BODn (MaI.15).
5 506 npinnnnt noaay rapaoyi BOn, nepw hix KaBOMaunHa 3aBepuNTb npiroToyBaHHra, 3HOBy HATNCHTb KONky NOatKy/3ynHeHHRA
HajauTyBaHHa KabOMaHH
HanaHTyBaHHaY acy ouiKyBaHHa
1 HaTnCHiTb KhoNkY "YbIMK./BumK.", 0o6 BmMKnHyTn KaBOMaunHy.
2 Koli KaBOMaunHy BmKHyTo, HATncHt b i yTpmyTe 3NaOc (MaI. 16) Calc/Clean (BudaneHHaKnny), Dokn He 3aropTbcra iHdNkatOp Calc/Clean (BudaneHHaKnny) i Aroma strength (MiucHicTb) (MaI. 17).
3 Hatnchitb 3naok miucnocti, uo6 Bn6paTn Heo6xidn yac ouikybaHn: 15, 30, 60 a6o 180 xbuiHH. BiinobiDnO 3aogopTbcra 1, 2, 3 a6o 4 iHnkaTopn 3nauka miucnocti.
4 HalaTbyBaBwn yac ouikyBaHHa, haTnCHiB KONky NOATKy/3ynHeHHa. KabOMaunHa BUMKHeTbcra.
5 HatncHt b KhONkY "YbIMK./BmK.", 0o6 3HOBy yBIMKHyTu KabOMaunHy.
Поррамьаня МаКсимальНOrO CTaHДapTHOrO 06'Emy HanoIB
MaunHa Mae 3 cTaHapTHi HanaStyBaHHra 6'Emy dIy KOxHoro HanoIO: MaII, cepeHni i BeIKNi. MoXHa HanaStyBaTu IINse MaKcImaJIbHNI 6'Em. HObe 3NaueHHra 6'Emy MoXHa 36epeRTn, KOJI 3abIImaE iHdNkATOp NOatKy.
i Iepsh hix noatn nporpaMyBaTu ob'em HanoIO 3 MoIoka, 36epitb LatteGo Ta HaniIe TdyM MoIoka.
1 106 haataBn MaKcmaJIbHe 3NaueHnO6'Emy, HATNCiTb i yTpmyTe 3HaOK Heo6xIDHOrO HaNoIO npotraOM 3cekynd.
Bepxhi iHdkaTop 3NaKa 06'Emy HanoTo Ta Bepxhi iHdkaTop 3NaKa 06'Emy MoIoka (Jnwe dny Okpemux MoJeIe) nouHaIOb 6ImaTn. Ppi cIbOMy 6ImaHHK KOnkN NoaTKy/3ynHeHHBA3ye Ha Te, 0o BN nepe6yBaTe B pexmI nporpaMyBaHH.
2 HatncHt b KhoNky noaTkY/3ynHeHHra MaunHa nouHae roTyBaTu B6paHn Hani.
- Cnepshy iHdikatop noaTk yropntb 6e3nepepbHo. KoI MaunHa roToBa 36epeTn haIaTobAHn o6'em, iHdikatop noaTk/3ynHeHH naHnAe 6JImaTu.
3 HaTnCHiTB KhONKy noaTKy/3ynHHeHHra pa3, KOJIu YaIka MICTNTmE 6axaHn o6'Em KaBn a6o MOJOKa.
-ПдчспгOTуВаннкAnuHо a6o late MaiaTo cNoaTky 3JnBaETbCЯ MoJIOKo.HaTNCiTB KONKy noaTKy/3yNInHeHHKoJI YuAshaMaMiCTiTmE 6axaHnO6'EM MoJOKa.MaunHa aBTOMaTHNOH noUHe 3JINBaTn Kaby.HaTNCiTB KONKy noaTkY/3yNInHeHHaIe pa3, KOJI YuAshaKa MiCTiTmE 6axaHnO6'Em.
Iicra nporpaMyBaHHa HOBOrMaKcImaJIbHOrO CTaHdapTHoro 6'My HanoIO MaUHa 3JIbATmE HOBn O6'EM 7Opazy, KOJIb Bn BVbIpaTmTe MaKcImaJIbHn OB'Em cboHO HaIOU.
i MoXHa HaJaIaTbTaN IInIe MaKcImaJIbHn PiBeHb CtaHdapTHOrO 6'Emy.
i 106 BiHOBHTN cTaNdapTHi HanaWtYBaHHa o6'Emy, nVB. "BiHOBJIeHHa 3aBOJcBKnx HanaWtYBaHb".
Hanaштуваиму Temперату Кави
KabomauHn6e3 3NaUaKa TeMnepaTpyu
1 HatncHtB KHONky "YbIMK./BumK," 06 BmMKHyTu KabOMaunHy.
2 Koli KaBOMaunHy BmKHyTo, HATNCiTb i yTpmyTe 3NaOk o6'Emy KaBn, DoNOKn He 3arOpntbcra (MaI. 18) ueh 3NaOk.
3 HaTnCHiB 3NaUOK o6'Emy, uo6 Bn6paTu Heo6xIDHy TempePaTy: Hn3bky, cepenHIO a6o BnCoky.
- IHHaTopn 1, 2 a6o 3 3aropraTbcBiINOBiHNo.
4 HanaatyBaBmI TemnepaTpy Kabn,HaTncHtB KONkNoaTky/3ynHeHHra
5 HaTnChiItb KhONky "YbIMK./BmK.", 0o6 3HOBy yBIMKHyTN KaBOMaunHy.
i KaHcHo BmKHyTn KabOMaunHy camOCTiH, BOHa BmNkaETbcra ABTomauHO uepe3 neBn yac.
Maunn 3i 3naekom Temnepatypn (Tilbkn EP3221)
1 KjIbka pa3iB HATnCHiTb 3HaouK TempepaTyPi KaBn, Uo6 Bn6paTn Heo6xIDHy TempepaTypy.
BidHOBJIeHHaBOIDcbKnxHaJaSTyBaHb
KabomauHa MoKe BiINHOBHTn CTaHdapTHi HaJauTByaHHa HanoIB y 6ydb-aykuiac.
i BiHOBNTI cTaHdapTHi HalaHTyBaHHa MOxHa JnSe ToDi, KOJI KABOMaUNHy BUMKHyTO.
1 HaTnCHiB KhoNkY "YbIMK./BmK.", 0o6 BmKHyTu KaBOMaunHy.
2 HaTnChiTi b i yTpmyTe 3Haouk ecnpco npotrarom 3 cekyHd.
- 3aropaotbcepeHni iHnkaTopnHa 3NaKax HanaTByBaHHaHOIB. IHnkaTOp noaTky/3ynHeHHaNoHnac6blMaTu, nobIDomlaIOn npo roTOBHiCTb HanaTByaHb Do BiHOBJeHHa.
3 HaTncHtB KhoNkY noaTkY/3ynnHeHHyIoo6 niTBePdntu 3aynck BiHOBLeHHraHaIaTuBaHb.
4 HaTnChiItb KhONky "YbIMK./BmK.", 0o6 3HOBy yBIMKHyTN KaBOMaunHy.
3BykobicnHaJIKNHOpOK"YbIMK./BmK."iNoaTky/3yInHeHHNe He MoXHa DeakTbByBaTI.
www.home.id/support. OrIaCTINH, kI MOXHa MNTN B NOCyDOMnHi MaunHi, nB. Ha pnc. D.
3HIMHI qactHHI PepiouHictb OunueHn
Cnoci6 ouuueHna
БлOK 3aВарюВань LLoTиЖнь ВиМiТь 6ЛOK 3aВарюВань 3 KaBOMaшИн (ДИВ.
OuHnHnLaTeGo (MOJouHOcCTeMn)
OuHnHnLaLatteGo nicna KoxHoRo BnKOpncTaHHa
1 3himiTb LatteGo 3 kaBOMaunHn (Maj. 34).
2 BnInIte MoNOKO, 0o 3aJINuNOcA.
3 HaTncHtB KONky po36JIOyBaHHra Ta BnIMiTb KOHTeHep dJa MOLOka 3 Kopnyc LyatteGo (MaJ. 35).
4 Ouchte Bci yactn H B nocydomn Hi Maunhi a6o Ni kpaHOM y Tepni Boi 3 MnHHM 3ac6om.
OuHnHnKlaCnHOro CnHOBaHa MoIoka
OuHHeHH KlaCnHOro cInHOBaHa MOJoka nICJa KOxHOro BnKOpNCtAHn
OuHyIe cInIOBaMOLoka nICJI KOKHO RO BUKOPcTaHHa 3 ririEHIHNx npuH i IJRA 3aNo6irAHnHaKoNueHHIO 3aIIuIKIB MOLOKA.
1 NocTaBte yawky niD cnIHOBaU MOLOka.
2 Topkhitbcra 3haoka napn Hatachitb KhoNky noatky/3ynnHeHHa, o6 po3noatn noaay napn BuaNTM MOnko, 03aJIuHIOcY cInHOBaY MoIoka.
3 3ynnnntnoa npaep3 kibka cekynd,3HOBy HaTNCHTb KHONky noaTky/3ynneHH
4 OuHCTbTe cniHOBaMOLOKa BOIIOTO raHupkoIO.
UoJeHHe OunuHnKJlacnHOrO cniHIOBaHa MOLOKa
1ДаиTe cInHOBaU MOJOKa NOBHCtIO OXOJHOHTN.
2 Haxnjitb cniHOBaMOnoka JIbOpyu (MaI. 36) i BnMiTb MeTaJeBy ta cnIKoHOby YactHH (MaI. 37).
3 Po36epiTb Dbi yactnHn (MaI. 38) Ta npomnTe ix nuCTO BOIO a6o nomnTe iX y nocydomnHi MaunHi. IpekehaiTecb, lo man OTBip MeTaJIeBOI Tpy6Kn (MaI. 39) nobHicTIO uNCTn i He 3a6HTn 3aIIuKamMoJOKa.
4 3HOBy 36epitb Dbi YactHnCniHOBaCa MOJOKa Ta NiD'EnHaIte CNIHOBaUMOJOKa Do KaBOMaUNHN.
ΦilbTpДЯВODn AquaClean
BaSHA KABOMAUNHa JKAHKApaue npaio 3 yctahOBHeHM fIbTpom dna BODn AquaClean. IInbTp dna
BODn AquaClean MOxHa BCTAHOBHTN B pe3epByap dna BODn, o6 36epeTn cMaK KabN. Bin TaKoX 3MeHwye
Heo6xHicTB BnJaTn HAKIN, BNOBilbHIOUOn npouec NOrO yTBOpEHn. IInbTp dna BODn AquaClean
KOMnJIeKTyETbcr He y BCix MoJeJax: Ioro MOxHa pnpD6aTN B MiccEBOmy po3dpioHOMy mara3HHi* a6o Ha
Be6caHti www.home-appliances.philips/parts-accessories.
i*OoctynHicTh3aJIeKHTb BiI KpaHn.
3начok Та iнданkaTop AquaClean
Kabomauhy o6laadhaHO iHdkatopom (MaI. 40) fIbtpa Ira BODn AquaClean Ira iHdkaicii cTany fIbtpa. NpepiK nopti6hnx diy y ciTuayx, KOJI nHdkatop 3aropcTbcra abo 6nmae, nIB.y Ta6nci HnXyue.
3amHa pfIbTpra IJIy BoOn AquaClean (5 XB.)
Iicn nponyskaHH 95 n BODn uepe3 fIbTp BIn nepecta e npaioBAtn. IndkaTOp AquaClean ctae opanxkeBIM i noHnac 6JImaTn, HaraDyOuN, 0o Heo6XiDHO 3amHHTn fIbTp. POKn BIn 6JImaE, BN MOxete 3amHHTn fIbTp, He BndaJIaOuN npeed Tm HaKUn i3 KaBOMaShHn. JkUo He 3amHHTn fIbTp dJa BOAnAquaClean, opanxkeBn iNDkaTOp i3 yacom rache. Bu doci moxete 3amHHTn fIbTp, aJe cnOuaTkY Heo6XiDHO BnDaJIHTn HAKUN i3 KaBOMaShHn.
KoJIi 6JIIMa€ opaHxKeBn iHДиKaTOp AquaClean:
1 BnIMtB CTapn fIbTp dIy BoOn AquaClean.
2 YctaHOiB HOBn iIbTp i aKTuByTe Ioro, k OnicaHo B po3di "AeTNaCiia IbTpra IJRA BoDn AquaClean (5 XB.)".
i 3amHouTe fIbTp Ira BOnn AquaClean npHaMHi KoxHi 3 Micci, HabiTb JkIo KaBOMuHa He NOBIDOMJIe Ipo Heo6xIHcTB TaKoi 3aMiHN.
Дeakтваця Нагадувань по замину Флътpa AquaClean
Якwo BV 6iMbwe He BnKOpNCToBvBaTmMeTe φiNbTpri Дя ВOnn AquaClean, BiKlIoUItb HaraNyBaHnAquaClean (iHdNkaTop AquaClean 6IImaE opaHkeBm):
1 HaTnCHiB KhONKy "YbIMK./BmK.", 0o6 BmKHyTu KaBOMaunHy.
2 Koln KaBOMaHInHy BmKHyTo, HATNCiTb i yTpMnyTe 3NaOcAquaClean, Dokn IOno iHdkaTop He 3aRopntbcra. IHdkaTop Nowatky 6JImatme.
3 HaTnCHiTb 3HaUOK AquaClean ue pa3, 0o6 DeakTnByBaTn HaraNyBaHH. IHnKaTOp 3HaUka AquaClean 3raCHe.
4IJIy iITBepJKeHH Bn6Opy HATNCHTb KHONKy NOaTky/3yINHeHH.
5 HaTnChiB KhoNky "YbIMK./BmK.", 063HOBy yBIMKHyTN KaBOMaunHy. HaraNyBaHH npo 3amHy fiNbTp a AquaClean neakTnBOBaHo.
3amOBJIeHnI npJIaIaIaI
Дя ouишени Кавомшини вдалени на киу викоростову te Лше спцiaльни засоби Philips, takikя розундя вдалени на киу, Флър дя Bodи AquaClean i Tabletkn Philips дя вдалени Кавoboоi onii (як soo BOHи дoctуни y BAWIй краiihi). IX можна пидбати Bmiceвх Магаших,В abtopиobahnx cepbicnix ceHTpax abo Ha cstopinci https://www.home-appliances.philips/parts-accessories.Ио6ЗнТи NOBн спсok розднх akcescyapib OHLaIN, ВьедiTb Homep moJI BaWo'i Kавомшини. Homep moJI MOЖн 3найтни BAHTpiшни CTopoHI DBepzt dЯ obcnyrobybaHHa.
i MaunHa He niTpmye fiNbtpn Brita.
UcynenHHeCnpaBHOCTe
U cybomy po3diJIpo3rIaHObC8OCHOBHI npo6JeMn, kI MOxTy BHNKHyTNIiJcAcsBnKOpNCtAHNKAbOMaunHn. BiJeO NOBHn cncock qactnx 3aNTaHb DocTyHni 3a NocuHaHm www.home.id/support. KaIso BV He MoXeTe yCyHyTu npo6JeMn, 3BepHiTbc4 Do LcHTpy o6cnyroByBaHHra KJIeHTIB y CBOiJ KpaIH. KoHTaTKHa iHopMaucj 3haxOuNTbc8 BrapaHTINHomy TaIOHi.
PonepeJxUyBaJIbHi 3NaUKN
| ПonepeDEX- увалын Знayok | Ришени Piiшени 3нayok |
| Загорястся спороженны peз扼ыар дд вори - Peэ扼ыар дд вори майке п ductи. Hanobnіть peэ扼ыар CBIXOю ВОДОю do makсимально рознayк. - Неравильно встановлесуpeз扼ыар дд вори. Установіть peэ扼ыар дд вори на міце. | |
| Загорястся спороженны kohteиега дд кавоій ryши - Рмість дд кавоій ryши повна. Виіmaіteи оочиійte kohteиегдд Кавоій ryши, лішіе колі машіну ввімКнуTO. Почекіte утонаімehоше 5 cekyнд, пechі nіж Встановлівати kohteінелр назад. | |
| Загорястся спдникатор тривоги - Контейнера дд кавоій ryши ta/aбо лотOK дд Крапель 3нaxо\'япьсг He Na Mіці abo Ирравильно встановлеси. Установіть kohteиег дд Кавоій ryши ta/aбо notok дд Крапель на міце ta пerekoініteся, ёо BOHи 3нaxо\'япьсг B правиьнomy по loхенni. - Двэрета дд обсіуговувань Відірпі. Виіміть peэ扼ыар дд вори ta пerebірte, чі зakріпі дөрцята дд обсіуговувань. | |
| Понередж- увальни Знayok | Ришени |
| A | Блимас i Indикатор TrpvВоги -Блик 3аварювannahа поpe6byBaС He Na Mici aбо He nprabUVьн Встановлесno. Вийmitь Блик 3аварювannahа поpe6kaHaiTecSа, сио яloro 3aФicCOBAHNo. ПокрOKOBi i nctpyKci ДИВ.y po3diЛ "ВиMaHnra Ta BCTaHOBJIeHry 6IlyOy 3abarpoVBahHry". |
| -Блик 3аварювannahа 3abLOKOBaHNo. ВиIMiB 6IlyK 3abarpoVBAHry Ta npomniTe IorO ВОДЮ pID КраHOM. Писяцу 3maCtITb 6IlyK 3abarpoVBAHry uystahOBiY IorO Назд.Y MaShInu. ПокрOKOBi i nctpyKciII DnB. y po3diЛ "ОчицEHry Ta DoTgIAd". | |
| A | ЗагорЯевся i Indикатор TrpvВоги, a i Indикатор nochТуКу 6Iлмас. Усераши Машини нахочилось поВитг. сиob BVnUcTNTs Nobitpr3 3 Машини, Наловпь pe3eRByap ДЯ BODIO, noCTaВte YaWsu пid КласчHy спIHOBaH МOLOKA Ta HATNCHITb KONKny noVATKU/3yUnHeHry, сио 6Iлмас. Будые оберекhi, 3 Класчного спIHOBaЧа молOKa 6bUdty BVdIJIaTSCa 6pIz3kn ragayoi BODI, sO6 BVnUcTNTs Nobitpr. |
| Aqua Clean | Блимас i Indикатор AquaClean. BCTaВte abo 3amHitb ФiIbtr ДЯ BODIN AquaClean i akTibByte И�о. ПокрOKOBi i nctpyKciII DnB. y po3diЛ "ФiIbtr Дя BODIN AquaClean". |
| Aqua Clean | IIndikatop BVDaJIeHry HabiPy nobiHBO 6Iлмас. ВиДaIbTHa HAKIN i3 Машини (ДИВ. «П proseduура ВиДaIeHry HabiPy (30xb.)»). |
| Aqua Clean | IIndikatop 3HaChkIB HanoiB NOчрзi 3aRopaIOTbCЯ 3racaIOTb. Машина HarpiBa€tbcTa HAMaraeTbCЯ BnUcTNTs Nobitpr, яke BTaRHyJa. 3aYeKaIte, ДОКИ Bci i Indikatopri NaOiB He nouchTyb 6e3nepeBbHO CBiTITSCa. |
| Aqua Clean | Блимают b Indикатор BCix nonepedxJyBaIbNHx 3HaCkIB. П配电�аустlb Машиу, BiD'EDnabWii II BiD megexi Ta 3HOBу niD'EDnabWii II. Перш hIX ЗнOBу VBIMKHUTM Машиу, ВиКОнайte Taki diI. -ВиIMiB ФiIbTp ДЯ BODIN AquaClean i3 pe3eRByap Дя BODIN. -Установltpe3eRByap Дя BODIN Ha MICIte. ПрошTOBXHITb IorOЯKOMORA daJIb V машиу, сOБ bVBeBHTncb, сOо BiN pepe6bYBaE B nPabNVbHomy noLoJoxHHi. -Віdkрипte кршky BiDcIky Дя nonepedxHb 3MeIeHoi KaBV Ta nepeBipTe, сий IorO He ЗАБИТо KaBOvIM nOporWskOM. IcOБ иOrO OchIcTNTs, BCTaВte ручКу loJoxKу V BiDcIKДЯ NonepedHb 3MeIeHoi KaBV pyxaIte II BrOpy Ta BHNZ, дOKи habits MeJeHa KaBa He Випадe (MaI. 27). ВиIMiB 6IlyK 3abarpoVBAHry Ta BnDAJIbY cIy KaBOv Byru, сO Випалa. UCTaHOBITb ChIcTNI 6IlyK 3abarpoVBAHry Ha MICIte. -3HOB yBIMKnHITb Машиу. Якso дообл demу виршно, сe OЗнaue, сио ФiIbtr AquaClean He 6bIyo priroTOBLeHNo Налжимmчinom. ПidroToyIte ФiIbtr AquaClean поeYCTaHOBleHm Ha MICIte, як ОписANO B kPokax 1 ta 2 y po3diЛ "AkTbuaizia ФiIbtr Дя BODIN AquaClean (5xb)."。 Якso i Indikatopri nPoDobXyIotb 6IлmAtn, Машиу могla neperprticrs. ВIMKnHITb Машиу, zauchaite 30xbuLIni i BBIMKnHITb II 3HOBy.Якso i Indikatopri Nicecle II ЗернiTbсdo LcIeTpy obScIyROvBaHnKJIcIeHIV bCBoI KpaIHI. KoNTaKTHy iNΦopMaIJO ДИВ. y MixnapodHomу rapaHTIiyHomу taJIoHi. |
Ta6nucyaCyHeHHa HecnpaBHOCTe
Y zu bomy po3diJIpo3rIaHObC8 OCHOBHI npo6JIeMn, kI MOxuyB BHNKHyTNI iJ qac BHKOpNCtAHN KaBOMaunHn. BiJeO I NOBHN CnncOK cactnx 3aNTaHb DOCTynHi 3a NocuHaHHm www.home.id/support. RaIO BV He moKeTe yCyHyTN npo6JIeMy, 3BepHITbcra Do LcHTpy o6cIyroByBaHHa KJIeHTIB y CBOiIN KpaIH. KoHTaTKHa IHopMaui3haxoDntbcra B rapaHTInHomy TaIoHi.
PpO6IeMa PpUHHa PiUeHHa
.17 77 nnnn nn nnnn nnnn nnnn nnnn nnnn nnnn nnnn nnnn nnnn nnnn nnnn nnnn nnnn nnnn nnnn nnnn nnnn nnnn nnnn nnnn nnnn nnnn nnnn nnnn nnnn nnnn nnnn nnnn nnnn nnnn nnnn nnnn nnnn nnnn nn
2.17
n7wn nn nnnn nn nn nn
10790X77NNN7NIN,177N X 10790X77NNN7NIN
3.
17772x 7n7wn 7007y 7ny97n, nnt-n97n2 07n7i
(7n) LatteGo ny 7n o? n iX7wn
:Jn nn nnnn aquaClean
1.Aqu
2.1
n97nn nwn nn n7 |Tyn nn Dn Dn, dwn 3 7n 97AquaClean 7u Dn nn nn 97nn
AquaClean 70
Aquaclean 7w nn nnnn 7017 7n nn,Philips Aquaclean 7w nn nn nn nn nn nn nn nn nn nn nn nn nn nn nn nn nn nn nn nn nn nn nn nn nn nn nn nn nn nn nn nn nn nn nn nn nn nn nn nn nn nn nn nn nn nn nn nn nn nn nn nn nn nn nn nn nn nn nn nn nn nn nn nn nn nn nn nn nn nn nn nn nn nn nn nn nn nn nn nn nn nn nn nn nn nn nn nn nn nn nn
- 27
.7
- n.v.d
Calc / Clean |D'0 7 TV D'IN INX 7N |D'NN7I D'IN 7N Philips 7U NNN 7N 7N 7N .nD'7 nIN INX 7N |D'NN7. (45 N)
1.7y
2.11X
3.017r
4.Aqu
5
6.DD
7.
8nnoi
nnon 7nnn n nn n n n n n n n n n n n n n n n n n n n n n n n n n n n n n n n n n n n n n n n n n n n n n n n.
9.77
10.Calc
17n 77n77n77n77n77n77n77n77n77n77n77n77n77n77n77n77n77n77n7
11
12
13.[]
14.11U
15
. ^(11175) AquaClean 10n n7yon' nX I7) aquaClean 7u uTN Dn Dn Dn Dn Dn Dn Dn Dn Dn Dn Dn Dn Dn Dn Dn Dn Dn Dn Dn Dn Dn Dn Dn Dn Dn Dn Dn Dn Dn Dn Dn Dn Dn Dn Dn Dn Dn Dn Dn Dn Dn Dn Dn Dn Dn Dn Dn Dn Dn Dn Dm Dm Dm Dm Dm Dm Dm Dm Dm Dm Dm Dm Dm Dm Dm Dm Dm Dm Dm Dm Dm Dm Dm Dm Dm Dm Dm Dm Dm Dm Dm Dm Dm Dm Dm Dm Dm Dm Dm Dm Dm Dm Dm Dm Dm Dm Dm Dm Dm Dm Dmn 7u
I 1
709" n nn nn nn nn nn nn
197 7y n nn 7n Dn .n nn n nn /n nn |nn 7y nn n 7y nn nn nn nn nn nn nn nn nn nn nn nn nn nn nn nn nn nn nn nn nn nn nn nn nn nn nn nn nn nn nn nn nn nn nn nn nn nn nn nn nn nn nn nn nn nn nn nn nn nn nn nn nn nn nn nn nn nn nn nn nn nn nn nn nn nn nn nn nn nn nn nn nn nn nn nn nn nn nn nn nn nn nn nn nn nn nn nn nn nn nn nn nn nn nn nn nn
1.DD
ynnn nn n .n nn nn 7ynl Calc / Clean nnnn T y nn nn nn nn .nnn
2
Dn nn nn nnn, nnnn nn nn nn nn nn nn nn nn nn nn nn nn nn nn nn nn nn nn nn nn nn nn nn nn nn nn nn nn nn nn nn nn nn nn nn nn nn nn nn nn nn nn nn nn nn nn nn nn nn nn nn nn nn nn nn nn nn nn nn nn nn nn nn nn nn nn nn nn nn nn nn nn nn nn nn nn nn nn nn nn nn nn nn nn nn nn nn nn nn nn nn nn nn nn nn nn nn nn nn nn
3
1
D
non, nnnn7 noon 10, Philips 7u nnnnn nn nn nn 77n, nnnn nn nn nn nn nn nn nn nn nn nn nn nn nn nn nn nn nn nn nn nn nn nn nn nn nn nn nn nn nn nn nn nn nn nn nn nn nn nn nn nn nn nn nn nn nn nn nn nn nn nn nn nn nn nn nn nn nn nn nn nn nn nn nn nn nn nn nn nn nn nn nn nn nn nn nn nn nn nn nn nn nn nn nn nn nn nn nn nn nn nn nn nn nn nn
-https://www.home.jnniyjnniinjinniinnninnninnninnninnninnninnninnninnninnninnninnninnninnninnninnninnninnninnninnninnninnninnninnninnnnnnnnnnnnnnnnnnnnnnnnnnnnnnnnnnnnnnnnnnnnnnnnnnnnnnnnnnnnnnnnnnnnnnnnnnnnnnnnnnnnnnnnnnnnnnnnnnnnnnnnnnnnnnnnnnnnnnnnnnnnnnnnnnnnnnnnnnnnnnnnnn
JINUN77U 19077N 77N 790NNX77N 77N
1
n7n n9
7777777777777777777777777777777
Dn nn nnn 71719, nnn nn nn 97 Dn nn nn nn .www.home.id/support qTJ nn 19
JINNNI7yI"y,NNW7nn 0797.
nntx 1700
n nn nnn 70
n77n77n77n
-77077
-0nn 7nn nn.
777n97nnny

-nnn.nyynnnne
7nN 107 n5 n97
n77n7n7n

-7n
PHILIPS and the Philips Shield
Emblem are registered trademarks of Koninklijke Philips N.V. and are used under license.
This product has been manufactured by and is sold under the responsibility of Versuni Holding B.V., and Versuni Holding B.V. is the warrantor in relation to this product.

642001030415 (8/2025) rev.00
www.home.id
