
Safari Chef 2 - Barbecue CADAC - Free user manual and instructions
Find the device manual for free Safari Chef 2 CADAC in PDF.
| Brand | CADAC |
| Model | Safari Chef 2 |
| Category | Portable gas barbecue |
| Usage | Outdoor use only |
| Compatible gas types | Butane, Propane or mixture |
| Operating pressure | 28-30 mbar / 37 mbar / 50 mbar depending on country |
| Nominal gross heat output | 1.8 kW |
| Nominal gas consumption | 130 g/h |
| Max. gas bottle dimensions | Height ≤ 500 mm, width ≤ 350 mm |
| Minimum safety distances | Above: 1.2 m; rear and sides: 600 mm |
| Cooking functions | Barbecue, griddle, wok, oven (dome), boiling, pizza (optional) |
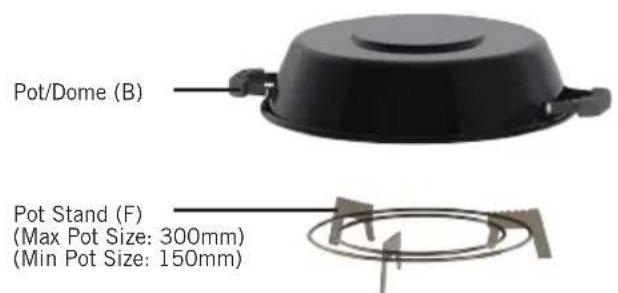
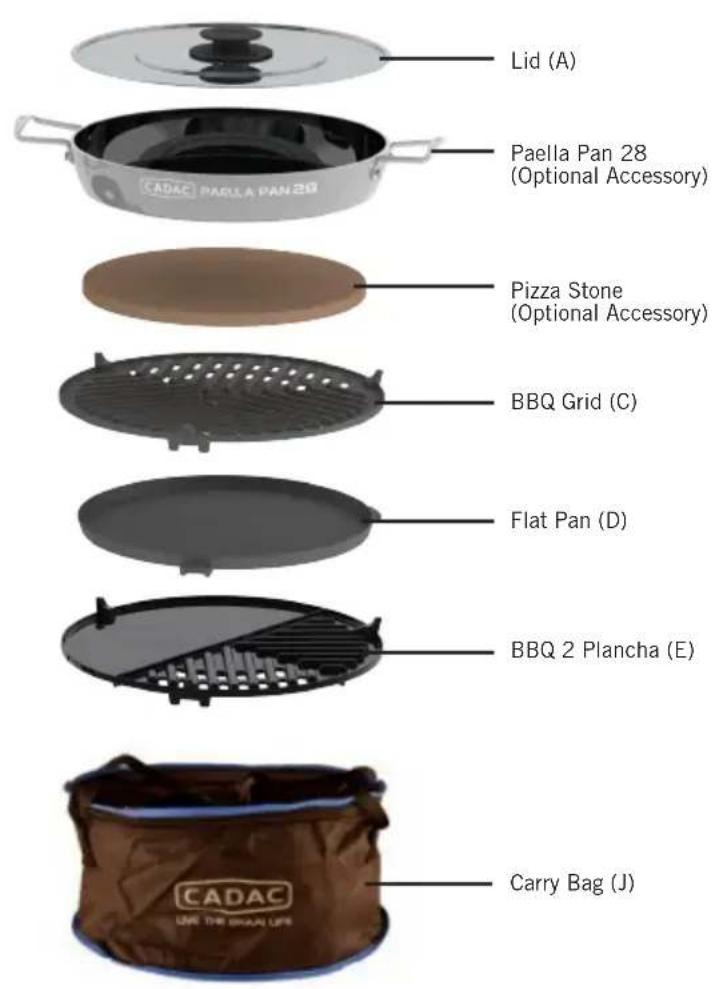
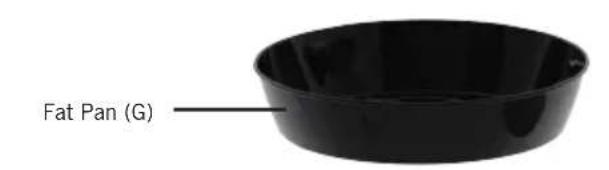
| Included cooking surfaces | Barbecue grid, smooth cooking plate, drip tray, dome, pot support |
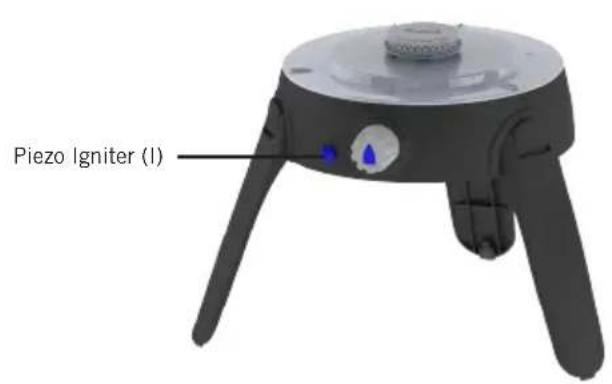
| Ignition | Integrated piezo or gas lighter |
| Flame adjustment | Rotary knob with stop positions (low and high flame) |
| Materials | Coated steel, non-stick surfaces |
| Cleaning | Hot water and mild detergent; some parts dishwasher safe (except burner and legs) |
| Maintenance | Check for insects in vents after storage; do not clean nozzle with a pin |
| Spare parts available | Injectors (0.65 / 0.59 / 0.56), legs, grids, plates, dome, cover, etc. |
| Warranty | 2 years against factory defects |
| Compliance standards | EN 498:2012, EN 484:2019, SANS 1539:2017 |
| Optional accessories | Pizza stone, transport cover, Power Pak (cartridge supply) |
| Countries of use | BE, CH, CY, CZ, ES, FR, GB, GR, IE, IT, LT, LU, LV, PT, SK, SI, PL, AT, DE, etc. |
Frequently Asked Questions - Safari Chef 2 CADAC
User questions about Safari Chef 2 CADAC
0 question about this device. Answer the ones you know or ask your own.
Ask a new question about this device
Download the instructions for your Barbecue in PDF format for free! Find your manual Safari Chef 2 - CADAC and take your electronic device back in hand. On this page are published all the documents necessary for the use of your device. Safari Chef 2 by CADAC.
USER MANUAL Safari Chef 2 CADAC
For Outdoor use only!
This appliance may not be used in an exterior enclosed balcony, porch or entertainment area!
IMPORTANT
Read these instructions for use carefully so as to familiarize yourself with the appliance before connecting it to its gas container. Keep these instructions for future reference.
1. General information
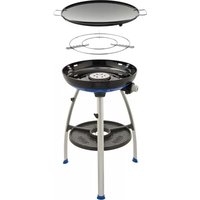
This appliance has been designed to be used for outdoor cooking, specifically for people who go camping to enjoy outdoor life and it can also be used at home on your patio.
- Various food types can be prepared on this appliance. The Safari Chef 2 is designed to utilise various cooking surfaces.
Gas is supplied to the unit via a hose and regulator, connected to a gas cylinder or a CADAC Power Pak. The CADAC Power Pak is a unit that takes two or more gas cartridges. Note: hose, regulator and Power Pak are not supplied with the appliance.
The unit is easy to switch on, and to operate (Section 6) and the user can control the heat input with an adjustable valve.
The unit is supplied with a convenient carry bag.
This appliance complies with EN 498:2012, EN 484:2019 and SANS 1539:2017.
This appliance may only be used with an approved hose and regulator connected to a refillable cylinder complying with the local regulation in force.
- The refillable cylinder is to be used only in an upright position. Only to be used with a gas cylinder that does not exceed 500mm in height and 350mm in width (including the regulator).
- Warning: Accessible parts may be very hot. Keep young children away.
Gas appliances require ventilation for efficient performance and to ensure the safety of users and other persons in close proximity, therefor do not use the appliance in an unventilated area. It is intended for use outdoors only.
- Read these instructions carefully before using the appliance.
Use outdoors only!
| 6540L0, 6540L1 | |||||
| Country of Use | BE, CH, CY, CZ, ES, FR, GB, GR, IE, IT, LT, LU, LV, PT, SK & SI | PL | BE, CY, DK, EE, FR, FI, HU, IT, LT, NL, NO, SE, SI, SK, RO, HR, TR, BG, IS, LU, MT, & ZA | AT, CH, DE & SK | |
| Appliance Categories I | 3+(28-30/37) | \( I_{3B/P} \)(37) | \( I_{3B/P} \)(30) | \( I_{3B/P} \)(50) | |
| Allowable gasses Butane | Propane Butane | Propane | or their mixture | ||
| Gas Pressure 28-30mBar | 37mBar | 37mBar | 28-30mBar(2.8kPa for South Africa) | 50mBar | |
| Jet Number 0.65 0.59 | 0.65 | 0.56 | |||
| Nominal Usage | 130g/hr | 130 g/hr | 130g/hr | 130 g/hr | |
| Gross nom. heat input | 1.8kW | 1.8 kW | 1.8kW | 1.8 kW | |
| Country Name and Abbreviations | ||||
| AE = United Arab Emirates | AL = Albania | AT = Austria | BE = Belgium | CH = Switzerland |
| CZ = Czech Republic | DE = Germany | DK = Denmark | ES = Spain | FI = Finland |
| FR = France | GB = United Kingdom | GR = Greece | HR = Croatia | IT = Italy |
| JP = Japan | KR = Korea | NL = Netherlands | NO = Norway | PL = Poland |
| PT = Portugal | RO = Romania | RU = Russia | RS = Serbia | SI = Slovenia |
| SK = Slovakia | SE = Sweden | TR = Turkey | ZA = South Africa | |
2. Safety Information
- Do not move the appliance during use.
- Turn off the gas supply at the gas cylinder after use.
- The hose must be checked for wear or damage before every use and before connecting to the gas container.
- Do not use the appliance if it has a damaged or worn hose. Replace it.
- Do not use an appliance that is leaking, damaged or which does not operate properly.
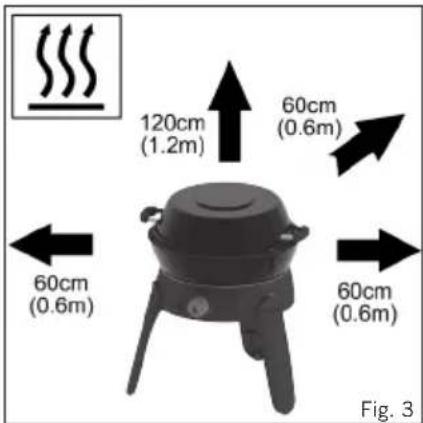
- This appliance must be kept away from flammable materials during use. Minimum safe distances are: Above the appliance 1.2m . At the rear and sides 600mm .
- Ensure that the gas container is fitted or changed outdoors, away from any sources of ignition, such as naked flames, pilots, electric fires and away from other people.
- Keep gas containers away from heat and flame. Do not place on a stove or any other hot surface.
- Ensure that the assembled product is stable and does not rock.
- In the event of light back (where the flame burns back and ignites at the jet), immediately turn off the gas supply by closing the control valve on the gas container and then the appliance valve. After the flame is extinguished remove the regulator and check the condition of its seal. Replace the seal, if in doubt. Re-light the appliance as described in section 6 below. Should the flame persistently light back, return the product to your authorised CADAC repair agent.
If there is a leak on your appliance (smell of gas), close the cylinder valve immediately and take it into a flame free location where the leak may be detected and stopped. If you wish to check for leaks on your appliance, do it outside. Do not try to detect leaks using a flame; use soapy water.
The correct way is to smear the joints e.g. where the stem fits into the cylinder, with soapy water.
- If bubbles form, then there is a gas leak. Immediately turn off the gas supply by closing the control valve on the gas container and then the appliance valve. Check that all the connections are properly fitted. Re-check with soapy water.
If a gas leak persists, return the product to your CADAC dealer for inspection / repair.
Use Outdoors Only.
3. Assembly Instructions
WARNING: The legs are spring loaded. Opening and closing of the legs must be done in a controlled manner to avoid personal injury or damage to your Safari Chef 2.
- To open the legs, turn the unit upside-down and hold the legs down while lifting each leg individually (Fig. 4c). You will hear a "click" if the leg(s) has located correctly (Fig. 4a).
- To fold the legs back, securely hold the leg and push the leg release clip down (Fig. 4b). Then push the legs in-ward to its closed position (Fig. 4c). This needs to be done sequentially to optimize space. First the right front leg (1), then the left front leg (2), and lastly the rear leg (3) (as seen in Fig. 4d).
Before connecting the gas supply, firstly check that the appliance valve is in the off position by turning the control knob fully clockwise (See Fig. 2).
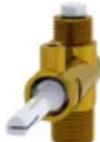
- I 3B/P (30), I 3+ (28-30/37) and I 3B/P (37) Appliance categories: Fit the Valve Tailpiece onto the Valve (Fig.5) by screwing it on in an anti-clockwise direction. Push an 8mm inside diameter Hose onto the Valve Tailpiece until it is properly seated. On the other end attach a suitable 30mbar low-pressure (I 3B/P (30) and I 3+ (28-30/37) Butane configurations) or 37mBar low-pressure regulator (I 3+ (28-30/37) Propane configuration), again making sure that the hose is well seated. The hose used must comply with BS 3212 / SABS 1156-2 or equivalent.
- I 3B/P (50) Appliance category: Screw a Hose with the correct threaded fittings on each end, onto the left hand 1 / 4 "BSP thread of the Valve. Attach a suitable 50mbar low-pressure regulator on the other end of the hose. The hose used must comply with DIN 4815 part 2 or equivalent.
Note: The hose and regulator are not supplied with the appliance. For details, contact your local stockist.
- The hose length should be no less than 800mm and shall not exceed 1.5m . Check the expiry date on the hose and replace when necessary or when national conditions require it. Do not twist or pinch hose.
- Your appliance is now ready for use.


4. Component List
| ABCDEFGHIJ | ||||||||||
| 6540L0-10 | * | * | * | * | * | * | ||||
| 6540L1-10 | * | * | * | * | * | * | * | |||
| 6540L1-20 | * | * | * | * | * | * | ||||
| 6540L1-21 | * | * | * | * | * | * | ||||
| 6540L1-25 | * | * | * | * | * | * | * | * | * | |
5. Fitting and Changing the Hose and Gas Cylinder
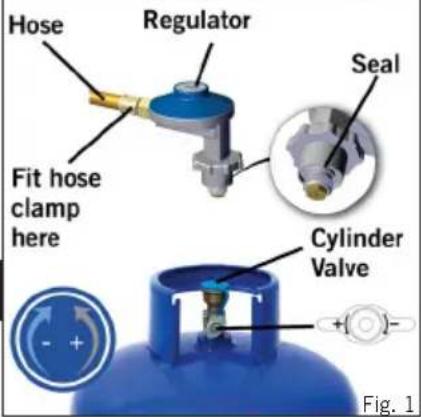
- Before fitting the regulator to a gas container, ensure that the seal on the regulator is in position and in good condition. This should be done on every connection.
- Ensure that the gas container is fitted or changed outdoors, away from any source of ignition, such as naked flames or electric fires and away from other people.
- Making sure that the gas container is kept upright, screw the regulator onto the gas container until it is fully engaged. Do not over tighten.
If there is a leak on your appliance (smell of gas), take immediately into a flame-free location where the leak may be detected and stopped.
If you wish to check for leaks on your appliance, do it outside using soapy water only, which is applied to the joints. A formation of bubbles will indicate a gas leak.
- Check that all the connections are securely fitted and re-check with soapy water. If you cannot rectify the gas leak, do not use the appliance. Contact your local CADAC stockist for assistance.
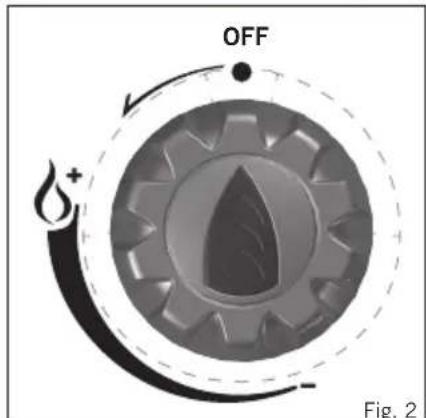
- When changing a gas container close the cylinder valve and then the appliance Valve (see Figs. 1 and 2). Making sure the flame is extinguished, unscrew the regulator. Re-fit a full gas container following the same precautions as described above.
6. Using the Appliance
- This appliance must be used outdoors only!
- When in use, protect from wind for optimum performance.
- Do not move the unit whilst hot. The use of protective gloves is recommended.
- CAUTION: Accessible parts may become very hot. Keep young children away from the appliance.
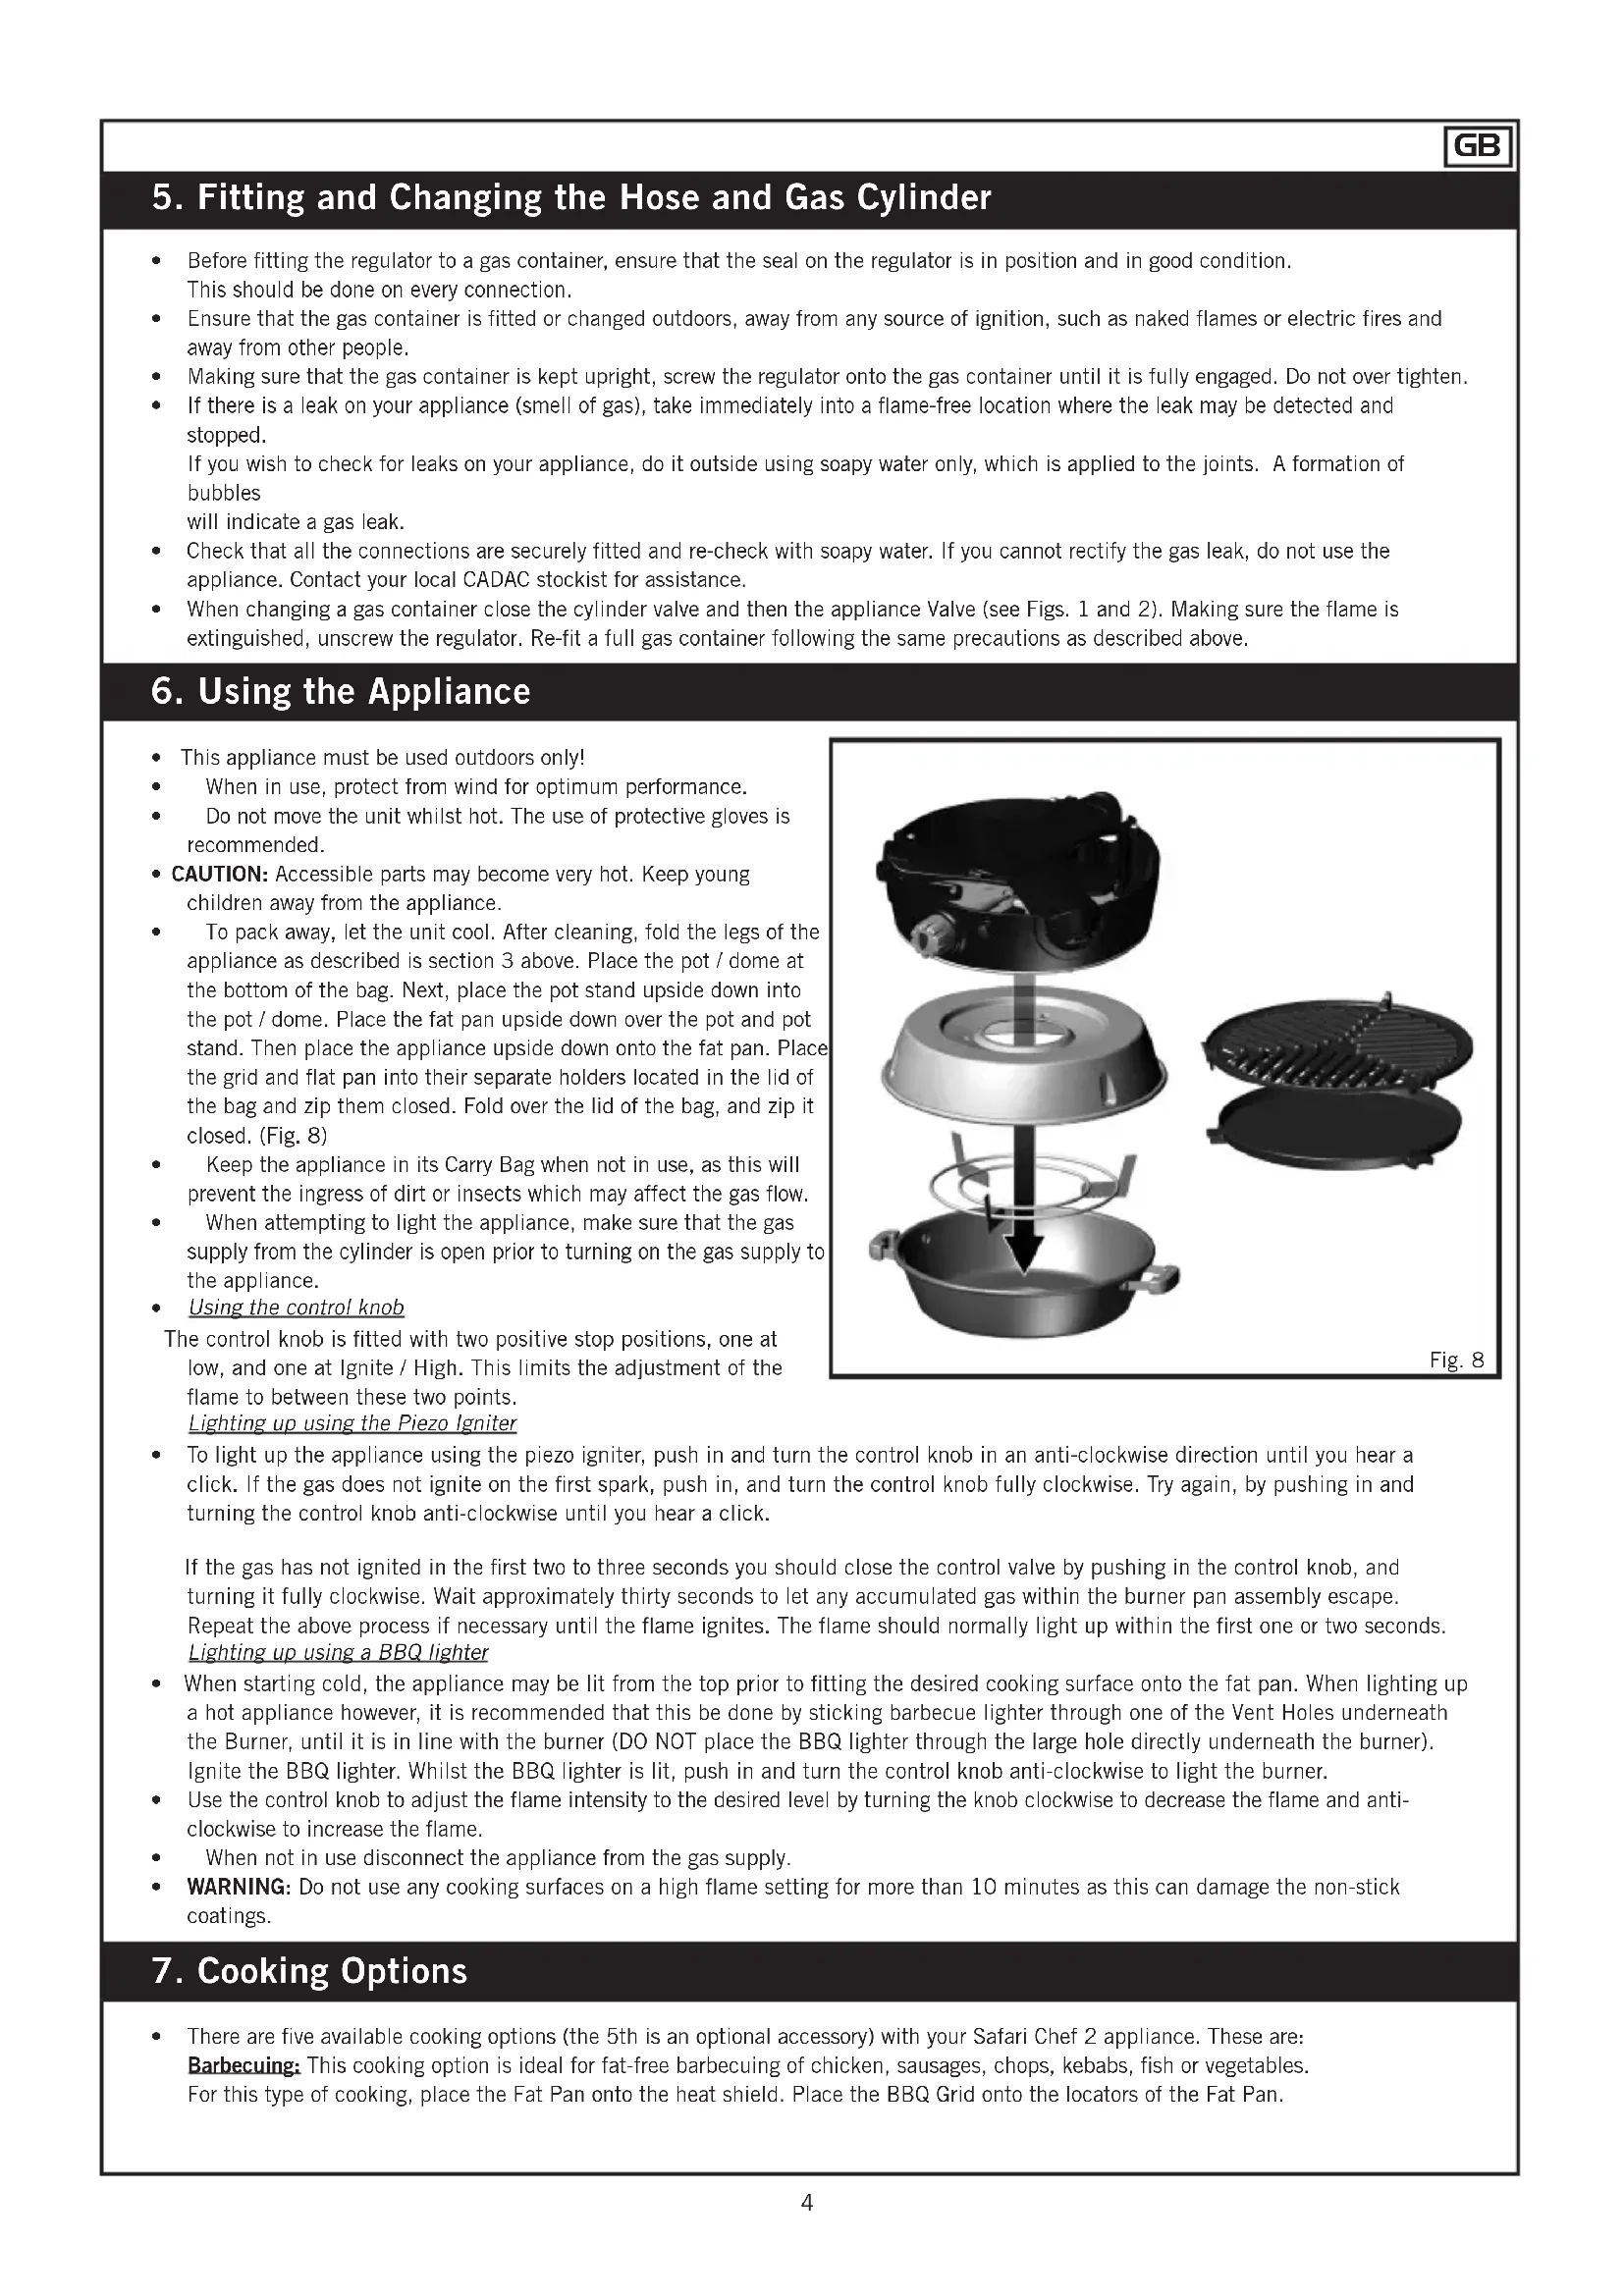
To pack away, let the unit cool. After cleaning, fold the legs of the appliance as described is section 3 above. Place the pot / dome at the bottom of the bag. Next, place the pot stand upside down into the pot / dome. Place the fat pan upside down over the pot and pot stand. Then place the appliance upside down onto the fat pan. Place the grid and flat pan into their separate holders located in the lid of the bag and zip them closed. Fold over the lid of the bag, and zip it closed. (Fig. 8) - Keep the appliance in its Carry Bag when not in use, as this will prevent the ingress of dirt or insects which may affect the gas flow.
- When attempting to light the appliance, make sure that the gas supply from the cylinder is open prior to turning on the gas supply to the appliance.
Using the control knob
The control knob is fitted with two positive stop positions, one at low, and one at Ignite / High. This limits the adjustment of the flame to between these two points. Lighting up using the Piezo Igniter

- To light up the appliance using the piezo igniter, push in and turn the control knob in an anti-clockwise direction until you hear a click. If the gas does not ignite on the first spark, push in, and turn the control knob fully clockwise. Try again, by pushing in and turning the control knob anti-clockwise until you hear a click.
If the gas has not ignited in the first two to three seconds you should close the control valve by pushing in the control knob, and turning it fully clockwise. Wait approximately thirty seconds to let any accumulated gas within the burner pan assembly escape. Repeat the above process if necessary until the flame ignites. The flame should normally light up within the first one or two seconds. Lighting up using a BBQ lighter
- When starting cold, the appliance may be lit from the top prior to fitting the desired cooking surface onto the fat pan. When lighting up a hot appliance however, it is recommended that this be done by sticking barbecue lighter through one of the Vent Holes underneath the Burner, until it is in line with the burner (DO NOT place the BBQ lighter through the large hole directly underneath the burner). Ignite the BBQ lighter. Whilst the BBQ lighter is lit, push in and turn the control knob anti-clockwise to light the burner.
- Use the control knob to adjust the flame intensity to the desired level by turning the knob clockwise to decrease the flame and anticlockwise to increase the flame.
- When not in use disconnect the appliance from the gas supply.
WARNING: Do not use any cooking surfaces on a high flame setting for more than 10 minutes as this can damage the non-stick coatings.
7. Cooking Options
There are five available cooking options (the 5th is an optional accessory) with your Safari Chef 2 appliance. These are:
Barbecuing: This cooking option is ideal for fat-free barbecuing of chicken, sausages, chops, kebabs, fish or vegetables.
For this type of cooking, place the Fat Pan onto the heat shield. Place the BBQ Grid onto the locators of the Fat Pan.
Caution: Please note that when cooking fatty meats some fat will drip onto the unit which may cause flare-ups. Please use caution when handling such meats. The cooking temperatures are easily adjusted to suit your own requirements by turning the Valve Knob to regulate the degree of heat.
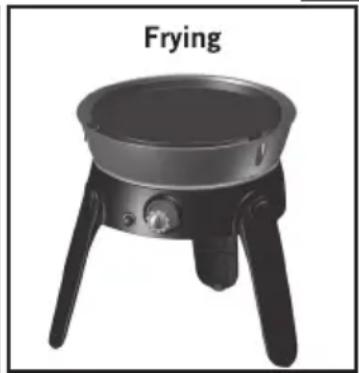
Frying: This option is ideal for stir-fries, fish, breakfast, pancakes, prawns, paella and vegetables. For this type of cooking, place the Fat Pan onto the heat shield. Place the Flat Pan onto the locators of the Fat Pan. Please note that being a shallow pan, it is not suitable for deep-frying. The easy clean surface encourages the minimum use of fat for healthy cooking.
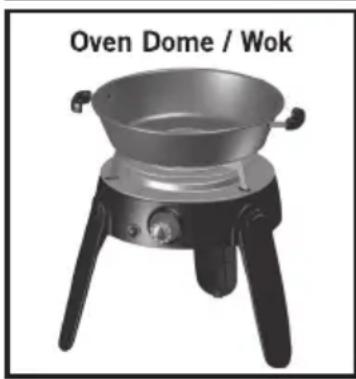
Oven Dome / Wok: The dome can be used as a wok, a lid to create an oven on the BBQ, or a saucepan. For wok-style cooking, place the dome upside-down directly onto the Pot stand and use to prepare stir-fries, pasta dishes or paella. To use the Dome as an Oven lid place the dome over a meal cooking on the BBQ option for convection style cooking. This is ideal for roasting chicken, lamp, beef or pork. The Dome can also be used as a saucepan, to heat sauces, marinades, boil water, cook rice, pasta etc. Place the dome upside-down directly onto the Pot Stand.
Boiling: For this type of cooking, place the Pot stand in its locator grooves on the heat shield ensuring that it is properly seated. Place a suitable pot (not less than 150mm diameter and not more than 300mm diameter) or the Safari Chef 2 Dome on the Pot Stand. The Fat Pan has been designed in such a way that it can also be used as a windshield. One liter of water will boil in approximately 6 minutes depending on the conditions, size of pot used, etc. Note: When using small sized pots do not attempt to use pots with plastic handles. Pot stand can also be used in the fat pan.
Pizza Baking: For this type of cooking, place the pot stand into the fat pan. The fat pan has been designed in such a way that it can also be used as a windshield. Place the pizza stone onto the pot stand. Pre-heat your pizza stone before use. Ensure that food is at room temperature before placing it onto the pizza stone, DO NOT put frozen food onto a heated pizza stone. Put the dome on to create an oven effect for better heat distribution. For cooking methods when using the pizza stone, please refer to the pizza stone user manual.


8. Cleaning
BBQUnit
To clean the Fat Pan, Flat Pan, and BBQ Grid, wash in warm water with a non-abrasive detergent after first wiping off any excess fat left after cooking.
To Clean the Dome, wash in warm water with a non-abrasive detergent.
- Do not use an abrasive cleaner on any part, as this will damage its surface coating.
- These parts are perfectly safe to clean in the dishwasher after removing any excess fat.
Body / Leg Unit
This is best cleaned by using a soft damp cloth and a mild non-abrasive detergent. Do not place in a dishwasher as this may allow water into the valve or burner ports, which will cause the unit to malfunction.
- When cleaning the body/leg unit the pot stand may need to be removed. This can be done lifting the pot stand out of the locator groove in the heat shield.
9. General Maintenance
- The onus of maintaining this appliance solely rests on the consumer from date of purchase.
- This appliance does not require scheduled maintenance.
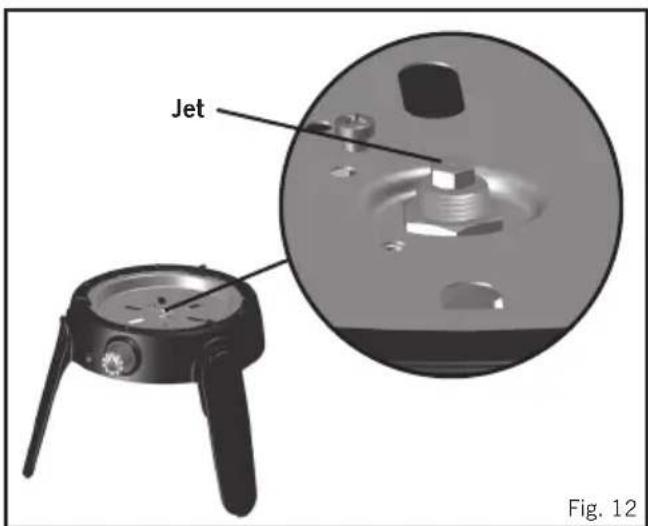
After prolonged storage, inspect the Air Holes under the unit and the inlet of the venturi for insects such as spiders, etc which could affect gas flow. Also inspect the inlet of the Venturi for insects. After checking, refit all components into the prescribed position. Replacing a Bloked Jet: - Your Safari Chef 2 is fitted with a specific size jet to regulate the correct amount of gas.
- Should the hole in the Jet become blocked, this may result in a small flame or no flame at all. Do not attempt to clean the Jet with a pin or other such device as this may damage the orifice, which could make the appliance unsafe.
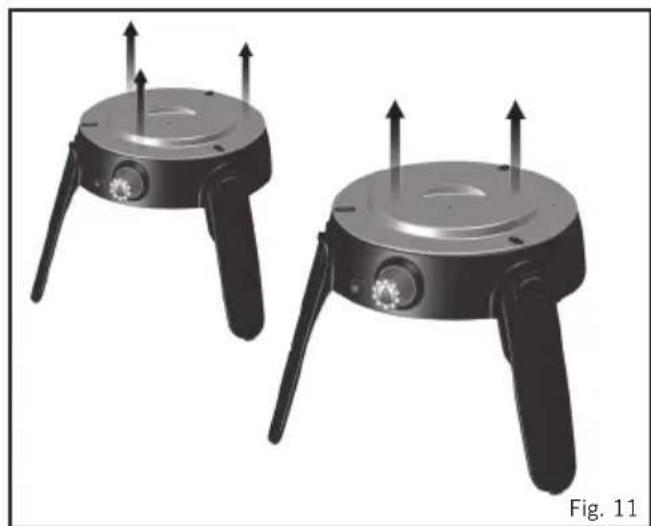
To replace the Jet: Remove the Fat pan (Fig. 9). Gently unscrew the burner assembly (Fig. 10). Remove the three screws from the heat shield plate and remove the Heat Shield(Fig. 11), taking care not to damage the piezo electrode. The Jet can now be removed using a suitable spanner (Fig. 12). Do not use pliers on the jet as this may damage the jet, making it unusable or impossible to remove. Screw the new jet into the valve. Do not over-tighten as this may damage the jet.
- Reverse the above procedure to re-assemble the unit.
Replacing the Hose:
- The fitting of a hose is described in Section 5 - Fitting and replacing the hose and gas cylinder.


10. Returning the appliance for repair or service.
- Do not modify the appliance, as this could be dangerous.
If you cannot rectify a fault by following these instructions, contact your local CADAC distributor for details on how to return the product for attention. - Your CADAC Safari Chef 2 is guaranteed by CADAC for a period of 2 years against factory fault.
11. Spares and Accessories
- Always use genuine CADAC spares as they have been designed to give optimum performance.
Spares
| Item Spare No. | |
| 6540-SP011 | |
| 6540-SP020 | |
| 6540-SP002 | |
| 6540-SP004 | |
| 6540-SP003 | |
| 6540-SP017 | |
| 6540-SP005 (2014) 6540-SP005-V2 (2015 onwards) | |
| 6540-SP019 | |
Item Spare No.

6540-SP007

6540-SP008
6540-SP037
(Jet 0.65 - 30mbar)
6540-SP038
(Jet 0.59 - 37mbar)
6540-SP039
(Jet 0.56 - 50mbar)

6540-SP055
Front L & R Leg
6540-SP010
Back Leg
6540-SP009
Accessories
| Item Spare No. | |
| 6540-300 | |
| 6540-100 | |
| 6540-200 | |
| 6540-600 | |
| 6540-700 | |
| Cover (300 x 300mm) 6540-800 | |
| 8635 | |
| 6544-100 | |
VORSICHT
Email: info@cadac.co.za
www.cadacinternational.com
CADAC UK
14 Deanfield Court,
Link59 Business Park,
Clitheroe, Lancashire,
BB71QS
United Kingdom.
Tel: +44 (0) 333 2000363
E:mail:info@cadacuk.com
www.cadacinternational.com
CADAC USA
50 Mountain View Road
Warren, NJ, 07059
Tel: 908 604 0677
Email: cadacusa@yahoo.com
CADAC IRAN
Robin Bazarganan Carin Co.
Unit D, 6th Floor, Negin Zafar
Building, No.1327
Shariati Street, Tehran, Iran
Tel: +98 21 276 00 781
Mail: info@cadac.ir
CADAC MALAYSIA
Katrin BJ SDN BHD (90816-M)
No 12, Jalan TP2, Taman
Perindustrian SIME UEP,
47600 Subang Jaya, Selangor
Darul, Ehsan, Malaysia.
Tel (603) 8023 3939
info@katrinbj.com
CADAC MOZAMBIQUE
Exclusive Brands A
492 Avenida Namaacha
Maputo, Mozambique
Tel: +258 21 406254
www.cadac.co.mz
CADAC U.A.E.
Supreme Impex General Trading
LLC Office No. 1801-7 Latifa
Tower Sheikh Zayed Road
Dubai, UAE
CADAC EUROPE
Ratio 26, 6921 RW Duiven
The Netherlands
Tel: +31 26 319 7740
Email: info@cadaceurope.com
www.cadacinternational.com
CADAC SCANDINAVIA
Millarco International A/S
Rokh0j 26
8520 Lystrup, Denmark
Phone: +45 87 43 42 00
millarco@millarco.dk
www.millarco.com
CADAC AUSTRALIA
CADAC-BBQ Pty Ltd, Australia
Tel: +61 420 503 967
Customer Care: 1300 135 011
Email: info@cadacbbq.com.au
www.cadacbbq.com.au
CADAC DENMARK
Camper Fritid
Industrivej 11
6640 Lunderskov, Denmark
Tel.: +45 7558 5255
Email: info@camper.dk
www.camper.dk
CADAC CHINA
Room 807, Huayue International
Building, No.255 Tiangao Road, South
Yinzhou business district,
Ningbo, China
Tel: +86 574 87723937
Email: info@cadac.com.cn
CADAC MONTENEGRO
Cetinski put bb,novi City
kvart,zg.1,lokal 6
81101 Podgorica,Monte Negro
Tel.+38269020063
Email: coca@t-com.me
CADAC SWEDEN & NORWAY
KAMA FRITID AB
004636353700
info@kamafritid.se
CADAC GERMANY
Ratio 26, 6921 RW Duiven
The Netherlands
Tel: +31 26 319 7740
Email: info@cadaceurope.com
www.cadacinternational.com
CADAC Czech Rep.
RÖSLER Praha spel. s r.o.
K Horkam 19/21
102 00 Praha 10 Ceska republika
Tel: +420 267 188 011
Email: info@rosler.cz
www.rosler.cz
CADAC ISRAEL
Chagim
PO.box 8122819
Hayarden 13, Yavne, Israel
Tel: +972-73-2595666
Email: grill@i-berman.co.il
CADAC SAUDI ARABIA
Noble Ventures
34 Ibn Saad Al Kathib Street,
Khalidiya,
Jeddah, 21435
Kingdom of Saudi Arabia
info@nobleventures.com
CADAC ZIMBABWE
Exclusive Brands Africa
Unit 8 Birkenhead Park
43 Josiah Chinamano Street
Belmont, Bulawayo
Tel: +263 971 740 (Bul)
Tel: +263 479 2564 (Har)
www.cadac.co.zw
CADAC SOUTH EAST EUROPE
Bulevar oslobodjenja 285
Tel: +381 11 339 270
Email: sinisaj@cadac.rs
www.cadac.rs
CADAC FINLAND
OY KAMA FRITID AB
Koivuhaantie 2-4 B
01510 VANTAA
00358207920310
info@kamafritid.fi
CADAC FRANCE
LeViallon,42520Veranne
France
Tel: +33 4 74 78 13 65
Email: info@cadaceurope.com
www.cadacinternational.com
CADAC NEW ZEALAND
Riverlea Group (Pty) Ltd
2A Maui Street, Pukete,
Hamilton 3200, New Zealand
Tel: +64 7 847 0204
Email: sales@riverleagroup.co.nz
www.riverleagroup.co.nz
CADAC KOREA
Suite 502 Pika Bldg.
39100 Bolzano (Italy)
Tel: +39 0471 542900
Email: info@brunner.it
www.brunnerinternational.com
CADAC ZAMBIA
Exclusive Brands Africa Limited
7225A Kachidza Road
Light Industrial Area
Lusaka, Zambia
Tel: +260 211 842015
Tel: +260977 345034
Email: info@ebagrp.com
CADAC POLAND
Kamai
Wola Batorska 461
32-007 Wola Batorska Poland
Tel: +48 12 635 1373
Email: handlowy@kamai.pl
www.kamai.pl
CADAC HONG KONG
Everything Under The Sun
902 Horizon Plaza, 2 Lee Wing Street
Ap Lei Chau, HK
Tel:+85225549088
Email: info@everythingunderthesun.com.hk
www.everythingunderthesun.com.hk


- For Outdoor use only!
- IMPORTANT
- General information
- Safety Information
- Assembly Instructions
- Component List
- Fitting and Changing the Hose and Gas Cylinder
- Using the Appliance
- Cooking Options
- Cleaning
- BBQUnit
- Body / Leg Unit
- General Maintenance
- Returning the appliance for repair or service.
- Spares and Accessories
- VORSICHT
- CADAC UK
- CADAC USA
- CADAC IRAN
- CADAC MALAYSIA
- CADAC MOZAMBIQUE
- CADAC U.A.E.
- CADAC EUROPE
- CADAC SCANDINAVIA
- CADAC AUSTRALIA
- CADAC DENMARK
- CADAC CHINA
- CADAC MONTENEGRO
- CADAC SWEDEN & NORWAY
- CADAC GERMANY
- CADAC Czech Rep.
- CADAC ISRAEL
- CADAC SAUDI ARABIA
- CADAC ZIMBABWE
- CADAC SOUTH EAST EUROPE
- CADAC FINLAND
- CADAC FRANCE
- CADAC NEW ZEALAND
- CADAC KOREA
- CADAC ZAMBIA
- CADAC POLAND
- CADAC HONG KONG
Brand : CADAC
Model : Safari Chef 2
Category : Barbecue