
RAD 2000 - Frying Pan Eurom - Free user manual and instructions
Find the device manual for free RAD 2000 Eurom in PDF.

| Product Type | Oil-filled radiator |
| Brand | Eurom |
| Model | RAD 2000 |
| Maximum power | 2000 W |
| Adjustable power levels | 800 / 1250 / 2000 W |
| Number of fins | 9 |
| Dimensions (W x D x H) | 40.5 x 24 x 55 cm |
| Weight | 7.2 kg |
| Power supply | 220-240 V / 50 Hz |
| Adjustable thermostat | Yes |
| Swivel casters | Yes (4 casters) |
| Tip-over protection | Yes |
| Overheat protection | Yes |
| Power indicator light | Yes |
| Carrying handle | Yes |
| Cable winder | Yes |
| Material | Steel (fins) + diathermic oil |
| Cleaning | Dry or slightly damp cloth; vacuum cleaner for grilles |
| Storage | In the original packaging, dry and dust-free |
Frequently Asked Questions - RAD 2000 Eurom
User questions about RAD 2000 Eurom
0 question about this device. Answer the ones you know or ask your own.
Ask a new question about this device
Download the instructions for your Frying Pan in PDF format for free! Find your manual RAD 2000 - Eurom and take your electronic device back in hand. On this page are published all the documents necessary for the use of your device. RAD 2000 by Eurom.
USER MANUAL RAD 2000 Eurom
This product is only suitable for well insulated spaces of occasional use
| Model identifier(s):RAD500 | |||||
| Item | Symbol | Value | Unit | Item | Unit |
| Heat output | Type of heat input, for electric storage local space heaters only (select one) | ||||
| Nominal heat output | Pnom | 0,276 | kW | manual heat charge control, with integrated thermostat | No |
| Minimum heat output (indicative) | Pmin | 0,00 | kW | manual heat charge control with room and/or outdoor temperature feedback | No |
| Maximum continuous heat output | Pmax,c | 0,276 | kW | electronic heat charge control with room and/or outdoor temperature feedback | No |
| Auxiliary electricity consumption | fan assisted heat output | No | |||
| At nominal heat output | elmax | N/A | kW | Type of heat output/room temperature control (select one) | |
| At minimum heat output | elmin | N/A | kW | single stage heat output and no room temperature control | No |
| In standby mode | eSB | N/A | kW | Two or more manual stages, no room temperature control | No |
| with mechanic thermostat room temperature control | Yes | ||||
| with electronic room temperature control | No | ||||
| electronic room temperature control plus day timer | No | ||||
| electronic room temperature control plus week timer | No | ||||
| Other control options (multiple selections possible) | |||||
| room temperature control, with presence detection | No | ||||
| room temperature control, with open window detection | No | ||||
| with distance control option | No | ||||
| with adaptive start control | No | ||||
| with working time limitation | No | ||||
| with black bulb sensor | No | ||||
| Contact details | EUROM-KOKOSSTRAAT 20-8281JC-GENEMUIDEN-NETHERLANDS | ||||
| Model identifier(s):RAD1500 | |||||
| Item | Symbol | Value | Unit | Item | Unit |
| Heat output | Type of heat input, for electric storage local space heaters only (select one) | ||||
| Nominal heat output | Pnom | 0,526 | kW | manual heat charge control, with integrated thermostat | No |
| Minimum heat output (indicative) | Pmin | 0,00 | kW | manual heat charge control with room and/or outdoor temperature feedback | No |
| Maximum continuous heat output | Pmax,c | 0,526 | kW | electronic heat charge control with room and/or outdoor temperature feedback | No |
| Auxiliary electricity consumption | fan assisted heat output | No | |||
| At nominal heat output | elmax | N/A | kW | Type of heat output/room temperature control (select one) | |
| At minimum heat output | elmin | N/A | kW | single stage heat output and no room temperature control | No |
| In standby mode | eSB | N/A | kW | Two or more manual stages, no room temperature control | No |
| with mechanic thermostat room temperature control | Yes | ||||
| with electronic room temperature control | No | ||||
| electronic room temperature control plus day timer | No | ||||
| electronic room temperature control plus week timer | No | ||||
| Other control options (multiple selections possible) | |||||
| room temperature control, with presence detection | No | ||||
| room temperature control, with open window detection | No | ||||
| with distance control option | No | ||||
| with adaptive start control | No | ||||
| with working time limitation | No | ||||
| with black bulb sensor | No | ||||
| Contact details | EUROM-KOKOSSTRAAT 20-8281JC-GENEMUIDEN-NETHERLANDS | ||||
| Model identifier(s):RAD2000/RAD2000 SWISS PLUG | |||||
| Item | Symbol | Value | Unit | Item | Unit |
| Heat output | Type of heat input, for electric storage local space heaters only (select one) | ||||
| Nominal heat output | Pnom | 0,813 | kW | manual heat charge control, with integrated thermostat | No |
| Minimum heat output (indicative) | Pmin | 0,00 | kW | manual heat charge control with room and/or outdoor temperature feedback | No |
| Maximum continuous heat output | Pmax,c | 0,813 | kW | electronic heat charge control with room and/or outdoor temperature feedback | No |
| Auxiliary electricity consumption | fan assisted heat output | No | |||
| At nominal heat output | elmax | N/A | kW | Type of heat output/room temperature control (select one) | |
| At minimum heat output | elmin | N/A | kW | single stage heat output and no room temperature control | No |
| In standby mode | eSB | N/A | kW | Two or more manual stages, no room temperature control | No |
| with mechanic thermostat room temperature control | Yes | ||||
| with electronic room temperature control | No | ||||
| electronic room temperature control plus day timer | No | ||||
| electronic room temperature control plus week timer | No | ||||
| Other control options (multiple selections possible) | |||||
| room temperature control, with presence detection | No | ||||
| room temperature control, with open window detection | No | ||||
| with distance control option | No | ||||
| with adaptive start control | No | ||||
| with working time limitation | No | ||||
| with black bulb sensor | No | ||||
| Contact details | EUROM-KOKOSSTRAAT 20-8281JC-GENEMUIDEN-NETHERLANDS | ||||
| Model identifier(s):RAD2000T | |||||
| Item | Symbol | Value | Unit | Item | Unit |
| Heat output | Type of heat input, for electric storage local space heaters only (select one) | ||||
| Nominal heat output | Pnom | 1,274 | kW | manual heat charge control, with integrated thermostat | No |
| Minimum heat output (indicative) | Pmin | 0,376 | kW | manual heat charge control with room and/or outdoor temperature feedback | No |
| Maximum continuous heat output | Pmax,c | 1,274 | kW | electronic heat charge control with room and/or outdoor temperature feedback | No |
| Auxiliary electricity consumption | fan assisted heat output | No | |||
| At nominal heat output | elmax | N/A | kW | Type of heat output/room temperature control (select one) | |
| At minimum heat output | elmin | N/A | kW | single stage heat output and no room temperature control | No |
| In standby mode | eSB | N/A | kW | Two or more manual stages, no room temperature control | No |
| with mechanic thermostat room temperature control | Yes | ||||
| with electronic room temperature control | No | ||||
| electronic room temperature control plus day timer | No | ||||
| electronic room temperature control plus week timer | No | ||||
| Other control options (multiple selections possible) | |||||
| room temperature control, with presence detection | No | ||||
| room temperature control, with open window detection | No | ||||
| with distance control option | No | ||||
| with adaptive start control | No | ||||
| with working time limitation | No | ||||
| with black bulb sensor | No | ||||
| Contact details | EUROM-KOKOSSTRAAT 20-8281JC-GENEMUIDEN-NETHERLANDS | ||||
Dank
Thank you very much for choosing for a EUROM device. You have made a good choice! We hope you will be satisfied about its functioning. To get maximum profit from your product, it is important to read this manual attentive and totally before use, and to understand what is written. Read especially the safety instructions: they are there to protect you and your environment. Keep the manual in a safe place for future reference. Store also the package: that is the best protection for your product in times of no-use. And if you at any time pass the appliance on, pass on the manual and package too.
We wish you a lot of fun with the RAD heater!
Eurom
Kokosstraat 20
8281 JC Genemuiden (NL)
info@eurom.nl www.eurom.nl
This manual has been complied with the utmost care. Nevertheless, we reserve the right to optimize this manual at any time and to adjust it technically. The image used may differ.
Symbol Explanation
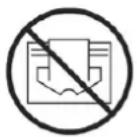
Do not cover the device
Technical data
| Type | RAD 500 | RAD 1500 | RAD 2000 | RAD 2000T | |
| Supply voltage | V/Hz | 220-240 / 50 | |||
| Maximum capacity | Watt | 500 | 1500 | 2000 | 2000+400(T) |
| Settings | Watt | 500 | 600 - 900 -1500 | 800 - 1250 -2000 | 800 - 1250 - 2000 - 2400(Turbo) |
| Number of fins | 5 | 7 | 9 | 9 | |
| Thermostat | + | + | + | + | |
| Turbo | - | - | - | + | |
| Dimensions | Cm | 26x14x38 | 33x24x55 | 40,5x24x55 | 42,5x24x62,5 |
| Weight | Kg | 2,7 | 6 | 7,2 | 10 |
Warning electric cables
Safety warning - general
- Read the user instructions carefully and completely before using (and installing) this device. Keep the instruction leaflet somewhere safe so that you can consult it and pass it on in future.
- Before use, check your new device (including cable and plug) for any visible damage. Never use a damaged device but take it back to the supplier for a replacement.
- In the event of incorrect usage or installation, there is a risk of electric shocks and/or a fire hazard.
Warnings device position
- Only use the device when the feet (RAD500) / wheels (RAD1500, RAD2000 & RAD2000T) have been installed. Using the device without feet/wheels creates a significant risk of fire. Always remove the plug from the socket if you are installing/removing.
- This device is not suitable for wall or ceiling installation.
- Do not use this device in the immediate vicinity of a bath, shower or swimming pool.
- This device is not suitable for use in damp spaces such as bathrooms, wash rooms etc. Never locate the device near waterpoints and reservoirs (tap, bath, shower, toilet, sink, swimming pool, etc.). Make sure that the device cannot fall into water and that it cannot be penetrated by water. If the device falls into water make sure you remove the plug from the socket! Do not use a device that is wet inside but take it to be repaired. Never immerse the device, cable or plug in water or any other fluid and never touch device with wet hands.
- The air around the device must be able to circulate freely. Never install it too close to walls or large objects and never under a shelf, cupboard, curtains or similar. When locating the device, make sure you have the following minimum free space:
Front, minimum free space 50 cm
Back, minimum free space 50 cm
Sides, minimum free space 50 cm
Top, minimum free space 100 cm
- Always place the unit on a sturdy, flat horizontal surface
- The base on which the device is placed must not be made of flammable materials. It must be resistant to temperatures of at
least 125^ without burning, melting, deforming or bursting into flames. Check regularly to ensure that the surface is not overheating; this could be dangerous!
- Never place the device on surfaces such as beds or deep-pile carpet as openings could be blocked.
- Do not place the device near an open window as rain could blow in; do not place on wet surfaces and avoid any liquids being spilt nearby. Do not place the device behind a door or along a walking route to avoid accidental trips.
- Do not place the device near, under or facing an electrical socket and not in the vicinity of an open fire or heat source.
- Do not use the device nearby or facing furniture, curtains, paper, clothing, bedding or other flammable materials. Keep at least 1 metre from device!
- Do not use the heater outdoors or in areas that are smaller than 5m^3 (RAD500), 15m^3 (RAD1500), 20m^3 (RAD2000&RAD2000T).
- The device contains hot and/or glowing and sparking components. Do not, therefore, use where fuels, paint, flammable fluids and/or gases are stored. Do not use the device in an environment that poses a fire risk, e.g. near gas tanks, gas pipes or aerosols. This is an explosion and fire risk!
Warnings - use
- Do not use additions/accessories on the device that have not been supplied or approved by the manufacturer.
- Only use the device for its intended purpose and in the manner set out in this instruction leaflet.
- Some parts of this device will get very hot and could cause burns. You must pay particular attention to children, vulnerable persons and pets that are present near the device. Never leave them alone with a working device.
- Never cover or block the device; it will overheat and this could lead to a fire risk. Never hang or place objects such as clothing, blankets, cushions, paper, etc. on the device.
The minimum distance of 1 metre between the device and flammable materials must always be applied.
Ventilation openings should never be blocked as this may pose a fire risk. Never use the device to dry clothing or place anything on it. Do not let anything lean against the device!
- Do not set the device to come on automatically using a timer, clock or other facility. You must always check for safe conditions before using the fireplace! Never use the device with an external voltage regulator such as a dimmer or similar, as this could be dangerous!
- The device is exclusively intended for normal, household usage. Only use for providing heat in your home.
- The connection voltage and frequency, as given on the device, must correspond to that of the socket to be used. The electrical socket to be used must be an earthed connection. The electrical installation must be protected via a 30mA earth leakage circuit breaker. The electrical socket that you are using must be to hand at all times in order to be able to remove the plug from the socket in the event of an emergency.
- To avoid overloading and/or fuses being blown, do not use any other equipment on the same socket or electrical group as the one used for the device.
- Unroll the electric cable for the device fully before inserting the plug into the socket and ensure that the electrical cable does not come into contact with the fireplace or get hot. Do not run the electrical cable under carpet, cover with mats, runners or similar and do not place in areas that are walked on frequently. Ensure that it cannot be stepped on and that no furniture is placed on top of it. Do not bend the electrical cable around sharp corners and do not roll up too tightly after use! Prevent the electrical cable coming into contact with oil, solvents and sharp objects. Check the cable and plug regularly for damage. Do not bend or pinch the electrical cable and do not wind it around the device; this could damage the insulation!
- The use of an extension cable is not advised as this can lead to overheating and fire. If the use of an extension cable is unavoidable, make sure that it is not damaged and that it is an approved extension cable with a minimum diameter of 3 × 1,5 ~mm^2 (RAD500&RAD1500), 3 × 2,5 ~mm^2 (RAD2000&RAD2000T) and a minimum permitted capacity of 600 Watt (RAD500), 2000 Watt (RAD1500), 2500 Watt (RAD2000) and 3000 Watt (RAD2000T). Always fully extend the cable in order to prevent overheating.
-
Only connect the device to a fixed socket. Do not use multi-plug adapters or similar.
-
During use, the plug may begin to feel warm; this is normal. If it's really warm, there may be something wrong with the socket. Please contact your electrician.
- Always turn off the device and remove the plug from the power socket: Never turn the device off using the plug!
- Prevent foreign objects entering the radiation/ventilation or outlet openings on the device. This may cause electric shock, fire or damage.
- Never leave a working device unattended but switch off and then remove the plug from the socket.
- Always remove the plug from the socket when the unit is not in use! Always remove plug by pulling on the plug itself; never pull on the electrical cable!
- This device gets hot during use. Never touch the device when it is on or shortly thereafter; it could burn you.
- Never operate the device with wet hands.
Who can use the device?
- Children younger than 3 must be kept out of the vicinity of the device unless they are continuously supervised.
- Children between the ages of 3 and 8 may only switch the device on or off if it is set up or installed at its usual location and they are supervised or have received instructions regarding the safe use of the device and understand the corresponding hazards. Children between the ages of 3 and 8 may not insert the plug into the socket, adjust the device settings or clean or maintain it.
- This device can only be used by children from the age of 8 and elderly persons and persons with diminished physical or mental capacities or a lack of experience and expertise if they are supervised or have received instructions regarding the safe use of the device and understand the corresponding hazards.
- Children may not clean or maintain the device without supervision.
- Children may not play with the device.
Warnings for maintenance
- Keep the device clean. Dust, dirt and/or deposits in the device often lead to overheating. Ensure that this type of build-up is regularly removed.
-
Always switch the device off, remove plug from socket and let the device cool down before you:
-
clean the device
-
users maintain the device.
-
touch or move the device.
-
Never switch the device on if you have noticed damage to the device itself, the cable or plug or if it does not work properly, makes strange noises, smells odd or you can see smoke, or if it has fallen or shows any other signs of damage. Remove the plug from the socket immediately. Take the entire device back to your supplier or a recognised electrician to be checked and/or repaired. Always ask for original parts to be used.
- The device may only be opened and/or repaired by a competent and qualified person. Do not carry our your own repairs as this could be dangerous! Repairs carried out by unauthorised persons or changes made to the device could damage the dust/waterproof capacity of the device and will nullify the guarantee and the manufacturer's liability.
- If the electrical cable is damaged, it must be replaced by the manufacturer, their service department or somebody with similar qualifications in order to prevent creating a hazard.
- This device is filled with a precise quantity of special oil. Repairs which involve the oil container being opened must only be carried out by the manufacturer or their service department who you should also contact if there is an oil leak.
- The instructions with respect to removing oil when disposing of the device must be followed.
Failing to adhere to points 3, 4, 5, 6 could lead to damage, fire and/or personal injury. They will invalidate the guarantee and the supplier, importer and/or manufacturer shall not be liable for the consequences.
Description
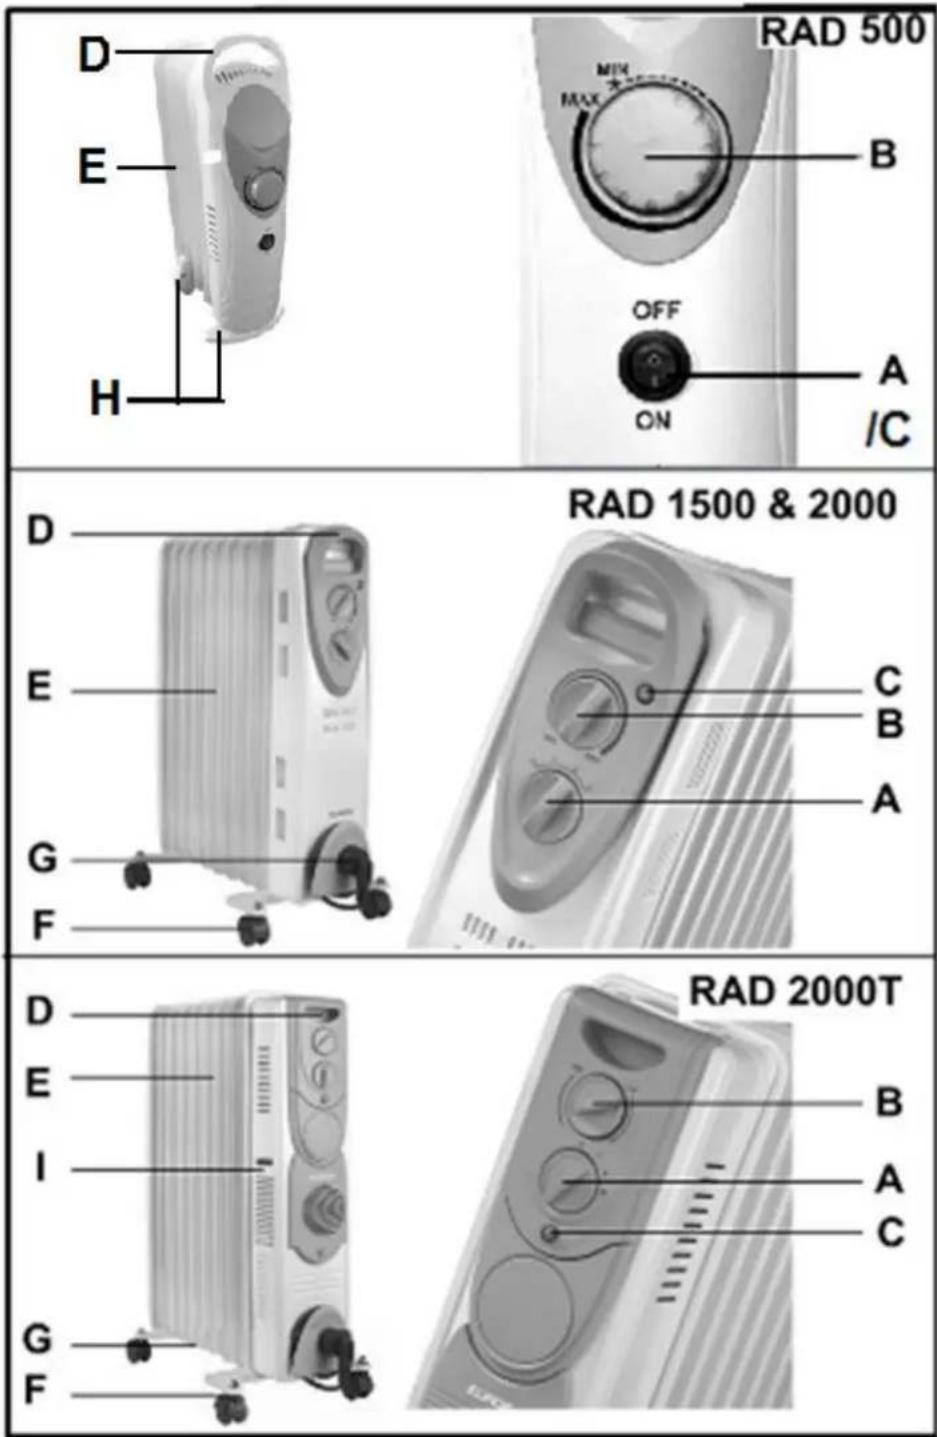
A. ON/OFF- und output button
B. Thermostat dial
C. Indicator light
D. Handle
E. Oil filled fins
F. Swivel Casters
G. Power cord spool with plug connection
H. Foot (2x)
I. Turbo button
Installation, Location and Connection
Remove all packaging material and keep out of reach of children. After removing packaging, check the appliance for damage or other signs that could indicate a fault/defect/malfunction. In case of doubt, do not use the appliance, but contact your vendor for inspection or replacement.
Do not use the heater before it has been installed in accordance with the following instructions!
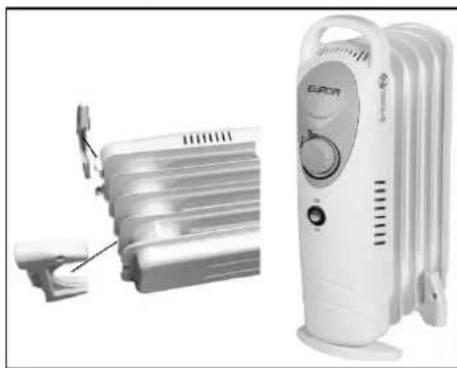
RAD 500:
Firmly slide the legs supplied over the front panel or the second last fin, as illustrated.
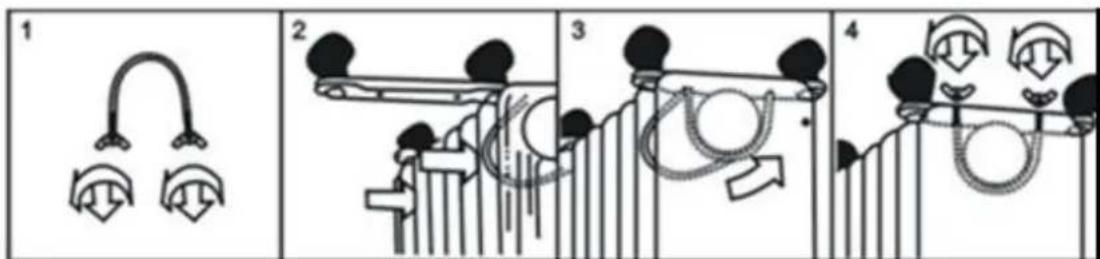
RAD 1500 en RAD 2000:
- Screw the 2 × 2 swivel castors with the 4 capped nuts onto the ends of the two wheel supports. The wheels should be at the hollow side!
- Turn the radiator upside-down (make sure you don't scratch the paint or the floor!)
- Remove the wing nuts from the U-shaped bolts.
- Then mount the U-shaped bolts left and right between the outer fins.
- Slide the wheel supports with wheels over the ends of the U-shaped bolt, so that the wheels are as far as possible mounted.
- Now tighten the wing nuts tightly onto the ends of the U-shaped bolt, but not so tight as to damage the oil-filled fins.
- Return the heater to its upright position, wheels down.
Warning: only use the heater when it is in an upright position, with the wheels (c.q. feet) attached to the bottom (as pictured on the front of this manual). Any other position is dangerous!
- Select a suitable location for the device taking into account all the aforementioned warnings in this manual.
- Check that the socket used is earthed and that it matches the power specified on the heater's type plate.
Set-up and operation
- Set the ON/OFF switch to 0 (off) and the thermostat button to MAX
- Fully insert the plug into the socket. When doing so, completely unwind the flex. The RAD 1500, 2000 and 2000T lamp will now light up.
RAD 500:
- Set the ON/OFF switch to 1 (on); the lamp will burn and the heater will start working.
RAD 1500 / 2000 / 2000T:
- Operate the heater by setting the power switch to 1, 2 or 3. The heater will now operate at 600, 900 or 1500 W respectively (RAD 1500) or 800, 1250 or 2000 W respectively (RAD 2000 and 2000T). To heat up slowly, for a slight temperature increase or in a small space, select position 1; For heating up fast, for a larger temperature increase or in a larger space, select position 2 or 3.
Thermostat RAD 500
Turning the thermostat knob fully to 'min' will retain a temperature of 5^ in the space (as long as the area is not too big or too cold), this is the frost protection functionality.
Thermostat RAD 1500/2000/2000T):
Once the space has reached the right temperature, turn the thermostat dial to MIN until you hear a click. If you leave the dial in this position, the heater will maintain the current temperature by regularly switching on and off. By turning the thermostat dial to the MAX / MIN, you increase/decrease the set temperature. If so desired, you can now switch to a lower power level.
Turbo RAD2000T:
The RAD 2000T is fitted with an extra ceramic heating element (400W) with an integral fan that can blow warm air into the room. Activate this Turbo by pressing the turbo switch on (I) the lamp lights. Stop it by pressing the turbo switch off (O); the lamp extinguishes.
- To switch off, turn the power switch to off (O). The heater switches off. Unplug.
- Note! It takes a long time for an oil filled radiator to cool down. Give the radiator sufficient time to cool down before touching or moving (use handle!).
Safety features
The heater is fitted with a tipping safeguard which automatically shuts off the appliance if it inadvertently falls over. When the heater is returned to its upright position, it will resume functioning as normal but, before reusing, switch off, unplug and check for damage. Do not use the heater if it is damaged or malfunctioning, but have it inspected/ repaired!
In case of internal overheating, the overheating safeguard will switch the heater off. This may occur if the heater cannot give off enough heat or if it or cannot draw in enough fresh air. As mentioned above, this is generally caused by (partially) covering the heater, obstructing the air intake and/or outlet grills or installing the heater too close to a wall or something similar. When the overheating safeguard has switched the heater off, you need to set the power switch to 'O' (off) and unplug the heater. Give the heater time to cool down, remove the source of the overheating and use as normal. If the problem persists or if you have not been able to trace the source of the overheating, turn the heater off immediately and unplug. Contact a service point to have the heater repaired.
Cleaning and maintenance
Keep the heater clean. Deposits of dust and dirt in the appliance are a common cause of overheating so these should be removed regularly. Switch off the heater, remove the plug from the socket and allow the heater to cool down before cleaning or carrying out maintenance work.
- Wipe the outside of the heater regularly with a dry or slightly damp cloth. Do not use aggressive soaps, sprays, cleaners or abrasives, waxes, polishes or chemical solutions!
- Carefully use a vacuum cleaner to remove dust and dirt from the grills.
- The heater contains no other parts which need maintenance.
- At the end of the season, store the cleaned heater in the original packaging if possible. Store upright in a cool, dry and dust-free place.
Removal
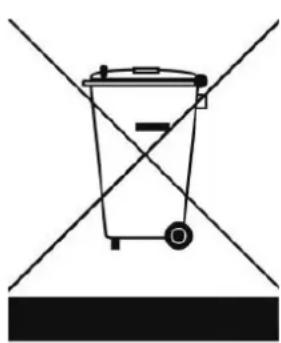
In the EU this symbol indicates that this product may not be disposed of as ordinary household waste. Old equipment contains valuable materials, suitable for recycling. These materials should be made suitable for reuse in order to prevent any adverse effects to health and the environment caused by unregulated waste collection. Therefore, please make sure that you bring old equipment to a designated collection point. Alternatively, contact the original supplier, who can make sure that as many of the components as possible can be recycled.
CE-statement
Eurom - Genemuiden-NL hereby declares that the EUROM oil filled radiator heater, type RAD500/RAD1500/RAD2000/RAD2000T, complies with the LVD guideline 2014/35/EU and the EMC guideline 2014/30/EU and meets the following standards:
EN 60335-1:2012+A11:2014 EN 55014-1:2006+A1:2009+A2:2011
EN 60335-2-30:2009+A11:2012 EN 55014-2:2015
EN 62233:2008 EN 61000-3-2:2014
RoHS 2011/65/EU&(EU)2015/863 EN 61000-3-3:2013
Genemuiden, 22-05-2019
W.J. Bakker, alg. dir.
Remerciements

- Dank
- Symbol Explanation
- Do not cover the device
- Warning electric cables
- Safety warning - general
- Warnings device position
- Warnings - use
- Who can use the device?
- Warnings for maintenance
- Description
- Installation, Location and Connection
- Do not use the heater before it has been installed in accordance with the following instructions!
- RAD 500:
- RAD 1500 en RAD 2000:
- Warning: only use the heater when it is in an upright position, with the wheels (c.q. feet) attached to the bottom (as pictured on the front of this manual). Any other position is dangerous!
- Set-up and operation
- RAD 1500 / 2000 / 2000T:
- Thermostat RAD 500
- Thermostat RAD 1500/2000/2000T):
- Turbo RAD2000T:
- Safety features
- Cleaning and maintenance
- Removal
- CE-statement
- Remerciements
Brand : Eurom
Model : RAD 2000
Category : Frying Pan