ERGB42 - Beard trimmer PANASONIC - Free user manual and instructions
Find the device manual for free ERGB42 PANASONIC in PDF.
| Technical Specifications | Panasonic ER-GB42 Beard Trimmer |
|---|---|
| Power Type | Rechargeable |
| Battery Life | 60 minutes |
| Charging Time | 8 hours |
| Cutting Length | 0.5 to 10 mm |
| Blade Width | 30 mm |
| Number of Length Settings | 19 settings |
| Weight | 150 g |
| Usage | Dry or wet use (waterproof) |
| Maintenance | Washable blades, cleaning under water |
| Safety | Overload protection, safe use |
| Included Accessories | Cleaning brush, power adapter |
| Warranty | 2 years |
Frequently Asked Questions - ERGB42 PANASONIC
User questions about ERGB42 PANASONIC
0 question about this device. Answer the ones you know or ask your own.
Ask a new question about this device
Download the instructions for your Beard trimmer in PDF format for free! Find your manual ERGB42 - PANASONIC and take your electronic device back in hand. On this page are published all the documents necessary for the use of your device. ERGB42 by PANASONIC.
USER MANUAL ERGB42 PANASONIC
Operating Instructions (Household) Rechargeable Beard/Hair Trimmer
Model No. ER-GB42

English. 3
Francais 19
Espanol. 35


Panasonic®
Operating Instructions
(Household) Rechargeable Beard/Hair Trimmer
Model No. ER-GB42
Contents
Safety precautions 4
Intended use 8
Parts identification. 9
Charging the trimmer. 9
Using the trimmer 10
Using the comb attachment. 10
Trimming beard 11
Cleaning the trimmer 13
Troubleshooting 15
Blade life. 15
Battery life. 15
Removing the built-in rechargeable battery....16
Specifications 16
Thank you for purchasing this Panasonic product.
Before operating this unit, please read these instructions completely and save them for future use.
Safety precautions
To reduce the risk of injury, loss of life, electric shock, fire, and damage to property, always observe the following safety precautions.
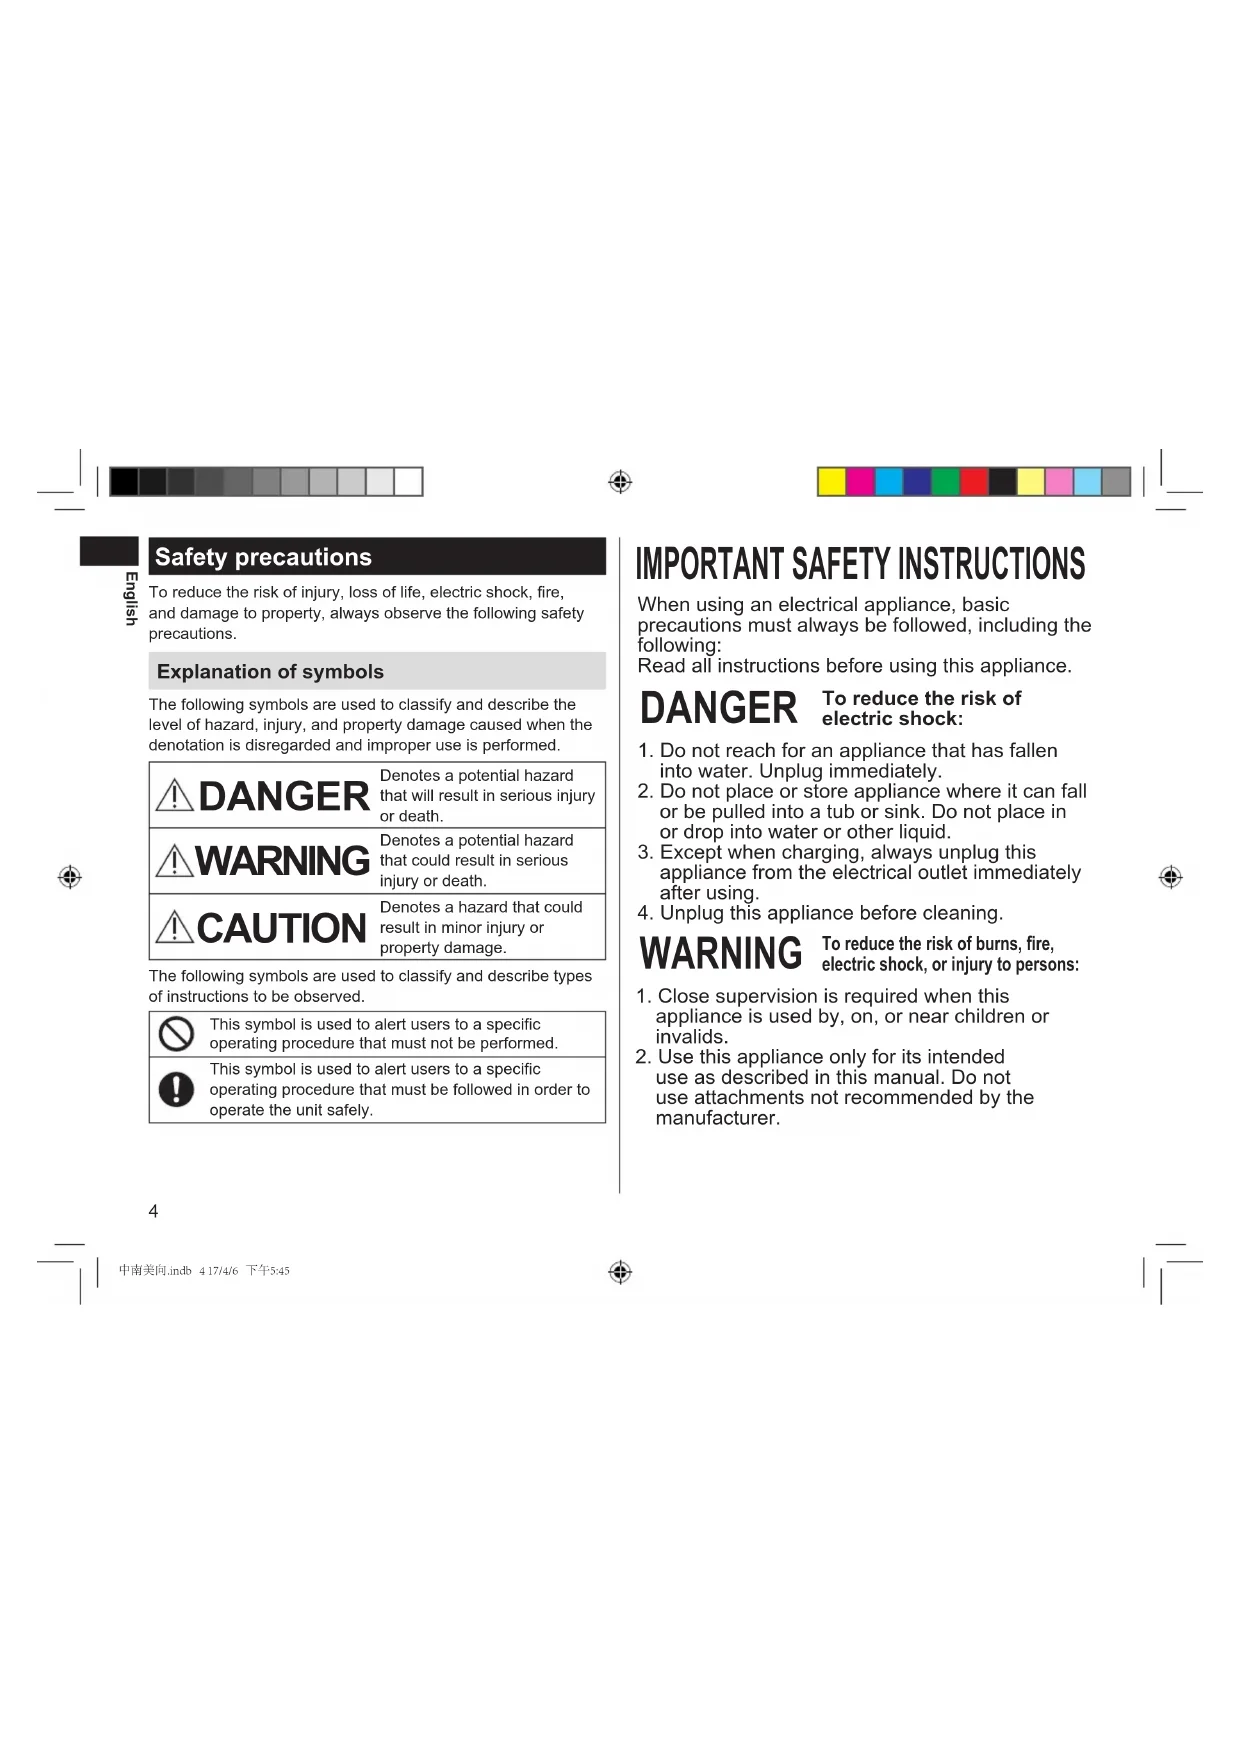
Explanation of symbols
The following symbols are used to classify and describe the level of hazard, injury, and property damage caused when the denotation is disregarded and improper use is performed.

DANGER
Denotes a potential hazard that will result in serious injury or death.

WARNING
Denotes a potential hazard that could result in serious injury or death.

CAUTION
Denotes a hazard that could result in minor injury or property damage.
The following symbols are used to classify and describe types of instructions to be observed.

This symbol is used to alert users to a specific operating procedure that must not be performed.

This symbol is used to alert users to a specific operating procedure that must be followed in order to operate the unit safely.


IMPORTANT SAFETY INSTRUCTIONS
When using an electrical appliance, basic precautions must always be followed, including the following:
Read all instructions before using this appliance.
DANGER
To reduce the risk of electric shock:
- Do not reach for an appliance that has fallen into water. Unplug immediately.
- Do not place or store appliance where it can fall or be pulled into a tub or sink. Do not place in or drop into water or other liquid.
- Except when charging, always unplug this appliance from the electrical outlet immediately after using.
- Unplug this appliance before cleaning.
WARNING
To reduce the risk of burns, fire, electric shock, or injury to persons:
- Close supervision is required when this appliance is used by, on, or near children or invalids.
- Use this appliance only for its intended use as described in this manual. Do not use attachments not recommended by the manufacturer.


- Never operate this appliance when it has a damaged plug, when it is not working properly, after it has been dropped or damaged, or after it has been dropped into water. Return the appliance to a service center for examination and repair.
- Never drop or insert any object into any opening.
- Do not use outdoors or operate where aerosol (spray) products are being used or where oxygen is being administered.
- Do not use this appliance with damaged or broken comb as it has the potential to result in facial injury.
- Always attach plug to appliance first, then to outlet. To disconnect, turn all controls to "off" then remove plug from outlet.
- Plug charger directly into receptacle - do not use an extension cord.
- Unplug charger before plugging or unplugging appliance.
SAVE THESE INSTRUCTIONS

WARNING
Power supply

Do not connect or disconnect the power plug to a household outlet with a wet hand.
- Doing so may cause electric shock or injury.

Do not immerse the AC adaptor in water or wash it with water.
Do not place the AC adaptor over or near a water-filled sink or bathtub.
Never use the appliance if the AC adaptor is damaged or if the power plug fits loosely in a household outlet.
- Doing so may cause electric shock or fire due to a short circuit.

Do not use in a way exceeding the rating of the household outlet or the wiring.
- Exceeding the rating by connecting too many plugs to one household outlet may cause fire due to overheating.

Do not use anything other than the supplied AC adaptor for this product.
Also, do not use any other product with the supplied AC adaptor. (See page 9.)
- Doing so may cause burn or fire due to short circuit.

Always ensure the appliance is operated on an electric power source matched to the rated voltage indicated on the AC adaptor.
Fully insert the power plug.
- Failure to do so may cause fire or electric shock.


WARNING

Always unplug the power plug from the household outlet when cleaning.
- Failure to do so may cause electric shock or injury.

Regularly clean the power plug and the charging plug to prevent dust from accumulating.
- Failure to do so may cause fire due to insulation failure caused by humidity.
Disconnect the power plug and wipe with a dry cloth.
In case of an abnormality or malfunction
Immediately stop using and remove the power plug if there is an abnormality or malfunction.
- Failure to do so may cause fire, electric shock, or injury.
The main unit or AC adaptor is deformed or abnormally hot. - The main unit or AC adaptor smells of burning.
- There is abnormal sound during use or charging of the main unit or AC adaptor.
- Immediately request inspection or repair at an authorized service centre.
This product

This product has a built-in rechargeable battery. Do not throw into flame or heat.
- Doing so may cause fluid leak, overheating, or explosion.

Do not modify or repair.
- Doing so may cause fire, electric shock, or injury. Contact an authorized service centre for repair (battery change, etc.).

Never disassemble except when disposing of the product.
- Doing so may cause fire, electric shock, or injury.
Preventing accidents

Do not store within the reach of children or infants. Do not let them use it.
- Putting the blade, and/or oil container in the mouth may cause accidents or injury.

If the oil is consumed accidentally, do not induce vomiting. Please drink a large amount of water, and contact a physician.
If the oil comes into contact with eyes, immediately wash thoroughly with running water, and contact a physician.
- Failure to do so may result in physical problems.

This appliance is not intended for use by persons (including children) with reduced physical, sensory or mental capabilities, or lack of experience and knowledge, unless they have been given supervision or instruction concerning use of the appliance by a person responsible for their safety. Children should be supervised to ensure that they do not play with the appliance.
- Failure to do so may cause an accident or injury.


Check that the blades are not damaged or deformed before use.
- Failure to do so may cause skin injury.
Note the following precautions
Do not allow metal objects or trash to adhere to the power plug or the charging plug.
- Doing so may cause electric shock or fire due to a short circuit.
Do not drop it or expose it to shock.
- Doing so may cause injury.
Disconnect the power plug from the household outlet when not using.
- Failure to do so may cause electric shock or fire due to electrical leakage resulting from insulation deterioration.
Handling of the removed battery when disposing

DANGER
The rechargeable battery is exclusively for use with this trimmer. Do not use the battery with other products.
Do not charge the battery after it has been removed from the product.
- Do not throw into fire or apply heat.
- Do not solder, disassemble, or modify the battery.
- Do not let the positive and negative terminals of the battery get in contact with each other through metallic objects.
- Do not carry or store the battery together with metallic jewellery such as necklaces and hairpins.
- Never peel off the tube.
- Doing so may cause fluid leak, overheating, or explosion.


WARNING
After removing the rechargeable battery, do not keep it within reach of children and infants.
- The battery will harm the body if accidentally swallowed. If this happens, consult a physician immediately.
If the battery fluid leaks out, do not touch the battery with your bare hands.
- The battery fluid may cause blindness if it comes in contact with your eyes.
Do not rub your eyes. Wash immediately with clean water and consult a physician.
- The battery fluid may cause inflammation or injury if it comes in contact with the skin or clothes.
Wash it off thoroughly with clean water and consult a physician.

Intended use
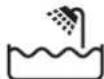
- This WET/DRY trimmer can be used for wet trimming or for dry trimming. You can use this watertight trimmer in a shower and clean with water. The following symbol means that it is suitable for use in a bath or shower.
- Be sure to mount the attachment after each use. Otherwise, infants may remove the blade and accidentally swallow it, or the blade may be deformed.
Before and after each use, apply oil at the places marked with arrows. (See page 14.) - The trimmer may become warm during operation and/or charging. This is normal.
- Clean the housing only with a soft cloth slightly dampened with tap water or soapy tap water. Do not use thinner, benzine, alcohol or other chemicals.
- Before using an attachment, check that it has been installed correctly. Failure to do so may cause hair to be cut too short.
- Store the trimmer in a place with low humidity after use.
The appliance should not be used on animals.


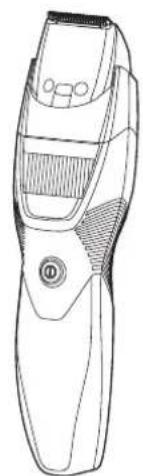
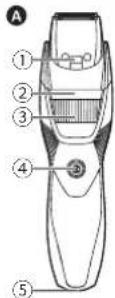
Parts identification
B
D

C


A Main body
① Water inlet
② Trimming height indicator
③ Dial (Height adjustment control)
④ Power switch
⑤ Appliance socket
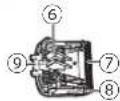
Blade
⑥ Cleaning lever
⑦ Movingblade
(8) Stationary blade
⑨ Mounting hook
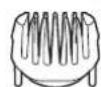
Comb attachment for beard (1 mm (1/32") to 10 mm (13/32"))
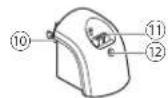
AC adaptor (RE9-93)
10 Power plug
①Charging plug
Charge indicator lamp
Accessories
Cleaning brush
Oil
Charging the trimmer
Make sure that the trimmer is turned off.
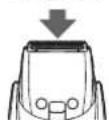
1 Place the trimmer on the AC adaptor.
- Plug the trimmer into the AC adaptor until it clicks into place.
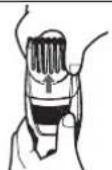
- Remove the trimmer with one hand while pressing the AC adaptor with the other hand.
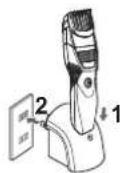
2 Insert the power plug into a household outlet.
The charging time differs depending on the rated voltage. (See page 16.)
- Check that the charge indicator lamp glows.
3 Disconnect the plug after charging is completed. (for safety and to reduce energy usage)
The charge indicator lamp continues to glow after charging is complete. There is no indication to show that "charging is complete".
Notes
To keep charging the battery will not affect battery performance.
- If there is noise from the radio or other sources while using or charging the product, move to a different location to use the product.
- When the appliance is not used for 6 months or more, the battery will weaken (leak battery fluid, etc.). Fully charge the battery once every 6 months.

- You can charge the battery before it is completely discharged. However, it is recommended to charge when the battery is completely discharged. The battery life depends strongly on factors such as how it is used and stored.
Recommended ambient temperature for charging is 0 - 35^ (32 - 95 F). Battery performance may decrease under extremely low or high temperatures. - A full charge supplies enough power for approximately 50 minutes of use. (Based on dry using at 20 - 30^ (68 - 86^) .) The operating time may differ depending on the frequency of use and the operating method.
- When charging the trimmer for the first time or when it has not been in use for more than 6 months, the operating time may shorten. Please charge it for more than 30 hours in such cases.
- The charge indicator lamp glows and stays on until the plug is disconnected from a household outlet.
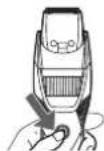
Using the trimmer
Make sure that the trimmer is turned off.
- The appliance may not operate in an ambient temperature lower than approximately 0^ (32^) .
1 Mount the desired comb attachment and adjust the trimming height as needed. (See this page.)
It can also be used without the comb attachment. (Trimming height: approx. 0.5mm (1 / 64^ )
Actual hair length will be a little longer than the height you set.

2 Press the power switch to turn on the power.
Using the comb attachment
Make sure that the trimmer is turned off.
- Be careful not to cut your hand with the blade when attaching or removing the comb attachment.
1 Turn the dial to the "1" position.
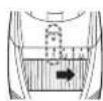
2 Mount the comb attachment to the main body until it clicks.
| Trimming height (estimate) | Comb attachment |
| 1 mm (1/32") to 10 mm (13/32") | Comb attachment for beard |


3 Turn the dial to move the comb attachment to the desired trimming length (between 1 mm and 10 mm).
| Indicator | 1 | 1.5 | 2 | 2.5 | 3 | 3.5 | 4 | 4.5 | 5 | 5.5 | |||||
| Trimming length (estimate) | mm | 1 | 1.5 | 2 | 2.5 | 5 | 3 | 3.5 | 4 | 4.5 | 5 | 5.5 | |||
| inch | 1/32 | 1/16 | 5/64 | 3/32 | 1/8 | 9 | 64 | 5/32 | 11/64 | 3/16 | 7/32 |
| Indicator | 6 6.5 | 7 7.5 | 8 8.5 | 9 9.5 | 10 | ||||
| Trimming length (estimate) | mm | 6 6.5 | 7 7.5 | 8 8.5 | 9 9.5 | 10 | |||
| inch | 15/64 | 1/4 | 9/32 | 19/64 | 5/16 | 11/32 | 23/64 | 3/8 |
Actual hair length will be a little longer than the height you set.
Removing the comb attachment Remove the comb attachment from the main body.
2 Mount the attachment and adjust the dial. (See page 10.)
Press the power switch to turn on the trimmer.
4 Holding the trimmer with the power switch facing up, trim by bringing the blade in contact with the skin and moving the trimmer against the flow of the beard.
- Hair trimmings may collect inside the attachment when a large volume of beard is cut, so discard hair trimmings after each use.
Trimming without the comb attachment
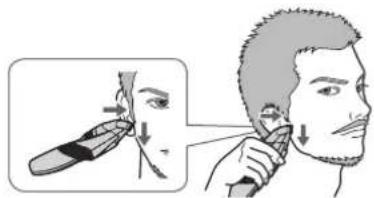
Beard shaping
Above and below lips Holding the trimmer with the power switch facing down, cut across a line with the blade at a 90^ angle to the skin.

Trimming beard
Dry trimming
Trimming with the comb attachment
Do not use with shaving creams applied or when the beard is wet.
Press the power switch to turn off the trimmer.


4s16u3
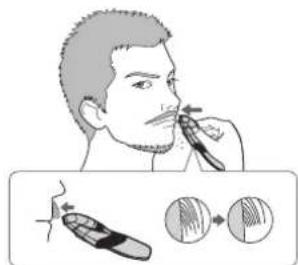
Ends of moustache
Holding the trimmer with the power switch facing outside, trim gradually from the ends by bringing the blade in contact with the skin.
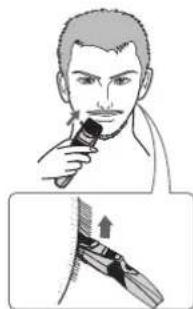
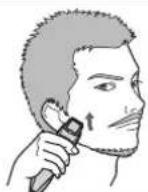
Beard
Holding the trimmer with the power switch facing outside, trim by bringing the blade in contact with the skin and cutting along a line while moving the trimmer forward.
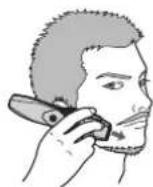
Sideburns
Holding the trimmer with the power switch facing down, trim by moving the trimmer downward with the blade at a 90^ angle to the sideburns.
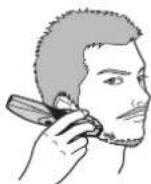
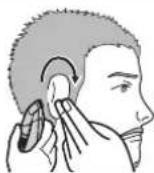
Shaping the hair around your ears Trim the hair around your ears by hol the main body sideways.
Trimming the downy hair Holding the trimmer with the power switch facing outside, trim by bringing the blade in contact with the skin.
- Trimming your beard or moustache without an attachment will trim hair length to approx. 0.5mm (1/64").
Wet trimming
Trimming without the comb attachment Cut your beard or downy hair with water or facial cleanser on your face. Wet trimming will decrease the friction, allowing a smooth touch. Wet trimming is recommended to trim a fuller beard to a length of 0.5mm (1 / 64^ ) without an attachment.
1 Remove the comb attachment.
2 Apply water, soap, etc. to your face.


Press the power switch to turn on the trimmer.


Cut your beard slowly, moving upward from the bottom with the power switch facing outside.

Notes
- Do not use any shaving creams as these may cause a decrease in cutting performance due to scoring of the blades.
- Make sure to rinse the main body with water and apply the oil to the blades after wet trimming.
Cleaning the trimmer
It is recommended to clean after each use.
1. Remove the trimmer from the AC adaptor.
To remove light dirt To remove heavy dirt
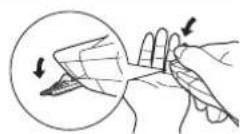
- Remove the comb attachment and turn the trimmer on.
- Run water down the water inlet at the front of the main body, rinse thoroughly for approximately 20 seconds, and then turn the trimmer off.
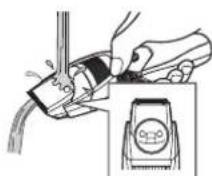
- Rinse with water and shake up and down several times to remove the water.
- Be careful not to hit the main body on the sink or any other object while draining the water. Failure to do so may cause malfunction.
4516b3
- Wipe off the water with a towel and let it dry naturally.
- It will dry faster with the blade removed.
- Apply the oil to the blade after drying.
- Attach the comb attachment and blade to the trimmer.

Cleaning with a brush
- Remove the trimmer from the AC adaptor. -Make sure that the trimmer is turned off.
- Remove the comb attachment and blade.
- Brush off any hair trimmings from the main body and from around the blade.
- Brush any hair trimmings out from between the stationary blade and the moving blade while pressing down the cleaning lever to raise the moving blade.
- Apply the oil to the blade
- Attach the comb attachment and blade to the trimmer.
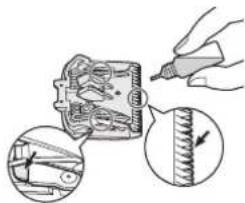
Lubrication
Apply the oil to the trimmer before and after each use.
Apply a drop of oil to each point indicated by the arrows.
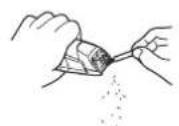
Removing the blade
Hold the main body, place your thumb against the blades, and then push them away from the main body.
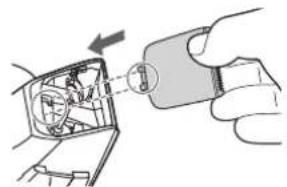
Remounting the blade
Fit the mounting hook into the blade mounting on the trimmer, and then push in until you hear a click.

Troubleshooting
Problem Action
The trimmer has become blunt.
The operating time is short.
The trimmer stopped working.
The trimmer cannot be charged.
Until problems are solved, please follow each procedure as follows:
1. Charge the trimmer (See page 9.)
2. Clean the blade and apply oil. (See pages 13 and 14.)
3. Replace the blade. (See page 14.)
4. Have the battery replaced by an authorized service centre.
Charge the battery for approximately 30 hours continuously to rejuvenate it. If few uses remain even after
charging, the battery has reached the end of its life. (Fluid may be leaking due to degradation at the end of battery life.) Contact an authorized service center for repair.
Push the main body into the charge plug all the way and make sure the charge indicator lamp glows.
Charge within the recommended charging temperature of 0^ (32^) to 35^ (95^) .
Problem Action
The trimmer cannot be properly cleaned even after water is poured from the water inlet.
The trimmer makes a loud sound.
When the trimmer is very dirty, remove the blade and wash with water. (See page 13.)
Apply oil. (See page 14.)
Confirm that the blade is properly attached.
If the problems still cannot be solved, contact the store where you purchased the unit or a service centre authorized by Panasonic for repair.
Blade life
Blade life varies according to the frequency and period of use of the trimmer.
For example, the blade life is approximately 3 years when using the trimmer for 5 minutes 10 times a month. Replace the blades if cutting efficiency reduces substantially despite proper maintenance.
Battery life
Battery life will vary according to the frequency and length of use. If the battery is charged once a month, the service life will be approximately 3 years.
If the operating time is significantly shorter even after a full charge, the battery has reached the end of its life.


usb
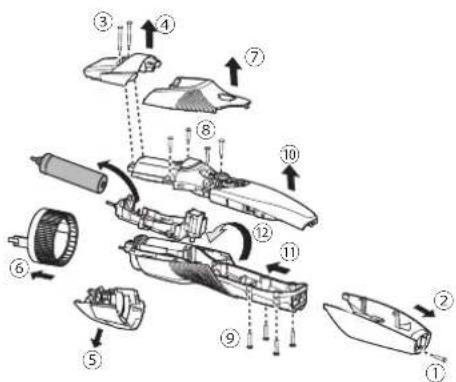
Removing the built-in rechargeable battery
ATTENTION:
A nickel metal hydride battery that is recyclable powers the product you have purchased. Please call 1-800-8-BATTERY for information on how to recycle this battery.

Remove the built-in rechargeable battery before disposing of the trimmer.
Please make sure that the battery is disposed of at an officially designated location if there is one.
This figure must only be used when disposing of the trimmer, and must not be used to repair it. If you dismantle the trimmer yourself, it will no longer be waterproof, which may cause it to malfunction.
- Remove the trimmer from the AC adaptor.
- Press the power switch to turn on the power and then keep the power on until the battery is completely discharged.
- Perform Steps ① to ⑫ , and then lift the battery to remove it.
Take care not to short-circuit the positive and negative terminals of the removed battery, and insulate the terminals by applying tape to them.

Specifications
| Power source See | the name plate on the AC adaptor. | |
| Motor voltage 1.2 V | --- | |
| Charging time RE9 | -93 | 120 V~ Approx. 15 hours |
| 110 V~ Approx. 20 hours | ||
This product is intended for household use only.


Federal Communication Commission Interference Statement
This equipment has been tested and found to comply with the limits for a Class B digital device, pursuant to Part 15 of the FCC Rules. These limits are designed to provide reasonable protection against harmful interference in a residential installation. This equipment generates, uses and can radiate radio frequency energy and, if not installed and used in accordance with the instructions, may cause harmful interference to radio communications. However, there is no guarantee that interference will not occur in a particular installation. If this equipment does cause harmful interference to radio or television reception, which can be determined by turning the equipment off and on, the user is encouraged to try to correct the interference by one of the following measures:
- Reorient or relocate the receiving antenna.
- Increase the separation between the equipment and receiver.
- Connect the equipment into an outlet on a circuit different from that to which the receiver is connected.
- Consult the dealer or an experienced radio/TV technician for help.
FCC Caution: To assure continued compliance, install and use in accordance with provided instructions. Any changes or modifications not expressly approved by the party responsible for compliance could void the user's authority to operate this equipment.
This device complies with part 15 of the FCC Rules. Operation is subject to the following two conditions: (1) This device may not cause harmful interference, and (2) this device must accept any interference received, including interference that may cause undesired operation.
Personal Care & Beauty Care Products
FOR USA ONLY
30-Day Quality Satisfaction Guarantee
If you are dissatisfied with any Panasonic Personal Care & Beauty Care Products for any reason, simply return it to the place of purchase with a dated proof of purchase, in the original packaging, with all accessories, parts and instructions, within 30 days of the date of purchase, for a full refund, or call Panasonic at 1-800-338-0552. Abuse or misapplication of this product voids the guarantee.
FOR YOUR CONVENIENCE, WE HAVE ESTABLISHED A TOLL-FREE (IN USA ONLY) NATIONAL ACCESSORY PURCHASE HOT LINE AT 1-800-332-5368.


Panasonic
Panasonic Corporation of North America
Two Riverfront Plaza, Newark, NJ 07102-5490
IN CANADA CONTACT:
AU CANADA, COMMUNIQUEZ AVEC:
Panasonic Canada Inc.
5770 Ambler Drive, Mississauga, Ontario L4W 2T3
www.panasonic.com
EN MÉXICO CONTACTE CON:
Panasonic de Mexico S.A. de C.V.
Felix Cuevas No. 6 Piso 2 y 3
Col. Tlacoquemecati Del Valle
Del. Benito Juarez
Mexico, D.F. C.P.03200
01(55)5488-1000
EN PANAMA CONTACTE CON:
Panasonic Latin America. S.A.
P.O.Box 0816-03164
Panama, Republica de Panama
(507)229-2955
Service · Assistance · Accessories
Dépannage · Assistance · Accessoires
Call 1-800-338-0552 (In USA)
http://shop.panasonic.com/personal-care
http://shop.panasonic.com/support
www.panasonic.ca/english/support (In Canada)
www.panasonic.ca/french/support (Au Canada)
http://www.panasonic.com
© Panasonic Corporation 2017
EN, CA, ES
Printed in China
Imprimé en Chine
Impreso en China
ER9700GB421551 S0517-0