Patio Chef - Barbecue Patton - Free user manual and instructions
Find the device manual for free Patio Chef Patton in PDF.
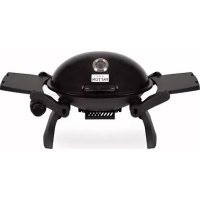
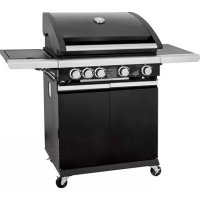
| Technical Features | Gas barbecue with multiple burners, cooking surface made of enameled steel, total power of XX kW. |
|---|---|
| Dimensions | Total dimensions: XX cm x XX cm x XX cm, cooking surface: XX cm x XX cm. |
| Usage | Ideal for cooking meats, vegetables, and fish, with options for direct and indirect cooking. |
| Maintenance | Regular cleaning of grates and burners, checking gas hoses for leaks. |
| Safety | Use only outdoors, keep away from flammable materials, check gas connections before use. |
| General Information | XX years warranty, included accessories: barbecue utensils, lid, built-in thermometer. |
Frequently Asked Questions - Patio Chef Patton
User questions about Patio Chef Patton
0 question about this device. Answer the ones you know or ask your own.
Ask a new question about this device
Download the instructions for your Barbecue in PDF format for free! Find your manual Patio Chef - Patton and take your electronic device back in hand. On this page are published all the documents necessary for the use of your device. Patio Chef by Patton.
USER MANUAL Patio Chef Patton
OPERATING AND ASSEMBLY INSTRUCTIONS
BBQ Patio Chef series
PATTON B.V.
Postbus 2044 NL 5300 CA Zaltbommel Holland
Website: www.patton.eu
★★★ PATTON
GB,IE Operating instructions-33
WAT INDIEN UW BBQ NIET FUNCTIONERT
1. Technical data for the Patio Chef series
| Product name | Patio Chef 2+-burner | CE 0063-14 | ||||
| Model Number | 54GCPR201 | |||||
| Product Identification Number | 0063CN7292 | |||||
| Total heat input: Qn | 8.4 kW (610 g/h) | |||||
| Gas Category | I3+(28-30/37) | I3B/P(30) | I3B/P(50) | I3B/P(37) | ||
| Type of gas | Butane Propane | Butane/Propane | Butane/Propane Butane/Propane | |||
| Gas Pressure | 28 - 30 mbar 37 | mbar | 30 mbar 50 mbar | 37 mbar | ||
| Injector size | 0.86 mm | 0.86 mm | 0.76 mm 0.82 mm | |||
| Injector size Sideburner | 0.75 mm | 0.75 mm | 0.65 mm 0.65 mm | |||
| Country Destination | BE, CH, CY, CZ, ES, FR, GB, GR, IE, IT, LT, LU, LV, PT, SK, and SI. | BE, CY, DK, EE, FI, HU, LT, NL, NO, SE, SI, SK, RO, HR,TR, BG,LU and MT. | AT, CH, DE and SK | PL | ||
| Product name | Patio Chef 3+-burner | CE 0063-14 | ||||
| Model Number | 54GCPR511 | |||||
| Product Identification Number | 0063CN7292 | |||||
| Total heat input: Qn | 11.4 kW (829 g/h) | |||||
| Gas Category | I3+(28-30/37) | I3B/P(30) | I3B/P(50) | I3B/P(37) | ||
| Type of gas | Butane Propane | Butane/Propane | Butane/Propane Butane/Propane | |||
| Gas Pressure | 28 - 30 mbar 37 | mbar | 30 mbar 50 mbar | 37 mbar | ||
| Injector size | 0.86 mm | 0.86 mm | 0.76 mm 0.82 mm | |||
| Injector size Sideburner | 0.75 mm | 0.75 mm | 0.65 mm 0.65 mm | |||
| Country Destination | BE, CH, CY, CZ, ES, FR, GB, GR, IE, IT, LT, LU, LV, PT, SK, and SI. | BE, CY, DK, EE, FI, HU, LT, NL, NO, SE, SI, SK, RO, HR,TR, BG,LU and MT. | AT, CH, DE and SK | PL | ||
| Only to be used outdoors. |
| Read the instructions before using the appliance. |
| Accessible parts maybe very hot, keep young children away. |
| Do not move the appliance during use. |
| Turn off the gas supply at the gas cylinder after use. |
| Any modification of the appliance may be dangerous. |
| Parts sealed by the manufacturer or his agent must not be altered by the user. |
| Do not modify the appliance |
- THE TECHNICAL SPECIFICATION OF THE UNIT IS SHOWN ON ON THE SILVER LABEL.
- THE UNIT USES FLUIDAL PROPANE/BUTANE. DO NOT USE HOSES AND CONNECTIONS FOR EARTH GAS, UNLESS THE GRILL IS ADAPTED FOR THIS KIND OF GASES.
FOR THE USE OF THE GRILL A LPG GAS BOTTLE FILLED WITH PROpane OR BUTANE GAS AND EQUIPPED WITH A PRESSURE REGULATOR, ACCORDING TO ACTUALLY LEGISLATION- HAS TO BE USED.
DO NOT PERMIT, THAT CHILDREN OPERATE THE EQUIPMENT. - ACCESSIBLE PARTS MAYBE VERY HOT, KEEP YOUNG CHILDREN AWAY.
ANY MODIFICATION OF THE APPLIANCE MAY BE DANGEROUS.
DO NOT CHANGE THE PRESSURE REGULATOR OR THE GAS OUTFLOW.
DO NOT MOVE THE APPLIANCE DURING USE. - CHECK THE HOSE BEFORE EACH USE, SEARCHING FOR CRACKING, CUTS OR ANY ABRASIONS.
DO NOT LIGHT THE FLAME, IF A GAS SMELL CAN BE RECOGNIZED.
DO NOT USE PARTS SWITCHED OFF BY THE PRODUCER.
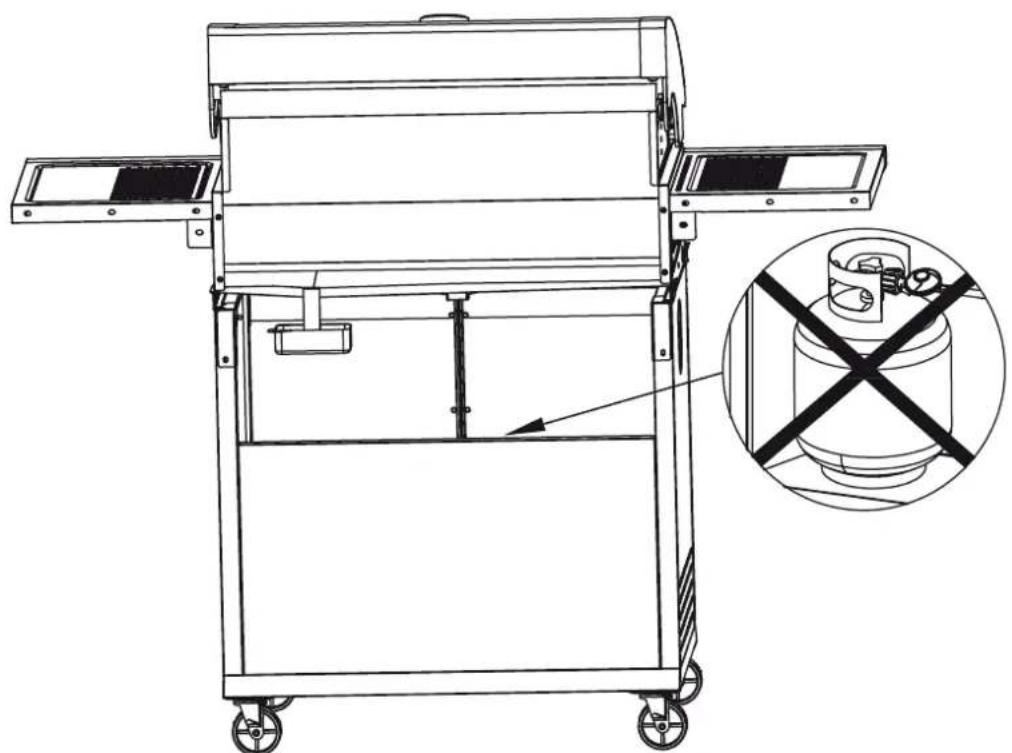
DO NOT PLACE THE GAS BOTTLE UNDER THE APPLIANCE OR ON THE GRILL PLATE
DO NOT STORE Filled OR EMPTY SPARE BOTTLES UNDER THE GRILL OR CLOSE TO THE GRILL.
DOES NOT STORE CLOSE TO TE GRILL ANY GASOLINE OR VAPORIZING BURNING SUBSTANCES. - THE GAS HOSE AND ELECTRICAL CABLE HAS TO BE STORED AWAY FROM HOT SURFACES.
- AVOID THAT THE GAS HOSE WILL BE TWISTED OR KINKED.
- CHANGE THE HOSE IF DAMAGED OR REQUIRED BY THE NATIONAL RULES.
DO NOT LIGHT THE FLAME IF THE LID IS CLOSED. - THE FLAMES SHOULD BE BLUE AND STABLE, WITHOUT YELLOW COLOR NEAR THE ENDS.
DO NO SUPPORT AGAINST THE SURFACE OF THE GRILL PANEL OR THE GRILL GRID, WHEN LIGHTING THE GRILL. - USE ONLY GRILL ACCESSORIES AND ATTACHMENT IN GOOD CONDITION.
DO NOT COVER USING ALU-FOIL OR OTHER MATERIAL THE FLAME DISTRIBUTOR/ THE GRILL GRID/ THE GRILL PANEL OR THE GRILL BASE, BECAUSE THIS CAN DISTURB THE AIR FLOW AND OVERHEATING THE BURNERS AREA.
BEFORE USING, REMOVE ALL THE PACKING ELEMENTS AND ALL FIXING TAPES FROM THE GRILL AND BURNERS. - FAT IS A COMBUSTIBLE SUBSTANCE, WAIT FOR COOLING THE FAT, BEFORE FAT REMOving. DO NOT ALLOW TO ACCUMULATE THE FAT IN THE FAT CONTAINER. THE FAT CONTAINER HAS TO BE CLEANED I REGULAR TIME INTERVALS (AFTER EACH 4-5 USAGES). BEFORE YOU USE ANY CLEANING SPRAY, AROUND THE GRILL, SWITCH OFF ALL PUSH BUTTONS AND BE SURE, THE GRILL IS COOLED DOWN. THE CHEMICAL SUBSTANCES IN SPRAY DOSES CAN CAUSE A FIRE OR CORROSION.
- NEVER USE ACCESSORIES/ PARTS FROM FOREIGN PRODUCERS, IF NOT DISTINCTLY STATED. IN SUCH CASES YOUR WARRANTY WILL NOT BE VALID.
- AFTER EVERY USE THE HAND WHEEL OR THE GAS BOTTLE SHOULD BE TURNED ON (CLOSED).
SAFETY
- Never use the grill without pressure regulator installed.
If a pressure regulator was delivered, that is not proper for the given fuel type, to obtain the proper pressure regulator - please contact your local gas distributor.
The on the underneath drawing given - pressure values serve as indications only
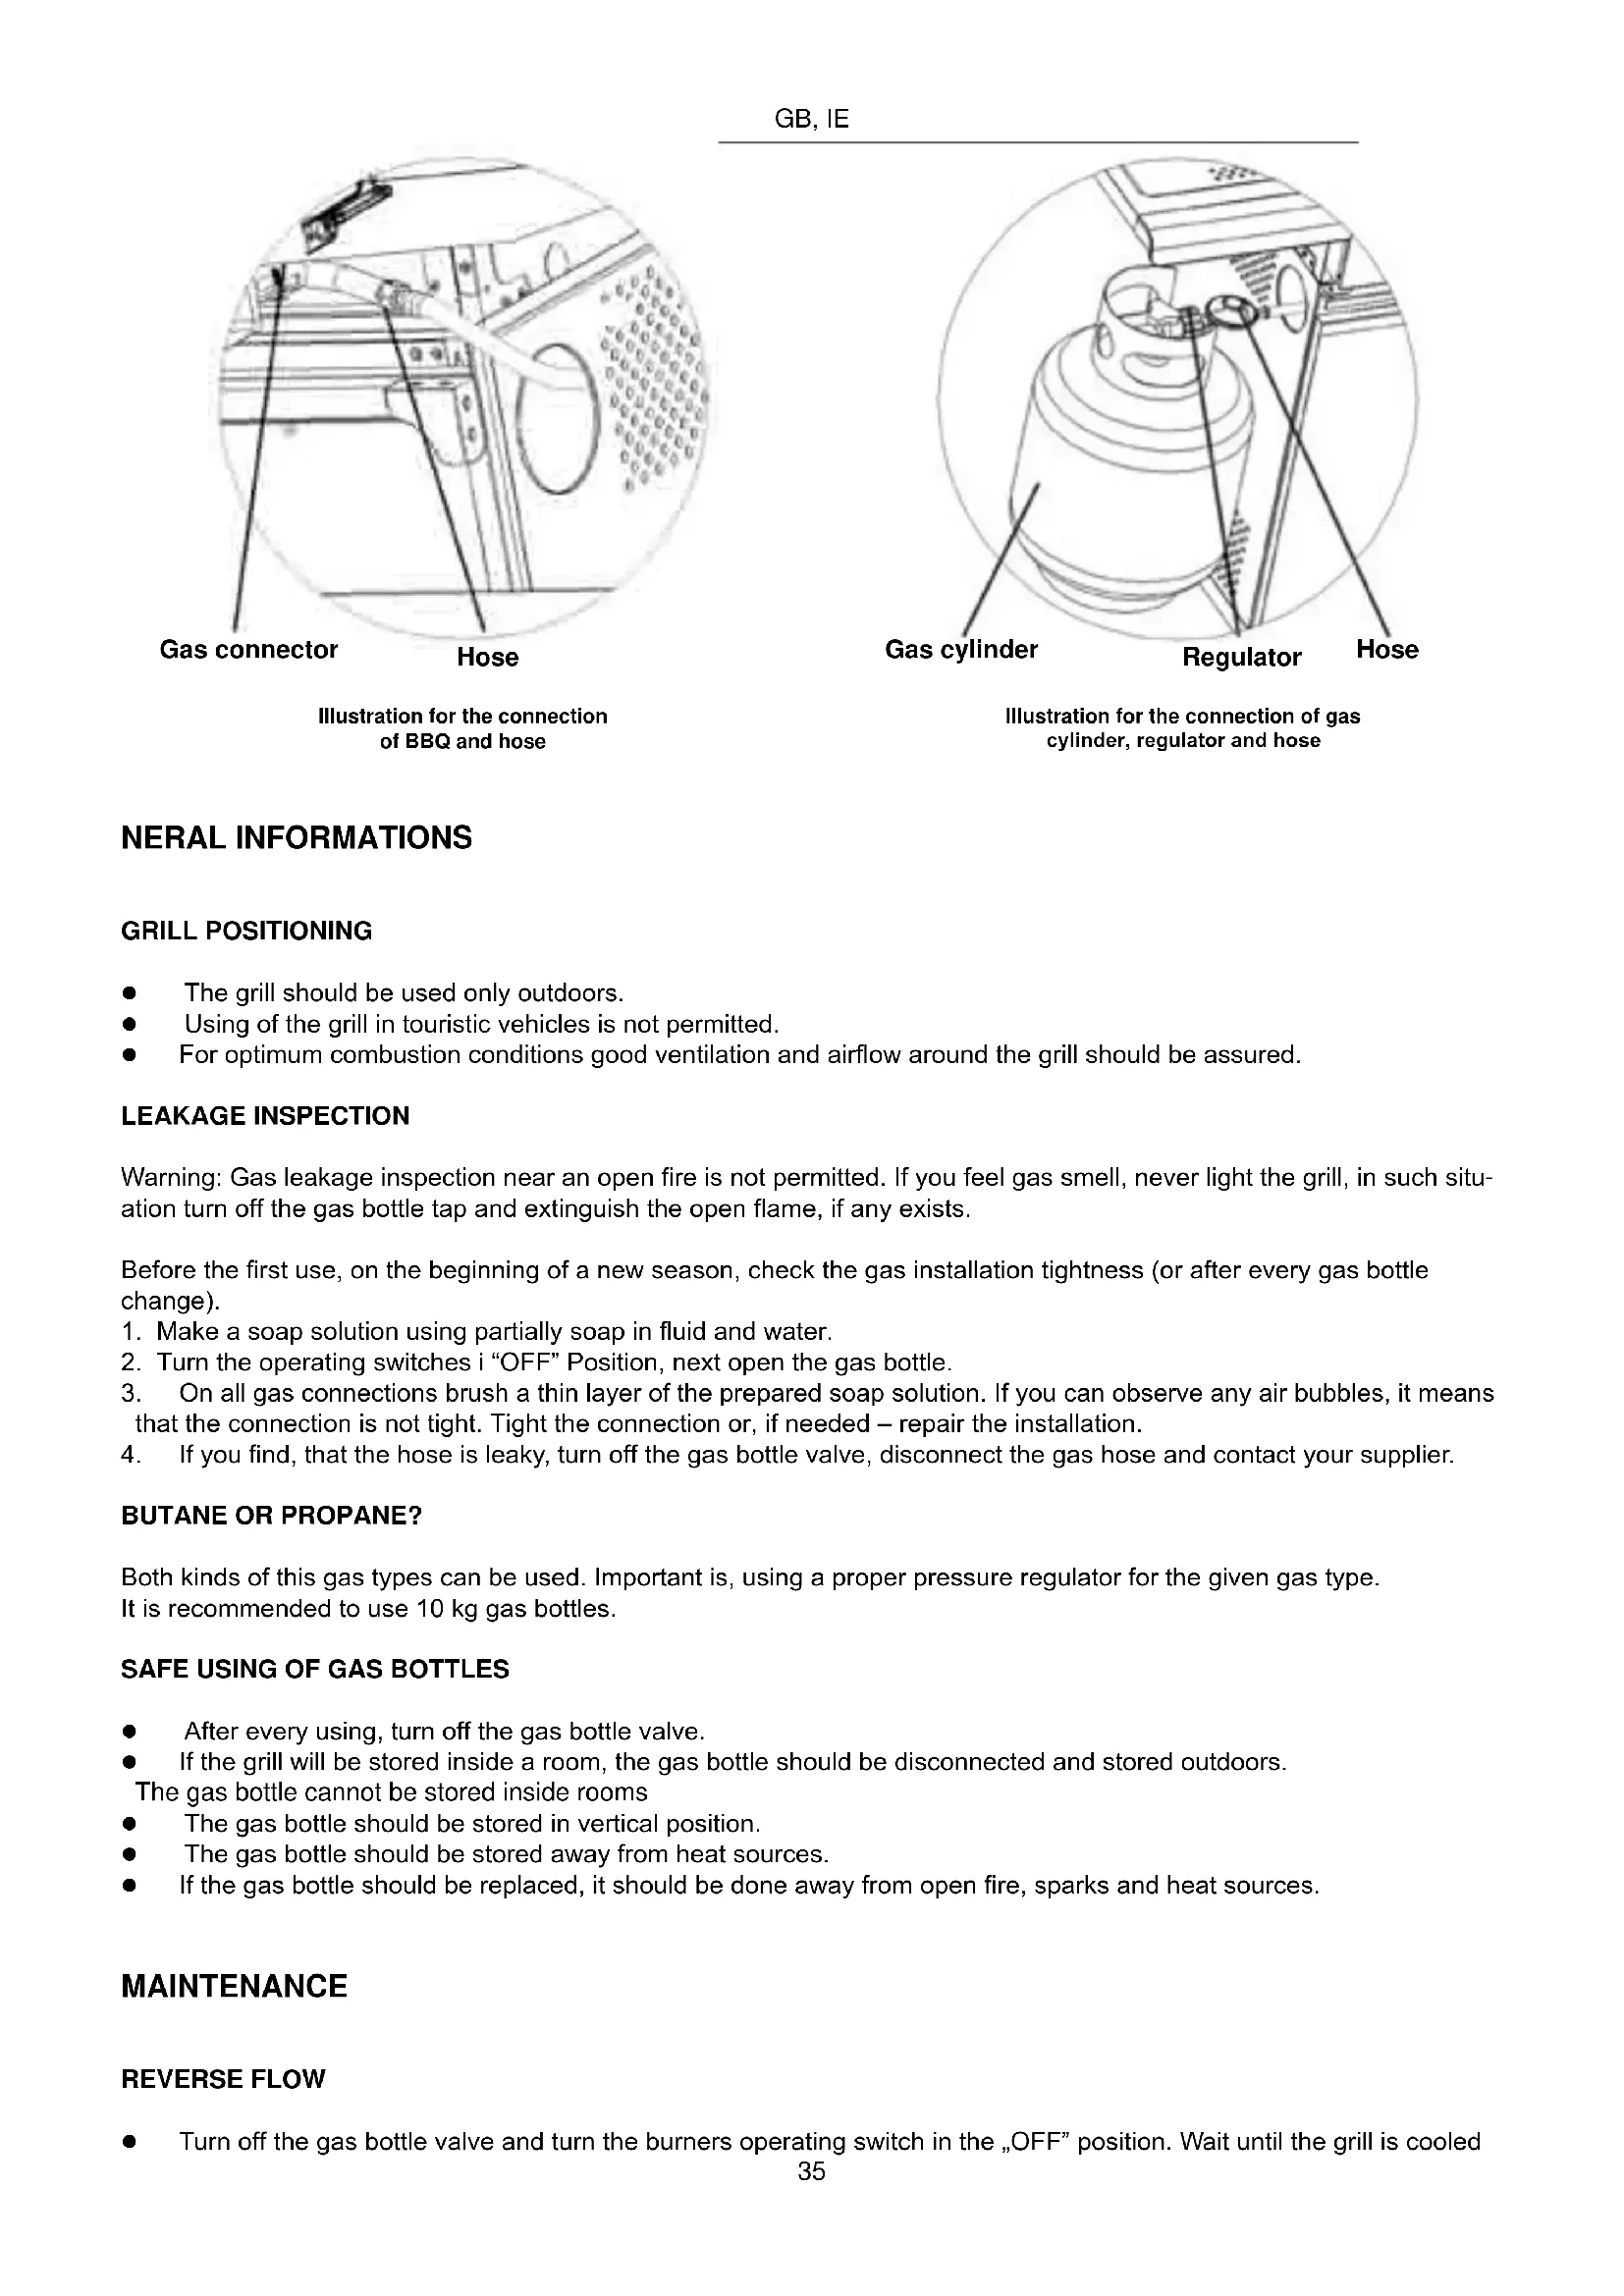
INSTALLATION OF THE PRESSURE REGULATOR AND GAS HOSE
The pressure regulator (pressure reductor) and the gas hose should be suitable for liquid gas- Liquid Petrol Gas (LPG).
The pressure regulator and gas hose should withstand the above named pressure.
The gas hose can not be longer then 1,5m
A flexible gas hose should be connected to the adapter.
- Use a proper hose clamp to connect the hose to the the grill adapter and the pressure regulator hose.
Install the complete assembly, turn on the gas and check the tightness of the hose. See Leakage Inspection. Ensure, that the procedure will be done in a good ventilated room and in safe distances from open fire, sparks and heat sources.
- Never use damaged or rusty LPG gas bottles.
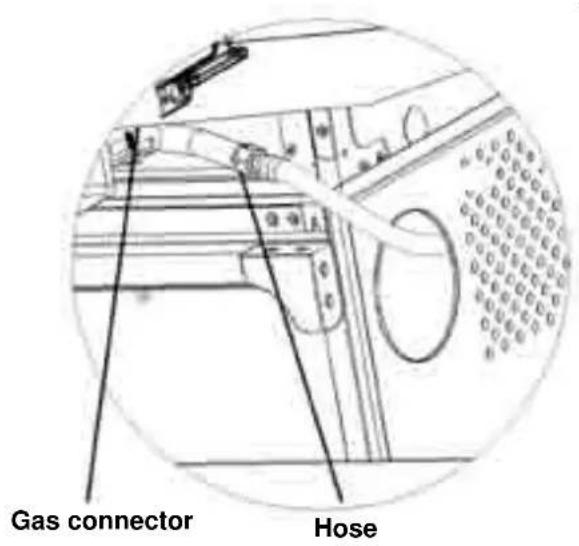
Illustration for the connection of BBQ and hose
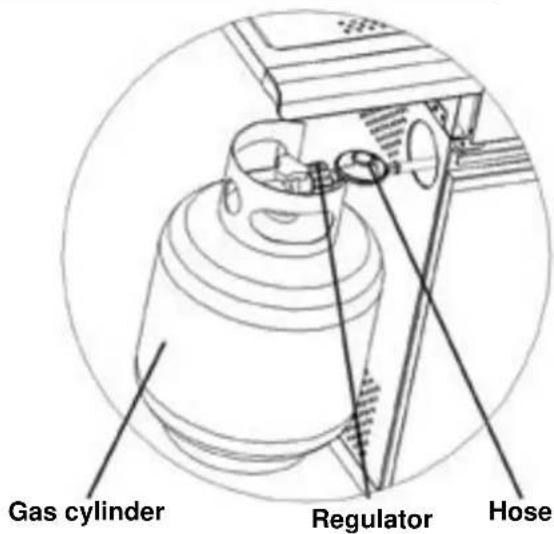
Illustration for the connection of gas cylinder, regulator and hose
NERALINFORMATIONS
GRILL POSITIONING
The grill should be used only outdoors.
Using of the grill in touristic vehicles is not permitted.
For optimum combustion conditions good ventilation and airflow around the grill should be assured.
LEAKAGE INSPECTION
Warning: Gas leakage inspection near an open fire is not permitted. If you feel gas smell, never light the grill, in such situation turn off the gas bottle tap and extinguish the open flame, if any exists.
Before the first use, on the beginning of a new season, check the gas installation tightness (or after every gas bottle change).
- Make a soap solution using partially soap in fluid and water.
- Turn the operating switches i "OFF" Position, next open the gas bottle.
- On all gas connections brush a thin layer of the prepared soap solution. If you can observe any air bubbles, it means that the connection is not tight. Tight the connection or, if needed - repair the installation.
- If you find, that the hose is leaky, turn off the gas bottle valve, disconnect the gas hose and contact your supplier.
BUTANE OR PROPANE?
Both kinds of this gas types can be used. Important is, using a proper pressure regulator for the given gas type. It is recommended to use 10kg gas bottles.
SAFE USING OF GAS BOTTLES
After every using, turn off the gas bottle valve.
If the grill will be stored inside a room, the gas bottle should be disconnected and stored outdoors.
The gas bottle cannot be stored inside rooms
The gas bottle should be stored in vertical position.
The gas bottle should be stored away from heat sources.
If the gas bottle should be replaced, it should be done away from open fire, sparks and heat sources.
MAINTENANCE
REVERSE FLOW
- Turn off the gas bottle valve and turn the burners operating switch in the „OFF" position. Wait until the grill is cooled
down and then clean the burners and gas inlet.
CLEANING OF THE GRIDS, GRILL PLATES/ HOTPLATES
- Turn off the grill valve.
- Wait until the grids, grill pates/ hotplates are cooled down. Clean using a plastic sponge and water. The cleaning is more efficient, if the cleaned elements will be placed overnight in a container with worm water and a small amount of Bio-tex or soda. All elements before placed is the right places should be before good drayed.
CLEANING OF THE FLAME DISTRIBUTOR
- The flame distributor should be cleaned in regular Intervals, using hot water with a clearing agent or soda. If needed to remove burned food deposits, some steel wool should be used. After cleaning, the flame distributor should be drayed and placed in his place.
CLEANING OF THE DRAIN CONTAINER
- Let the container cooling down, before empting it and clean with warm water using a burst and a mild cleaning agent (soda). The parts should be flushed and dried. If an Alu-foil layer will be placed in the container, fat and deposits removing will be much easier.
YEARLY CLEANING OF YOUR GRILL
The grill will be always ready for use, if the grids and the grill plate/ hotplate will be systematically cleaned after every use, the best will be- using a copper burst. Yearly the complete grill should be cleaned accurately and completely.
INSIDE
- Turn the burner operating switch to the "OFF" position, close the gas bottle valve and disconnect the hose/ gas pressure reducer from the grill.
- Remove the grill plate/ hotplate, grids, flame distributor and the burners. The gas outlet orifices close with aluminium foil. Burst the inside and the internal side of the grill using soft/ copper burst. Clean the grill plate/ hotplate, grids and the flame distributor using a plastic sponge and water. The cleaning is more efficient, if the cleaned elements will be placed overnight in a container with warm water and a small amount of Bio-tex or soda. All elements before placed is the right places should be before good drayed.
- The drain container should be cleaned with warm water using a burst and a mild clearing agent (soda). The parts should be flushed and drayed. Complement the missing lacquer. The email can be hardened using hot resistant lacquer. Grease the grill plate, grids and the inner part with a small layer of oil.
- Remove the Alu-foil from the orifices and check, if the orifices are not clogged. If the orifices are clogged, they should be opened using normal office clips. Never use wooden sticks because they can break and the orifice will be still clogged.
Install the burners and remaining parts on his right places. - Check lighting system, if needed- adjust the burners.
- Connect the hose and check lighting the burner.
- For the winter-time, wrap the grid and the flame distributor using news papers and store in dry place. When you want to use the grill again, first switch on the appliance with the lid closed, only two burners should be lighted with adjusting knobs in his middle positions, for about 10 minutes. The purpose is - burning out the protective oil.
- In autumn and winter months, the best store method will be- to store the grill indoors but without any covering. If impossible, the grill should be stored in a protected place in the garden and covered. The cover should be removed from time to time in the winter, by good weather conditions- to reduce the moisture level.
- A proper and regular maintenance, ensure a good condition and the live time elongation of the device.
STAINLESS STEEL
- The grill is made from stainless steel in connection with powder coated steel and partially with a porcelain or lacquer layer. There is a large number of stainless steel cleaning substances on the market. Always start with the mildest cleaning method.
Visible scratches on the stainless steel can be removed using extra-mild grinding agent or fine-grained sand paper. Fat spots can scorch on steel surfaces. Such spots look like rust damages. In such cases, to remove such spots, a
cleaning sponge for stainless steel with cleaning agent should be applied.
SPIDERS AND OTHER INSECTS CAN BUILD SPIDER-WEBS OR NESTS IN THE BURNERS (AND HIS BORINGS) AND HOSES AND CAN DECREASE THE DAS FLOW OR CAUSE A FIRE.
THIS EFFECT WAS NAMED AS "REVERSE FLOW" AND CAN SERIOUSLY DAMAGE THE GRILL OR CAUSE A DANGEROUS FIRE. A CLEANING OF THE BURNERS (HIS OPENINGS), HOSES AND CONDUCTORS IS RECOMMENDED IN REGULAR INTERVALS.
USING THE BURNERS AND LIGHTING PROCEDURE CONTROL
OPEN THE LID BEFORE LIGHTING YOUR GRILL
- Turn all the control knobs to the 'OFF' position and open the gas bottle valve.
- If the grill is installed for the first time, then the gas hoses are filled with air. Some time is necessary to fill the hoses with gas.
- Push the operating switch and turn it into the highest position "HI". Simultaneously push the electric spark igniter.
Release the igniter when the burner light up. If the grill has the igniters build in the hand regulator, light the burner turning the switch (operating switch).
- If the burner was not lit after two attempts, turn 'OFF' the gas tap on the gas bottle and retry the ignition sequence to step 3, 2 - 3 times.
- If the burner still will not switched on, go to step 4, IN SUCH A CASE TURN OFF THE GAS AND WAIT 5 MINUTES, after this try to light the burner using normal matches.
- Attention: Before every check turn the operating switches to the "OFF" position.
- If the burners still will not be switched on, close the gas bottle valve and check the gas conductors if they are not clogged.
FIRST USING AFTER A LONGER PERIOD-BeginNING OF THE SEASON
- Carefully read the safety, lighting and operating instructions.
- Check the gas supply openings, gas conductors, gas hoses, burners conductors and the burners, if they are not clogged.
- Check if the burner conductor is property guided through the closing opening.
- Check if the gas bottle is filled.
- Check that no gas gas leakages exist, to do this use a soap solution.
- Turn the operating switch to "OFF" position and close the gas supply.
Before you light the grill, open the grill lid.
Before you light the gas, check if the gas hose has no cracks, break, damages or wearings. If yes- replace the gas hose before using the grill. The side burner cannot be used if you feel a gas smell.
Not far away from the gas valve place a sprayer with a soap- water solution and before using, check the connections.
Before you will light the grill, open the lid.
- Push the hand regulator (switch) and turn it into the highest position "HI". Simultaneously push the electric spark igniter. Release the igniter when the burner light up. If the grill has the igniters build in the operating switch, light the burner, turning the switch.
If the burner still will not switched on, try to light the burner using normal matches.
- Use pans with a minimal diameter 120mm and maximum 200mm . When using pans with greater diameters, the highest layer can change his color.
FIRST USE, BURNING OUT THE FAT OR OIL
Before the first use, the fat and oil used to protect the grill should be burned out.
- Open the lid, light the burners and burn on the highest fire "HI" through 10- 15 minutes.
- Close the switches, cool down, and clean the grill with a cleaning agent - water solution using a scrubbing sponge.
Next properly dry the unit.
GRILLING WITH CLOSED LID
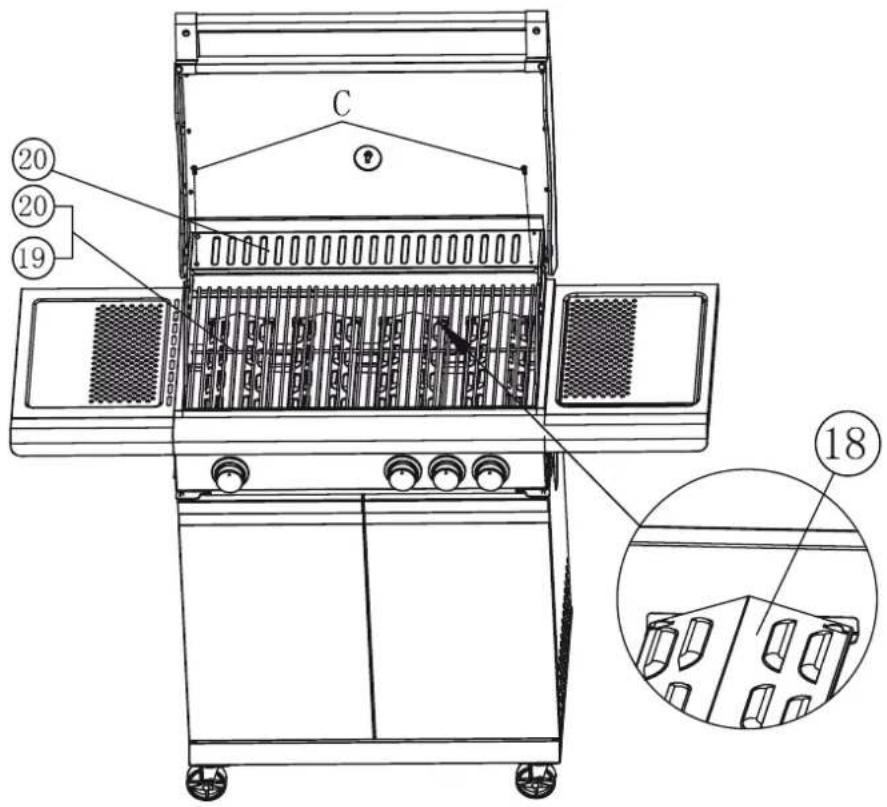
URGENT: When you are cooking with the lid closed, never set all burners in the „HI" position.
Use the burners only in the way indicated on the drawing, if you prepare the food with the lid closed.
Before you light the grill, open the lid.
- Place the flame distributor, the grill plate or panel on the middle burners. Close the lid and turn the operating switch into "LO" position.
- Maintain the temperature maximally 200 o C.
If you want to bake the food, place the food in the middle of the grill, for example on a reversed cooking plate.
- Regular supervise the baking process.
WHAT TO DO IF YOUR GRILL DOES NOT WORK
Smoking during checking of the grill is prohibited!
- Turn the operating switch into "OFF" position and close the gas supply.
Before next try, wait 5 minutes.
- Check the gas outflow.
- Repeat the ignitron procedure, if the grill is still not working, CLOSE THE GAS SUPPLY AND TURN THE OPERATING SWITCHES IN THE „OFF“ POSITION. Wait, the grill is cooled down an check the following elements:
a) Connection of the burners conductors in the openings.
CORRECTION: Carry through the burner hose in a correct manner.
b) Clogged gas conductor.
CORRECTION: Disconnect the gas hose from the grill.
Open the gas flow for 1 second, to unstop the hose. Close the gas inflow (close the gas bottle valve) and connect the gas hose to the grill.
c) Clogged orifice
CORRECTION: Remove all loose parts from the inside of the grill. Unscrew the burner and remove the splint from the Lower part of the grill base, using a screwdriver and pliers. Raise each burner from the gas opening, the clogged places unstop using a thin needle. Place the burners again in the openings and fasten on the grill base. Insert the remaining loose parts.
d) Connection of the burner igniter
CORRECTION: The electrode tip should reach the burner/ collection box. The orifice between the spark electrode and the burner tip/ collection box should be 3 - 5mm . When needed, can be adjusted through carefully bending. If it will be necessary to lighting a hot grill, first you should wait at least 5 minutes.
(This will give an opportunity for gas dissipation).
If all checks/ repairs will be executed and your grill still will not property working, please contact your distributor or gas installation specialist.
Assembly Instructions for the Patio Chef 2+1 / Patio Chef 3+1
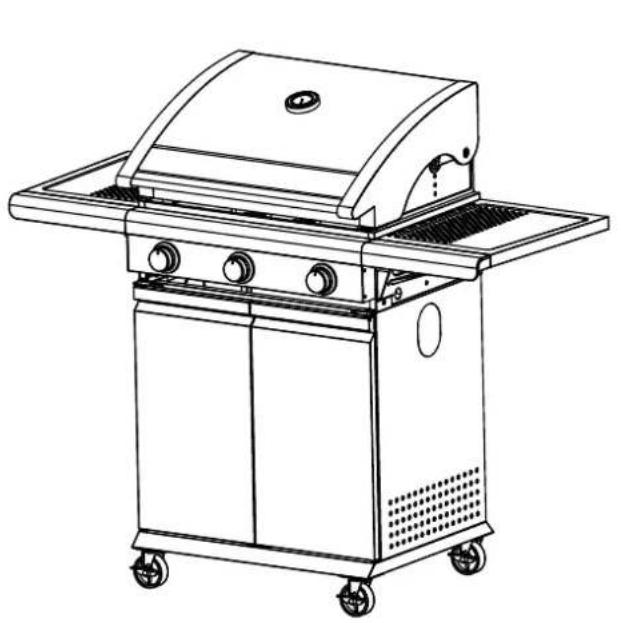
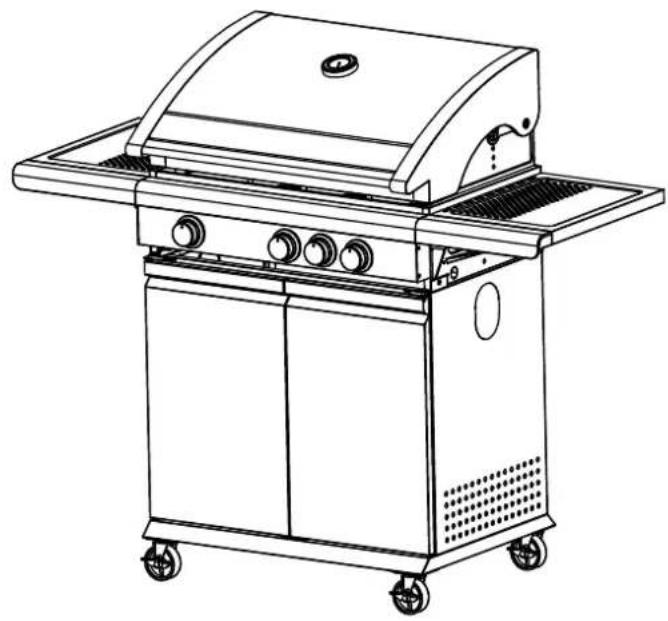
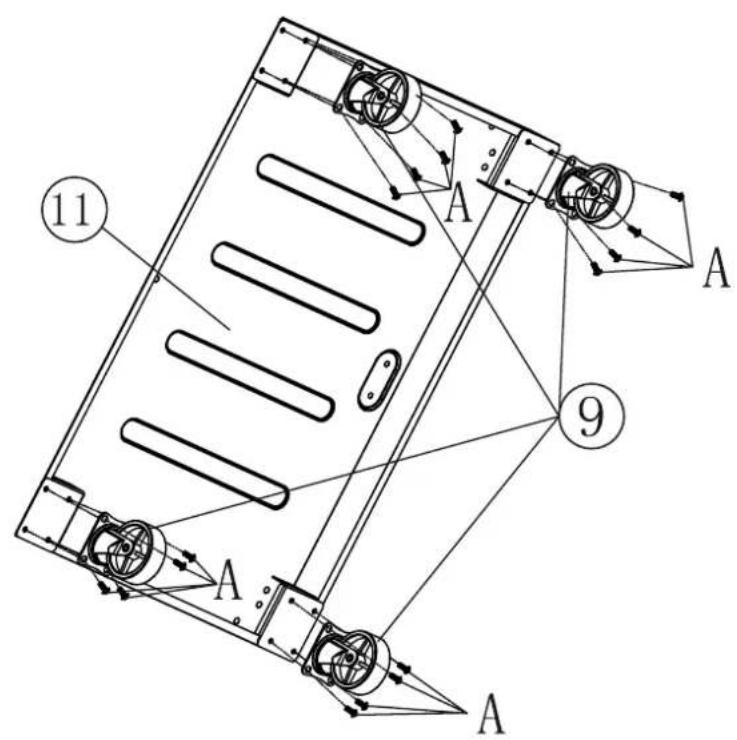
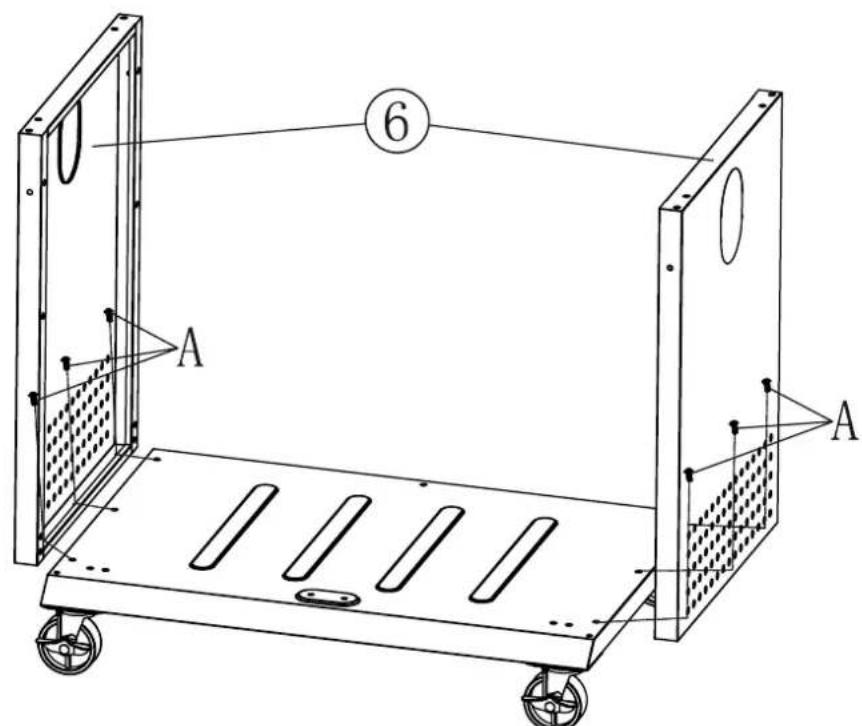
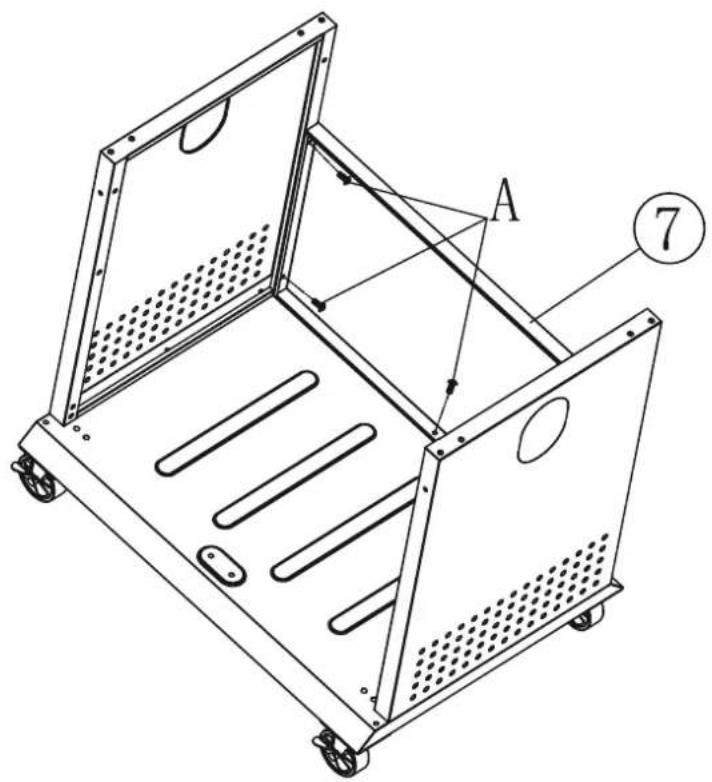
- Illustration of individual components of the Patio Chef 3+1 (equal to the Patio Chef 2+1)
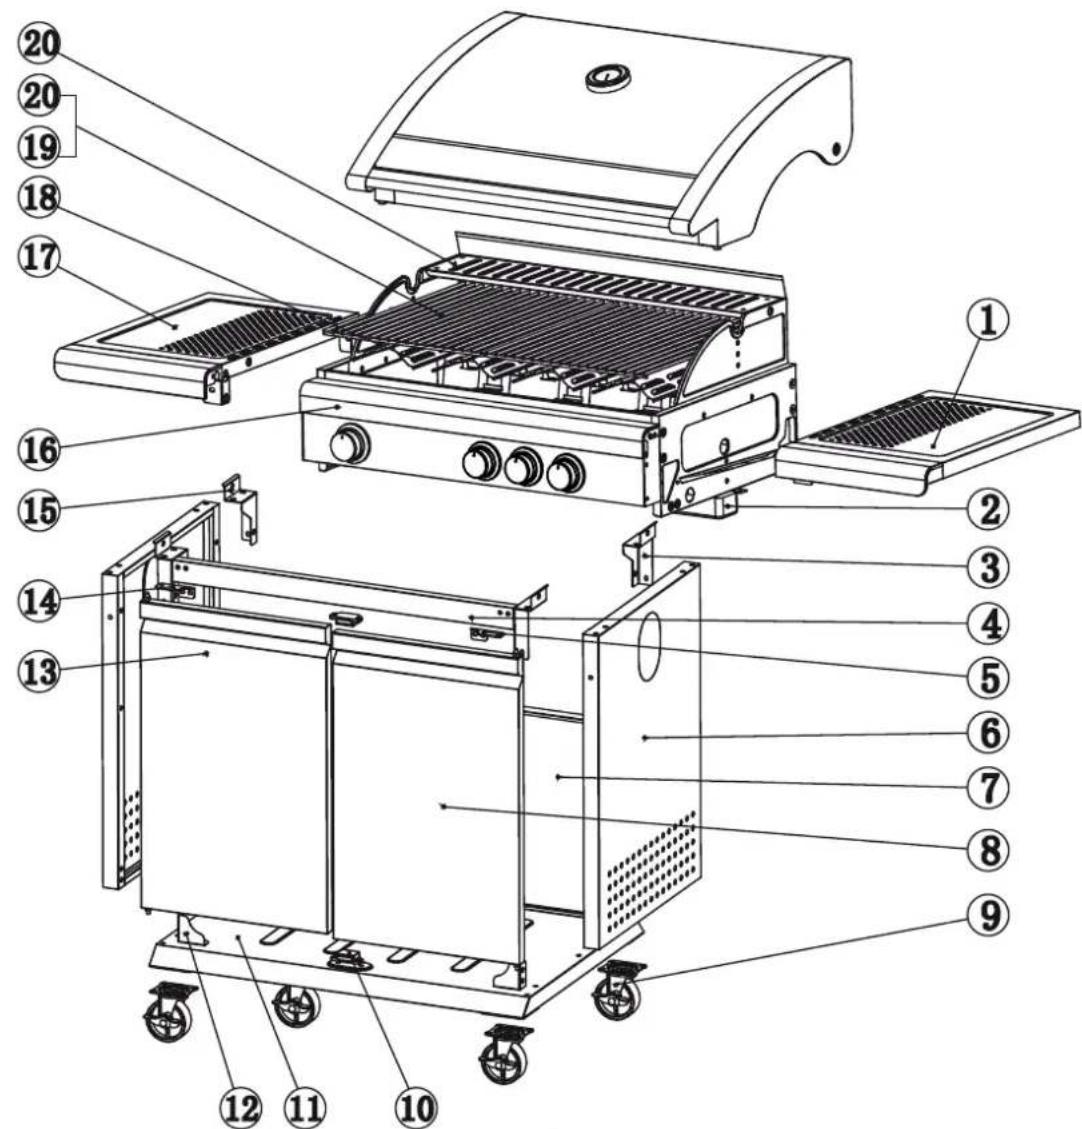
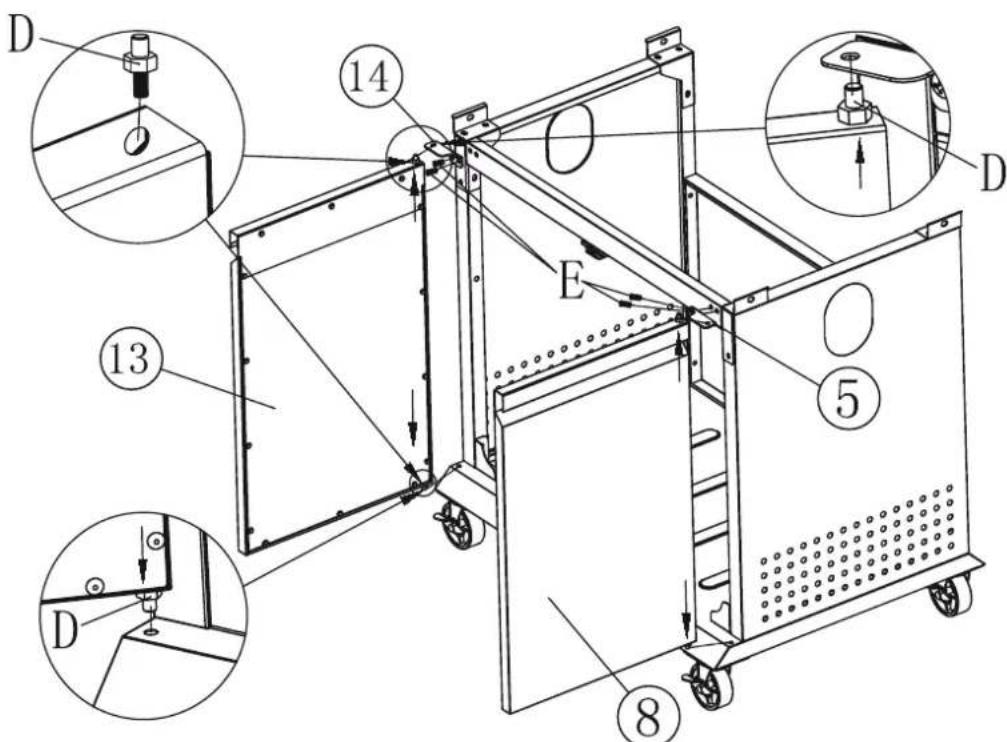
Parts List
| 1*1 | 2*1 | 3*1 | 4*1 | |||
| 5*1 | 6*2 | 7*1 | 8*1 | |||
| 9*4 | 10*11 12 | 11 | **2 | |||
| ○*1 *1 *1 *1 | ○ | ○ | 16151413 | |||
| 17*118 19 20 | ○*3(5353-01) *4(5354-01) | ○*1(5353-01) *3(5354-01) | ○*1(5353-01) *0(5354-01) | |||
| 21*1 | A M5-10*65 | B M4-8*2 | C M5-6*2 | D *4 | E M-10*8 | |
ASSEMBLY
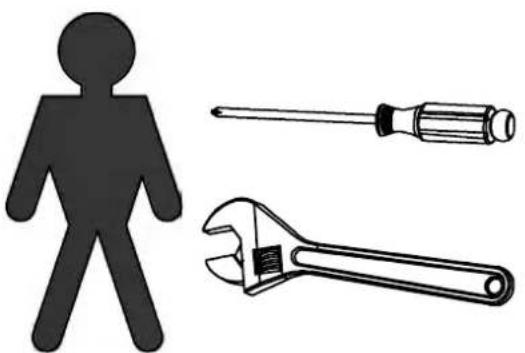
Make sure your grill is assembled properly. Detailed assembly instructions are packed with each grill giving specific assembly procedures for each model. Follow these instructions carefully to ensure the correct and safe assembly of the grill.
Caution: Although we take every effort to ensure that the assembly process is as easy as possible, it is inherent with fabricated steel parts that corners and edged can cause cuts if improperly handled during assembly procedures. Be careful while handling any parts during assembly. It is strongly recommended that you protect hands with a pair of work gloves.
1、A*16
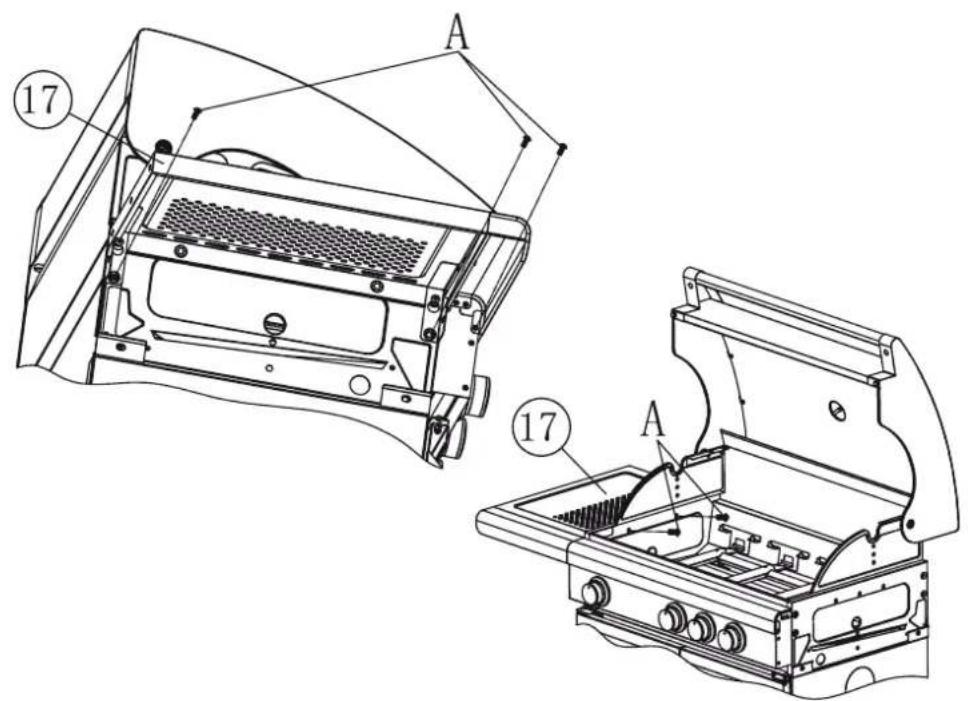
2、A*6
3、A*5
4、A*20 E*4
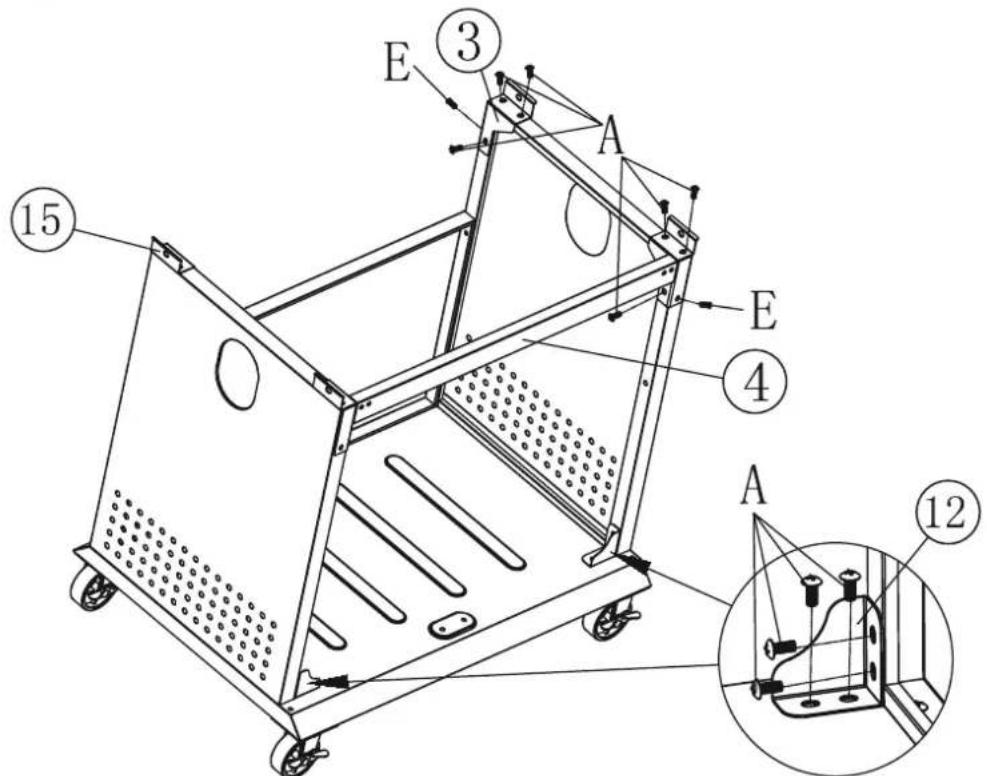
5、B*2
6、D*4 E*4
7、A*8
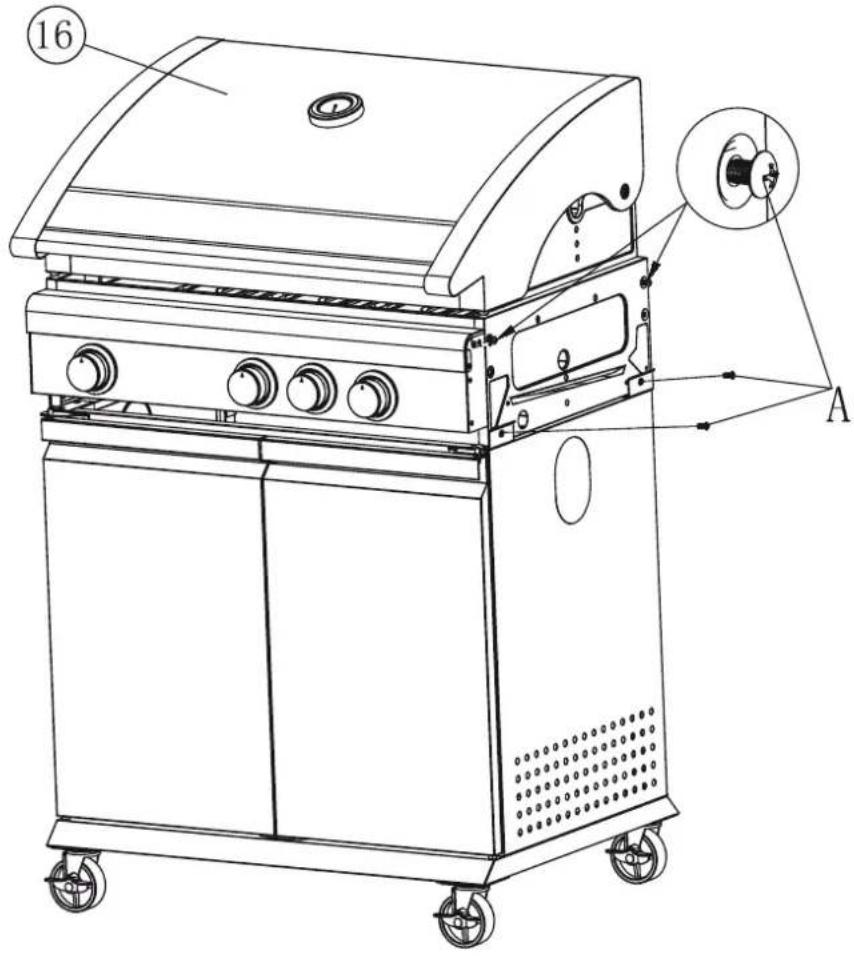
8、A*5
9、A*5
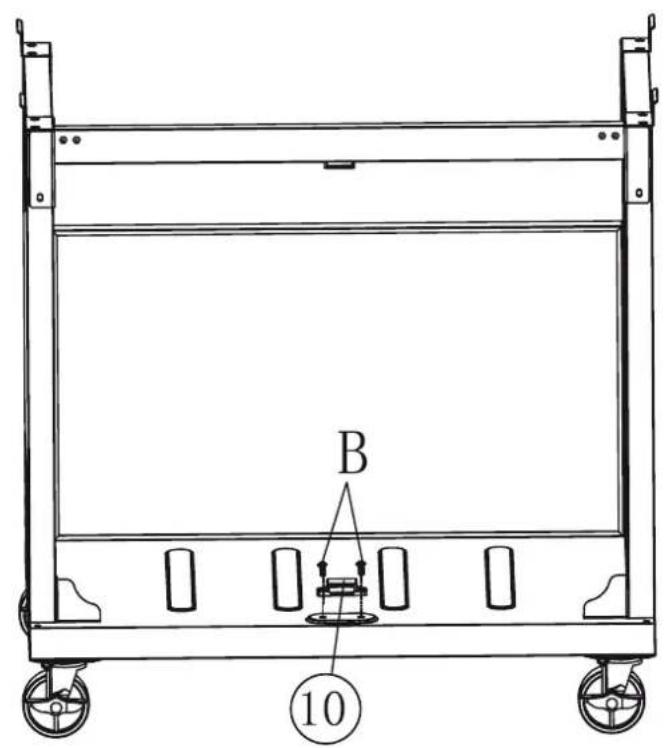
10、
11、C*2
12、


WARNING: The Handle Black Area (See Above Picture for Reference) will become hot when the gas grill is in use, BE CAREFUL! Do Not Touch The Black Area.
Lighting instructions
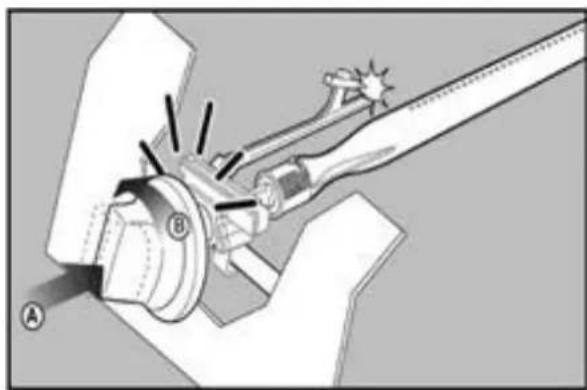
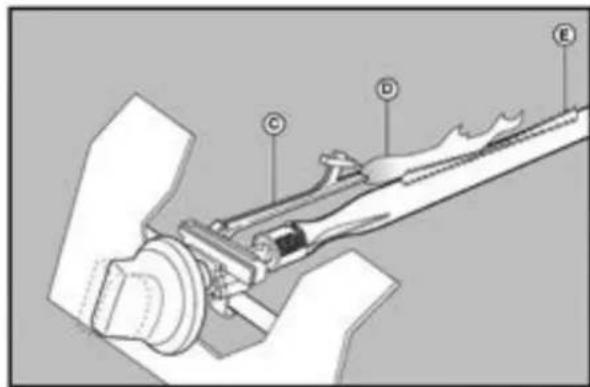
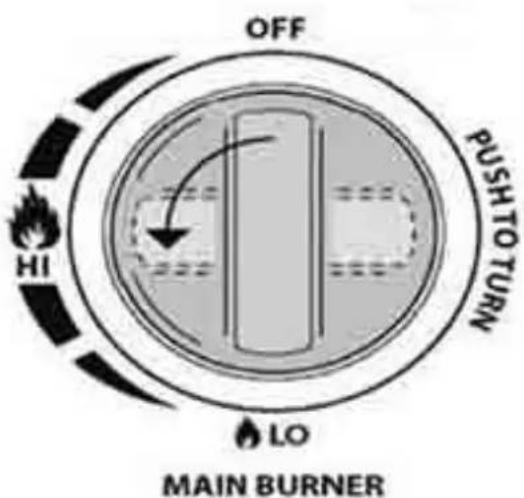
With all gas controls on the Gas grill in the "OFF" position, turn the gas cylinder valve to the on position at the regulator. To create a spark you must push the control knob in (A) and hold in this position for 3-5 seconds to allow gas flow and then turn anticlockwise to "HIGH" (B). It can spark the burner lighting tube (C) too. You will hear a "snap" from the igniter and you will also see a orange flame 6 - 10cm from the burner lighting tube at the left side of the burner (D). Continue to hold the burner control knob in for two seconds after the "snap", this will allow gas to flow completely down the burner tube (E) and insure ignition. When the burner is lighted, adjacent burners will cross light when their controls are turned to "HIGH". At "High" setting the burner flame should be approximately 12 - 20mm long with a minimum of orange flame. Turn the gas control fully anticlockwise for minimum setting. Should you have any difficulty lighting your gas grill following the above steps, contact your dealer for advice.

WARNING!
Warning: if the burner still does not light, even all activities were did property, contact your supplier.