C2 Charcoal Chef - Barbecue Patton - Free user manual and instructions
Find the device manual for free C2 Charcoal Chef Patton in PDF.

| Product type | Charcoal barbecue |
| Brand | Patton |
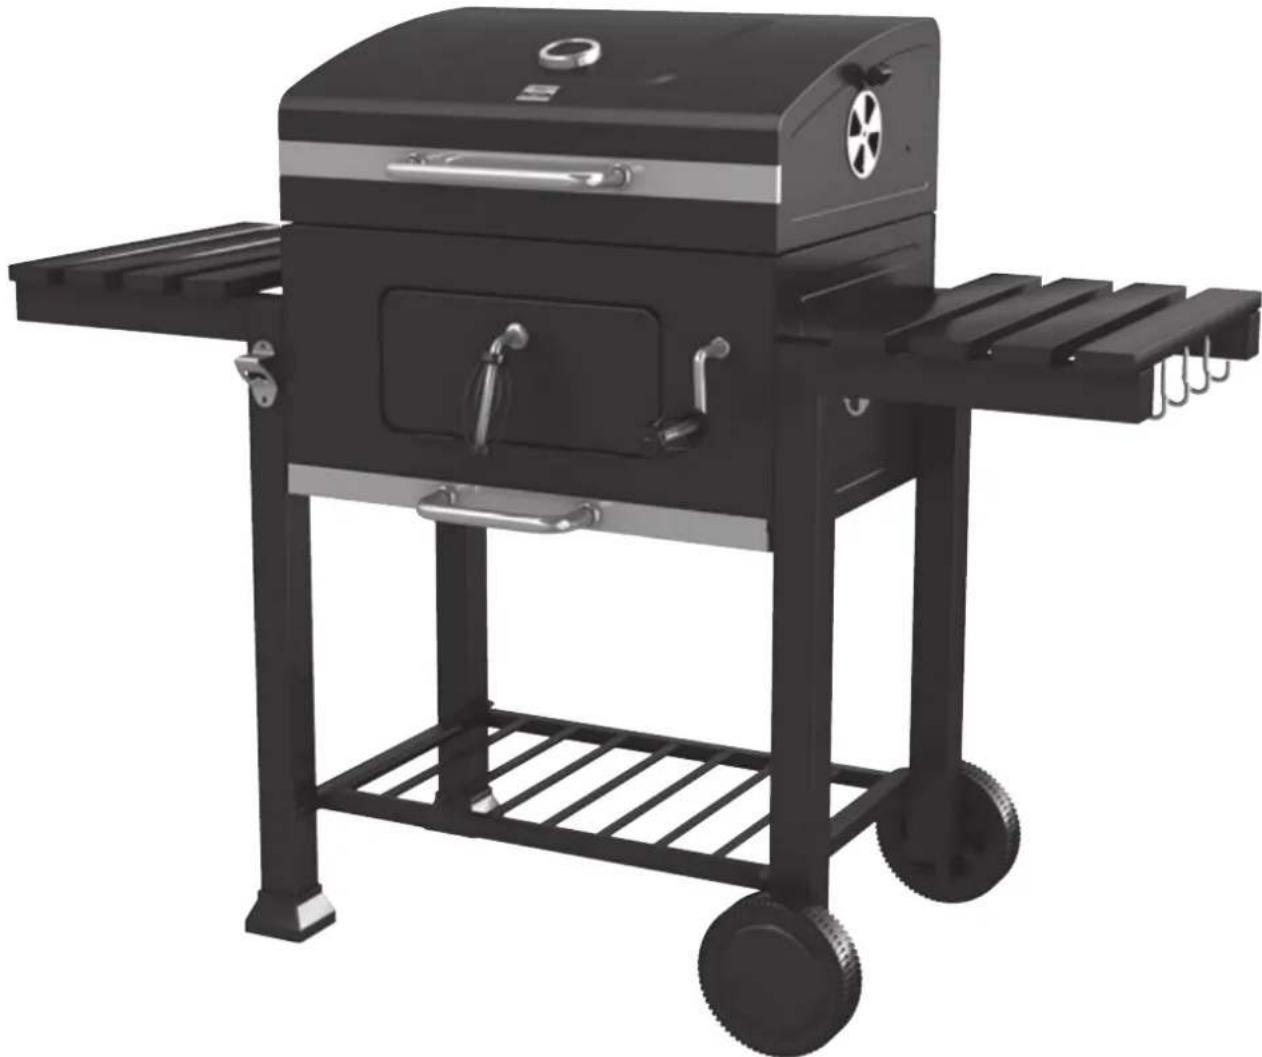
| Model | C2 Charcoal Chef (55CCE101) |
| Usage | Outdoor only |
| Fuel | Charcoal (briquettes or lumps) |
| Main material | Steel |
| Cooking grid coating | Porcelain |
| Thermometer | Built into lid |
| Fire grate | Height adjustable (high/low position) |
| Ventilation system | 4 adjustable air diffusers |
| Side tables | 2 with hooks |
| Ash drawer | Removable |
| Wheels | 2 casters |
| Max charcoal capacity | 8 lb (3.6 kg) of briquettes or 4 lb (1.8 kg) of charcoal |
| Max recommended temperature | 400°F (204°C) |
| Cooking methods | Direct grilling, indirect barbecue, smoking |
| Included accessories | Utensil hooks (8), bottle opener |
| Maintenance | Clean after each use, brush hot grate, empty cold ashes |
| Safety | Do not use indoors, oven mitts required, stable surface |
| Warranty | Limited 2 years (parts) |
Frequently Asked Questions - C2 Charcoal Chef Patton
User questions about C2 Charcoal Chef Patton
0 question about this device. Answer the ones you know or ask your own.
Ask a new question about this device
Download the instructions for your Barbecue in PDF format for free! Find your manual C2 Charcoal Chef - Patton and take your electronic device back in hand. On this page are published all the documents necessary for the use of your device. C2 Charcoal Chef by Patton.
USER MANUAL C2 Charcoal Chef Patton
OPERATING AND ASSEMBLY INSTRUCTIONS
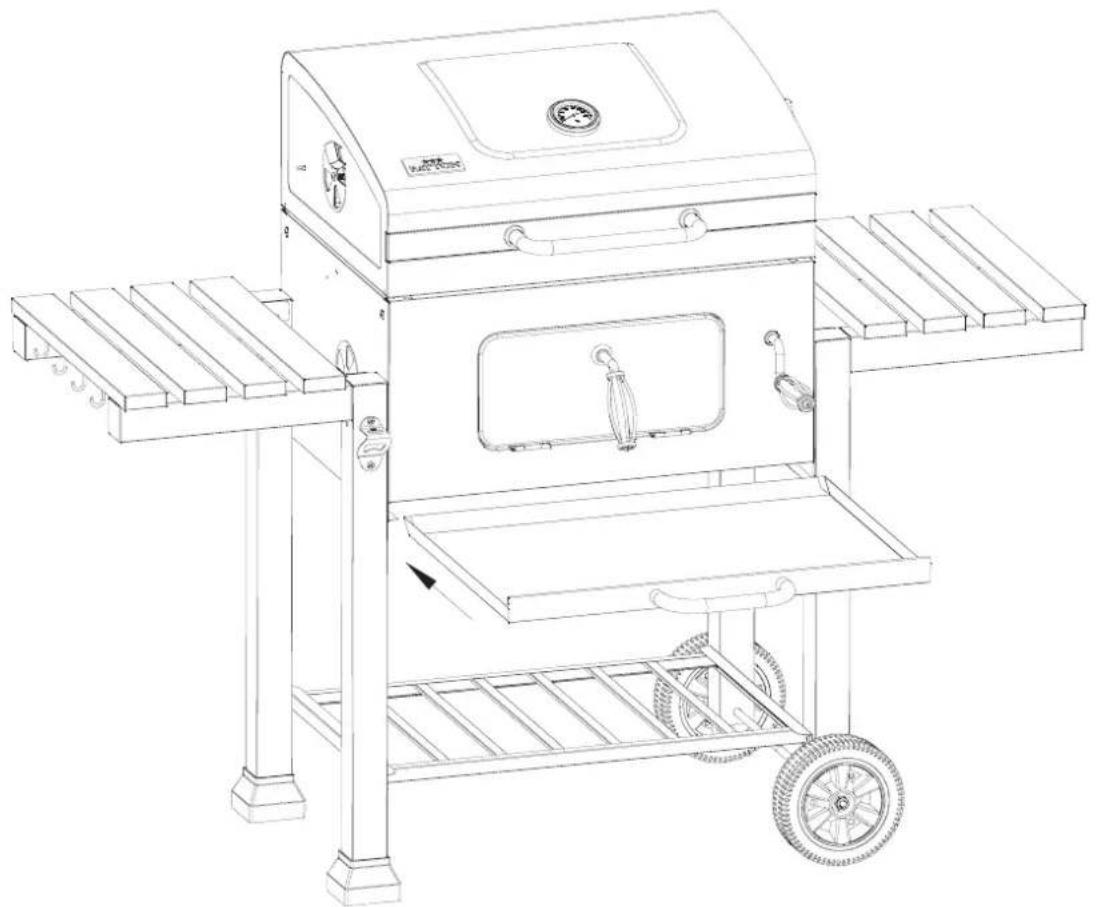
BBQ C2 Charcoal Chef
PATTON B.V.
Postbus 2044 NL 5300 CA Zaltbommel Holland
Website: www.patton.eu
★★★ PATTON
GB,IE Operating instructions-57
“!” WAARSCHUWING “!”
MONTAGE

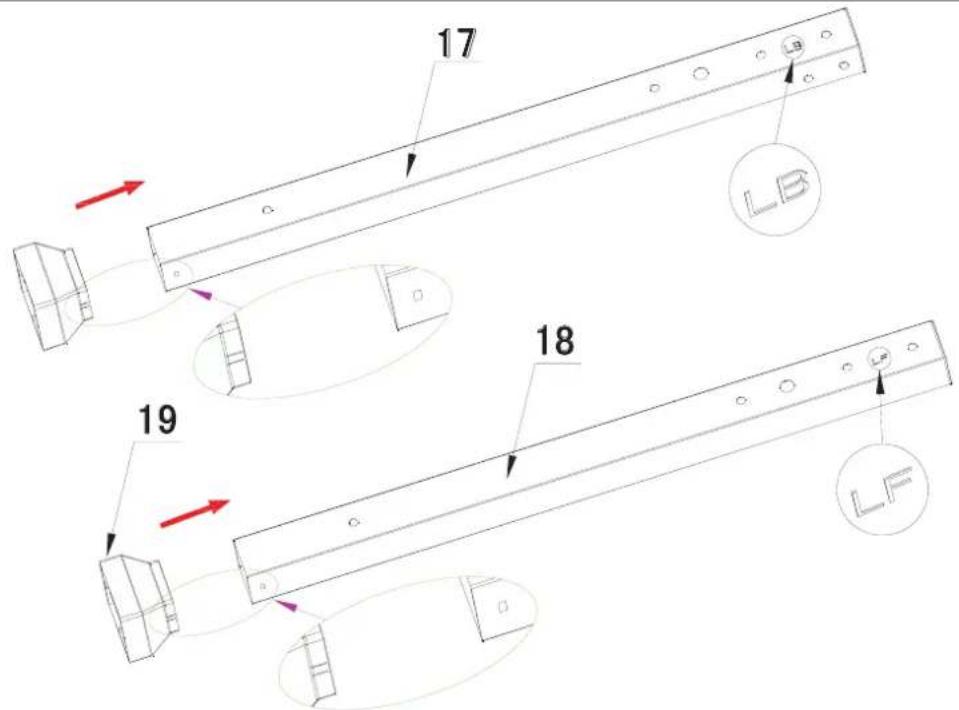
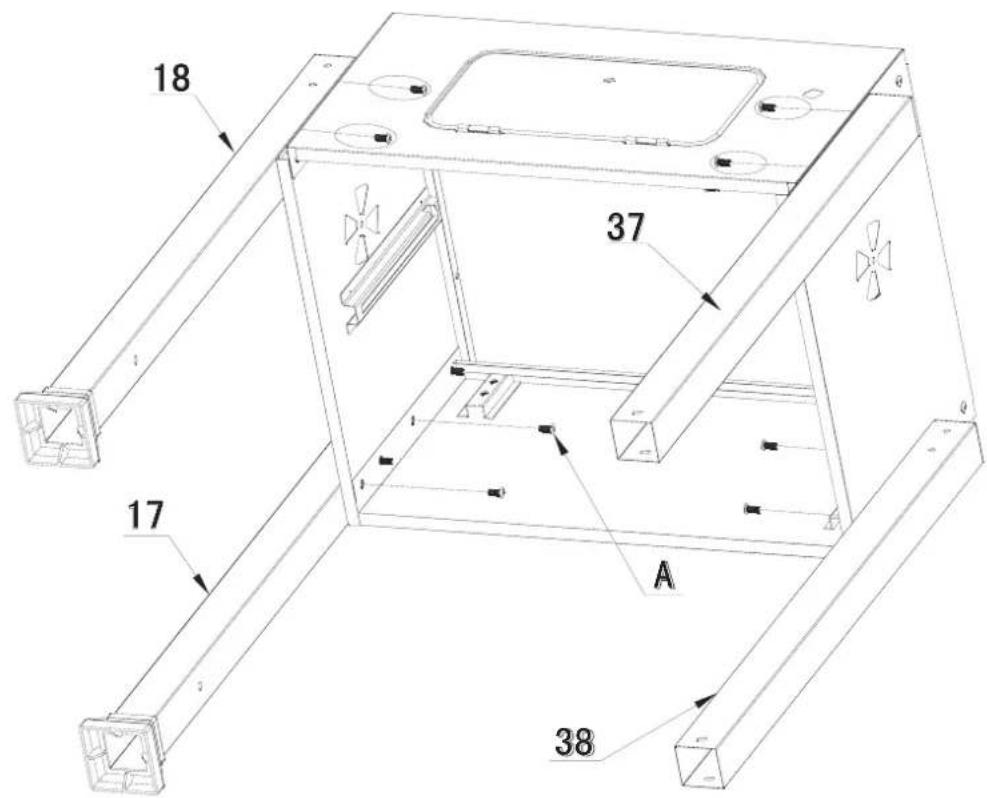
Put Leg End Cap (19) into Left Back Leg (17) and Left Front Leg (18). Make sure the bumping on Leg End Cap is locked into the square hole on the legs.
STEP3

STEP4
STEP5
STEP6

STEP7
STEP8

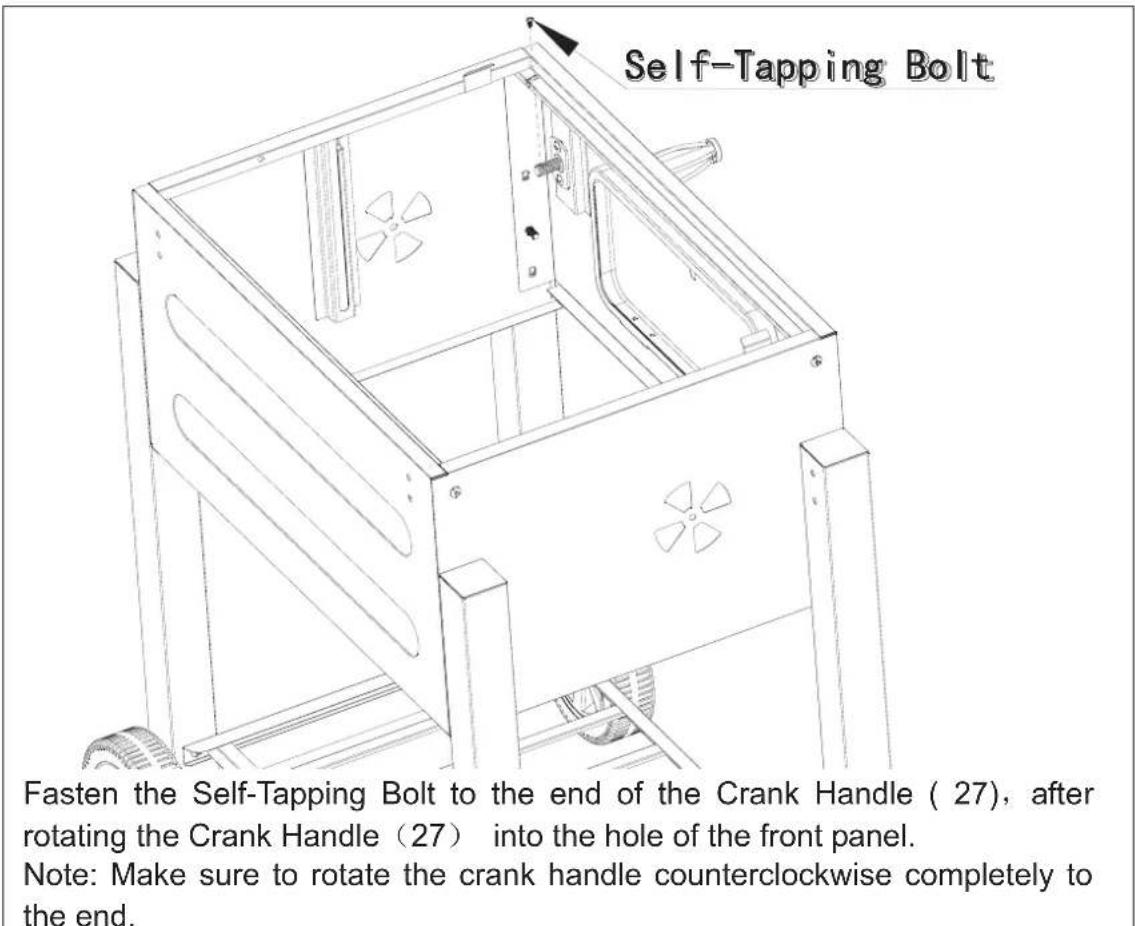
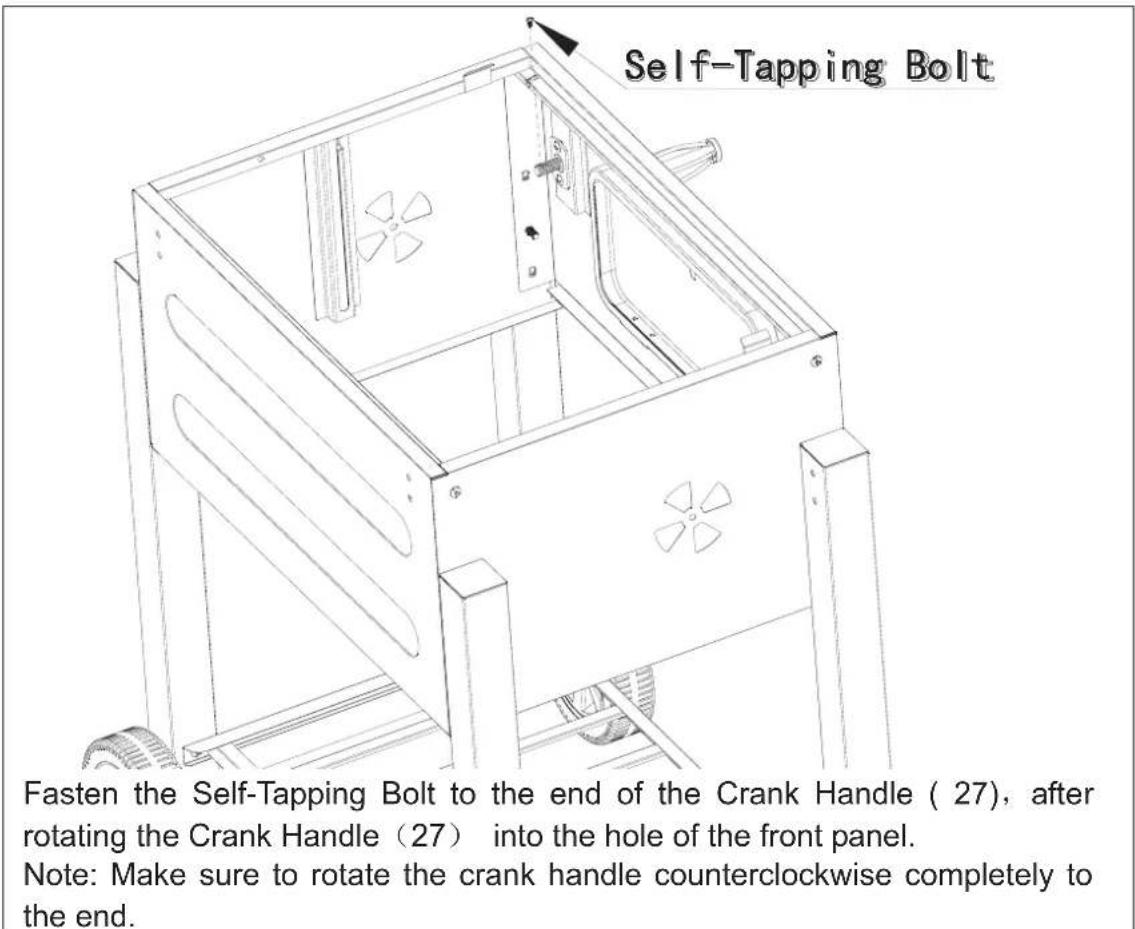
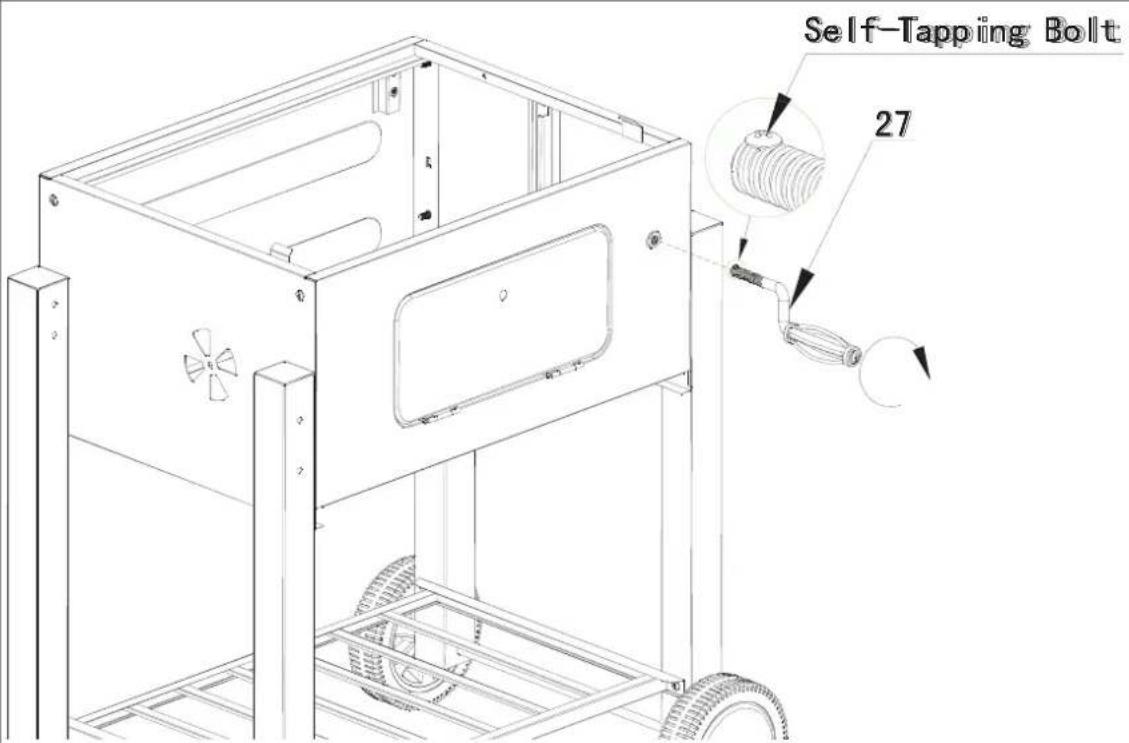
Loosen the pre-assembled Self-Tapping Bolt from the end of Crank Handle (27), then rotate the Crank Handle (27) into the hole of the front panel.

STEP9

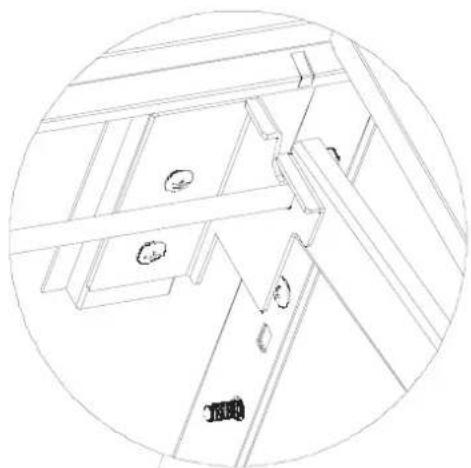
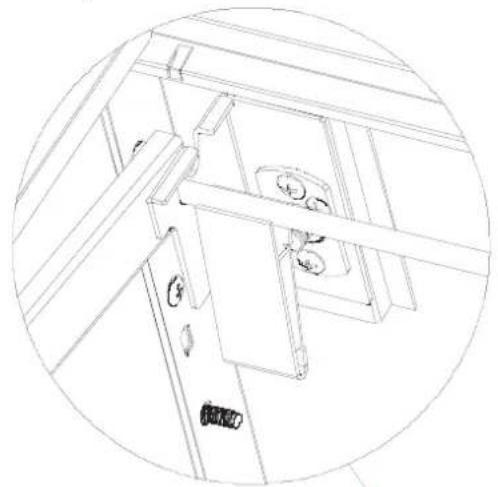
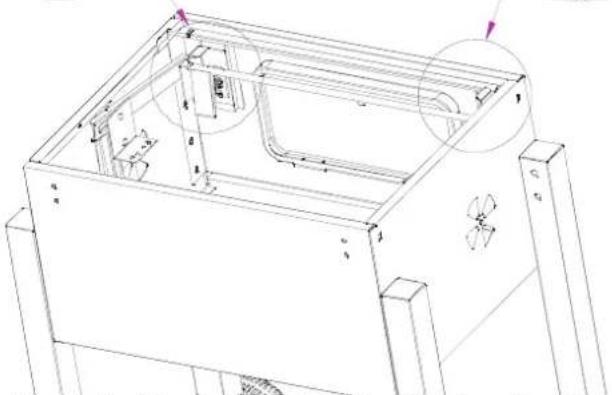
Put the Bolts of the Shaft Assembly (23) into the slot of the Left & Right Fire box side panel.


Fit the shaft onto the slot of the bracket of the fire box front panel.
STEP10

STEP11

STEP12

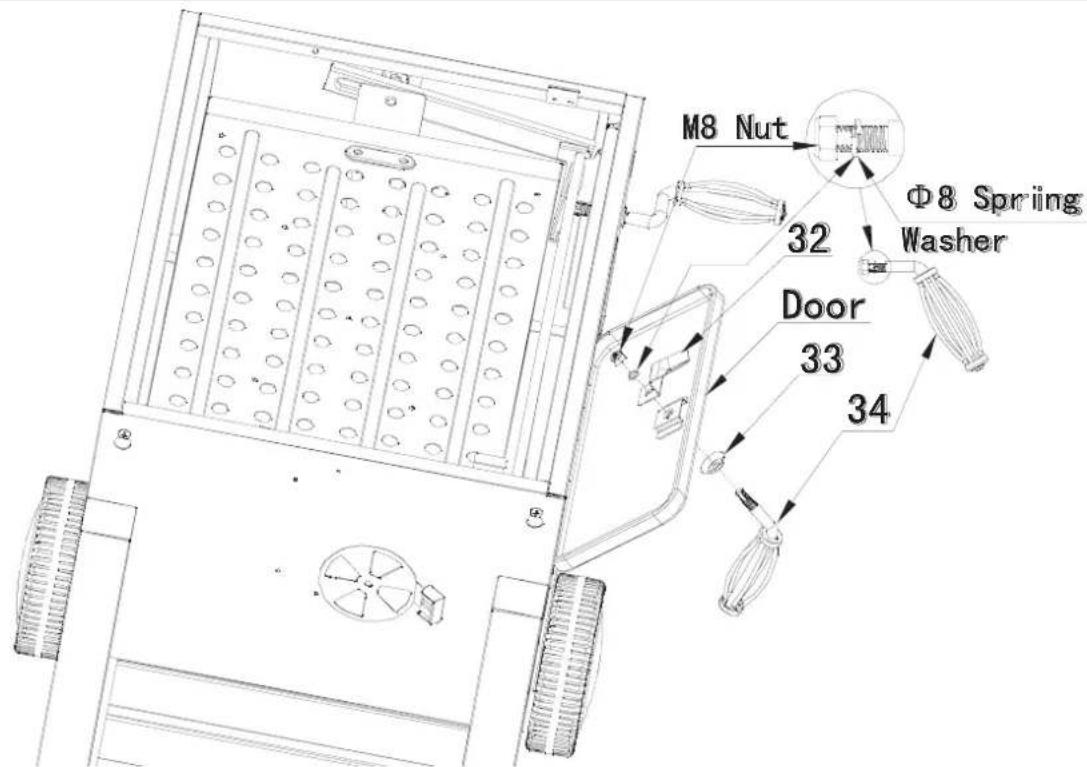
Loosen the pre-assembled M8 Nut and spring washer from the handle (34), and then assemble the handle to Charcoal Door according to the diagram as shown.
STEP13


STEP14

STEP15

STEP16
STEP 17
STEP 18

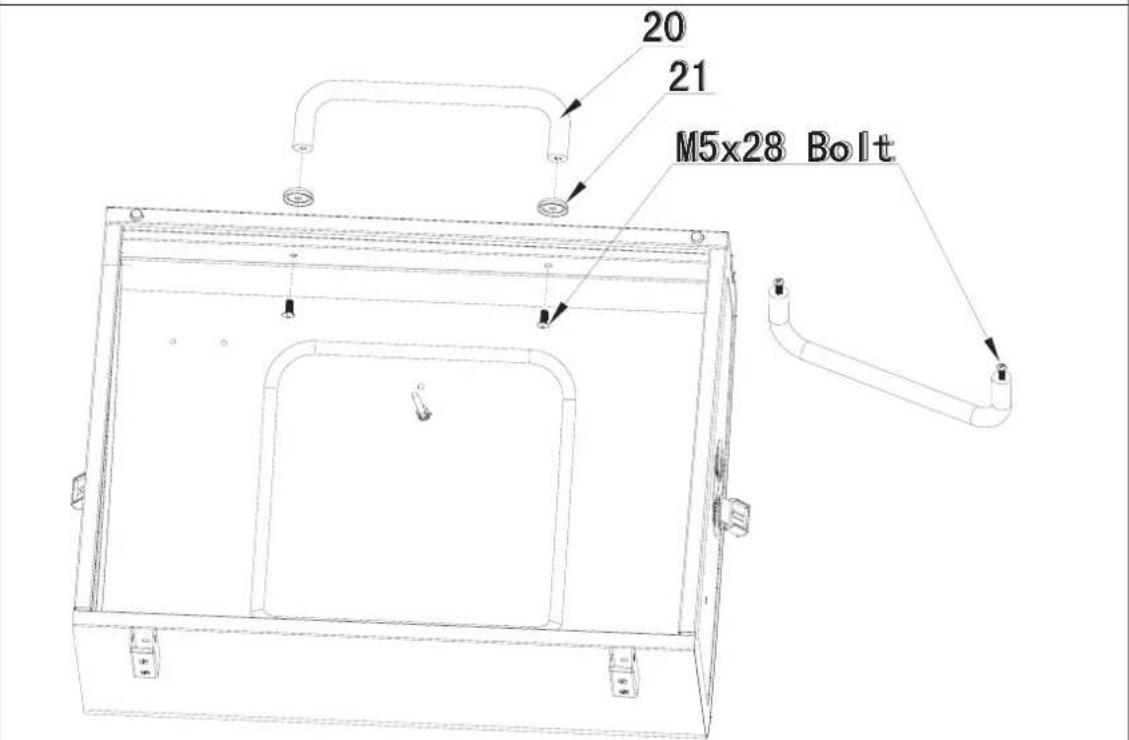
Loosen the pre-assembled M5x28 Bolts from Hood Handle (20), and then assemble the handle together with spacer (21) to the hood according to the diagram as shown.
STEP 19
STEP20

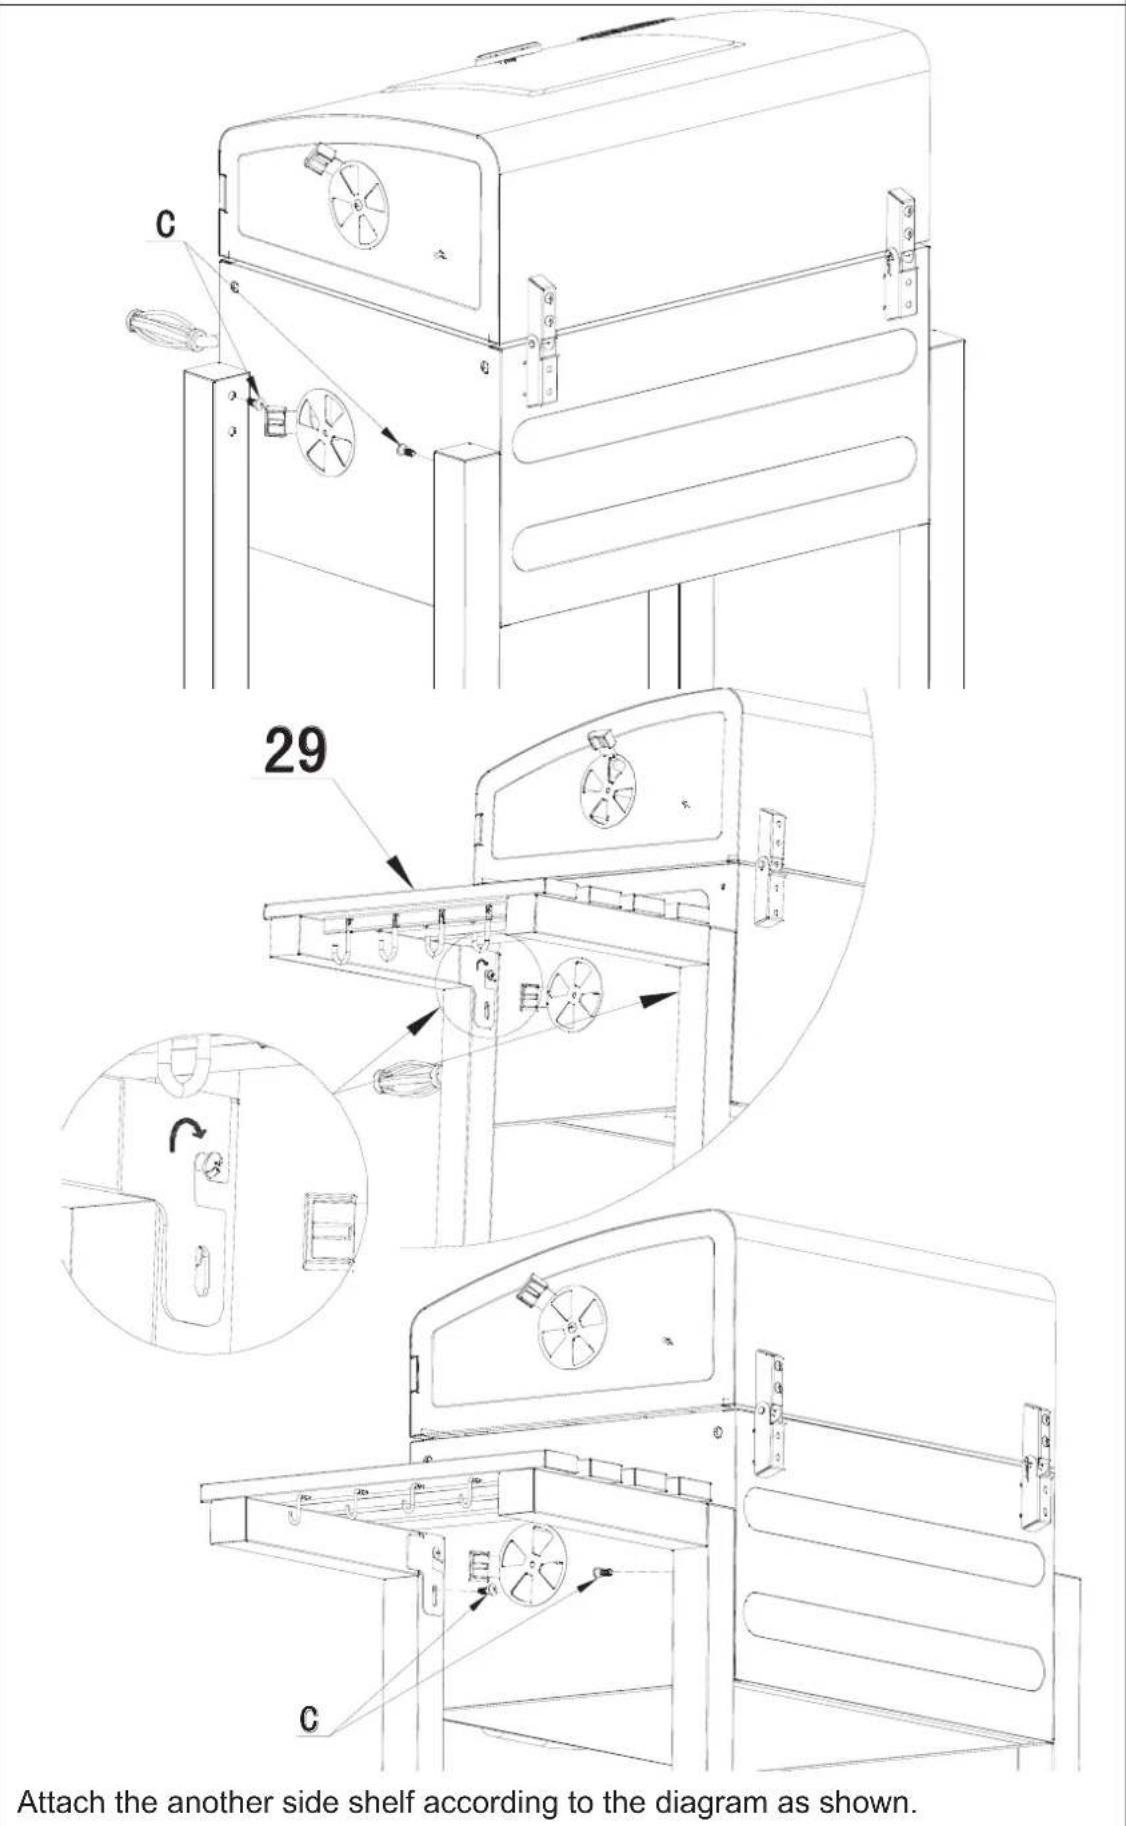
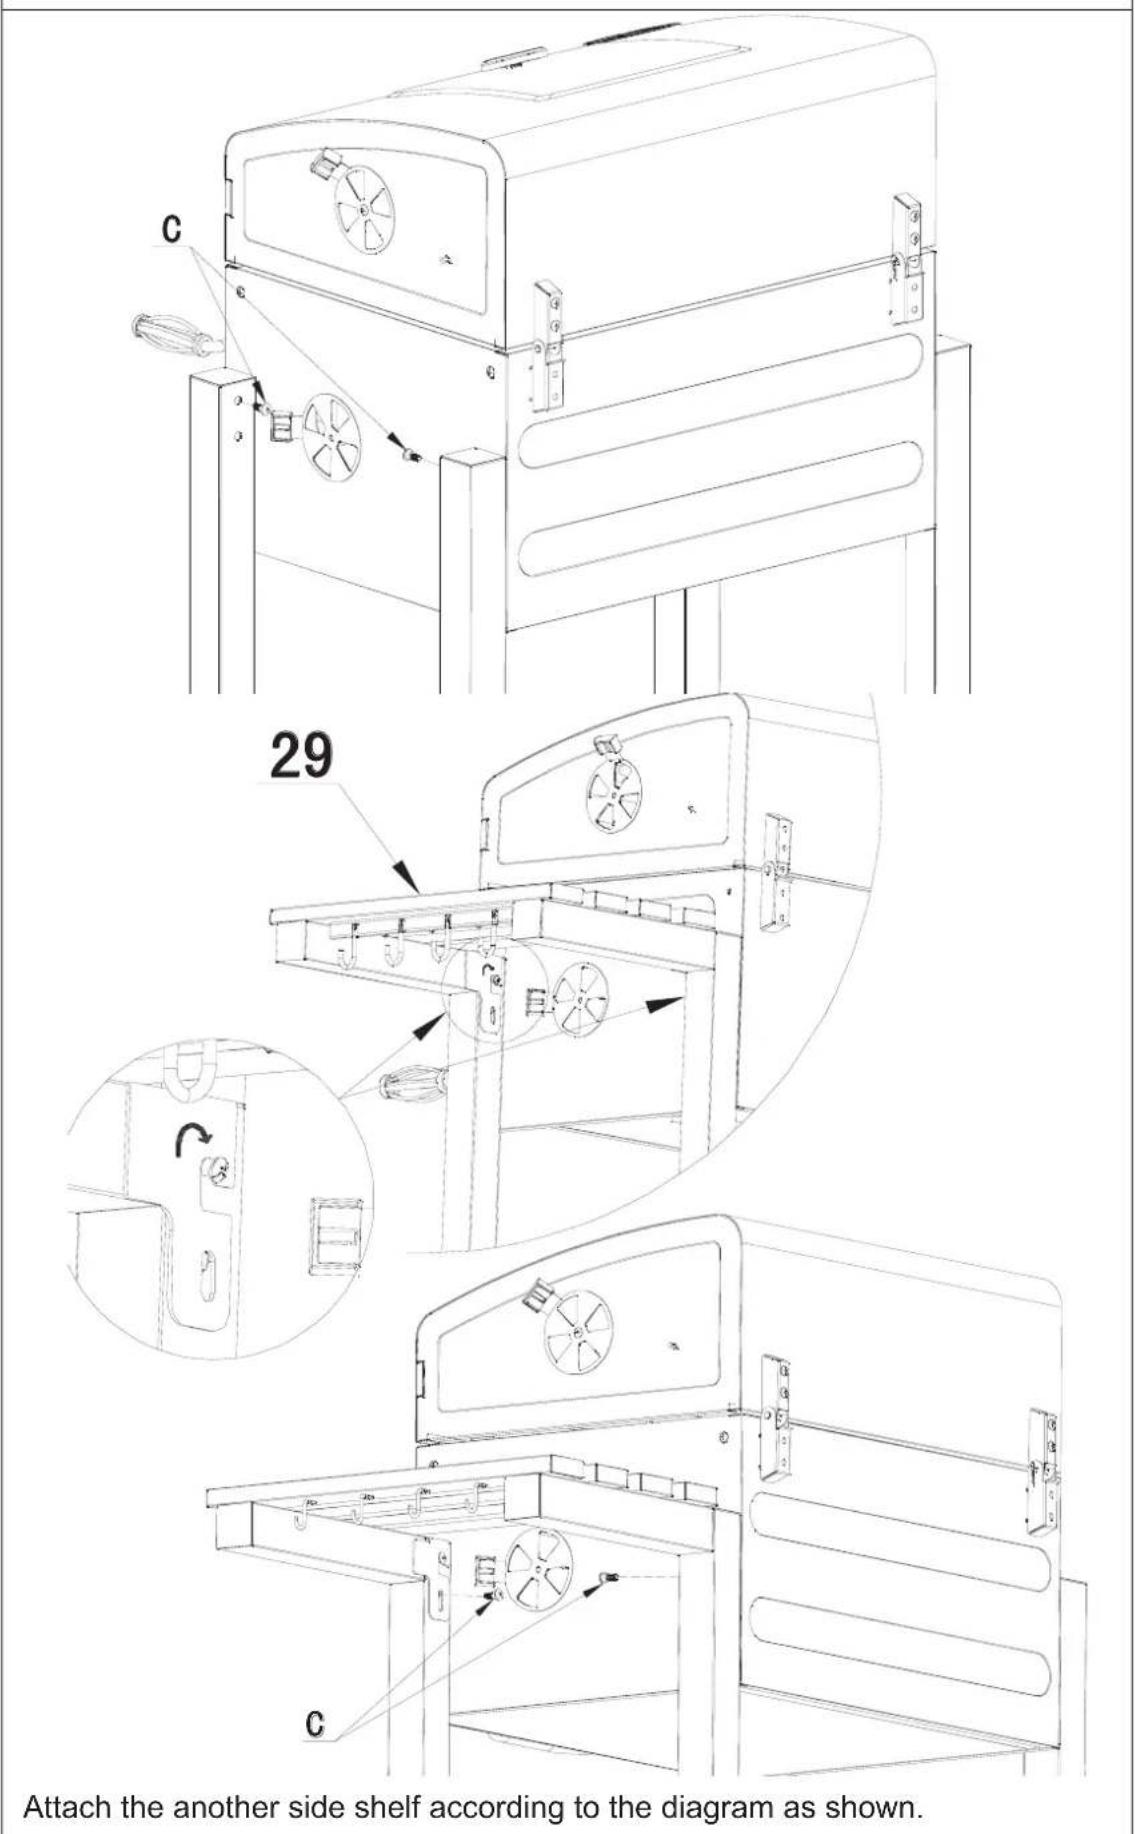
Attach the another side shelf according to the diagram as shown.
STEP21
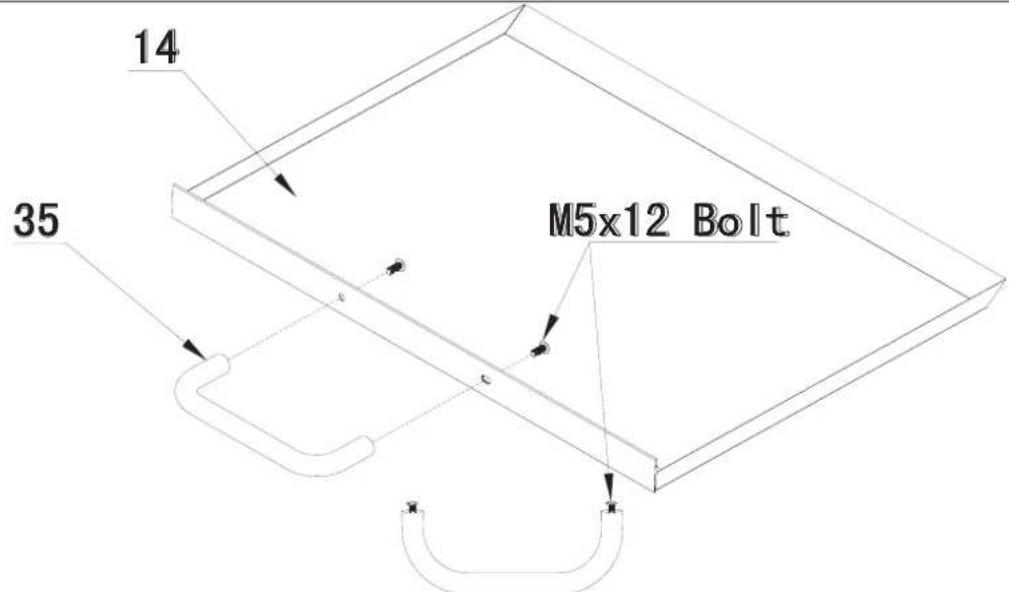
Loosen the pre-assembled M5x12 Bolts from Ash Pan Handle (35), and then assemble the handle to Ash Pan (14) according to the diagram as shown.

STEP22

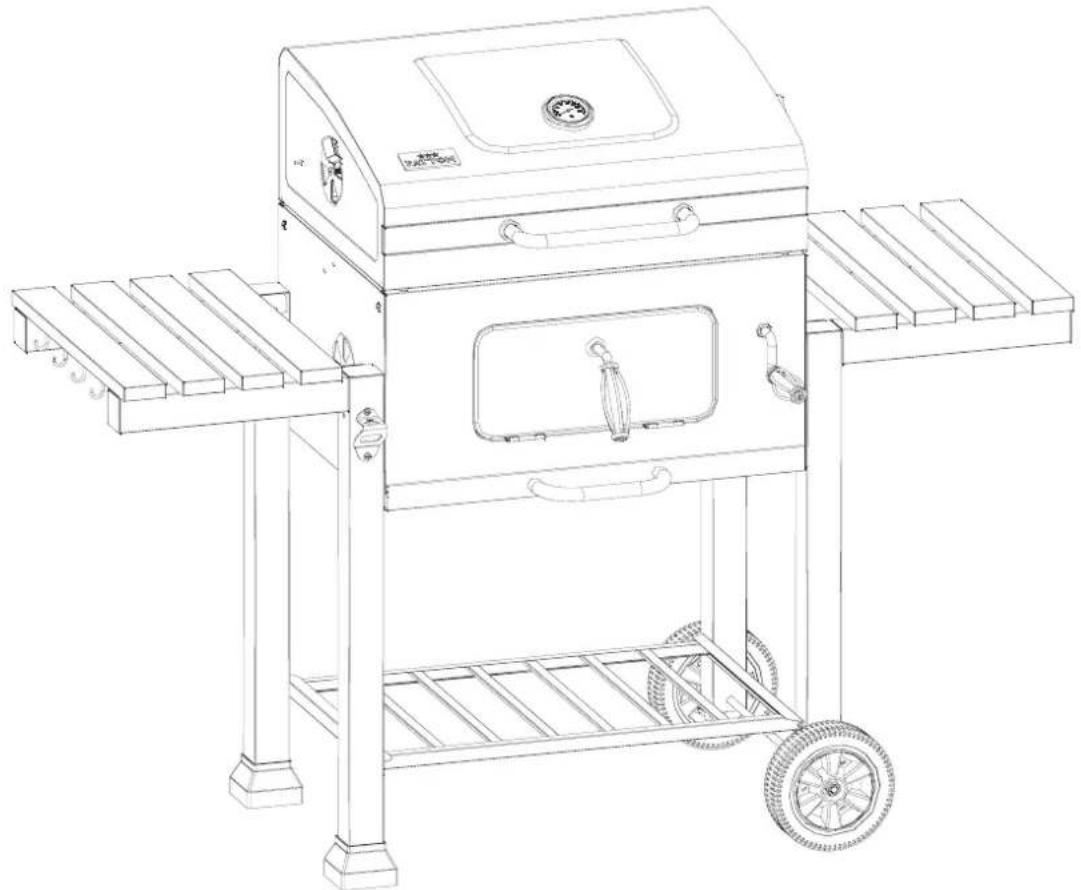
Finish
★★★ PATTON

Put Leg End Cap (19) into Left Back Leg (17) and Left Front Leg (18). Makesure the bumping on Leg End Cap is locked into the square hole on the legs.
STEP3


STEP4

STEP5
STEP6
STEP7
STEP8

Loosen the pre-assembled Self-Tapping Bolt from the end of Crank Handle (27), then rotate the Crank Handle (27) into the hole of the front panel.

STEP9
Put the Bolts of the Shaft Assembly (23) into the slot of the Left & Right Fire box side panel.


Fit the shaft onto the slot of the bracket of the fire box front panel.
STEP10
STEP11
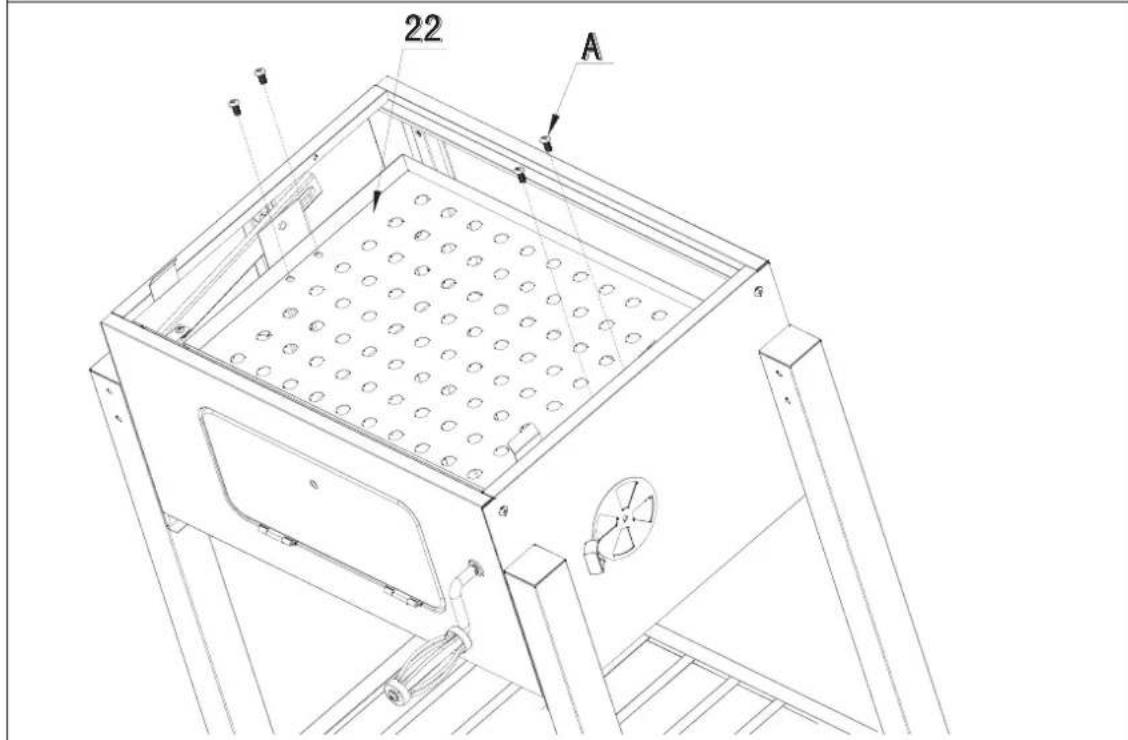
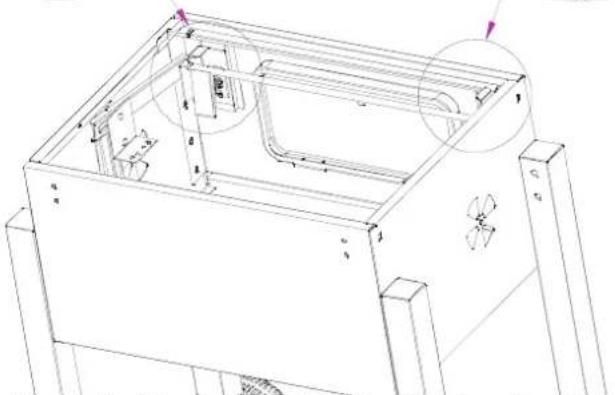
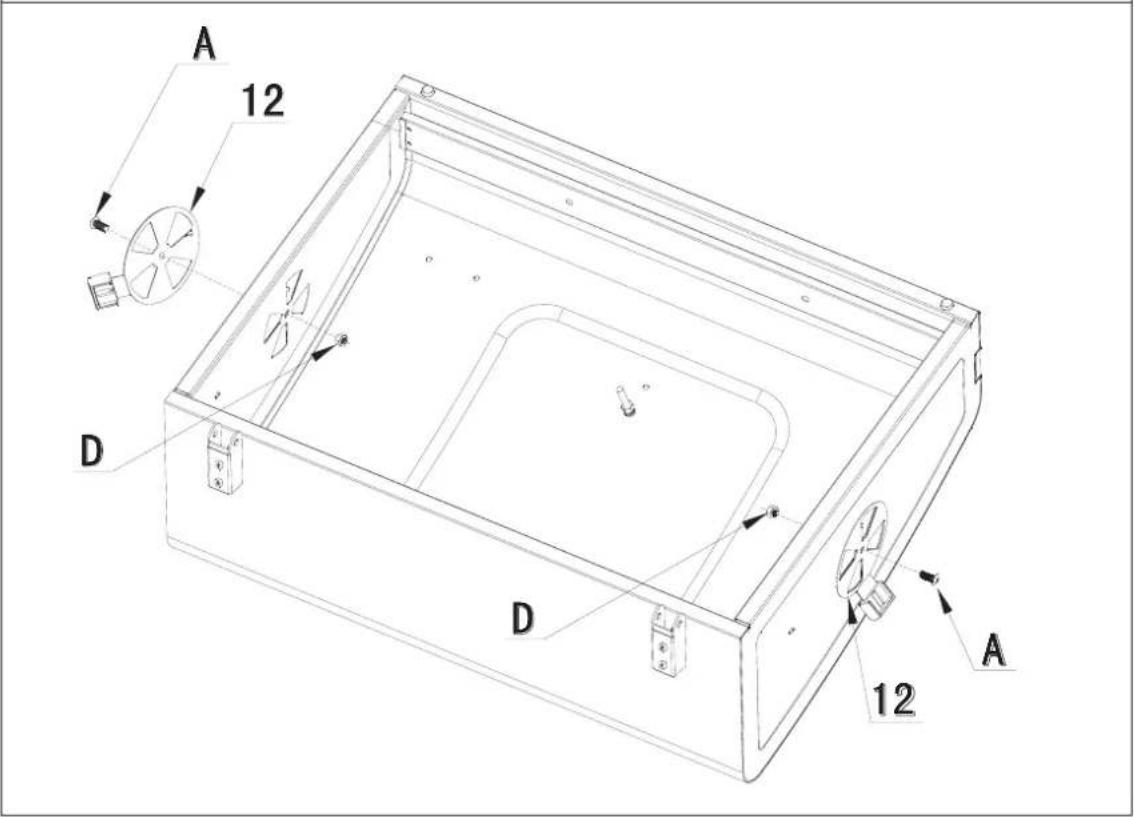
Make sure the holes of the charcoal pan (22) are matched with the holes on Shaft Assembly brackets. Screw the M6x12 Bolts (A) as shown, then tighten them one by one.
STEP12

Loosen the pre-assembled M8 Nut and spring washer from the handle (34), and then assemble the handle to Charcoal Door according to the diagram as shown.
STEP13

STEP14

STEP15
STEP16
STEP 17
STEP 18

Loosen the pre-assembled M5x28 Bolts from Hood Handle (20), and then assemble the handle together with spacer (21) to the hood according to the diagram as shown.

STEP 19
STEP20

STEP21
Loosen the pre-assembled M5x12 Bolts from Ash Pan Handle (35), and then assemble the handle to Ash Pan (14) according to the diagram as shown.


STEP22

Finish
★★★ PATTON
Technical data for the C2 Charcoal Chef
| Product name | C2 Charcoal Chef |
| Model Number | 55CCE101 |
| Use outdoors only. | |
| Read the instructions before using the appliance. | |
| WARNING: accessible parts may be very hot. Keep young children away. | |
| This appliance must be kept away from flammable materials during use. | |
| Do not move the appliance during use. | |
| Do not modify the appliance. | |
| Retain this manual for future reference. | |
IMPORTANT:
Read the following instructions carefully and be sure your barbecue is properly installed, assembled and cared for.
Failure to follow these instructions may result in serious bodily injury and/or property damage.
If you have any questions concerning assembly or operation, consult your dealer.
SAFETY WARNINGS - READ CAREFULLY
Before assembling or using your new Patton C2 Charcoal Chef, carefully read the instruction manual and all safety warnings!
This symbol "!" indicates a safety warning. Pay special attention to the information following this warning when assembling or using your grill.
Use caution and common sense when operating grill to protect persons and property.
Failure to follow safety warnings could result in bodily injury or property damage.
"!”WARNING "!”
Assembly
- Use caution during assembly or operation of grill. Use caution when reaching into or under grill.
- Properly dispose of packaging materials.
- When moving or lifting grill, use caution to avoid back strains or injuries.
Placement
- Outdoor use only. Do not use grill indoors or in an enclosed or non-ventilated area.
Household use only. Do not operate this grill for other than its intended use. - Never use grill on a wooden surface or other flammable surfaces. Use grill only on a hard, stable surface that can support the grill's weight.
- Keep 10 feet of clearance between grill and any combustible materials when grill is in use (including, but not limited to bushes, shrubs, trees, leaves, grass, wooden decks or fences, buildings, etc.).
- Keep grill away from gasoline and/or other flammable liquids, flammable gases, flammable vapors, or areas where these may be present. Do not store or use grill in these areas.
- In windy conditions, place in an outdoor area that is sheltered from wind.
- Keep out of reach of children and pets.
- When moving or lifting grill, use caution to avoid back strains or injuries.
- Do not try to move or reposition grill while it is in use.
- Store out of reach of children when not in use.
- Don't place goods over 10kgs/22lbs on side shelf.
Lighting a Fire
- Do not use gasoline, kerosene, or alcohol to light charcoal. Using any of these products (or similar products) could cause a flare up, flash fire, or explosion. Severe bodily injury or
- If using lighter fluid to start fire, leave the rolltop hood open until briquettes are ashed over and lighter fluid has burned off. Closing hood too soon could cause fumes from the lighter fluid to accumulate inside the grill. This could cause a flare up or explosion when the hood is opened.
- Do not add lighter fluid to warm or hot coals. A flash fire may result in bodily injury or property damage.
- Do not add instant light charcoal briquettes to an existing fire. A flash fire may result in 2 bodily injury or property damage.
- Do not light grill without the slide out ash pan in place.
Grill Usage and Operation
- It is always recommended to pre burn your grill prior to your first use. By lighting a small charcoal fire to simulate the cooking process, you will burn off any residues or oils created during the manufacturing process.
- Grill is hot when in use - do not touch grill surfaces.
Always wear insulated mitts when grill is in use. - Do not wear loose clothing when using grill or allow hair to come in contact with grill.
- When in use, never leave grill unattended
- Do not operate grill without the slide out ash pan in place.
- Use caution when opening the charcoal pan access door. Charcoal pan access door handle may be hot, use insulated mitts. Follow additional instructions in the "ADDING ADDITIONAL CHARCOAL" section.
-
Use caution when adjusting the charcoal pan -- do not allow adjustable charcoal pan to fall uncontrolled to its lowest position. Adjustable charcoal pan handle may be hot, use insulated mitts.
-
Use caution when opening the hood - push back to its fully opened position. If the hood is left partially open, it may drop suddenly, causing bodily injury. Hood's handle may be hot, use insulated mitts.
- Do not lean on or place more than 10kgs/22lbs on the side shelf.
- Keep a fire extinguisher on hand – in the event the fire gets out of control.
- When fresh air comes in contact with flame, a flare up can result. Use caution when opening hood or charcoal pan access door. Maintain a safe distance from hot steam and flame.
- Close hood and butterfly dampers to extinguish flames.
- To prolong grill finish and metal life, do not exceed a grill temperature of 400^ and do not let burning charcoal or wood come in contact with the walls of the grill.
- Use caution when adjusting the butterfly dampers. The butterfly damper handles may be hot - use insulated mitts.
Ash Disposal and Clean Up
- Do not leave hot grill or hot coals and ashes unattended.
- Do not remove or empty slide out ash pan until coals and ashes have completely cooled.
- Using insulated mitts - after coals and ashes have completely cooled - remove slide out ash pan and empty ashes into a metal container. Douse with water before disposal.
Keep container a safe distance from combustible materials.
- Wet the surfaces beneath and around the grill to extinguish any ashes or coals that may have fallen out of grill.
- To prevent excessive rust: clean grill after each use, cover and store in a dry place.
Exploded view
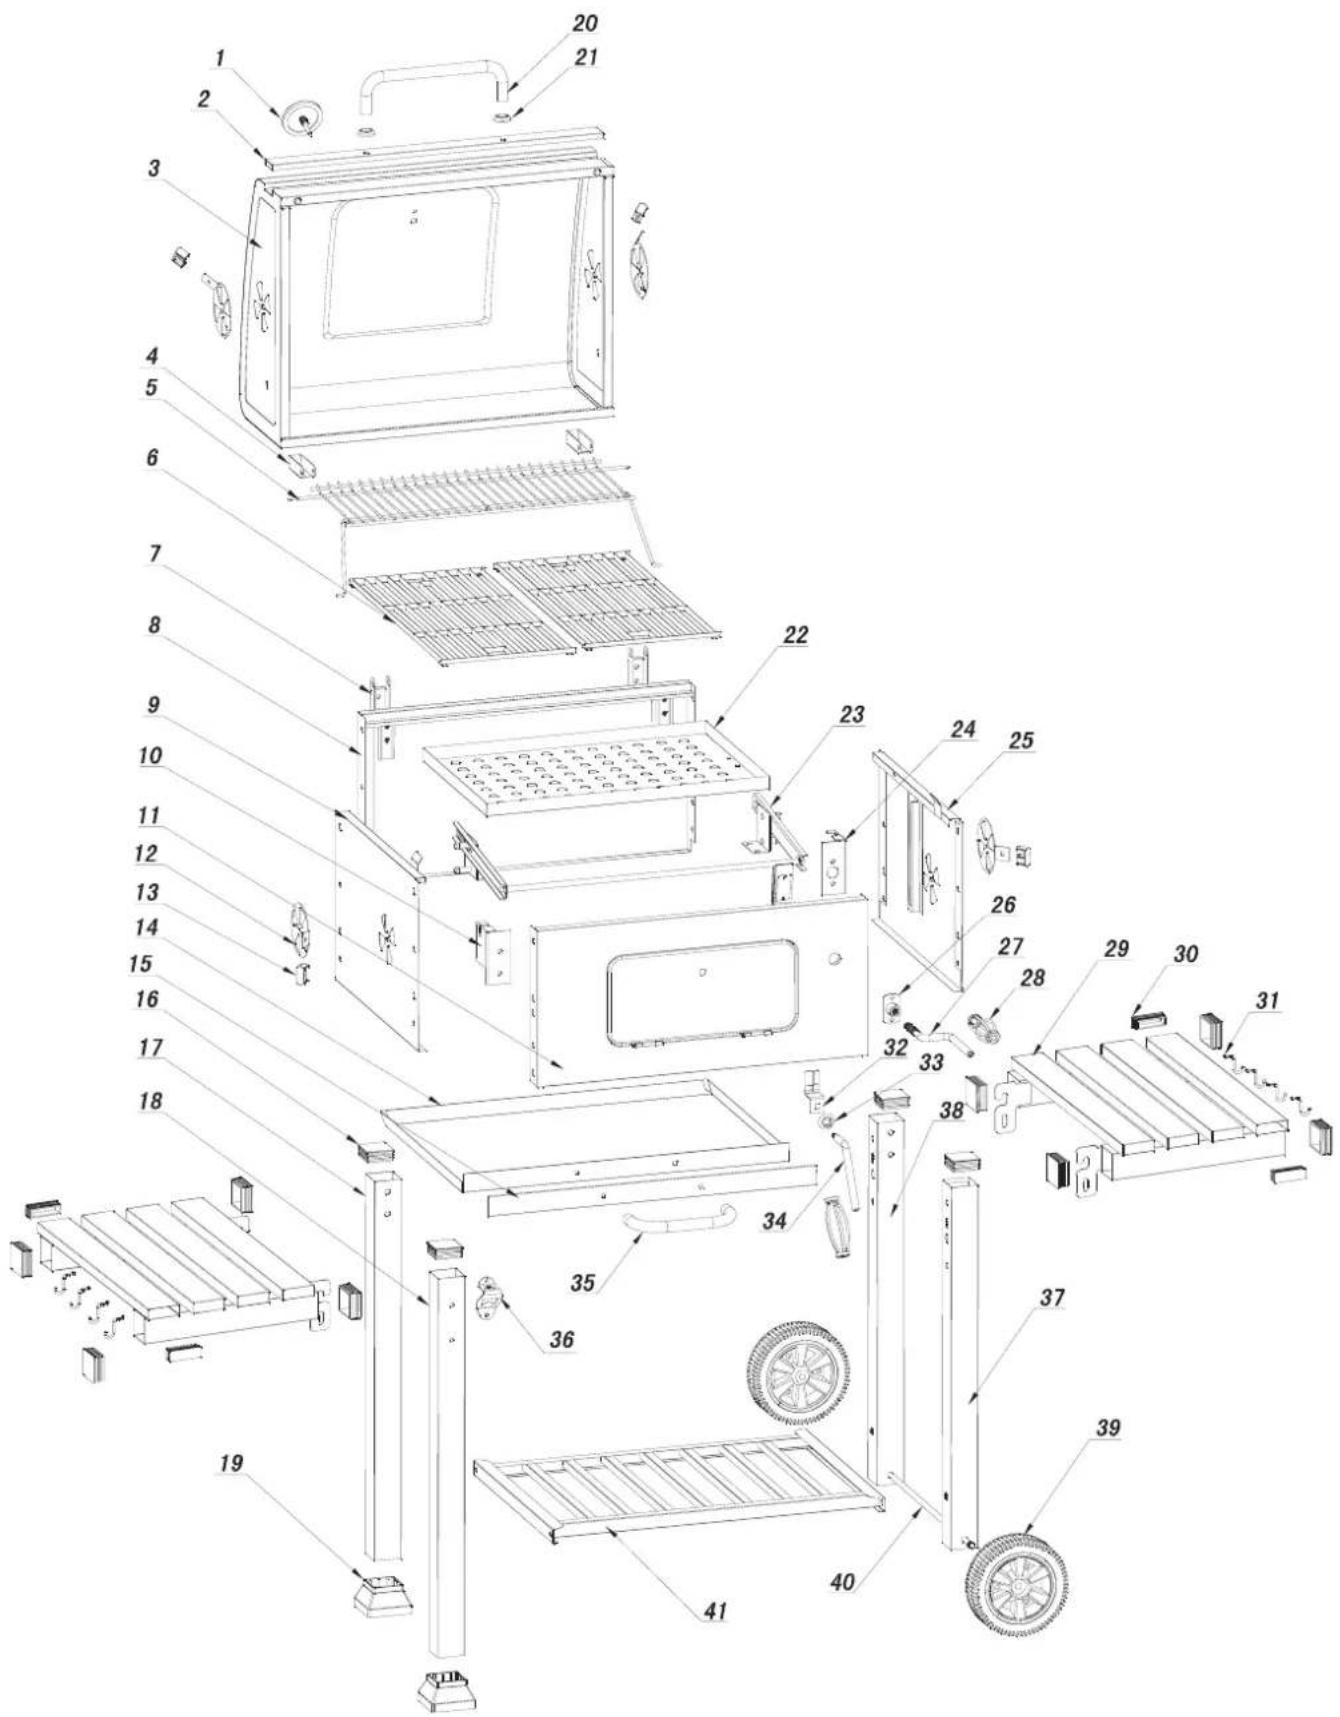
Parts List
| Part | Part Name | Photo | Qty |
| 1 | Temperature Gauge | 1pc | |
| 2 | Lid Decorative Plate | 1pc | |
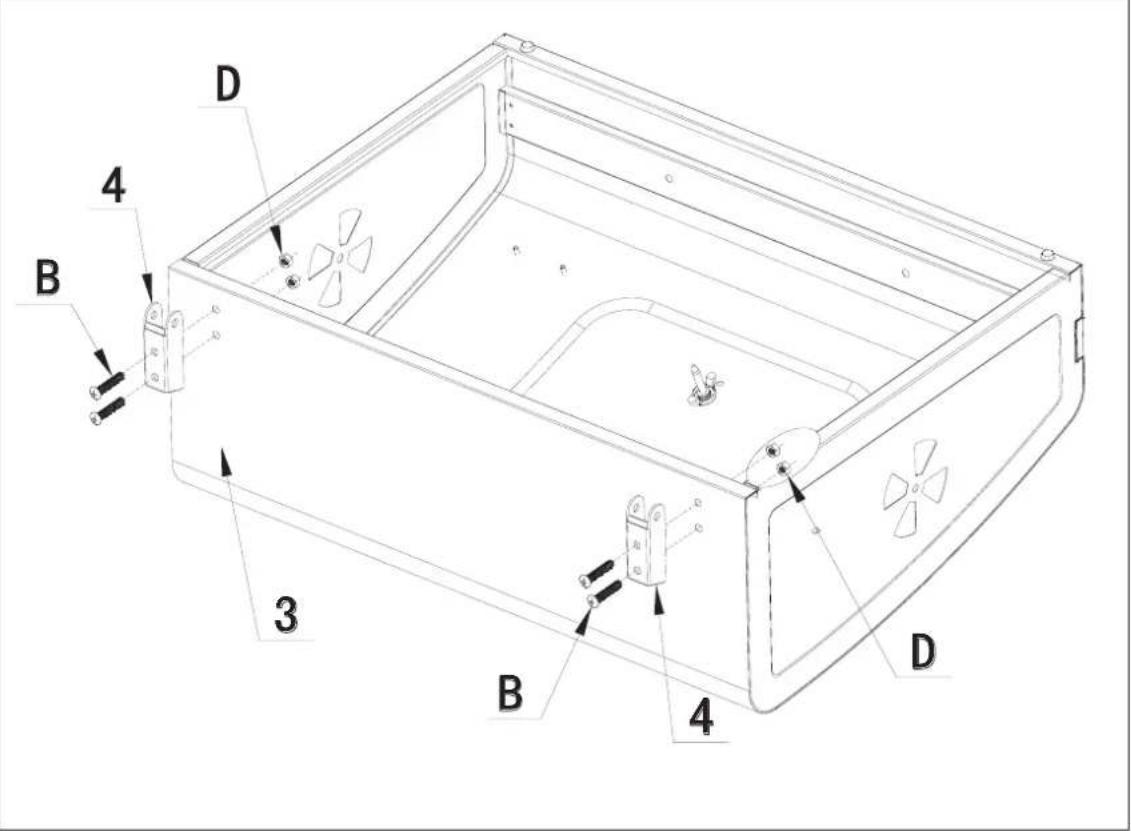
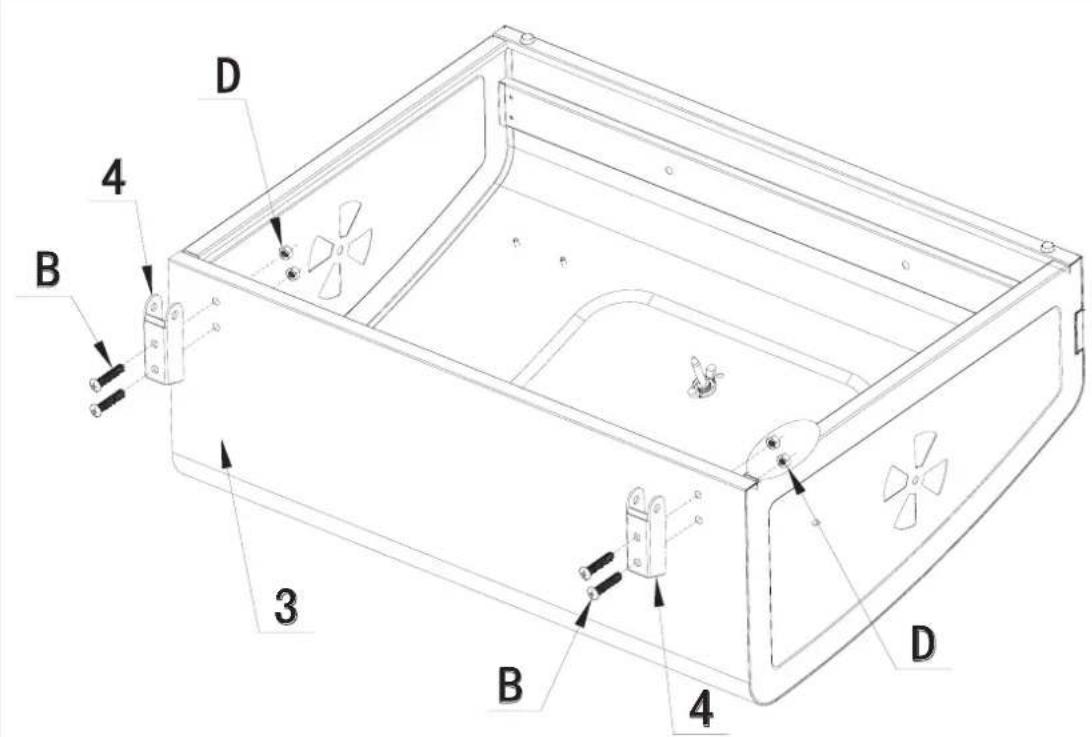
| 3 | Hood Assembly | 1pc | |
| 4 | Upper Hood Hinge | 2pcs | |
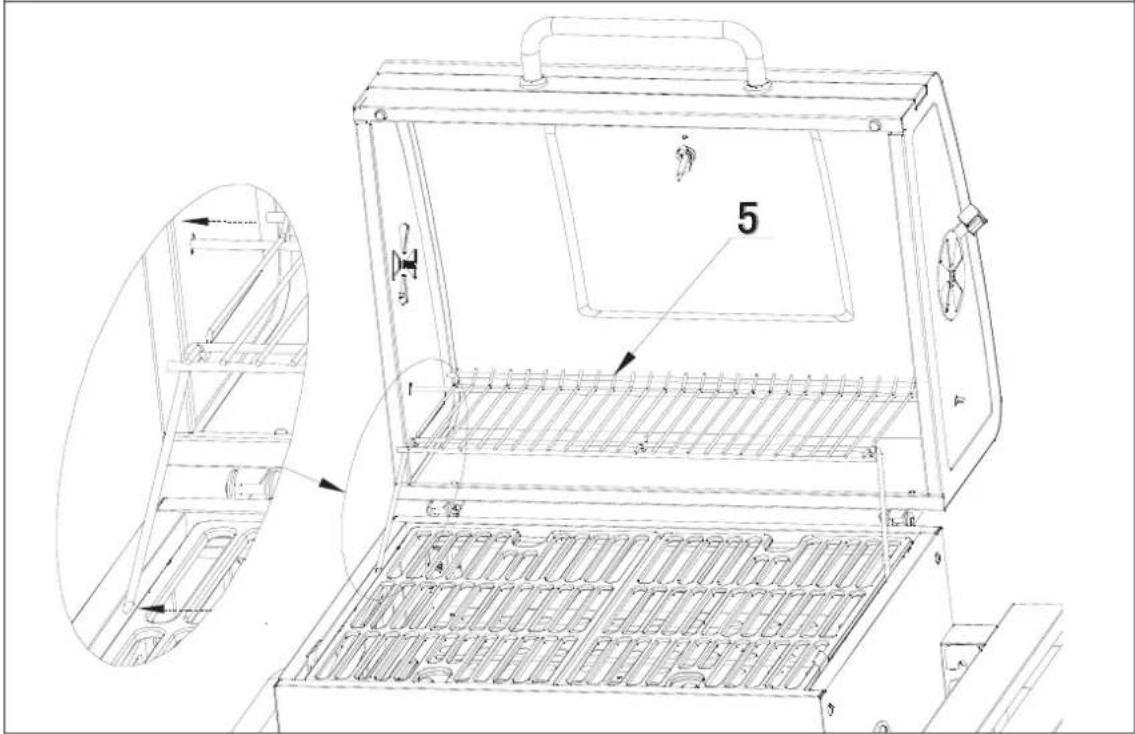
| 5 | Warming Rack | 1pc | |
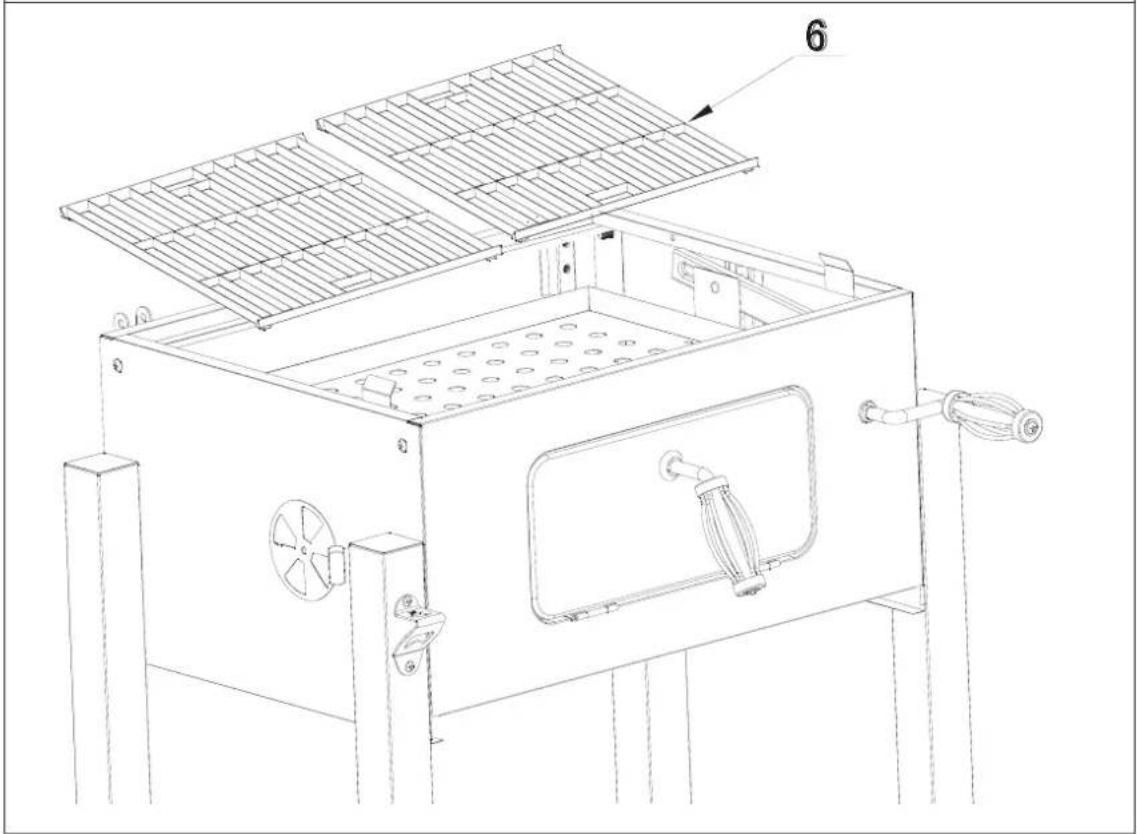
| 6 | Cooking Grid | 2pcs | |
| 7 | Lower Hood Hinge | 2pcs | |
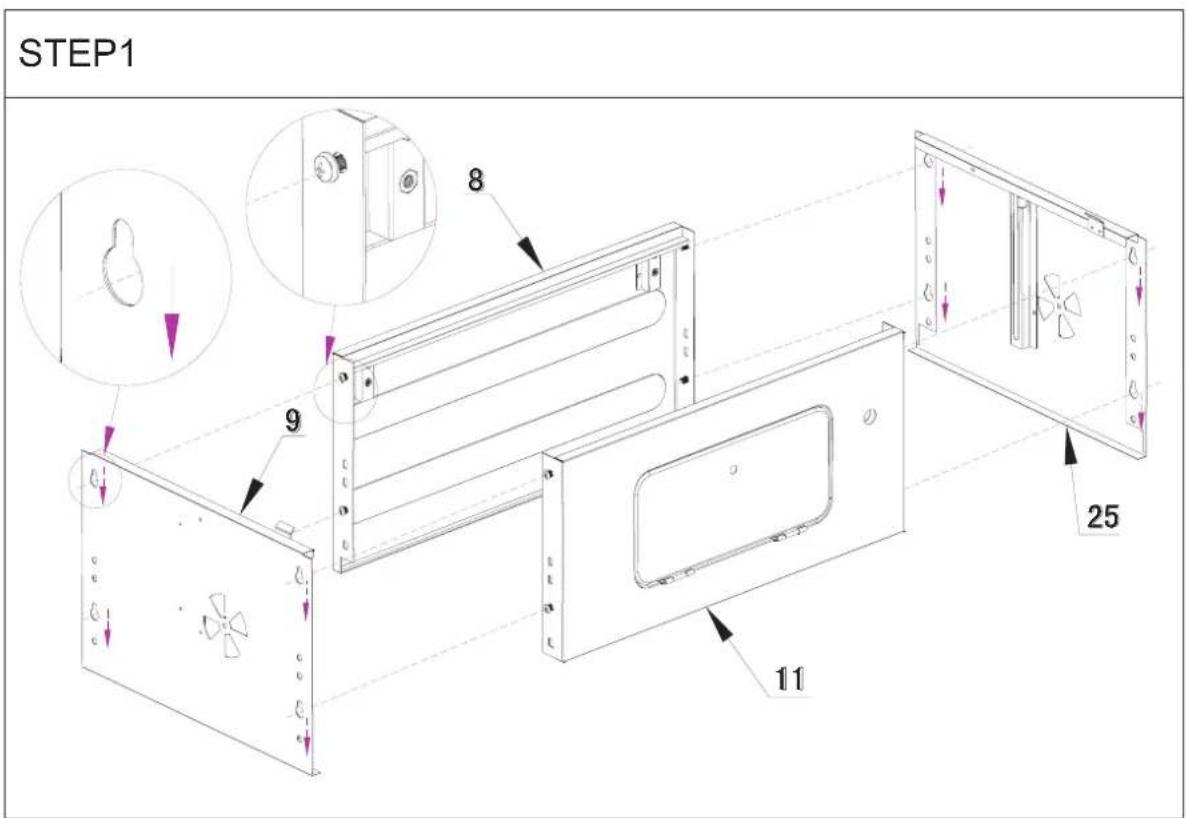
| 8 | Fire Box Back Panel | 1pc | |
| 9 | Fire Box Left Panel | 1pc | |
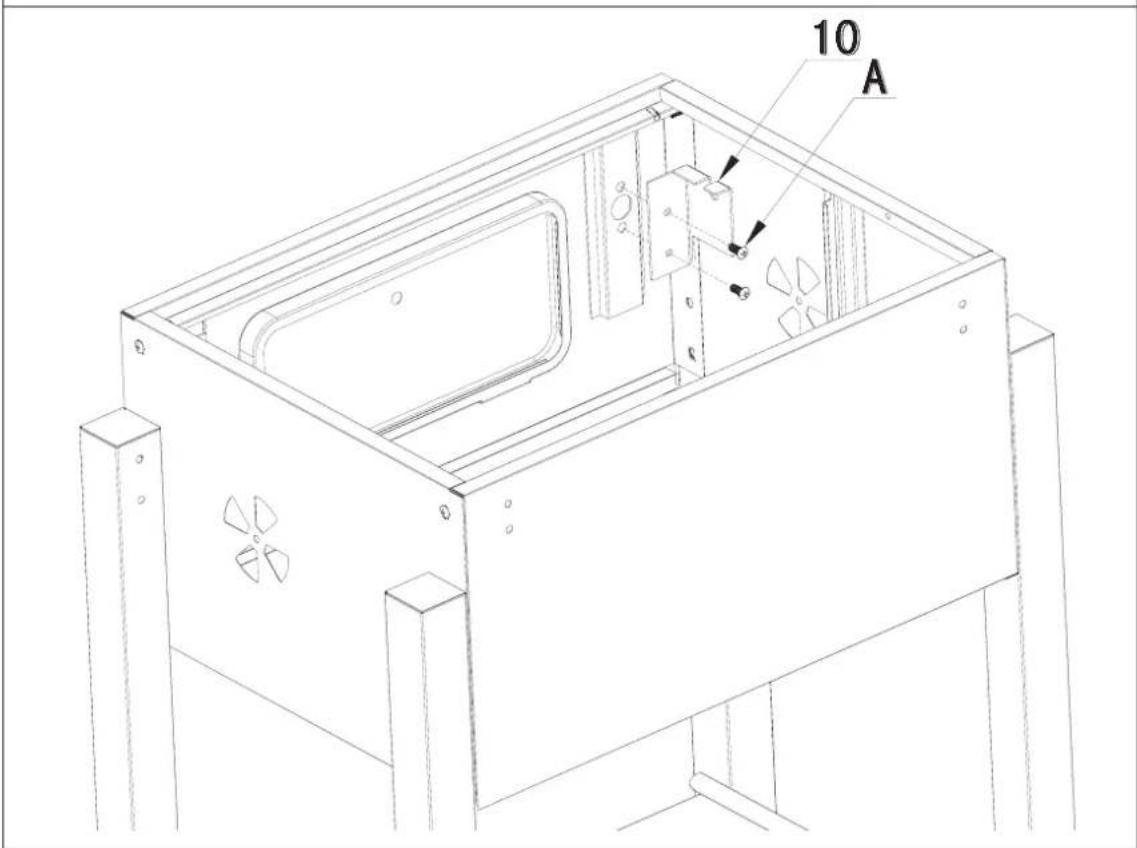
| 10 | Left Shaft Support Bracket | 1 pc |
Parts List
| Part Number | Part Name Photo Qty | ||
| 11 | Fire Box Front Panel with charcoal door (pre-assembled) | 1pc | |
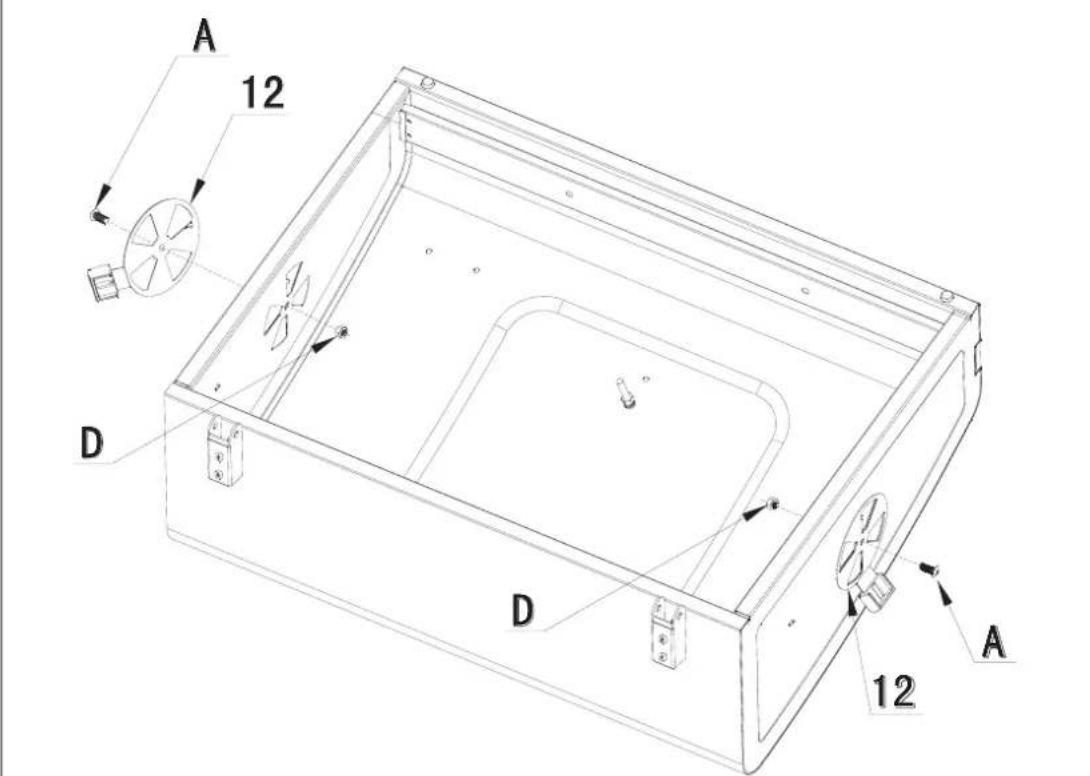
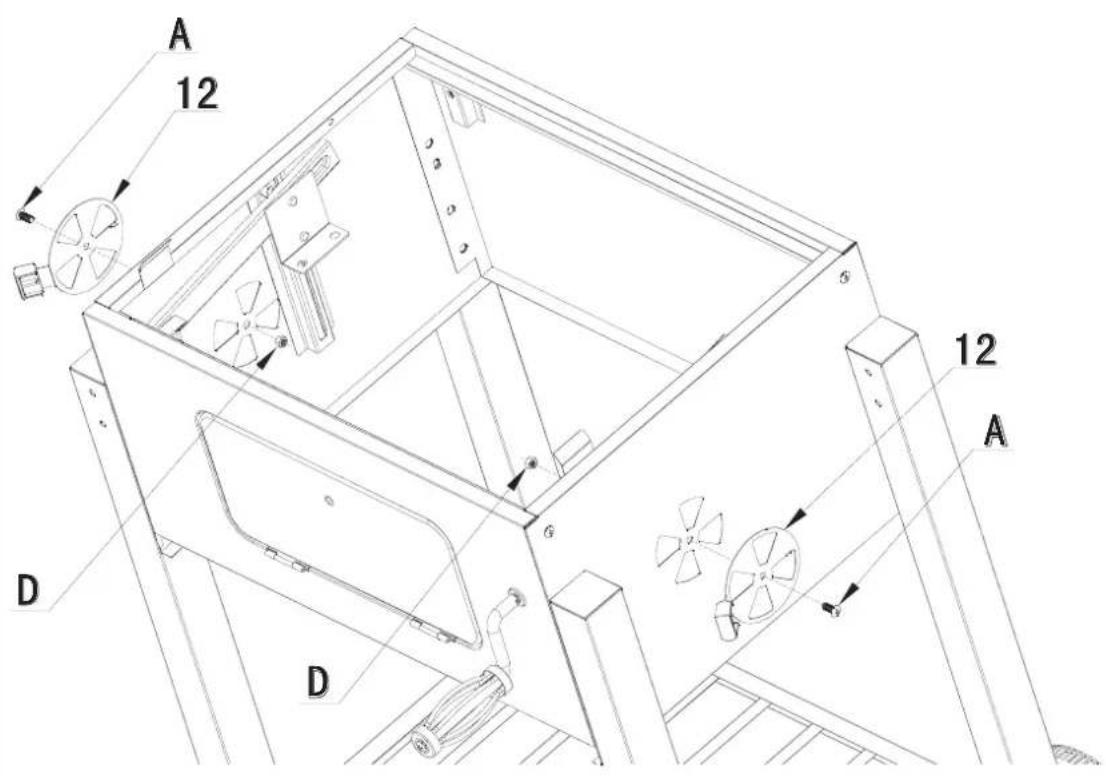
| 12 | Butterfly Damper | 4pcs | |
| 13 | Butterfly Damper Handle | 4pcs | |
| 14 | Ash Pan | 1pc | |
| 15 | Ash Pan Decorative Plate | 1pc | |
| 16 | Large Pipe Plug | 8pcs | |
| 17 | Left Back Leg | 1pc | |
| 18 | Left Front Leg | 1pc | |
| 19 | Leg End Cap | 2pcs | |
| 20 | Hood Handle | 1pc |
Parts List
| Part Number | Part Name Photo Qty | |
| 21 | Spacers | 2pcs |
| 22 | Charcoal Tray | 1pc |
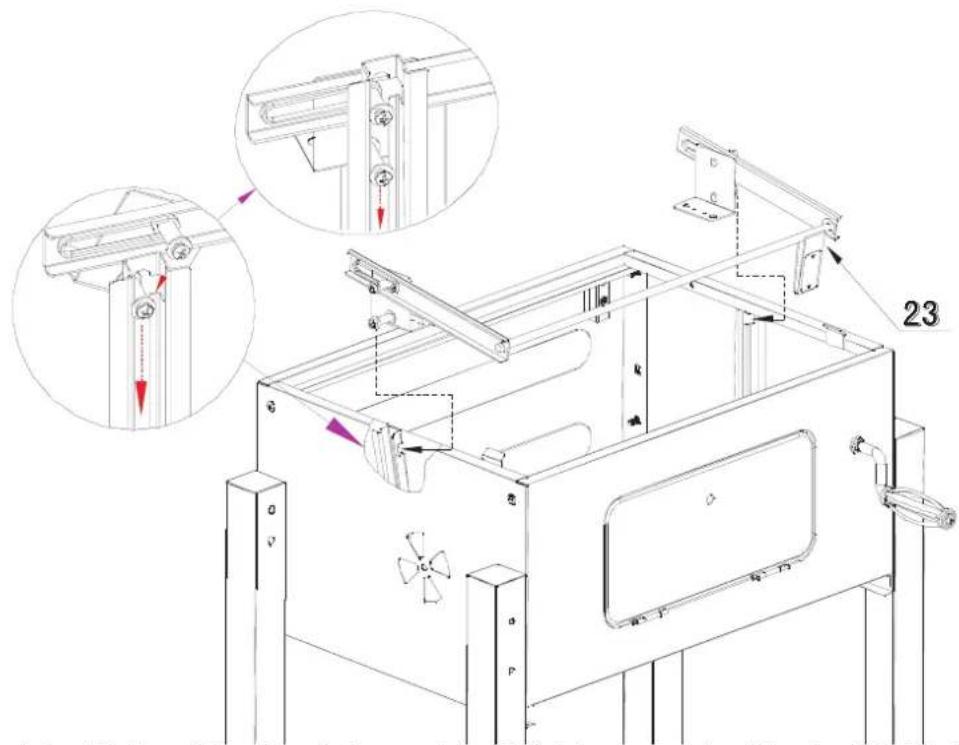
| 23 | Shaft Assembly | 1pc |
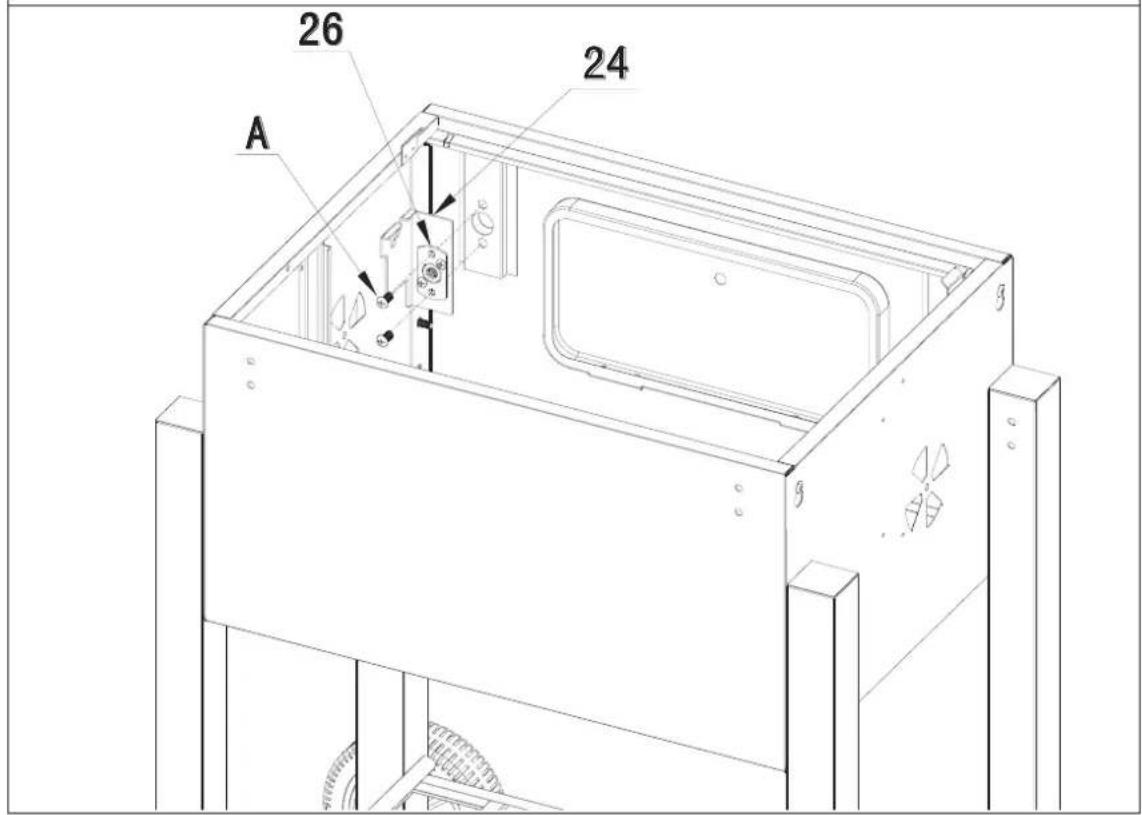
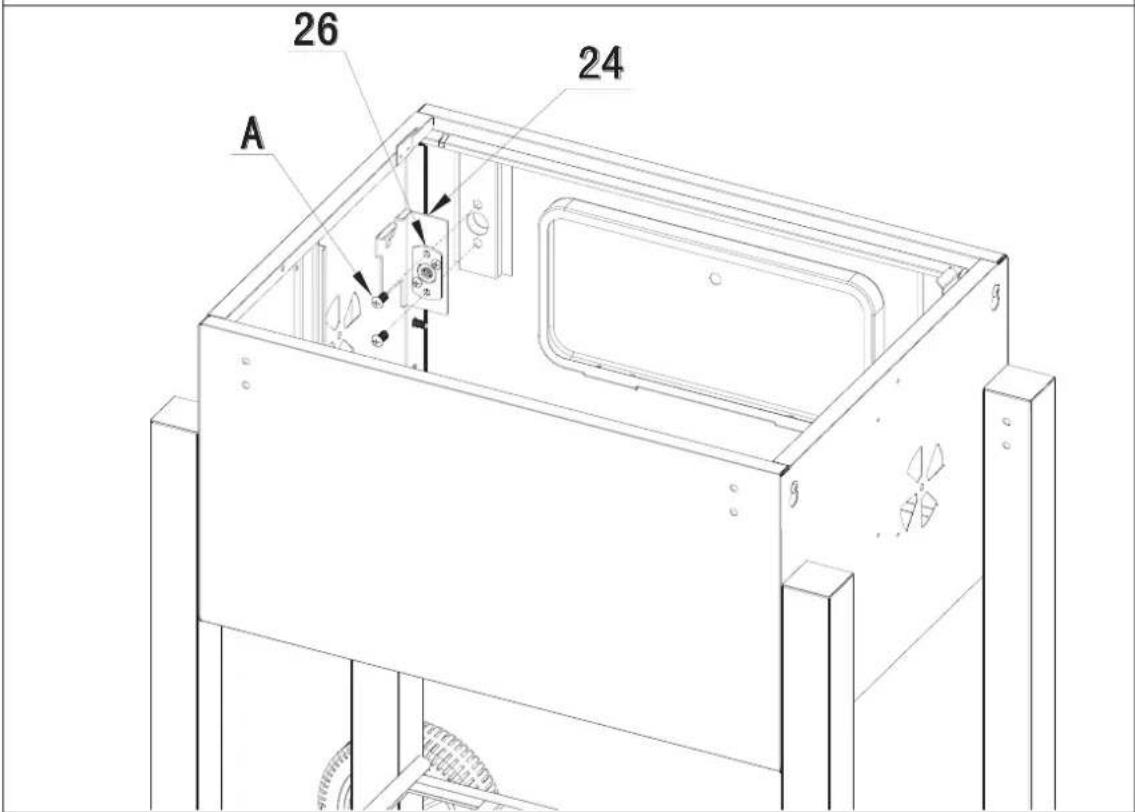
| 24 | Right Shaft Support Bracket | 1pc |
| 25 | Fire Box Right Panel | 1pc |
| 26 | Handle Locking Bracket | 1pc |
| 27 | Crank Handle | 1pc |
| 28 | Handle Grip | 2pcs |
| 29 | Side Shelf with hooks (pre-assembled) | 2pc |
| 30 | Small Pipe Plug | 4pcs |
Parts List
| Part Number | Part Name | Photo | Qty |
| 31 | Tool Hook | 8pcs | |
| 32 | Door Locking Lever | 1pc | |
| 33 | Trim | 1pc | |
| 34 | Charcoal Door Handle | 1pc | |
| 35 | Ash Pan Handle | 1pc | |
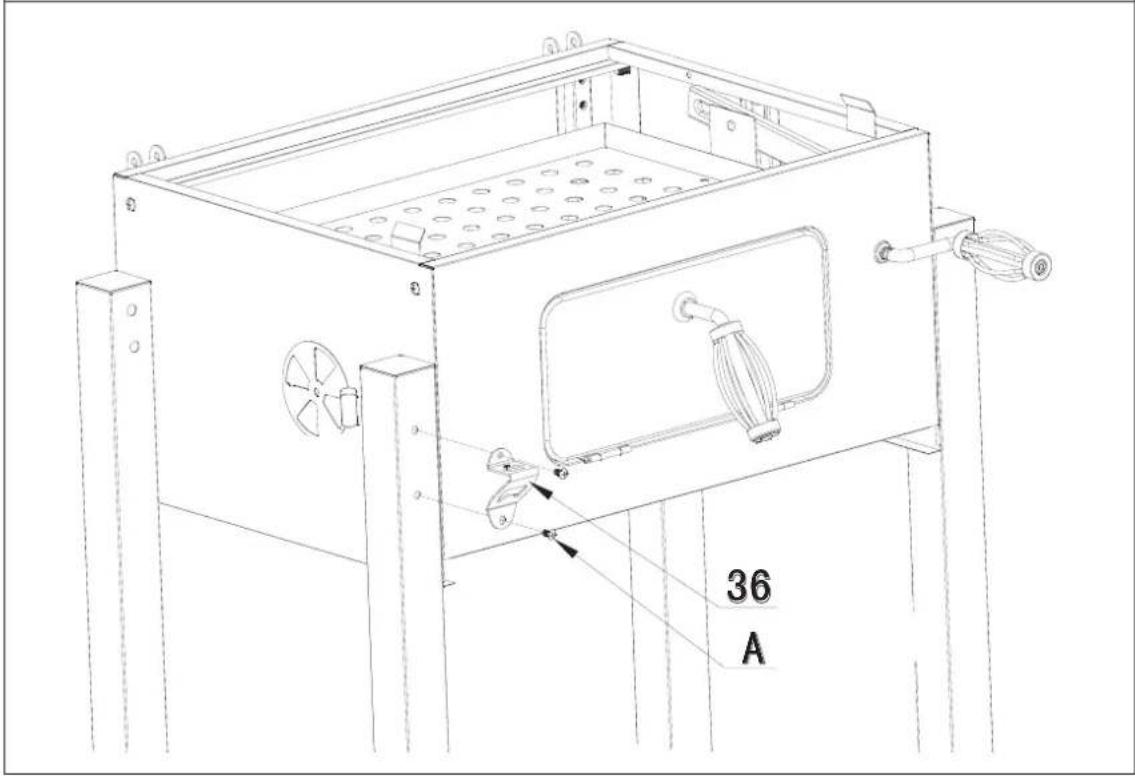
| 36 | Bottle Opener | 1pc | |
| 37 | Right Front Leg | RF | 1pc |
| 38 | Right Back Leg | RB | 1pc |
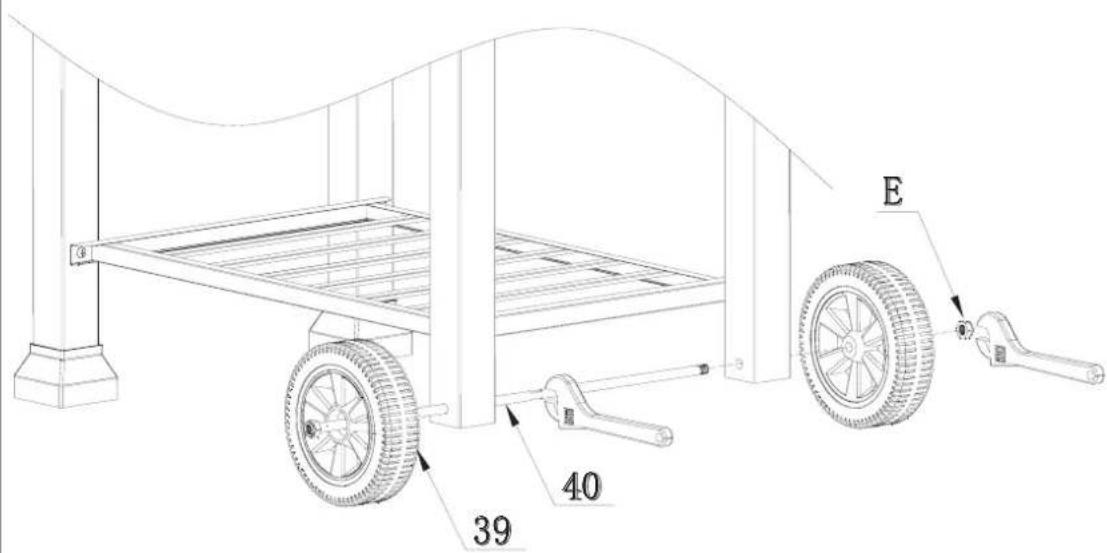
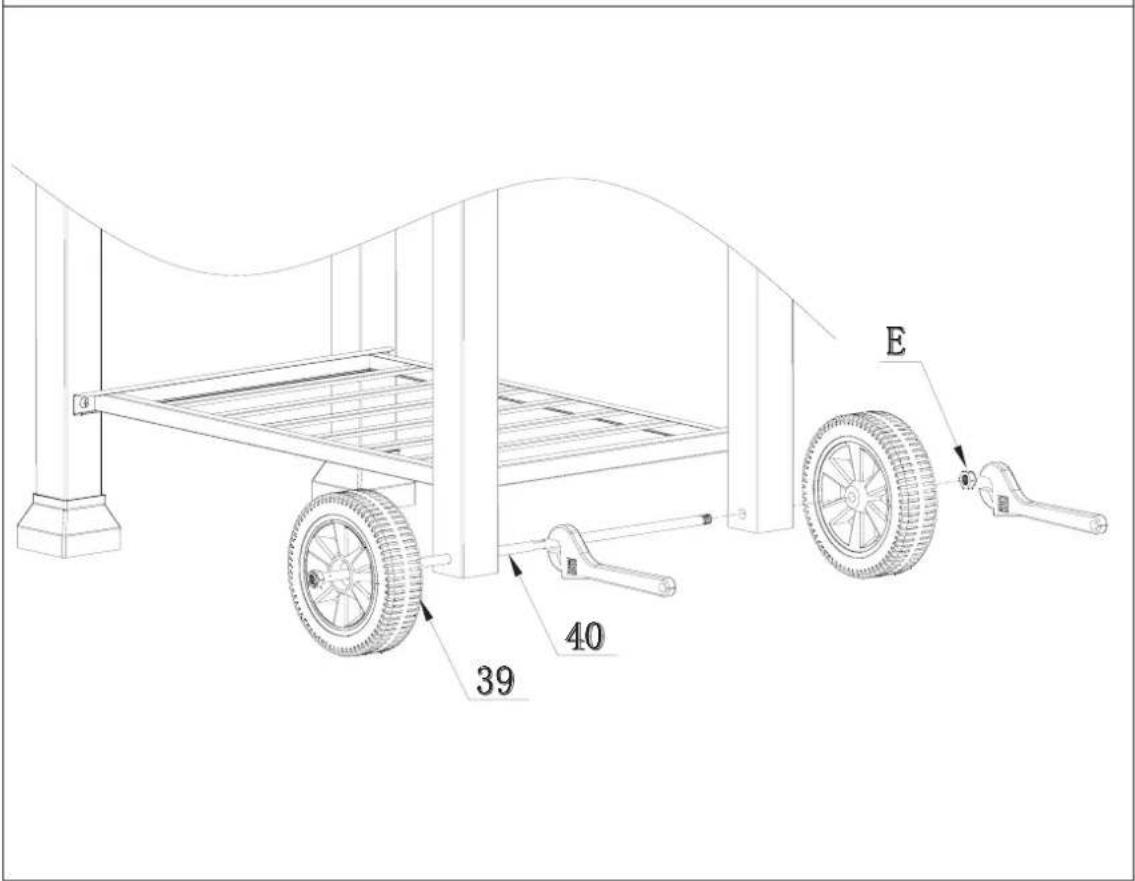
| 39 | Wheel | 2pcs |
Parts List
| Part Number | Part Name Photo Qty | |
| 40 | Axle | 1pc |
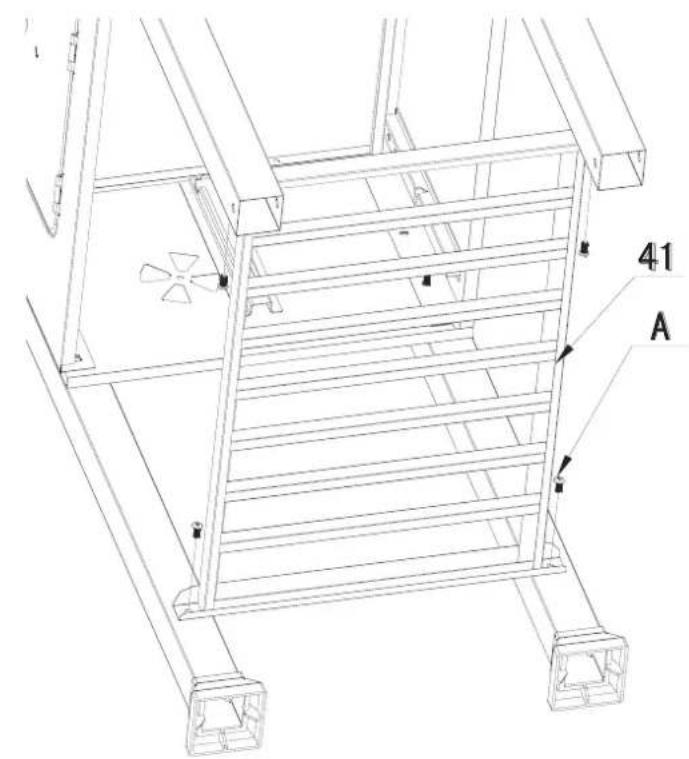
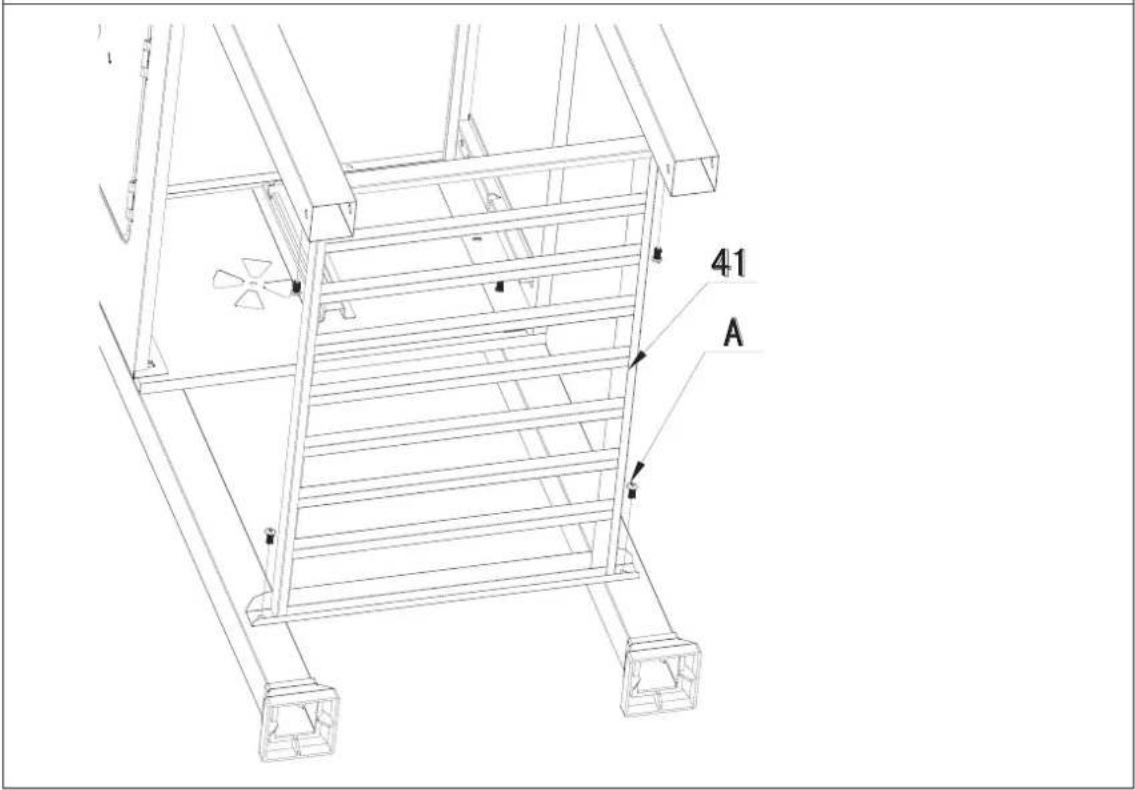
| 41 | Bottom Shelf | 1pc |
Parts List
| Part Number | Part Name Photo | Qty | |
| A M6x12 | 26pcs | ||
| B M6x35 | 8pcs | ||
| C | M6 | 8pcs | |
| D M6 | 8pcs | ||
| E M10 | 1pc | ||
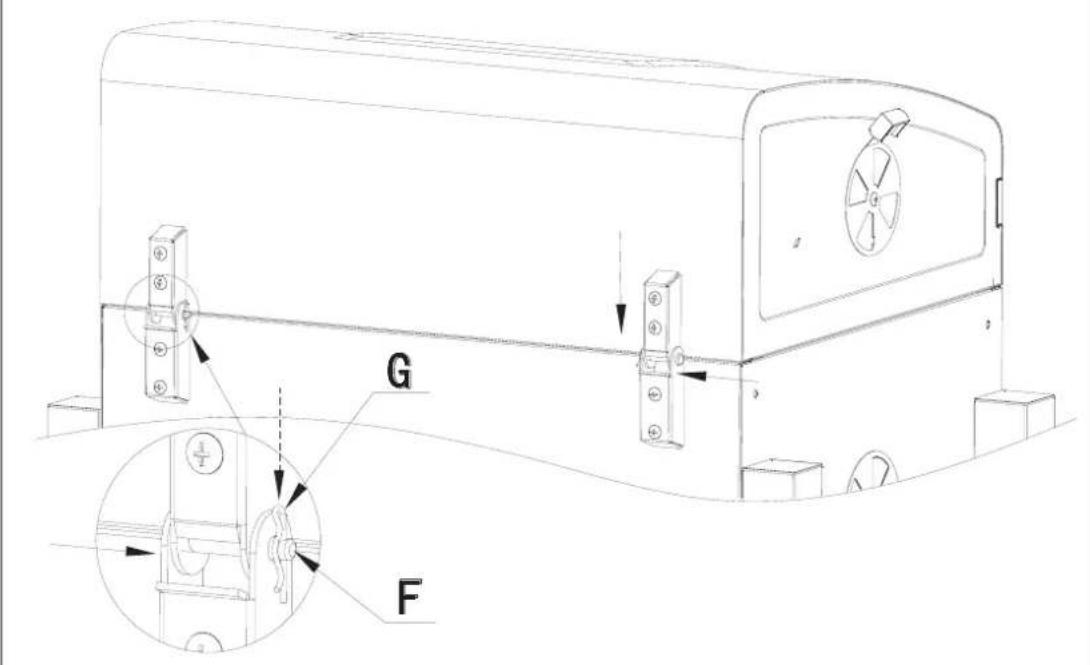
| F | 2pcs | ||
| G | 2pcs | ||
STEP2
Put Leg End Cap (19) into Left Back Leg (17) and Left Front Leg (18). Makesure the bumping on Leg End Cap is locked into the square hole on the legs.
STEP3


STEP4

STEP5

STEP6

STEP7
STEP8

Loosen the pre-assembled Self-Tapping Bolt from the end of Crank Handle (27), then rotate the Crank Handle (27) into the hole of the front panel.
STEP9

Put the Bolts of the Shaft Assembly (23) into the slot of the Left & Right Fire box side panel.


Fit the shaft onto the slot of the bracket of the fire box front panel.
STEP10

STEP11

STEP12

Loosen the pre-assembled M8 Nut and spring washer from the handle (34), and then assemble the handle to Charcoal Door according to the diagram as shown.
STEP13


STEP14

STEP15

STEP16

STEP 17
STEP 18

Loosen the pre-assembled M5x28 Bolts from Hood Handle (20), and then assemble the handle together with spacer (21) to the hood according to the diagram as shown.

STEP 19
STEP20

STEP21
Loosen the pre-assembled M5x12 Bolts from Ash Pan Handle (35), and then assemble the handle to Ash Pan (14) according to the diagram as shown.


STEP22
Finish
★★★ PATTON
Put Leg End Cap (19) into Left Back Leg (17) and Left Front Leg (18). Makes sure the bumping on Leg End Cap is locked into the square hole on the legs.
STEP3


STEP4

STEP5

STEP6

STEP7
STEP8

Loosen the pre-assembled Self-Tapping Bolt from the end of Crank Handle (27), then rotate the Crank Handle (27) into the hole of the front panel.
STEP9

Put the Bolts of the Shaft Assembly (23) into the slot of the Left & Right Fire box side panel.


Fit the shaft onto the slot of the bracket of the fire box front panel.
STEP10

STEP11

STEP12
Loosen the pre-assembled M8 Nut and spring washer from the handle (34), and then assemble the handle to Charcoal Door according to the diagram as shown.
STEP13

STEP14

STEP15
STEP16

STEP 17
STEP 18
Loosen the pre-assembled M5x28 Bolts from Hood Handle (20), and then assemble the handle together with spacer (21) to the hood according to the diagram as shown.

STEP 19
STEP20

Attach the another side shelf according to the diagram as shown.

STEP21
Loosen the pre-assembled M5x12 Bolts from Ash Pan Handle (35), and then assemble the handle to Ash Pan (14) according to the diagram as shown.

STEP22

Finish
★★★ PATTON
Lento smoking utilizes temperature much more, but it is also a way to make money. Lento smoking is in real estate and mode of curare carni rather than cuocerli. Lento smoking is the ideal one for manzo, formaggio and salsiccia.
Put Leg End Cap (19) into Left Back Leg (17) and Left Front Leg (18). Makesure the bumping on Leg End Cap is locked into the square hole on the legs.
STEP3
STEP4
STEP5

STEP6

STEP7
STEP8
Loosen the pre-assembled Self-Tapping Bolt from the end of Crank Handle (27), then rotate the Crank Handle (27) into the hole of the front panel.

STEP9

Put the Bolts of the Shaft Assembly (23) into the slot of the Left & Right Fire box side panel.


Fit the shaft onto the slot of the bracket of the fire box front panel.
STEP10

STEP11

STEP12

Loosen the pre-assembled M8 Nut and spring washer from the handle (34), and then assemble the handle to Charcoal Door according to the diagram as shown.
STEP13


STEP14
STEP15
STEP16

STEP 17
STEP 18

Loosen the pre-assembled M5x28 Bolts from Hood Handle (20), and then assemble the handle together with spacer (21) to the hood according to the diagram as shown.

STEP 19
STEP20
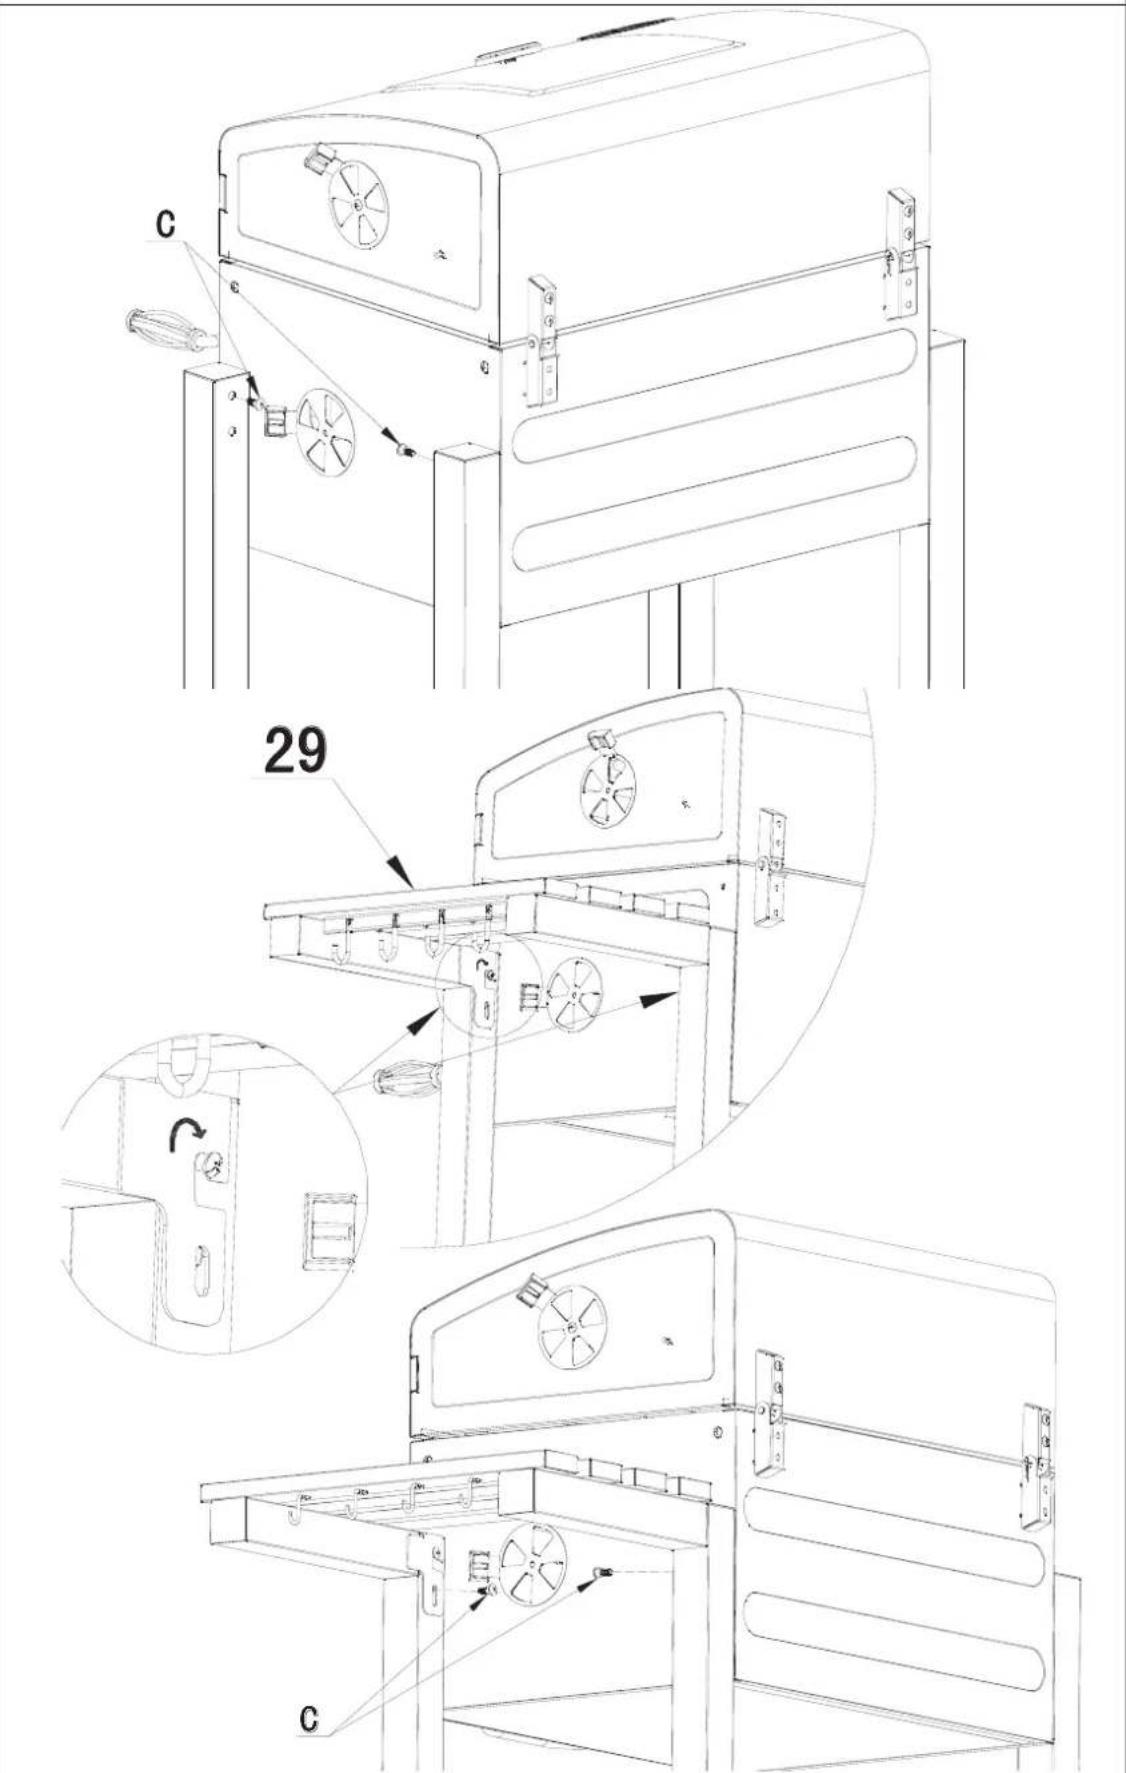
Attach the another side shelf according to the diagram as shown.

STEP21
Loosen the pre-assembled M5x12 Bolts from Ash Pan Handle (35), and then assemble the handle to Ash Pan (14) according to the diagram as shown.


STEP22

Finish