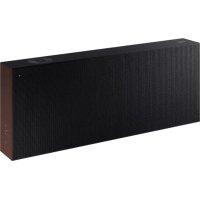
VL550 - Pregnant SAMSUNG - Free user manual and instructions
Find the device manual for free VL550 SAMSUNG in PDF.



| Product Type | Wireless Speaker |
| Brand | Samsung |
| Model | VL550 |
| Dimensions (W x H x D) | 522.0 x 211.5 x 70.0 mm |
| Weight | 4.6 kg |
| Power Supply | AC/DC Adapter (100-240 V AC, 50/60 Hz) |
| Wireless Connectivity | Wi-Fi 2.4/5 GHz, Bluetooth |
| Wired Connectivity | AUX Input (3.5 mm jack), LAN Port (Ethernet) |
| Speakers | 3 woofers, 2 tweeters, 4 ohms |
| Main Functions | Play/Pause, touch volume control, voice recognition, Audio Group, Spotify Connect, SmartThings, Amazon Alexa |
| Remote Control | Wireless, rechargeable via micro USB, battery life up to 90 days |
| Standby Power Consumption | 3.0 W (all network ports active) |
| Operating Temperature | +5 °C to +35 °C |
| Operating Humidity | 10% to 75% |
| Safety | Surge protection, do not open, avoid water |
| Cleaning | Dry, soft cloth |
| Repairability | Repair by Samsung authorized center |
| Box Contents | Speaker, remote control, AC/DC adapter, power cord, quick setup guide, regulatory guide |
Frequently Asked Questions - VL550 SAMSUNG
User questions about VL550 SAMSUNG
0 question about this device. Answer the ones you know or ask your own.
Ask a new question about this device
Download the instructions for your Pregnant in PDF format for free! Find your manual VL550 - SAMSUNG and take your electronic device back in hand. On this page are published all the documents necessary for the use of your device. VL550 by SAMSUNG.
USER MANUAL VL550 SAMSUNG
WI R E L E S S A U D I O V L Series
Safety Information
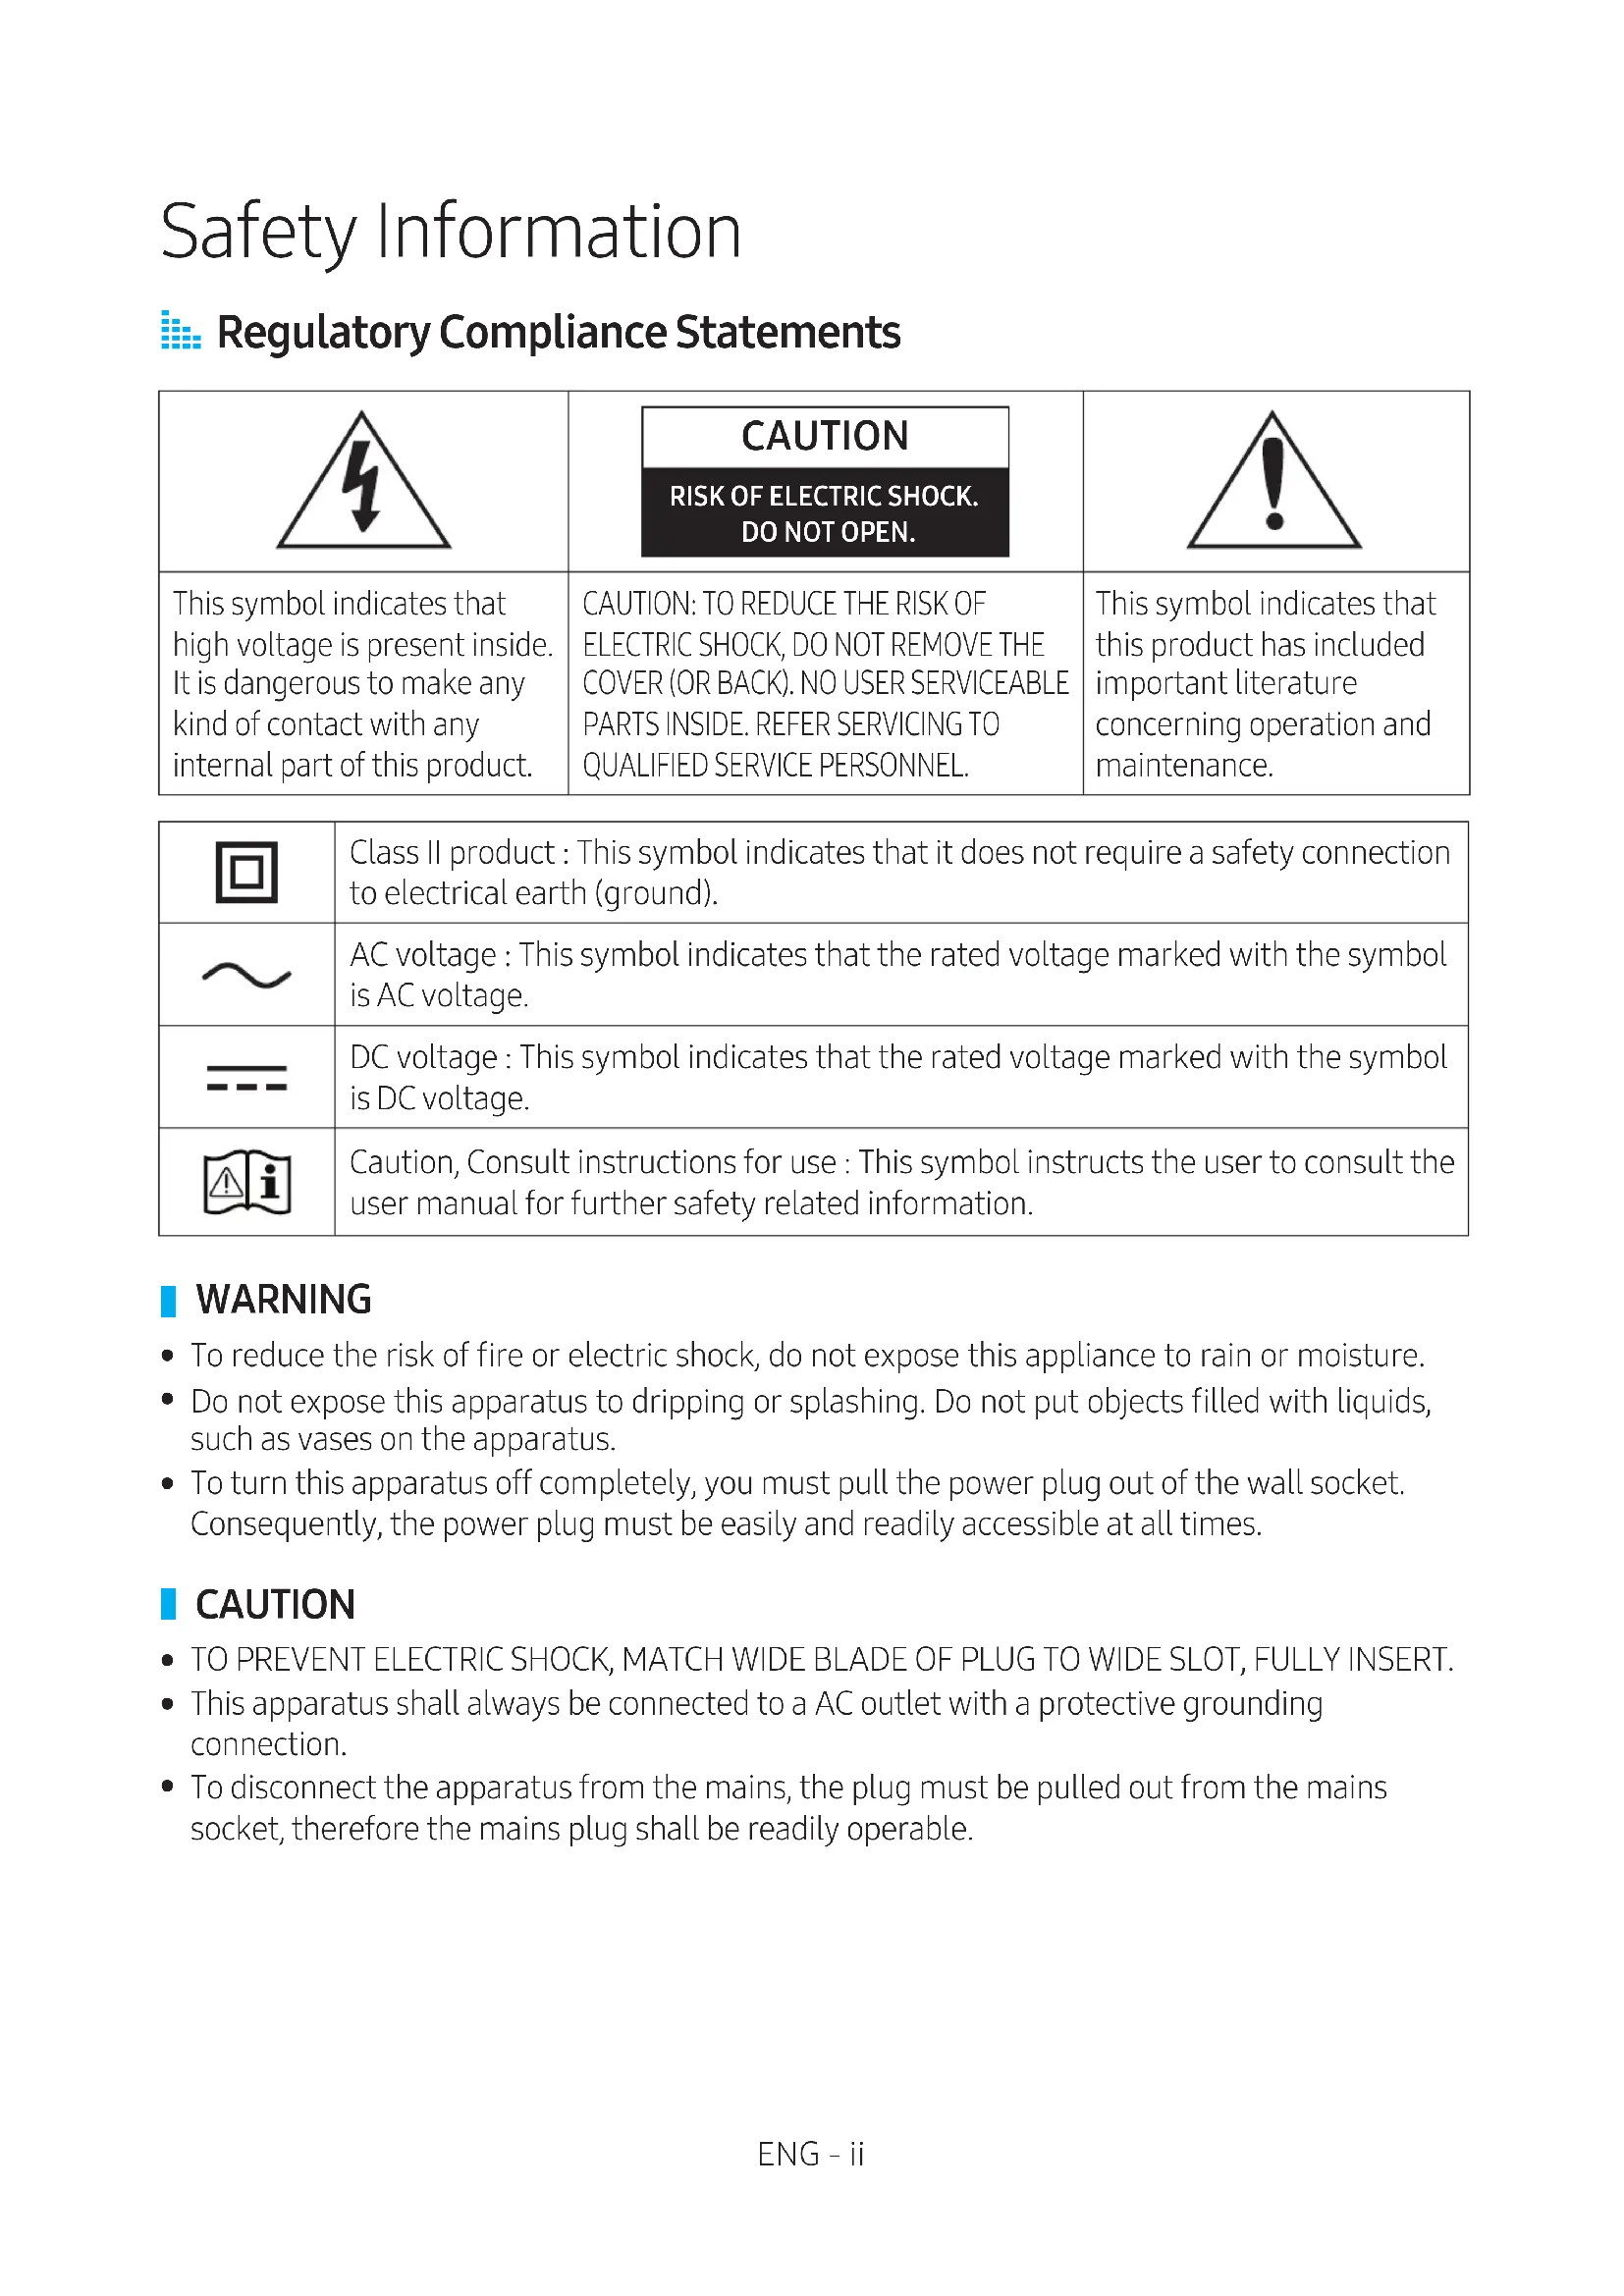
Regulatory Compliance Statements
| 4 | CAUTION RISK OF ELECTRIC SHOCK. DO NOT OPEN. | ! |
| This symbol indicates that high voltage is present inside. It is dangerous to make any kind of contact with any internal part of this product. | CAUTION: TO REDUCE THE RISK OF ELECTRIC SHOCK, DO NOT REMOVE THE COVER (OR BACK). NO USER SERVICEABLE PARTS INSIDE. REFER SERVICING TO QUALIFIED SERVICE PERSONNEL. | This symbol indicates that this product has included important literature concerning operation and maintenance. |
| 回 | Class II product : This symbol indicates that it does not require a safety connection to electrical earth (ground). |
| ~ | AC voltage : This symbol indicates that the rated voltage marked with the symbol is AC voltage. |
| --- | DC voltage : This symbol indicates that the rated voltage marked with the symbol is DC voltage. |
| ▲i | Caution, Consult instructions for use : This symbol instructs the user to consult the user manual for further safety related information. |
WARNING
- To reduce the risk of fire or electric shock, do not expose this appliance to rain or moisture.
- Do not expose this apparatus to dripping or splashing. Do not put objects filled with liquids, such as vases on the apparatus.
- To turn this apparatus off completely, you must pull the power plug out of the wall socket. Consequently, the power plug must be easily and readily accessible at all times.
CAUTION
- TO PREVENT ELECTRIC SHOCK, MATCH WIDE BLADE OF PLUG TO WIDE SLOT, FULLY INSERT.
- This apparatus shall always be connected to a AC outlet with a protective grounding connection.
- To disconnect the apparatus from the mains, the plug must be pulled out from the mains socket, therefore the mains plug shall be readily operable.
Safety precautions
Power Supply Precautions
-
Do not overload outlets or extension cords.
-
This may result in abnormal heat or fire.
-
Do not plug in or unplug the power cord with wet hands.
-
Do not place the product near heating equipment.
-
To clean the power plug blades, remove the plug from the wall outlet and wipe the blades with a dry cloth only.
-
Do not bend the power cord or pull it forcefully.
-
Do not put heavy objects on the power cord.
-
Do not plug the power cord into a loose or damaged outlet.
-
Fully insert the power cord's plug into the wall outlet so that the plug is firmly attached to the outlet.
-
If the connection is unstable, there is a risk of fire.
-
Before connecting the AC power cord to the DC adaptor outlet, make sure the voltage designation of the DC adaptor corresponds to the local electrical supply.
Installation Precautions
-
Do not install the product near equipment or objects that generate heat or produce fire (candles, mosquito coils, heaters, radiators, etc.). Do not install in direct sunlight.
-
When moving the product, turn off the power and disconnect all cords (include the power cord) from the unit.
-
A damaged cord may cause a fire and poses a risk of electric shock.
-
Installing the product in environments with high heat or humidity, dust, or extreme cold, can lead to quality problems or cause the product to malfunction. Before you install the product in an environment that is outside the norm, please contact a Samsung dealer or service centre for additional information.
-
When placing the product on a shelf, cabinet, or desk, make sure the top panel faces upwards.
-
Do not place the product on an unstable surface (e.g. a shaky shelf, a tilted desk, etc.).
-
Dropping the product can cause it to malfunction and poses a risk of injury. Severe vibration or impact can also cause the product to malfunction and lead to a fire hazard.
-
Install your product with enough space around it for ventilation.
-
Leave at least 10cm at the rear of the product and more than 5cm on each side of the product.
-
Keep the plastic packing materials out of reach of your children.
- Children playing with the plastic packing materials run the risk of suffication.
Usage Precautions
- Using for an extended time at high volume may cause serious damage to your hearing.
- If you are exposed to sound louder than 85db for an extended time, you may adversely affect your hearing. The louder the sound is, the more seriously damaged your hearing may become. Note that an ordinary conversation is between 50 to 60 db and road noise is approximately 80 db.
- This product contains dangerous high voltage. Do not attempt to disassemble, repair, or modify it yourself.
- Contact a Samsung dealer or service centre when your product is in need of repair.
- Do not place any container that contains liquid on the product (e.g. a vase, beverages, cosmetics, chemicals, etc.). Do do not allow any metal objects (e.g. coins, hair clips, etc.) or flammable material (e.g. paper, matches, etc.) to enter the product (through the air vents, I/O ports, etc.).
- If any harmful material or liquid enters the product, turn off the product immediately, unplug the power cord, and then contact a Samsung dealer or service centre.
- Do not drop the product. In case of a mechanical breakdown, disconnect the power cord and contact a Samsung dealer or service centre.
- There is a risk of fire or electric shock.
- Do not hold or pull the product by the power cord or the signal cable.
- A damaged cable can cause the product to malfunction, cause a fire, and poses a risk of electric shock.
- Do not use or keep flammable materials near the product.
- If the product emits an abnormal sound or a burnt smell or smokes, unplug the power-cord immediately and contact a Samsung dealer or service centre.
- If you smell gas, ventilate the room immediately. Do not touch the power plug of the product. Do not turn the product off or on.
-
Do not strike or subject the product to a sudden shock. Do not pierce the product with a sharp object.
-
This product can be moved and placed indoors.
- This product is not waterproof or dustproof.
- Be careful when moving the product to avoid dropping it and possibly damaging it.
Cleaning Precautions
- Never use alcohol, solvents, waxes, benzene, thinners, air freshener, or lubricants to clean the product, or spray insecticide on the product.
- Using any of these materials can discolour the exterior coating or cause it to split or peel off, or remove the labelling on the product.
- To clean the product, unplug the power cord, and then wipe the product with a clean, dry, soft cloth (Microfiber, cotton).
- Avoid leaving dust on the product. Dust can scratch its surface.
Contents
Safety Information
Regulatory Compliance Statements...
WARNING
CAUTION
Safety precautions.iii
Power Supply Precautions .iii
Installation Precautions..
Usage Precautions..iv
Cleaning Precautions..
Getting Started
Checking the Components. 2
Product Overview. 3
Top / Front / Right Side of the Speaker ....3
Rear of the Speaker. 5
Using Dial Controller 6
Top of the Dial Controller. 6
Bottom of the Dial Controller 8
Connecting between the Dial
Controller and Speaker. 9
Connecting to Bluetooth
Connecting to Wi-Fi
Connecting to an External Device
Connecting an external device via the AUX cable. 13
Additional Functions
Using mobile device voice recognition ... 14
Using via Wi-Fi connection. 16
Using 2 units - Audio Group 16
Using 2 units - Stereo (Dedicated for VL350 / VL351) 17
Connecting with a Samsung Smart TV....19
Connecting an Amazon product. 20
Installing the Wall Mount
Appendix
Troubleshooting 26
Open Source Licence Notice 29
Licences. 29
Specifications 29
Additional Information 31
About the Network Connection 31
Works with SmartThings™ 31
Copyright 31
Getting Started
Checking the Components
Check the components supplied with your speakers.
VL350/VL351

Speaker Dial Controller

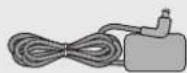
AC/DC Adapter
AC Plug
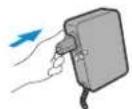
Connect the AC plug to the AC/DC Adapter until you hear a "snapping" sound to ensure they are securely fastened. (Dedicated for VL350 / VL351)
The AC plug may look different or can be an integrated unit with the AC/DC adapter. (Dedicated for VL350 / VL351)
The AC plug cannot be removed after assembly. (Dedicated for VL350 / VL351)
VL550/VL551
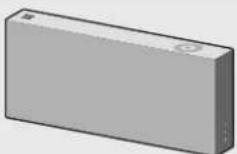
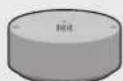

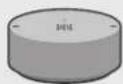
Speaker Dial Controller
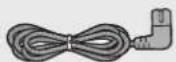
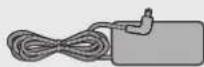
AC/DC Adapter

Power Cable Quick Setup Guide Regulatory Guide
Make sure to rest the AC/DC Adapter flat on a table or the floor. If you place the AC/DC Adapter so that it is hanging with the AC cord input facing upwards, water or other foreign substances could enter the Adapter and cause the Adapter to malfunction.
To purchase additional components or optional cables, contact a Samsung Service Centre or Samsung Customer Care.
CAUTION
- Do not place any items on top off or sit on the main unit.
Handle the product with care as it has sharp edges.
See the speaker's bottom for important safety information.

Product Overview
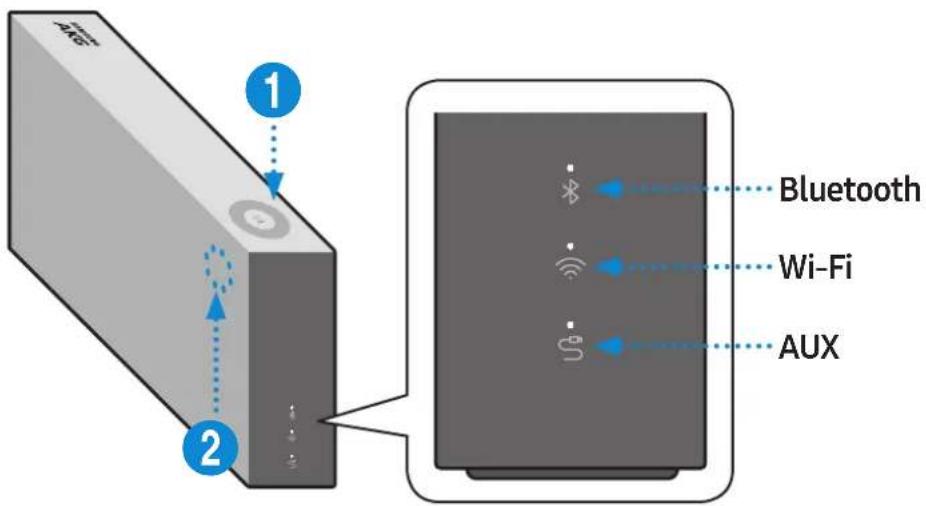
Top / Front / Right Side of the Speaker
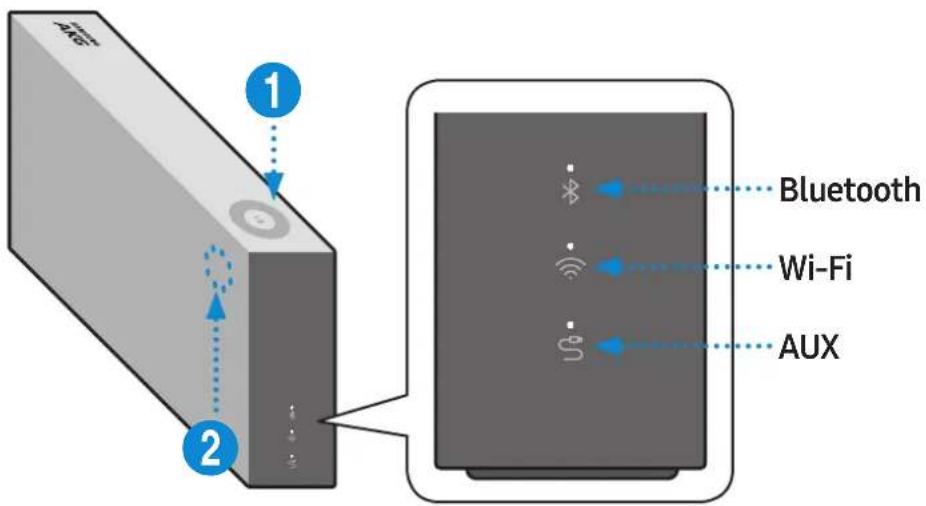

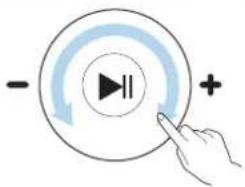
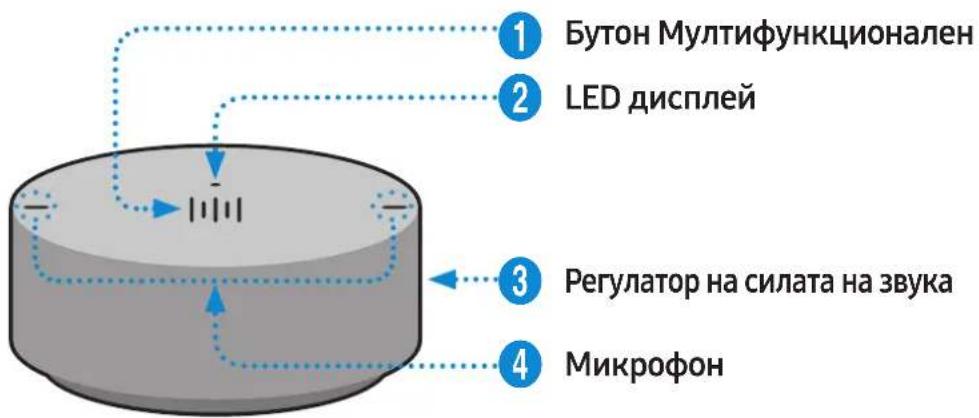
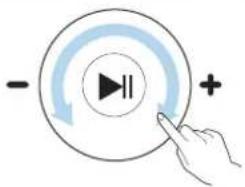
Volume adjustment (Turning the Touch-wheel)
Touch and drag the touch wheel clockwise to increase the volume.
Touch and drag the touch wheel anticlockwise to decrease the volume.
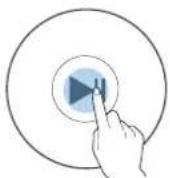
Play/Pause
ouch
to play or pause music.

LED Display
| LED Status | Description | ||
| Operation Mode | |||
| White | On Connected / Normal operation - | ||
| Blinking | Booting - | ||
| Ready for connecting to Dial Controller | - | ||
| Updating the firmware - | |||
| Ready for Wi-Fi connection Wi-Fi | |||
| Blue Blinking Waiting to connect the device Bluetooth | |||
| Red | On | Connection error | - |
| Yellow | Blink once | When the volume is set to Min or Max | - |
| Off | Off | Power saver | - |
If not used for more than 5 minutes, the mode is changed to Standby to decrease energy consumption.
The Bluetooth / Wi-Fi / AUX button activates one function at a time.
Play / Pause and Skip features are not available in AUX mode.
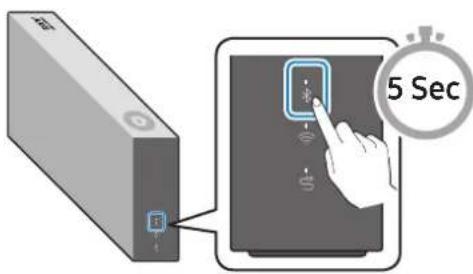
Press Bluetooth button for 5 seconds or more to set up Bluetooth connection.
Mute / unmute feature can be used with the Play / Pause button while in AUX mode or Bluetooth mode (connected to a TV).
Rear of the Speaker
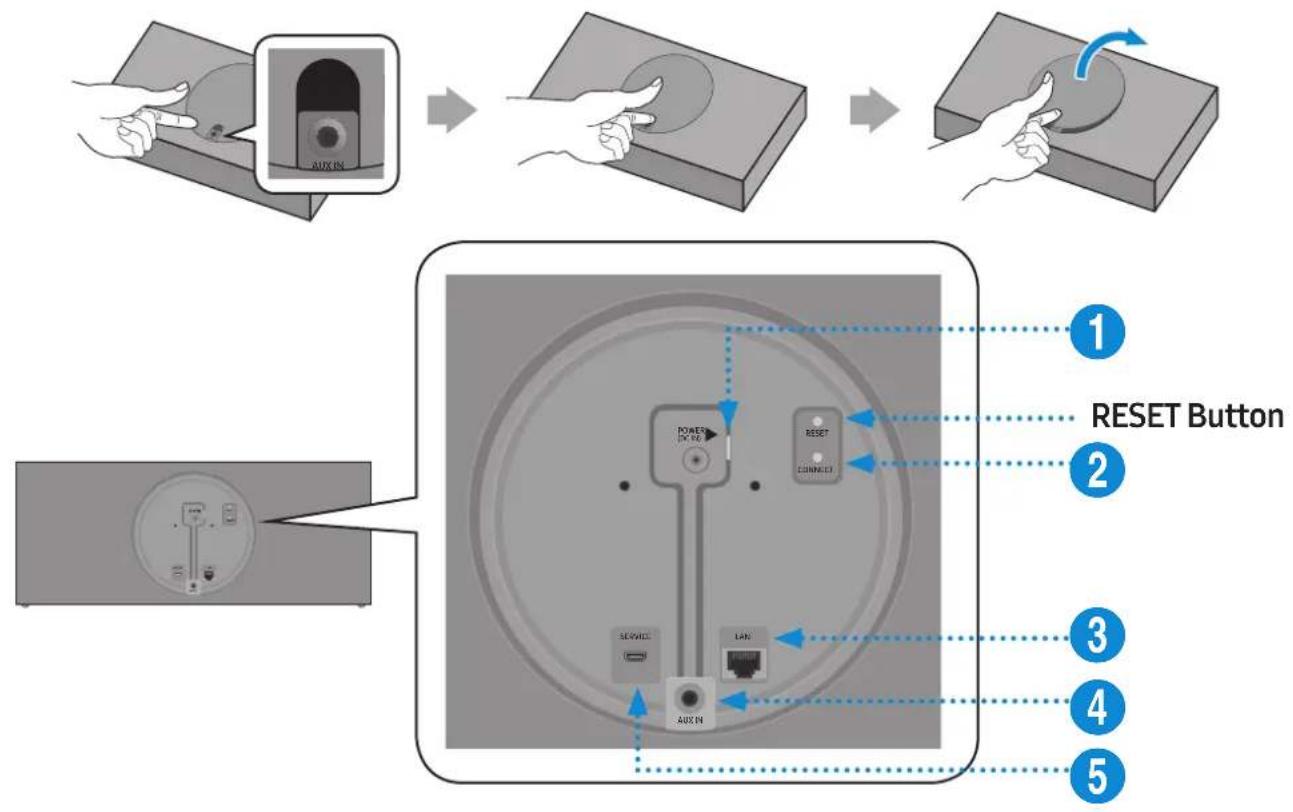

POWER (DC IN) Jack
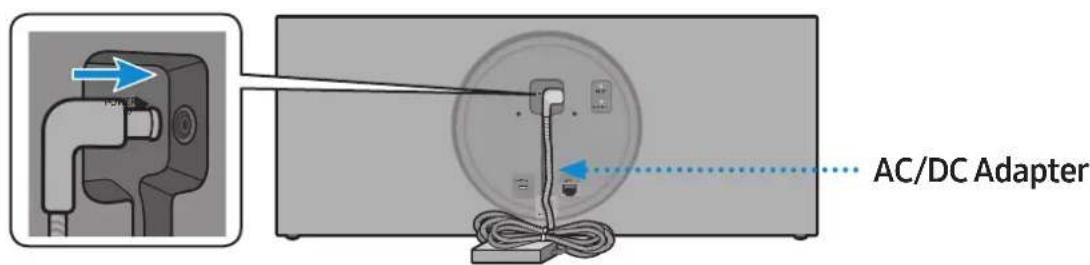
- Connect the power cord to the AC/DC adapter. (Dedicated for VL550 / VL551)
- Connect the AC/DC adapter output power cord (round plug) to the POWER (DC IN) port on the speaker.

CONNECT Button
Press : To disconnect from or reconnect with the Dial Controller. Long press it for 5 seconds : To initiate Wi-Fi connection.

LAN Jack Used to connect the speaker to the wired network.

AUX IN Jack Connect it to the analogue output port on an external device.

SERVICE Jack Used to update the speaker firmware by a service engineer.

Use Cat 7 (STP Type) cable for the connection. ( Shielded Twisted Pair)

The RESET button is for troubleshooting.
Using Dial Controller
Top of the Dial Controller
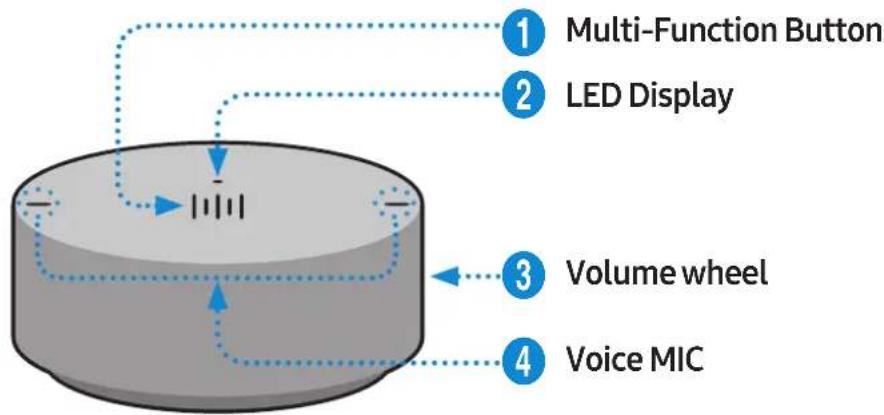

1

X1 Play/Pause Touch
X1 to play or pause music.

X2 Play the next music
Touch X2 to play the next music.

X3 Play the previous music
Touch X3 to play the previous music.
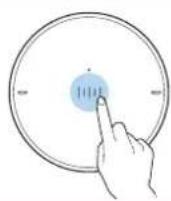

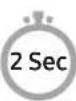
Mobile device voice recognition
Press 1012 seconds to activate the voice recognition service in your mobile device.
- It is available only in Bluetooth mode.

LED Display The indicator blinks, lights, or changes the colour depending on the speaker status.
| LED Status | Description | ||
| Operation Battery | |||
| Off All | Off Standby | Battery discharged | |
| White | On Normal operation Fully charged | ||
| Blinking | Waiting for connection to the speaker | - | |
| Cyan On | Mobile voice recognition active (Dedicated for Bluetooth) | - | |
| Red On | Connection to the speaker failure | - | |
| In error | |||
| Yellow Blink once | When the volume is set to Min or Max | - | |
| Pink | Blink once after key use | - | Battery less than 10 % |
| On Currently charging | |||

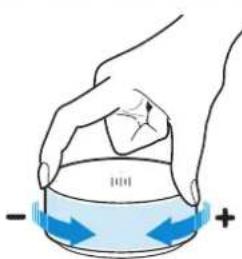
Volume adjustment
(Turning the volume wheel)
Turn the volume wheel clockwise to increase the volume.
Turn the volume wheel anticlockwise to decrease the volume.

Voice MIC MICs that are used for mobile device voice recognition.

Play / Pause and Skip features are not available in AUX mode.
Bottom of the Dial Controller
1 Remove the cover at the bottom of Dial Controller and then turn on the power.
- Charge your Dial Controller before turning the power on.
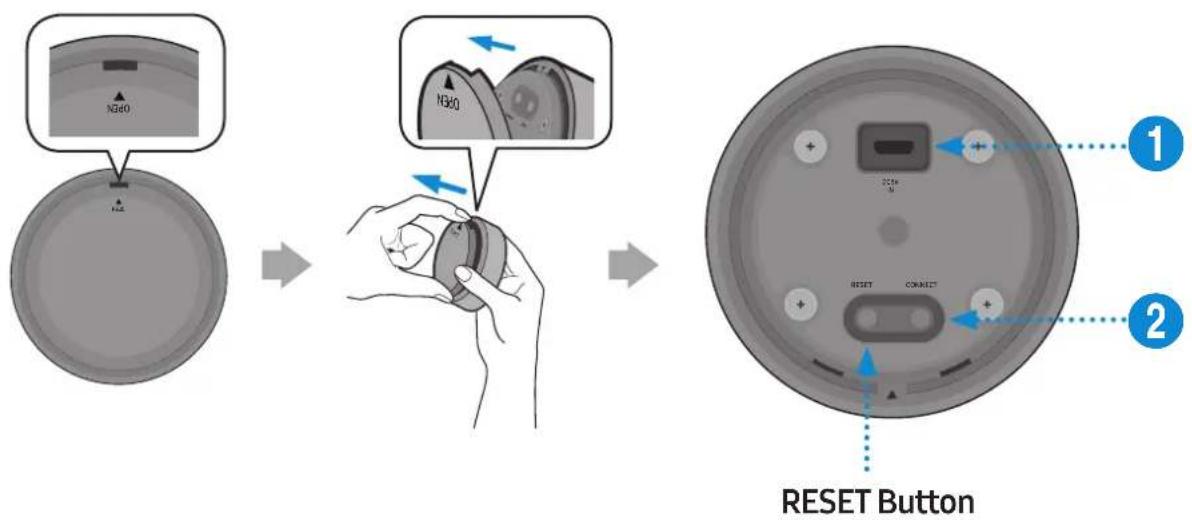
DC 5V IN Jack Connect the Micro USB cable to charge the Dial Controller.
2 CONNECT Try connecting to a Speaker. Button
2 Check the LED status (blinking in pink). If the battery level is low, charge the Dial Controller by connecting the Micro USB cable. (For more information about the LED display, see page 7.)
It takes approximately 3 hours to fully charge the battery. Fully charged battery can last up to 90 days.
Battery life is subject to use conditions and environment.
The RESET button is for troubleshooting.
- Connecting between the Dial Controller and Speaker
* Before use of the Dial Controller
Charge the Dial Controller until the LED lights. (When fully charged, the LED changes to white.)
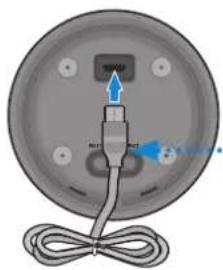
Micro USB Cable (not supplied)
1 Press the CONNECT button on the rear of the speaker.
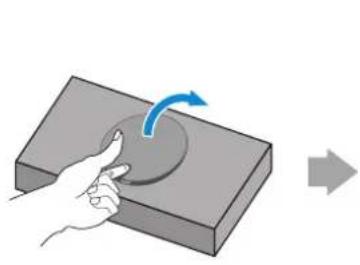
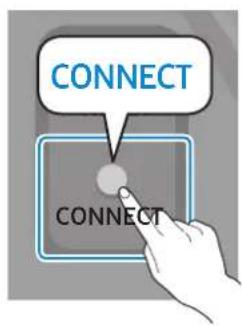
2 Press the CONNECT button on the bottom of the Dial Controller.
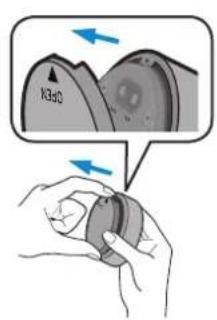
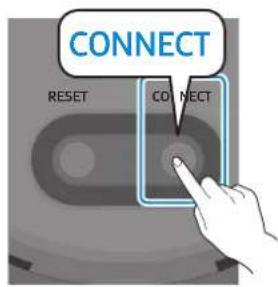
3 Once the Dial Controller and speaker are connected, you can hear voice message, "Pairing is complete," from speaker.

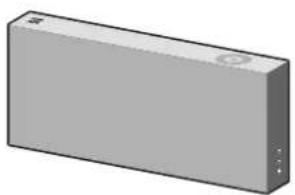
Connecting to Bluetooth
You can connect a mobile device via the Bluetooth, and then enjoy sound from the speaker.
* First time connection
Press the Bluetooth button on the right side of the speaker for 5 seconds or more.
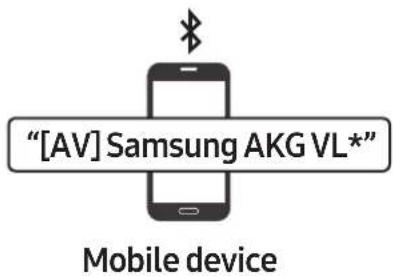
2 Select the speaker from the Bluetooth list on your mobile device and connect it. (e.g. [AV] Samsung AKG VL5)
* Reconnection
Only Step 2 is required when reconnecting to mobile devices.
Bluetooth connection allows you to use voice recognition service in your mobile device.
Connecting to Wi-Fi
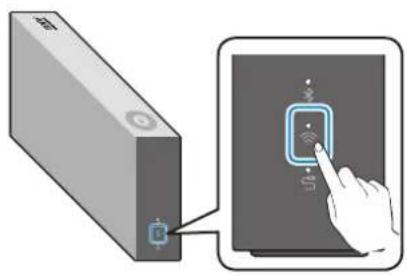
1 Press the Wi-Fi button on the right side of the speaker to switch to Wi-Fi mode.
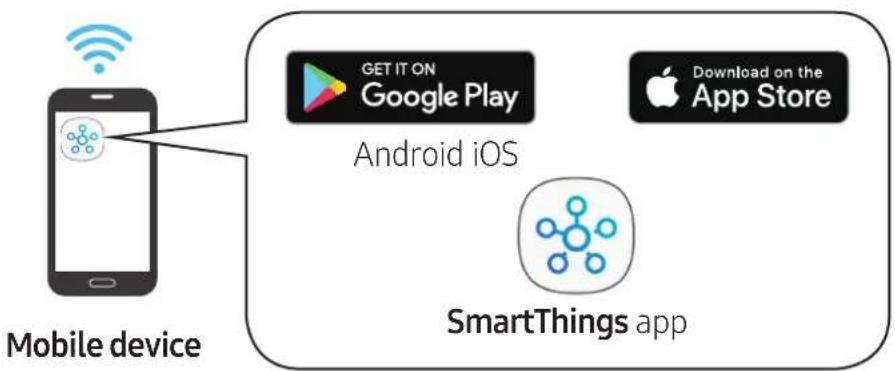
2 Download the SmartThings app to your mobile device and then launch it.
- You cannot configure the settings for the devices that are not supported by the SmartThings app.
- SmartThings requirements : Android 6.0 or newer version / iOS 10.0 or newer version
- To use the SmartThings app, a Samsung Account is required.
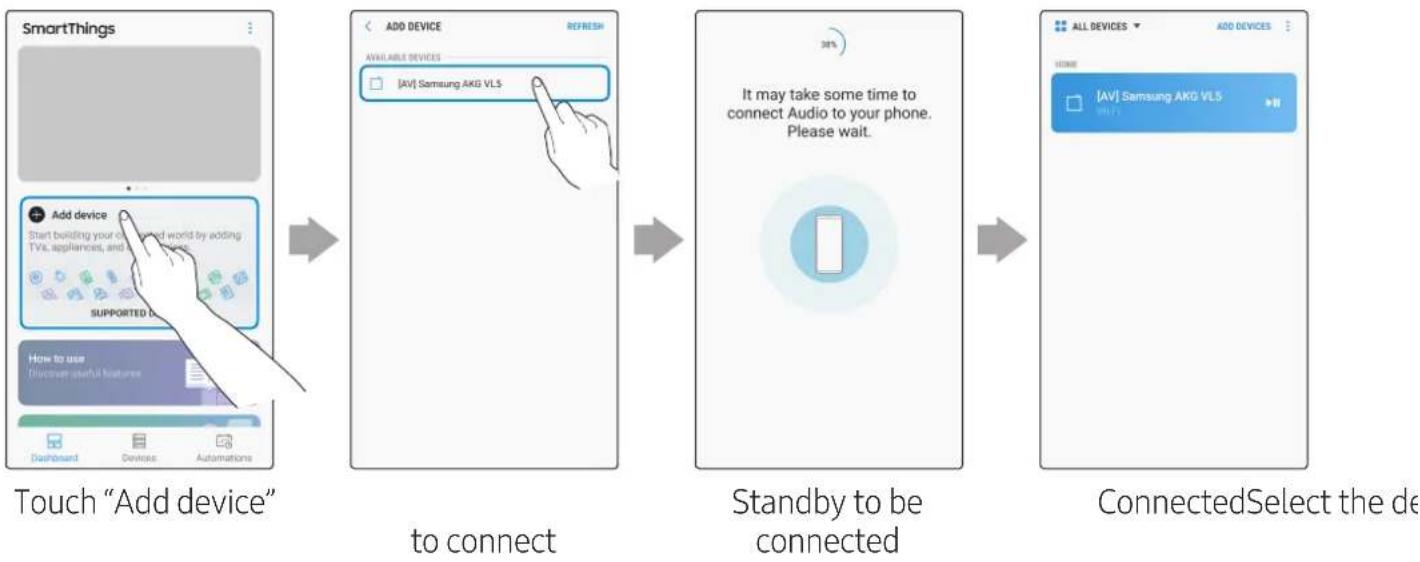
3 Follow the instructions on the SmartThings app screen to complete settings.
4 Repeat steps 1-3 to connect all speakers to the same wireless router.
- Spotify Premium users can enjoy music by using the Spotify app.
5-1 Follow the instruction below to reconnect or connect to a new wireless router.
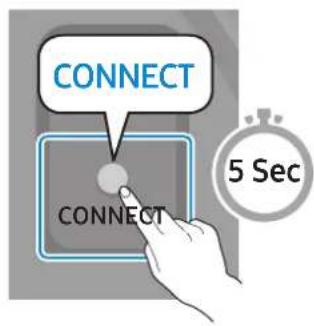
Press the CONNECT button for 5 seconds.
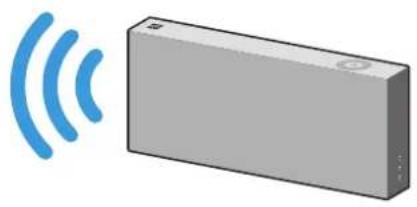
The speaker generates a voice message notifying that it is now in standby mode.
5-2 Repeat step 3.
- Deleting a device from SmartThings app
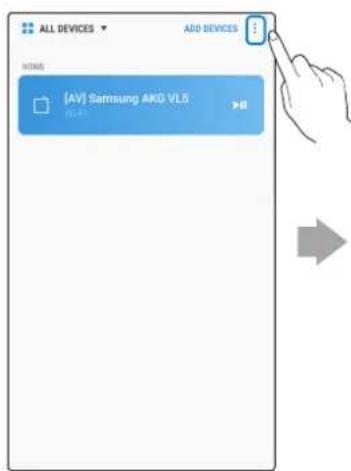
Touch in the top right of the device list
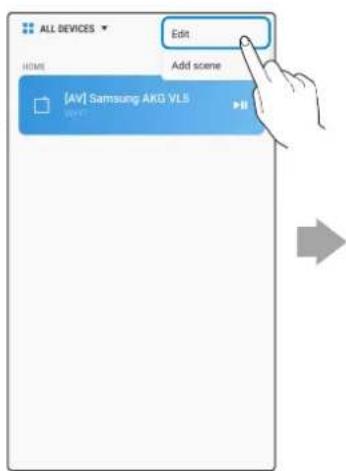
Touch "Edit"
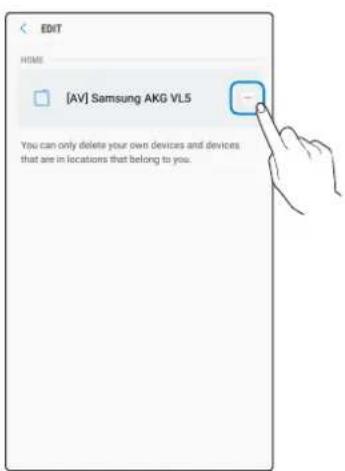
Touch next to the device to remove
Connecting to an External Device
- Connecting an external device via the AUX cable
You can connect a mobile device via the AUX cable, and then enjoy sound from the speaker.
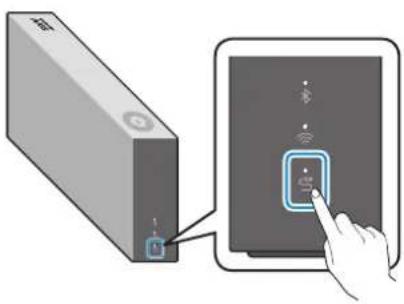
1 Press the AUX button on the right side of the speaker to switch to AUX mode.
2 Connect the AUX IN port on the rear of the speaker to an external device via the AUX cable (not supplied).
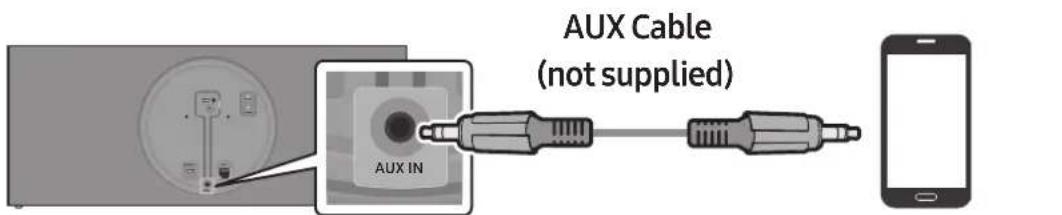
Rear of the speaker
External Device (e.g. Mobile device)
Additional Functions
Using mobile device voice recognition
Dedicated functions in Bluetooth mode
- This function can be used only when a mobile device is connected via Bluetooth.
- The operation may differ depending on the specification of the mobile device.
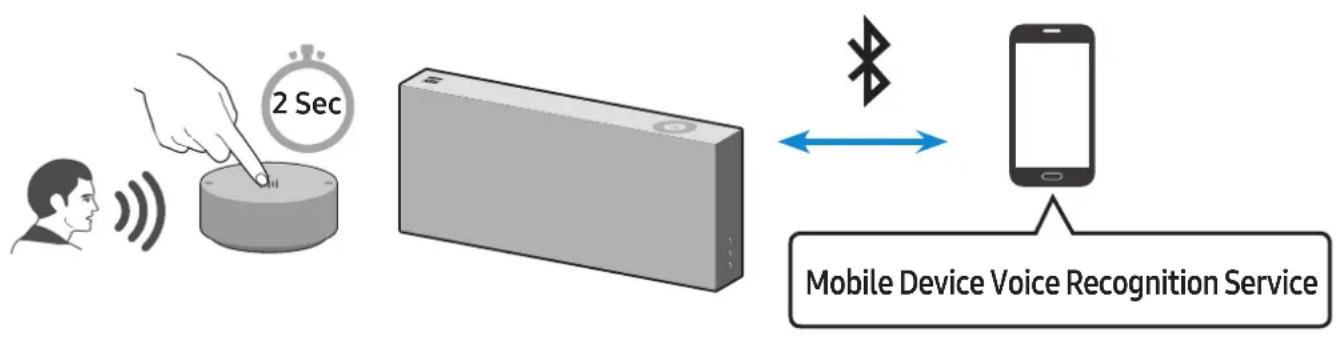

Depending on the voice recognition service provided by your mobile device (e.g. Bixby, Siri, Google Assistant, etc.), its availability and usage may differ.
| Function example Speaking example | |
| Listening to music Play TOP | 100 |
| Sending messages Forward | my most recent text message to mom |
1 Press the Bluetooth button on the right side of the speaker to switch to Bluetooth mode.
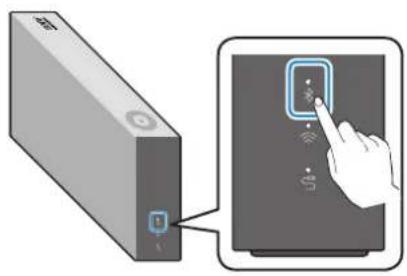
1-1 If you have not already, set up Bluetooth connection between the speakers and your mobile device.
- To connect a mobile device, please see [Connecting to Bluetooth] Click here.
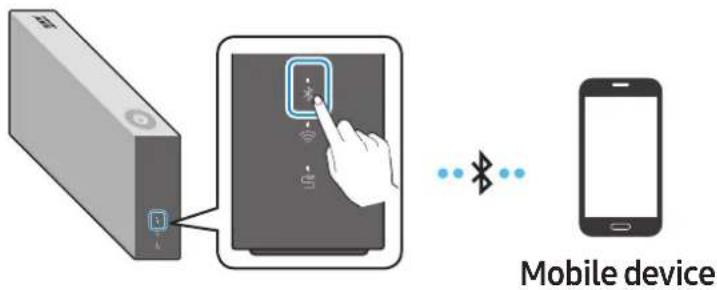
2 Press and hold the Multi-Function button on Dial Controller until LED shows cyan. (for 2 seconds or more)
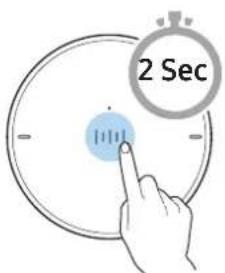
3 LED colour turns cyan, indicating the device's voice recognition is activated. Speak directly to Dial Controller to use voice recognition service.

In case of S voice on Samsung Galaxy, be sure to release the lock pattern for use of the function.

CAUTION
Maintain at least 1.5 cm distance between your face and Dial Controller when using voice recognition service.
Using via Wi-Fi connection
Functions upon Wi-Fi connection
- Using 2 units - Audio Group
- Using 2 units - Stereo (Dedicated for VL350 / VL351)
- Connecting with a Samsung Smart TV
- Connecting an Amazon product
Speakers should be all connected to the same wireless router.
5 GHz wireless connection is recommended when using two devices.
When using two devices, a time difference between the video output of the connected equipment and its audio output may occur.
On rare occasions, there can be choppy audio or interruption of connection due to wireless interference when used in some conditions.
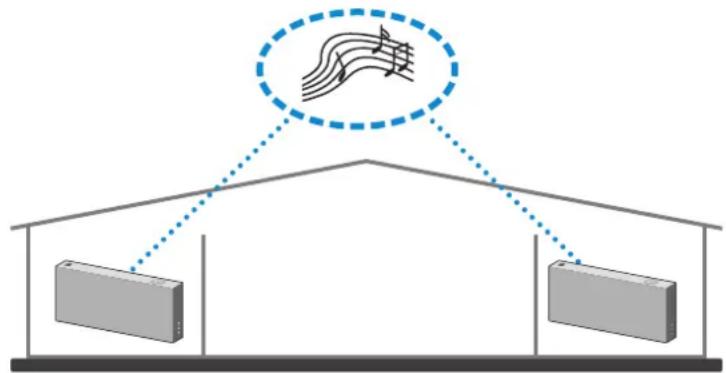
Using 2 units - Audio Group
1 Use SmartThings app to connect and enjoy 2 speakers as a Audio Group.
- To use Audio Group, all speakers must be connected to the same wireless router.
2 Select Audio Group in SmartThings app.
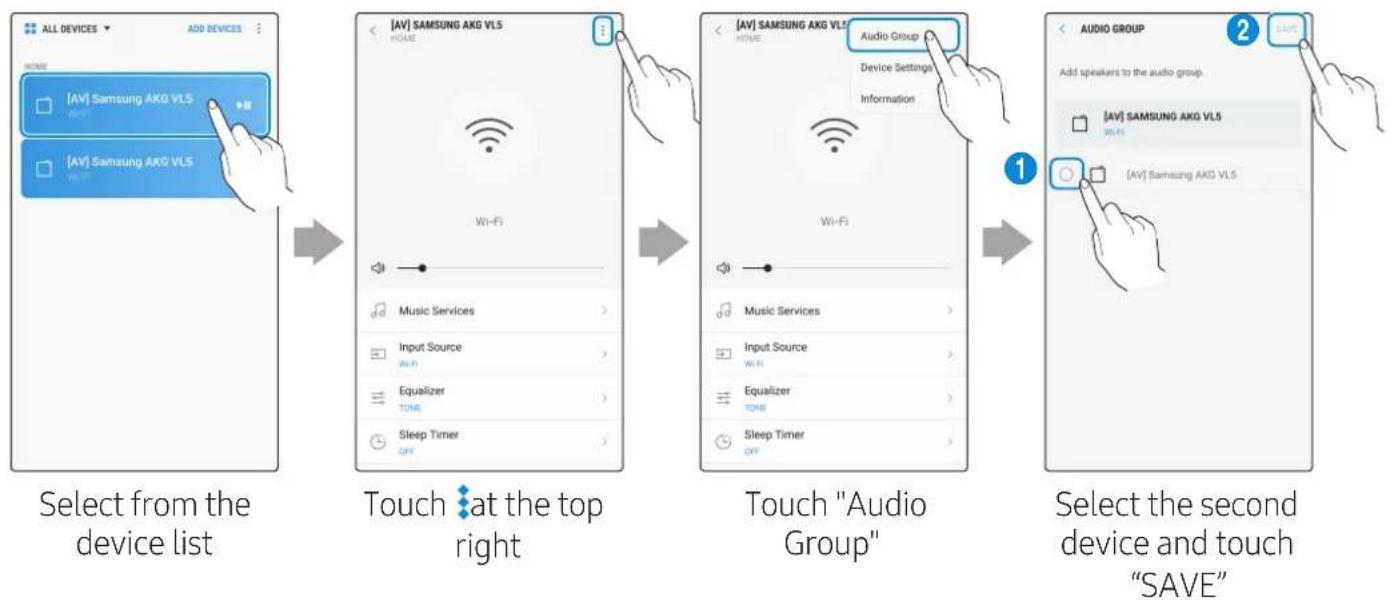
Using 2 units - Stereo (Dedicated for VL350 / VL351)
1 Use SmartThings app to connect and enjoy two speakers as a Stereo.
- To use Stereo, all speakers must be connected to the same wireless router.
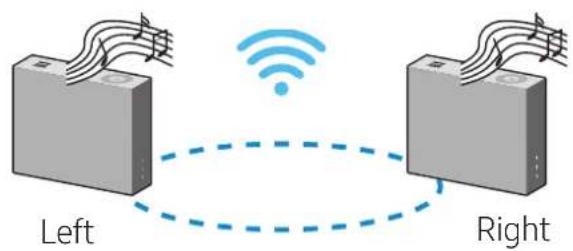
2 Select Stereo in SmartThings app.
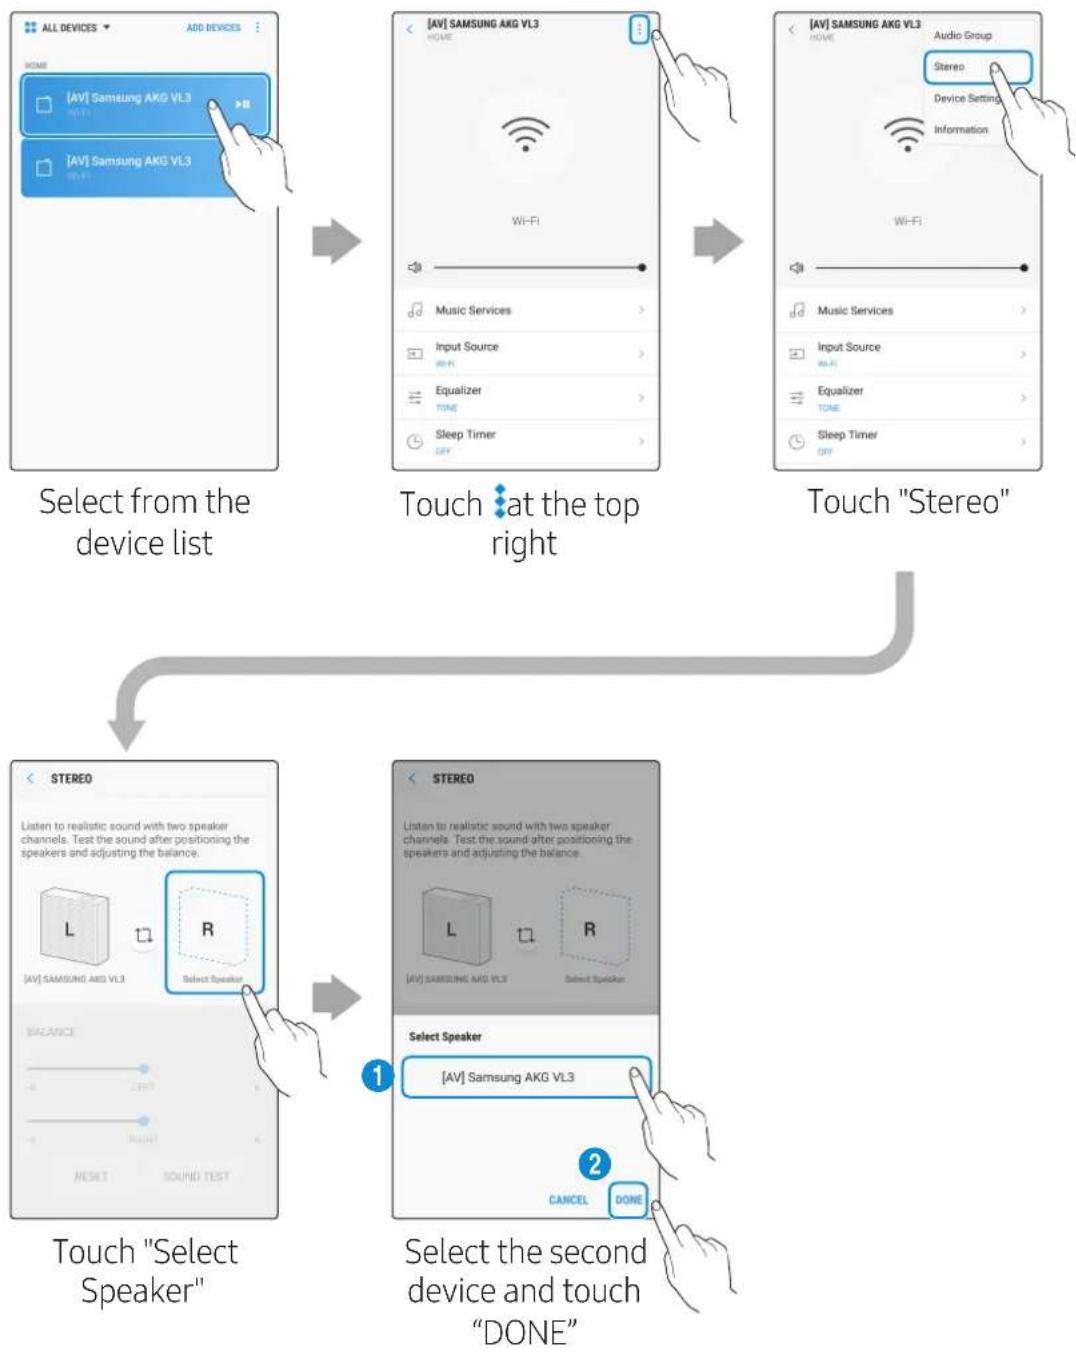

VL550 / VL551 is already a Stereo device so does not support Stereo Multiple connection, only for Audio Group function.
Connecting with a Samsung Smart TV
- This feature is available only for Samsung Smart TVs released in 2014 and later.
- TV must be connected to a wireless router.
- Your Samsung speakers should be connected to the wireless router that is connected to your TV. (Refer to the corresponding product's user manual.)
- Connecting 1 speaker to Samsung Smart TV 2018
Home () Settings () Sound Sound Output [AV] Samsung AKG VL* (Wi-Fi)
- Connecting 2 speakers to Samsung Smart TV 2018
Home () Settings () Sound Wi-Fi Speaker Surround Setup
- Connecting 1 speaker to Samsung Smart TV 2017
Home (O) Settings (O) Sound Sound Output [AV] Samsung AKG VL*(Wi-Fi)
- Connecting 2 speakers to Samsung Smart TV 2017
Home () Settings () Sound Wi-Fi Speaker Surround Setup
- Connecting 1 speaker to Samsung Smart TV 2016
Home ( ) Settings ( ) Sound Select Speaker [AV] Samsung AKG VL*(Wi-Fi)
- Connecting 2 speakers to Samsung Smart TV 2016
Home (O) Settings (O) Sound Expert Settings Wireless Speaker Manager
- Connecting 1 or 2 speakers to a 2015 Samsung Smart TV
Menu Sound Speaker List
- Connecting 1 or 2 speakers to a 2014 Samsung Smart TV
Menu Sound Speaker Settings Multiroom Link - Settings
Because the menus may differ depending on the year of manufacture, refer to your TV manual.
Connecting an Amazon product
- This feature may not be available in some countries.
- This service is provided by Amazon and can be terminated at any time. Samsung does not assume responsibility for service availability.
- Connect and use with an Amazon product (Amazon Echo)
Use an Amazon Echo product to control your Speaker and enjoy music services provided by Amazon Echo.
Check if the Speaker is connected to Wi-Fi. [Connecting to Wi-Fi] Click here.
1 In the SmartThings app, change your Speaker's name to one that can be recognized by your Amazon device.
(Example: Samsung, Speaker, Living Room, Family Room, Bedroom, Office, etc.)

CAUTION
Amazon devices may not recognize names that contain elements such as special characters.
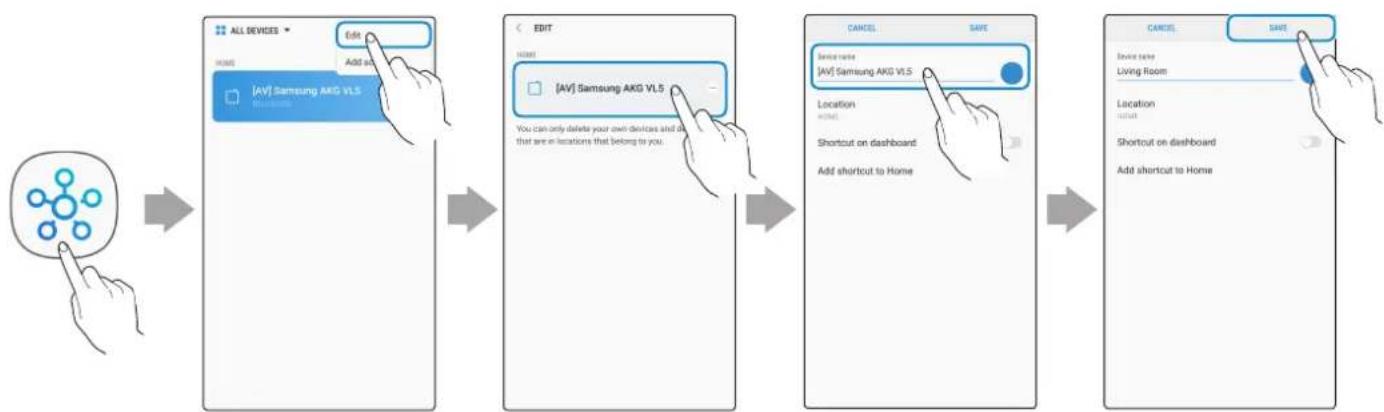
Select "Edit" Select speakers
Change name "SAVE"
2 In the Alexa app, search "Samsung Wireless Audio" in Skills, and then select ENABLE.
- Skip this step if you have Skills set up already.
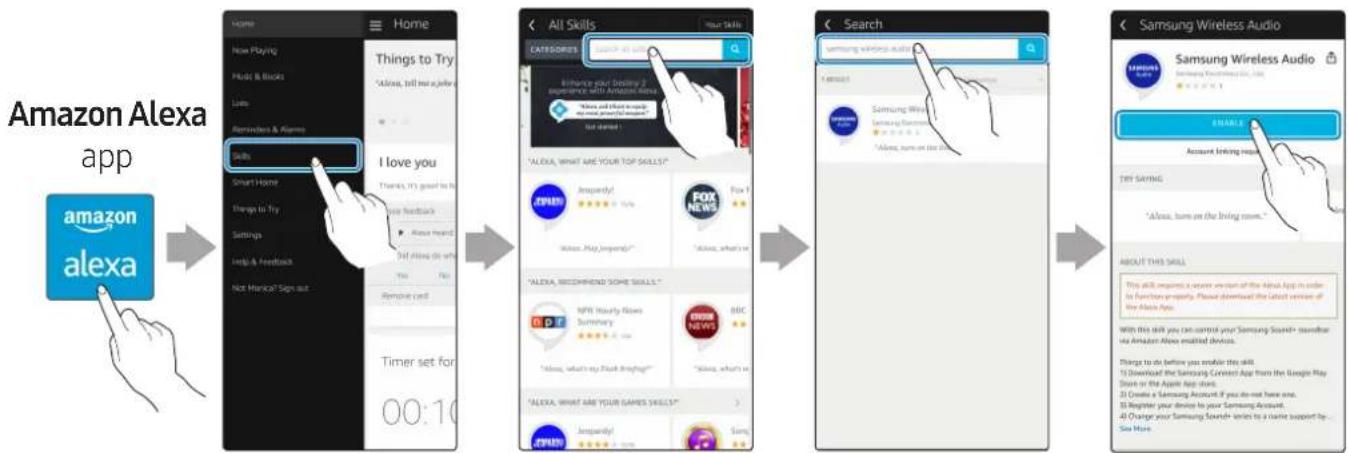
Select "Skills" Search "ENABLE"
3 In the Alexa app, tap Smart Home Devices DISCOVER to complete the connection.
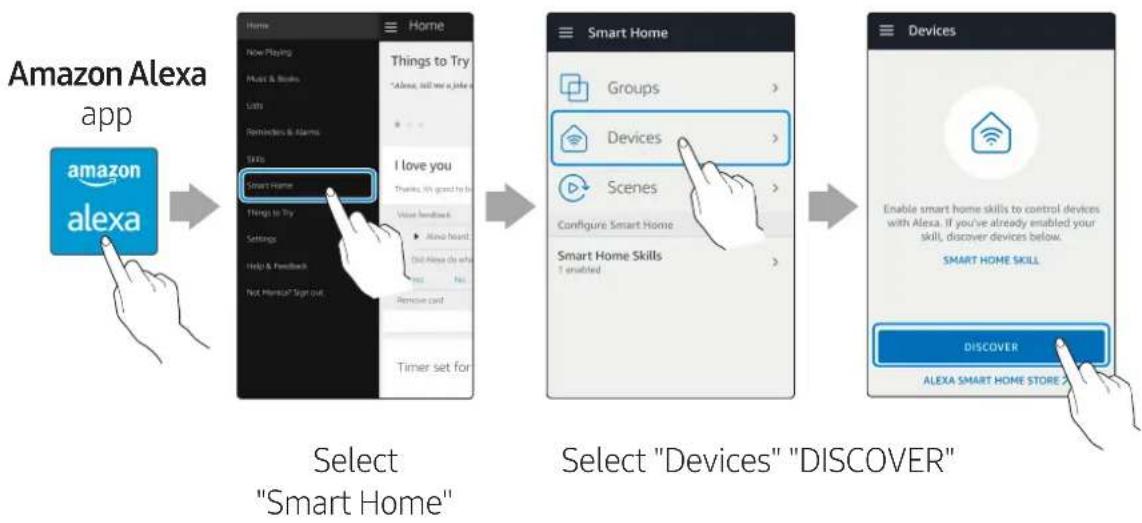
Use voice commands to control the Speaker
- The Amazon Echo service you can use with your Speaker is limited to music. Other services provided by Amazon Echo, such as news and weather, can only be accessed through your Amazon Echo product.

Trigger + Command + Speaker name
Use the Speaker name you changed in the SmartThings app.
[Connect and use with an Amazon product (Amazon Echo)] Click here.
| Action Voice Command | |
| To search an audio device added to the SmartThings account connected to the Amazon Alexa account | "Alexa Discover devices" |
- To use voice commands for the Speaker named "Living room"
| Action Voice Command | |
| To set the volume level to 20 "Alexa Set the volume to 20 on Living room" | |
| To increase the volume level "Alexa Volume up on Living room" | |
| To mute the sound "Alexa Mute on Living room" | |
| To listen to a radio station named KISS FM "Alexa Play Kiss FM on Living room" | |
| To play the next song "Alexa Next song on Living room" | |
| To stop the audio "Alexa Stop on Living room" | |
| To turn the audio on "Alexa Turn on Living room" | |
| To turn the audio off "Alexa Turn off Living room" | |
| To change the input source "Alexa Switch to Bluetooth on Living room" | |
Installing the Wall Mount
Purchase wall mounting screws according to the type and thickness of the wall you want to mount the Speaker on.
- Considerations for purchasing
- Endurable load : VL350 / VL351 : Above 8.4 Kg
VL550 / VL551 : Above 18.0 Kg
Hole size : M5
Do not install in a place with high temperature or humidity.
Verify whether the wall is strong enough to support the product's weight. If not, reinforce the wall or choose another installation point.
Purchase and use the fixing screws or anchors appropriate for the kind of wall you have (plaster board, iron board, wood, etc.). If possible, fix the support screws into wall studs. Install on a vertical wall only.
Make sure the unit is turned off and unplugged before you install it. Otherwise, it may cause an electric shock.
Please have a qualified installer install the Wall Mount Bracket.
Ask a professional installation company to mount your product on the wall.
Samsung Electronics is not liable for any damage to the product due to the product being installed inappropriately.
Please beware not to install the speaker being laid down or turned upside down.
Wall-Mount Components
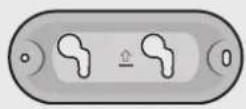
Bracket-Wall

Bracket-Screw (2 EA)
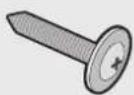
Wall Fixing Screw (2 EA) (not supplied)
1 Connect the AC/DC Adapter on the main unit before installation of the wall mount.
Fix the Bracket-Wall, and then fasten the Wall Fixing Screw from the left hole.
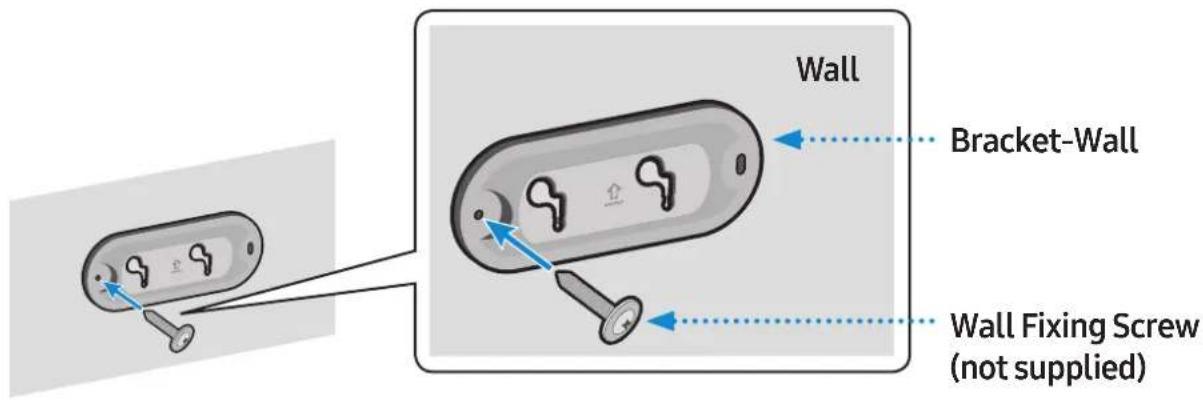
3 Fasten the Wall Fixing Screw in the right hole.
- When leveling is not made correctly, slightly unfasten the Wall Fixing Screw on the left and then adjust the Bracket-Wall up or down for leveling.
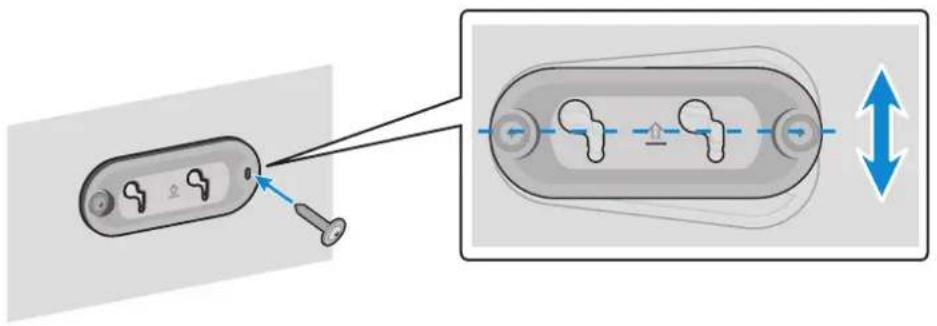
4 Fasten two Bracket-Screw into the bracket hole on the rear of the main unit.
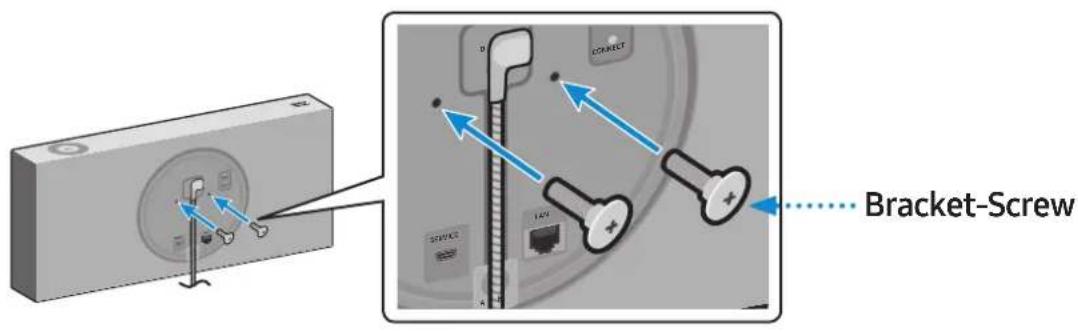
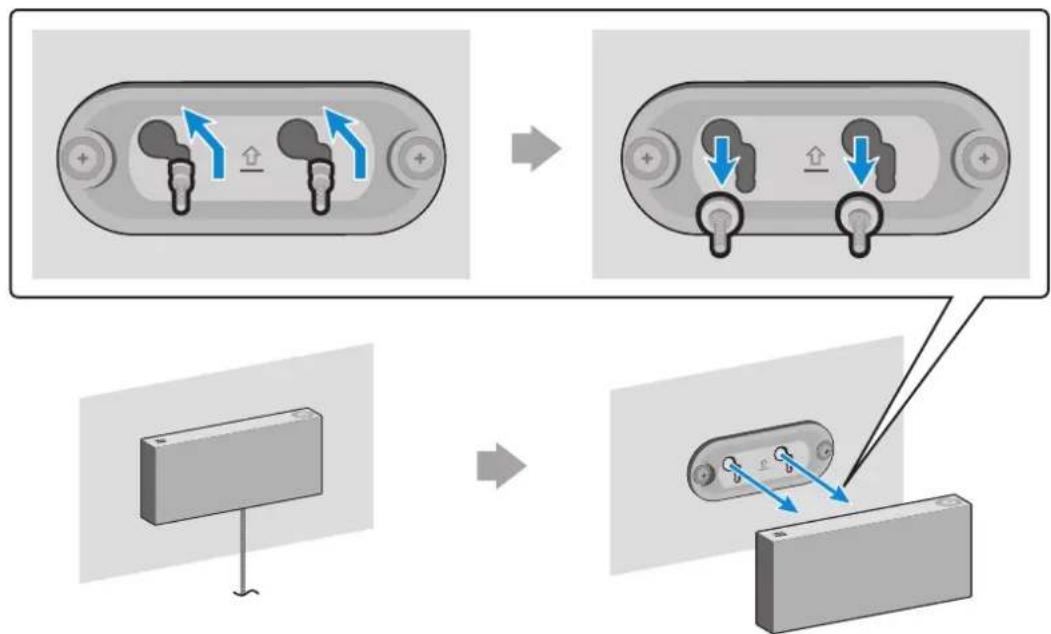
5 Align the Bracket-Screw on the main unit to fit into the large groove of Bracket-Wall. Slide it in the arrow direction until it is seated in the small groove.
- Be sure to slide it in the arrow direction until it is seated in the small groove of the Bracket-Wall.
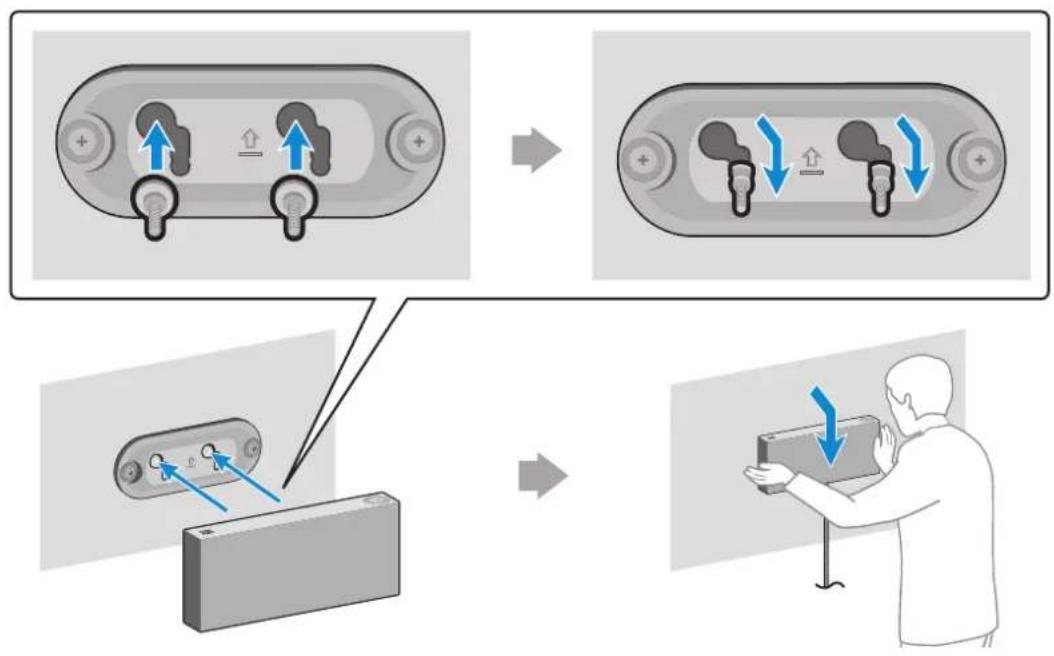
* Removing the Wall Mount
Lift the main unit up until the Bracket-Screw is seated in the large groove of Bracket-Wall and then pull out the main unit.
Appendix
Troubleshooting
Before requesting service, please check the following.
| Symptom Check Remedy | |
| The speaker does not turn on. | Check if the power cord is properly connected. |
| There is no response when you press a button or touch wheel area. | The button or touch wheel area may be exposed to statics. |
| There is no sound. | Is your speaker connected to a power source? The volume may be set to the lowest level. |
| The Dial Controller does not work. | The Dial Controller may not have enough battery power. The Dial Controller may be out of operating range. Check the connection between the Dial Controller and speaker. |
| Press the RESET button on the bottom of the Dial Controller. Charge the battery as instructed for the Dial Controller LED version. Bring the Dial Controller closer to the speaker. Check “Connecting between the Dial Controller and Speaker”.(9 page) Click here. |
| Symptom Check Remedy | ||
| Cannot connect the speaker to a mobile device or TV. | For wired connection ·Check the cable connection. ·Check on the right side of the speaker and make sure that the speaker mode is set to AUX mode. | ·Check the name of the port and make sure that the cable is connected to the right port. ·See “Connecting to an External Device”. (13 page) Click here. |
| For Bluetooth connection ·Check on the right side of the speaker and make sure that the speaker mode is set to Bluetooth mode. ·Set the speaker to Bluetooth mode and try searching from the mobile device or TV again. | ·Press the Bluetooth button on the right side of the speaker for 5 seconds or longer to enter the standby mode and search for the speaker from your mobile device or TV. See “Connecting to Bluetooth”. (10 page) Click here. | |
| For Wi-Fi connection ·Check if your TV is a supported model. ·Make sure that your mobile device or TV is connected to the Wi-Fi network. ·Make sure that your speaker is connected to the Wi-Fi network. ·Check the DFS channel. (DFS: Dynamic Frequency Selection) | ·This feature supports Samsung Smart TVs released in 2014 and later. ·If your TV is not connected to the Wi-Fi network, use the network menu on the TV to establish the connection. (See the user manual provided with your TV) ·If the TV is already connected, the speaker should appear on SmartThings app on your mobile device (smartphones, tablets, etc.). See “Using via Wi-Fi connection”. (16 page) Click here. ·Connecting the TV and speaker over Wi-Fi may not be available if your wireless router uses the DFS channel. For details, please contact your internet provider. | |
| The audio stutters when playing music or videos on my mobile device over Bluetooth. | ·Check if there are any nearby devices that use radio communications or may cause interferences. ·Are your mobile device or any radio communication devices are connected to 2.4 GHz Wi-Fi network? | ·If you have any nearby device that use radio communications or may cause interferences, please turn them off. ·See “Connecting to Bluetooth”. (10 page) Click here. ·If your mobile device or other radio communication devices are connected to a 2.4 GHz Wi-Fi network, this may cause interferences. Try to connect your mobile device to a 5 GHz network. |
| The audio stutters when the speaker is connected in Audio Group or Stereo mode over Wi-Fi. | ·Are you using a 2.4 GHz Wi-Fi network to connect your mobile device and speaker? ·Check the distance between your wireless router and speaker. ·Check the distance between the speakers. | ·Connect your mobile device and speaker to a 5 GHz Wi-Fi network. ·Make sure that your wireless router and speaker are within the operating range from each other. ·Try to power off your wireless router and restart. ·Make sure that your speakers are within the operating range from each other. |
| The speaker loses connection or stays disconnected intermittently when used in stereo mode after connecting TV and speakers via Wi-Fi. | ·Are you using a 2.4 GHz Wi-Fi network to connect your TV and speaker? ·Check the distance between the wireless router, TV, and speaker. | ·Connect your TV and speaker to a 5 GHz Wi-Fi network. ·If you are already connected to a 5 GHz Wi-Fi network and having this problem, check the DFS channel. ·Make sure that your wireless router, TV, and speaker are all within the operating range. |
| SmartThings app does not show the speaker on the list of available devices when I try to connect it over Wi-Fi. | ·Is your speaker connected to a power source? ·Is your mobile device connected to a wireless router? | ·Check if the speaker is properly connected to the power. ·Connect your mobile device to the wireless router. ·Press CONNECT button in the back of the speaker for 5 seconds or longer to enter standby mode and try to connect again. |

If the problem persists, contact the Samsung Call Centre for troubleshooting.
Open Source Licence Notice
- For further information on Open Sources used in this product, please visit the website: http://opensource.samsung.com
Licences
- The Spotify Software is subject to third party licences found here : www.spotify.com/connect/third-party-licenses
- For more information about Spotify Connect, please visit www.spotify.com/connect

Specifications
| Model Name VL350 / VL351 VL550 / VL551 | ||
| Weight 2.1 Kg 4.6 Kg | ||
| Dimensions (W X H X D) 210.0 X 211.5 X 70.0 mm 522.0 X 211.5 X 70.0 mm | ||
| Speaker Woofer x 1, Tweeter x 1, 4 ohm Woofer x 3, Tweeter x 2, 4 ohm | ||
| Operating Temperature Range | +5°C to +35°C | |
| Operating Humidity Range | 10 % to 75 % | |
| Wireless LAN | Built-in | |
| Security | WEP (OPEN/SHARED) WPA-PSK (TKIP/AES) WPA2-PSK (TKIP/AES) | |
| Wireless device output power Wi-Fi max transmitter power | 100mW at 2.4GHz – 2.4835GHz, 5.15GHz – 5.35GHz & 5.47GHz – 5.725GHz | |
| Wireless device output power BT max transmitter power | 100mW at 2.4GHz – 2.4835GHz | |
Network speeds equal to or below 10Mbps are not supported.
- Design and specifications are subject to change without prior notice.
- For more information about the power supply and power consumption, refer to the label attached to the product. (Label : Bottom of the Speaker Main Unit)
Weight and dimensions are approximate.
- For further details on using the speaker, visit www.samsung.com.
| Overall Standby Power Consumption (W) (All the network ports are “ON” condition) | 3.0 W | |
| Wi-Fi | Disabling Wi-Fi | In Wi-Fi mode, press the Play / Pause button (on the top side) and the CONNECT button (in the rear side) together and hold for 30 seconds or more to disable Wi-Fi. |
| Enabling Wi-Fi | Press the Wi-Fi button on the right side of the speaker while Wi-Fi is disabled and hold for 30 seconds or more to enable Wi-Fi again. | |
| Bluetooth | Disabling Bluetooth | In Bluetooth mode, press the Play / Pause button (on the top side) and the CONNECT button (in the rear side) together and hold for 30 seconds or more to disable Bluetooth. |
| Enabling Bluetooth | Press the Bluetooth button on the right side of the speaker while Bluetooth is disabled and hold for 30 seconds or more to enable Bluetooth again. | |
Wi-Fi and Bluetooth are enabled in default settings.
When Wi-Fi and Bluetooth are disabled, turning the product off and on does not enable them.
Additional Information
About the Network Connection
- Depending on the wireless router used, some network operations may perform differently.
- For detailed information on networking with a wireless router or modem, refer to the router's on modem's documentation.
- Select the wireless channel that is not in use. If selected channel is also used by other communication devices in close proximity, it may cause wireless interference which interrupts communications or cause choppy audio.
- Experiencing choppy audio and interruption of connection due to wireless interference is possible as the performance of wireless LAN is affected by your environment and use conditions including router's performance, distance, obstruction, and interference by other mobile devices.
- WEP encryption does not work with WPS (PBC) / WPS (PIN).
Works with SmartThings™
- This product is compatible with SmartThings.
-
SmartThings service varies from country to country.
For more information, visit http://www.smartthings.com -
Figures and illustrations in this Full Manual are provided for reference only and may differ from actual product appearance.
- An administration fee may be charged if either (a) an engineer is called out at your request and there is no defect in the product (i.e. where you have failed to read this user manual). (b) you bring the unit to a repair centre and there is no defect in the product (i.e. where you have failed to read this user manual).
- The amount of such administration charge will be advised to you before any work or home visit is carried out.
Copyright
© 2018 Samsung Electronics Co., Ltd. All rights reserved; No part or whole of this user's manual may be reproduced or copied without the prior written permission of Samsung Electronics Co., Ltd.
- Hereby, Samsung Electronics, declares that this equipment is in compliance with Directive 2014/53/EU. The full text of the EU declaration of conformity is available at the following internet address: http://www.samsung.com go to Support > Search Product Support and enter the model name. This equipment may be operated in all EU countries.
The 5GHz WLAN(Wi-Fi or SRD) function of this equipment may only be operated indoors.

[Correct disposal of batteries in this product]
(Applicable in countries with separate collection systems)
This marking on the battery, manual or packaging indicates that the batteries in this product should not be disposed of with other household waste at the end of their working life. Where marked, the chemical symbols Hg, Cd or Pb indicate that the battery contains mercury, cadmium or lead above the reference levels in EC Directive 2006/66.
If batteries are not properly disposed of, these substances can cause harm to human health or the environment.
To protect natural resources and to promote material reuse, please separate batteries from other types of waste and recycle them through your local, free battery return system.
Correct Disposal of This Product (Waste Electrical & Electronic Equipment)
(Applicable in countries with separate collection systems)
This marking on the product, accessories or literature indicates that the product and its electronic accessories (e.g. charger, headset, USB cable) should not be disposed of with other household waste at the end of their working life.
To prevent possible harm to the environment or human health from uncontrolled waste disposal, please separate these items from other types of waste and recycle them responsibly to promote the sustainable reuse of material resources.
Household users should contact either the retailer where they purchased this product, or their local government office, for details of where and how they can take these items for environmentally safe recycling.
Business users should contact their supplier and check the terms and conditions of the purchase contract.
This product and its electronic accessories should not be mixed with other commercial wastes for disposal.

WARNING
To remove the battery contact an authorised service centre. To obtain battery removal instructions please visit samsung.com/global/ecodesign_energy
You must not remove (or attempt to remove) the battery incorporated in this product on your own. FOR YOUR OWN SAFETY, DO NOT ATTEMPT TO REMOVE THE BATTERY ON YOUR OWN OR DISPOSE OF IT IN FIRE. DO NOT DISASSEMBLE. CRUSH OR PUNCTURE THE BATTERY.
For information on Samsung's environmental commitments and product specific regulatory obligations e.g. REACH, WEEE, Batteries, visit:
http://www.samsung.com/uk/aboutsamsung/samsungelectronics/corporatecitizenship/data-corner.html
Mepkn 3a 6e30nacnoct, Cbbp3aHn Cbc 3axpaHbaHeTo
He npetobapbaite KOHTaKTnte nIpa3KIOHHTeJIte.
- ToBa MoZe Da DoBeJe Do npegrBaHe nn noXap.
He BkIIOUbaIte nIINn3KJIIOUBaIte 3axpaHbAunia Ka6eI c MOKpn pbIe.
He nocTaBnTe npOdykTa B 6IIN3OCT IO OTOnJIInTeHN ypeDN.
- 3a Да поочипг Te UngToBTe Ha 3axpaHbUng Ka6eI, N3BaJeTe UeNceIa OT KOHTaT a N36bPseTe UngToBTe CamO CbC CyXa Kbpna.
He orbbaIte n He IbpnaIte cbc cnila 3axpaHbauJnKa6eJ.
He nocTaBryTe TeJkN ppeMeTn Bbpyx 3axpaHbauaKna6eJ.
He noctabyTe 3axpaHbaaunKa6eB pa3xa6eHN nnIOBpeHn KOHTaKTN.
- Поставete сенина на зхсаньшикаел дokрай в kohtakta, тaka че сенида e Фиксанн Здравовkohtakta.
-AkoBpb3kaTa e Hecta6nHa,Ima OnaCHOCT OT NOXap.
- Преши вклочип роменьOTOКOBЯ (AC) зхранваш Кбел Кьм ИЗХODа на павOTOKOBЯ (DC) садпетер, уberete ce, че habржениTo, обз nauseho на DC садпетер, сотВETCTBa на TOBa на MeCTHATA eLEKtp03axpaHbua Мржа.
I PpeDpa3Hm MepKn 3a HcTalaunraTa
He nHCTaInpaTe npOdykTa B 6IIN30CT Do ypeN nn npEmdTn, KOITo reHepnP aT TOnIInHa nn IpaMbK (CBeuN, CnpaN npOTnb KOMapN, HArpeBaTeN, paNaTOpn n T.H.). He nHCTaInpaTe Ha npraKa CbHueBa CBeTlnHa.
- Korato MeCTnte npOdyKta, n3KJIIOUeTe 3axpaHbaHETo n n3BaJeTe BCNUKN Ka6eNn (BkIIOuHTeJHo 3axpaHbAaun) ot ypeJa.
-
Поврень Кабел може за причинни пожар и за пpeинзвика onaCHOCT OT TOKOB y,dap.
-
Инстелегукту в сpenсьбпатул влжноct, прах лимMHOrO HnCKn Tempepatур можда довеadingо побLEMв КачeTBOTo Ha pa6OTn lln daпразИЗВИКa Heu3npaBnOCT Ha npoIyKtA. ПразДа мOnTpapTe пodukTu B cpeda, kOЯTO e HeCbOTBeTcTBa Ha CTaHdApTInTe, moJI, obbpHeTe ce KbM ppeIcTaBnTeI nII cepBn3eH ueHTbpHaSamsung 3a ДОпьнIHteHL NaHΦopMaция.
Korato noctabraye npodykta Ha paT, ukaΦ nnn 6Hpo, ce yBepTe, ye rOpHnT naHelen coHn Harope.
He noctabraye npodykta Bbpxy Hecta6nHa NOBbpxHocT (hnp. pa3xa6en paT, haknoheho 610po n T.H.). -
Паданeto на порукta може ддовеadingи HeN3правноCT И сьшесТВуВа риСК OT hapанявае.Слпни Вибрацши лл удари могат ддоведдо HeN3правноCT Ha порукta lл onaCHOCT OT NOЖAP.
-
Инсталпайта пождукта, koTo сьобразида достаюно място за поветраве.
-
Octabete nohe 10 cmПространсво OTан HaПрodyкta И NOBEue ot 5 CM OT BCЯka CTpaHa Na NOdYkTa.
-
Na3eTe HaJIIOHOBInTe ONAKOVBcHn MaTePnaIi DaJeu OT O6ceRa Ha Deca.
- Има onасноct Deцata, KONTO си ngparT C onaKOBbHnTE MaTePnaJI, Да ce 3aDyUaT.
I PpeDpa3Hm MepKn npn ynoTpe6a
- I3noI3BaHeto 3a npoIbIjKnteIHO BpeMe npn BnCOKn HnBa Ha cnla Ha 3Byka MoKe da IOBede Do cepNo3Ho yBpeKdaHe Ha Cnyxa BN.
- Ako cte n3lojkeHn Ha 7um no-ciJeH ot 85db npoIbJIknteHNO BpeMe, TOBa MoKe da ce Otpa3n cepNo3HO Ha clyxa BN. KofkoTo no-ciJeH e 3ByKbT, TOnKOba no-cepNo3HO MoKe da 6bJe yBpeHen clyxbT BN. 3a6eJekete, ye obNKHObeH pa3rOboP e mexy 50 n 60 db, a 7umbT Ha vliuata e np6Iin3nteHno 80 db.
To3n npOdyKT cBdIbPka onaCHO BnCOKO HanpeKeHne. He ce onNTBaIte da pa3rIo6BaTe, peMOHTnpate nn MoDnΦnCnpate camn npOdykTa. - OБърhoe ce кьм представител ил сервизен центьр на Samsung, korato вшияпюдукт ce hyждae ot peMOHT.
He nocTabaIte cboBe, kOnTO cbIbpxat TeuHocTN, Bbpxv npOyKta (HaNPmep Ba3n, NHTneTa, KO3MeTnka, xIMnKaJIu NT.H.). He no3BOJraBaTe Ha metaJIHn PpeDMeTu (HaNP. MoHETn, fN6n NT.H.) IIN 3aPAnIMMaTePnAIn (HaNP. XApTn, KnbptEni KLeUKN T.H.) Da Bn3aT B npOyKTA (npE3 OTBOpTE 3a BeHTnlaun, nopToBeTe I/O NT.H.). - Аков подукta пonaднат Teчно сил onaceH MaTePnA, n3KlIoUeTe He3a6abHNo npOduyKTA, n3KJIIOUeTe 3axpaHbauNt Ka6eI OT KOHTaKTA, cIeI KoETo ce obbpHeTe KbM ppeDCTaBNTeI nIIcepBn3eH ueHTbp Ha Samsung.
He donyckaite npodykta da nahe. B cnyuay ha mexaunuHa noBpeDa n3Kluoyete 3axpaHbauuT ka6eI ne o6bprte KbM npedctabnte Inn cepBn3eH cHTbp Ha Samsung. -Ma pNCK OT nOJap NII TOKOB ynap.
He npbxte nll nbpnaite npodykta 3a 3axpaHbaunia Ka6en nll Ka6ena 3a cnHaJ. - Поврень Кабел може за причимни Немпарноct на рорукта, пожар пол TOKов удap.
He cbxpaHЯBaIte 3aIJIteJIHn MaTePnaJIb B 6JIu3OCT Do npOdyKTa. - Ako npodukTBt n3daBa Heo6nuaeH 3Byk nll Mnpn3Ma Ha n3rOpraIo nll dIM, n3KlUoyete He3a6abHO 3axpaHbAunKa6eI OT KOHTaKta I ce o6bpHeTe KbM ppeiCTaBNTeI nll cepBn3eH UeHTbp Ha Samsung.
- Ako nomnpiuhe ra3, BeHara npOBetpeTe cTa. He JOKocBaIte 3axpaHbAunia nceiHa npOdykta. He n3KJIouyBaIte nII BKnUoyBaIte npOdykta.
He npoIaIarate npOdykTa Ha BHe3aHn yIapn. He npo6uBaIe npOdykTa c OCTpN npEdmTe.
To3n npOdyKT MoKe Da ce npemeCTN I NocTaBn Ha 3aKpnto.
To3n npOyKT He e BOIoOyCToUHB nn npaxOyCToUHB.
BnIMaBaIte, KOrato MeCTnte npOyKta, 3a da n36eHHeTe n3nyckaHeto n eBeHTyaJIHOTo My NOBpeJdaHe.
I Ipeedna3Hm MepKn npn nouchTbaHe
-
HnKora He n3noI3BaIte aIkoXoI, pa3TBOpIeII, BocbI, 6eH3eH, pa3peIteII, oCBexHTeII 3a Bb3dyx IJIy6pIkaHTn 3a NouchTa H na npOykTa n He npbckaiTe C IHcEKTUNiNo HrO.
-
Изполизовeto на Няков OT TeЗи Матерпалноюда обeзцBetи ВьншаТа част на подуктада пчинни науквае плnoобелване плдсвалл Маркировке по подуктад.
-
3a Да поочипгукта, ИЗваде Te 3axpaHbaцяka6eI nИЗбьршeTe npodukrta Cчиста, cyxa I Meka Kbpna (MnKpoΦn6bp nII nIamyK).
- ɪЗбягваіte дɑ ocṭabraye npax nɔ npodуkta. Toba може дɑ na haɪpacka noBbpxHocTTa My.
CbDbRgKaHne
Инструкции за 6еzoноct
HhOpMaun 3a cna3BaHe Ha HopMaTINBnTe ype6n
PPEyPPEKDEHNE
BHIMAHNE
Cbbp3BaHe Ha npodykT Ha Amazon ....20
Инсталаре наkomноенте 3aстен MOтax
Прилaxesн
OCTpaHЯBaHe Ha Hen3npaBHOCTn 26
Pa60tn cbc SmartThingsTM 31
Copyright 31
PbBn CTbPkN
PereylnpHa He Ha 3Byka (3aBbptAHe Ha ceH3OpHTo KOJIeI0)
Iokochete n 3aBbptete perynaTopa Ha 3Byka IIO yacOBnKOBaTa CTpeJIka, 3a Da yBeJInuHte Cnilata Ha 3Byka.
Iokochete n 3aBbptete perylaTopa Ha 3Byka o6patHO Ha yacOBHnKOBata CTpeNka, 3a Ja HamaJIte Cnilata Ha 3Byka.

Bb3npoN3BExKdaHe /Pay3a
IOKOCHete II,3a Da NyCHeTe My3Nka IIN da
ra NOCTaBNTe Ha NaY3a.

LED dncnne
| LED Индikatop | Състорие | Описане | |
| Дeйстве Ржим | |||
| Баян | СBSTEN CBьрзан / Нормална pa6ота - | ||
| Пremигва | Зарождanie - | ||
| ГOTOBHOCТ 3a CBьрзВане с КOHтpoлера | - | ||
| Актуалзираны на Фырмуера - | |||
| ГOTOBHOCТ 3a CBьрзВане пе3 Wi-Fi | Wi-Fi | ||
| Син Пremигва | Изчakваны 3a CBьрзВане на УстroduстВOTO | Bluetooth | |
| Червен СBSTEN Гешка вCBьрзВанeto - | |||
| ЖылTO | Пremигва Вedlyньж | Korato силatable на звуka e заideна На Міи мMax | - |
| He сBSTEN He сBSTEN Иковомия на[eheprгия - | |||

Ako npoaykTB He ce n3no13Ba noBce 0T 5 MInHyTN, peKIMbT ce npeBknIOyBa B peKIM Ha rotOBHocT, 3a da ce HamaII pa3XoDbT Ha eHepnI.

ByToHbT Bluetooth / Wi-Fi / AUX aKtINBnpa cAmO eHa fYHKnra B daJeH MOMeHT.

Функципг Te 3a BьзпроиЗвжданe / Пay3a n 3a пponусkaнe He ca habичиВ ржIM AUX.

HaTnchTe 6yToH Bluetooth 3a 5 cekyni nn noBue, 3a da yctanobite Bluetooth Bpb3ka.

Функцята 3а ИЗКлючван Ha 3Byka/BКЛЮчван Ha 3Byka може на 6ьд eИЗПОЛЗВан c 6уTOH Bьзпpon3Бveждaine / Пay3a в ржим AUX ИИн ржим Bluetooth (прс CBbp3Ван c TV).
3aɪnə CTpaHa Ha BncoKOrOBopnteɪa
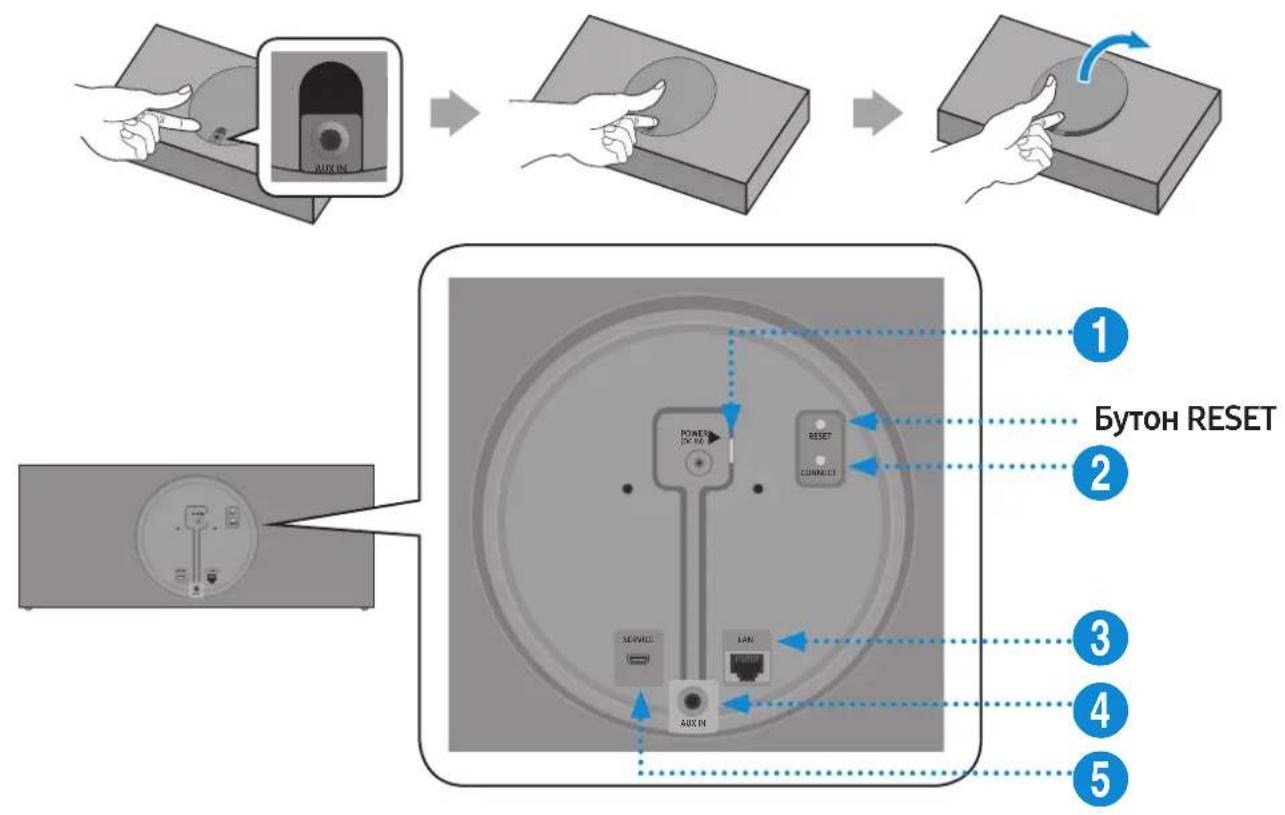

ИЗВОД POWER(DCIN)
- Cbpxte 3axpaHbaunKa6en KbM AC/DC aanTepa. (CneunaHno 3a VL550 / VL551)
- CBbpxkTe n3xOndnna 3axpaHbaa, Ka6eHa AC/DC aanTepa (KpbIa 6yka) KbM npTa POWER (DC IN) Ha BnCOKOROBOpNTeJIa.

Bytoh CONNECT
HaTnCHe:3a npEkbcBaHe Ha Bpb3kata nn CBbp3BaHe c KOHTpOlepa.
HaTnCHeTo pOndbIxxIeHNo 3a 5 ceKyni: 3a cTapTnpaHe Ha Wi-Fi CBbp3BaHe.

H3B0d LAN
I3nOJ3BaCe 3a CbBp3BaHe Ha BNCOKOROBOpNTeKbM Ka6eHaTa MpeKa.

I3BOd AUX IN CbbpkeTe ro KbMaHaIOROB I3XoJeH NOP Ta BbHsHo yCTPOINCTBO.

I3BOD I3noJI3Ba ce 3a akTuJIIn3nPaHe OT cepBn3eH INJKeHep Ha φbpyepa SERVICE Na BnCOKOrOBOpNTeJI.

3aВpb3kata n3noJ3BaIte ka6eI Cat 7 (TIN *STP). (^*E KpaHnpaHa yCykaHa IBOiKa)

ByToHbT RESET cnyyKn 3a oTcTaHaBaHe Ha npo6IeMn.
I3noJ3BaHe Ha KOHTpOlepa
TopHa CTpaHa Ha KOHTpOlepa
Лицензи за www.spotify.com/connect/third-party-licenses.
- 3a noBee uHΦopMaζη 3a Spotify Connect nocetete www.sparky.com/connect
CpeunΦnKaun
© 2018 Samsung Electronics Co., Ltd.
Sva prava pridržana; nijedan dio ovog korisničkog prisučnika ne smije se reproducirati ili kopirati bez prethodnog pismenog odobrenja tvrtke Samsung Electronics Co.,Ltd.
© 2018 Samsung Electronics Co.,Ltd.
Vsechna przyva vyhrazena. Zadna cst te to uzivatske prirucky nesmi byt reproducovana ani kopirovana bez predchozho pisemného souhlasu spolecnosti Samsung Electronics Co., Ltd.
Precautions concerning le nettoyage
Précautions concerning le nettoyage ....v
Démarrage
© 2018 Samsung Electronics Co., Ltd.
I I npooulaeic kata n xpno
Pntote to yia avanapaywyn n dakotn tns ouokns.

'EvdEiEη LED
Eldoioiog yia tic aediec xpnoaoyloikou avolxtou kwoik
© 2018 Samsung Electronics Co., Ltd.
Me tvv eipulaaen pavtoc dikawmuoc. ev eiptpenea n avanapaywn h avtypa n epouc n ooknpou tou npovtoc eyxepiou xpno, xwpic npotepn ypantn aedla ano tn Samsung Electronics Co.,Ltd.
H Samsung Electronics oI o E v loyw Eoanuoc oumuopfoeT aI e Tnv odnyia 2014/53/EK. To nane c Kieveo tnc dnaowc oumuoppwong EE diatietai otnv akolouon dEuvan:http://www.samsung.com. EiAeTe Ynootnpi> Avzntn on unootnpicns npoiovtoc kal eayte to ovua tou movteau. O eonuoc mopei va aeitoupynoe ie oLec tic xwpc ts EC. H aeitoupyia aupaotoudeltatuou WLAN 5 GHz (Wi-Fi n SRD) autou tou eonuoumupoei va aeitoupynoe i mvo eosrpeikxwo.

(loyeI e xwpec me EexwploTa ouotnmuataoulloync)
Auto to onma Tou eufzetai enavw oTo npoiov, oTa eapntmuata Tou n oTa evxepiaa Tou To ouvodouv, unoedikvuei otu to npoiov kai ta nlektropivka Tou eapntmuata (P.x. foptiotns, aKouotika, kaWdsIO USB) dV th a npentie va pittovta uzi ta unolauia okiak aonoppmuata uetao teloTou kuklou zwnc touc. Ppokelévou va anofoevov evdeltaoxoyevcs baaepes c ouveilec 0to nepiabalov n tnvyia eiaiaac tnc aveleyktnc diaeonc anoppimuatwv, oac Ta paakaIoume va dlaxwpioete auta ta npoiovta aIo aIauoc tuouc anoppimuatwv kai va ta avakukkwote, wote va bonnoeote otny biowuim enavaxpoioinon twv ulikov npow. OI okiakoi xnoTEc 0a npenie va elthouv oe nikoivwvia ete me to katostma an' onou ayopaov auto to npoiov, ete me tic kata tonouc unnpoeic, npokelévou va nlpopoopnOuv tic leTToupeleec oxetkae tv TOIO KA TOTPOIO TEOV OTIO IOIOUAVA TPOIVTA yia aphianipoc to pcpiaalov avakukwog.
Oi eipnoeic-xpntc 0a npie i va eAouv oE eTn aH n e Tov pounthuot cai v Aevouv Tou opouc kai tC npounoeoc tou ouoBoalou ayopac. Auto to npoiov kal ta nektpovka tou Eapntmuata dev th a npie i va avamuyovtaI e alaa ouvnOeva anoppmuata poc dia theon.

IPOEIAOONIH2H
© 2018 Samsung Electronics Co., Ltd.
Toccare "Select Speaker"
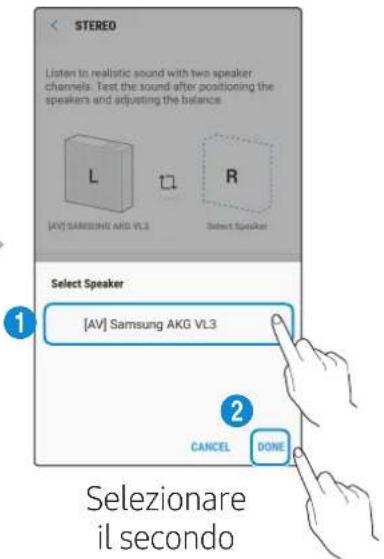
© 2018 Samsung Electronics Co., Ltd.
http://www.samsung.com/it/aboutsamsung/sustainability/environment/our-commitment/data/
Skalrunis Regulators
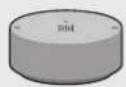
Skalrunis Regulators
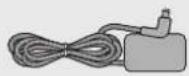
Mainstrāvas/lidzstrāvas adapteris
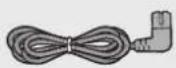
Barosanas kabelis
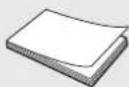
Atras iestatisanas rokasgramata

Regulativorokasgramatu
Noteikti novietojiet mainstravas/lidzstrvas adapteri plakaniski uz galda vai gridas. Ja piekarat mainstrvas/ lidzstrvas adapteri ta, ka tā mainstrvas vada ieejas pieslēgvieta ir versta uz augsu, adapteri var ieklut udens vai CITAS neatabilstosas vielas, kas var izraisit adaptera darbibas traucejumus.
Lai iegadatos papildu componentus, szinieties ar Samsung apkopes centru vai Samsung klienu apkalposanas centru.
UZMANIBU!
Nenovietojiet nekadus pireksmetus uz galvenas ierices augsejas virsmas un nesediet uz tas.
Rikojieties ar produktu uzmanigi, jo tam ir asas malas.
Skatiet produkta apakspuse sniego svarigo informaciju par drosibu.
ProduktaPARSKATS
Skalru na augsa/priekspuse/labapuse
1
Skaluma regulësana (skarienripas pagriesana)
Pieskarieties skarienritenitim un velociet
pulkstenraditaju kustibas virziena, lai palielinatu
skalumu.
Pieskarieties skarienritenitim un velociet
pretesi pulkstenraditaju kustibas virzienam, lai
samazinatu skalumu.


Atskanot / Pauzet
Pieskarieties pie lai saktu vai pauzetu atskanošanu.

LED displejs
© 2018 Samsung Electronics Co., Ltd.
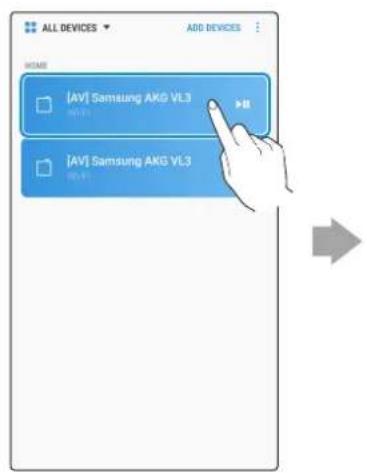
Pasirinkite is jrenginiu saraso
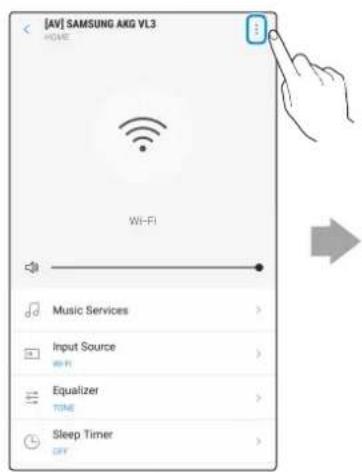
Palieskite virsuje desinéje
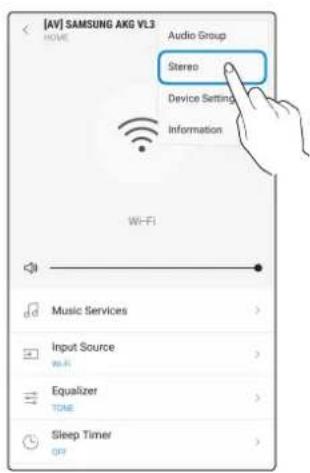
Palieskite „Stereo"
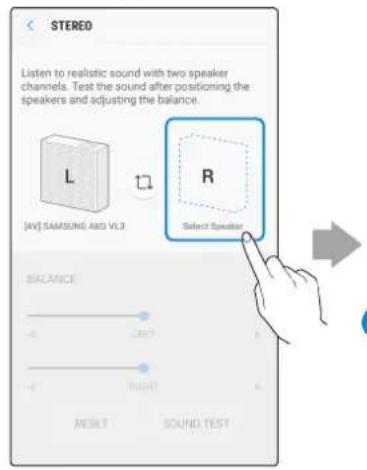
Palieskite, "Select Speaker"
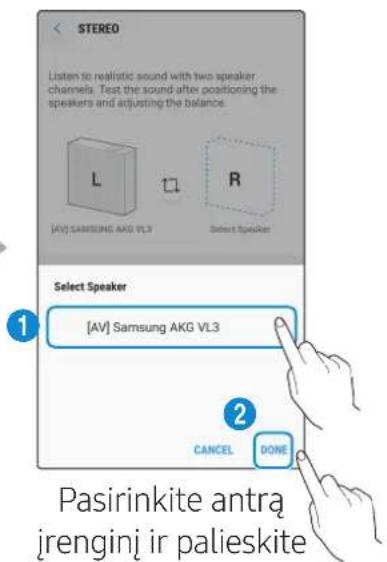
"DONE"

VL550 / VL551 jau yra Stereo jrenginys, todél nepalaiko keleto jrenginiu Stereo jungimo, tik Audio Group Funktioni.
■ Prisijungimas naudojanti „Samsung Smart TV"
© ,Samsung Electronics Co., Ltd.," 2018
1 Use SmartThings app to connect and enjoy two speakers as a Stereo.
© 2018 Samsung Electronics Co., Ltd.
If you have any questions or comments relating to Samsung products, please contact the SAMSUNG customer care centre listed for your country.
| Country Contact Centre | © | Web Site |
| ■ North America | ||
| U.S.A 1-800-SAMS | JNG (726-7864) www.samsung.com/us/support | |
| CANADA 1-800-SAMSUNG (726-7864) | www.samsung.com/ca/support (English) www.samsung.com/ca_fr/support (French) | |
| ■ Latin America | ||
| MEXICO 01-800-SAMSUNG (726-7864) www.samsung.com/mx/support | ||
| BRAZIL | 0800-124-421 (Démais cédées e regioes) 4004-0000 (Capitais e grandes centros) | www.samsung.com/br/support |
| COSTA RICA 00-800-01-1-SAMSUNG (726-7864) | ||
| DOMINICAN REPUBLIC | 1-809-200-7264 | |
| ECUADOR 1-800-SAMSUNG (72-6786) | ||
| EL SALVADOR 800-0-SAMSUNG (726-7864) | ||
| GUATEMALA 1-800-299-0033 | ||
| HONDURAS 800-2791-9111 | ||
| JAMAICA | 1-800-SAMSUNG (726-7864) | www.samsung.com/latin_en/support (English) |
| NICARAGUA | 001-800-5077267 | www.samsung.com/latin/support (Spanish) www.samsung.com/latin_en/support (English) |
| PANAMA | 800-0101 | |
| PUERTO RICO | 1-800-682-3180 | |
| TRINIDAD & TOBAGO | 1-800-SAMSUNG (726-7864) | |
| VENEZUELA | 0-800-SAMSUNG (726-7864) | |
| COLOMBIA | Bogotá en el 600 12 72 Sin costo en todo el pais 01 8000 112 112 Y desde tu CELL #726 | www.samsung.com/co/support |
| CHILE | 800-SAMSUNG (726-7864) | www.samsung.com/cl/support |
| BOLIVIA | 800-10-7260 | |
| PERU | 080077708适合自己el Pais 01 8000 112 112 Y desde tu CELL #726 | www.samsung.com/pe/support |
| ARGENTINA | 0800-555-SAMS (7267) | www.samsung.com/ar |
| URUGUAY 0800-SAMSUNG (7267) www.samsung.com/uy | ||
| PARAGUAY | 0800-11-SAMS(7267) | www.samsung.com/py |
| ■ Europe | ||
| UK | 0330 SAMSUNG (7267864) | www.samsung.com/uk/support |
| IRELAND (EIRE) | 0818 717100 | www.samsung.com/ie/support |
| GERMANY | 06196 77 555 77 | www.samsung.com/de/support |
| FRANCE | 01 48 63 00 00 | www.samsung.com/fr/support |
| ITALIA | 800-SAMSUNG (800.7267864) | www.samsung.com/it/support |
| SPAIN | 0034902172678 | www.samsung.com/es/support |
| PORTUGAL | 808 207 267 | www.samsung.com/pt/support |
| LUXEMBURG | 261 03 710 | www.samsung.com/be_fr/support |
| NETHERLANDS | 088 90 90100 | www.samsung.com/nl/support |
| BELGIUM | 02-201-24-18 | www.samsung.com/be/support (Dutch) www.samsung.com/be_fr/support (French) |
| Country Contact Centre | Web Site | |
| NORWAY 815 5648 | www.samsung.com/no/support | |
| DENMARK 707 019 | 70 www.samsung.com/dk/support | |
| FINLAND 030-6227 | 515 www.samsung.com/fei/support | |
| SWEDEN 0771 726 | 786 www.samsung.com/se/support | |
| POLAND | 801-172-678* lub +48 22 607-93-33* *(koszt polaczenia wedlug taryfy operadora) http://www.samsung.com/pl/support/ | |
| HUNGARY 0680SA | MSUNG (0680-726-7864) www.samsung.com/hu/support | |
| AUSTRIA | 0800-SAMSUNG (0800-7267864) [Only for Dealers] 0810-112233 www.samsung.com/at/support | |
| SWITZERLAND | 0800 726 78 64 (0800-SAMSUNG) www.samsung.com/ch/support (German) www.samsung.com/ch_fr/support (French) | |
| CZECH | 800 - SAMSUNG (800-726786) www.samsung.com/cz/support | |
| SLOVAKIA | 0800 - SAMSUNG (0800-726 786) www.samsung.com/sk/support | |
| CROATIA | 072 726 786 www.samsung.com/hr/support | |
| BOSNIA | 055 233 999 www.samsung.com/support | |
| MONTENEGRO | 020 405 888 | |
| SLOVENIA | 080 697 267 (brezplačna številka) www.samsung.com.si/support | |
| SERBIA | 011 321 6899 www.samsung.com/rs/support | |
| ALBANIA | 045 620 202 www.samsung.com/al/support | |
| BULGARIA | *3000 Lěna в мржата 0800 111 31, Бразлattа телегонна линь www.samsung.com/bg/support | |
| ROMANIA | *8000 (apel in retea) 08008-726-78-64 (08008-SAMSUNG) Apel GRATUIT www.samsung.com/ro/support | |
| CYPRUS | 8009 4000 only from landline, toll free | |
| GREECE | 80111-SAMSUNG (80111 726 7864) only from land line (+30) 210 6897691 from mobile and land line www.samsung.com/gr/support | |
| LITHUANIA | 8-800-7777 www.samsung.com/lt/support | |
| LATVIA | 8000-7267 www.samsung.com/lv/support | |
| ESTONIA | 800-7267 www.samsung.com/ee/support | |
| ■ CIS | ||
| RUSSIA | 8-800-555-55-55 (VIP care 8-800-555-55-88) www.samsung.com/ru/support | |
| BELARUS | 810-800-500-55-500 www.samsung.com/support | |
| GEORGIA | 0-800-555-555 | |
| ARMENIA | 0-800-05-555 | |
| AZERBAIJAN | 0-88-555-55-55 | |
| KAZAKHSTAN | 8-10-800-500-55-500 (GSM: 7799, VIP care 7700) www.samsung.com/kz_ru/support | |
| UZBEKISTAN | 00-800-500-55-500 (GSM: 7799) www.samsung.com/support | |
| KYRGYZSTAN | 00-800-500-55-500 (GSM: 9977) | |
| TAJIKISTAN | 8-10-800-500-55-500 (GSM: 8888) | |
| MONGOLIA | 1800-25-55 | |
| UKRAINE | 0-800-502-000 www.samsung.com/ua/support (Ukrainian) www.samsung.com/ua_ru/support (Russian) | |
| MOLDOVA | 0-800-614-40 www.samsung.com/support | |
| Country Contact Centre | Web Site | |
| ■ Asia Pacific | ||
| CHINA | 400-810-5858 | www.samsung.com/cn/support |
| HONG KONG | 3698 4698 | www.samsung.com/hk/support (Chinese) www.samsung.com/hk_en/support (English) |
| MACAU | 0800 333 | www.samsung.com/support |
| SINGAPORE | 1800 7267864 | 1800-SAMSUNG | www.samsung.com/sg/support |
| AUSTRALIA 1300 362 603 www.samsung.com/au/support | ||
| NEW ZEALAND | 0800 726 786 (All Product) 0800 6 726 786 | www.samsung.com/nz/support |
| VIETNAM | 1800 588 889 | www.samsung.com/vn/support |
| THAILAND | 0-2689-3232 1800-29-3232 (Toll free) | www.samsung.com/th/support |
| MYANMAR | +95-1-2399-888 | www.samsung.com/mm/support |
| CAMBODIA | +855-23-993232 1800-20-3232 (Toll free) | www.samsung.com/th/support |
| LAOS | +856-214-17333 | |
| MALAYSIA | 1800-88-9999 +603-7713 7420 (Overseas contact) | www.samsung.com/my/support |
| INDONESIA | 021-5699-7777 0800-112-8888 (All Product, Toll Free) | www.samsung.com/id/support |
| PHILIPPINES | 1-800-10-726-7864 [PLDT Toll Free] 1-800-8-726-7864 [Globe Landline and Mobile] 02-422-2111 [Standard Landline] | www.samsung.com/ph/support |
| TAIWAN | 0800-329-999 | www.samsung.com/tw/support |
| INDIA | 1800 40 SAMSUNG (1800 40 7267864) (Toll-Free) | www.samsung.com/in/support |
| NEPAL | 16600172667 (Toll Free for NTC Only) 9801572667 | |
| BANGLadesH | 09612300300 08000300300 (Toll free) | |
| SRI LANKA | +9411SAMSUNG (+94117267864) +94117540540 +94115900000 | |
| ■ Middle East | ||
| EGYPT | 08000-7267864 16580 | www.samsung.com/eg/support |
| IRAN | 021-8255 [CE] | www.samsung.com/iran/support |
| ISRAEL | *6963 | www.samsung.com.il/support/ |
| SAUDI ARABIA | (+966) 8002474357 (800 24/7 HELP) | www.samsung.com/sa/home www.samsung.com/sa_en |
| PAKISTAN | 0800-Samsung (72678) | www.samsung.com/pk/support |
| U.A.E | 800-SAMSUNG (800 - 726 7864) | www.samsung.com/ae/support (English) www.samsung.com/ae_ar/support (Arabic) |
| OMAN | 800-SAM CS (800-72627) | |
| KUWAIT | 183-CALL (183-2255) | |
| BAHRAIN 8000-GSAM (8000-4726) | 800-CALL (800-2255) | |
| QATAR | 800-CALL (800-2255) | |
| TURKEY | 444 7711 | www.samsung.com/tr/support |
| JORDAN | 0800-2227306 5777444 | www.samsung.com/levant/support |
| SYRIA 962 5777444 | ||
| LEBANON 1299 | ||
| IRAQ 80010080 | ||
| ALGERIA 3004 | www.samsung.com/n_africa/supportTUNISIA 80100012 | |
| MOROCCO 080 100 22 55 | ||
| ■ Africa | ||
| SOUTH AFRICA 0860 SAMSUNG (726 7864) | www.samsung.com/support | |
| NAMIBIA 08197267864 | ||
| ZAMBIA 3434 | ||
| MAURITIUS 800 2550 | ||
| REUNION 0262 5088 80 | ||
| ANGOLA 917 267 864 | ||
| ZIMBABWE 0808 0204 | ||
| MOZAMBIQUE 847267864 | ||
| NIGERIA | 0800-726-7864 | www.samsung.com/africa_en/support |
| GHANA | 0800-100-077 | |
| COTE D'IVOIRE | 8000-00-77 | www.samsung.com/africa_fr/support |
| SENEGAL 800-00-0077 | ||
| CAMEROON | 67095-0077 | |
| KENYA | 0800 545 545 | www.samsung.com/support |
| UGANDA | 0800 300 300 | |
| TANZANIA 0800 780 089 | ||
| RWANDA | 9999 | |
| BURUNDI 200 | ||
| DRC | 499999 | |
| SUDAN | 1969 | |
SAMSUNG

- WI R E L E S S A U D I O V L Series
- Safety Information
- Regulatory Compliance Statements
- WARNING
- CAUTION
- Safety precautions
- Power Supply Precautions
- Installation Precautions
- Usage Precautions
- Cleaning Precautions
- Contents
- Getting Started
- Connecting to Bluetooth
- Connecting to Wi-Fi
- Connecting to an External Device
- Additional Functions
- Installing the Wall Mount
- Appendix
- Checking the Components
- VL350/VL351
- Speaker Dial Controller
- AC/DC Adapter
- AC Plug
- VL550/VL551
- Product Overview
- Top / Front / Right Side of the Speaker
- LED Display
- Rear of the Speaker
- Using Dial Controller
- Top of the Dial Controller
- Bottom of the Dial Controller
- - Connecting between the Dial Controller and Speaker
- * Before use of the Dial Controller
- * First time connection
- * Reconnection
- - Connecting an external device via the AUX cable
- Using mobile device voice recognition
- Dedicated functions in Bluetooth mode
- Using via Wi-Fi connection
- Functions upon Wi-Fi connection
- Using 2 units - Audio Group
- Select Audio Group in SmartThings app.
- Using 2 units - Stereo (Dedicated for VL350 / VL351)
- Select Stereo in SmartThings app.
- Connecting with a Samsung Smart TV
- - Connecting 1 speaker to Samsung Smart TV 2018
- - Connecting 2 speakers to Samsung Smart TV 2018
- - Connecting 1 speaker to Samsung Smart TV 2017
- - Connecting 2 speakers to Samsung Smart TV 2017
- - Connecting 1 speaker to Samsung Smart TV 2016
- - Connecting 2 speakers to Samsung Smart TV 2016
- - Connecting 1 or 2 speakers to a 2015 Samsung Smart TV
- - Connecting 1 or 2 speakers to a 2014 Samsung Smart TV
- Connecting an Amazon product
- - Connect and use with an Amazon product (Amazon Echo)
- Use voice commands to control the Speaker
- Trigger + Command + Speaker name
- - Considerations for purchasing
- Wall-Mount Components
- * Removing the Wall Mount
- Troubleshooting
- Open Source Licence Notice
- Licences
- Additional Information
- About the Network Connection
- Works with SmartThings™
- Copyright
- [Correct disposal of batteries in this product]
- (Applicable in countries with separate collection systems)
- Correct Disposal of This Product (Waste Electrical & Electronic Equipment)
- Mepkn 3a 6e30nacnoct, Cbbp3aHn Cbc 3axpaHbaHeTo
- I PpeDpa3Hm MepKn 3a HcTalaunraTa
- I PpeDpa3Hm MepKn npn ynoTpe6a
- I Ipeedna3Hm MepKn npn nouchTbaHe
- CbDbRgKaHne
- Инструкции за 6еzoноct
- Инсталаре наkomноенте 3aстен MOтax
- Прилaxesн
- PbBn CTbPkN
- 3aɪnə CTpaHa Ha BncoKOrOBopnteɪa
- I3noJ3BaHe Ha KOHTpOlepa
- TopHa CTpaHa Ha KOHTpOlepa
- CpeunΦnKaun
- Precautions concerning le nettoyage
- Démarrage
- I I npooulaeic kata n xpno
- 'EvdEiEη LED
- Eldoioiog yia tic aediec xpnoaoyloikou avolxtou kwoik
- (loyeI e xwpec me EexwploTa ouotnmuataoulloync)
- IPOEIAOONIH2H
- UZMANIBU!
- ProduktaPARSKATS
- Skalru na augsa/priekspuse/labapuse
- LED displejs
- ■ Prisijungimas naudojanti „Samsung Smart TV"
Brand : SAMSUNG
Model : VL550
Category : Pregnant