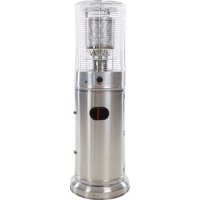
GS17K - Heating SunRed - Free user manual and instructions
Find the device manual for free GS17K SunRed in PDF.

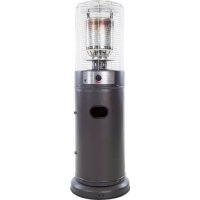
| Product type | Halogen infrared radiant heater |
| Brand | SunRed |
| Model | GS17K |
| Power (settings) | 900 W / 1200 W / 2100 W |
| Power supply | 230 V ~ 50 Hz |
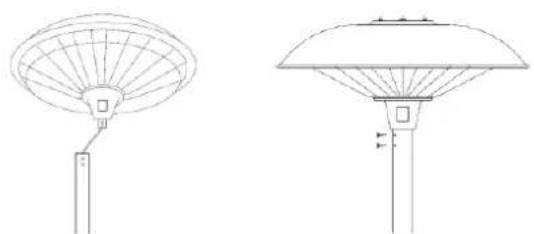
| Dimensions (H x Diam) | 205 cm x 50 cm |
| Net weight | 10.1 kg |
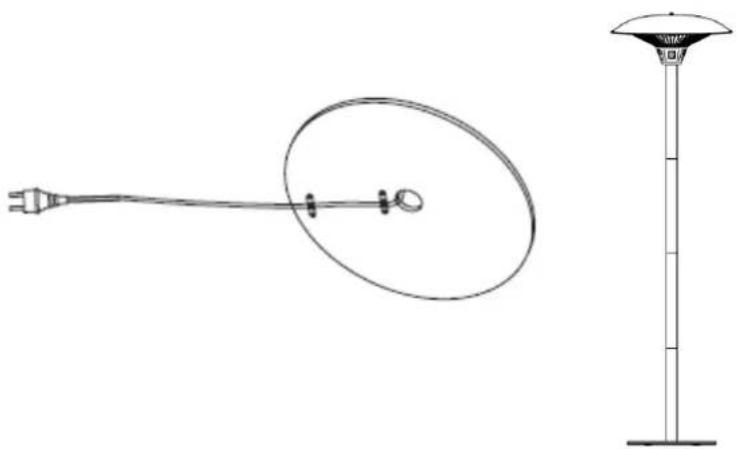
| Power cord length | 1.9 m |
| Heating element type | Halogen infrared |
| Element lifespan | 5000 hours |
| Insulation class | I (grounding required) |
| Height adjustment | Yes, by telescopic tube |
| Safety switch | Automatic shut-off in case of tipping |
| Usage | Indoor / outdoor (sheltered from rain) |
| Assembly required | Yes, 8 steps |
| Cleaning | Soft damp cloth, mild detergent if necessary |
| Storage | In a cool and dry place, original packaging |
| Disposal | Recycling via approved center (WEEE) |
| Spare parts | Heating elements, switch, power cord |
| Repairability | Repair by an approved professional |
Frequently Asked Questions - GS17K SunRed
User questions about GS17K SunRed
0 question about this device. Answer the ones you know or ask your own.
Ask a new question about this device
Download the instructions for your Heating in PDF format for free! Find your manual GS17K - SunRed and take your electronic device back in hand. On this page are published all the documents necessary for the use of your device. GS17K by SunRed.
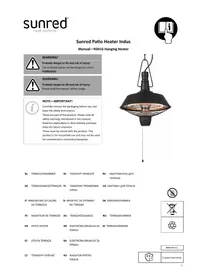
USER MANUAL GS17K SunRed
Manual Standing Electric Heater (EN)
Handleiding Staande electrische patio heater (NL)
User manual - please keep for future reference

TECHNICAL INFORMATION
Wattage: 900W/1200W/2100W
Element type: Infrared Halogen
Expected Life span elements: 5000 hrs.
Weight: 10.1kg
Ingress Protection Rating: IP44
Certificates: CE, GS, PAH, ROHS
Cable Cord: 1,9 meters
Dimensions: H205 x Diam 50 cm
Remarks: Height adjustable


All measurements are approximate
IMPORTANT - Carefully remove any packaging before use, but retain the safety instructions.
These instructions are part of the product.
Please take note of all the safety warnings listed in these instructions.
Please read these instructions in their entirety and retain them for future reference.
These instructions should be stored with the product.
Unpack the halogen heater, making sure that all the items are present and that there are no components left in the box and that the heater head is free from any packaging material.
Using the detailed drawing, follow the steps to assemble your heater.
Do not connect the heater to the electrical supply until all the assembly is complete.
Do not connect the heater to the electrical supply if any of the components or the power cord is damaged in any way. If in doubt contact your supplier.
Caution
Only use the heater on a firm, solid and horizontal surface with the base securely in contact with the floor. The heater is fitted with an automatic turn off-switch in case the heater tilts or falls over.
-
Place the heater outside or in a large open area and well away from any obstructions such as branches or from objects that can be affected by heat, such as furniture, curtains or other inflammable objects (minimum distance 1 meter).
-
Do not use near bath tubs, washing areas or swimming pools.
-
Do not use in unventilated areas.
-
Do not use where gas, petrol, paint or other inflammable goods are stored.
-
Do not push any items through, obstruct or cover the grill of the heater head.
-
Do not position immediately above or below an electrical socket.
-
Do not move when connected to an electrical supply and always wait for the patio heater to cool down before storing away.
-
Do not touch the heater head when in use.
-
Do not leave turned on and unattended especially when children and/or animals are in the vicinity.
-
The indication of the different positions of switches must be visible from a distance of 1m
-
The marking concerning covering must be visible after the heater has been installed. It shall not be placed on the back of the heater.
-
The unit must be placed with the clearance of 100cm to the wall and 30cm to the ceiling.
-
The unit must be correctly installed according to the instructions.
-
The unit must be securely placed on a horizontal and flat surface.
-
The unit is at high temperature during operation. It keeps hot for a period after shut down. Do not touch it during this period.
-
Do not place the unit close to curtains and/or other flammable objects. Otherwise there will be a danger of catching fire.
-
Do not cover the unit with anything during operation or a short time after it has been shut down.
-
Do not wrap the power supply cord around the unit.
-
The unit must be handled with care. Avoid vibration or impact.
-
The unit must be securely grounded during operation.
-
If the unit gets damaged, it must be repaired by a professional electrician.
-
When the power supply cord is damaged, it must be replaced by an authorized agent or other professionals to avoid danger.
-
The unit must not be positioned under a socket.
-
When assembling, keep clear from any board or flammable material.
-
The unit must be supervised by adults if it is used by a child.
-
It is not safe to install the unit by a swimming pool, in a bathroom or shower area.
-
The unit is for household use only. It is not safe to use on a building site, greenhouse, barn or stable where there is flammable dust.
-
The head of the unit is at high temperature during operation. Unplug the unit and wait until it cools down before cleaning.
-
Do not use this unit in place where causticity or volatile air exists, i.e. dust, steam, gas, etc.
-
Do not use this unit as a cloth drier or towel drier.
-
Do not use this unit as a sauna heater.
-
Do not use this unit as a room heater.
-
Do not use this unit in place of animal propagating and raising.
-
Do not immerse this unit into water for cleaning.
-
The unit should be plugged in a socket, which is easily visible and reachable.
- Two dark points may appear on the surface of the heating elements during the first few minutes after it is turned on. This is normal, and will not affect the performance of the unit.
- A tilt switch is fitted inside the unit for safety purposes.
Operation
Connect the power cable to a 13 amp supply that is located in a safe, dry area.
- The switch on the heater head is used to control the three heat settings. (I) for 900W - (II) for 1200W - (I&II) for 2100W. When the timer is in the "ON" position, the heater will be on continuously.
Although the patio heater is weather proof, do not use when raining or in wet conditions.
Always disconnect the power cable from the electrical supply when the patio heater is not in use.
Care and maintenance
Unplug the unit and let it cool completely.
- To keep the heater clean, the outer shell may be cleaned with a soft, damp cloth. You may use a mild detergent if necessary. After cleaning, dry the unit with a soft cloth.
DO NOT use alcohol, gasoline, abrasive powders, furniture polish, or rough brushes to clean the heater. This may cause damage or deterioration to the surface of the heater.
- Although this heater is outdoor approved, DO NOT immerse the heater in water for your safety.
- Wait until the unit is completely dry before use.
Storage
- Ensure the unit is completely cold before storing in a cool, dry location.
- To prevent dust and dirt to build-up, use the original packaging to repack the unit.
- CHOKING HAZARD: Store out of reach of children and pets. Contains small parts.
Disposal
DO NOT dispose of the unit via your weekly household waste collection service. ONLY dispose of this product at your local, licensed recycling/waste centre.
For further information on the disposal of electrical goods, please contact your local authority.
Trouble shooting
If the heater will not operate, please check the following before seeking repair of service:
- Check if the power cord is plugged into an electrical outlet; if not, plug in.
- Check if electricity to the main fuse is working.
- Make sure the power switches are turned on. If not, choose a heat setting.
Technical specification
Power supply 230V 50Hz
Wattage max 2100W
Net weight 10,1 kg
Insulation class I
- Height max 205 cm
Assembly
The heater can be put together by one person, but is recommended to do this with two people.
Step 1: Connect the Bottom Tube to the Base by screwing them together.
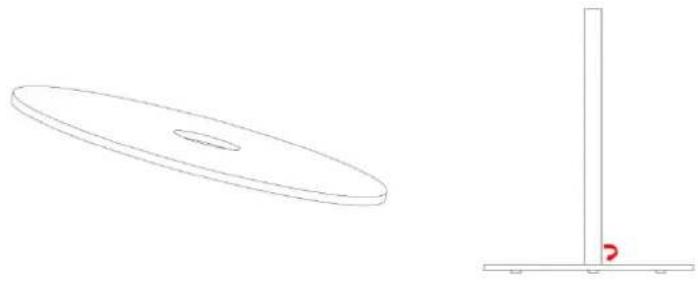
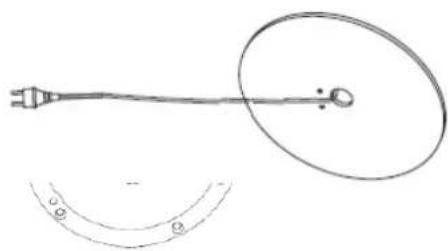
Step 2: Feed the Power Cord through the Base and the Bottom Tube, and pull through around 2m of cable.
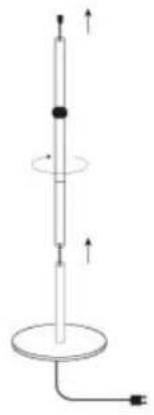
Step 3: Connect the Middle Tube with the Bottom Tube by screwing them together.
Step 4: Connect the Top Tube with the Middle Tube by screwing them together.

Step 5: Place the power cord plug through base, Bottom Tube, Middle Tube and Top Tube. Connect the power cord plug to the socket in the heater head.
www.sunred.nl
Step 6:Push the Heater Head onto the Top Tube and fix in position using the 2 × 8 ~mm screws.
Step 7: Fix the power cord on the rubber base by using two M4X15 screws.
Step 8: Fixing on the floor
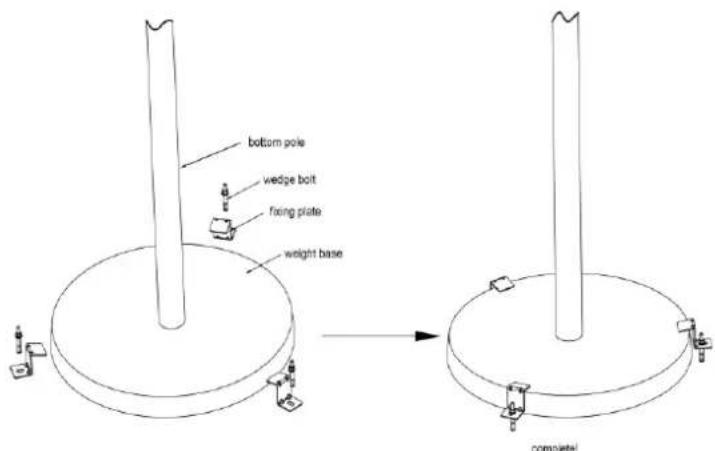
fixing on the floor:
1.bore three holes in the floor
2-fix the heater by three wedge bolts on the floor.
3.tighening the screws by spanner.
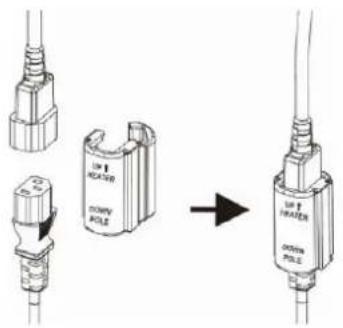
Tip: When you're moving your heater and when you use it again you're the heater stopped working, could it be the connection inside has popped out. This you can restore itself through the tubes apart and the cables back together. See step 5 in the Assemble.
Staande electrische Patio Heater (GS17K/GS17B) NL
Certificates: CE, GS, PAH, ROHS
Kabellenge: 1.9 meter
Afmetingen: H205 x Diam 50 cm
Ingress Protection IP44
Zertifikate: CE, GS, PAH, ROHS
Qualification IP:IP44
Certificates: CE, GS, PAH, ROHS