
Electra 6130 - Faucet Oras - Free user manual and instructions
Find the device manual for free Electra 6130 Oras in PDF.

| Product type | Infrared electronic faucet |
| Brand | Oras |
| Model | Electra 6130 |
| Power supply | 230 V AC via transformer (12 V DC) |
| Operating voltage | 12 V DC (low voltage) |
| Sensor type | Infrared cell |
| Maximum flow duration | 2 minutes (adjustable from 1 to 255 seconds) |
| Sensor range | Adjustable (preset at factory) |
| Delay after hands are removed | 1 second (adjustable via ORAS terminal) |
| Safety function | Automatic shut-off after 40 seconds of obstruction |
| Washbasin drilling diameter | 28 to 35 mm |
| Water connection | Supply hose (threaded) |
| Frost protection | Drain the solenoid valve and faucet |
| Maintenance | Clean with a non-abrasive cloth, without acid |
| Filter cleaning | Unscrew the hose and the fitting, remove and rinse the filter |
| Areas of use | Hospitals, clinics, public toilets, schools, etc. |
| Weight | Approximately 1.5 kg (estimate) |
| Repairability | Filter and solenoid valve replaceable by a professional |
Frequently Asked Questions - Electra 6130 Oras
User questions about Electra 6130 Oras
0 question about this device. Answer the ones you know or ask your own.
Ask a new question about this device
Download the instructions for your Faucet in PDF format for free! Find your manual Electra 6130 - Oras and take your electronic device back in hand. On this page are published all the documents necessary for the use of your device. Electra 6130 by Oras.
USER MANUAL Electra 6130 Oras
Water Is Worth Loving.
Contents
CZ Obsah
FI Sisallysluettelo
NL Inhoud
RU CoidepkaHne
DE Inhaltsübersicht
FR Sommaire
NO Innhold
0.11 l/s (300 kPa) (with flow controller)
170 kPa (0.1 l/s)
max. +80^


STF VTT-RTH-00112-11
WA1.41/18176

GODKENDT
TIL DRIKKEVAND
Sintef Nr. 0312

(EMC 89/336/EEC)
6130
EN 15091
I (ISO 3822)
50 - 1000 kPa
0.11 l/s (300 kPa) (with flow controller)
170 kPa (0.1 l/s)
max. +80^


WA1.41/18176

GODKENDT
TIL DRIKKEVAND

(EMC 89/336/EEC)
Technical data
CZ Technická data
FI Tekniset tiedot
GB Electrical Connection
CZ Napajeci napeti
DE Elektr. AnschluB
DK Elektrisk tilslutning
EE Elektrilides
Installation and Maintenance Guide
GB
General
The Electra Installation and Maintenance Guide introduces the operation, installation, maintenance and use of the Oras Electra lavatory faucet. Please read the instructions carefully prior to installation and save them for reference where servicing may be needed. If any fault or malfunction occurs in the faucet, please seek the best possible advice at an expert HVAC store.
Function
No-touch Electra faucets are turned on and shut off by a solenoid valve that is actuated by a photocell. When the hands are held under the faucet, the solenoid valve opens and water starts to flow. When the hands are removed, the faucet shuts automatically after a preset time delay.
Applications
No-touch Electra faucets are intended for use in areas that require a high standard of hygiene, e.g. hospitals, doctors' offices, food processing plants etc. Electra faucets are also suitable for use where there is a possibility that a faucet can be left running, e.g. public toilets, restaurants, schools etc.
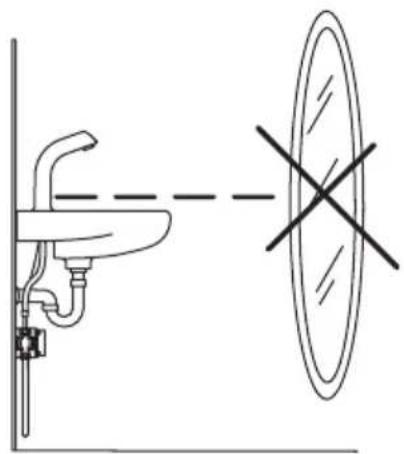
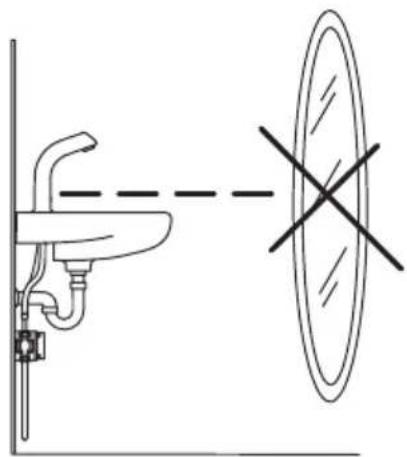
The wash-basin to which the Electra faucet is to be fixed may not be of the kind that can be plugged.
To clean the faucet
When cleaning the surface of the faucet, use neutral liquid detergents only. Do not use any scrubbing or corrosive cleaning agents! WARNING: Do not clean the appliance with a high pressure washer.
Risk of freezing
When installing the faucet in a place where the temperature may fall below freezing, the entire system must be drained of water to prevent bursting in freezing weather.
-
Shut off the water supply.
-
Disconnect all flexible hoses and make certain that all parts and hoses are drained of water.
Protection against vandalism
If the eye of the photocell is continuously covered for over 40 seconds, the faucet shuts automatically. To regain normal operation, remove the blockage (e.g. chewing gum, tape) from the sensor.
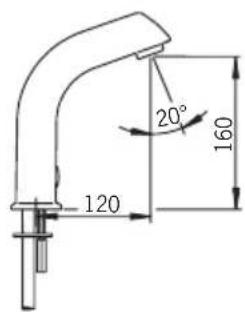
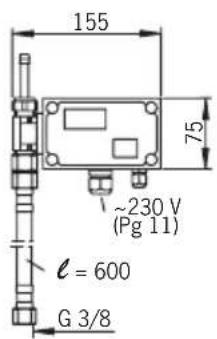
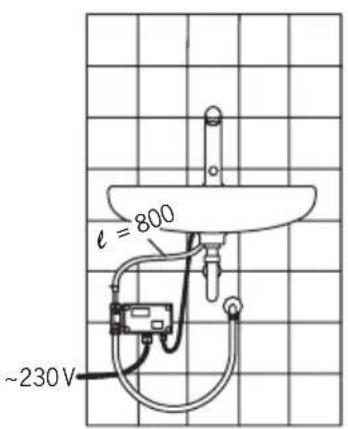
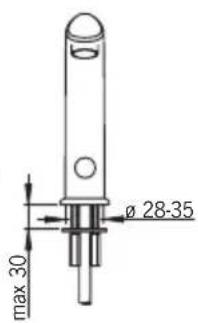
Installation (see Figures 1 and 2)
- Mount the no-touch faucet on the wash-basin (ø 28–35 mm). Ensure that the o-ring seal between the faucet and the wash-basin is correctly installed.
- Slip the fixing washer (1) and stud nuts (2) into position and tighten with a screwdriver or 9mm adjustable wrench.
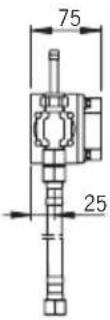
- Remove the control-box cover.
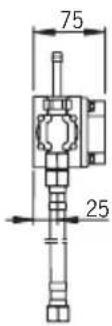
- Using the four screws supplied, mount the control box (3) onto a suitable place in the cabinet or on the wall below the wash-basin, in a position that permits easy access for maintenance.
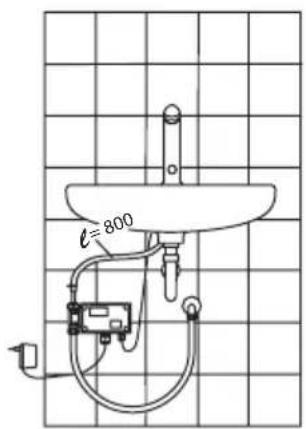
- Cut the hose (4) to the proper length.
- Attach the hose to the connector (5) on the control box.
- Secure the hose with a hose clamp (6).
Connecting the Water-Supply Hoses
- Attach one end of the flexible water-supply hose (7) to the control-box attaching nipple (8) and the other end to the pipe for pre-mixed water.
Electrical Connections
- Connect the sensor wire (9) to the control box and tighten the cable gland with the nut (10).
6100:
- Connect the 230V mains current as follows:
- Remove the connector (11) e.g. by prying off with a small screwdriver.
- Make sure that the electric wires are not live and then attach them to the connector.
- Push the connector and wires back into the counterpart.
- Pull any loose wire through the cable gland and out of the control box. Tighten the cable gland (12) nut.
PLEASE NOTE!
The electrical installation of the 6100 requires a qualified electrician, and must include a two-pole trip device with a circuit breaker of at least 3mm .
6130:
Put the contact plug transformer (13) into a 230V wall socket.
- The control box operates at low voltage (12 V), so a plumber may also install and adjust the faucet.
PLEASE NOTE!
When connecting the mains voltage to the appliance, the solenoid valve will always be open for a moment.
- Turn on the water supply to the faucet.
- Check that the connections are watertight and that the faucet operates by putting your hand in front of the photocell (14).
- Replace the control-box cover.
- Stick the instruction label supplied in a place where it can be easily seen.
After-flow time and sensing range (see Figure 2)
After-flow time is the period of time between the moment the photocell ceases to be activated and the moment the water stops flowing. The sensing range is the greatest distance that an object can have from the photocell to activate it and open the faucet. The after-flow time and sensing range have been preset at the factory. If necessary, they can be adjusted as follows:
Sensing range
- Remove the control-box cover.
- Push the button (15).
- Position a piece of white paper (e.g. the installation instructions) vertically in front of the faucet, at the distance at which the photocell is intended to react (e.g. at the outer edge of the wash-basin).
- Hold the paper at this distance. Water will start to flow after about 30 seconds. Pull the paper away after the water flow has stopped!
- The sensing range is now set and stored.
- This information will not be lost from memory due to a power failure.
- Should the distance prove unsatisfactory, simply readjust by changing the position of the piece of paper.
- Replace the control-box cover.
- The recognition range can also be adjusted using the Oras Data Terminal (v. 2.4 or later).
After-flow Time (factory-set to 1 second)
- After-flow time can be adjusted using the Oras Data Terminal (v. 2.4 or later).
Cleaning the Filter (see Figures 1 and 2)
If the water flow has decreased, this may be because the filter is clogged. Clean the filter as follows:
- Shut off the water supply to the faucet.
- Remove the connecting hose (7) from the control box.
- Unscrew the connecting nipple (8) and remove the strainer from the nipple.
Clean the strainer under running water.
Reassemble the parts.
Troubleshooting
Symptom Cause / Solution
Water flow from the outlet - The sensing range is too low does not stop, or stops - Check that the photocell is clean after 40 seconds - The solenoid valve is damaged
Water flow is low and weak - Filter is clogged
No water comes out of the faucet - Check the water supply to the control box
- The solenoid valve is damaged
- Power failure
- The sensor is covered or damaged
- Check the fuse (17) inside the control box:
6100: 0.1 A
6130: 1 A
Bo3MOxHbIe HenCnpaBHOCTN
HencnpabHoctb PnunHa/Heo6xOumbIe deNCTBna
Iopdaa BOdbI He npekpaaaetc Jn6o - CNIuKOM MaIOe 3HaueHne pacctoHne npekpaaetc ToJbKO uepe3 40 cekyHd ono3HaBaHn;
- npOBepbTe uCTOTy fOTo3nEmeHTa;
- HenCnpaBHOCTb 3JIeKTpPOMaHrHTHOrO KlaNaHa.
Cna6bnoTOK BOBnI3 cmecnten - 3acopeHne hnltpa.
Boda He noctynaeTn3 cmecnten - 3acopeHne HnIbTpca;
- BODa He NoidaTcHa Kopo6Ky ynpabHeHHa;
- npepbIbAHHe 3JIeKTPoNITaHnIa
- foTo3nemeHT HeNCpabeH IIn6o 3aKpbIT YcEM-lIn6o;
- npoBepbTe nnabKn ppeOxpaHnteIb (17) B kopo6Ke
ynpablennna:
MoeJIb 6100:0.1 A
moenb6130:1A
Oras Group is a powerful European provider of sanitary fi tings: the market leader in the Nordics and a leading company in Continental Europe. The company's mission is to make the use of water easy and sustainable and its vision is to become the European leader of advanced sanitary fi tings. Oras Group has two strong brands, Oras and Hansa.
The head office of the Group is located in Rauma, Finland, and the Group has four manufacturing sites: Burglengenfeld (Germany), Kralovice (Czech Republic), Olesno (Poland) and Rauma (Finland). Oras Group employs approximately 1400 people in twenty countries. Oras Group is owned by Oras Invest, a family company and an industrial owner.
ORAS GROUP
Isometsäntie 2, P.O. Box 40
FI-26101 Rauma
Tel. +358 2 83 161
Fax +358 2 831 6300
info.fi nland@oras.com
www.oras.com

Water Is Worth Loving.