USER MANUAL SBC 15 SANITAS
Quelle: WHO, 1999 (World Health Organization)
- Getting to know your device 18
- Important notes 19
- Unit description 23
4.Preparing for the measurement 24
- Measuring blood pressure 26
6.Evaluating results 28
Included in delivery
Blood pressure monitor with cuff
- 2 x 1.5 V LR03 AAA batteries
Storage box
- Instructions for use
Please read these instructions for use carefully and keep them for later use, be sure to make them accessible to other users and observe the information they contain.
1. Getting to know your device
Check that the device packaging has not been tampered with and make sure that all contents are present. Before use, ensure that there is no visible damage to the device or accessories and that all packaging material has been removed. If you have any doubts, do not use the device
- Saving, displaying and deleting measured values ..29
- Error messages/troubleshooting 30
- Cleaning and storing the device and cuff 31
- Technical specifications 31
- Warranty / Service 33
and contact your retailer or the specified Customer Services address.
The wrist blood pressure monitor is used to carry out non-invasive measurement and monitoring of arterial blood pressure values in human adults. This allows you to quickly and easily measure your blood pressure, save the measurements and display the development of the measurements. You are also warned of possible existing cardiac arrhythmia.
The recorded values are classified and evaluated graphically.
2. Importantnotes

Signs and symbols
The following symbols are used in these instructions for use, on the packaging and on the type plate for the device and the accessories:
| ! | Attention |
| i | Product information
Note on important information |
| Observe the instructions
Read the instructions before start-
ing work and/or operating devices or
machines |
| Isolation of applied parts
Type BF
Galvanically isolated applied part
(F stands for “floating”); meets the
requirements for leakage currents for
type B |
| - - - | Direct current
The device is suitable for use with
direct current only |
| Disposal in accordance with the Waste Electrical and Electronic Equipment EC Directive - WEEE |
| Separate the packaging elements and dispose of them in accordance with local regulations. |
| B
A | Marking to identify the packaging material.
A = Material code,
B = Material number:
1-7 = Plastics,
20-22 = Paper and cardboard |
| Manufacturer |
| Storage/Transport | Permissible storage and transport temperature and humidity |
| Operating | Permissible operating temperature and humidity |
| IP22 | IP class
Device protected against foreign objects ≥ 12.5 mm and against water dripping at an angle |
| SN | Serial number |
| REF | Item number |
| MD | Medical device |
| CE | CE labelling
This product satisfies the requirements of the applicable European and national directives. |
| Separate the product and packaging elements and dispose of them in accordance with local regulations. |

Notes on use
- In order to ensure comparable values, always measure your blood pressure at the same time of day.
- Do not take a measurement within 30 minutes of eating, drinking, smoking or exercising.
- Before the initial blood pressure measurement, make sure always to rest for about 5 minutes.
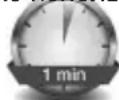
- Furthermore, if you want to take several measurements in succession, make sure always to wait for at least 1 minute between the individual measurements.
-
Repeat the measurement if you are unsure of the measured value.
-
The measured values taken by you are for your information only - they are no substitute for a medical examination. Discuss the measured values with your doctor and never base any medical decisions on them (e.g. medicines and their administration).
- Using the blood pressure monitor outside your home environment or whilst on the move (e.g. whilst travelling in a car, ambulance or helicopter, or whilst undertaking physical activity such as playing sport) can influence the measurement accuracy and cause incorrect measurements.
- Do not use the blood pressure monitor on newborns, pregnant women or patients with pre-eclampsia.
- In the case of restricted circulation on the arm as a result of chronic or acute vascular diseases (including vascular constriction), the accuracy of the wrist measurement is limited. In this case you should avoid using an upper arm blood pressure monitor.
-
This device is not intended for use by people (including children) with restricted physical, sensory or mental skills or a lack of experience and/or a lack of knowledge, unless they are supervised by a person who has responsibility for their safety or they receive instructions from this person on how to use the device. Supervise children around the device to ensure they do not play with it.
-
Cardiovascular diseases may lead to incorrect measurements or have a detrimental effect on measurement accuracy. The same also applies to very low blood pressure, diabetes, circulatory disorders and arrhythmias as well as chills or shaking.
- The blood pressure monitor must not be used in connection with a high-frequency surgical unit.
- Only use the device on people who have the specified wrist measurement for the device.
- Please note that when inflating, the functions of the limb in question may be impaired.
- During the blood pressure measurement, the blood circulation must not be stopped for an unnecessarily long time. If the device malfunctions remove the cuff from the arm.
- Do not allow sustained pressure in the cuff or frequent measurements. The resulting restriction of the blood flow may cause injury.
- Make sure that the cuff is not placed on an arm in which the arteries or veins are undergoing medical treatment, e.g. intravascular access or intravascular or therapy, or an arteriovenous (AV) shunt.
- Do not use the cuff on people who have undergone a mastectomy.
-
Do not place the cuff over wounds as this may cause further injury.
-
Place the cuff on your wrist only. Do not place the cuff on other parts of the body.
- The blood pressure monitor can only be operated with batteries.
- To conserve the batteries, the blood pressure monitor switches off automatically if you do not press any buttons for one minute.
- The device is only intended for the purpose described in these instructions for use. The manufacturer is not liable for damage resulting from improper or careless use.

Instructions for storage and maintenance
- The blood pressure monitor is made from precision and electronic components. The accuracy of the measured values and service life of the device depend on its careful handling:
- Protect the device from impacts, humidity, dirt, marked temperature fluctuations and direct sunlight.
- Do not drop the device.
- Do not use the device in the vicinity of strong electromagnetic fields and keep it away from radio systems or mobile telephones.
- We recommend that the batteries be removed if the device will not be used for a prolonged period of time.
Notes on handling batteries
- If your skin or eyes come into contact with battery fluid, rinse the affected areas with water and seek medical assistance.
- Choking hazard! Small children may swallow and choke on batteries. Store the batteries out of the reach of small children.
- Observe the plus (+) and minus (-) polarity signs.
- If a battery has leaked, put on protective gloves and clean the battery compartment with a dry cloth.
- Protect batteries from excessive heat.
- Risk of explosion! Never throw batteries into a fire.
- Do not charge or short-circuit batteries.
- If the device is not to be used for a relatively long period, take the batteries out of the battery compartment.
- Use identical or equivalent battery types only.
Always replace all batteries at the same time.
- Do not use rechargeable batteries!
- Do not disassemble, split or crush the batteries.
Instructions for repairs and disposal
-
Batteries do not belong in household waste. Please dispose of empty batteries at the collection points intended for this purpose.
-
Do not open the device. Failure to comply will invalidate the warranty.
- Do not repair or adjust the device yourself. Proper operation can no longer be guaranteed in this case.
- Repairs must only be carried out by Customer Services or authorised suppliers. Before making a claim, please check the batteries first and replace them if necessary.
- For environmental reasons, do not dispose of the
device in the household waste at the end of its useful life. Dispose of the device at a suitable local collection or recycling point.
Dispose of the device in accordance with EC
Directive - WEEE (Waste Electrical and Electronic
Equipment). If you have any questions, please contact the local authorities responsible for waste disposal.

Notes on electromagnetic compatibility
-
The device is suitable for use in all environments listed in these instructions for use, including domestic environments.
-
The use of the device may be limited in the presence of electromagnetic disturbances. This could result in issues such as error messages or the failure of the display/device.
-
Avoid using this device directly next to other devices or stacked on top of other devices, as this could lead to faulty operation. If, however, it is necessary to use the device in the manner stated, this device as well as the other devices must be monitored to ensure they are working properly.
-
The use of accessories other than those specified or provided by the manufacturer of this device can lead to an increase in electromagnetic emissions or a decrease in the device's electromagnetic immunity; this can result in faulty operation.
-
Failure to comply with the above can impair the performance of the device.
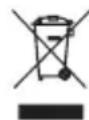
3. Unitdescription
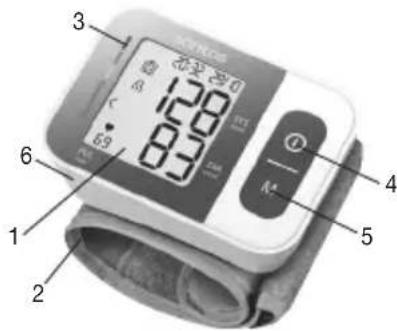
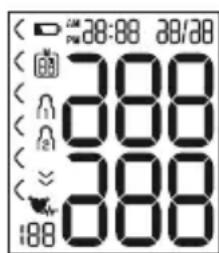
- Display
- Wrist cuff
- Risk indicator
4.Start/stop button ①
- Memory button M
- Battery compartment lid
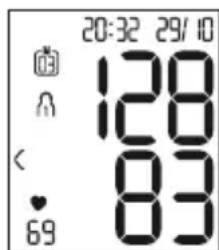
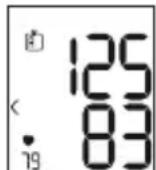
- Systolic pressure
- Risk indicator C
- Diastolic pressure
- Calculated pulse value
5.Cardiac arrhythmia symbol
- Pulse symbol
- User memory
- Memory space num ber/memory display for average value (A)morning (A)Ravening (P)Pf
- Battery replacement symbol
- Time and date
- Release air (arrow)
4. Preparing for the measurement Inserting the batteries
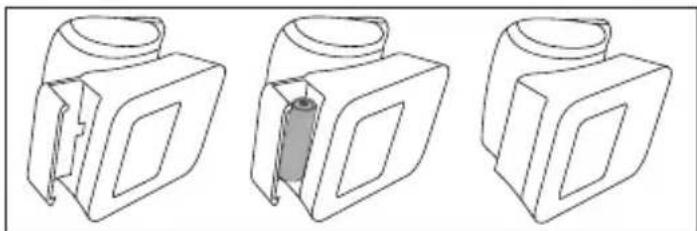
- Remove the battery compartment lid on the left side of the device.
- Insert two 1.5V micro (alkaline type LR03) batteries.
- Make sure that the batteries are inserted the correct way round in accordance with the markings. Do not use rechargeable batteries.
- Carefully close the battery compartment lid again.
If the battery replacement symbol is displayed, you can no longer perform any measurements and must replace all batteries.
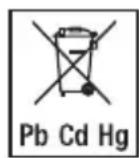
! Battery disposal
-
The empty, completely flat batteries must be disposed of through specially designated collection boxes, recycling points or electronics retailers. You are legally required to dispose of the batteries.
-
The codes below are printed on batteries containing harmful substances: Pb = Battery contains lead, Cd = Battery contains cadmium, Hg = Battery contains mercury.
It is essential that you set the date and time. Otherwise, you will not be able to save your measured values correctly with a date and time and access them again later.
(i) There are two different ways to access the menu from which you can adjust the settings:
- Before initial use and after each time you replace the battery:
When inserting the batteries into the device you will be taken to the relevant menu automatically.
- If the batteries have already been inserted: With the device switched off press and hold the START/STOP button for approx. 5 seconds.
In this menu you can adjust the following settings in succession:

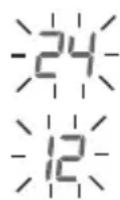
- Press and hold the START/STOP button ① for 5 seconds or insert the batteries. The full display appears.
- Select the desired hour format using the memory button M and confirm with the START/STOP button①
Date
The year flashes on the display.
- Select the desired year using the memory button M and confirm with the START/STOP button①
The month flashes on the display.
- Select the desired month with the memory button M and confirm with the START/STOP button ①
The day flashes on the display.
- Select the desired day with the memory button M and confirm with the START/STOP button ①.

If the hour format is set as 12h, the day/month display sequence is reversed.
Time
The hours flash on the display.
- Select the desired hour using the memory button M and confirm with the START/STOP button ①
The minutes flash on the display.
- Select the desired minute using the memory button M and confirm with the START/STOP button ①

Once all the data has been set, the device switches off automatically.
5. Measuring blood pressure
Ensure the device is at room temperature before measuring. The measurement can be performed on the left or right wrist.
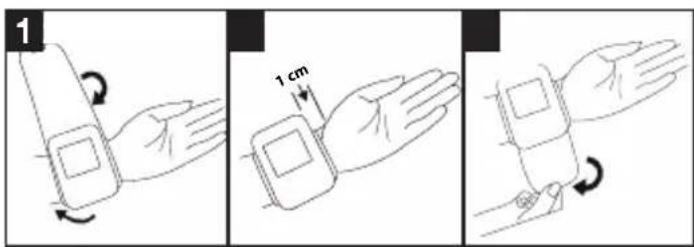
Attach the cuff
- Expose your wrist. Ensure that the circulation of the arm is not hindered by tight clothing or similar. Place the cuff on the inside of your wrist.
- Close the cuff with the hook-and-loop fastener so that the upper edge of the device is positioned approx. 1 cm underneath the heel of the hand.
- The cuff must be fitted tightly around the wrist, but must not constrict.
Blood pressure may vary between the right and left arm, which may mean that the measured blood pressure values are different. Always perform the measurement on the same arm.
If the values between the two arms are significantly different, please consult your doctor to determine which arm should be used for the measurement.
Adopting the correct posture
- Before the initial blood pressure measurement, make sure always to rest for about 5 minutes. Otherwise deviations can occur.
- You can take the measurement while sitting or lying
down. To take your blood pressure, make sure you are sitting comfortably with your arms and back leaning on something. Do not cross your legs. Place your feet flat on the ground. Make sure to
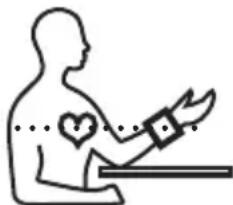
rest your arm and move it. Always make sure that the cuff is at heart level. Otherwise significant deviations can occur. Relax your arm and the palm of your hand.
- To avoid falsifying the measurement, it is important to remain still during the measurement and not to speak.
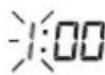
- Wait for at least 1 minute before taking another measurement.
As described above, attach the cuff and adopt the posture in which you want to perform the measurement.
- Press the START/STOP button ① to start the blood pressure monitor. All displays will illuminate briefly.
- The last measured value is displayed and the blood pressure monitor automatically begins the measurement after 3 seconds.
You can cancel the measurement at any time by pressing the START/STOP button
As soon as a pulse is found, the pulse symbol will be displayed.
- The systolic pressure, diastolic pressure and pulse rate measurements are displayed.
- Er_- appears if the measurement has not been performed properly. Observe the chapter on error messages/trouble

shooting in these instructions for use and repeat the measurement.
- Now select the desired user memory by pressing the memory button M. If you do not select a user memory, the measurement is stored in the most recently used user memory. The relevant symbol appears on the display.
- Press the START/STOP button to switch off the blood pressure monitor. The measurement is then stored in the selected user memory.
If you forget to turn off the device, it will switch off automatically after approx. 1 minute.
In this case too, the value is stored in the selected or most recently used user memory.
Wait for at least 1 minute before taking another measurement.
6. Evaluating results
Cardiac arrhythmia
This device can identify potential disruptions of the heart rhythm when measuring and if necessary, indicates this after the measurement with the symbol
This can be an indicator for arrhythmia. Arrhythmia is an illness in which the heart rhythm is abnormal because of flaws in the bioelectrical system that regulates the heartbeat. The symptoms (skipped or premature heart beats, pulse being slow or too fast) can be caused by factors
such as heart disease, age, physical make-up, excess stimulants, stress or lack of sleep. Arrhythmia can only be determined through an examination by your doctor. If the symbol is shown on the display after the measurement has been taken, repeat the measurement. Please ensure that you rest for 5 minutes beforehand and do not speak or move during the measurement. If the symbol appears frequently, please consult your doctor. Self-diagnosis and treatment based on the measurements can be dangerous. Always follow your GP's instructions.
Risk indicator
The measurements can be classified and evaluated in accordance with the following table.
However, these standard values serve only as a general guideline, as the individual blood pressure varies in different people and different age groups etc.
It is important to consult your doctor regularly for advice. Your doctor will tell you your individual values for normal blood pressure as well as the value above which your blood pressure is classified as dangerous.
The classification on the display and the scale on the unit show which category the recorded blood pressure values fall into. If the values of systole and diastole fall into two different categories (e.g. systole in the 'High normal' category and diastole in the 'Normal' category), the
graphical classification on the device always shows the higher category; for the example given this would be 'High normal'.
| Blood pressure value category | Systole (in mmHg) | Diastole (in mmHg) | Action |
| Setting 3: severe hypertension | ≥180≥110 | | seek medical attention |
| Setting 2: moderate hyper-tension | 160–179 | 0–109 | seek medical attention |
| Setting 1: mild hypertension | 140–159 | 0–99 | regular monitor-ring by doctor |
| High normal 130–139 | 985–89 | | regular monitor-ring by doctor |
| Normal 120–12980– | 84 self-monitoring | | |
| Optimal <120<80 self-monitoring | | |
Source: WHO, 1999 (World Health Organization)
7. Saving, displaying and deleting measuredvalues
User memory
The results of every successful measurement are stored together with the date and time. The oldest measurement is overwritten in the event of more than 60 measurements.
- To retrieve the measurement, press the memory button M.
Rashes on the display.
The average value of all saved measured values in this user memory is displayed.
To change the user memory, press and hold the memory button M for approx. 2 seconds.
Average values
- Press the memory button M.
Anashes on the display.
The average value of the morning measurements for the last 7 days is displayed (morning: 5.00 a.m. - 9.00 a.m.).
- Press the memory button M.
frashes on the display.
The average value of the evening measurements for the last 7 days is displayed (evening: 6.00 p.m. - 8.00 p.m.).
- When you press the memory button M again, the last individual measurement is displayed (in this example, measurement 03).

- When the memory button M is pressed again, you can view your individual measurements.
- To switch the device off again, press the START/ STOP button ①
You can exit the menu at any time by pressing the START/STOP button
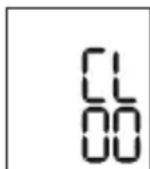
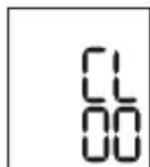
Delete the measured values
- To clear the memory of the relevant user memory, you must first select a user memory.
- Start the retrieval of the average measured values. R flashes on the display and the average value of all saved measured values in this user memory is displayed.
- Press and hold the memory button M and the START/STOP button for 5 seconds, depending on the user memory you are in.
All values of the current user memory are deleted and the device switches off.
8. Errormessages/troubleshooting
In the event of errors, the error message E appears on the display.
Error messages may appear if
In such cases, repeat the measurement. Ensure that you do not move or speak during the measurement. If necessary, reinsert or replace the batteries.
Technical alarm - description
Should the recorded blood pressure (systolic or diastolic) lie outside the limits specified in the section "Technical specifications", the technical alarm will appear on the display indicating either "Hi" or "L0". In such cases, you should seek medical assistance and check the accuracy of your procedure.
The limit values for the technical alarm are factory set and cannot be adjusted or deactivated. These alarm limit values are accorded second priority under the standard IEC 60601-1-8.
The technical alarm is a non-locking alarm and must not be reset. The signal shown on the display will disappear automatically after about 8 seconds.
9. Cleaning and storing the device and cuff
- Clean the device and cuff carefully using a slightly damp cloth only.
- Do not use any cleaning agents or solvents.
- Under no circumstances hold the device and cuff under water, as this can cause liquid to enter and damage the device and cuff.
- If you store the device and cuff, do not place heavy objects on the device and cuff. Remove the batteries.
10. Technical specifications
Model No. SBC 15
| Measurement method | Oscillometric, non-invasive blood pressure measurement on the wrist |
| Measurement range | Cuff pressure 0–300 mmHg, Systolic 60-260 mmHg, Diastolic 40-199 mmHg, Pulse 40-180 beats/minute |
| Display accuracy Systolic ±3 mmHg, Diastolic ±3 mmHg, Pulse ±5 % of the value shown |
| Measurement inac-curacy | Max. permissible standard devia-tion according to clinical testing:Systolic 8 mmHg /Diastolic 8 mmHg |
| Memory 2 x 60 memory spaces |
| Dimensions L 83.8 mm x W 59.9 mm x H 29.4 mm |
| Weight Approximately 92 g (without batter-ies, with cuff) |
| Cuff size 140 to 195 mm |
| Permissible operat-ing conditions | +10°C to +40°C, ≤85% relative humidity (non-condensing) |
| Permissible storage conditions | -20°C to +50 °C, ≤85% relative humidity, 800 - 1050 hPa ambient pressure |
| Power supply | 2 x 1.5V — — AAA batteries |
| Battery life For approx. 170 measurements,depending on levels of blood pres-sure and pump pressure |
| Classification Internal supply, IP22, no AP orAPG, continuous operation, appli-cation part type BF |
Technical information is subject to change without notification to allow for updates.
- This device complies with European Standard EN 60601-1-2 (in accordance with CISPR 11, EN 61000-4-2, EN 61000-4-3, EN 61000-4-8) and is subject to particular precautions with regard to electromagnetic compatibility. Please note that portable and mobile HF communication systems may interfere with this unit.
- The device complies with the EU Medical Devices Directive 93/42/EEC, the German Medical Devices Act (Medizinproduktgesetz) and the standards EN 1060-1 (Non-invasive sphygmomanometers - Part 1: General requirements), EN 1060-3 (Non-invasive sphygmomanometers - Part 3: Supplementary requirements for electro-mechanical blood pressure measuring systems) and IEC 80601-2-30 (Medical electrical equipment - Part 2 - 30: Particular requirements for the basic safety and essential performance of automated non-invasive sphygmomanometers).
- The accuracy of this blood pressure monitor has been carefully checked and developed with regard to a long useful life. If using the device for commercial medical purposes, it must be regularly tested for accuracy by appropriate means. Precise instructions for checking accuracy may be requested from the service address.
11. Warranty / Service
Further information on the guarantee and guarantee conditions can be found in the guarantee leaflet supplied.
FRANÇAIS
Sommaire
Source: WHO, 1999 (World Health Organization)
Ripetere la misurazione nel caso compaia sul display l'icona --- ++---- ----- --- --- --- --- --- --- --- --- --- --- --- --- --- --- --- --- --- --- --- --- --- --- --- --- --- --- --- --- --- --- --- --- --- --- --- --- --- --- --- --- --- --- --- --- --- --- --- --- --- --- --- --- --- --- --- --- --- --- --- --- --- --- --- --- --- --- --- --- --- --- --- --- --- --- --- --- --- --- --- --- --- --- --- --- --- --- --- --- --- --- --- --- --- --- --- --- --- --- --- --- ---
dopo una prima misurazione. Assicurarsi di aver osservato 5 minuti di riposo prima di effettuire la misurazione e di non parlare né muoversi durante la misurazione. Rivolgersi al proprio medico nel caso l'icona Compaia frequentlymente. Diagnosi e terapie definite autonomamente in baseagli esiti delle misurazioni possono rivelarsi pericolose. Attenersi sempre alle indicazioni del proprio medico.
Fonte: WHO, 1999 (World Health Organization)
Ipepe IOBTOpHbIM N3MepeHnEM NOOxKdTe He MeHee MNHyTbl!
6.Оцениcopeультатов
Hapuhena cepdeuHoro pntma
DaHbI np6Op BO Bpemn3MepeHn moKeT nDeHTnΦuPobatb BO3MOXHbIe HApUeHn cepDeHOro PntMa I npn IX HaJIuHn COO6uaet O HIX NocJe n3MepeHn CmBOJOM
3TO MOKET yka3bIbA Tb Ha apITMIO. ApITMnra - 3TO 60Je3Hb, npu KOTopoB BO3HnKaeT aHOMaJIbHbI CepDeHbI PNTM, Bbl3BaHHbI C6OAMN B 6nO3JIeKTPnueCKoCnCTeme, peryInpuyIoSei 6neHne cepDca. CmPTombl (HepaBHomepHoe nII npexKeBpeMeHHoe cepDce6Hne, MedenHHbI NII CNLWKOM 6bICTpbI PyIbc) MOrY T 6bITb Bbl3BaHbI 3a6OJIeBAHNMa CepDca, Bo3paCTOM, npedpaCNOJoxEHHOCtBuK 3a6OJIeBAHNIM, I36bITKOM KoPe n AIKOROI, CTpeCCOM NII HeOCTaTOUHBIM CHOM. ApITMnMA MoKET 6bITb BblBNeHa TOIbKO B pe3yJIbTaTe 6cJIeOBAHnry Y Brpa.
Ecn nocne nepBoro n3MepenHa daicnlee oTo6paXaetcra CmboJ,OBTOPuTe n3MepenHe.ObpaTtte BHMaHne Ha To,TO B TeueHne 5 MHyT nepeiN3MepenHem HeIb3aHNMaTbcra kTNBHOJeTeJIb-HOCTbU, a BO BpEm N3MepenHne HeIb3ra TBOOpNTb IIN DBuratcbc. Ecn CmboJ TgABnReTcra cacto,ObpaTtceb K Bpauy.CamOnaHocntka n camolueHne Ha OCHOBE pe3yIbTaTOB n3MepenHn MOYr 6bITb ONachbl. O63aTeJIbHo cNeDuYte peKOMeHdaunm CBOero Bpaua.
HndkaTop pncka
OueHky pe3yIbTaTOB n3MepeHn MOxHO npOBecTN C NOMOuTo Ta6Ntbl, ppeCTaBHeHHo HxKe.
Ondako 3Tn CTaHdapThbIe 3HaueHn CJIyKaT TOJbKO
O6UIM opHeHTnpOM, TaK KaK INDINBIDyaJIbHbIE 3HaueHnKPOBraHOrO DaBJIeHnY pa3HbIX IIOJe BApbIpyOTcR
B 3aBNCUMOCTN OT pINHaJNeXHOCTN K ToI INI INHOI
BO3pactHOI rpyPne n T. P.
Baxho peryIpaHo KOHCyIbTnpObaTbc c BpaOm. BpaOpedeNt Baun nHdNBuaNbHbIe 3NaueHn HOpMaIb-Horo KpOBAHOro DaBHeHn, a TaKxE 3NaueHn, BbiUeKOToPbIX KpOBAHOe DaBHeHne CJeNyET KJIaCCnФuHPOBaTb KaK ONaCHOe.
Грацян Ндсплги Ишкала Н прборе рokаьот, B КAKOM ДИАПАЗОЕ HAXODITСЯ ИЗМерEHоDEДавLEHne. Eсл 3нauчEHн СИСТOLUЧECKOrO IДИСТOLUCHECKOrO DAВLEHNY HAXODITСЯ B pa3HBxДИАПАЗОHAX (HaprIMep, CNTOLUCHECKoe DABLHeHNE - BBICOKOE B DOYNCTMlbIX ppeJELax, aДИСТOLUCHECKoe - HopMaJIbHoe), TO rpa-ФИЧECHKOЕ DEЛЕHNe HA прборе BCERda BydET OTOБРжATb 6OJIeB BBICOKOE ppeJELbl, KaK B OINCAHHOM pPIMepe: BBICOKOE B DOYNCTMlbIX ppeJELax.
IcToHnK: WHO, 1999 (World Health Organization).
Pe3yIbTaTbI KaKdOro ycNeuHoro n3MepeHncoxpaHIOTCa Yka3aHnem DaTbI IN BpeMeHN3MepeHn. KOrda KOJIueCTBO coXpaHeHHbIXpe3yIbTaTOB n3MepeHn npEbbIaet 60, 6oJee paHHne daHHbIe 3aMeHnIOCTPOcJeDyUOIMN.
- YTO6bI CHOBA Bbl3BaTb pe3yJbTaTbI n3MepeHnHa DnCnJIe, HaxMITE Ha KHOKNy COxpaHeHn M.
Ha ducnnee 3amuraet
OTo6pa3ntcpeDHee 3HaueHne BCex COxpaHeHHbIX B DaHHoI NOJIb3OBaTeJIbCKOINamrTIN pe3yJIbTaTOB IN3MepeHn.
YTo6bI CMeHnTb NOJb3OBaTeNbCKyU NaMaTb, yJeP-XnBaIte KHOhKy CoXpaHeHnM OkONo 2 cekyHd.
- Haxmte KhoNky coxpaHnma M. Ha dinCnnee 3amraet
OTo6pa3ntcpeJHee 3NaueHne pe3yIbTaTOB yTpeHHnx I3MepeHn 3a nocJeHne 7 dHei (yTpo:5:00 -9:00).

HaXMMTe KHOKNy COxpaHeHnMa. Ha dncnnee 3amirraet PPI Ot6pa3ntcra cpeJeee 3NaueHne pe3yIbTaTob Beeepnix N3MepeHn 3a nocJeHne 7 dHei (Beep: 18:00 -20:00).
- Пи NOBTOPHOM HaxaTIN KHOKN coxpanehnmaHaIscnnee OTO6pa3ntcpe3yIbTaT nocJeHero n3Mepenna(B KaueCTBe pnpMepa nCnoJIb3yeTcra N3Mepenne 03).
Ecnne eune pa3 haxaTb KhoNky coxpaHeHnM, MoXHO npocMOrpeTb pe3yJbTaTbI OTdJIbHbIX N3MepeHn.
- TTo6bI BHOBB BbIKNIOHTb npu6Op, HaxMnte KhoNky BKl./BbIKJ. ①
13 MeHIO MOXHO BJIIO6oe BpeMBAIHTN HaxKaTHeM KHOJKNBKL./BbIKL. ①

-Дя удалени CODEPЖIMORO COOTBETCTBYOUSeI NOJB3OBaTeJIbCKOЯ PMaTIN BbIbEpNTe NOJB3OBaTeJIbCKyU NaMrtb.
3aynctte 3anpoc cpeHnIX pe3yIbTaTOB n3MepeHn. Ha dincnlee 3amnaet Rn oTo6pa3ntcra CpeHnee 3NaueHne BCex COxpaHeHHbIX B daHHoN POnb30BaTeJIbCKoN pAmrTn pe3yIbTaTOB n3MepeHn.
- YdepxnBaTe HaxaToB TeeyHne 5 ckyHd KhoNkY COxpaHeHMa KhoNkY BKJ./BblKJI. ① B3aBnCIMOCTN OT TORO, B KaKoI NOJb3OBaTeJIb-CKoI NaMrtu Bby HaxoDITecb.
Bce 3naeHnra Tekyuie nolb3OBaTeIbckoI naMRTn 6ydyT ydaJIeHbI, a npIbOp BvIKIIOHTcR.
8. Coo6eHne o6 own6ke/ycTpaHeHne own6kn
Pn BO3HKnHOBeHHn OuN6ok Ha dncnnee NOBnreTc coo6eHne o6On6ke
Co06ueHnO6 oWu6Kax NOBJIaIOTc,ecn
He ydaIOcb n3MePntb CnCTOJIuYeCKoe nn dnaCTOnIuYeCKoe daJIeHne (Ha DCnJIee NOBJIeTcR HaDnCb Er 1nn Er2),
3HaueHnI3MepeHHnCnCTOJIuYeCKoRIOJIN DaNactOJIuYeCKoR OaBHeHn He BXoT B DnAna3OH n3MepeHHn (Ha dncPiee noBlaeTcra Hndnscb HnnL0),
MaHKeTa 3aTMyTa CnIiKOM Cna6o nnCIniKOM Tyro (Ha nCnlee NoBnEer Tc Hnncb Er3 nnEr4),
B TeueHne 60Jee, Yem 1,5 cekyHd, KPOBraHoe daBJIeHne Bblwe 300 MM pT. CT. (Ha dncnnee IORBJIaTeCra HaI nncb E),5
- HakaunBaHne dInTc8 60nee 180 ceKyHn (Ha nCnnee NOBnEeTc COO6ueHn E),5
- npoun3oewen c60B pa6ote cnCTembln npnbopa (Ha dncnnee noBbIeTcReR,EnDnEr7 Er8),
- 6atapeeKn noTy pa3pXeHbI
B TaKnx Cnyaax BbINOJHnTe NOBTOpHOe N3MepeHne.
POMHnTe, YTO Bbl He dOJIKHbI DBNrA TbCBs IIN ROBOpNTb BO BpeMg N3MepeHnry. Ppi Heo6xOJIMOCtN yCTaHOBnTe 6aTapeKn 3aHOBO INN 3aMeHnTe INX.

CnHaj TpeBOrn npn HecO6JIoDeHmTexHnuecknx DaHHbIX - OINCAHne
Ecnn n3mepenHoe 3NaeHne apTepeaIbHoro daBJeHna (CnCTOJIueCKoRo IIN dIaCTOJIueCKoRo) HaxoITcra 3a npedeIamn rpaHnU, yka3aHHbIX B pa3dene «TexHueCKne daHHble», Na dIscPlee OTO6pa3ntcra CnHaN Tpe
BOrn,IMeOuN BnD COo6ueHnRA «Hi » nIi «Lo».B 3TOM cnUyae cJeDuYet oBaPaNTbCra K BpaCy IIN npOBepntb npaBnBHOCTb PPOeDypbl N3MepeHnR.
Гразиьгье 3нayehня сгнана Тревогу yctahOBJIeHbI
Ha npedpinrTm-N3rOToBHTeNe H He MOrTy 6bITb N3Me-
HeHb IIN DeakTbUbpObaHbI. CorlaCHO cTaHdApTy
IEC 60601-1-8, 3TN 3нayehnя oblaaIoT Hn3KIM npno-
pntetom.
CnHnTpeBOrn npn HecO6IIODeHm TeXnuecknx DaHbIX He Tpe6yeT c6poca n OTKIOUaetc caMoCToTeNbHO. OTo6paKaembI Ha DnCnJIe e CnHaJI NcYe3aET aBTOMaTuueCKn npImepHo Yepe3 8 cekyHd.
9. OuInCTka n xpaHeHne npI6opau N MaHXKeTbl
- Пожибпгочнstку пибopa n MaHkeТВ C OCTOPOX-HocTbIO.Испь3уITE TOnIbKO cIeRka yBnaxKHeHHyO caIpeTky.
He nCnoJb3yIe YnCTaIue CpeIcTba nn paCTBOpTeJIu.
HnB Koem cnyae He onyckaIte npnbop n MaHKeTy B BoY, TaK KaK nonaHaHne BoIbI npNBeTe K NOBpeX- DeHIO np6bopa n MaHKeTbl.
- Pn xpaHenn Ha np6ope n MaHKeTe He DoJXHbI CToTb TjXeJIbe npedMeTbI. N3BNeKnte 6aTapeiKn.
10. Texhnueckne daHHbIe
NmoJEn SBC 15
Zródlo: WHO, 1999 (World Health Organization)
Bron: WHO, 1999 (World Health Organization)
7. Meetwaarden opslaan, opvragen en wissen
Gebruikersgeheugen