
EIV9467 - Cooker ELECTROLUX - Free user manual and instructions
Find the device manual for free EIV9467 ELECTROLUX in PDF.

| Product type | Built-in induction hob |
| Brand | Electrolux |
| Model | EIV9467 |
| Number of cooking zones | 3 flexible zones (6 burners) |
| Electrical supply | 230 V / 400 V, 11.0 kW |
| Maximum power per zone (PowerBoost) | 3200 W (max 10 minutes) |
| Cookware diameter | 125 - 210 mm |
| Main functions | Bridge, PowerBoost, Pause, Timer (countdown, CountUp, Timer), Hob²Hood, PowerSlide, Key Lock, Child safety device, Power management, Automatic switch-off, OffSound Control |
| Residual heat indicator | OptiHeat Control (3 levels) |
| Control type | Touch controls |
| Surface material | Glass ceramic |
| Cleaning | Soft cloth, non-abrasive detergent, scraper for stubborn dirt |
| Safety | Key lock, child safety, automatic switch-off, power management |
| Energy consumption | 186.8 Wh/kg (cooking hob) |
| Weight | Not specified in the manual |
| Appliance dimensions (Width x Depth) | Not specified in the manual |
| Hood compatibility | Hob²Hood (infrared communication with compatible hood) |
| Spare parts | Use only original parts, contact after-sales service |
| Repairability | Repair only by a qualified professional |
| Warranty | Refer to the warranty booklet provided |
Frequently Asked Questions - EIV9467 ELECTROLUX
User questions about EIV9467 ELECTROLUX
0 question about this device. Answer the ones you know or ask your own.
Ask a new question about this device
Download the instructions for your Cooker in PDF format for free! Find your manual EIV9467 - ELECTROLUX and take your electronic device back in hand. On this page are published all the documents necessary for the use of your device. EIV9467 by ELECTROLUX.
USER MANUAL EIV9467 ELECTROLUX
How to install your Electrolux Induction Hob - Worktop installation

4. POPIS SPOTČE
WE'RE THINKING OF YOU
Thank you for purchasing an Electrolux appliance. You've chosen a product that brings with it decades of professional experience and innovation. Ingenious and stylish, it has been designed with you in mind. So whenever you use it, you can be safe in the knowledge that you'll get great results every time.
Welcome to Electrolux.
Visit our website to:

Get usage advice, brochures, trouble shooter, service and repair information: www.electrolux.com/support

Register your product for better service: www.registerelectrolux.com

Buy Accessories, Consumables and Original spare parts for your appliance: www.electrolux.com/shop
CUSTOMER CARE AND SERVICE
Always use original spare parts.
When contacting our Authorised Service Centre, ensure that you have the following data available: Model, PNC, Serial Number.
The information can be found on the rating plate.
Warning / Caution-Safety information
1 General information and tips
Environmental information
Subject to change without notice.
CONTENTS
1.SAFETY INFORMATION 22
2.SAFETYINSTRUCTIONS 24
3. INSTALLATION 27
4.PRODUCT DESCRIPTION 28
5.DAILYUSE 29
6.HINTS AND TIPS 34
7.CARE AND CLEANING 37
8.TROUBLESHOOTING 37
9. TECHNICAL DATA 39
10. ENERGY EFFICIENCY 39
11. ENVIRONMENTAL CONCERNS 40
1. SAFETY INFORMATION
Before the installation and use of the appliance, carefully read the supplied instructions. The manufacturer is not responsible
for any injuries or damage that are the result of incorrect installation or usage. Always keep the instructions in a safe and accessible location for future reference.
1.1 Children and vulnerable people safety
- This appliance is not intended for use by persons (including children) with reduced physical, sensory or mental capabilities, or lack of experience and knowledge, unless they have been given supervision or instruction concerning use of the appliance by a person responsible for their safety.
- Children should be supervised to ensure that they do not play with the appliance.
- Keep all packaging away from children and dispose of it appropriately.
- WARNING: Keep children and pets away from the appliance when it operates or when it cools down. Accessible parts become hot during use.
- If the appliance has a child safety device, it should be activated.
- Children shall not carry out cleaning and user maintenance of the appliance without supervision.
1.2 General Safety
- WARNING: The appliance and its accessible parts become hot during use. Care should be taken to avoid touching heating elements.
- WARNING: Unattended cooking on a hob with fat or oil can be dangerous and may result in fire.
- NEVER try to extinguish a fire with water, but switch off the appliance and then cover flame e.g. with a lid or a fire blanket.
-
WARNING: The appliance must not be supplied through an external switching device, such as a timer, or connected to a circuit that is regularly switched on and off by a utility.
-
CAUTION: The cooking process has to be supervised. A short term cooking process has to be supervised continuously.
- WARNING: Danger of fire: Do not store items on the cooking surfaces.
- Metallic objects such as knives, forks, spoons and lids should not be placed on the hob surface since they can get hot.
- Do not use the appliance before installing it in the built-in structure.
- Do not use a steam cleaner to clean the appliance.
After use, switch off the hob element by its control and do not rely on the pan detector. - If the glass ceramic surface / glass surface is cracked, switch off the appliance and unplug it from the mains. In case the appliance is connected to the mains directly using junction box, remove the fuse to disconnect the appliance from power supply. In either case contact the Authorised Service Centre.
- If the supply cord is damaged, it must be replaced by the manufacturer, an authorized Service or similarly qualified persons in order to avoid a hazard.
- WARNING: Use only hob guards designed by the manufacturer of the cooking appliance or indicated by the manufacturer of the appliance in the instructions for use as suitable or hob guards incorporated in the appliance. The use of inappropriate guards can cause accidents.
2. SAFETY INSTRUCTIONS
2.1 Installation

WARNING!
Only a qualified person must install this appliance.

WARNING!
Risk of injury or damage to the appliance.
- Remove all the packaging.
- Do not install or use a damaged appliance.
- Follow the installation instructions supplied with the appliance.
-
Keep the minimum distance from other appliances and units.
Always take care when moving the appliance as it is heavy. Always use safety gloves and enclosed footwear. -
Seal the cut surfaces with a sealant to prevent moisture from causing swelling.
- Protect the bottom of the appliance from steam and moisture.
- Do not install the appliance next to a door or under a window. This prevents hot cookware from falling from the appliance when the door or the window is opened.
Each appliance has cooling fans on the bottom. -
If the appliance is installed above a drawer:
-
Do not store any small pieces or sheets of paper that could be pulled in, as they can damage the cooling fans or impair the cooling system.
- Keep a distance of minimum 2 cm between the bottom of the appliance and parts stored in the drawer.
- Remove any separator panels installed in the cabinet below the appliance.
2.2 Electrical Connection

WARNING!
Risk of fire and electric shock.
- All electrical connections should be made by a qualified electrician.
The appliance must be earthed. - Before carrying out any operation makesure that the appliance is disconnected from the power supply.
- Make sure that the parameters on the rating plate are compatible with the electrical ratings of the mains power supply.
- Make sure the appliance is installed correctly. Loose and incorrect electricity mains cable or plug (if applicable) can make the terminal become too hot.
- Use the correct electricity mains cable.
- Do not let the electricity mains cable tangle.
- Make sure that a shock protection is installed.
- Use the strain relief clamp on the cable.
- Make sure the mains cable or plug (if applicable) does not touch the hot appliance or hot cookware, when you connect the appliance to a socket.
-
Do not use multi-plug adapters and extension cables.
-
Make sure not to cause damage to the mains plug (if applicable) or to the mains cable. Contact our Authorised Service Centre or an electrician to change a damaged mains cable.
- The shock protection of live and insulated parts must be fastened in such a way that it cannot be removed without tools.
- Connect the mains plug to the mains socket only at the end of the installation. Make sure that there is access to the mains plug after the installation.
- If the mains socket is loose, do not connect the mains plug.
- Do not pull the mains cable to disconnect the appliance. Always pull the mains plug.
- Use only correct isolation devices: line protecting cut-outs, fuses (screw type fuses removed from the holder), earth leakage trips and contactors.
- The electrical installation must have an isolation device which lets you disconnect the appliance from the mains at all poles. The isolation device must have a contact opening width of minimum 3 mm.
2.3 Use

WARNING!
Risk of injury, burns and electric shock.
- Remove all the packaging, labelling and protective film (if applicable) before first use.
- This appliance is for household (indoors) use only.
- Do not change the specification of this appliance.
Make sure that the ventilation openings are not blocked. - Do not let the appliance stay unattended during operation.
- Set the cooking zone to "off" after each use.
- Do not put cutlery or saucepan lids on the cooking zones. They can become hot.
- Do not operate the appliance with wet hands or when it has contact with water.
- Do not use the appliance as a work surface or as a storage surface.
- If the surface of the appliance is cracked, disconnect immediately the appliance
from the power supply. This to prevent an electrical shock.
- Users with a pacemaker must keep a distance of minimum 30~cm from the induction cooking zones when the appliance is in operation.
- When you place food into hot oil, it may splash.

WARNING!
Risk of fire and explosion
- Fats and oil when heated can release flammable vapours. Keep flames or heated objects away from fats and oils when you cook with them.
- The vapours that very hot oil releases can cause spontaneous combustion.
Used oil, that can contain food remnants, can cause fire at a lower temperature than oil used for the first time. - Do not put flammable products or items that are wet with flammable products in, near or on the appliance.

WARNING!
Risk of damage to the appliance.
- Do not keep hot cookware on the control panel.
- Do not put a hot pan cover on the glass surface of the hob.
- Do not let cookware boil dry.
- Be careful not to let objects or cookware fall on the appliance. The surface can be damaged.
- Do not activate the cooking zones with empty cookware or without cookware.
- Do not put aluminium foil on the appliance.
- Cookware made of cast iron, aluminium or with a damaged bottom can cause scratches on the glass / glass ceramic. Always lift these objects up when you have to move them on the cooking surface.
- This appliance is for cooking purposes only. It must not be used for other purposes, for example room heating.
2.4 Care and cleaning
- Clean the appliance regularly to prevent the deterioration of the surface material.
- Switch off the appliance and let it cool down before cleaning.
- Do not use water spray and steam to clean the appliance.
- Clean the appliance with a moist soft cloth. Use only neutral detergents. Do not use abrasive products, abrasive cleaning pads, solvents or metal objects.
2.5 Service
To repair the appliance contact the Authorised Service Centre. Use original spare parts only.
- Concerning the lamp(s) inside this product and spare part lamps sold separately: These lamps are intended to withstand extreme physical conditions in household appliances, such as temperature, vibration, humidity, or are intended to signal information about the operational status of the appliance. They are not intended to be used in other applications and are not suitable for household room illumination.
2.6 Disposal

WARNING!
Risk of injury or suffocation.
- For information on how to dispose of the appliance, contact your dealer, manufacturer's authorized person, or your local solid waste operator.
- Disconnect the appliance from the mains supply.
- Cut off the mains electrical cable close to the appliance and dispose of it.
3. INSTALLATION

WARNING!
Refer to Safety chapters.
3.1 Before the installation
Before you install the hob, write down the information below from the rating plate. The rating plate is on the bottom of the hob.
Serial number
3.2 Built-in hobs
Only use the built-in hobs after you assemble the hob into correct built-in units and work surfaces that align to the standards.
3.3 Connection cable
The hob is supplied with a connection cable.
- To replace the damaged mains cable, use the cable type: H05V2V2-F which withstands a temperature of 90^ or higher. Contact an Authorised Service Centre. The connection cable may only be replaced by a qualified electrician.
3.4 Assembly
If you install the hob under a hood, please see the installation instructions of the hood for the minimum distance between the appliances.
If the appliance is installed above a drawer, the hob ventilation can warm up the items stored in the drawer during the cooking process.
Find the video tutorial "How to install your Electrolux Induction Hob - Worktop installation" by typing out the full name indicated in the graphic below.

YouTube
www.youtube.com/electrolux www.youtube.com/aeg
How to install your Electronlux Induction Hob - Worktop installation

4.PRODUCT DESCRIPTION
4.1 Cooking surface layout

1 Induction cooking surface
2 Control panel
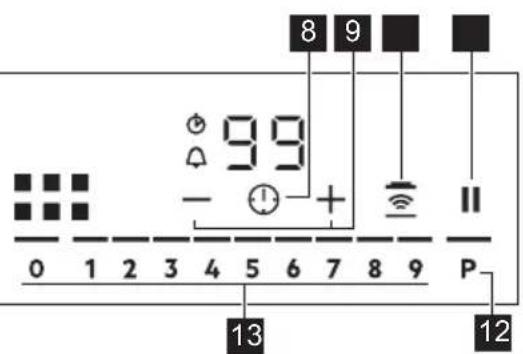
4.2 Control panel layout
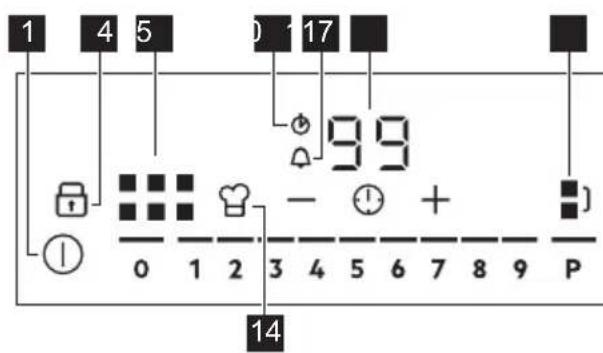
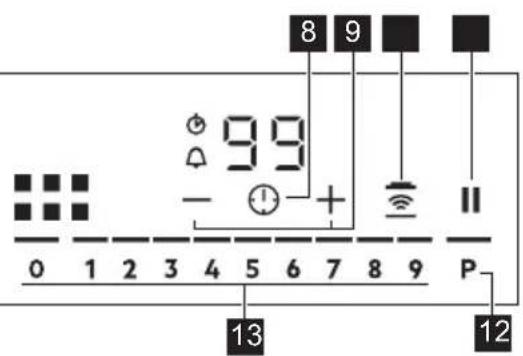
Use the sensor fields to operate the appliance. The displays, indicators and sounds tell which functions operate.
Sensor field Comment
| 1 | ① | To activate and deactivate the hob. |
| 2 | To activate and deactivate Lock or Child Safety Device. | |
| 3 | To show the active zone. | |
| 4 | CountUp Timer indicator. | |
| 5 | Count Down Timer indicator. | |
| 6 | - Timer display: 00 - 99 minutes. | |
| 7 | To activate and deactivate Bridge and to switch between the modes. | |
| 8 | To select Timer functions. | |
| 9 | +/- | To increase and decrease the time. |
Sensor field Comment
| 10 | To activate and deactivate Hob2Hood. |
| 11 | To activate and deactivate Pause. |
| 12 | To activate PowerBoost. |
| 13 | - To set a heat setting: 0 - 9. |
| 14 | To activate and deactivate.PowerSlide. |
5. DAILY USE

WARNING!
Refer to Safety chapters.
5.1 Activating and deactivating
Touch for 1 second to activate or deactivate the hob.
The control panel comes on after you activate the hob and goes off after you deactivate the hob.
5.2 Automatic Switch Off
The function deactivates the hob automatically if:
- you do not place any cookware on the hob for 50 seconds,
- you do not set the heat setting for 50 seconds after you place the cookware,
- you spill something or put something on the control panel for more than 10 seconds (a pan, a cloth). When you hear the acoustic signal, the hob deactivates. Remove the object or clean the control panel.
- the hob gets too hot (e.g. when a saucepan boils dry). Let the cooking zone cool down before you use the hob again.
- you do not deactivate a cooking zone or change the heat setting. After some time, the hob deactivates.
The relation between the heat setting and the time after which the hob deactivates:
Heat setting The hob deactivates after
1-26hours
3-45 hours
54 hours
6-91.5 hours
5.3 Using the cooking zone

CAUTION!
Do not place hot cookware on the control panel. There is a risk of damage to the electronic parts.
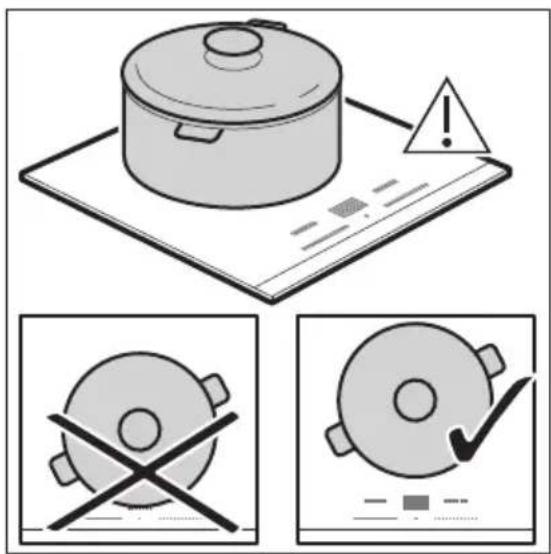
Place the cookware in the centre of the selected zone.
Induction cooking zones adapt to the dimension of the bottom of the cookware automatically.
When you place the cookware in the correct position, the hob recognizes it and the appropriate control bar comes on. A red cooking zone indicator appears above the control bar and indicates the position of the pot.
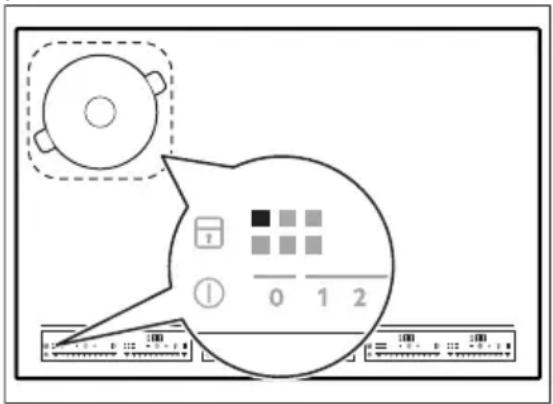
Each square on the control panel represents one cooking zone on the induction cooking surface. Zone indicators show which cooking zone is controlled by the appropriate control bar.
5.4 Heat setting
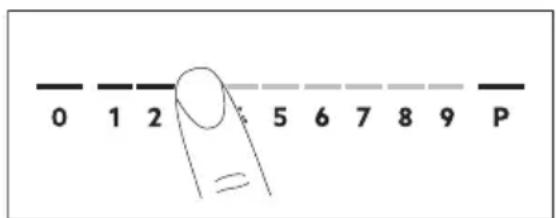
- Press the desired heat setting on the control bar. You can also move your finger along the control bar to set or change the heat setting for a cooking zone.
- To deactivate a cooking zone, press 0. Once you place a pot on the cooking zone and set the heat setting, it remains the same for 2 minutes after you remove the pot. The control bar and the cooking zone indicator blink for 2 minutes. If you place the pot on the cooking zone again within this time, the heat setting reactivates. Otherwise the cooking zone deactivates.
5.5 OptiHeat Control (3 step Residual heat indicator)

WARNING!
/ As long as the indicator is on, there is a risk of burns from residual heat.
The induction cooking zones produce the heat necessary for the cooking process directly in the bottom of the cookware. The glass ceramic is heated by the heat of the cookware.
The indicators / appear when a cooking zone is hot. They show the level of the residual heat for the cooking zones you are currently using.
The indicator may also appear:
for the neighbouring cooking zones even if you are not using them,
- when hot cookware is placed on cold cooking zone,
- when the hob is deactivated but the cooking zone is still hot.
The indicator disappears when the cooking zone has cooled down.
5.6 Bridge
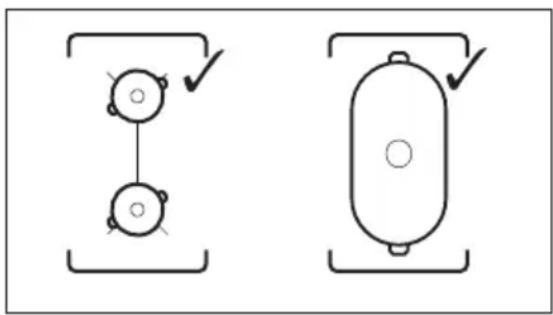
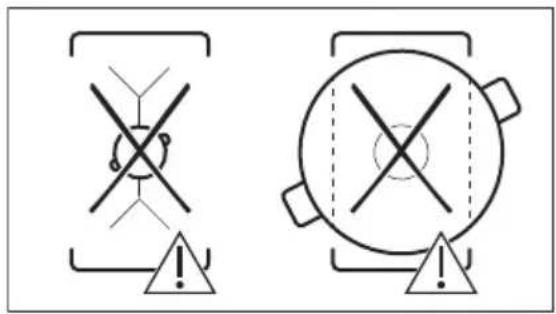
This function connects two cooking zones and they operate as one. You can use the function with large cookware.
- Place the cookware on two cooking zones. The cookware must cover the centres of both zones.
turns white.
2. Touch B activate the function.
3. Set the heat setting.
The cookware must cover the centres of both zones but not go beyond the area marking.
To deactivate the function, touch The cooking zones operate independently.
5.7 PowerBoost
This function activates more power for the appropriate induction cooking zone, depending on the cookware size. The function can be activated only for a limited period of time.
Touch P to activate the function for the cooking zone.
The symbol turns red.
The function deactivates automatically.
i
For maximum duration values, refer to "Technical data".
5.8 Pause
When the function is active, and symbols can be used.
The function does not stop the timer functions.
Press to activate the function. The symbol turns red. The heat setting is lowered to 1.
To deactivate the function: press The symbol turns white. The previous heat setting comes on.
5.9 Timer

Count Down Timer
Use this function to specify how long a cooking zone should operate during a single cooking session.
First set the heat setting, then set the function.
-
Touch to activate the function or change the time.
The timer digits and the indicators + and come on the display. turns red, and turns white.
If the timer is not set, all indicators disappear after 4 seconds. -
Touch or to set the time (00 - 99 minutes). After 3 seconds, the timer starts to count down automatically. The indicators 1 , and disappear. Stays red.
When the time comes to an end, a signal sounds and flashes. To stop the signal, touch
To deactivate the function: touch The indicators and come on. Use or to set on the display. Alternatively, set the heat level to 0. As a result, a signal sounds and the timer is cancelled.

CountUp Timer
You can use this function to monitor how long a cooking zone operates.
Touch twice to activate the function. The indicator turns red, the timer starts to count up automatically.
To deactivate the function: touch When the indicators light up, touch

Minute Minder
You can use this function when the hob is activated but no cooking zone operates.
To see the control panel, place a pot on a cooking zone.
-
Touch, until the indicator turns red, to activate the function.
-
Touch or to set the time. The function starts automatically after 4 seconds. The indicators, and disappear. Stays red.
When you set the function, you can remove the pot.
When the time comes to an end, a signal sounds and flashes. Touch to stop the signal.
To deactivate the function: touch The indicators + and light up. Use or to set on the display.

The function has no effect on the operation of any cooking zone.
5.10 Lock
You can lock the control panel while the hob operates. It prevents an accidental change of the heat setting.
Set the heat setting first.
Touch to activate the function. The symbol turns red and blinks.
To deactivate the function, touch The symbol turns white.

When you deactivate the hob, you also deactivate this function.
5.11 Child Safety Device
This function prevents an accidental operation of the hob.
Activate the hob first and do not set the heat setting.
Touch until it turns red to activate the function. The control bars disappear. Deactivate the hob.

When you deactivate the hob, the function is still active.
To deactivate the function for only one cooking time: Activate the hob with ① comes on. Touch until it turns white. The control bars appear. Set the heat setting within 50 seconds. You can operate the hob. When you deactivate the hob with ① the function is still active.
To deactivate the function permanently: Activate the hob and do not set the heat setting. Touch until it turns white. The control bars appear. Deactivate the hob.
5.12 PowerPoint
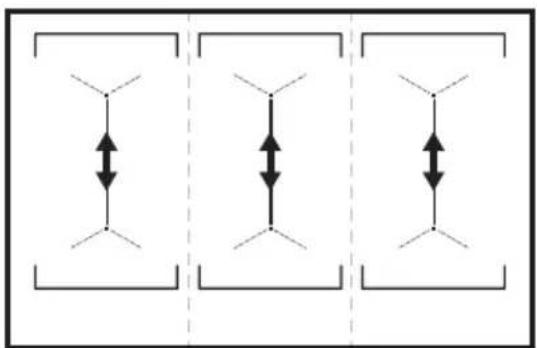
This function allows you to adjust the temperature by moving the cookware to a different position on the induction cooking area.
The function divides the induction cooking area into three areas with different heat settings. The hob detects the position of the cookware and adjust the heat setting corresponding with the position.

Use only one pot when you operate the function. If you want to change the heat setting, lift up the cookware and place it on a different zone. Sliding the cookware can cause scratches and discolouration of the surface.
The zone indicator shows both zones in a bridge even if only one of the zones is used.
-
You may adjust the heat setting manually only if at least one of the zones is activated automatically.
-
You can change the heat settings for each position separately. When you deactivate the hob, it remembers your heat settings and applies it next time you activate the function.
-
If you want to change the heat setting, lift up the cookware and place it on a different zone. Sliding the cookware can cause scratches and discolouration of the surface.
Touch to activate the function. The symbol turns red and the control bar displays the default heat setting. All cooking zones operate for 9 minutes. After 9 minutes, an acoustic signal sounds and the empty cooking zones are deactivated. Touch to resume this function. You can move the pot or place it in a new position.
To modify the default heat setting manually touch the control bar and choose the appropriate level.
- You may change the default heat setting only if the function is active.
- You can change the default heat settings for each position separately. When you deactivate the hob, it remembers your settings and applies them the next time you activate the function.
To deactivate the function, touch The symbol turns white.
5.13 Hob²Hood
It is an advanced automatic function which connects the hob to a special hood. Both the hob and the hood have an infrared signal communicator. Speed of the fan is defined automatically on the basis of the mode setting and temperature of the hottest cookware on the hob. You can also operate the fan from the hob manually.

For most of the hoods, the remote system is originally deactivated. Activate it before you use the function. For more information refer to the hood user manual.
Operating the function automatically
To operate the function automatically set the automatic mode to H1 - H6. The hob is originally set to H5. The hood reacts whenever you operate the hob. The hob recognizes the temperature of the cookware automatically and adjusts the speed of the fan.
Activating the light
You can set the hob to activate the light automatically whenever you activate the hob. To do so set the automatic mode to H1 - H6.

The light on the hood deactivates 2 minutes after deactivating the hob.
Automatic modes
| Auto- | matic light | Boiling 1) | Frying 2) |
| Mode H0 Off Off Off | |||
| Mode H1 On Off Off | |||
| Mode H23) | On Fan speed 1 | Fan speed 1 | |
| Mode H3 On Off Fan speed | 1 | ||
| Mode H4 On Fan speed | 1 | Fan speed 1 | |
| Mode H5 On Fan speed | 1 | Fan speed 2 | |
| Mode H6 On Fan speed | 2 | Fan speed 3 | |
1) The hob detects the boiling process and activates the fan speed in accordance with the automatic mode.
2) The hob detects the frying process and activates the fan speed in accordance with the automatic mode.
3) This mode activates the fan and the light and does not rely on the temperature.
Changing the automatic mode
- Deactivate the appliance.
- Touch for 3 seconds.
The display comes on and goes off. - Touch for 3 seconds.
- Touch a few times until comes on.
- Touch of the Timer to select an automatic mode.
When you finish cooking and deactivate the hob, the hood fan may still operate for a certain period of time. After that time the system deactivates the fan automatically and prevents you from an accidental activation of the fan for the next 30 seconds.

To operate the hood directly on the hood panel deactivate the automatic mode of the function.
Operating the fan speed manually
You can also operate the fan from the hob manually.
Touch when the hob is active.
This deactivates automatic operation of the function and allows you to change the fan speed manually.
When you press, you raise the fan speed by one. When you reach an intensive level and press again, you set the fan speed to 0 which deactivates the hood fan. To start the fan again with the fan speed 1 touch

To activate an automatic operation of the function, deactivate the hob and activate it again.
5.14 OffSound Control (Deactivating and activating the sounds)
Deactivate the hob first.
- Touch for 3 seconds to activate the function.
The display comes on and goes out.
- Touch for 3 seconds.
bO or bcomes on.
-
Touch of the timer to choose one of the following:
-
the sounds are off
-
the sounds are on
-
Wait until the hob deactivates automatically to confirm your selection.
When the function is set to byou can hear the sounds only when:
·you touch ①
6. HINTS AND TIPS

WARNING!
Refer to Safety chapters.
- Minute Minder comes down
- Count Down Timer comes down
- you put something on the control panel.
5.15 Power management
If multiple zones are active and the consumed power exceeds the limitation of the power supply, this function divides the available power between all cooking zones.
The hob controls heat settings to protect the fuses of the house installation.
- Cooking zones are grouped according to the location and number of the phases in the hob. Each phase has a maximum electricity loading of 3680 W. If the hob reaches the limit of maximum available power within one phase, the power of the cooking zones will be automatically reduced.
- For cooking zones that have a reduced power, the control panel shows the maximum possible heat settings.
- If a higher heat setting is not available reduce it for the other cooking zones first.
The activation of the function depends on the number and size of pots.
Refer to the illustration for possible combinations in which power can be distributed among the cooking zones.
6.1 Cookware

For induction cooking zones a strong electro-magnetic field creates the heat in the cookware very quickly.
Use the induction cooking zones with suitable cookware.
- The bottom of the cookware must be as thick and flat as possible.
- Ensure pan bases are clean and dry before placing on the hob surface.
- In order to avoid scratches, do not slide or rub the pot across the ceramic glass.
Cookware material
- correct: cast iron, steel, enamelled steel, stainless steel, multi-layer bottom (with a correct marking from a manufacturer).
not correct: aluminium, copper, brass, glass, ceramic, porcelain.
Cookware is suitable for an induction hob if:
- water boils very quickly on a zone set to the highest heat setting.
- a magnet pulls on to the bottom of the cookware.
Cookware dimensions
- Induction cooking zones adapt to the dimension of the bottom of the cookware automatically.
- The cooking zone efficiency is related to the diameter of the cookware. The cookware with a diameter smaller than the minimum receives only a part of the power generated by the cooking zone.
- For both safety reasons and optimal cooking results, do not use cookware larger than indicated in "Cooking zones specification". Avoid keeping cookware close to the control panel during the
cooking session. This might impact the functioning of the control panel or accidentally activate hob functions.

Refer to "Technical data".
6.2 The noises during operation
If you can hear:
- crack noise: cookware is made of different materials (a sandwich construction).
whistle sound: you use a cooking zone with a high power level and the cookware is made of different materials (a sandwich construction). - humming: you use a high power level.
- clicking: electric switching occurs.
- hissing, buzzing: the fan operates.
The noises are normal and do not indicate any malfunction.
6.3 Öko Timer (Eco Timer)
To save energy, the heater of the cooking zone deactivates before the count down timer sounds. The difference in the operation time depends on the heat setting level and the length of the cooking operation.
6.4 Examples of cooking applications
The correlation between the heat setting of a zone and its consumption of power is not linear. When you increase the heat setting, it is not proportional to the increase of the consumption of power. It means that a cooking zone with the medium heat setting uses less than a half of its power.

The data in the table is for guidance only.
| Heat setting Use to: Time | Hints (min) |
| 1 Keep cooked food warm. as neces- | Put a lid on the cookware. |
| sary | |
| 1 - 2 Hollandaise sauce, melt: butter, choco-late, gelatine. | 5 - 25 Mix from time to time. |
Heat setting Use to: Time
Hints
(min)
1 - 2 Solidify: fluffy omelettes, baked eggs. 10 - 40 Cook with a lid on.
2-3 Simmer rice and milkbased dishes, heat up ready-cooked meals.
25 - 50 Add at least twice as much liquid as rice, mix milk dishes halfway through the procedure.
3 - 4 Steam vegetables, fish, meat. 20 - 45 Add a couple of tablespoons of liquid.
4 - 5 Steam potatoes. 20 - 60 Use max. 1% of water for 750g of po
tatoes.
4-5 Cook larger quantities of food, stews and soups.
60 - 150 Up to 3 l of liquid plus ingredients.
6-7 Gentle fry: escalope, veal cordon bleu, cutlets, rissoles, sausages, liver, roux, eggs, pancakes, doughnuts.
as necessities- Turn halfway through. sary
7-8 Heavy fry, hash browns, loin steaks, steaks.
5 - 15 Turn halfway through.
9 Boil water, cook pasta, sear meat (goulash, pot roast), deep-fry chips.

Boil large quantities of water. PowerBoost is activated.
6.5 Hints and Tips for Hob²Hood
When you operate the hob with the function:
- Protect the hood panel from direct sunlight.
- Do not spot halogen light on the hood panel.
- Do not cover the hob control panel.
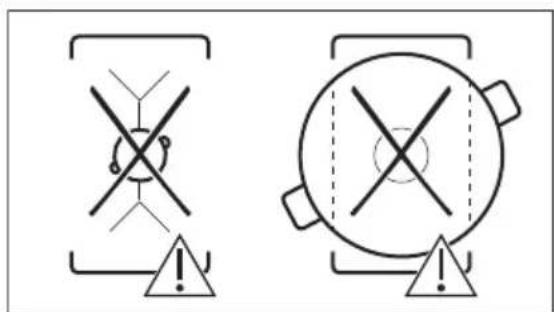
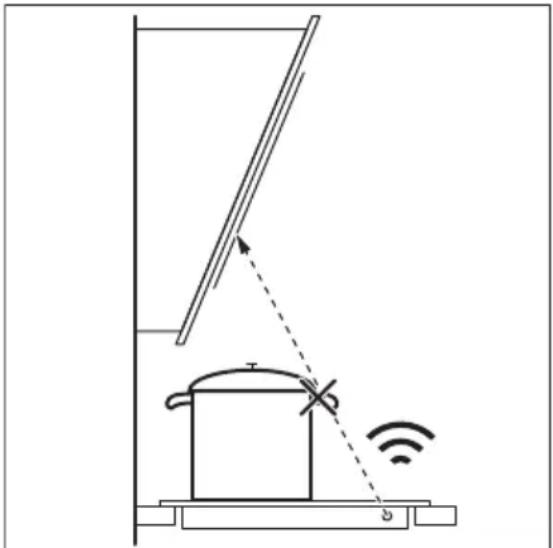
- Do not interrupt the signal between the hob and the hood (e.g. with the hand, a cookware handle or a tall pot). See the picture.
The hood in the picture is only exemplary.
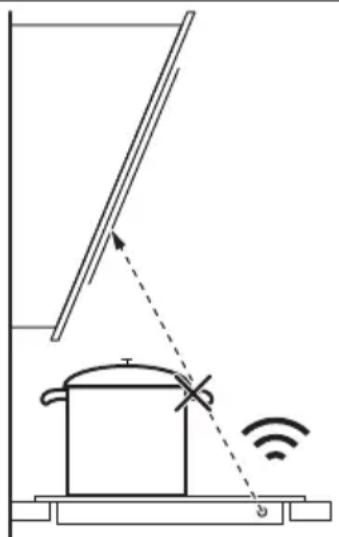

Other remotely controlled appliances may block the signal. Do not use any such appliances near to the hob while Hob²Hood is on.
Cooker hoods with the Hob²Hood function To find the full range of cooker hoods which work with this function refer to our consumer website. The Electrolux cooker hoods that work with this function must have the symbol
7. CARE AND CLEANING

WARNING!
Refer to Safety chapters.
7.1 General information
Clean the hob after each use.
Always use cookware with a clean base.
- Scratches or dark stains on the surface have no effect on how the hob operates.
- Use a special cleaner suitable for the surface of the hob.
- Use a special scraper for the glass.
7.2 Cleaning the hob
- Remove immediately: melted plastic, plastic foil, sugar and food with sugar,
otherwise, the dirt can cause damage to the hob. Take care to avoid burns. Use a special hob scraper on the glass surface at an acute angle and move the blade on the surface.
- Remove when the hob is sufficiently cool: limescale rings, water rings, fat stains, shiny metallic discoloration. Clean the hob with a moist cloth and a non-abrasive detergent. After cleaning, wipe the hob dry with a soft cloth.
- Remove shiny metallic discoloration: use a solution of water with vinegar and clean the glass surface with a cloth.
8. TROUBLESHOOTING

WARNING!
Refer to Safety chapters.
8.1 What to do if...
Problem Possible cause Remedy
| You cannot activate or operate the hob. | The hob is not connected to an elec- trical supply or it is connected incor- rectly. | Check if the hob is correctly connected to the electrical supply. |
| The fuse is blown. Make sure that the fuse is the cause of | the malfunction. If the fuse is blown again and again, contact a qualified electrician. | |
| You touched 2 or more sensor fields at the same time. | Touch only one sensor field. | |
| Pause operates. Refer to "Daily use". | ||
| There is water or fat stains on the control panel. | Clean the control panel. | |
| You cannot select the maximum heat setting for one of the cook- ing zones. | The other zones consume the maxi- mum available power. Your hob works properly. | Reduce the heat setting of the other cooking zones connected to the same phase. Refer to "Power management". |
| An acoustic signal sounds and the hob deactivates. An acoustic signal sounds when the hob is deactivated. | You put something on one or more sensor fields. | Remove the object from the sensor fields. |
Problem Possible cause Remedy
| The hob deactivates. You put something on the sensor field ① | Remove the object from the sensor field. | |
| Residual heat indicator does not come on. | The zone is not hot because it operated only for a short time or the sensor is damaged. | If the zone operated sufficiently long to be hot, speak to an Authorised Service Centre. |
| Hob²Hood does not work. You covered the control panel. Remove the object from the control panel. | ||
| You use a very tall pot which blocks the signal. | Use a smaller pot, change the cooking zone or operate the hood manually. | |
| There is no sound when you touch the panel sensor fields. | The sounds are deactivated. Activate the sounds. Refer to "Daily use". | |
| comes on. | Child Safety Device or Lock oper- ates. | Refer to "Daily use". |
| The control bar blinks. There is no cookware on the zone or the zone is not fully covered. | Put cookware on the zone so that it fully covers the cooking zone. | |
| The cookware is unsuitable. Use suitable cookware. Refer to "Hints and tips". | ||
| The diameter of the bottom of the cookware is too small for the zone. | Use cookware with correct dimen- sions. Refer to "Technical data". | |
| PowerSlide operates. Two pots are placed on the flexible induction cooking area. | Use only one pot. Refer to "Flexible in- duction cooking area". | |
| and a number come on. | There is an error in the hob. Deactivate the hob and activate it again after 30 seconds. If comes on again, disconnect the hob from the electrical supply. After 30 seconds, connect the hob again. If the problem continues, speak to an Authorised Service Centre. | |
| You can hear a constant beep noise. | The electrical connection is incor- rect. | Disconnect the hob from the electrical supply. Ask a qualified electrician to check the installation. |
8.2 If you cannot find a solution...
If you cannot find a solution to the problem yourself, contact your dealer or an Authorised Service Centre. Give the data from the rating plate. Make sure, you operated the hob correctly. If not the
servicing by a service technician or dealer will not be free of charge, also during the warranty period. The information about guarantee period and Authorised Service Centres are in the guarantee booklet.
9. TECHNICAL DATA
9.1 Rating plate
Model EIV9467 PNC 949 596 708 00
Typ 61 E6A 04 AA 400 V 3N 50 - 60 Hz
Induction 11.0kW Made in: Germany
Ser.Nr. 11.0 kW
ELECTROLUX

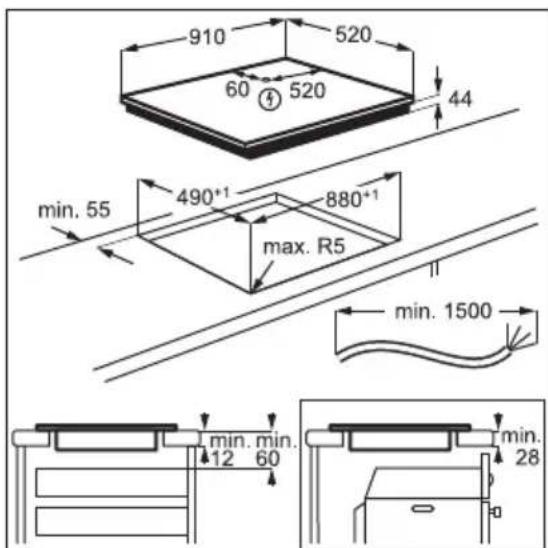
9.2 Cooking zones specification
| Cooking zone Nominal power (maximum heat setting) [W] | PowerBoost [W] PowerBoost maximum dura- tion [min] | Cookware diamie- ter [mm] |
| Left front 2300 3200 10 125 - 210 | ||
| Left rear 2300 3200 10 125 - 210 | ||
| Middle front 2300 3200 10 125 - 210 | ||
| Middle rear 2300 3200 10 125 - 210 | ||
| Right front 2300 3200 10 125 - 210 | ||
| Right rear 2300 3200 10 125 - 210 |
The power of the cooking zones can be different in some small range from the data in the table. It changes with the material and dimensions of the cookware.
For optimal cooking results use cookware no larger than the diameter in the table.
10. ENERGY EFFICIENCY
10.1 Product Information*
Model identification EIV9467
| Type of hob Built-In Hob | ||
| Number of cooking areas | 3 | |
| Heating technology Induction | ||
| Length (L) and width (W) of the cooking area | Left | L 37.9 cm W 22.0 cm |
| Length (L) and width (W) of the cooking area | Middle | L 37.9 cm W 22.0 cm |
| Length (L) and width (W) of the cooking area | Right L 37.9 cm | W 22.0 cm |
| Energy consumption of the cooking area (EC electric cooking) | Left 186.8 Wh / kg |
| Energy consumption of the cooking area (EC electric cooking) | Middle 186.8 Wh / kg |
| Energy consumption of the cooking area (EC electric cooking) | Right 186.8 Wh / kg |
| Energy consumption of the hob (EC electric hob) 186.8 Wh / kg | |
- For European Union according to EU 66/2014. For Belarus according to STB 2477-2017, Annex A. For Ukraine according to 742/2019.
EN 60350-2 - Household electric cooking appliances - Part 2: Hobs - Methods for measuring performance.
The energy measurements referring to the cooking area are identified by the markings of the respective cooking zones.
10.2 Energy saving
You can save energy during everyday cooking if you follow below hints.
- When you heat up water, use only the amount you need.
- If it is possible, always put the lids on the cookware.
- Before you activate the cooking zone put the cookware on it.
- Put the smaller cookware on the smaller cooking zones.
- Put the cookware directly in the centre of the cooking zone.
- Use the residual heat to keep the food warm or to melt it.
11. ENVIRONMENTAL CONCERNS
Recycle materials with the symbol Put the packaging in relevant containers to recycle it. Help protect the environment and human health by recycling waste of electrical and electronic appliances. Do not dispose of
appliances marked with the symbol with the household waste. Return the product to your local recycling facility or contact your municipal office.
NOUS PENSES À VOUS
How to install your Electrolux Induction Hob - Worktop installation

4. DESCRIPTION DE L'APPAREIL
Type 61 E6A 04 AA 400 V 3N, 50 - 60 Hz
How to install your Electrolux Induction Hob - Worktop installation
How to install your Electronlux Induction Hob - Worktop installation

Bizin Be6-caTka 6apbIn KeleciHi KapaHbI3:

PainanahyFa KaTbICTb KeHecTi, KITan7a, akaynbIKTB TY3eTy, KbI3MeT KepeCy XHeXeHDey TypaNbI aKnapaATbMbHa JepdeH aJIbIHbI3:
www.electrolux.kz/support
C3re 6apbHwa JkaKcbI KbI3MeT Kepcety WsiH eHimiH3di MbHa Jepre TipKeHi3:
www.registerelectrolux.com


Kypblfblb3fa KaKeTTi KepeK-KapaKTapdbI, bIfblDbI MaTePnaIapdbI XaHe cnmuJIk Kocankbl BeJWeKTEpdi catbn any ywiH:
www.part33.ru
TYTbIHyUblFA Kbl3MET KOPCETY
ΦnmpaMbIK 3aTTapDbI KOJaHaHydbI YcbiHaMbI3.
KbI3MeT KOpCETy opTaIbIFbHa xa6apnackaHda KeNeci DepeKTePdiH daBbH 6OnybH KaMTamacbi3 etiH3. Ylrici, Ohim Hemipi, CepnaIbIK Hemipi.
IpeekTeepi TEXnkaJIbIK aKnapaT TaKtaIwacbHaH anyfa 6oNaIbI.
EckepTy / Kayin-kaTepeH caKaTaNbIpy aKnapaTbI
i KaannbI aKnapat XeHe aKbIn-KeHec
KopwaFaH opTaFa KaTbICTbl aKnapaT
OHHipuyi eckepTyci3 e3repic enHri3y KyKbIFbHa ne.
MA3M¥Hbl
1.KAYINCI3IKAKNAPATbl. 105
2.KAYINCI3IK HYCKAYAPbl 107
3. OPHATY 109
4. BYиbIM CINATTAMACbl 111
5. ΘPKYHДIK KOДАнУ 112
6.AKbJI-KEHEC 118
7.KYTY MEHEH TA3AJAY 120
8.AKAYJIbIKTBI TY3ETY 121
9.TEXHINKANbIK DEPEK 123
10.KyAT TNIMDINI 123
11. KOPUJAFAH OPTAFA KATbICTbI JKAfDAnJIAP 124
1. KAYINCI3IK AKNAPATbl
KypblfblbOpHaTbI icKe KOndaHap aIdbHda 6ipre
Ketki3iIrrn HycKaynapbl MyKnT OKbl NbIFbHbI3. Dypbc
opHaTnay HeMece naJaIaHbay HToXJecInHe opBn anFaH
XapaKaT HeMece 3aKbIMFa OHdipywi XayaANTbI eMec.
HyckaylbkTapbl KeiH kapan Jypy ywiH apkaan Kayinci3
XeHe KOJI XeTImdi XepDe caKTaHbI3.
1.1 BaIIap meH oIci3 aIamdapdbIn kayinci3diRi
BvI Kypblfbl DeHe, ce3IM HeMece aKbI-NoKabileTepi WeKteyIi He Taxipnbeci XHe 6iImi JOK aAdamapdbH (cohbn iwiHne 6aIaNapdbH) naJaIaNHybHa apHaIMaFaH. KayincizirHe XayantbI aDAM Kypblfbl NaJaIaNHybH KaIaNacA He Mece HcKaynap 6epin Typca fana OIap KypblfblNbl NaJaIaNHa aIaNbl.
BaIaIapDbIH KypblfBImeH XHe 6ap MoBnIbdi KypblfblapMeH OINHaMaybIH KaDaFaIay KepeK.
Bapnbokopam maTeepnaIapbH banaIapdaH aIbIC yCTan, KOkbicKa TnicTi Typde Tactay KepeK.
- ECKEPTY: KypbIINfbl Jxmbic icTei TpyfHaHda Hemece oJ cybin XaTkaHda, 6aIanap MeH yJ xaHyapnapbIH OFaH XaKbIHDaTnaHbI3. KolkeTimdi 6oJIweKTeP naJaIaHy Ke3iHnde bICTbIK 6OlybIMyMKiH.
KypbIfbIa 6ana kayinci3diirH KypaIbI 6ap 6oIca, OHbl 6eIceHdipy KepeK.
-Баллар КрьнгыньхэндeyхэHe Ta3anayЖмblcTapbH 6akblaycbI3 opblHaMaybI KepeK.
1.2 Kaannbikayinci3dk
·ECKEPTY: KypbInfbl MeH OHbIH KOJKeTIMdi 6eJIkTepi naIdaIaHy Ke3iHne KbI3aIbI. KbI3dbIpFbIw 3JIeMeHTTepre TnIN KeTney ywiH a6aIJay KepeK.
·ECKEPTY: MaH HeMeCe 0cIMdk MaBbI KocblfA H TaFamDbI 3iPney 6eTHe KapaycbI3 Nicipce, Kayinti 6onybIXHe ept 5bIFybl MyMKiH.
- ΘopTTI EUSHKAUH cymen cehdipyre opekeT jacamaHb3, OHbIH OPHbIHa KypblfblHbI Cehdipin, JazbIHdbI KaKnaK Hemece eptke Te3imdi Kepne, T.6. Tepi3di 3aTpeH ja6bHb3.
- ECKEPTY: Курьлфыны таймер сяжтб CBiPТан КocatbH KypaIMeH JабдыКТamay Hemece JnI KocblbIn JxHe Cehin TypaTBH JxJIinepre Kocnay KepeK.
CAKTbIK ECKEPTY: Nicipy 6apbicsbH Kaadafana n Otbipy KepeK. Nicipy 6apbicsb KblcKa 6oIca, y3diKci3 Kaadafana n Otbipy KepeK. - ECKEPTY: Θρτ κayni 6ap: 3aattapdbi ὄ3ipney 6eTTepiHnde caKTamaHbI3.
- Пышak, shaньшкы, kacbik xэHe KaKnaK Təpi3di Temip 3aTTapdbi ā3ipney 6etɪhe KoɪMaHbɪ3, ce6e6i bɪcbln KeTeDi.
KypbIbfHbI KipictipinreH KypbIbIMFa opHaTy aIdbHda naIaIaN6aHbI3.
KypaIbI Ta3apTy ywiH 6yMeH Ta3apTKbIUtB1 naJaIaN6aHbI3. - Пайдаланын 6олfasанн кeин əзipney 6etihin элем entiH, bIDbIC aHbIKtafblska cyeHbei, oHbIH 6aCKapy teTirimeh cEHdiPiHi3.
- Erep shbHbI Kepamka 6eT / shbHbI cblHca, 3neKtp KaTepi naJa 6oJmac ywiH KypblfblHbI CenHdiPiH3 JHe TK Ke3iHe H aFbITbIHbI3. Kypblfbl TOK Ke3iHe 3neKtp KopanWacbl apKbIbI Kocblfah 6oJCa, KypblfblHbI TOK TaH aFbITY ywiH caKTaHdbIpfbIwTbI aJIbHbI3. OcbI JaJapda yakineTTi KbI3MeT Kepcety opTaNbIFbHa xa6apnaCbIHbI3.
KyaT cblbHa 3aKbIM KeIce, Kayinti 6oJdbIpMay yuH OHbI eHdipywi, yakineTTi KbImET Kepcety optaIbIFbI Hemece coJI cnAKTbI 6ilIKTi MAmHap aybICTbIPybl Tnic. - ECKEPTY: Nicipy KypbIfblcblH eHdipywi ci XacaFahn neW KOpfaBliTapdbI fAHa Hemece KypbIfbl eHdipywi ci NaIdaIaNHysbI HycKayIbIFblHda apHaNbI KOpceTKeH Hemece KypbIfblbIH 3iHe opHaTbIFlFaH KOpfaBliTapdbI FaHa KOJaHbIHbI3. CaI KeJIMeTIH KOpfaBliTAPdbI NaIdaIaNcaHbI3, OKbc JkaFdaI opbIH aNybl MyMKiH.
2. KAYINCI3IHK HYCKAYAPbl
2.1 Ophaty

ECKEPTY!
OcbI KypbInfblHbI TEK 6iniKTi MaMaH FaHa opHaTyFa Tnic.

ECKEPTY!
KapaKaT any HeMece KypbInfbHbI 6yNipin any Kayni 6ap.
Opam MaTepeHaIaPbIHbIH 6apJIbIFbIH aJIbIHbl3.
- ByniHReN KypblfbiHbOpHaTnaHb3 Hemece icke KocnHaB3.
KypbInfbIme 6ipre xetkiinreH opHaTy HcaynapbiH opbiHaBl3.
KypbInfbInap MeH 3aTTapDbIH apacbIHdaFbl MHHIMYM KaWbIKTbIKTbl caKTaHbI3.
Kypblfbl aybip 6oNfaHdbiKaTah,OpHbHaH XblXbITkAH Ke3De apkaWah abaB 6oJbIHbI3. Opkwah Kayinci3dk KonFa6bl MeH 6itey aAK KIM KNIiH3.
Kecinreh 6eTepre bInfkan kipin yIkeuTin xi6epmec yuiH TbIfb3daFbUwneH 6iTeHi3.
KypblfBihbAcTbIHFbI XaFbIH 6y MeH bJFaJdah KOpFaHbI3.
KypblfblHb ecikTih kahbiHa Hemece Tepe3eHiH acTbHa KOImaHbI3. Byn ecik Hemece Tepe3e aWbIFaH Ke3de bICTbIK bIDbICTap KypblfblDaH Kylan KeTney YwIH KaKeT.
- Θp KypblfblHbH actbHfbl KaFbIHda 33 JeIeTkiuTepi 6ap.
- Erep KypbIINfBi TapTnahBiH yCTiHe opHaTbInca:
-KeIeTeKlUke Kipin KeTyi MymKiH KiUkeHe KaFa3IapDbI Hemece npaKTapDbI caKaTaMaHbI3,ce6e6i OJap caIKbIHdaTKbIuKa 3aKbIM KeTTipyI Hemece caJIbIHdAty JyueciH 3aKbIMdAybIMyMKH.
- KypblFbIHbIH actbIHfbl XaFbIMeH TapTnada caKTanFaH 3aTTapDbIH apacbHa keMihde 2 cm opbl KaIdbIpbl3.
KypblfblHbIH acTbIHfbI XaFbIHda opHaIacKaH Ke3 KeIreH 6enriu naneBdi anblHbI3.
2.2 ΘηεΚTp TórbɪHa Kocy

ECKEPTY!
Opt XeHe 3neKtp KaTepeiHeyuBipay kayni 6ap.
-Барпькэнгт кocьньмьн 6iikTi ənEKTpwi .
KypbInfbHbMiHdETTI Tpye Xepre TybIKay KaKeT.
KaHdai da 6ip opekeTti opbIHday anDbIHda, KypblfblHbIH 3JleKtp JxeniciHe n aXbIpaTbIFaHbHa Ke3 XeTKi3IH3.
- TexHnKaIbIk aKnapa TaKTacbIHdaFbl napaMeTpnePiH Heri3ri KyaTneH xa6DbIkTay JeNiciHderi 3NeKtp napaMeTpnePiH caikec KeJIeTIHHe K03 XeTKi3iHi3.
KypbIFbI Dypbc OpHaTbINFaHbIn TekcepH3. Boc api dypbic emec 3neKtp XeniciH Ka6eni Hemece aWacbl (6ap 6oJca) aftnHaHbI TbIM bICbITbIN xibepyi MymkiH.
-Дурбic кeилік ka6eьdi naДааныHbI3.
- Keiinik ka6eBdiH waTacybiHa MymkiHdkepMeHi3.
- AmOpTN3aTOP opHaTbINFaHbIH TeKcepiH3.
- CbIMFa DeOpMaunraFa Kapcbl KaCbIPMaHbI NaaJaHaHbIHb3.
KypbIFbHbpo3eTKaFaXaNfAFAHKe3de Xenilik Ka6enb Hemece a7a (6ap 6onca) BICTbIK KypbIFbIfa Hemece bICTbIK bIDbICKa TnIN KeTneyIH Ka7aFanaHbI3.
Ken tapmaKTbI aanTep MeH y3apTKbIcBIMdbI KOJaHa6aHbI3.
KypbIbIbIHbIH aWacbl (6ap 6oJca) MeH XeJIiIK KaBeIbRE eW6ip 3aKbIM KeNTIpMeHl3. 3aKbIMdaIFaH XeJIiIK KaBeIbDi ayBICbpy yuINyakInetTI Kbl3Met KepcTeOpTaIbIFbIH aHEmeC 3NeKTp MaMaHbIH a6apJaCbIHbI3.
- Tok kypin Tpyfah khe He rnpon30nraocb6ap 6enwekTepdi 3neKtp KaTepiHekpfay ywiH Kypancb3 aIbIHbaTbH etinMbIKtan opHaTy kepk.
KypblfblHbHa aWacbH po3eTkaFa TeK KypblfblbI opHaTbI 60nfaHHaH KeiHa FaHa Kocblb3. OPhaTbI 60nfaHHaH KeiHa aWahbIH KOJ XeTeTIH XepDe TpyFaHbHa Ke3 XeTKi3iHi3.
Erep po3etka 6ekitimerehen 6onca, ahaHbJ kAnfamaHbI3.
KypbInfbHbI axbipaty ywiH 3neKtp cbmbHaH TapTnHaB3. OpaBIM Kopek aHaHbI KOJMeH TapTbIN WbIFapbHbI3.
TekdpybICOKwaynaftbI W KypanapdbI KOJdaHbIHb3:KeJIiHi KopFaTbIH axbipaTKblITapDbI, CaKTaHdbIPfblITapDbI (ycTaTkblITah anbIHFaH 6ypaHdaNbCaKTaHdbIPfblITap), Jepre TynbIKtanydaN Kopfay TeTikTepi MeH TynbIKtaFbIITapDbI naJaHaHbIHbI3.
3NeKtp KOHDbipfbicbIHda KypblfbiHbKe3 KeIReH TOK NIOCTepiHeh axbipaTyfa MymkiHdk 6epetih Okwayafbl Kypblfbl 6onybl Kepek. Okwayafbl W Kypblfda KeHdiiri 3 MM-DeH KEM eMec caHbInay 6ony Kepek.
2.3Паадалану

ECKEPTY!
Kapakat any,kyin kany xhe TOKcof y kayni 6ap.
- BipiHwi pet naДanaHy anDbIHda 6ykin opayblTbI, kAncbIpMaJapdbI JxHe KOpFaBbI NJIeHkaHbI (TnicTi 6oJca) aIbIn TaTaHbI3.
- ByTpyMbICTbIK (kaaiiHne) MaKcaTTa fHa NaIdaIaNHyf aPhaIaNFaH Kypblfbl.
- ByI KypblfBihbTexHknabIK CnataTamacbiH e3reptneHi3.
XeIeTeY caHbInaynapbHbIH 6iteJmEreHIn TeKcepiH3.
XyMbICICTEN TYpFaH KypbINFbIHbI Ha3apDaH TbIC KaJNbIPMaHbI3. - Picipy aMafbH KOndaHbIn 60nFaHHaH KeiH apKaWan «Off» (eWipy) KyiHe OPhaTbHbI3.
- Iicipy aImaKTapbHa nbIwaKTapdbI HEmece KcCTpeJI KaKaNaKTapbIH KOIOFa 6OImaIbI. Onap bICTbIK 6OlybIMyMKiH.
KypblfblHbIdbIMkbIIN KOJIapMeH Hemece cyFa TnIn TypfHa naiDanaH6aHbI3.
KypblfblHbJxmbic6eti Hemece caTay 6etipeiHne naaandaHaB3. - Erep KypblfblHbH 6eti Xapblca, KypblfbHb Kyat XeicHeH Depey axbipaTbHb3. ByJ Tok COfyBbH 6ondbipMay ywiH icTeNei.
KypbInfblXyMbic icTei TpyFaHda, XypeKUnpaTkbIWBbI 6ap naJaIaNHyBlnap
HNDyKnIbIK nicipy aMakTapbHaH KEMHeH 30 cm apaIbIKTa 6Onybl KaKeT.
TafamdbblbICTbIKMaNfA KOINCAHb3,ON WaaWbIpaybl MYMKH.

ECKEPTY!
Opt KHe KapbIbIc naJa 6ony kayni 6ap
KbI3dbipfahmaMainapaHTyTaHfbi6ynap 6eniHyi MymkiH.MaInapMeH nicipreHne,OTbI Hemece KbI3dbipbINFaH 3aTTapdbI aNbcYCTaHbI3.
-Te bictbMaJdaH 6eJIHeTIn 6ynap e3diirHeH epteHyi MymkiH.
Kypamblnda TaMaKa KaIbIKTapbi 60nybl MymkiH naJaIaHaBInFaH MaBipiHwi pet NaIdaIaHbINFaH MaIFa KapaFaHda TemeHipek TemnepaTypaDa oPteHyi MymkiH.
- TyTaHbIiHhIMdepdi Hemece TyTaHbIiH hIMdepMeH bIIFAanDaHdbIpblfah 3aTTapDbI KypblfBiHbIH iWiHe, XaHbHa Hemece YCTiHe KOImaHbI3.

ECKEPTY!
KypbIINfBiHbi 6yIipin anybIHb3 MymKiH.
- Baçkapу TačTacbIHda bICTbIK bIDbICTapdbI caKTamaHbI3.
- bICTbIK Ta6aHbIH KaKaNaFbIH NeuTih bICTbIK aHHeK 6eTIHe KOImaHbI3.
-bldbictbl Kypfak 60JFaHwa KaHaTnaHb3.
KypbIfblHbIH yCTiHe 3aTTapDbIH Hemece bIdbICTapdbIH KJaybiHa J01 BepMeHi3. Bet 3aKbIMdanybl MymKiH.
-3ipney aImaKTapbH 6oc bIdbc KOybIn Hemece bIDbcBcI3 6eNceHIpMeHi3.
Kypblfblfa aIOMHn foIbraHbI KOIMaHbI3.
KyibIHaH WOnbIHHa, aJIOMHNiDeH XacanFaH Hemece actbHa HyKcaH KeIReH bIDbICTap, 1bHb / 1bHb KepaMnKa 6eTKe cb3at TycipeDi. 3ipney 6etInHe XblXkblTy KepeK 6oNfAHa da epKaUah OcbI 3aTTapdbIXofapbl KeTepiHi3. - ByI TeK TaFam Nicipyre apHaIFaH Kypblfbl. Ohbl 6acka MaKcaTTapFa naJaIaNHyfa 6oImaIbI, MbIcAbl, 6eIMeHi Xblity.
2.4 KyTu MeHeH Ta3aJay
KypbIINfbIHbH 6eTIHeI MaTePnAJIbIH canacbl Tycnec ywiH Me3rIn-Me3rIn Ta3aHaHbI3.
KypbIfblHbI Ta3aIapdaH 6ypbH cHdipin, cybifaHwa KOnbHbI3.
KypbInfbHbTa3anay ywiH cybl cnpeNi XHe 6yDbI KOJaHaBnB13.
KypblfblHbIdbIMkbIJxymcaK 乌6bepeken Ta3aHaHbI3.BeiTapan 9yfb13aTTapDbI FaHa KOnDaHbIHbI3. Xemiprii 3aTTapDbI,TypniJI xekenepei, epitkiWTePdi Hemece MeTAn 3aTTapDbI naDanaH6aHbI3.
2.5 Kb13MeT
KypblfnbHbI XeHdey ywiH yakiNetti Kbl3MeT Kepcety opTaIbIfbHa xa6apnaCbIHbI3. TeK TynHcyckanbIK Kocankbl 6enweKeTpdi naDanaHbIHbI3.
OcbI eHIMHiH iwiHderi waM(apa) MeH waMdapdbIH KocankbI 6eIweKTepi JKeke catbIaIbI: ByI waMdap TemnepaTpa,
dipin,blfalfandbilbIK CNKTBiTeHeWe
Hn3nkablkXafdaInapFa TypmbICTbk
KpybllfblapdbIH KapcbI TypybHa Hemece
KpyblfbHbIH XyMbIC XafdaBbI TypaBl
CnHAn bepyre apHaflan. Onap 6aca
KoJdaHbApda naDanaHyfa
apHaImaFah Xhe TpyfbH yInepdi
XapblkTaHdbipyFa cKeKc KeImeiDi.
2.6 Kokbicka Tactay

ECKEPTY!
KapaKaT any Hemece TYHbIfbIn Kaany Kayni 6ap.
KypbIbIbIyTuJIIN3aUJayXoJIbTypaJIbaknapaTanyuWInDnIepre,ENdipyuHInyakIneTTTyNfAcbHaHemeceXepriIKTi KaTTbI TyMbICTbIKKaIDbIKTap onepaTopbIHxaabapnaCbIHbI3.
KypblfblHb3neKtp xeniciHeaXbIpaTbHb13.
KypbInfbifa XaKbIH opHaJaackaH 3JeKTp CbIMbIH Kecin, KOkbicka TactaHbI3.
3. OPHATY

ECKEPTY!
Kayinci3ik TapaynapbIH KapaHbI3.
3.1 Ophaty aIdbiHda
NeWti opHaTy anDbIhDa, TexHnKaJIbIK aKnapaT TaKTaIwacBHaH TeMeHderi aKnapaTTbI Xa3bIn aNbIbI3. TexHnKaJIbIK aKnapaT TaKTaIwacBl neWtIH TEmeHrI XaFbIHDa OPhaJnackaH.
CepnaybIK hemipi
3.2 Kipiktipinren newterp
Kipiktipinre NeWTePdi, acnantbI dypbc KOHdbipbIHaN neWTePRe XHe CTaHdapTTbI TaanTAPFa cai KeNetIH XyMbIC 6eTTepiHe KypacTbIPfAHHaN KeiH fAHa naDaIaNbIHbI3.
3.3 KocbIbIM ka6eni
-ПлNTa Kocblm Ka6eImeH naДаныЯды.
HyKcaH KeIReH KyaT cbIMbIH aybICTbIPy yuH MbHa Ka6eNb TyPiH KOJaHaBbIHb3: H05V2V2-F 6yn 90^ He Xofapbipak TemnepaTypaFa Te3eDi. YekineTTi Kb3Met Kepcety opTaIbIFbHa xa6apnaCbIHb3. Kocblm Ka6eJIH Tek 6jinikTi 3neKtpwi aybICTbIPybl KepeK.
3.4 KypacTbipy
KypblfbiHblyaaya TaTkbIHTbIHacTBHa OPhaTcaHbI3,KypblfbiNapdbIH apacbiHaFbIMH.KaBbIKtbIKbIOphATy HcaynapbHaH KapaHbI3.

KypbIbI TapTnHaBih yCtiHe opHaTbIInca, neTIH XeJndetkiWi TaFam Nicipy 6apbcIHda TApTnAdaBfI 3aTTapDbI XblbITybl MymKiH.
TemeHderi cbl36ada kepceTinreH toIbIK ataydbI Tepy apkblbl «Electrolux HnyKunBik nnITacBH opHaTy eDiici - Kymbic yCTeJIHe opHaTy» Bndeo OKyJbIFbIH KapaHbI3.

YouTube
www.youtube.com/electrolux www.youtube.com/aeg
How to install your Electrolux Induction Hob - Worktop installation

4.БУныМСИПATTAMACBI
4.1 Nicipyre apHaJFaH 6eTTiH Kepinici
1 NHyKzIyIbIK nicipy aHaHbI
2 Baçapy naheşi
4.2 Baçapy naHeJIiHIn KepiHici
KypbInfbHb icke kocy ywiH ceHcOpnbIe epictepi naHaanHbIb3. BeHHe6eTTep, HndNKaTOpnap MeH dbiobictbIK cnHaJdap kaYHKunapdbIH Kymbc JacaaiTbIHbH KepceTeDi.
= /F INHINKaTOp KaHbIn TypFaHda KaIbIK bICTbIKTaH KyiKTeP aIy Kayni 6ap.
Hnykunlkb 3ipney aMakTapbl 3ipney npoeci ywiH KaKeT Kbl3ydbTIkeNei bIbICTbIH TMeHri JkaFbIHDa TydbpaDbI. IbHbI KepaMnKa bIDbICTbIH Kb3YbIMeH Kb13aDbI.
F INHINKATOpnapbI 3ipney aMafbl bICTbIK Ke3de KepiHeDi. Onap Ka3ipri yaKbTTa naJaHaNbIn TpyFaH 3ipney aIMaKTapDbIH KaNbIK Kb13yBH KepceTeDi.
CoHdai-ak 6yI INDnKaTOpMbHaXaFdaJa KaepiHyIMyMKiH:
- tinti naIdaIaNbIin XaTnacAh3 da, ipreIec e3ipJey aMakTapbl yuH,
cYbIK 3iPney aMafBHa bICTbIK bIDbcKoNbIFaHda, - nnta 6eencehci3dpiJreHne, 6ipak e3ipJey aMaftbI eJI bICTbIK Ke3de.
BvI INHdkatop e3ipney aMafbl cybHaHaJxKofanaBl.
5.6 Bridge
Byn cyHKnra eki nicipy aMaFbH xanFaIdbI
XaHe onap 6ip aMak petIHde XyMbIC
icTeuDi. FyHKnraHbl YlKeH bIDbc YwiH
KoJaHyfa 6oJaBl.
- bIbIcIeKi Nicipy aHaHbHa KoBbHbI3. bIbIc eKi aHaHbIH Da opTacbH KAYbIN Tpybi KepeK.
akTyckeaybicaa.
2.Функцянbl kocy yuH IMecih 6acbIb3. - KbynapameptiH opHaTbHb3. bIbIcTap eki aHaHbIH da opTacbH kaybIn, 6ipak 6enrineHren XepdeH acnai Tpybl Kepek.

Функцянbl ewipy ywiH Tymecin TyptiH3. Nicipy aMaktapbI JKeke-JKeke Kymbcic iTeenDi.
5.7 PowerBoost
Byn cyHKnra Tniicti nicipy anaHbHa Ke6ipek Kyat Xiepeedi XeHe ON bIDbICTbIH KENEMHe 6aJNaHbICTbI. Byn cyHKnraHbIKbICKa yaKbITka fHa Kocyfa 6oJaBl.
Iicipy aanaHbHa apHaJIFaH yHKnRnHb Kocy ywiH P TyptiH3. BeJIriH Tyci KbI3blFa aHaJaBb. FyHKnra ABTomaTTbI TypDe cHeDi.
i ¥3aKtbIcapaMeTpH eH yNKeH MHepeIH "TexHKnblk aknapaT" TapaybHaH KapaHbI3.
5.8 Kizipic
Функия кocулby Tpyfahda He 6eHrinepi naIaIaNbIaNbI.
Функця Таймер Функцяларын TOKТаТпды.
yHKnHbI 6eNceHdipy ywiH HymMeWirih 6acblh13.
BenriHIn Tyci Kbi3bInFa aHanaDbj.Kbiny napametpi 1-reein HtemeHdetinDi.
Функцяньш偷у wih: TymMeWirin6acbHb3.TaHa aK Tycke 6oJnaDbI.
AaHbIbI XbIy npaMeTpKocblnaBl.
5.9 TaMep
Kepi cHaKaTaiMepi
Byn cyHKunmEn Nicipy anaHbHbIH 6ip nicipy
KKnbl Ke3IHne KaHwa yaKbIT KymbcI
ICTeHTiHIN KepcETiH3.
AaIbIMeH Kbl3y napameTpIH, coaH KeiH cyHKnraHbOpHaTbIHb3.
1.ФyHKUHbI icKe KOCy Hemece yaKbITbI e3repy yuin TypTHi3.
IinneJe TaMep uOpPnapbIXe He
XHe HndkaTOpnpbl naDa 6oJaBl.
Tyci Kb13bInfa aHaJadbl, codaH KeiH aKa
aHaJaBl.
TainMep KoiBImaca, INHdkaTopnap 4 cekyHdTan KeiH Keipin6eKeTeDi.
2.YaKbTTbI opHaTy yWih +Hemece - TyptiHi3 (00-99 MNHyT).
3ceyntdanKeinTaMepaBTOMATbI Tpyde Kepi cHaai bactaB1.
HnIkaTopnapbl XofanaDbI. Kbl3bl TycTe kana 6epei.
YaKbIT aAaKTaJFaH Ke3De, DbIbICTbIK CnIHAn eCtinin enriweci XbInbInbIKTaIbI.
Cunhandbi TokTaTy ywiH TpyTHi3.
Функцянbl ewipy: Tymecin TyptiH3. + XeHe HdkaTopnapbI KaHaDbI.
HnncnneJe O npaty yuiH Hemece KOndaHbIHbI3. AInbTePHaTnBa petiHde Kbi3y napaMeTpIn 0 KaIIbHa KOIOFA 6OJaDbI.
HetnHexicHe cHraJI ecTineJxHe TaMep 6ipKoJa TOKTaIbI.
CountUp Timer
Iicipy aHaHapbHbIH Kymblc icTey yaKbITbIHbIH y3aKtBIfbIH 6akblay yWih OcbI cyHKunHbIKoJaHyra 6oJadbl.
Функцинь кocу yшin TypTIni3.
INHnKaTopbl Kbl3bl TYCKe aHaIbIn, TaMep aBTOMaTTbl Tpyde cahai 6actaIbI. FyHKUraHbI eWipy: Tymecin TypTHi3.
HnKatop XapbIfbl XaHFaHda, TyMeciH TpyTHi3.
MnHyT caHbIHfbl Dbl6bIC
C3 6yI cyHKnHbI nei icke KocblnfaH Ke3de, 6ipak eWkaHdai nicipy aMafbl XyMbIC icTeMei TypFaH Ke3de KOJaHa anacbl3.
BaCKApy naHEniH Kepy yWIn bIDbICtbl NiCipy anaHbHa KOHyIbI3.
1.Функи�нь КOCY yuH Tymecin HДИКaTOpbl Kbl3bIN TYCKe aybICKaHua TyptiH3.
2.YaKbTTbI OPhATy ywiH +HEMece - TYIMecIH TpyTIH3.
Функця4cekyндтан KeiH aBTOMaTTbI Tpynde 6actanaDbI. 1, -
HINKaTOPJIapbl XOfaJalaBl. 1b3bl TycTe KaJa 6epei.
Функиянbl opHaTKaHHaH KeiH, bIDbICTbl aIbIHb3.
YaKbIT aKaTaNFaH Ke3De, Dbl6bICTbIK CNrHaI nectiin enriweci XbInbInbIKTaIdbI.
CnHaIbI ToKTaTy ywiH typtiHi3.
Функцянbl ewipy: Tymecih TyptiH3. + XeHe HdkaTopnapbl KaHaDbI.
HcnnpeOpHaTy ywiH HeMece + KOndaHbIbI3.
i ΦyHKnna eWKaHdai niCipy aIMaFbIHbIH XyMbICbHa ecep etneNi.
5.10 KynbInTay
Bacapy nahenin new kymbic icten Typfahda 6yfaTayfa 6onaDbI. OJ kbl3y napametpiHn abaCbi3da e3repYiHe kon 6epMeiDi.
Anbimeh Kbi3y napameptipn ophaTbHb3.
Функцинbl kocy yuH ymecin 6acbHb3. Benri Tyci Kbi3binaaHaJaDbj XeHe KbblbIKTaIbI.
AypbIC: WOnbIH, Temip, 3MaJIbMeH KaNTaIFaH 6OJaT, TOTTaHbAaTbIH Temip, TaBaHbI KeN Ka6aTTaH TypaTbIH bIDbc
(əHɪpʌwi TapaʌbɪHaN ἀνpɒc TaɪbɑscaɪbɪHraH).
- Dypbc eMec: aIIOHMnH, MbC, Ke3, 1bIHbI, KepaMnKa, apop.
MbHa XaFdaunapda bIDbc HNyKcuaNbIK nnTu ywiH xapaMaIbI:
cyEH KOFapbl Kbl3y npaMeTpine OPhaTbIJFaH aIMaKta eTe Te3 KaHaNDbI.
- MarHIT bIDbICTbIH TY6iHe TapTbINbIN Tycedi.
blbc eIwemdepi
-Индукшильник Nicipy aJaHapbl bIbICTbIH Ty6iHiEJWeMeHe aBtOMaTTbI Typde 6eimdeJIe.
- Inicipy aHaHbHbIH TImdIiniri bIDbcTbIH dNaMeTpIe 6aIIaHbICtbl. DnaMeTpi KepcetilreH eK iwi dNaMeTpdeH kiwi 6oJFaH bIdic, nicipy aHaHbHaH 6eJIHeTIH KyaATtbIH 6ip 6eJIirH fHa aIaNbl.
Kayinci3dk MaKcaTbIHda XHe NicipydiH OHTaIbI HAtnxKeIepi yuHIn «Nicipy aHaHdapbIbIH CnPaTTaMaChbHa KpcetilreH eIWeMepDeH yIKeH 6oJFaH bIDbICTbI naIdaIaNbHaB. Nicipy 6apbcihDa bIdbICTbI backapy naHeJIne
XaKbIH KOImaHbI3. ByI bacapy naHeJIHH
XMyMbICbHa acep eTyI Hemece PInrTaBH,
fYHKUJnApbIH Ke3DeuCok icKe KocybIMyMKiH.

6.2 XyMbic 6apbIcbIHdafbI ybyI
ErepMbIHahbIeCTiceHi3:
- cbIpTbIJaFaH dIbIc ecIceHi3: bIDbc ep TypJI MaTePnaIapdAn JxacanFaH (KoN KaTnapbl KypblMa).
- BICKbIPfAH DbIbIC: Nicipy anaHbIH KyaTbI eTe XOFapbl XaHe bIDbc ap Typni MaTePnAaHaH XacaIFaH (cHDbNtocinimeH).
- ryndey: kofapbI KyaT deHrein H naDanaHaHcbI3.
- WbIpTbInay: 3neKtp JeNiciHi Kocblnybl.
- bICbIyay,bl3bIHday:KeIeTkiuXyMbic icTei.
UybIbIH 6onybl KaIbITbl XaFdaJ XHe 6ynap ew6ip akaydbI 6iDipMeiDi.
6.3 Oko Timer (3ko TaMep)
KyaattbI yHemdey wHnicipy aHaHBHbIH Kbl3dbIpfbWbI Kepi caHaKa TaMepiHi CNrHaJIbI ecTIImeN TypbIN cHeDi. XMbIC icTeY yaBtBnHbN ap TpyPi 6onybl Kb13y napameTpIne XHe nicipy yaBtBHa 6aJNaHbICTbl.
6.4 Θ3ipney Ke3iHnde KOndaHy KaFdaIJaPbIHbIH MbIcAJaPbI
Nicipy anaHbIHbIN KbI3y napameTpimeh KyaTTbI TYbIHy MHI e3apa Typa 6aHaNbICTbI eMec. Kbl3y napameTpIH Ke6eHTkeH Ke3de, nicipy anaHbI NaaHaHaTbIH Kyat MHI nponopuHOHaNbDbI Type Ke6eMeiDi. CoHbIKtah opTaWa Kbl3y napameTpIH KOJaHaTbIH nicipy anaHbI, e3 KyaTbIHbIH JapTBICbIH a3bIH KymcaNdbl.

KecTeDi IepeKTeP TeK HycKay petiHde 6epinreH.
| Жыл汞 napametpi | Мына ушin падалану: Укыт | Кенистор (Mин.) |
| 1 Θзірінген Тамakсы Кылі устань. КожеТ | 6оллafан жafдайda | bldістары кakпаIGNEN 星бынь.3. |
| 1 - 2 Голандялік epітінг соус: май, шokолад, келатин. | 5 - 25 Apa-тура apәаласьірьнь.3. | |
| 1 - 2 Катай耗 ушін: уліпідек омілітөр. nicipінг жуmbірTKa. | 10 - 40 Кakпаftын кayын Nicipy Kepek. | |
| 2 - 3 Куриш көне сttke nicipiİng ТаГAMDардь Баяу кayнату, дайын ТаГAMDардь Кылыт. | 25 - 50 KemiHne KryiSten eki ece кeŋс сүык KOSbHbI3, Cyt TafamDarbyn NicipydiN OpTacbHa KeJreHne apәаласьірьнь.3. | |
| 3 - 4 Кекеністерд, балыксы, etti Бүmen nicipy. | 20 - 45 BiPheSe ac KacbIK cYbIKTBk KuBHybI3. | |
| 4 - 5 KapToNTы 6umen eazipney. 20 - 60 750 r kapToPka en kəsbi ¼л су πañdaʌnaHbɪh.3. | ||
| 4 - 5 Tamakсын, 6укырmaын, кэнe coplanapdibn Ylkeniipek мeilseрлepiN nicipy. | 60 - 150 3л-гe DeiH nCyrbIKTBk ППОС ИнгroduNTTeP. | |
| 6 - 7Женін Кыру: оскалон, кордог blio сыр ETi, кOTлeTTep, фрикадьkanap, сосискалap, bayibp, py, КуMbIrTkA, панkeйКтр, doHaTTap. | КажET Боллafан Жafдайda | УakbITbH nKapTbICb l ETKeHde aydapbHbI3. |
| Жыл汞 napametpi | Мына ушin пайдану: Укыт | Кенистор (Mин.) |
| 7 - 8 Каты Кыр, Kapтог Күмамы, сөб сөдөдөдөдөдөдөдөдөдөдөдөдөдөдөдөдөдөдөдөдөдөдөдөдөдөдөдөдөдөдөдөдөдөдөдөдөдөдөдөдөдөдөдөдөдөдөдөдөдөдө �ткөдөдөдөдөдөдөдөдөдөдөдөдөдөдөдөдөдөдөдөдөдөдөдөдөдөдөдөдөдөдө �тк. Картон. | 5 - 15 Укыттын жарысы отkende aydapыныз. | |
| 9 Сүдүй салу, пада озірley, оті 키ліш, кәстрәл'de Кыр), Каты КырылfaH Картон. | ||
| P | Сүдүн көр мөлшерін кайнасыз. PowerBoostSEEнсдірінedi. | |
6.5 Hob²Hood ΦyHKcIaCbIHa apHaJIraH aKbIJI-KeHeC
Питаны keleci Функцямен naДангдд:
Aya tapTkbltbih TaKTacbiH Tikeeey Tycetih KHy CeyneciHeH KopFaHbI3.
Aya TaptKbIUtbIH TaKTacbHa ranoreHdi KapbIKTbI TycipMeHi3.
- NewTin 6ackapy nahein xannahb3.
- New TaptKbI Kypblfbl apacbHdafl cnHaIFa Keepri XacamaHbI3 (MbIcIbI, KOJIbHbI36eH, bIDIC TYTKacbImeH He 6nIK bIDbcneH). CypETTI kapaHbI3.
Cypetteri aya TapTkbiMbicaJ peTiHde faha 6epinreH.
Baca KaBbIaH backapatbH Kypblfblnap CnHaIbI 6yFaTaybMyMKIn.Hob²Hood Kocynbl TyPfAHa neiKe XaKbIH Xepde ocBHaan KypalapDbI naDanaH6aHbI3.
Hob²Hood ΦyHKcnaCbI 6ap neuTin aya TapTKblwTapbl
OcbI cyHKUmaMeH KymbIC icTeiTin neWtih aya TapTkblTapbIH TObIK aykbIMbIH TyTbHyBbIaPf aPhaJFaH Be6-caTTah anyfa 6oJaBI. OcbI cyHKUmaMeH KymbIC icTeiTH Electrolux neWtIH aya
TapTKbIHTapbIHda TaH6a 60nybKepeK
7. KYTY MEHEH TA3AJAY

ECKEPTY!
Kayinci3ik TapaynapbIH KapaHbi3.
7.1 XannbI aKnapaT
-Плпаны ep падандан keин Ta3aJaHaB13.
- ΘρΚαψαηι ΜαδαΗβι Ματα bɪdɒcTbɪ NaɪДаɪaɪHbɪHbɪ3.
- Betteri cbi3aTTap Hemece Kapa daKtap nnTahbIH kYMbICbHa ocep etnei.
- NeWtiH 6eTIHe apHaIFaH apHaIbI Ta3aJNaFbIuTbI naJaIaHaHbIHbI3.
- UbIbIfa apHaIFaH apHaNbl KblpFbIuTbI NaIdaIaNbIHbI3.
7.2 Newtih yctih Ta3anay
- Depey Ta3anaHbI3: epireh nlaactNK, nlaactNK kyaKaNtBip, KaHT XeHe KaHTbI 6ap TaFam Hemece KOKbICTap neTuH 6eTHe 3aKbIM KeNTipyi MymKiH. Kyin KaJmay ywiH a6aB 6oJIbHbI3. KbIPfBiWbTI WbIHbI 6etKe apHaNb cyiP 6ypblw jacan
KoMbI, OHbl XblJXbIta OTblpbl Ta3aJahbl3.
- Newtih ycti keTkiniikti Tpyde cybifaH Ke3de anbHbI3:ek DaKTapbl, cy daKTapbl, MaJ daKTapbl, MeTaJIbIH XblITbIPAfAH daKTapbl. NeTtH 6eTIH dbIMkbI INy6epeKneH xHe Xemipriu emec xyfbIw 3aTne H ta3anaHbI3. Ta3anan 6oNfAHnH Kein H neTtih ycti H xMcaK wSybepeKeNeH CypTHi3.
XbntbiparaH MeTaanJaKTapbH KeTipiHi3: cipke cybl KocblFaH cy epiriHicin naIdaIaNbIn, eHHeK 6eTIH Wy6epeKeNeh Ta3aIahbI3.
8. AKAYJIbIKTbl TY3ETY

ECKEPTY!
Kayinci3ik TapaynapbIH
KapaHb3.
8.1 He ictepci3, erep...
| Месе biktumal ce6e6i Sheim | ||
| Плитаны icke кosa hemeces пайдана на щима сь3. | ПлITA злескtrжуеси Косылмаман hemeces ол дурьс Жалганбаган. | Плитанын олескtrжуесид дурьс КосылмаманTekceрінiz. |
| Сakтандыр fvblk kynin ketken. Акayлбikka сakтандыр fvblktsbн ce6en Кan cehcopьik epicterdi Tуртінiz. | БOLMAfAHn Tekcepɪniz. Сakтандыр fvblk kainta-кainta kynin Коте берse,бліkti олескtr Mamahын хабарласьнiz. | |
| Сi3 6ip yakblttа 2 hemeces odn da КeI cehcopьik epicterdi Tуртінiz. | Tek 6ip сehcop epicin Tуртінiz. | |
| Кidipic kymbic icteyd. «Кунделікті колдану» Беліmin Кapаньiz. | ||
| Бackapy панелінde cy hemeces мa Дakтары 6ap. | Бackapy панелін ta3anaнiz. | |
| Пису aiMaKTapbHbN bipine maks. Кызу пarametprin ophata алмайсь3. | БаSCa nicipy aiMaKTapbI МAKC. КолжетIMdi КаТы пайдали. Сi3dIn Плитань3 dnybic kymbic ICTEN Tpy. | Осы φазаFA kocbllrMAN baska nicipy aiMaKTapbHbN Kbl3dbyp napametprinH mEHH a3aYbHb3. «Kyaattы baskapу» Беліmin KapaHb3. |
| Акystкалык сгнад дыбсы ectilin, рлITA сeнedi. ПлITA сөнгн ke3de akystickалык сгнад ectileedi. | Сi3 6ip hemeces bipheue сehcopьik epicke bipdehe Keясьiz. | Сehcopьik epicterperdi 3aTы albIn TactaHb3. |
Mocene bIKTmamJI ce6e6i Ieewim
| ПлNTа сенedi. | Сi3 сeнсорьк epicke bip həрce Коифаныз. | Сeнсорьк epicteri 3aTTbI aalbɪn ТаCTаныз. |
| Калдык жылу inhДикаторы ханбай тур. | Аймak bICTbI emec, ce6ebi on a3 уakbIT fana KocbIbI TpyraHne сeнсорын akaybyb6ap. | Егет aiМak bICHTbI dai y3ak yakblT ЖуMbIc icTece, yekinetti kIImet КерсETY opTaIbIbHa xa6aplnacbIbI3. |
| Hob²Hoodжуmbic ictemeit typ. Ciz 6ackary naheinih kajttbIH3. Baskary naheini deri 3aTTbI albɪn ТаCTaNыз. | ||
| Сигналfa 6eRer tжасайын ete 6nik ыdltbI NaДанДынl3. | Kiiшірек bIDbI cIbI naДaнaнынl3, nicipy aiMaFbI nAbyCtIbIbI3 He neuTIH MexaHnkaIbI KOLmeh Бaskarbyl3. | |
| Панелыдн сeнсорьк epicteriH тугken ke3de esbip сигнал ectiIMeYdi. | ДыбICTbI сигнадap ceHdIPuyni. ДыбICTbI сигнадapdyi. «Кундeпikti колдAnu» БeLIMIN КарaHbI3. | |
| Жанады. | Бana kayincizdiri Крвлгысbl Hemece KylbIITay kYmbic icTeydi. | «Кундeпikti колдAnu» BeLIMIN КарaHbI3. |
| Баckару жОлafы ЖылblktaiDyI. | Аймakта ew6ip bldlc xok hemec aIMAK toIbIFbIMeH kazbIIMaFAH. | Пису aiMaFbI nToIbIFbIMeH Жа6aTbIndai etIn bIdcIbI aMakKa KoibIbI3. |
| БiDlyc саи Keilmei.Саиkec Keletin bIDbI cOKdAnbHbI3. | «СeЗКeМeKTeRжэHe KeHecTeP» БeLIMIN KapaHbI3. | |
| БiDlyc Ty6iHdIaMeTpI aiMaK yUsh Тыm KiUKeHe. | Дурьс сeIlewemdepi 6ap bIDbIcbl КoLDaHbIbI.«ТeХИнKaIbIK сипATTama»БeLIMIN KapaHbI3. | |
| PowerSlideжуmbic icteydi. Eki | Кастюн Икemdi InHydkuzmaIbIK nicipy aiMaFbIHa opHaIaCTbIbIFaH. | Тек бр кастюн di naidanahbIbI3. «Икemdi InHydkuzmaIbIK nicipy aiMaFbI» БeLIMIN KapaHbI3. |
| Eжene сан пада soladl. | ПлNTада kaTe 6ap. ПлNTaНы сeHdipin3 De, kaia 30 cesyndtaHn KeiH icSe kOcblbI3.Егет E kaYta xanca, neuTI Tok Kezihen aftbIbIbI3. 30 seCyHdTaH KeiH ПлNTaHbI KaI Ta KocblbI3. Akaylblk ЖоьlIMaca yekinettI Kbl3MeT KepeSy opTaIbIFbHa xa6aplnacbIbI3. | |
| ТураKTы сигнал дыбicsbI eCTnci3. | Злесчтпдь baiLanbIc duPyBc emec. ПлNTaHы сeLeKtrp zeniciHEN akbpaTbIbIbI. BiLIMrI sIeKtrp mamahbHa xa6aplnacbI, onbIH opHaTbIbIbH tekcepTHi3. | |
8.2 Erep uewim Ta6bImmaca...
AkaaynbiktbI e3iH3 Ty3eTe aImacaHbI3, dInapeH3re HeyekineTTi KbI3MeT Kepcety optaibfbiHa xa6apnacbiHbI3. 3aybitbIK TaKaTaNadaFbI DepeKTePdi 6epH3. PnIta Dypbc naiDanaHbINFaHbIH TeKcePiH3.Erep
ocbl wapTTap opbIHdaJmaca, cepBnCTIK TexHnKTIH HeMeCe DInepDIn KbI3MeTi KeinDiK MEP3imHe De aKbIbI Tpye opbIHdaJaDbI. KeniNik MEP3imi MeH yekilTeTI KbI3MeT Kepcety optaIbIKTapbl TypaIbI aKnapaT KeniNdk KITanWacbIHDa KepcTeINReH.
9. TEXHnKAnbIK DePEK
9.1 3aybITbIK TaKTaIsha
Ynrici EIV9467 PNC 949 596 708 00
Typi 61 E6A 04 AA 400 B 3N 50 - 60 T
Индукця 11.0 KBТЖасалгжepi:Германь
Cep.No. 11.0 kBt
ELECTROLUX

9.2ПисуаIMaKTapbIHbIH cHnTaTamaCbI
| Пису онлайн城乡居民 Куат (еон жогары КьИЗУ паяметри) [ВТ] | PowerBoost [ВТ] PowerBoost eн КЕР узakтбК [Мин] | ыдьICTын Диаметри [MM] |
| Сол жak онлайн 2300 3200 10 125 - 210 | ||
| Сол(apткы жak 2300 3200 10 125 - 210 | ||
| Ортынfy онлайн 2300 3200 10 125 - 210 | ||
| Ортынfy(apткы 2300 3200 10 125 - 210 | ||
| Он жak онлайн 2300 3200 10 125 - 210 | ||
| Он(apткы жak 2300 3200 10 125 - 210 |
Nicipy aImaKTapbI KyaTbIHbIH aykbIMbl keTeaderi depeKTepeH a3dan backaHa 6onybl MymkiH. OI bIDcTBH MaTePnaJIbHa XHe eJWeMdepiHe kapaeepin OTbIPAbl.
Kakcbi nicipy hTnkelepHe xety ywiH dnaMeTp i keTeDe KepceTiIReHHen YJKeH eMec bIdbICTbl KOJaHbIHbI3.
10. KYAT TINIMДIJIIGI
10.1 Θhim TypalbI aKnapaT\*
MoJeB nIeHTnΦnKaTOpbEIV9467
| ПлNTа typi Kipictipilren ПлNTa | ||
| Пису умakтарын саны 3 | ||
| КыздыруTekhoлогиясы | Инданя | |
| Пису умakтарын yзындыfы (Y) кэн eнi (E) | Con | Y 37,9 cm E 22,0 cm |
| Пису умakтарын yзындыfы (Y) кэн eнi (E) | Opta | Y 37,9 cm E 22,0 cm |
| Пису ща м弗ын узвдьчы (Y) кени (E) OH Y 37,9 сm | E 22,0 см |
| Пису ща м弗ы пайдалианатын куат мелшepi (EC electric cooking) | Сою 186,8 Вт / кг |
| Пису ща м弗ы пайдалианатын куат мелшepi (EC electric cooking) | Орета 186,8 Вт / кг |
| Пису ща м弗ы пайдалианатын куат мелшepi (EC electric cooking) | Он 186,8 Вт / кг |
| Пештой пайдалианатын куат мелшepi (EC electric hob) 186,8 Вт / кг | |
- Eyponaык Oдак ушin 66/2014
стандартынca сайкес. Беларсь ушin STB
2477-2017стандартынвИн A кocьIMшacын
сайкес. Урална ушin 742/2019
стандартынca сайкес.
EN 60350-2 -Icipetih TypMbictbIK əJeKtp Kypblfblnapbl -2-6oIm: NeWTeP - OHIMdiNikTi oJnwey aicTepi.
Nicipy aymafbl naDanaHaTbH Kyat MneIsepiH enWeMepi TnicTi nicipy aMaFbIHDaFbl 6enrinep apKbJbI KepcetinreH.
10.2 KyaattbI yHemdey
TemeHderi KeHeCTePdi opbIHdaCaHbI3, KyHdeJIikTI TaFam NicipreH Ke3e KyaATbI yHemDeyre 6oJaBl.
CytkKaKeTTiMeIWepeFaHa bICbITbIHbI3.
-
Erep Mymkin 601ca, bIDbicka epkaaH KaKnaK Xa6bIHbI3.
-
Picipy aIaHbIH icKe Kocy aIbIHda OFaH bIbIC KOIbIHbI3.
-
WafbH bIdbcTb wafbH niicyy anaHdapbHa KObIHb3.
-
bɪdɪcɪtapɪnɪnicpɪy aɪəhɪbɪhɪŋ Typə optacbiHa Kɔɪbɪhɪʒ3.
TafamdbjXbIbIyCTayHemeceXi6ity YsiH KaIdbIK Kb3yDbI naJaIahBbI3.
11. KOPSHAFAH OPTAFA KATbICTbl JAFDAIJIAP
Benri caIbIHfAH MaTePnAldapbl KaIta eHdeydeH eTKi3yre TaNCbIPbHb3. Opam MaTePnAldapbl H KaTAt eHdeydeH eTKi3y ywiH Tnicti KOHTeHepJIepre caIbHb3. 3JeKtpnIK xHe 3JeKTPoHnKaIbIK KypblIFblApDblH KaNdbIfblH KaTAt eHdeydeH eTKi3y apkblbl, KopwafH optFa XHe aAMHbIH DeHCayIbIFbHa 3NbIH KeNTipeTih
Kafdaanapfa konbepmeyre e3 yneciHiz
KocbHb3. Benri TaHfAH
KypblfBnapdbI TpyMbICTbIK KaJDbIKTapMeH
6ipre TactamaHb3. Ohimdi XepriniKi KaTata
EHdey optaBIFbHa etKisH3 Hemece
XepriniKi MeKemere xa6apnaCbHb3.
Ocbl eHIMHH eHdipinre H KyH cepnIbIK hemipde KepceTilreH, OHbIH HemipiHbipihsi caHbI eHdipinre HxbIDbIH COHfbI caHbHa, ekHsI XeHe ywiHsi caHdp anTaBH peTTik hemipiHe caiKec KeJeI. Mbcanbl, 14512345 cepnIbIK hempi eHim 2021 xbIDbIH KbIPbIK beciHsi antacBHa eHdipinreHin biDipei.
Önhöpyusi: Electrolux Appliances AB, St. Göransgatan 143, 105 45 Stockholm, USBeuja
ИМнорТayшы кэHe eHДIPушiH yəKiJIeTTi yIbIMbl: OOO «ЗлЕкТpoЛIOКс Рс», КokeBичeckn npoe3d 1, 115114, Mockey/MockBa, TeI.: 8-800-444-444-8
TepMaHnJaXacanFaH
MYSLIMY O TOBIE
How to install your Electronux Induction Hob - Worktop installation

4. OPIS URZADZENIA
- Dotknac prize 3 sekundy.
How to install your Electronux Induction Hob - Worktop installation

4. DESCRIEREA PRODUSULUI
1. CBEDEHNO TEXHnke B3ONACHOCTN
Ipeed yctaHOBkoI n 3KcPlyatauneI np6Opa BnMaTeJbHo O3HaKOMbTEcB C 3ToI INHCTpyKUneI. I3rOToBInTeJb He HecET OTBeTCTBEHHOCtB 3a KaKHe-JN60 TpaBMbl NIIyUepe6, BO3HNKUne BCJeDCTBVe HEnpaBnJIbHOJyCTaHOBKn IIN 3KcPlyatau. Bcerda xpaHnte 3Tu INHCTpyKUIO NOd pyKOJ B HaDeXHOM MeCTe DnI NocJeDuOJero NcNoJIb3OBaHnI.
1.1 Be3oNaChOcTb DeTei N JnC C OrpaHnueHHbIMN BO3MOxHOCTaMn
-Прибор He праздна3начен Дя Испьзованя Лиами (ВКлочая DeTeи) с NOнжehныIMN ФиЗчесKMN, CEHCOPHBIMN Или УмCTВеHHыIMN CNoOC6HocTЯМN Или РпОТСYТВИN Y HIX XIN3HeHHOTo OпыTA Или 3HaHи, ecПИ OНи He HaxODЯТСЯ ПОД рпсмOTpOM Или He ПрОИНСТPyктUpOBaHыОБ Испьзовани рпбора ЛицOM, OTBETCTBeHHbIM 3a ИХ 6e3OnaCHoCTb.
-Детиdoлжнынходntьсяпд прсмOTpOM ДЯ HeDOnyuшеняИгсспбopom.
XpaHnte BCE ynaKOBOHbI MaTePnAJIbI BHe DoCraEMOCTN DeteH n yTnIN3npyTe nx HndJeKaUm o6pa3OM.
BHIMAHHE! He noDnyckaIte DeTei n Domaunx KINBOTbIX K np6Opy BO BpeM erO nCNoJb3OBaHnA, a TAKKe IocNe IcNoJb3OBaHnA, KOrDa np6Op eUe He ycpeI OCTbITb. OTKpbITbIe 3JIeMeHTbl np6Opa cnJbHo HArpeBaHOTcR BO BpeM 3KcPnIyaTaCuN.
- Ecnn npnbop ochaueh yctpoiCTBOM 3aunTbI deTei, erocJeNyET BKJIIOUHTb.
OuNTka IdoCTyHoe NOIb3OBaTeJIIO TexHnueCKoe 6cnyKNaHne np6opa He DoJxHO pON3BOIDITbcr DeTbMn 6e3 npncMOtpa.
CyueCTbyeT pNCK NOBpeKdEHH np6opa.
He cTabbTe Ha naneJb ynpaBneHnraTopryuKyxOHHyIO nocdy.
He KlaInte Ha CTeKnHHyIO NOBepXHOCTb BapOuHoi NOBepXHOCTn TOpAue KpbIiIKN CKOBOPoI.
He no3BOJnTe XnKoCTn NOJIHOCTbIO BbIKnPaTb N3 NOCyDbI.
Cneinte 3a Tem, TTo6bHa np6op He naan npeMeTbI nn KxOHnA NOcyda. NobepxHOCT MOKeT 6bITb NOBpeXDeHa.
He BKJIIOUaIte KOHOpKn 6e3 KxOHHOI NOcyDbI INI C NyCTOJ KxOHHOINOCyDoI.
He KlaIaIte aJIHOMnHneByIO FOJIbry Ha npI6Op.
- Nocya, n3rOToBJIeHHa n3 yUryHa, aIOMnHn IIN C NOBpeKdEHHbIM dHOM, MOxet npIBeCTN K NOBLeHnIO capaHn Ha CTekJIaHHoI INI CTeKNOkepaMueeCKoI NOBepXHOCTN. Bcerda noDnHMaIte 3TN npEdMeTbI pR INX nepemeSeHn Ha BapOCHNoIaHeJN.
-Данньпиборпpeнha3haeyen NCKIQUHTeNbHOДЯпriroTOBHeHn Iu.Пибор He cneDyET nCNoJb3OBaTb Bdpyrnx ceIax,HaNPmep,ДЯ oborpReBa nomeueHn.
2.4 YxOДиЧИСТКa
-Bo n36exaHne noBpeXeHnI pOKpbITn npnbopa npOn3BOdnte erO peryJpHyo OunchkY.
-Перед Каддо OUCNTKOB BIKIIOUaYTe np60p n daBaTe emy octbItb.
He nCnoB3yIe dIa OUncTk np6opa noDaBaEmyIO IO DaBneHnEM BDOy IJI nap.
OuuaTe np6op MgKoBnAaXHO TpIko. IcnoJb3yIe ToIbKO HeITpaJIbHbIe MOIOUne cpeDCTBa. He IcNoJb3yIte a6pa3INBhIe cpeDCTBa, UapanaIOUne rY6Kn, pactBOpHTeIN IN MeTaIINuCeKne PpeDMtbl.
2.5 CepBnC
-Дя ремонта пибopa образнесь в abTOPIN3OBaHHbI Сервсы сеHTP. ИспльзуITE ТOLTКО opИгИнHAлБHьe 3anachье уactN.
- O JIaMnax BHyTpN npi6opa nJaMaTnx, npoDaBaembIX OTdEJIbHO B KaueCTBe 3aNaChbIX YacTeH: DaHHbIe JaMnbl paCCHTaHbI Ha pa6OBy B 6bITOBbIX npi6opax B NCKIIOHTeJIbHO CLOXHBIX TeMnepaTypbIX, BN6paCNOHHbIX IN BLaJXHOCTbIX YcIOBnIX ININ ppeHa3NaYeHbI DnI nepeDaun HOpMaUIn O pa6OyEM COCTOHN npi6opa. OHn He npeHa3NaYeHbI DnI NCNoJIb3OBAHnB V dpyHX npi6opax I He NOxOJrT DnI OCBeUeHn8 6bITOBbIX NOMeUeHn.
2.6 YtNiN3aCnA

BHIMAHHE!
CyuectByeT onaCHOCTb TpaBMBI nn ydywba.
HnKaTOp MoKeT TaKc BKnHouHTbCra:
ДЯ COCEДнIX KOHΦOPOK,ДАЖЕ ecn OHH He NCNoIb3yOTc;
KordaHaXoOnHyIO KOHΦopky NOMEuaIOT ropayuIO nocyu;
KordaBapouhna NaHeIb BbIKIIOyeHa,HO KOHOpKa eue ropa.
HnkaTop nce3aet noCne noHoro octbBaHH KOHOpKn.
5.6 Bridge
Chauana BkIIOUHTe BapOCHyIO nAHeNb, Ho He Bbl6npaTe yPOBeHb HarpeBa.
ДяВКЮЧЕнЯФункUNKCHNTecbИ ydepxNBAIte,NOKaцBet He n3MeHNTcra Ha KpacHbI.
JInHeNk ynpabNeHnna norachyT. BbIKNoUHTe BapOCHyIO nHaHb.

Iocne BbIKNoueHnBapOuHO nnHeJI DaHHa FyHKnI NOnpexHemy npoDoJXaET pa6oTaTb.
BbIKJIIOueHHe cyHKUIN TOJbKO Ha OdHH 1nKII nprirotOBJeHn: BKnIOuHTe
Bapouhyo naneIb npn NOMOu ①
3aropntcKochntecbnyyepxnbaiTe, noka CBET He N3MeHNTcHa 6enbl.
BbICBETcJINHeKn ynpabJeHn. B TeueHne 50 cekynd 3aJaTe ypoBeHb HarpBa.BapOuHO nAHeJIbHO MOxHO nOJIb3OBaTbcra. NocIe BbIKIOUeHn BapOuHO nAHeJI npn NOMoUN DaHHa FyHKnnaNo-mpexHemy npoDoNkaet pa6oTaTb.
NoctoHHoe BbIKJIOueHne
Функин:Вклочи Варочи NaHeь, Ho He BBiUpaite ypoBeHb HarpeBa. KoCHNTecb
IydepKnBaTe noka CBet He n3MeHITcRaHa 6ebl.BbICBETcra NHeiKnYnpaBHeH.N BbIKNoHTe BapOCHyIO naHeJIb.
5.12 PowerPoint
DaHnaФyHKnnaNo3BOnJeTperynipOBaTb TemnepaTypy,nepeMeuaKyxOHHyIO nocdy BdpYroe noLoXeHHe Ha INdKyUHOHON KOHOpKe.
Функця Делп INДуКцINOHHyO 30Hy пригOTOBленя Ha Tpr OобlaCTN C pa3lnuHbIMn ypoBнMn HarpeBa. BapouHaJ naHeIb onpeDeIeT NOLOXKeHne KxOHHo nocybli 3aDaeT ypoBeHb HarpeBa, COOTBETCTByUOUsI ee NOLOXKeHNo.

IcnoJb3yIte c daHNoi
fynKUneTOnbKO Ondy
kactpOJIIO.
Ecni Heo6xOdmo N3MeHnITb
yPOBeHb HArpeBa, POnHMnITE
Nocdy n NOMeCTnTe ee Ha
dpryIO KOΦOpKy. CkONbXeHne
Nocdybl MoKet npNBecTNI K
06pa3OBaHNIO TpeuIN I
N3MeHeHIO ZBETA NOBepXHOCTN.
- INДИКaTOP KOHΦopOK OTo6paxKaet oBe KOHΦopKN B pexKmE Bridge («ОБъEdINHeHne»),Даже ecnN cNoJIb3YeTcTOnbKO OdHa KOHΦopKa
PyuHoe n3MeHeHne yPOBnHa HArpeBa DOCTyInHO TOJIbKO B CInyae,ecIN XOTa 6bl OdHa KOHΦOpKa 6blNa BKInOueHa ABToMaTnueCKn. - UpoBHeH HaPeBa IJI KAKDOrO IIOJKeHn MOxHO 3aDaBaTb OTDeJIbHO. Ipn BbIKNoUeHn BapOuHoN NaHeJI N OHa 3aONMHaE T HAcTPOkN yPoBHeH HaPeBa H NCNoJIb3yEt IX npN CJIeDyUoUeM BKNoUeHn OyHKUIn.
- Ecnn Heo6xOIMo n3MeHnTb ypOBeHbHarpeBa, NOHMnTe Nocdy u NOMeCTnTe ee Ha npTyIO KOHOpKy. CkOJIbXKeHne Nocdy MoKET npNBecTI K o6pa3OBaHIO TpeuIN H N3MeHEnIO CBeta IOBepxHOCTN.
ДяВКIOUeHЯФYHKUNHaKmnteHa CnMBOIcMeHITcBETHaKpaCHbI,a IINHeiKa ynpaBJIeHNA OTo6pa3NT ypoBeHb HarpeBa,3aDaHHbI NO yMOJuaHIO.Bce KOHΦOpKn 6ydyT pa6oTaTb B TeueHne 9 MNHYT.
Yepe3 9 MmHyT 6yDet BbIaH 3ByKOBO CNrHaI, a NyCTbIe KOHΦOpKn BblKlIOuTaCra.
Дя BO36HOBJIeHЯ pa6OtBI ΦyHKcIN KOCHTecb Hocyu MOxHO nepeMeaTaB IIN CTaBNTB HBOE NOJXeHne.
IyMaHnO KOnTeBnHeNk ynpaBneHn I Bb6epnte noXoAun ypoBeHb.
-3MeHnTb yPOBeHb HArpeBa NO yMOJIyAHIO MOXHO TOJIbKO pRn BKJIIOUeHHOfYHKUIN.
- YpoBHeH HarpeBa NO yMOnuHaHIO dJa KaXdOro NIOJoxeHn MAxHO 3aDaBaTb OTDeIbHo. Pn BbIKNoUeHn BapOuHoi NaHEn OHa 3aONMaHaet HAcTpOiKn I NCNoJIb3yEt IX Pn CNeDyUoUeM BKIOUeHn FyHKcN.
IyBikHcyHnKCHNTecb CmBOJ 3arOpntc 6elbIM cBeTOM.
5.13 Hob²Hood
3Ta COBpeMeHHaФyHKcHnC
NcNoIb3OBAHHeM aBTOMaTnKn,
CBraBaIOUeB BapOCHyIO NaHeJIb CO
CneuaJIbHOB bITJxKoN. KaB apOHa
NaHeJIb, TaK N BbITJXKa IOdEepXnBAIoT
CoeINHeHHe Yepe3 IOpTbI INΦpApKpaCHO
CBa3N. CkOPOCTb BpaUeHNr BEHTnJIaTOpa
3aJaETcA BATOMaTHuYeCKn Ha OCHOBe BbIbopa
peKIMa n TeMnepaTypbI cMoI rOpYeH
NocyDbI Ha BapOCHoN pAnHeN. TaKKe
IMeETcB O3MOxHOCtB pyHOr peRyIpOBKn
BEHTnJIaTOpa pRn POMOUsn BapOCHoN
NaHeJI.

B 60JIbUHCTBe BbITJxek
CnCTeMa DnCTaHcNHOHOrO
ynpabIeHnNo yMOJIaHnIO
BbIKIouHeHa. Npeed
NCNOJIb3OBaHNEm cyHKcnn
BKnIOuHTe ee. BoIee nOpRo6Na
INΦOpMaun npNBedeHa B
pyKOBoDCTBe NOJIb3OBaTeJI
BbITJxKn.
ABTomatnueckpa6oTa yHKun
Длг abTomatnuecko pa60tbyfHKu nCneDyET yCTaHOBnTB abTomatnuecknpexM, bbl6pab n3 cnNcKa ot H1 do H6. NoyMOJUHnHO Ha BapOuHoi naHeJIbBl6npaetcra pexm H5. Ppi KaJdOMNCnoJIb3OBaHnB apOuHoi naHeJIb BblTjXkapearnpuyet ha ee pa60Ty. BapOuHa naHeIb
perynpyet ckopocb BpaueHnBentnTopa,ABTOMaTneckn ONpeJeJrTemnpaTyPy KxOHNoNocybl.
BkIIOUeHHe IOCDBeTKn
IMeTcB 03MOxHOCTb HAcTpOuTb aBTOMaTnueCKOE BKNIOUeHne IODCBETKn Pn KaXdOM BKIOUeHm BApOuHOI NaHeJI.ДЯ 3TOrO 3aJaTe aBTOMaTnueCKn peXIM, BbI6paB n3 cnpca oT H1do H6.

Yepe3 2 MmHytbl nocne BbIKIIOUeHn BapOuHOI naHeJI NODCBETKa Ha BbITaXKe BBKlIOUaETc.
ABTOMaTnuecknepeXmbl
PyuHOB BbIbOp cKOpocTn BeHTnJIaTopa
Takke HMeeTCB 03MOxHocTb pyHOn perynopBKn BeHTnIaTopa npn NOMOuB BapouHoi NOBepXHOCTN.
KochnTeCb, KOrda BapOuHa nOBepXHOCTb BKIOUeHa.
TO DeICTBNE BbIKIOaET ABTomTuYeCKyO pa60Ty yHKUIN N IO3BOJAreT MeHrtb CKOPoCTb BEHTNJrTopa BpyHyIO.
Ipn Haxkntn Ha CKOpocb BeHTnIaTopa
yBeHnUBaetcHa OAnH yPOBHe. Ipn
IOCTNKeHH MaKcImMaJIbHOrO yPOBnA
CJeDyIOoee HaxkTne Ha HepeBOdNT
CKOpocb BeHTnIaTopa BbITJxKn Ha yPOBHe.
<0>,YTO npuBoIDt K erO octaHOBke.ДЯ
NoBTOpHOrO 3aNycka BeHTnIaTopa Ha
CKOpocn «1» KOCHInTeCb

ДяВКЛIOUeHЯ
aBTOMaTNUeCKOropeXIMa
BbIKJIIOuHTeBapOCHyIO
NOBePxHOCTbIcHOBaee
BKNIOUHTe.
5.14 OffSound Control (BkIIOUeHne I OTKIOUeHne 3ByKOBoi CnHaJI3aun)
Chauana BbIKHouHTe BapOHyIO naHeJIb.
1.ДЯВКЛIOUeHnФyHKuN KOCHTecbNydepXnBaIteB TeueHne 3ceKHyd.
2.ПИКОСНЕСБΚ TEUEHNE 3-x CEkyHД.
BbICBETNTCA Bn.
3.HaXmTe Ha TaMepa, yTo6bl npOn3BecTn CneDyUcN BbIbOp:
-3BykoBa CnHaHn3aUBAIKJIOyeHa
60-3BykoBaa CnHaHn3aun BkIIOyeha
4.ДЯ NOДТВЕРЖDEHЯ BbIbopa NOOJNTe, NOKa BapOuHaЯ NaHeJIb He BBIKJIIOUHTcA ABTOMaTnueCKN.
Pn pa6ote yHKuH BByKn CbIHbI TOJIbKO ecN:
BbIKOCHyINCb ①
- Taïmep BeDET octahtbI OTCHT
- TaMep obpaTHoro OTCyeta BeDet o6paTHbI OTChET
Ha nAHeN ynpaBneHn Oka3aIcna NOCTOPoHHn PpeDMeT.
5.15 Cnctema ynpabJeHna MOUHOCTbIO
Ecn npn BKNIOueHn HeCKoIbKx KOHcOpOK
NOTpe6nemar MOuHOCTb PpeBbIuaeT
OrpaHnueHne 3NeKTPoNtAHHa, 3Ta cyHKU
DeJNT DOCTynHyIO MOuHOCTb MExdy BCEMN
KOHcOpkAmn. BapouhnaHeB
KoHTpOIpuyET CTyneHb HArpeBa dIra 3aunTBi
PnabKnx pedeoxpaHnteNe, yCTaHOBNEHHbIX
Ha DomaHem 3NeKTPOUHTe.
KoHΦopKn OBeeINHJOTcB rpynnbI cOrIaCHO MeCTOnOJIoxKeHNIO HOMepy 3TaNoB BApOuHoi NaHeJIi. MakcImaNbHa JIeKTPnuecka Harpy3ka Ha KaXdyUo fAsy coCTabNaeT 3680 Bt. EcIn BapOuHra NaHeJIb DoCTnraet MakcImaNbHO JOCTynHO MoUHOCTNu B OdHoJ φa3e, MOUHOCTb KOHΦopOK aBTOMaTHueCKN UMeHBuaETcR.
-Дя KOHФОРК,MOUHOCTb KOTOpbIX yMeHbWeHa,naHeJIb ynpaBNeHnO TO6paXaET TOnbKO MaKcMmaIbHo DOCTyNhbIe IЯ HIX UPOBHN HarpeBa.
- Ecni ypoBeHb HArpeBa HeIOCTyPeH, ChaJaI NaONH3bTe HArpeB dpyrnx KOHΦopok.
BkIIOueHne cyHKcun 3aBncnt ot KOJIueCTBa n pa3MePoB nocybl. Bo3MOxHbIe coUeTaHHra pacppeJeHn moHOCHTN KOHOpOK cM. Ha pncyHke.
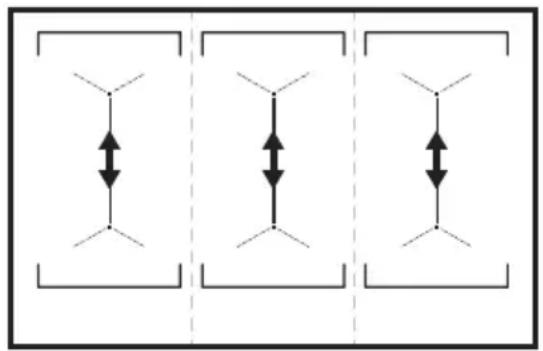
6. NOJE3HbIE COBETbl

BHIMAHNE!
Cm. rnaBbl, codepxauine CBeDeHnno TcXnKe 6e3oNaChOCTn.
6.1 Nocyda

B INHyKUHOHHbIX KOHΦopkax
NcNoJb3YeTcR
3JIeKTpOMarHHTHoe NOpE,
KOTOpoe OueHb6bICTpo
HaIpeBaet Nocdy.
IcnoJb3yIte HndyKuOHHbIe KOHΦOpKn C NOxOJaUe KxOHHO NocyDoI.
- HNO NocydbI DOJXHO 6bITb KaK MOxHO 6OJIee TOJCTbIM IIOCKIM.
- Ppexde yem cTaBnTb nocydy Ha BapouHyIO NOBepxHocTb, yBeiNTecb B TOM, YTO dHO nocydbl cyxoE uNCTOE.
Bo n36exaHne nOBLeHnApaHnH He DnIaTe HHe TpTe NocyDoi CTeKIOKePaMnueckyU NOBepxHOCTb.
MaTePnAn nocybl
- npaBnIbHo: yUryH, CTaIb, 3MaIInpoBaHHa CTAIb, HepKaeIOuzae CTaIb, Nocyda C MHorocNoIHbIM DHom (C NaJIeXaIeM MapKnipOBKO IpnO3BOdnteJI).
- HenpaBnIbHo: aIIOMHn, MeDb, NaTyHb, cTeKNo, KepaMnKa, φapφop.
Iocya noxodnt Ira nCnoJb3OBaHna HnDyKUHOHHbIX BapOuHbIX naHeJx, ecnn:
·BOda ouehb 6bIcTpo 3aKnnaeT Ha KOHΦopKe,Ha KOTopoN 3aJaHa MaKcImaJIbHaA CTyneHb HarpeBa;
MaHHT npTnBaeTcK dHy nocybl.
Pa3Mepbl nocydbI
8.1 YTo DeIaTb, ecn...
9. TEXHnueCKne DAHHbIE
9.1 Ta6nueKa c TexHnuecknIMn DaHHbIMN
MoIeJIb EIV9467 IpoDyKToBbH OHomep (PNC) 949 596 708 00
Tn61E6A04AA400B3N50-60
Hdukua 11.0 kBT I3roTOBneHO: TepMaHnIa
CepnHbN 11.0 kB
ELECTROLUX

9.2 Cpeunkaun KOHOpok
I3roTOBneHO B TepMaHnN
NAVRHNUTÉ PRE VÁS
Dakujeme, ze ste si zakupili spotrebić Electrolux. Vybrali ste si vyrobok, ktory vznikol na základe desatroči odbornych skúsenosti a inovácii. Dōmyselný a stylový – navrhnutý s dōrazom na vás komfort. Pri každom použiti si možete byt' istí, ze uvidite skvěly vykon. Vitajte vo svete Electrolux.
How to install your Electrolux Induction Hob - Worktop installation

4. POPIS VYROBKU
How to install your Electronux Induction Hob - Worktop installation

4. DESCRIPCION DEL PRODUCTO
How to install your Electronlux Induction Hob - Worktop installation

4. ÜRÜN TANIMİ
ELECTROLUX APPLIANCES AB
BUSINESS SECTOR EMA-EMEA (SEE)
ST GÖRANSGATAN 143
SE-105 45 STOCKHOLM
SWEDEN
TEL: +46 (8) 738 60 00
FAX: +46 (8) 738 63 35
www.electrolux.com
Ithalatci:Electrolux Dayanikli Tuketim Mamulleri San. ve Tic.AS.
TR-34435 Taksim-Beyoglu-Istanbul
Müsteri Hizmetleri: 0 850 250 35 89
musteri_hizmetleri@electrolux.com
WEB: www.electrolux.com.tr