
RMB76111NX - Fridge AEG - Free user manual and instructions
Find the device manual for free RMB76111NX AEG in PDF.
| Brand | AEG |
| Model | RMB76111NX |
| Product type | Combined fridge-freezer |
| Climate classes | SN, N, ST, T (from +10°C to +43°C) |
| Power supply | 220-240 V, 50 Hz |
| Special functions | Fast freezing, Fast cooling, Magic Cool zone, Xpress Can Chiller |
| Dispenser | Water and ice cubes (depending on model) |
| Interior lighting | LED |
| Safety | Key lock, Door open alarm |
| Maintenance | Regular cleaning of seals and rear |
| Defrosting | Automatic |
| Included accessories | Water filter, Ice cube tray, Egg tray |
| Materials | Stainless steel |
| Repairability | Spare parts available: filter, bulb |
| Installation | Leave a 10 cm space at the back |
| Ambient temperature | From +10°C to +43°C depending on class |
Frequently Asked Questions - RMB76111NX AEG
User questions about RMB76111NX AEG
0 question about this device. Answer the ones you know or ask your own.
Ask a new question about this device
Download the instructions for your Fridge in PDF format for free! Find your manual RMB76111NX - AEG and take your electronic device back in hand. On this page are published all the documents necessary for the use of your device. RMB76111NX by AEG.
USER MANUAL RMB76111NX AEG
Chladnica, Side by Side
Side by Side koelkast
EN User manual
Side by Side Refrigerator
ET Kasutsjuhend
Kahe poolega kulmutuskapp
Psiyεio Side by Side
Frigorifero Side by Side
LV Lietosanas instrukcija
"Side by Side" ledusskapis
Frigiderul Side by Side

OBSAH
BEZPECNOSTNI INFORMACE. 3
BEZPECNOSTNI POKNY 4
POPIS SOTREBICE 6
OVLADACI PANEL. 8
PRED PRVNIMPOUZITIM 10
DENNIPOUZIVANI 11
FUNKCE. 13
UZITECNÉ RADY A TIPY 14
CISTENIA UDRZBA 15
CO DELAT, KDYZ 18
POZNÁMKY K OCHRANE ZIVOTNIHO PROSTRED 19
PRO DOKONALÉ VÍSLEDKY
MODEL BEZ DÁVKOVÁČ Freezer Compartment

4. Police mraznicky a chladnicky
Otevretecela dvee a police vymete tazenim dopredu.

5. Prihradka na zeleninu a ovoce
BESCHRIJVING VAN HET PRODUCT 24
BEDIENINGSPANEEL 26
Gaaaronnezeweightsoor:

BESCHRIJVING VAN HET PRODUCT
SAFETY INSTRUCTIONS 40
PRODUCT DESCRIPTION 42
CONTROL PANEL 44
BEFORE FIRST USE. 46
DAILY USE 47
OPTIONS. 49
HELPFUL HINTS AND TIPS 50
CARE AND CLEANING 51
WHAT TO DO IF 53
ENVIRONMENTAL CONCERNS 55
FOR PERFECT RESULTS
Thank you for choosing this AEG product. We have created it to give you impeccable performance for many years, with innovative technologies that help make life simpler features you might not find on ordinary appliances. Please spend a few minutes reading to get the very best from it.
Visit our website to:

Get usage advice, brochures, trouble shooter, service information: www.aeg.com

Register your product for better service: www.registeraeg.com

Buy Accessories, Consumables and Original spare parts for your appliance: www.aeg.com/shop
CUSTOMER CARE AND SERVICE
Always use original spare parts.
When contacting our Authorised Service Centre, ensure that you have the following data available: Model, PNC, Serial Number.
The information can be found on the rating plate.

Warning / Caution-Safety information.

General information and tips

Environmental information.
Subject to change without notice.

SAFETY INFORMATION
Before the installation and use of the appliance, carefully read the supplied instructions. The manufacturer is not responsible if an incorrect installation and use causes injuries and damages. Always keep the instructions with the appliance for future reference.
Children and vulnerable people safety
- This appliance can be used by children aged from 8 years and above and persons with reduced physical, sensory or mental capabilities or lack of experience and knowledge if they have been given supervision or instruction concerning use of the appliance in a safe way and understand the hazards involved.
- Do not let children play with the appliance.
- Keep all packaging away from children.
- Cleaning and user maintenance shall not be made by children without supervision.
General Safety
-
This appliance is intended to be used in household and similar applications such as:
-
Farm houses; staff kitchen areas in shops, offices and other working environments
-
By clients in hotels, motels, bed and breakfast and other residential type environments
-
Keep ventilation openings, in the appliance enclosure or in the built-in structure, clear of obstruction.
- Do not use mechanical devices or other means to accelerate the defrosting process, other than those recommended by the manufacturer.
- Do not damage the refrigerant circuit.
- Do not use electrical appliances inside the food storage compartments of the appliance, unless they are of the type recommended by the manufacturer.
- Do not use water spray and steam to clean the appliance.
- Clean the appliance with a moist soft cloth. Only use neutral detergents. Do not use abrasive products, abrasive cleaning pads, solvents or metal objects.
-
Do not store explosive substances such as aerosol cans with a flammable propellant in this appliance.
-
If the supply cord is damaged, it must be replaced by the manufacturer, its service agent or similarly qualified persons in order to avoid a hazard.
- If the appliance is equipped with an ice maker or a water dispenser, fill them with potable water only.
- If the appliance requires a water connection, connect it to potable water supply only.
- The inlet water pressure (minimum and maximum) must be between 1 bar (0,1 MPa) and 10 bar (1 MPa)
SAFETY INSTRUCTIONS
Installation

WARNING!
Only a qualified person must install this appliance.
- Remove all the packaging.
- Do not install or use a damaged appliance.
- Obey the installation instruction supplied with the appliance.
Always be careful when you move the appliance because it is heavy. Always wear safety gloves. - Make sure the air can circulate around the appliance.
- Wait at least 4 hours before connecting the appliance to the power supply. This is to allow the oil to flow back in the compressor.
- Do not install the appliance close to radiators or cookers, oven or hobs.
- The rear of the appliance must stand against the wall.
- Do not install the appliance where there is direct sunlight.
- Do not install this appliance in areas that are too humid or too colds, such as the construction appendices, garages or wine cellars.
- When you move the appliance, lift it by the front edge to avoid scratching the floor.
Electrical connection

WARNING!
Risk of fire and electrical shock.
- The appliance must be earthed.
- All electrical connections should be made by a qualified electrician.
- Make sure that the electrical information on the rating plate agrees with the power supply. If not, contact an electrician.
Always use a correctly installed shockproof socket. - Do not use multi-plug adapters and extension cables.
- Make sure not to cause damage to the electrical components (e.g. mains plug, mains cable, compressor). Contact the Service or an electrician to change the electrical components.
- The mains cable must stay below the level of the mains plug.
- Connect the mains plug to the mains socket only at the end of the installation. Make sure that there is access to the mains plug after the installation.
- Do not pull the mains cable to disconnect the appliance. Always pull the mains plug.
Use

WARNING!
Risk of injury, burns, electrical shock or fire.
- Do not change the specification of this appliance.
- Do not put electrical appliances (e.g. ice cream makers) in the appliance unless they are stated applicable by the manufacturer.
- Be careful not to cause damage to the refrigerant circuit. It contains isobutane (R600a), a natural gas with a high level of environmental compatibility. This gas is flammable.
- If damage occurs to the refrigerant circuit, make sure that there are no flames and sources of ignition in the room. Ventilate the room.
- Do not let hot items to touch the plastic parts of the appliance.
- Do not put soft drinks in the freezer compartment. This will create pressure on the drink container.
- Do not store flammable gas and liquid in the appliance.
- Do not put flammable products or items that are wet with flammable products in, near or on the appliance.
- Do not touch the compressor or the condenser. They are hot.
- Do not remove or touch items from the freezer compartment if your hands are wet or damp.
- Do not freeze again food that has been thawed.
- Obey the storage instructions on the packaging of frozen food.
Internal light
The type of lamp used for this appliance is not suitable for household room illumination.
Care and cleaning

WARNING!
Risk of injury or damage to the appliance.
- Before maintenance, deactivate the appliance and disconnect the mains plug from the mains socket.
- This appliance contains hydrocarbons in the cooling unit. Only a qualified person must do the maintenance and the recharging of the unit.
- Regularly examine the drain of the appliance and if necessary, clean it. If the drain is blocked, defrosted water collects in the bottom of the appliance.
Disposal

WARNING!
Risk of injury or suffocation.
- Disconnect the appliance from the mains supply.
- Cut off the mains cable and discard it.
- Remove the door to prevent children and pets to be closed inside of the appliance.
- The refrigerant circuit and the insulation materials of this appliance are ozone-friendly.
- The insulation foam contains flammable gas. Contact your municipal authority for information on how to discard the appliance correctly.
- Do not cause damage to the part of the cooling unit that is near the heat exchanger.
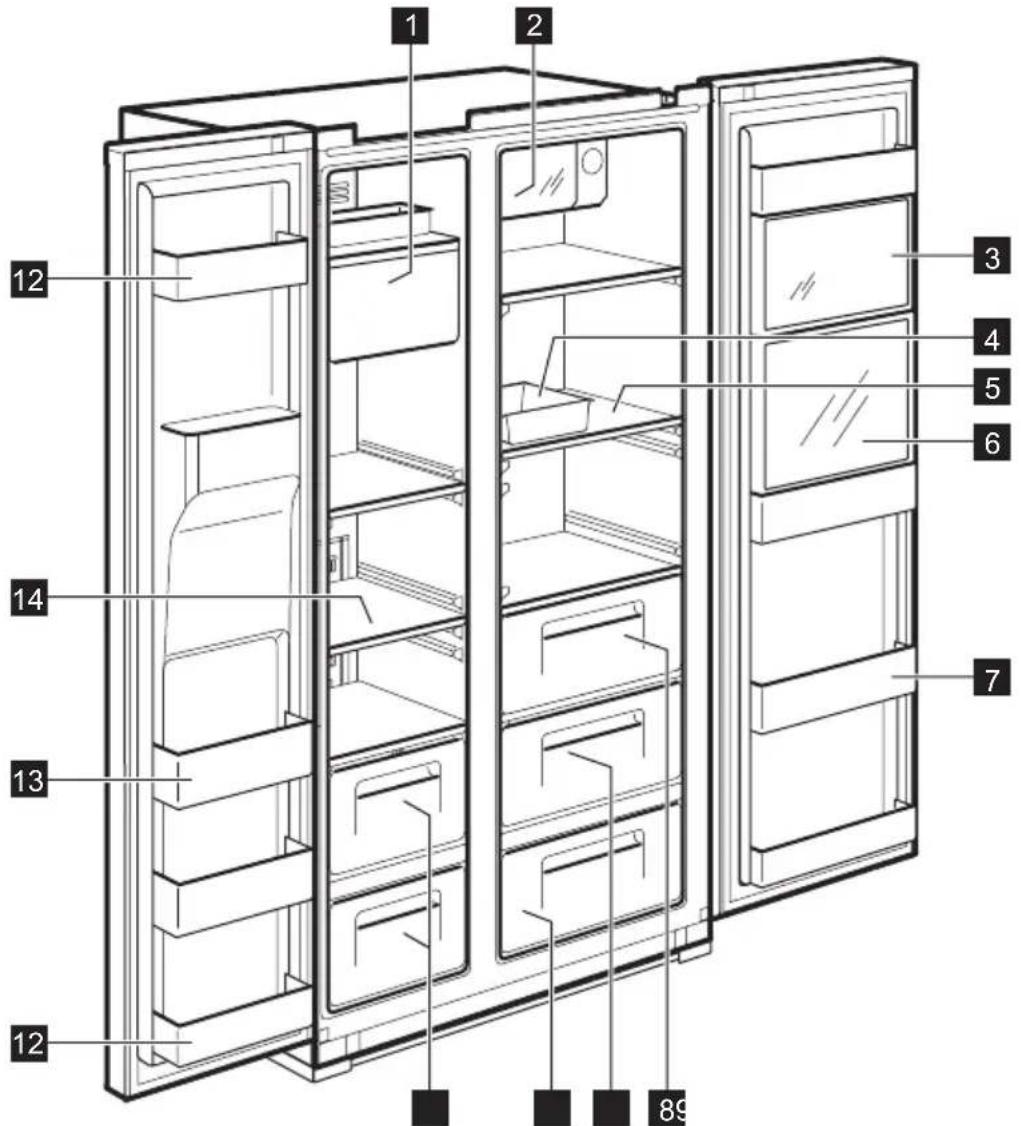
PRODUCT DESCRIPTION

DISPENSER MODEL
1 Ice Maker and Storage
2 Xpress Can Chiller (quick cooling compartment) For storing beverages.
3 Multi Plus Zone
For storing general medicines or cosmetic products. Safekeeping is not guaranteed for products such as academic sampling or medicine which require a specific temperature range.
4 Egg Case
Do not use this case for storing ice cubes nor place it in the freezer compartment.
5 Refrigerator Shelf (tempered glass) For storing common foods.
6 Refreshment Compartment (selected models only)
For frequently used cans, drinking water and beverages.
7 Refreshment Pocket
For storing refrigerating foods, milk, juice, beer bottles etc.
8 Vegetable Case
9 Fruit Case
10 Magic Cool Zone (selected models only)
1 Freezer Case For storing dried meat or fish for a longer period of time.
12 Door Storage Compartment (2-star compartment) For short-term storage of food and icecream.
13 Door Storage Compartment For storing frozen food.
14 Freezer Shelf (tempered glass) For storing frozen foods such as meat, fish, ice-cream.
NON DISPENSER MODEL

1 Ice Cube Tray
2 Xpress Can Chiller (quick cooling compartment) For storing beverages.
3 Multi Plus Zone
For storing general medicines or cosmetic products. Safekeeping is not guaranteed for products such as academic sampling or medicine which require a specific temperature range.
4 Egg Case
Do not use this case for storing ice cubes nor place it in the freezer compartment.
5 Refrigerator Shelf (tempered glass) For storing common foods.
6 Refreshment Pocket
For storing refrigerating foods, milk, juice, beer bottles etc.
7 Vegetable Case
8 Fruit Case
9 Freezer Case
For storing dried meat or fish for a longer period of time.
10 Door Storage Compartment (2-star compartment) 122 For short-term storage of food and icecream.
Door Storage Compartment For storing frozen food.
12 Freezer Shelf (tempered glass) For storing frozen foods such as meat, fish, ice-cream.
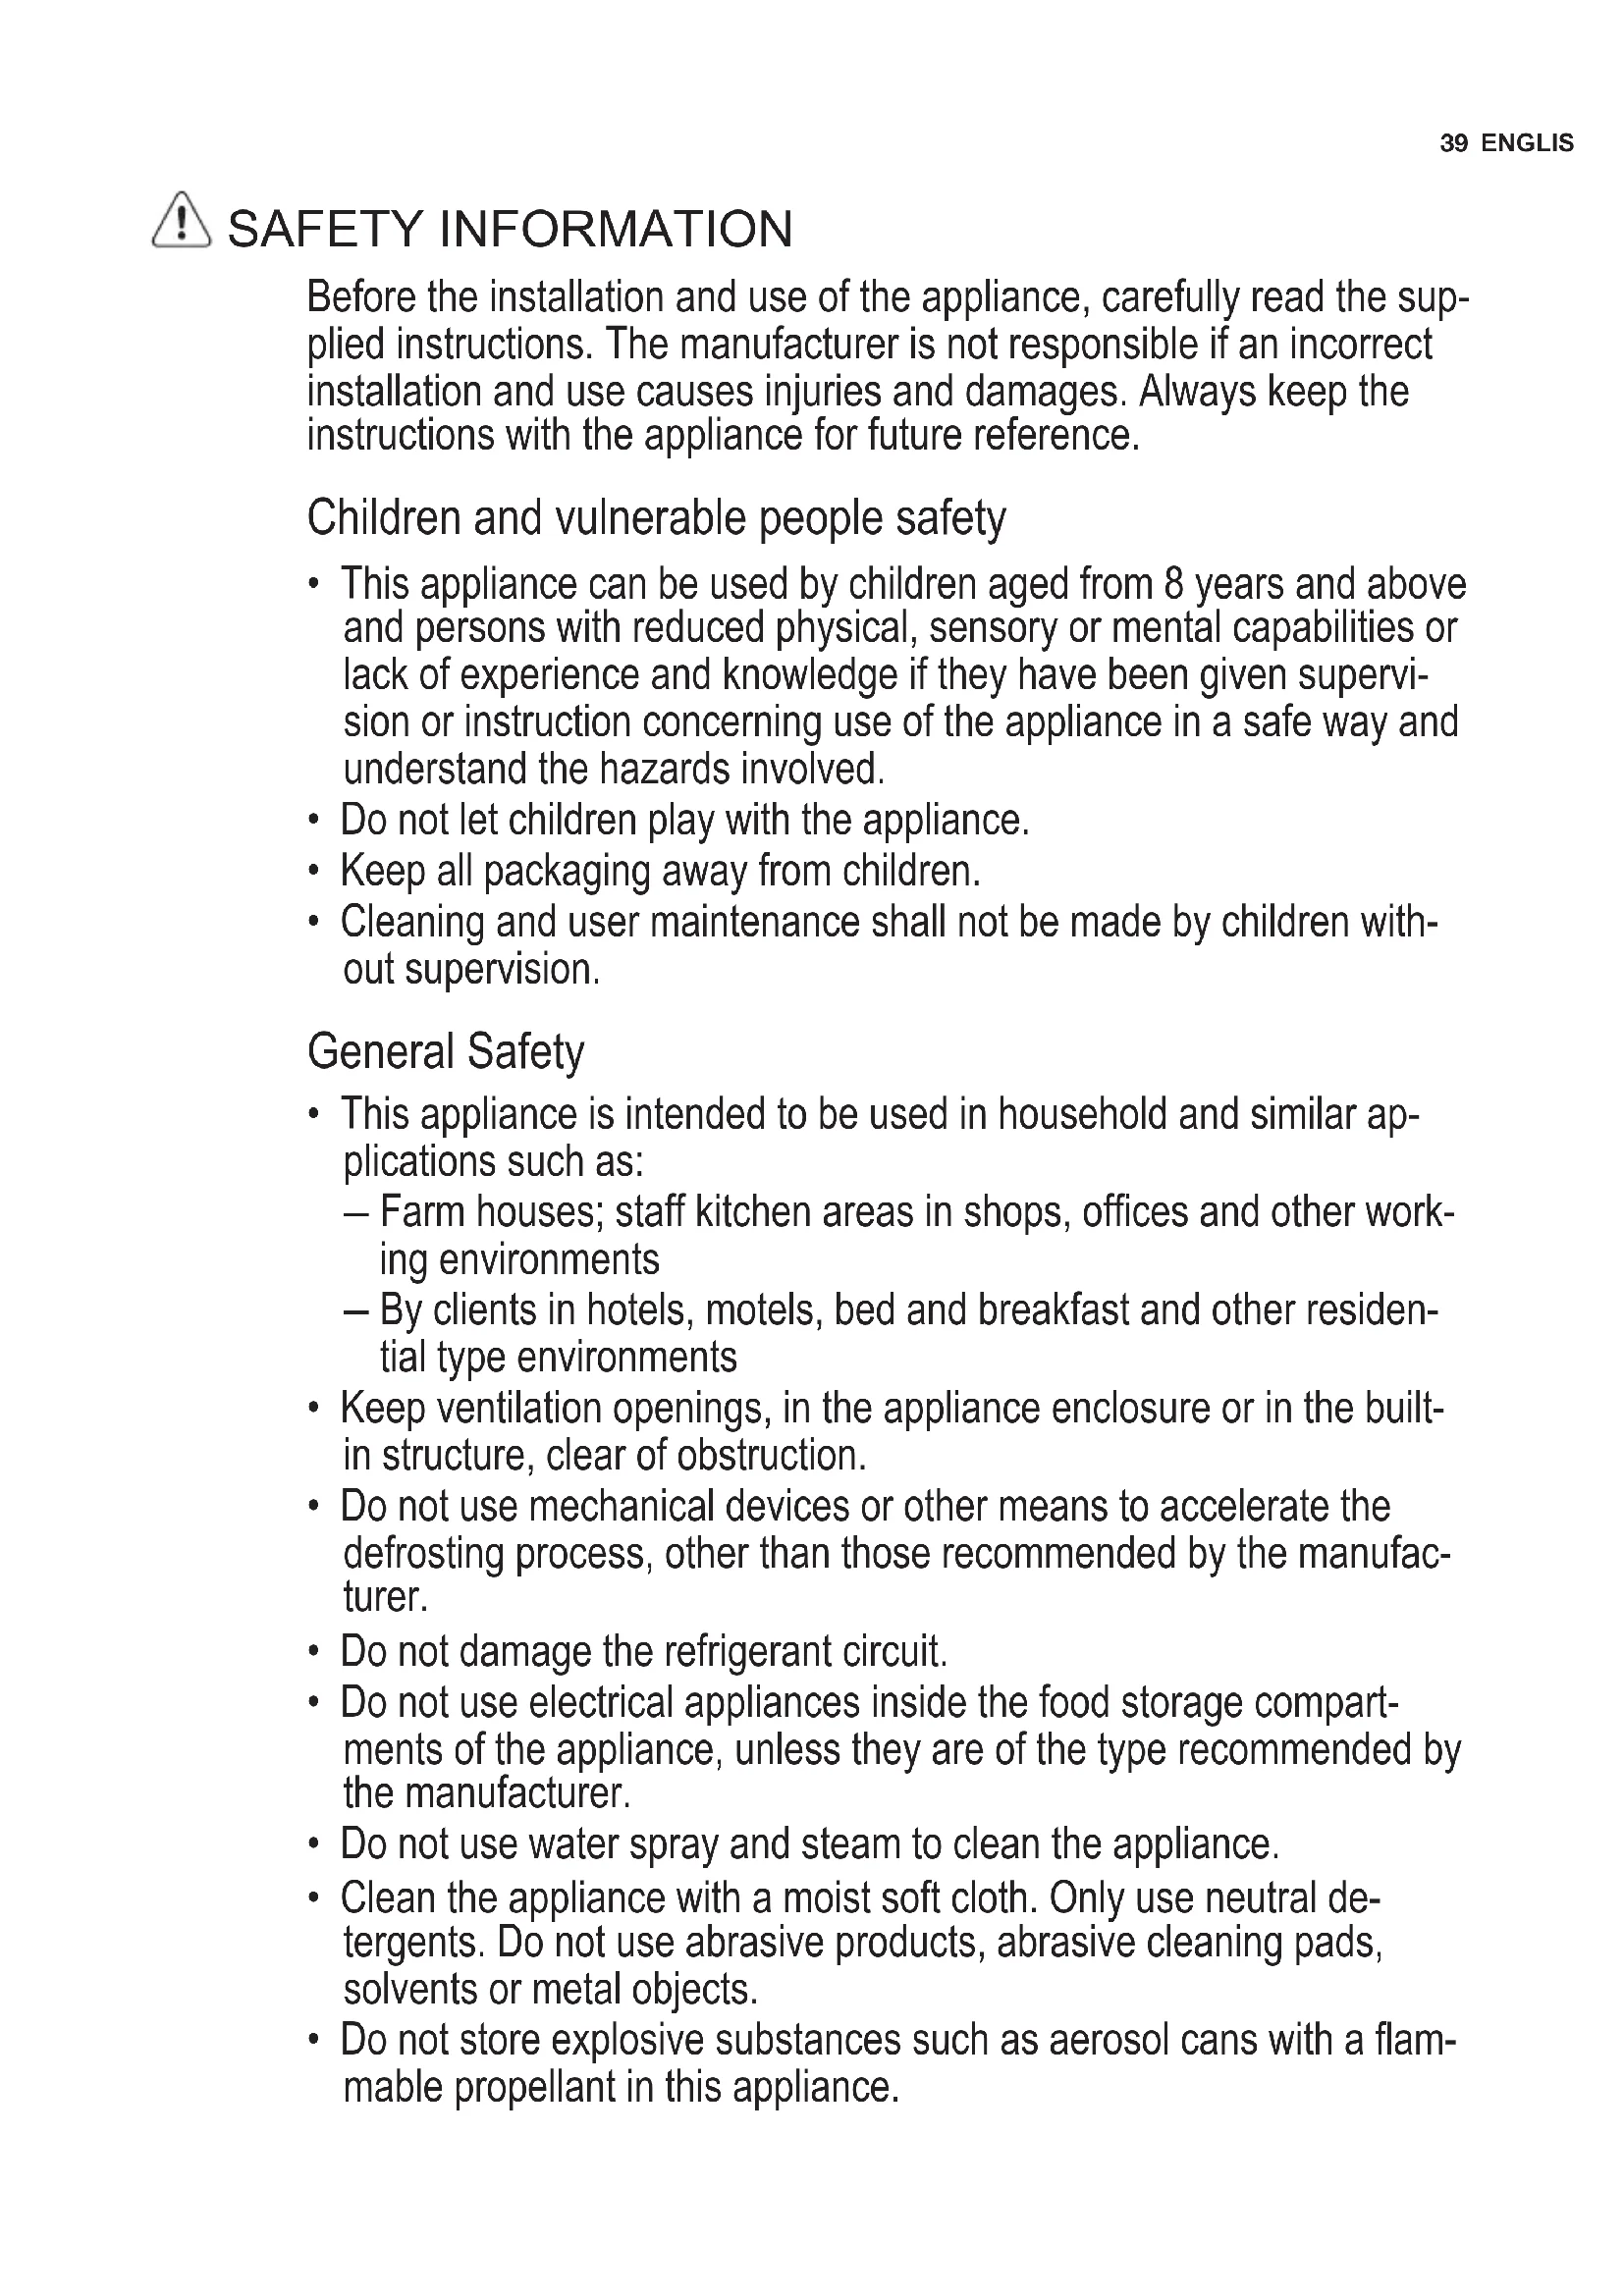
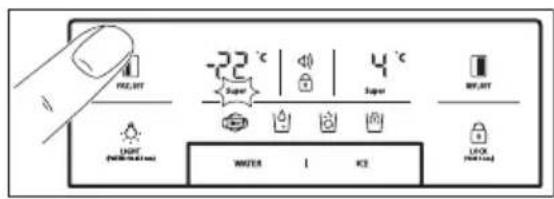
CONTROL PANEL
dispensersER MODEL


FRZ_SET
Selection button for freezer compartment temperature.

REF. SET
Selection button for refrigerator compartment temperature.

LOCK
00134
Press this button to prevent settings from being accidentally changed. To release the button, press it for longer than 3 seconds. The display switches off.
4 Selection button for Ice Dispensing and Lock for Ice Maker
Selection button for Water Dispensing

LIGHT/FILTER button:
- Button for switching on a dispenser light.
- Button for filter exchange or reset. After exchanging filter or in order to reset, press this button for 3 seconds.
| Indicators (A-H) | Description |
| A. Super | Freezer temperature indicator |
| B. | Alarm display (no sound) Customers can be informed of tem- perature status when it normally rises due to accidents (e.g. blackouts) 1. Alarm icon blinks displaying the highest inner temperature 2. Alarm stops when button is pressed and display shows tem- perature control value |
| C. | Lock indicator |
| Indicators (A-H) Description | |
| D. Super | Refrigerator temperature indicator |
| E. | Lock for Ice Maker indicator |
| F. | Ice Dispensing indicator |
| G. | Water Dispensing indicator |
| H. | Filter Exchange display After 6 months of the first power input, the icon will flicker. |

NON DISPENSER MODEL
FRZ. SET
Selection button for freezer compartment temperature
2 REF. SET
Selection button for refrigerator compartment temperature
3 LOCK (Hold 3 Sec.)
Lock button Press this button to prevent settings from being accidentally changed. To release the button, press it for longer than 3 seconds. For further technical information please refer to the rating plate on the internal leftside of the
| Indicators (A-E) Description | |
| A. -88 °C | Freezer temperature indicator |
| B. * | “Super”indicator for freezer |
| C. ☑ | Lock indicator |
| D. * | “Super”indicator for refrigerator |
| E. -88 °C | Refrigerator temperature indicator |
BEFORE FIRST USE
INSTALLING WATER LINE
1. For models with Automatic Ice Maker
-
The water pressure should be 2.0 12.5kgf/cm^2 or more to run the Automatic Ice Maker.
-
Check your tap water pressure. If a cup of 180 cc is full within 10 seconds, the pressure is appropriate.
-
If the water pressure is not high enough to run the Automatic Ice Maker, call the local plumber to get an additional water pressure pump.
-
When installing the water tubes, ensure they are not close to any hot surfaces.
- The water filter only "filters" water. It does not eliminate any bacteria or microbes.
- The filter life depends on the amount of use. We recommend you replace the filter at least once every 6 months. When attaching the filter, place it for an easy access (to remove and replace).

Note: After 6 months of first power input, icon is flickering. To eliminate the icon flickering, press the light button for 3 seconds after exchanging the water filter.
- After installing refrigerator and water line system, select WATER on your control panel and press it for 2-3 minutes to supply water into the water tank and dispense water.
DAILYUSE
TEMPERATURE CONTROL
When the appliance is plugged in for a first time, the temperature mode is set to Middle.
DISPENSER MODEL
Freezer Compartment
For temperature setting push button, until desired value displays. For Faster Freezing function hold FZ SET button until super LED turns on. To stop this function, just push the button again.
Refrigerator Compartment

For temperature setting push button, until desired value displays. For Faster Cooling function hold REF SET button until super LED turns on. To stop this function, just push the button again.

Temperature indicator convert function (Fahrenheit-Celsius) Default setting is Celsius. Press lock button to enter locked mode. Under the locked mode, press and WATER button at the same time for 10 seconds to swap temperature scale.
NON DISPENSER MODEL
Freezer Compartment

For temperature setting push
FRZ. SET button until desired temperature displays.
For Faster Freezing function hold
FRZ. SET button until super LED turns on. To stop this function, just push the button again.
Refrigerator Compartment

For temperature setting push
REF. SET button until desired temperature displays.
For Faster Cooling function hold
REF. SET button until super LED
turns on. To stop this function, just push the button again.

CAUTION!
Food in refrigerator can be frozen if the ambient temperature of the refrigerator is below 5^ .
HIGH TEMPERATURE MODE
DISPENSER MODEL
An increase in temperature in freezer or refrigerator compartment is indicated by:
- flashing the alarm icon (buzzer does not sound)
- electronic system shows the maximum temperature reached inside the compartments

Even though normal operation of the appliance is restored and inner temperature reaches a normal range, alarm icon still blinks and display indicator shows the highest temperature reached.

When you press Lock button alarm mode is terminated and alarm icon goes off. The display shows adjusted temperature value.
NON DISPENSER MODEL
An increase in temperature in freezer or refrigerator compartment is indicated by:
- flashing of a display of freezer or / and refrigerator compartment
- electronic system shows the maximum temperature reached inside the compartments

Even though normal operation of the appliance is restored and inner temperature reaches a normal range, the display still flashes and the highest temperature reached is indicated.

When you press Lock button LOCK, high temperature mode (Hold 3 Sec.)
is terminated and the display shows adjusted temperature value.
"OFF" FUNCTIONS
- Interior lights of the appliance turn off when the door is open for more than 10 minutes
-
Display Off function: - 5 minutes after no button is pressed or no doors are open, all the display LED lamps switch off except for WATER, ICE and icon
-
After the LED off mode, the appliance returns to a normal display mode when you press any button or open the door.
-
System Off function (Power Off function):
you can stop operating the appliance without unplugging it, especially during holiday
-
pressing FRZ. SET and REF. SET button at the same time for 5 seconds result in switching off the appliance
-
during the "OFF" mode freezer and refrigerator temperature displays
- Other LED lights go off and the whole operation of your appliance stops.
on the contrary, hold button
FRZ. SET and REF. SET
together for 5 seconds to clear the "OFF" function
DOOR OPEN ALARM
An acoustic alarm will sound if refrigerator or freezer door is left open for 1 minute. The alarm will stop after 5 minutes. When normal conditions are restored (door is closed), the alarm stops.
OPTIONS
MAGIC COOL ZONE

When you plug the appliance for a first time FRESH LED is ON.
For changing settings step by step use SELECT button.
| Step Display Target Temperature |
| 1. FRESH +5°C to +6°C. |
| 2. VEGETABLE +3°C to +4°C. |
| 3. FISH -1°C to +0°C. |
| 4. MEAT -3°C to -2°C. |
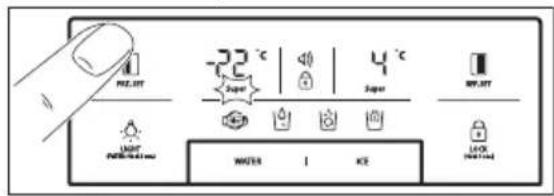
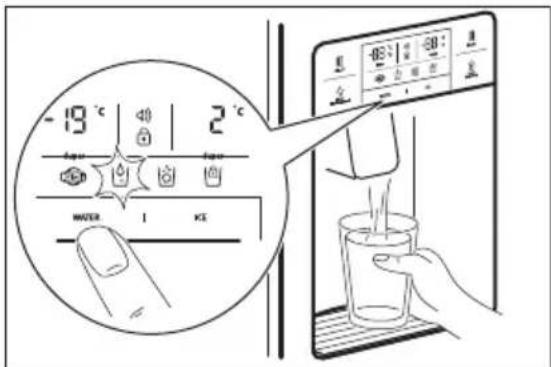
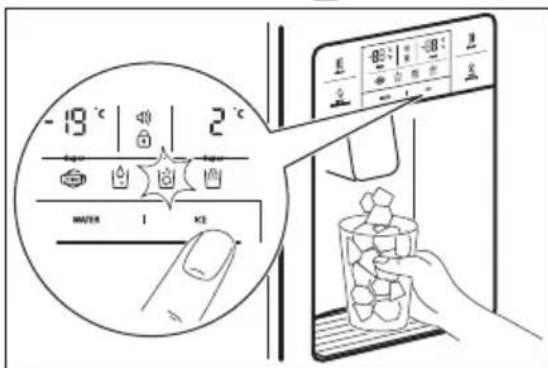
DISPENSER
Select WATER or ICE button and smoothly push the lever with you cup, after 2 seconds:
If you pressed WATER button, icon will light up
If you pressed ICE button, con will light up.

When cleaning the ice cubes case assembly or you do not use it for a longer time, remove the ice cubes from the Ice Storage Case and lock the Ice Maker by pushing ICE button for 3 seconds. will light up.

CAUTION!
Avoid using thin fragile cups or crystal glasses while collecting ice cubes.

CAUTION!
If the ice is discoloured, stop using the dispenser and call a service agent.

Use only ice from this appliance.
AUTOMATIC ICE MAKER
- About 10 ice cubes are made at one time, 14-15 times a day. If the Ice Storage Case is full, ice making stops.
It is normal for Ice Maker to make banging sounds when ice cubes are falling into Ice Storage Case. - To prevent a bad odour or smells, regularly clean the Ice Cube Storage Case.
If the amount of ice in the storage case is not sufficient, the ice may not be dispensed. Wait a day or so to make more ice.
If the ice does not dispense easily, ensure the dispenser outlet is not blocked. - If ice cubes get stuck and do not disperse, pull out the Ice Storage Case and separate the ice cubes which may have stuck together.

CAUTION!
If the amount of water which is supplied to Ice Maker needs adjusting, call for a service agent.

CAUTION!
In case of power failure ice cubes may melt and flow down to the floor. If you expect such situation to last for long hours, pull out the case and remove the ice cubes from it, then replace it back.
HELPFUL HINTS AND TIPS
HINTS FOR STORING FOOD
- Wash foods before storing.
- Divide and separate foods into smaller pieces.
- Place watery foods or foods with much moisture in front of shelves (close to the
- door side). If they are placed close to the cold air spout, they can be frozen.
- Warm or hot foods should be cooled down enough before storing to reduce
- power consumption and to enhance refrigeration performance.
- Be careful in storing tropical fruit such as bananas, pineapples and tomatoes as they can easily deteriorate in lower temperature.
- Keep as much space between foods as possible. If it is too tight or too close, cold air circulation is hindered, resulting in poor refrigeration.
- Never forget to cover or wrap foods to prevent odour of foods.
- Do not store vegetables in the chilled place as they can become frozen.
- Egg case can be placed on a refrigerator shelf the way you prefer.
CARE AND CLEANING
CLEANING OF THE INTERIOR PARTS
Use cloth with water and mild (neutral) detergent to clean.
1. Dispenser Water Shelf
Remove the spill grill and clean the water shelf regularly (the spill shelf is not self-draining).

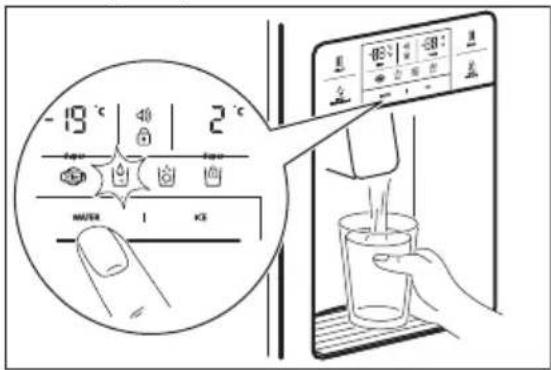
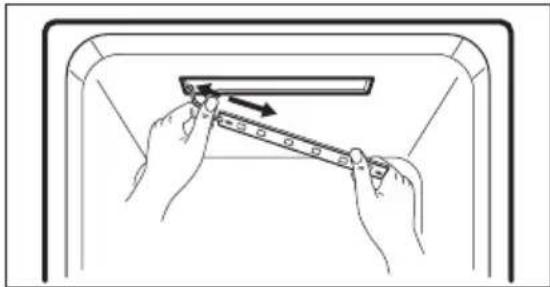
2. Ice Cube Storage Case
- Removing: pull up the case assembly forward to remove.
- Replacing: fit to the side grooves and insert to the end. If it is difficult to fully insert the case, remove it, rotate the swirl coil in the case or drive mechanism a quarter turn and insert again.
- Do not store ice cubes for too long.

- Freezer and Refrigerator Pockets Hold both ends and pull up.
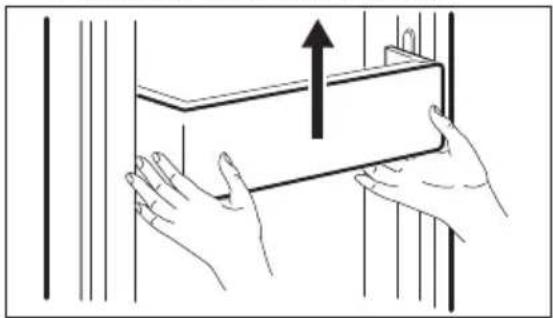
- Freezer and Refrigerator Shelves Open the door completely, then pull shelves forward to remove.

- Vegetable and Fruit Case Pull forward and lift up a bit to remove.

CLEANING OF DOOR PACKAGING
Use cloth with mild (neutral) detergent.
CLEANING OF THE BACK OF THE APPLIANCE (MACHINE ROOM)
Remove dust on a grill with a vacuum cleaner at least once a year.

CHANGING THE INTERIOR LED LIGHT

CAUTION!
LED light should be replaced only by a service agent or similarly qualified person.

CAUTION!
Be sure to unplug the appliance first!
Freezer and refrigerator LED changing
- Separate a back side of a LED cover using a screwdriver.

- Separate the LED cover and loosen 2 fixing screws for a LED plate.

- Disconnect a harness of the LED plate and change LED.

An assembly method is the opposite of a disassembling sequence
WHAT TO DO IF…

Please check up the following troubleshooting tips before you call for service!
| Problem Possible cause Solution | ||
| It never gets cold inside. Freezing and refrigerating is not sufficient. | Is the appliance unplugged? Is temperature set to LOW mode? Is the appliance under a direct sunlight or is any heat appliance placed near it? Is the space between the back of the appliance and the wall too small? | Plug in the appliance. Set temperature mode to MIDDLE or HIGH. Move to a place where there is no direct sun- light, no heat appliances around. Keep sufficient space (more than 10 cm) between the back of the appliance and the wall. |
| Foods in the appliance get frozen. | Is temperature set to STRONG mode? Is surrounding temperature too low? Is the food with much moisture stored close to the cold air spout? | Set temperature to MID-DLE or LOW mode. Foods can be frozen if ambient temperature is below 5 °C. Move to a place where the tempera-ture is over 5 °C. Place foods with moisture on the shelves close to the doors. |
| Strange sound from the appliance. | Is floor beneath the appliance uneven? Is the space between the back of the appliance and the wall too small? Do any objects or other stuff touch the appliance? | Move the appliance to a level and even floor. Keep sufficient space. Remove any object away which touches the appli-ance. |
| Strange sounds: cracking, clicking, water flowing, humming or buzzing. | It is normal (if the appliance is not leveled, the sound can be louder). | |
| Odour or disgusting smell from the inside. | ·Is the food stored uncovered or unwrapped? ·Are the shelves and pockets stained with food stuff? ·Is the food stored for too long? | ·Be sure to cover and wrap the foods. ·Clean the interior parts ·of the appliance regularly. Once smell gets soaked to those parts, it is not easy to remove. ·Do not store foods for too long. ·The appliance is neither a perfect nor a permanent food keeper. |
| Door do not open easily. | ·Was the door closed and open again immedi- diately? | ·In this case wait for a minute, then it will open easily. |
| Frost and dew inside the appliance and on the cabinet surface. | ·Was the door open for too long? ·Were the foods with much moisture stored uncovered or un- wrapped? ·Is temperature and/or humidity around the appliance high? | ·Do not leave the door open for a long time. ·Be sure to cover and wrap the foods. ·Install the appliance in a drier and cooler place. |
| Front and side of the appliance feels warm or hot. | It is normal. | |
AMBIENT TEMPERATURE
This appliance is designed to operate in ambient temperature specified by its category marked on the rating plate.
| Climate category Ambient temperature (from... to...) |
| SN +10°C to + 32°C |
| N +16°C to + 32°C |
| ST +16°C to + 38°C |
| T +16°C to + 43°C |

Internal temperature may be affected by factors such as location of the appliance, ambient temperature or frequency of door opening.
ACCESSIONS
- Filter Box
Water Supply Kit - User Manual
ENVIRONMENTAL CONCERNS
Recycle the materials with the symbol Put the packaging in applicable containers to recycle it. Help protect the environment and human health and to recycle waste of electrical and electronic appliances.
Do not dispose appliances marked
with the symbol with the household waste. Return the product to your local recycling facility or contact your municipal office.
SISUKORD
OHUTUSTEAVE 57
OHUTUSJUHISED. 58
SEADME KIRJELDUS 60
JUHTPANEEL 62
ENNE ESIMEST KASUTAMIST 64
IGAPAEVANE KASUTAMINE 65
VALIKUD. 67
VIHJEID JA NAPUNAITEID 68
PUHASTUS JA HOOLDUS 69
MIDA TEHA, KUI. 71
JAATMEKAITLUS 73
PARIMATE TULEMUSTE SAAVUTAMISEKS
Andmed leiate andmesildilt. Mudel, tootenumber (PNC), serianumber.
! Hoiatus / oluline ohutusinfo.
jaoks. water and beverages.
Be sure to unplug the appliance first!
Sous reserve de modifications.

INFORMATIONS SUR LA SÉCURITÉ
Step Display Target Temperature
If the amount of water which is supplied to Ice Maker needs adjusting, call for a service agent.

VORSICHT!
KataxwpnoeTo TPOIOv OaC, WOTe va ExETe KaUTePo oepic: www.aeg.com/productregistration

ayopaoTe Eapntmuata, avaawoiqa kai yvnoia avtaaaktkia yia tn ouokeuon oac: www.aeg.com/shop
YNOESTHPIEH NEATQN KAI SEPBIS
Suviotatai n xpnoan yvnoiow avtaaaktkow.
OTAV ETIKOIVWVEITE To oepis, BbaIWeite Oti exte diaeoiu ta akolouo a toixia.
MONTEAO ME IAPOXH KP'YOY NEPO'Y KAI IAPOY
PIN ANO THN PQTH XPHSE
ERKATAA TAH PAMMHNEPOY
IAPOXH KP'YOY NEPO'Y KAI IAPOY
ETIIEETo TNIKtpo WATER n ICE KAI TIEOTe Maakto moxlo e To KUTTLEA OaC.Met a aTO 2 dEutepoAeTTa:
Av ntoeTo nKtpo WATER, 0a avaepi To EIKovid
Av nTo Tn Ktpo ICE, 0a avapei To EIKovio
Kata tov kathetao tou ouykoptma-tos tns thnks yia payakia n av dev to xpoaiottoieTre ia eya loxovikio diaotn ma, aapoeote ta payakia ato tn thnk antohke uong tsayou kai klaedwote
TnV TAYoynxavn, TATWvTac To TAnktpo ICE yia 3 8eUTepoAeTTa. Oa avapei To EIKoviD will light up.
PPOZOXH
ATPOEUYETnXPONANETTUV EU- 0paouotwKUTTEAAWvN KpuoTaALIVWV TOTnpiwOtav TApivTe TAYAKIA.
IPOSOXH
Av o TAYOc Eivai aTNOxPOwUaTI- OEvoc, DIAKOyTE Tn XpnoTn Tns TAPoxNc Kpuou Vepou Kai TAYou KAI KAeOTe AVITINPOoWTO Tou
Xpnoiopoioite mvo Tayo aTOn autn Tn ouokun.
AYTOMATH IAPOMHXANH
Iepiou 10 aya kia npayovtai tautoxpova, 14-15 opec tnv nepa . Av n thn antohknueoans mayou eivai yepatn, n npaywyn nyauou diakotTTETAI.
Eivai quioaoyoKo va 8 nIoupyouVtai kantoioi Kpotoi OTNV TAYOu NxavN KaWc TEPouv TAYAKia OTN OKn aTIOHKeUOns TAYOU.
Tia va aTPOpeuyovtai duapeoTeC OoEc, kaapizete TAKTKa Tn 0knaatOhKeuOns yia ta Tayakia.
Av n noootnta payou otn hkn aTIOhkeuongc ev Etnapkei, Evexetai va unxopnynEi npoc. Pepie va TepiEvTe TepiTou ia nepa yia Tn oiupyia Tepioootepou payou.
Av o paoos xopnyeitai eu kola, 8eBaiwOeite oTI dEv eivai ppayevn n Edooc Tns npoxnc Payou.
Av ta payakia koalave kai de xopnyouvtai,tpaβnEte EeW tn th Kn aTohkeuongpiayoukai xwpiote Tuxov payakia Tou exouv KoAAnoei 1eTuOc.

PPO2OXH
Av n TIOOOTnTa Vepou Toun TApexTai OTNV TAYoynxavn XpeiaZetai puOmu, KaEOTe avTIppoosTTOU OePbIc.

PPOZOXH
MMTH TOY EΣΩTEPIKO'Y MMTHPALED

PPO2OXH
H avikoraraon Tou aamtnnpa LED pnte i va ekteiaitai mvo aoavittpooTou oepic n avtoia kataptioevo ato.

PPO2OXH
www.aeg.com/pmduclregistration

Remove dust on a grill with a vacuum cleaner at least once a year.


FIGYELEM!
Compartmentul congelator
Pentru setarea temperaturii apasati butonul FRZ. SET, panacand se afiseazvaloarea dorita.