USER MANUAL AS50D MARSHALL
Download the full manual at www.marshall.com
QUICK START GUIDE
Warning! Safety instructions 2
Specification 3
Front panel functions 4
Rear panel functions 6
FÉLICITATIONS POUR L'ACHAT DE VOTRE AMPLIFICATEUR AS50D.
WARNING SAFETY INSTRUCTIONS
Please read this manual carefully before plugging in. Follow all instructions and heed all warnings.
Warning: Please refer to full details in separate Important Safety Instructions CATS-90009.
Warning: Before going any further, make sure that your amplifier is compatible with your mains electricity supply. If you have any doubt, please seek help from a qualified technician - your Marshall dealer can help you with this.
MAINS INPUT & FUSE
The specific mains input voltage rating that your amplifier has been manufactured for is indicated on the rear panel of the amplifier. Your amplifier is provided with a detachable mains (power) lead, which should be connected to the mains input socket on the rear panel of the amplifier.
- Ensure that the power switch is set to the off position.
- Connect the supplied mains (power) lead into the mains input on the rear panel first and then into an electricity outlet.
- Ensure that the channel volume controls and master volume control on the front panel are set to zero.
- Plug your instrument into the channel 1 input jack socket on the front panel.
- You may also plug another instrument into the channel 2 input jack socket, and/or a microphone into the channel 2 microphone jack socket.
- Turn the front panel power switch on.
- Turn the volume up to your preferred level and your amplifier is ready to play.
TRANSPORTING YOUR EQUIPMENT
Please ensure that your amp is switched off, unplugged from the mains electricity supply and all removable cables have been disconnected from your equipment before attempting to move it.
FCC COMPLIANCE STATEMENT
This device complies with part 15 of the FCC Rules. Operation is subject to the following two conditions:
- This device may not cause harmful interference, and
- This device must accept any interference received, including interference that may cause undesired operation.
This equipment has been tested and found to comply with the limits for a Class B digital device, pursuant to part 15 of the FCC rules.
These limits are designed to provide reasonable protection against harmful interference in a residential installation.
This equipment generates, uses and can radiate radio frequency energy and, if not installed and used in accordance with the instructions, may cause harmful interference to radio communications.
However, there is no guarantee that interference will not occur in a particular installation. If this equipment does cause harmful interference to radio or television reception, which can be determined by turning the equipment off and on, the user is encouraged to try to correct the interference by one or more of the following measures:
- Reorient or relocate the receiving antenna.
- Increase the separation between the equipment and the receiver.
- Connect the equipment into an outlet on a circuit different from that to which the receiver is connected.
- Consult the dealer or an experienced radio/ TV technician for help.
Caution: Any changes or modifications not expressly approved by the party
SPECIFICATION
responsible for compliance could void the users authority to operate the equipment.
This device complies with CAN ICES-3(B)/ NMB-3(B)
The AS50D is a compact and portable 50W combo amplifier that delivers acoustic studio-quality sound. Designed for an abundance of acoustic instruments, the AS50D can accommodate instruments with magnetic pickups, piezos and microphones - dynamic or phantom powered. It is the perfect amp for the home or intimate acoustic gigs, no matter which instrument you are playing.
| Model AS50DV | |
| Power 50W | |
| Channels 2 (with independent EQ controls) |
| Inputs | 2 instrument jacks
1 Phantom power XLR input
1 Aux phono input |
| Outputs DI out, line out, parallel effects loop |
| Controls | Acoustic channel 1 - Volume, bass, treble
Microphone/aux channel 2 - Volume, bass, treble
Chorus channel 1 power switch, chorus channel 2 power switch, chorus effect speed, chorus effect depth
Reverb balance, reverb level
Anti-feedback phase, anti-feedback notch, anti-feedback frequency sweep
Master volume |
| Speakers 2 x 8" and 1 x tweeter |
| Unit weight 14.1kg |
| Unit width 565mm |
| Unit height 415mm |
| Unit depth 250mm |
| Accessories Detachable power cable included |
FRONT PANEL FUNCTIONS
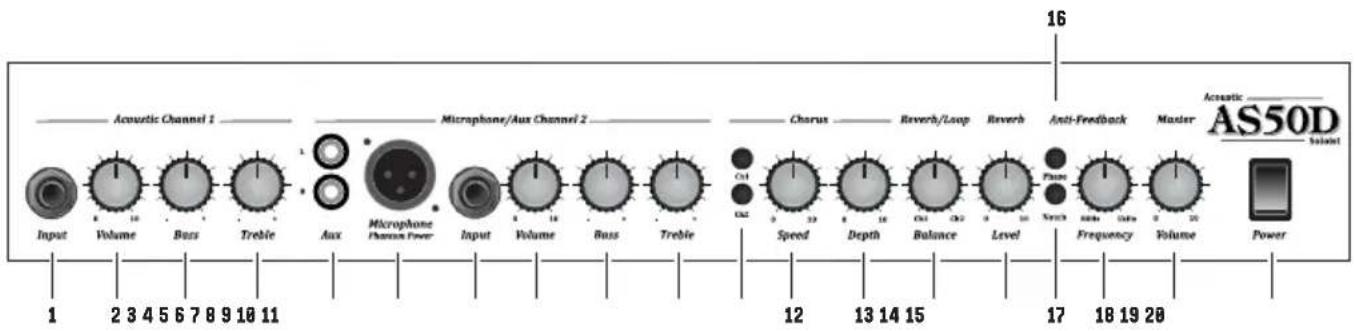
CHANNEL 1 - ACOUSTIC INSTRUMENT CHANNEL
Guitar input socket.
2. VOLUME CONTROL
Controls the volume level of the Acoustic Channel 1.
3. BASS CONTROL
Adjusts the low frequencies of the amp. It will add bottom end and depth to your sound.
4. TREBLE CONTROL
Adjust the upper frequencies of the amp. Your tone will get brighter as it is turned up.
CHANNEL 2 - MICROPHONE / AUX CHANNEL
Inputs to take a connection from an external source (such as an mp3 player or CD player).
XLR input for connection of a microphone and suitable for vocal or instrument applications. This input supplies phantom power.
Input to take any source, such as a drum machine, keyboard, etc.
8. VOLUME CONTROL
Controls the volume level of the Microphone / Aux Channel 2.
9. BASS CONTROL
Adjusts the low frequencies of the amp. It will add bottom end and depth to your sound.
10. TREBLE CONTROL
Adjust the upper frequencies of the amp. Your tone will get brighter as it is turned up.
MASTER SECTION
11. CHORUS ASSIGN SWITCHES
Allows the built in Chorus effect to be selected on either channel individually, or both channels together.
12. CHORUS SPEED CONTROL
Controls the speed of the built-in Chorus effect.
13. CHORUS DEPTH CONTROL
Controls the amount of frequency shift for the built-in Chorus effect.
14. REVERB BALANCE CONTROL
Controls the balance of the Reverb effect between Channel 1 and Channel 2. This control also affects the effects loop.
15. REVERB LEVEL CONTROL
Controls the overall level of the Reverb effect.
16. PHASE SWITCH
Controls the amount of low frequency acoustic feedback.
17. NOTCH FILTER SWITCH
Cuts the frequency selected using the frequency control, to reduce feedback further.
18. FREQUENCY CONTROL
Select the frequency of the feedback you wish to reduce.
19. MASTER VOLUME
Controls the overall volume output from the amplifier.
20. POWER SWITCH
This is the On/Off switch for the mains power to the amplifier.
REAR PANEL FUNCTIONS
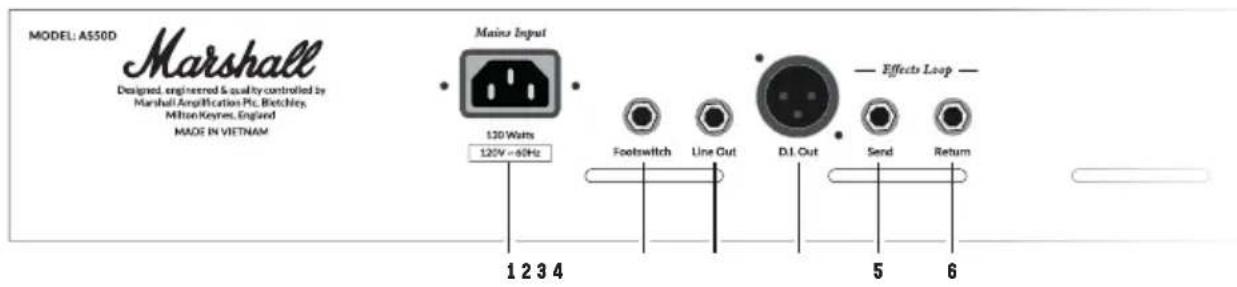
1. MAINS INPUT
The supplied mains power lead is connected here.
Jack socket for connection of the optional footswitch for switching the Reverb and Chorus functions on and off.
3. LINE OUT JACK
Jack socket for connection to home recording or other external equipment.
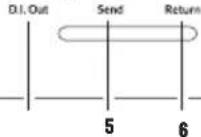
4. DI OUT
An emulated DI output allows you to connect to a recording device or sound desk.
5. EFFECTS SEND JACK
Sends signal to effects / outboard equipment.
6. EFFECTS RETURN JACK
Returns signal from effects / outboard equipment.
AVERTISSEMENT ! CONSIGNES DE SECURITE
Oedged, engineered & quality controlled by
Marhal Amphifcaln Pic, Htchthy
Milton Keynes, England
MADEINYETNAM


Effects Loop
1234
1. ENTRADA DE RED
Designated engineered quality controlled by
Marshall Amplification Pcs, Bitchow
MItton Keynes, England
MADEIN WETNAM


Effecto Loop

D.Out Send Return
WUEITE
20V-60Hz
Footswitch Line Out
1234
13/14
m = 311 ;
5
i
6
;
1. 电源输入:
将电源线连接至此处。
2. 踏板开关接口:
Whilst the information contained herein is correct at the time of publication, due to its policy of constant improvement and development, Marshall Amplification Plc reserves the right to alter specifications without prior notice.
MARSHALL AMPLIFICATION PLC, DENBIGH ROAD, BLETCHLEY, MILTON KEYNES, MK1 1DQ, ENGLAND.
T: +44 [0] 1908 375411
MARSHALL AMPLIFICATION PLC
REGISTERED IN ENGLAND
REGISTERED NUMBER: 805676
M3311.387 | CATS-90019-v04
MARSHALL.COM