
Venegance - Heating WANDERS - Free user manual and instructions
Find the device manual for free Venegance WANDERS in PDF.
| Product type | Built-in gas stove |
| Brand | Wanders |
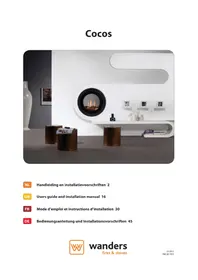
| Model | Venegance |
| Category | Heating |
| Dimensions (H x W x D) | 511 x 660 x 323 mm |
| Fuel | Gas (G20/G25) - Pressure 20/25 mbar depending on country |
| Rated power | 5 kW |
| Compatible gas type | Natural gas (G20/G25) for several countries |
| Main functions | Remote control, temperature adjustment, timer programmer, manual flame control, pilot light |
| Maintenance and cleaning | Clean ceramic glass with specific detergent, annual inspection by approved professional, replacement of broken logs |
| Safety | Thermal backflow protection, thermocouple, open draft diverter, downdraft diverter, automatic shutdown if insufficient draft |
| Spare parts and repairability | Use original parts, 1-year warranty, broken/cracked glass must be replaced before use |
| General information | Installation by certified installer mandatory, comply with local regulations |
| Remote control batteries | 1 9V alkaline battery (transmitter), 4 AA 1.5V batteries (receiver) |
| Safety instructions | Do not use if glass is broken, minimum distance 100 cm from combustible materials, 20 cm from back wall |
Frequently Asked Questions - Venegance WANDERS
User questions about Venegance WANDERS
0 question about this device. Answer the ones you know or ask your own.
Ask a new question about this device
Download the instructions for your Heating in PDF format for free! Find your manual Venegance - WANDERS and take your electronic device back in hand. On this page are published all the documents necessary for the use of your device. Venegance by WANDERS.
USER MANUAL Venegance WANDERS
2.1 Technical instructions 14
2.1.1 Chimney 14
2.2 Installing the hearth 14
2.3 Connecting the flue 15
2.3.1 Extra air inlet 15
2.4 Connecting the gas pipe 15
2.5 Maintenance 16
2.6 TTB safety device 16
2.7 Log set 16
2.8 Remote control 17
2.9 Operating instructions for the remote control 17
2.9.1 Setting the display (from F / 12h to C / 24h , and vice versa) 17
2.9.2 Setting the time 17
2.9.3 Setting the desired temperature 17
2.9.4 Programming the timer function 17
2.9.5 Using various options 18
2.9.6 Timer (TIMER) 18
2.9.7 Changing the battery 18
2.9.8 Safety switch-off 18
2.9.9 Directions 18
3.0 INSTRUCTIONS FOR THE USER 19
3.1 Operating the fireplace for the first time 19
3.2 Turning off the main burner 19
3.3 Turning off the pilot flame 19
3.4 Instructions for the user 19
3.5 TTB Safety device 20
3.6 Operating the fireplace for the first time 20
3.7 Maintenance 20
3.8 Ventilation 21
3.9 Warning and advice 21
3.10 Possible error messages 21
4.0 GUARANTEE 22
Technical drawings 45
Gas details 47

Do not use the appliance without glass.
Do not put flammable substances on the ceramic wood log set
Do not place highly flammable materials like nylon clothes of flammable
neighbourhood of the appliance.
This appliance is not meant for operation by persons (including children) with limited physical or intellectual faculties, or by persons who are unfamiliar with the operation of gas appliances. Always ensure that they are supervised when near the appliance.
Use a fire-screen to avoid burning and to protect the above-mentioned persons.
The appliance must be mounted and connected as a 'closed unit' by an acknowledge • installer in accordance with the installation instructions and national and currently applicable local regulations
1.0 TECHNICAL INSTRUCTIONS FOR THE INSTALLER
Important
Before installing and putting the gas hearth into operation, it is important to read these instructions carefully and keep them for future reference.
When constructing our stoves, we devote our greatest attention not only to design and appearance but also to maximum user-friendliness and operational safety.
We therefore have absolute confidence that you will enjoy the fireplace you selected for many years.
2.0 INSTRUCTIONS FOR THE INSTALLER
2.1 Technical instructions
- Check whether you received the stove for the right kind of gas (this is indicated on the type identification tag).
Check whether the gas pressure is right (this is indicated on the type identification tag).
The air needed for combustion is taken from the room, so be sure that there ventilation.
Never place this hearth in a mechanically ventilated home.
Combustion gases need to be discharged through an exhaust pipe suitable for this purpose.
The stove must be connected and checked by a certified gas installer.
Making changes to the setting values and other adjustments needs to be done installer and in accordance with the requirements.
The hearth must be installed into a fireproof recess.
- If you use an existing smoke channel, you must place a corrosion-proof steel tube on the stove measuring at least 0.5m long with a diameter of at least 100mm .
Always have your chimney flue professionally cleaned before placing the gas hearth.
Always comply with the currently applicable regulations for gas units.
Overall size of the encasement: height 511mm, width 660mm and depth 323mm.
When building in the appliance, there must be approximately 5cm clearance between the recess and the fireplace.
- The hearth must be installed in accordance with the currently applicable local and regional regulations.
2.1.1 Chimney
If the chimney has previously served as an exhaust for a coal or oil stove, it must be cleaned by a professional. Though a gas fireplace can operate well on little chimney draw, it is advisable to have the chimney checked for any blockages or obstructions, etc.
2.2 Installing the hearth
Remove the packaging
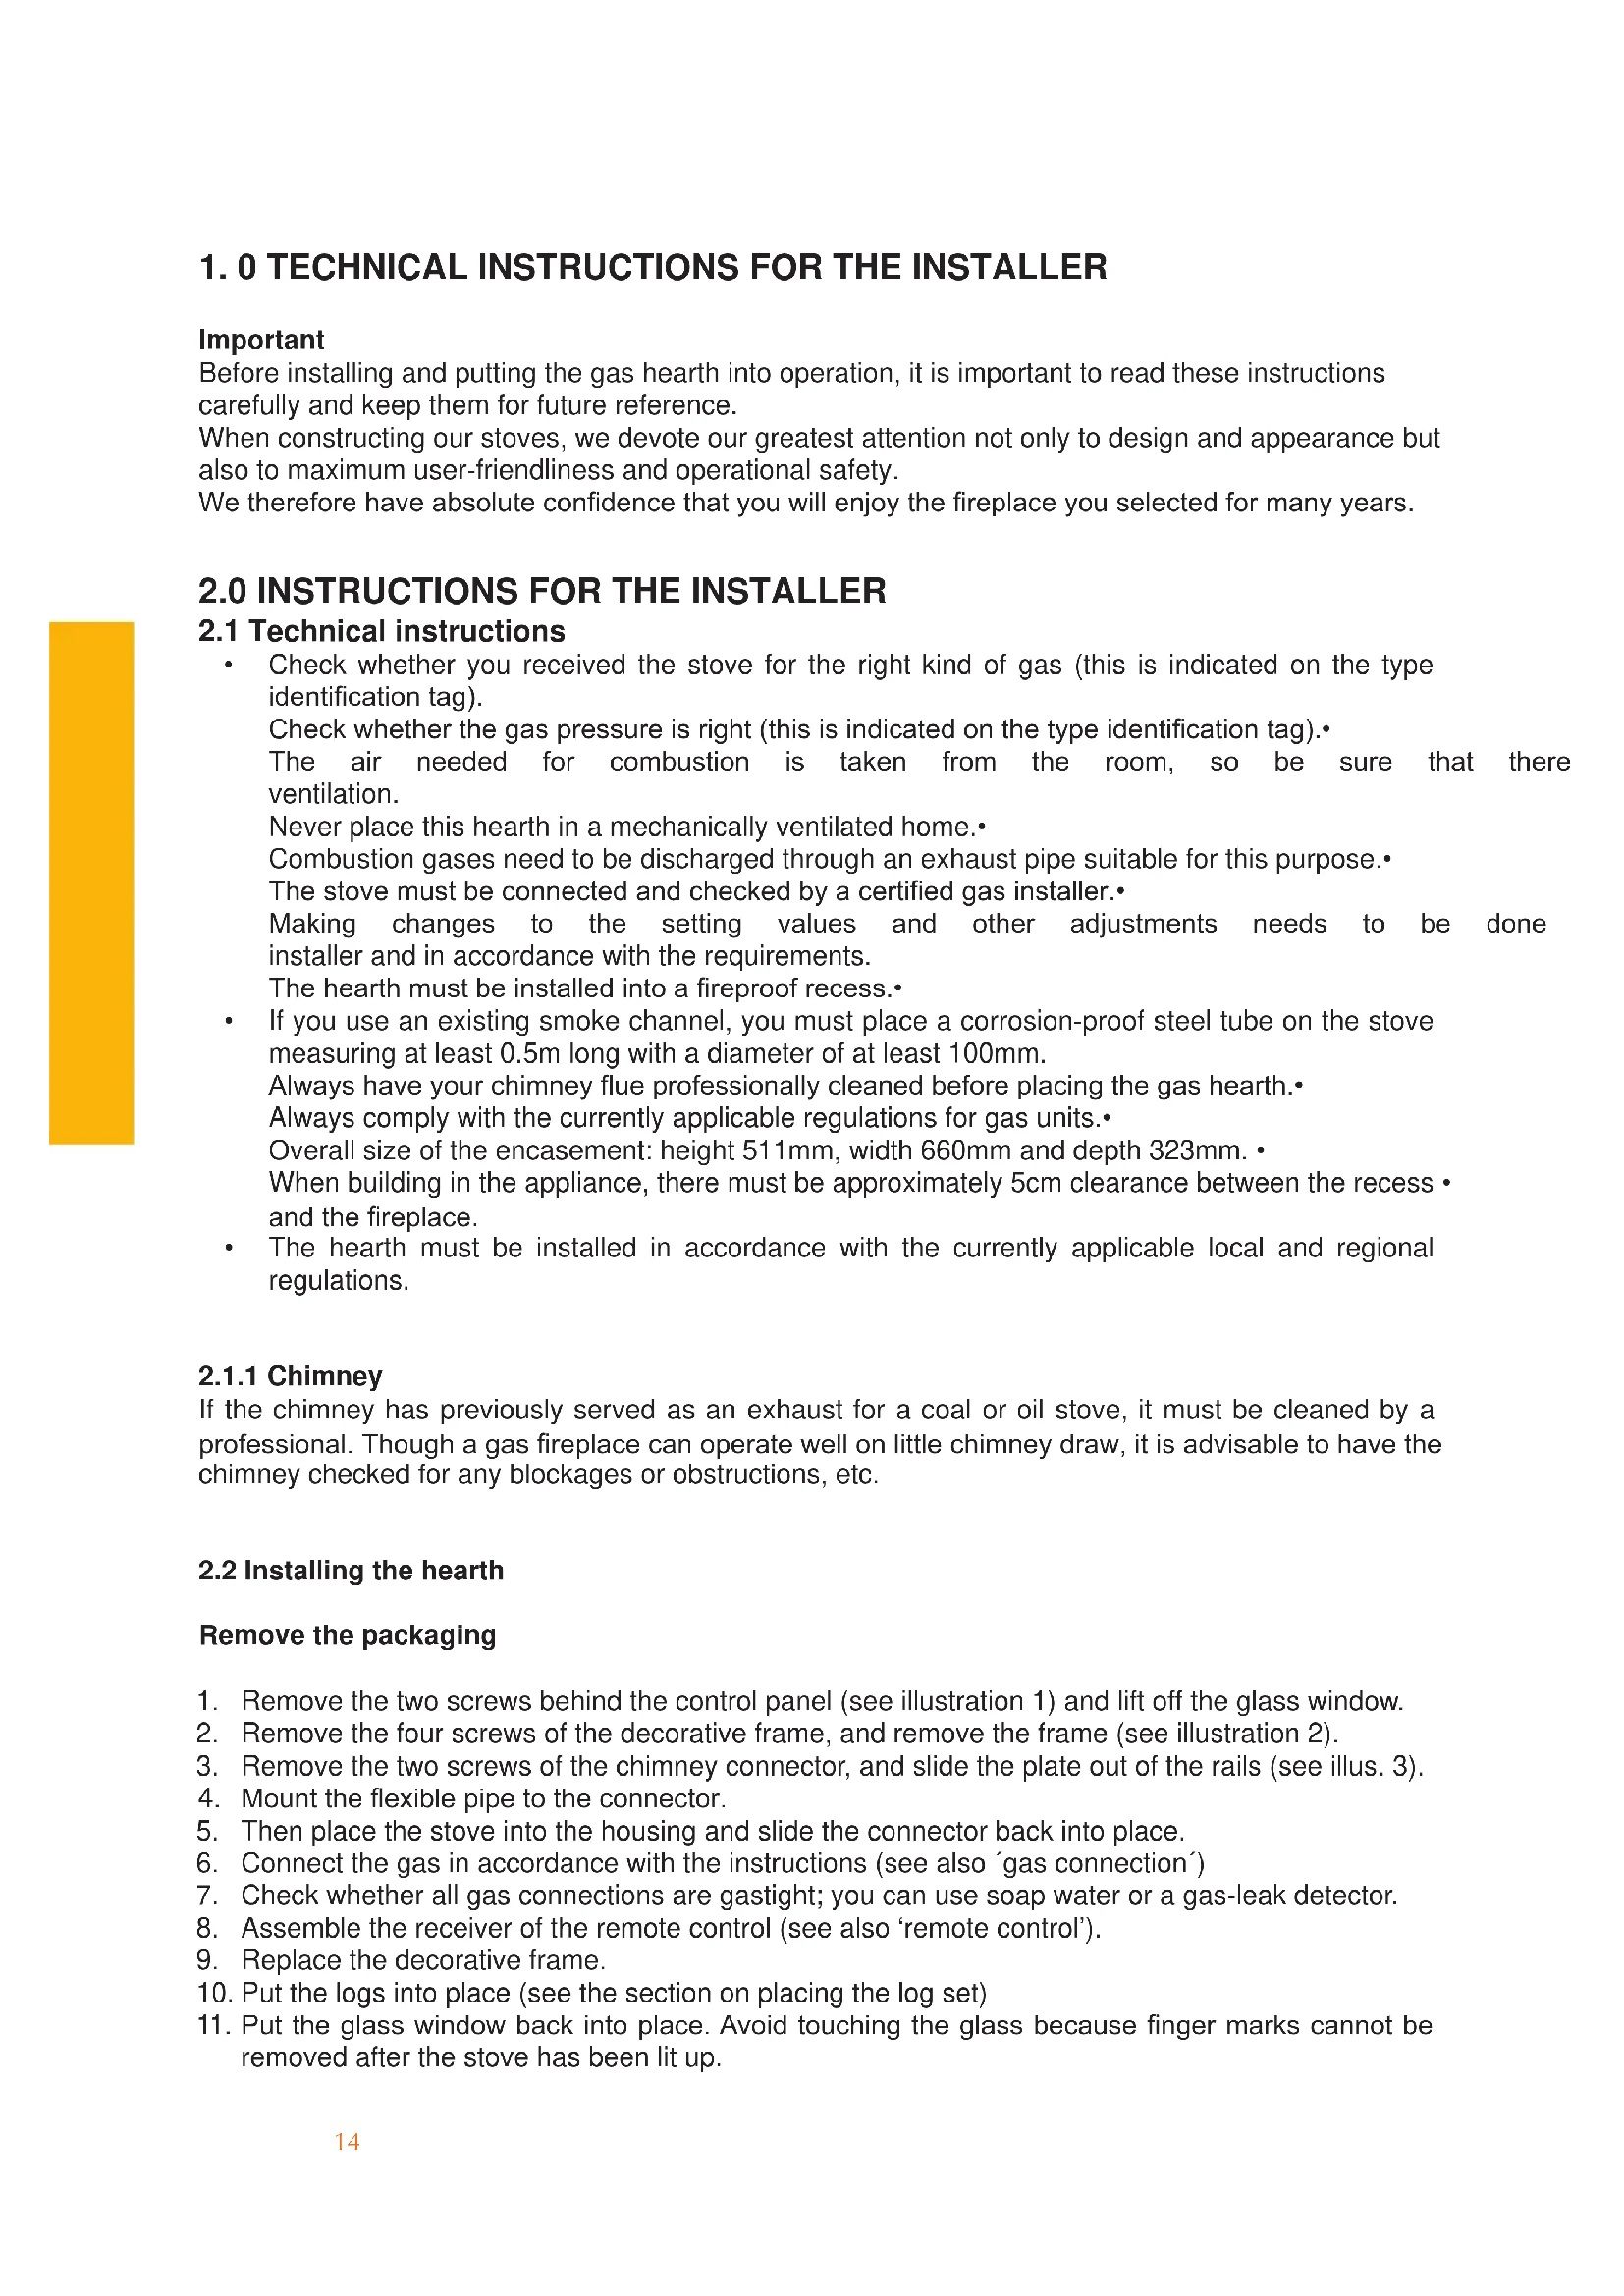
- Remove the two screws behind the control panel (see illustration 1) and lift off the glass window.
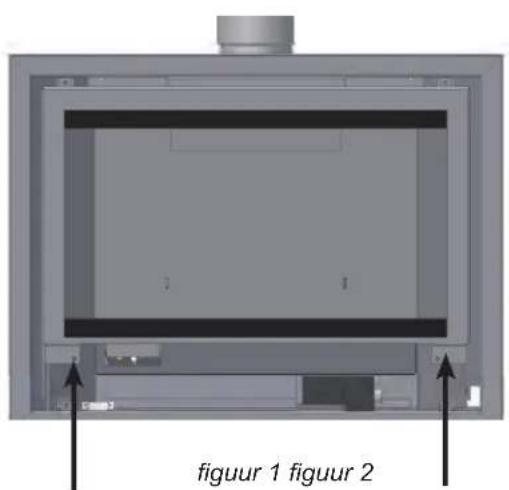
- Remove the four screws of the decorative frame, and remove the frame (see illustration 2).
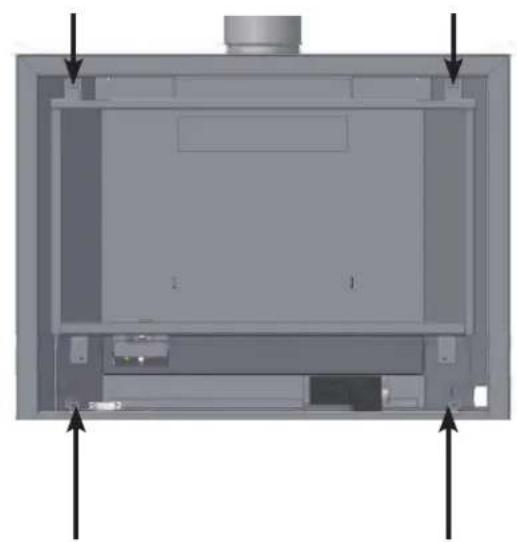
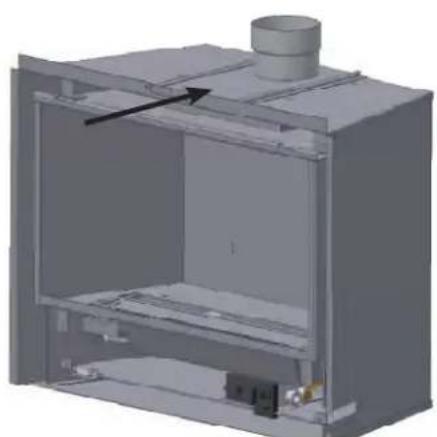
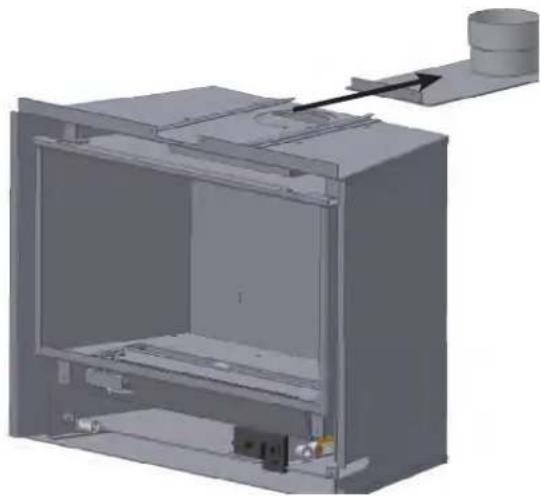
- Remove the two screws of the chimney connector, and slide the plate out of the rails (see illus. 3).
- Mount the flexible pipe to the connector.
- Then place the stove into the housing and slide the connector back into place.
- Connect the gas in accordance with the instructions (see also 'gas connection')
- Check whether all gas connections are gastight; you can use soap water or a gas-leak detector.
- Assemble the receiver of the remote control (see also 'remote control').
- Replace the decorative frame.
- Put the logs into place (see the section on placing the log set)
- Put the glass window back into place. Avoid touching the glass because finger marks cannot be removed after the stove has been lit up.
figuur 3 figuur 4
2.3 Connecting the flue
The gas fire is provided with an open draught breaker with wind diverter.
Use corrosion-resistant material for the connection between the hearth and the chimney flue.
The inner diameter of the pipe must be at least 100mm
The connection between the hearth and the chimney flue must be sound and leakage proof.
2.3.1 Extra air inlet
WANDERS recommends adding extra air inlets with all built in stoves.
2.4 Connecting the gas pipe
Place an approved gas tap measuring 3/8 in the gas pipe leading to the control unit.
Make sure that the tap is easily accessible.
The connection to the gas unit must measure 3/8 .
Check the whole unit with soap water or a gas-leak detector after fitting the pipe.
Avoid tension on the gas unit when fitting the gas pipe.
2.5 Maintenance
Have the fireplace checked and cleaned by an authorised professional every year to guarantee proper and safe operation of the stove.
The burner unit consists of a pilot flame and a combustion chamber.
The ceramic glass pane can be cleaned by a cleaning agent specially intended for ceramic cookers.
If a log is broken, it must be replaced.
If there is a crack in the glass window or if the pane is broken, it must be replaced before operating the gas hearth.
When replacing the log set, be sure to place them in the correct position (see 'placing the log set').
2.6 TTB safety device
This gas hearth is provided with a TTB draught breaker, wind diverter and thermal reflux valve.
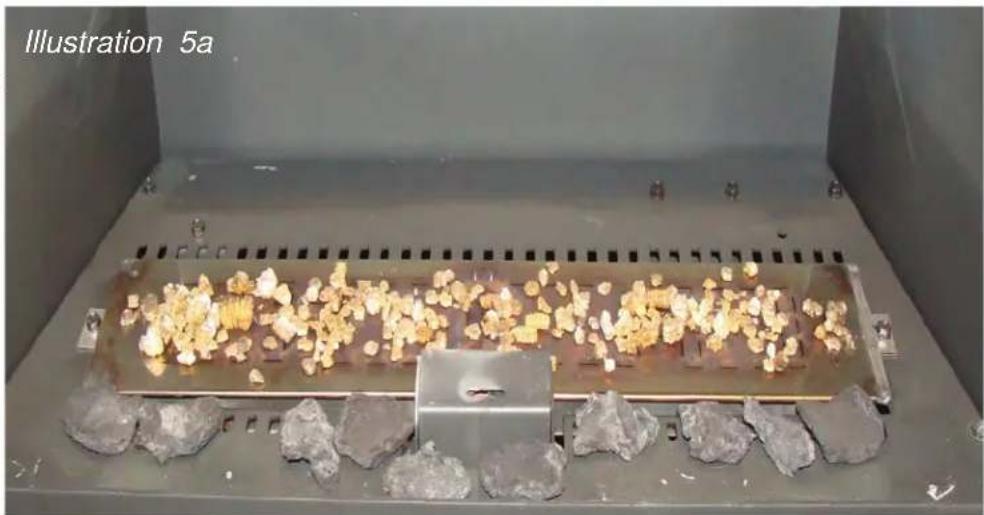
2.7 Log set
Firstly, fill the burner plate with the enclosed grains (see illustration 5a).
Then place the enclosed chips at the front side of the burner between the logs.
Caution! Never use more grains than the supplied quantity.
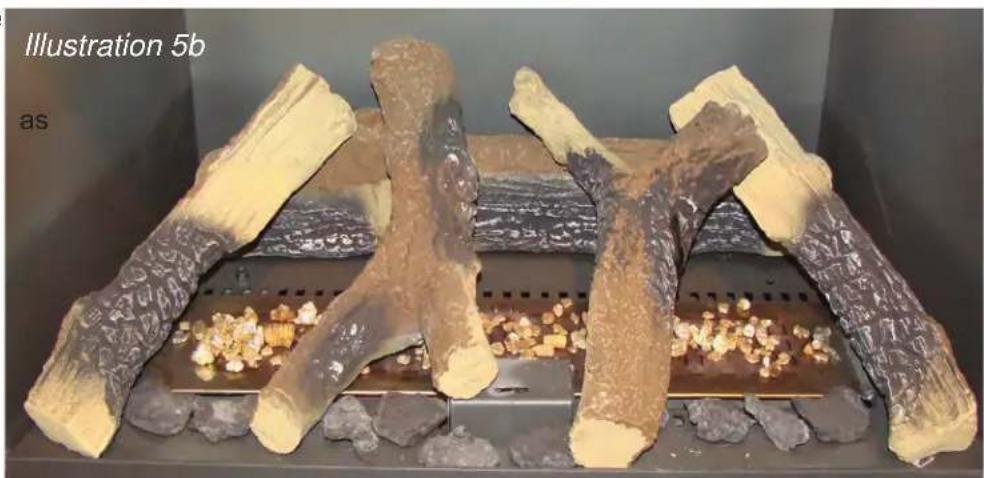
Now put the logs into place according to illustrations 5a and 5b.
When putting the logs into place, make sure that none of the logs covers the pilot flame.
Be sure to place the logs exactly as the example, so as to cover the flames less as possible and to prevent the flames from interruption and to avoid soot deposits.
Make sure that the glass window is firmly closed before lighting the hearth.
2.8 Remote control
Place the remote control receiver in the bottom left corner of the unit before mounting the decorative frame.
Slide the cable between the outer casing and the bottom plate of the combustion chamber.


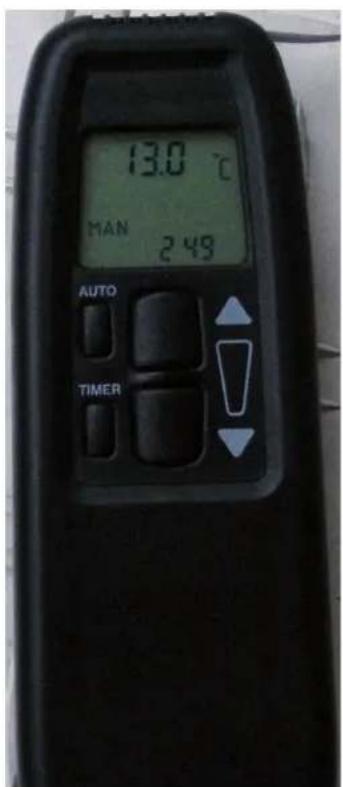
2.9 Operating instructions for the remote control
2.9.1 Setting the display (from F/12h to C/24h, and vice versa)
After fitting the battery (9V alkaline) or pressing the buttons AUTO and TIMER at the same time, the display will start blinking. As long as the display is blinking, you can switch from F to C by pressing the AUTO button. After some time, the display will return to manual operation. You can also press the TIMER button.
2.9.2 Setting the time
After fitting the battery or pressing the AUTO and TIMER buttons simultaneously, the display will start blinking. To set the time, press the (▲) button to set the hours, and press the (▼) button to set the minutes, or press the TIMER button to return to manual operation.
2.9.3 Setting the desired temperature
Press the AUTO button until the 'temp' indication starts to blink. Then press the () or the () button to set a higher or lower temperature. Then wait, or press the AUTO button to get to the automatic mode.
The sensor in the remote control measures the temperature in the room; the temperature is compared with the pre-set temperature, then the receiver on the stove gets a signal and adjust the height of the flames to the temperature in the room.
2.9.4 Programming the timer function
Keep the TIMER button pressed until the indication P1* blinks.
Then program the switch-on time with the () button for the hours, and the
(▼) button for the minutes; then press TIMER again until P1C appears to
program the switch-off time. By pressing TIMER again you can preset the times for the second program
P2* P2C and confirm it with pressing TIMER. The symbol will appear outside programmed times.
2.9.5 Using various options
Manual adjustment of the height of the flames.
Press () to switch on the fire or to increase the height of the flames; press () to decrease the flames or to switch to the pilot flame of the stove.
When pressing these buttons, the 'send' sign will appear in the upper left corner of the display. When the gas valve has reached its maximum position, the LED of the receiver will start blinking to indicate that the highest or lowest position is reached.
AUTO temperature adjustment
Press AUTO briefly and the display will indicate the programmed temperature to be followed by the temperature in the room.
2.9.6 Timer (TIMER)
If the timer mode is switched on, the temperature control is the same as in the AUTO mode. When the switch-off times are reached, the motor switches the appliance to the pilot flame.
Press AUTO to check the temperature settings and return to the TIMER mode.
There is no temperature control when the time is switched off; this will minimize battery consumption.
By pressing the () or the () button, you will reach manual operation from any mode.
We recommend that you switch off with the () button, as the transmitter will then be inactive and will not use the battery unnecessarily.
2.9.7 Changing the battery
The battery needs to be changed when BATT appears in the top right corner of the display, or when the LED light on the receiver becomes less bright.
2.9.8 Safety switch-off
If the receiver has not received any signal for two hours, the unit will switch automatically to the pilot flame mode and will switch on again as soon as a signal is received.
2.9.9 Directions
Before switching to AUTO or TIMER you must test reception with the () and () buttons (when the 'send' symbol appears on the transmitter, the LED on the receiver will flash).
With the temperature adjustment, the height of the flames is programmed during the time that the motor is running. The time depends on the size of the room where the unit is placed, on the capacity of the unit, on the power of the battery, and so on.
A microprocessor measures the increase in temperature per time, and adjusts the running time of the motor during the next heating period to adjust the height of the flames to your needs.
If the room can be heated in a lower position, the hearth will burn in a lower position or turns off when the hearth is burning on the automatic position. This gives longer burning times and a regular temperature.
Required batteries: 1x 9V alkaline for the remote control and 4x AA 1.5V penlight receiver
3.0 INSTRUCTIONS FOR THE USER
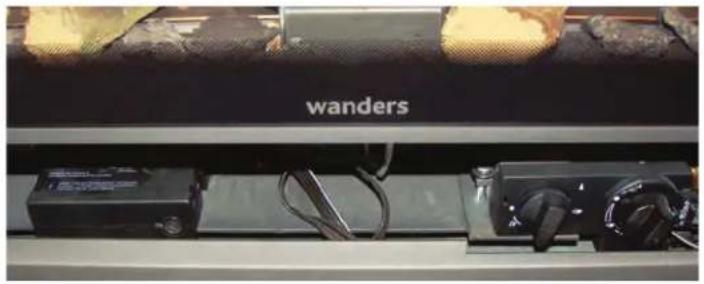
The operating switches of the fireplace are placed in the middle of the appliance behind the valve.
3.1 Operating the fireplace for the first time
Open the gas tap, which is mounted in the gas pipe leading to the fireplace.
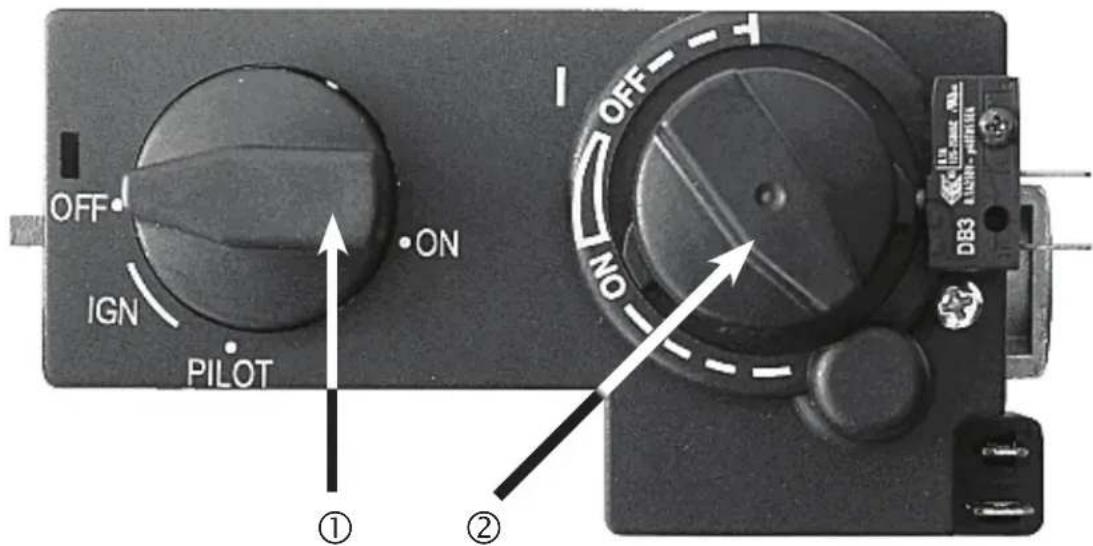
Turn ignition button ① to the left in the direction of ignition up to the end stop; then press it and wait for a few seconds. You will hear a click when pressing the button and turning it further to the left.
You can see through the glass window on the left side of the stove if the pilot flame has lit. Repeat these actions if the pilot has not lit.
Once the pilot flame is burning, keep the ignition button pressed for at least 30 seconds, then release the pressure, and the pilot flame should still be burning. Now turn button ① further to the left to put the flame higher.
Now the continuously variable ② knob can be set at the desired setting between high and low with the remote control.
You will learn which setting is most suitable for your room.
Operating the remote control is simple: knob (▲) to let the flame burn higher, and knob (▼) to let the flame burn lower or let the flame extinguish.
3.2 Turning off the main burner
You can turn off the main burner by keeping knob () of the remote control pressed until the LED light starts blinking on the receiver. You can also shut off the burner by turning the ignition knob A clockwise until the end stop.
3.3 Turning off the pilot flame
You can turn off the pilot flame by pressing the ignition knob lightly and turn it further to the right.
3.4 Instructions for the user
Do not place any combustible objects underneath or in front of the gas fire.
If the fire in the gas hearth has gone out you must wait at least 10 minutes before reigning the gas stove (check the section on 'putting the fireplace into operation).
To ensure safe and correct operation of the fireplace it is advisable to have it checked and cleaned by a certified installer at least once a year.
If the fire in the fireplace extinguished repeatedly you must consult your installer.
The front side of the stove is regarded as the heat exchange surface.
- Caution: do not burn the stove if the glass window is broken or if the door of the stove is open. Have the hearth repaired only with original parts supplied by the manufacturer, and have the repairs carried out by a certified installer.
- Do not alter or add anything to the log set under any circumstance. If a log is broken it must be replaced by an original log that is supplied by the manufacturer.
To eliminate any possible risk of fire, the distance between the combustible parts and the furniture must be at least 100cm , and the distance between the rear side of the stove and the wall must be at least 20cm .
It is important that you do not use the fireplace shortly after renovation or in a newly built home;
the air circulation draws in moisture and unhardened volatile elements of plaster, coverings and other materials. This can cause soot stains on cold surfaces.
3.5 TTB Safety device
The fireplace is equipped with a thermal reflux safety valve (TTB), a temperature switch that becomes operative when the chimney does not draw well and flue gasses enter the room. When this happens, the unit will conk out.
Caution: Never put the TTB out of operation. When the TTB is defect, you must replace it with original parts.
When the TTB safety mechanism has shut off the stove, you must wait at least 10 minutes before lighting the fireplace again. If the burner conks out repeatedly, you must consult an installer.
Caution: Do not use the fireplace until the qualified installer has given the go-ahead.
3.6 Operating the fireplace for the first time
When lighting the fire for the first time, an unpleasant scent may develop caused by the hardening of the heat resistant lacquer on the stove. The scent will disappear after several hours. We therefore advise you to burn the stove at its highest capacity when you light up the fire for the first time while ventilating the room in which the stove is installed.
3.7 Maintenance
In order to ensure the safe and correct operation of the fireplace, the stove must cleaned by a qualified professional every year. The service should include the burner unit, the pilot flame and the combustion chamber.
The ceramic glass can be cleaned with a special cleaning agent for ceramic cookers.
If a log is broken it must be replaced.
If there is a crack in the glass window, or if the window is broken, it must be replaced before operating the gas hearth.
When the logs are replaced, ensure that they are placed in the correct position (see the chapter on the log set).
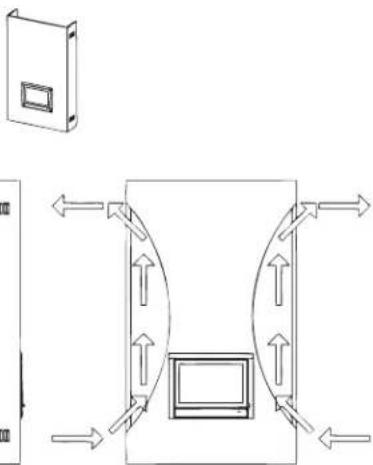
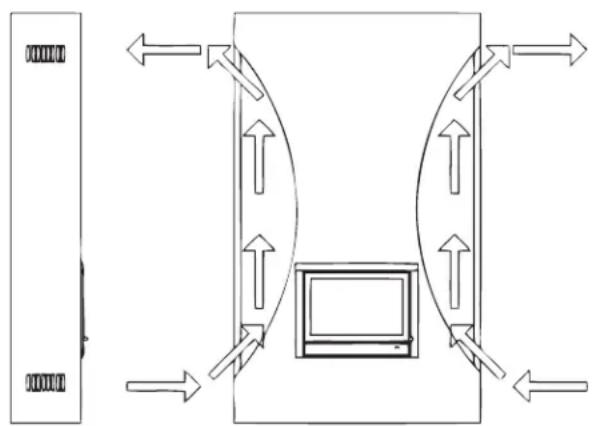
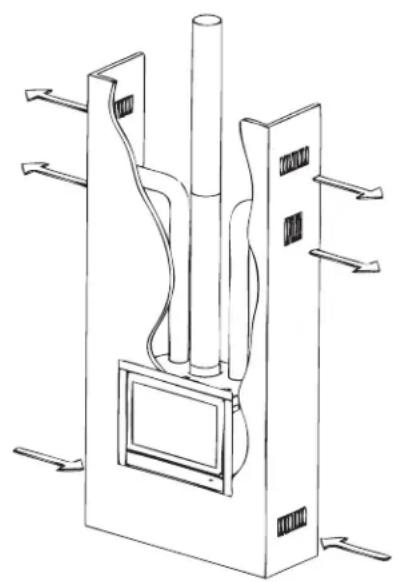
3.8 Ventilation
The fireplace is a so-called open combustion apparatus, which means that the air nee combustion is extracted from the room in which the fireplace is burning. It is therefore crucial to have enough ventilation in the room where the fireplace is burning.
3.9 Warning and advice
Every gas hearth by WANDERS is installed with a thermocouple interrupter. This will prevent unexpected gas flow if the pilot light has gone out.
Here are some recommendations for safely using your gas hearth:
- Only use your gas hearth when the door is properly closed. When the door is open, or the glass damaged, you must not use the fireplace.
Prevent small children or the infirm from getting too close to a burning stove and do not leave them alone in the room when the fireplace is ignited. You could use a fire-screen.
Never allow children to play with the remote handset.
- Do not pour or put any combustible liquids and materials on the log set, as it may damage the unit beyond repair.
Do not place any combustible materials, such as curtains, close to the distance of 1.5 meters is required.
The fireplace must be repaired with original parts only, and by a certified installer.
If for any reason the pilot light goes out, you must wait 5 minutes before igniting the hearth again.
WANDERS recommends adding extra air inlets with all built in stoves
3.10 Possible error messages
If your hearth does not function as planned please contact your gas hearth dealer or a certified installer. If the pilot light does not ignite, you can take the following steps.
Check whether the gas supply is open. If you cannot find the gas supply please contact your • installer.
- There may be some air in the pilot feed line. Wait for 5 minutes and light the hearth again. If this does not help please contact a certified installer.
4.0 GUARANTEE
WANDERS Metaalwerken B.V. in Netterden, the Netherlands, gives a one-year guarantee after the purchase date, provided that the fireplace is properly installed and used in accordance with the instructions in the manual.
The guarantee includes all defects which can be reduced to flaws in material and construction, in which case you will receive the new parts free of charge. Labour costs or other expenses are not covered by the guarantee. You can send defect parts (carriage paid) to WANDERS Metaalproducten B.V., Amtweg 4, 7077 AL in Netterden [The Netherlands].
The guarantee does not include: failure due to improper use; non-compliance with the installation and operating instructions; installation by a non-certified installer; negligence of the apparatus and converting the fireplace to be fired with another kind of gas.
Wanders can not be held responsible for any cracks in stuccoed walls or discolouration of walls, ceilings and/or grates after burning the fireplace. Discolouration is caused by the burning of dust particles in the convection cover. To reduce the chance of cracks in stucco and to minimize discolouration we refer to the advice given for decorative hearths. Your installer can give you more information.
Any complaints will be dealt with after the sales firm, the installer or the gas company filed a complaint and sent a copy of the purchase receipt with purchase date. Any repairs do not entitle you to extend the guarantee term. All consequential damages or loss are excluded.
FR
图
2.1 Instructions techniques
// please enclose copy of proof of purchase
The guarantee includes all defects which can be reduced to flaws in material and construction, in which case you will receive the new parts free of charge. Labour costs or other expenses are not covered by the guarantee. You can send defect parts (shipping paid) to WANDERS Metaalproducten B.V., Amtweg 4, 7077 AL in Netterden [The Netherlands].
Before installing your stove you must check if there is any visible damage to the unit. If there is, do not accept the unit and contact your supplier.
The guarantee does not include: the glass, failure due to improper use; non-compliance with the national regulations and enclosed installation and operating instructions; installation by an installer of dealer who is not acknowledged by WANDERS, negligence of the unit and change of owner. The guarantee is also disclaimed when a wrong fuel is used.
WANDERS disclaims responsibility for any cracks in stuccoed walls or discolouration of walls, ceilings and/ or grates after burning the fireplace. Discolouration can be caused when dust particles burn in the convection cover. To minimize the chance of cracks in stucco and discolouration we refer to the advice given for decorative hearths. Your installer can give you more information.
Any complaints will be dealt with after the sales firm, the installer has filed a complaint and sent a copy of the purchase receipt with purchase date. Any repairs do not entitle you to extend the guarantee term.
All consequential damages or loss are excluded.

- INSTRUCTIONS FOR THE USER 19
- GUARANTEE 22
- Technical drawings 45
- Gas details 47
- TECHNICAL INSTRUCTIONS FOR THE INSTALLER
- Important
- INSTRUCTIONS FOR THE INSTALLER
- Technical instructions
- Chimney
- Installing the hearth
- Remove the packaging
- Connecting the flue
- Extra air inlet
- Connecting the gas pipe
- Maintenance
- TTB safety device
- Log set
- Caution! Never use more grains than the supplied quantity.
- Remote control
- Operating instructions for the remote control
- Setting the display (from F/12h to C/24h, and vice versa)
- Setting the time
- Setting the desired temperature
- Programming the timer function
- Using various options
- AUTO temperature adjustment
- Timer (TIMER)
- Changing the battery
- Safety switch-off
- Directions
- INSTRUCTIONS FOR THE USER
- Operating the fireplace for the first time
- Turning off the main burner
- Turning off the pilot flame
- Instructions for the user
- TTB Safety device
- Operating the fireplace for the first time
- Maintenance
- Ventilation
- Warning and advice
- Possible error messages
- GUARANTEE
- Instructions techniques
Brand : WANDERS
Model : Venegance
Category : Heating