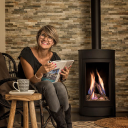
Marvic MF Cassette - Heating WANDERS - Free user manual and instructions
Find the device manual for free Marvic MF Cassette WANDERS in PDF.


| Product Type | Cassette stove |
| Brand | WANDERS |
| Model | Marvic MF Cassette |
| Category | Heating |
| Fuel Type | Wood logs (seasoned, <20% moisture) and smokeless solid fuel (anthracite or briquettes) |
| Nominal Heat Output (Wood) | 4.8 kW |
| Nominal Heat Output (Smokeless Fuel) | 4.5 kW |
| Efficiency (Wood) | 78.1% |
| Efficiency (Smokeless Fuel) | 70.8% |
| Weight | 65 kg |
| Flue Draught | 1.5 – 2.0 mm Wg |
| Minimum Chimney Height | 4.5 m from hearth to top |
| Refueling Interval (Wood) | 1 hour |
| Refueling Interval (Smokeless Fuel) | 1 hour |
| Distance to Combustibles (Shelf) | 575 mm |
| Distance to Combustibles (Side) | 300 mm |
| Hearth Thickness | Minimum 125 mm non-combustible |
| Air Controls | Primary air and air wash |
| Multi-Fuel Kit | Required for smokeless fuel (replaces grate parts) |
| Warranty | 1 year from purchase date |
Frequently Asked Questions - Marvic MF Cassette WANDERS
User questions about Marvic MF Cassette WANDERS
0 question about this device. Answer the ones you know or ask your own.
Ask a new question about this device
Download the instructions for your Heating in PDF format for free! Find your manual Marvic MF Cassette - WANDERS and take your electronic device back in hand. On this page are published all the documents necessary for the use of your device. Marvic MF Cassette by WANDERS.
USER MANUAL Marvic MF Cassette WANDERS
natural_image
Architectural cross-section diagram of a building facade with internal structural elements (no text or symbols)20-12-2011
INK.00.7927
Marvic MF Cassette
Instructions for Use, Installation and Servicing
For use in GB & IE (Great Britain and Republic of Ireland).
IMPORTANT
This appliance will become hot whilst in operation, it is therefore recommended that a suitable guard should be used for the protection of young children, the elderly or infirm. Do not attempt to burn rubbish in this appliance.
Please read these instructions carefully before installation or use. Keep them in a safe place for future reference and when servicing the fire.
APPLIANCE COMMISSIONING CHECKLIST 4
General Points 5
USER INSTRUCTIONS 6
Using the Appliance for the first time 7
Lighting the appliance 9
Running the appliance 9
Recommended Fuels 10
Ash Removal 12
Burning Tips 13
TECHNICAL SPECIFICATION 14
INSTALLATION INSTRUCTIONS 21
COMMISSIONING 24
MAINTENANCE and SERVICING 25
THE CLEAN AIR ACT AND SMOKE CONTROL AREAS 27
SPARE PARTS 28
WARRANTY 29
Dear Client,
Congratulations on your new stove, which will be a comfortable source of heat to enjoy for many years on end.
When designing this fireplace we took particular care regarding the ease of use, the operational safety and the design. The Marvic is developed and produced at our own factory in Netterden (the Netherlands) and is designed with the technical assistance of ACR heat products Ltd Birmingham UK and for the greater part handmade. Only the best materials are used for the construction and comply with current international standards. This will guarantee that your stove has a long life.
The first part of this user's guide gives you tips and directions about how to use your stove correctly and safely. The second part of the manual contains the installation instructions and the technical specifications of the Marvic. They are of particular importance to the installer.
We advise you to read this manual thoroughly before using your new stove and to keep the manual in a handy place. Your installer may need the manual for the yearly maintenance of your fireplace.
We wish you much warmth with your new fireplace!
The WANDERS team
APPLIANCE COMMISSIONING CHECKLIST
Dealer appliance was purchased from
Name:
Address:
Telephone number:
Essential Information - MUST be completed
Date installed:
Model Description:
Serial number:
Installation Engineer
Company name:
Address:
Telephone number:
Commissioning Checks (to be completed and signed)
Is flue system correct for the appliance yes no
Flue swept and soundness test complete yes no
Smoke test completed on installed appliance yes no
Spillage test completed
yes no
Use of appliance and operation of controls explained yes no
Clearance to combustible materials checked yes no
Instruction book handed to customer yes no
Signature:
name:
General points
1: Before installation and/or use of this appliance please read these instructions fully and carefully to ensure that you have fully understood their requirements.
2: The appliance must be fitted by a registered installer, or approved by your local building control officer.
3: All local regulations, including those referring to national and European Standards need to be complied with when installing the appliance.
4: Only use for domestic heating in accordance with these operating instructions.
5: You must burn only approved fuels. Do not use with liquid fuels or as an incinerator.
6: Appliance surfaces become very hot when in use. Use a suitable fireguard if young children, elderly or infirm persons are present.
7: Do not place combustible items on the wall or near the appliance. Exposure to hot temperatures will cause damage. Do not place furniture or other items such as drying clothing closer than 1m from the front of this appliance.
8: Extractor fans or cooker hoods must not be placed in the same room or space as this can cause appliance to emit fumes into the room.
9: Do not obstruct inside or outside ventilation required for the safe use of this appliance.
10: Do not make unauthorized changes to the appliance.
11: The chimney must be swept at least once a year.
12: Do not connect, or share, the same flue or chimney system with another appliance.
13: it is important to follow these instructions in order to achieve clean burning and to maximize the efficiency from the stove.
14: You must burn only approved fuels. Do not use with liquid fuels or as an incinerator.
15: The Marvic is capable of intermittent burning
User instructions
natural_image
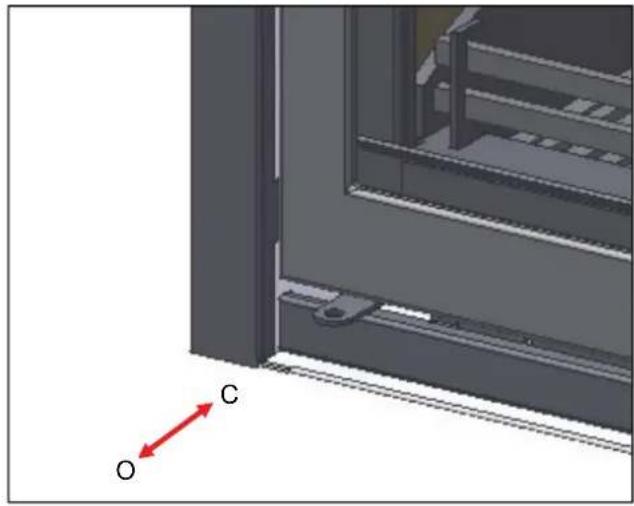
3D diagram of a server rack with labeled points O and C, showing structural components without any text or symbols.1: Primary Air - burns the fuel under the fuel bed. For use with solid fuel and initially with wood fires.
Push in to close pull out to open
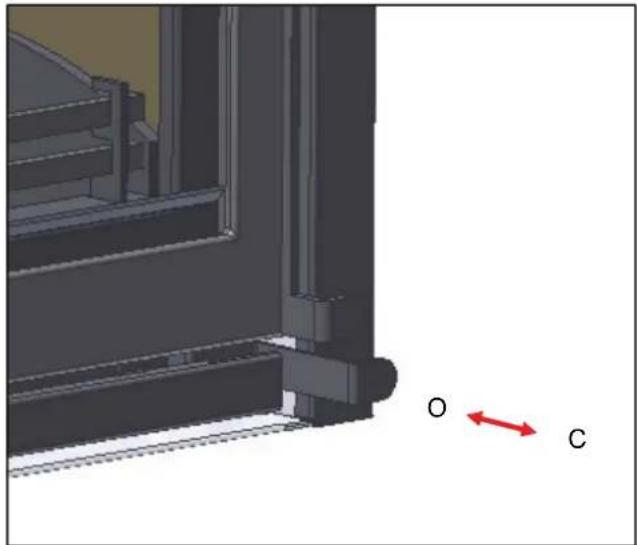
O=open
C=closed
natural_image
3D mechanical assembly diagram showing a bracket and shaft with directional arrows labeled O and C (no text or symbols beyond labels)2: Air wash - air drawn over the window cleans the glass. The source of Primary Combustion air when burning wood.
Push in to open pull out to close
natural_image
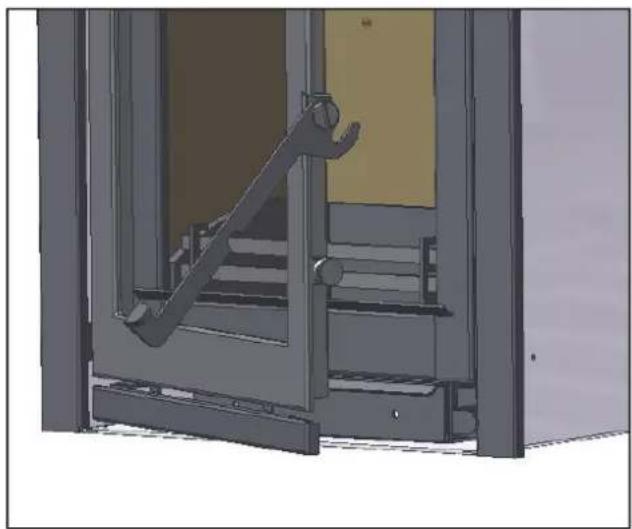
3D rendering of a mechanical device with a lever mechanism, showing internal components and mounting brackets (no text or symbols)Door handle
Use a protected gloved hand to operate.
To open the door:
1: Pull the lower portion of the handle
To close the door:
2: Hold the handle in the open position and push the door to the closed position
3: Rotate the handle to the vertical position
warning
Properly installed, operated and maintained this appliance will not emit fumes into the room.
Occasional fumes from de-ashing and refueling may occur.
Persistent fume emission is potentially dangerous and must not be tolerated.
If fume emission does persist:
- Open doors and windows to ventilate the room
- Allow fire to burn out or safely dispose of fuel from the appliance
- Check for chimney blockage and clean if required
- Do not attempt to relight until the cause of the emission has been identified and corrected
If necessary seek expert advice.
- All open flue appliances can be affected by temporary atmospheric conditions which may allow fumes to enter the house. Because of this it is recommended that an electronic carbon monoxide detector conforming to BSEN50291 be fitted and maintained.
First time use
1: To allow the appliance to settle, and fixing glues and paint to fully cure, operate the appliance at allow temperature for first few days.
2: Do not touch the paint during the first period of use.
3: During this time the appliance may give off some unpleasant odours. Keep the room well ventilated to avoid a build-up of fumes.
Wood Logs
Burn only seasoned timber with a moisture content of less than 20% and a length of 250mm. To ensure this allow cut wood to dry for 12 to 18 months.
Poor quality timber:
Causes low combustion efficiency
Produces harmful condensation
Reduces effectiveness of the air wash and life of the appliance
Do not burn construction timber, painted, impregnated / treated wood, manufactured board products or pallet wood.
Solid fuel
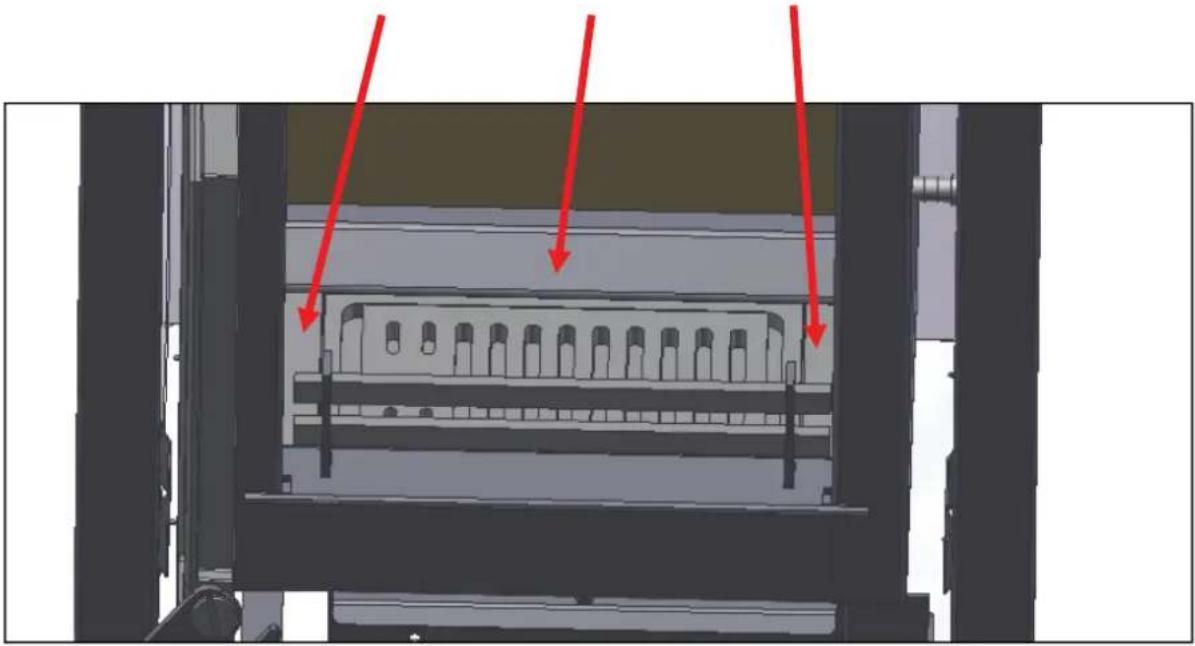
To burn smokeless fuels it is required to fit a multi fuel kit.
This is fitted by replacing the parts on the bottom of the combustion chamber in the order shown.
natural_image
Interior view of a mechanical or electrical enclosure with red arrows pointing to internal components (no text or symbols visible)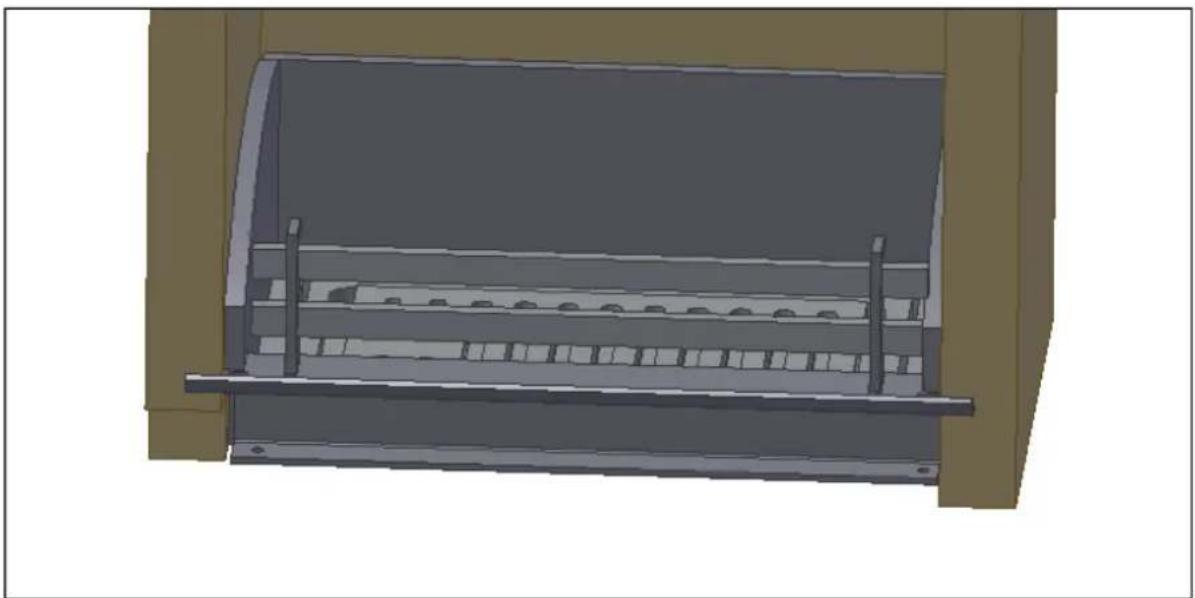
natural_image
3D architectural rendering of a building facade with horizontal shelves and structural supports (no text or symbols)Burn only anthracite or manufactured briquette smokeless fuels listed as suitable for use with closed heating appliances
Do not burn bituminous coal, ‘petro-coke’ or other petroleum based fuels as this will invalidate the product guarantee.
natural_image
Interior of a traditional stove burner with wooden planks and a bright flame (no text or symbols visible)Lighting the appliance
For best results set air controls primary air open and air wash completely open
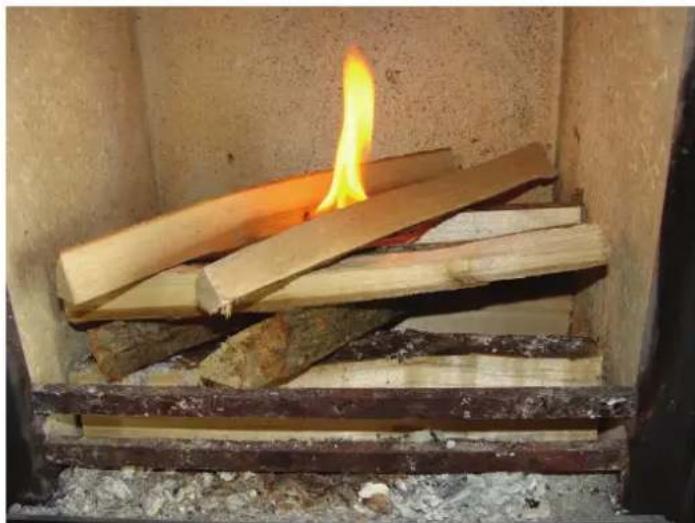
Place firelighters and two hands full of dry kindling wood on the grade Light the firelighters,
Leave the door slightly open as the fire establishes and the glass warms to avoid buildup of condensation.
after several minutes the fire bed is dying back at this point you place
lager pieces of wood on the fire approximately 1 kg leave the air controls unaltered when these logs are well alight place two more logs onto the fire approximately 1,4 kg the air controls and the door being in the same position as before after about 20 minutes from the start close the door and primary air control.
Do not overload the fire ensure that the top of the logs are no higher than and do not obstruct the rear holes the maximum amount of fuel specified in this manual should not be exceeded overloading can cause excess smoke
Close the door do not leave the door open as this could over-fire and damage the appliance.
natural_image
3D technical illustration of a mechanical component with ribbed structure and metal bracket (no text or symbols)Refueling
after refueling set the door on the latch but not closed. the primary air set fully open and the secondary air set in the required position after 5 minutes when the logs are burning well close the door and the primary air supply.
If there is insufficient burning material in the firebed to light a new fuel charge, excessive smoke emission can occur. Refuelling
must be carried out onto a sufficient quantity of glowing embers and ash that the new fuel charge will ignite. If the fire bed is too low or cool, suitable kindling must be use to relight fires.
Operation with the door open can cause excess smoke. The appliance must not be operated with the appliance door left open except as directed in the instructions.
Air controls left open
Operation with the air controls open can cause excess smoke. The appliance must not be operated with air controls or dampers door left open except as directed in the instructions
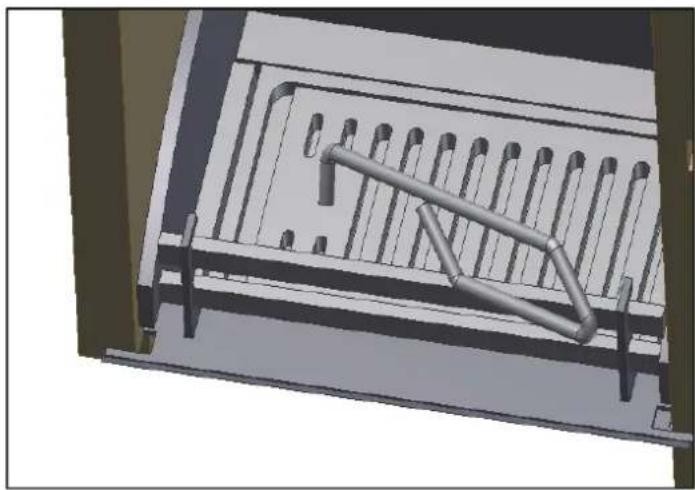
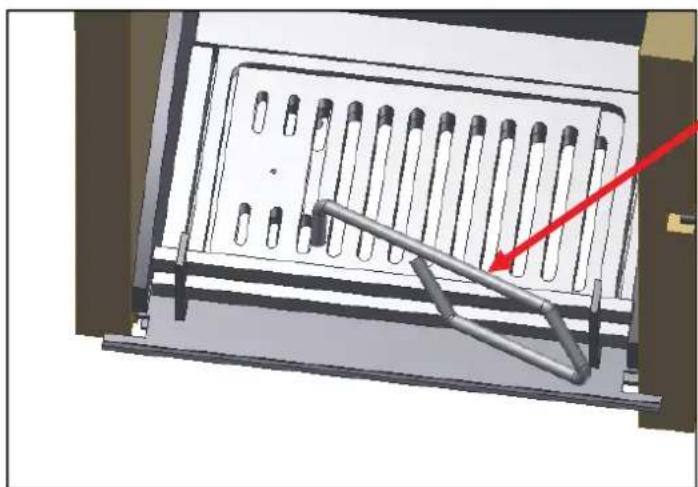
You can close the grate by using the tool that is supplied with the stove
Close the Primary air control and use the Air wash to control the burn rate when appliance is at operating temperature,
Wood burns best on a bed of ash.
Burn new logs at high output for a few minutes before adjusting the Air wash control. Refuel little and often for clean, burning.
When in use, burning the appliance at high output for a short period also reduces tars and soot.
If a chimney fire occurs:
Shut all air controls immediately.
Evacuate the building.
Call the fire brigade.
Do not re-enter the building until it is confirmed safe.
Do not use the appliance after a chimney fire until:
It has been inspected by a registered installer, confirming the appliance is safe to use.
natural_image
3D diagram of a mechanical component with multiple cylindrical rods and a metal bracket, showing a red directional arrow (no text or symbols)Burning Solid fuel
open the grate by using the tool that is supplied with the stove
For best results set air controls primary air open and air wash open
Open the Primary air control fully to establish a glowing bed before adding new fuel
Burn new fuel at high output for a few minutes before adjusting the primary air control to the desired setting
Refuel little and often for clean, efficient burning.
Do not burn large amounts of fuel with the Primary Air Control on low settings for long periods of time. This reduces the glass cleaning effect of the air wash and causes tars and soot to build-up in the appliance and flue system.
When in use, burning the appliance at high output for a short period also reduces tars and soot.
You must burn only anthracite or smokeless fuels suitable for use in closed appliances.
Do not burn bituminous coal, ‘petro-coke’ or other petroleum based fuels as this invalidates the product guarantee.
Fuel Quality Wood
Use wood with a moisture content of less than 20%. Seasoned logs have the bark beginning to lift and peel away and cracks radiating from the center. They feel lighter than fresh cut wood of a similar size and sound hollow when struck against each other. Logs should not feel damp.
Symptoms related to wet wood:
Difficulty starting and keeping a fire burning well
Smoke and small flames
Dirty glass and/or firebricks
Rapid creosote build-up in the chimney
Low heat output
Short burn times, excessive fuel consumption and blue/grey smoke from the chimney
Burn at high output for a short period each day to avoid large build-ups of tars and creosote within the appliance and the flue system.
Fuel Quality Solid Fuel
Use recommended solid fuels approved for use with closed appliances.
Symptoms related to unsuitable fuels include:
Difficulty starting and keeping a fire burning well
Smoke and small flames
Dirty glass and/or fire bricks
Short life span for grate and baffles
Permanent staining of glass
Flue Draught
The chimney has two main functions:
To safely remove the smoke, gases and fumes from the house.
To provide a sufficient amount of draught in the appliance ensuring the fire keeps burning.
Draught is caused by the rising hot air in the chimney when the appliance is lit.
Symptoms of poor performance related to flue draught include:
Excessive fuel consumption (high flue draught)
Poor burning control, overheating (high flue draught)
Wind noise from air controls (high flue draught)
Difficulty getting a fire going and keeping it burning well(low flue draught)
Low heat output (low flue draught)
Smoke entering room when doors opened (low fluedraught)
The construction, position, size and height of the chimney all affect the performance of the flue draught.
Other factors affecting the flue draught include:
Trees or other buildings nearby causing turbulence
High and gusty winds
Outside temperature
Outside weather conditions
Incorrect additional ventilation to building
Blocked flue / chimney
Your installer should advise you on possible solutions.
If the appliance emits smoke into the room continuously:
Close the air controls and allow the appliance to go out
Ventilate the room to clear the fumes
Leave the room
Do not re-light the appliance until the problem is solved.
natural_image
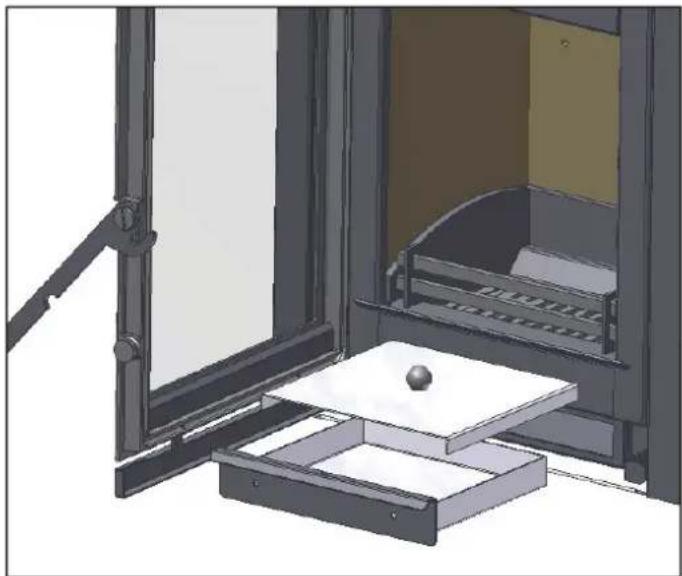
3D rendering of a mechanical device with a tray and central component, no visible text or symbolsAsh removal
Open door.
Remove ash pan.
Cover it by using the supplied ash pan cover.
Remove ash carefully - heat can remain long after use.
Do not place hot ash in a bin made from combustible material.
Chimney sweeping
To maintain safe and efficient use of the appliance, the chimney/flue must be inspected and swept at least once a year by a qualified chimney sweep.
If the appliance is used continuously throughout the year, or it is used to burn wood, more frequent sweeping is recommended.
The best time to have the chimney swept is at the start of the heating season.
The chimney, any connecting flue pipe and the appliance flue ways, if incorporated, must be regularly cleaned.
If the chimney is believed to have previously served an open fire it must be swept extra careful.
This should be done by a registered chimney sweep, who will issue you with a certificate.
Stove glass blackening
This has four possible causes:
Incorrect use of Air wash
See User Instructions.
Burning unseasoned wood
See User Instructions
Stove operated at too low a temperature
Failing to close down the Primary Air Control once the appliance has heated up to this range may cause the appliance to exceed the ideal temperature range and to over-fire. Over-firing can cause permanent damage to the appliance and invalidates your warranty. Burn with the Air wash Control fully open for approximately 20 minutes to cure this.
The problem may be caused by damping down the appliance during periods of extended burning.
Problems with the flue, in particular insufficient air pull.
If the flue is not working efficiently the glass can blacken. A flue which has too much downdraft may be too short, needs lining, or has too many bends. This can also cause blackening of the stove glass. Contact the installer or a flue specialist for advice.
Appliance is producing tar
This can be identified by:
very strong pungent smell shortly after the appliance is lit and heats up.
Glass blackening.
This is caused by burning damp wood and running the appliance at too low a temperature.
Use well seasoned wood and operate the appliance within the ideal temperature range.
Tar is a major cause of chimney fires. If the appliance experiences problems with tar build up consult a chimney sweep before continued use of the appliance.
In the unlikely event of a problem that cannot be solved by these tips contact your installer or dealer for help.
Technical specification
| Nom heat output | efficiency | CO emission At 13% O^2 | Flue gas temperature | Flue gas Mass flow | |
| Wood 4,8 kW | 78,1% 0,27% | 258°C 4,5 g/s | |||
| Ancit | 4,5 | kW 70,8% | 0,04% | 318°C | 4,1 |
g/s
Distance from combustibles Shelf 575 mm
Side 300 mm
| Refuelling | interval | Wood | Ancit | ||
| 1 | h | 1 | h | ||
mass of the Marvic 65 kg
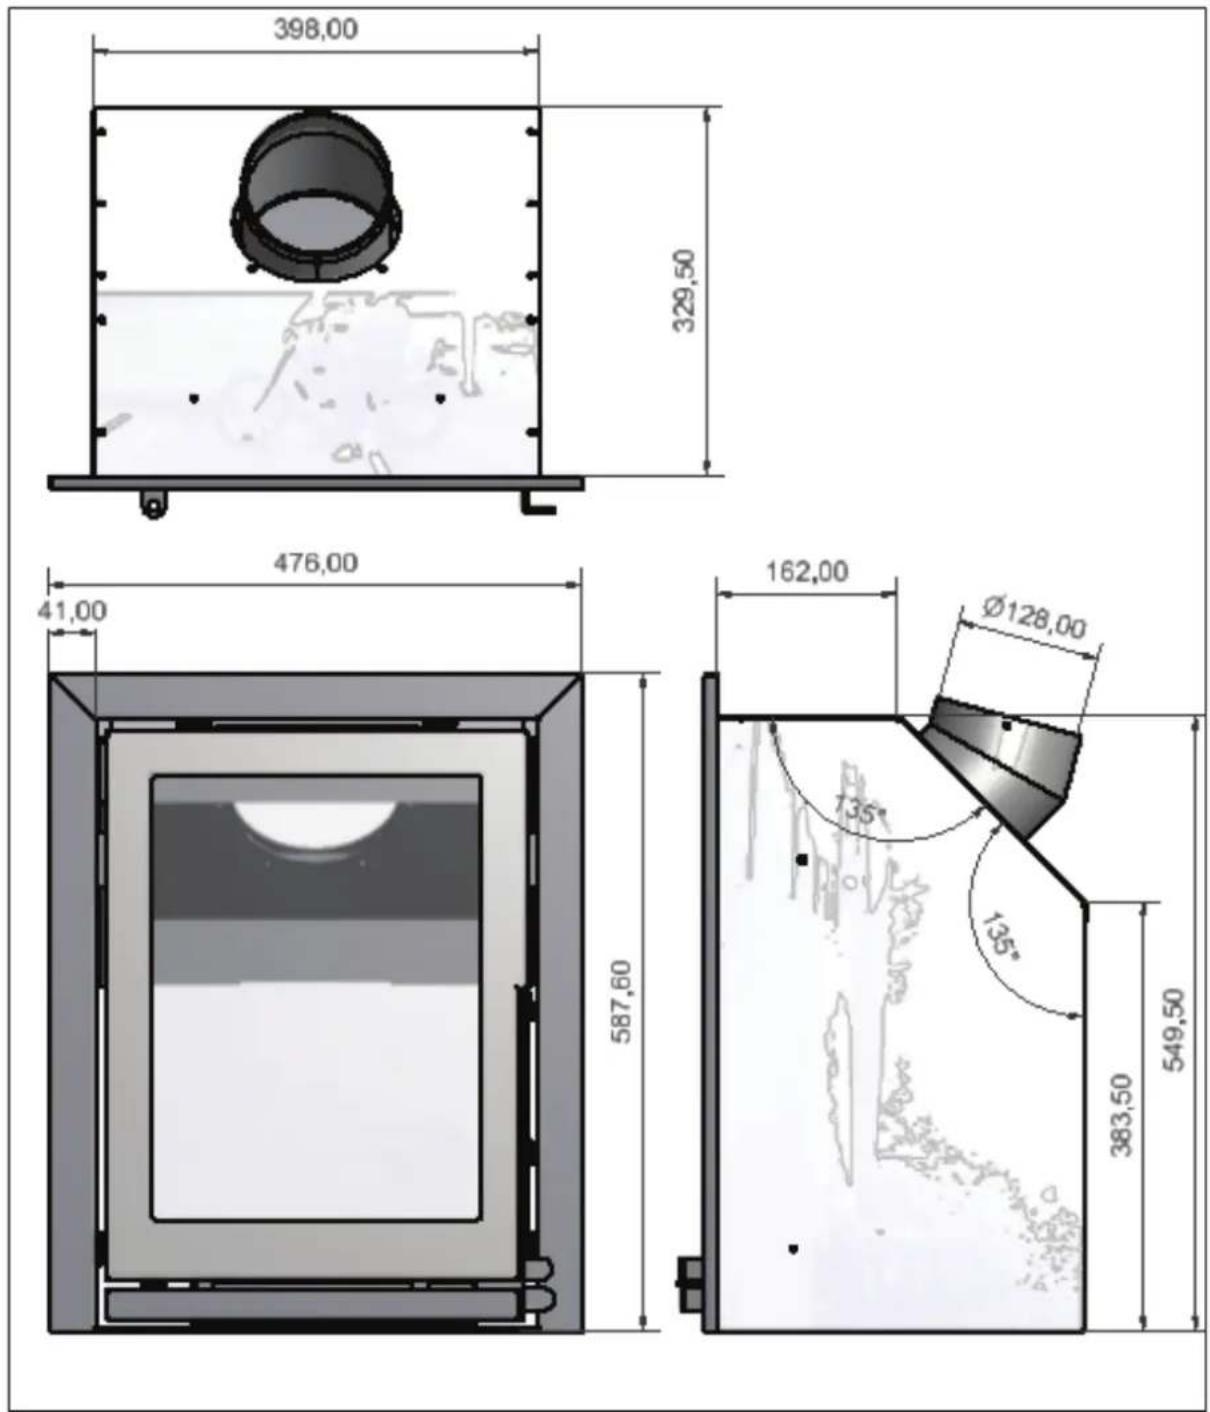
The flue or chimney system must be in good condition.
It must be inspected by a competent person and passed for use with the appliance before installation
Products of combustion entering the room can cause serious health risks.
You must check the following:
The construction of the masonry chimneys, flue block chimneys and connecting flue pipe system must meet the requirements of the Building Regulations
A flexible flue liner system certified for use with solid fuel systems and installed to manufacturer's instructions and Building Regulations should be used.
Theflue liner must be replaced when an appliance is replaced unless proven to be recently installed and in good condition.
The minimum height of the flue or chimney must be 4.5m from the hearth to the top of the flue, with no horizontal sections, a maximum of 3 bends with angles of less than 45 degrees
Ensure the connecting flue pipe is kept a suitable distance from any combustible material and does not form part of the supporting structure of the building
Make provision to remove the appliance without the need to dismantle the chimney
Any existing flue must be confirmed as suitable forthenew intended use as defined in the Building Regulations.
The flue or chimney systems must be inspected and swept to confirm the system is structurally sound and free from obstructions.
If the appliance is believed to have previously served an open fire the chimney must be swept a secondtime within a few months of regular use after installation to clear any soot falls that may occurred due to difference in combustion levels.
The flue exit from the building must comply with local building control rules.
Do not connect or share the flue or chimney system with another heating appliance
You must sweep and inspect the flue when the appliance is installed.
You must check the flue draught with all windows and doors closed and any extraction fans in this or adjoining rooms running at maximum speed.
Max. Draught = 2.0mm Wg
Min. Draught = 1.5mm Wg
The chimney flue must always end up in outlet area 1 (see the drawing and the table below)
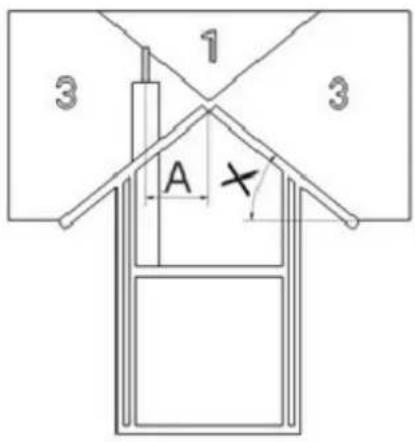
Roof slope x larger than 23°
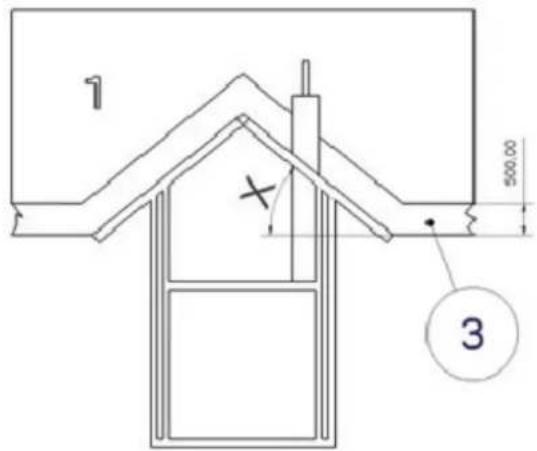
Roof slope x smaller than23°
| Height of chimney on the roof at a horizontal distance A measured from the ridge | |||||||||
| Roof with slope X | Horizontal distance A from the ridge, in metres | ||||||||
| On the ridge | 0.5 m | 0.75 m | 1 m | 1.25 m | 1.5 m | 2 m | 3 m | 4 m | |
| 25^ | 0.5 | 0.75 | 0.85 | 1.0 | 1.1 | 1.2 | 1.6 | 2.5 | 3.3 |
| 30^ | 0.5 | 0.85 | 1.2 | 1.6 | 2.0 | 2.4 | 3.2 | 4.9 | 6.5 |
| 35^ | 0.5 | 1.0 | 1.8 | 2.4 | 3.0 | 3.6 | 4.8 | 7.3 | 10 |
| 40^ | 0.5 | 1.2 | 2.4 | 3.2 | 4.0 | 4.8 | 6.4 | 10 | |
| 45^ | 0.5 | 1.5 | 3.0 | 4.0 | 5.0 | 6.0 | 8.0 | 12 | |
Ventilation :
For satisfactory appliance operation with a natural draught, check that sufficient air for combustion is available in the room.
This appliance has a nominal output not exceeding 5kW (and therefore does not normally require any additional permanent ventilation) but spillage is detected when commissioning the fire, there may be insufficient natural ventilation and additional ventilation may be required.
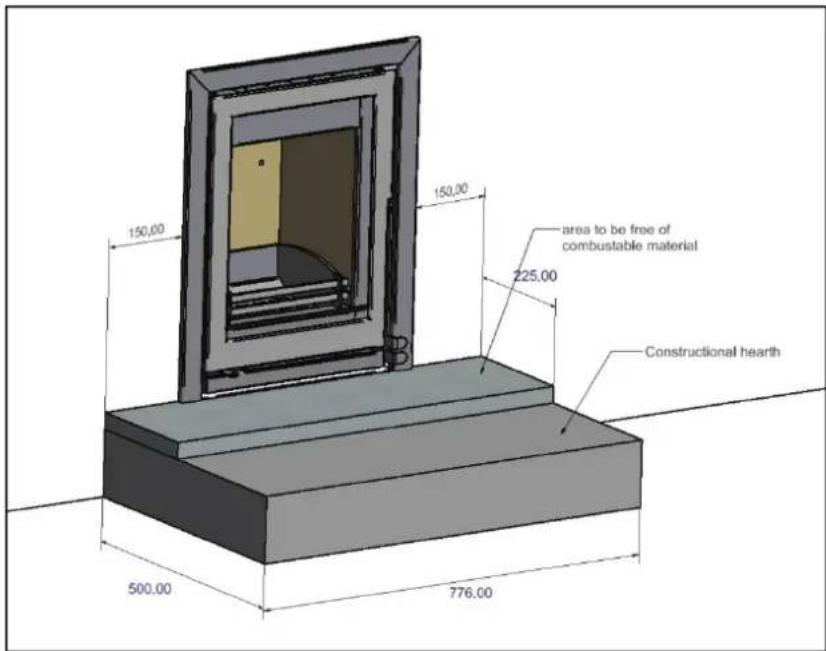
The appliance must stand on a non-combustible constructional hearth which is at least 125mm thick with the minimum dimensions as shown in diagram. If it is to be fitted in a raised setting consideration may need to be given to extending the depth of the hearth to safely containing any falling logs or embers.
The building must have a suitable load-bearing capacity for the hearth and appliance.
Consult a structural engineer for advice before proceeding
When fitting into an existing hearth check:
That the appliance complies with current construction regulations and is at least the minimum sizes shown
If there is no existing fireplace or chimney it is possible to construct a suitable non-combustible housing and hearth setting. The flue must be installed in accordance with all local and national regulations and current rules in force.
Check if adding a new chimney to your property requires planning permission
Some houses are built using a timber frame construction with high levels of thermal insulation. Isolate the appliance from combustible materials, and provide sufficient ventilation to maintain the heating efficiency.
Distance to combustible material
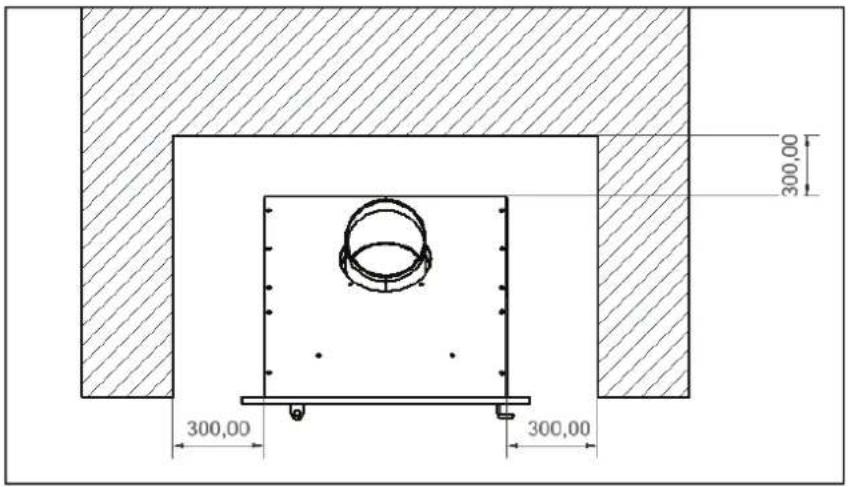
All parts of the studwork must be non-combustible for example metal studding.
Do not use combustible materials within the dimensions as shown in the diagrams on this page.
Fill the space around the appliance not with insulation material.
The space built for the appliance must be ventilated to prevent a buildup of heat. If the space is sealed then you must fit vents at both low and high levels of approximately 50cm2 each. These vents must take cold air from the room and return warm air back into the room.
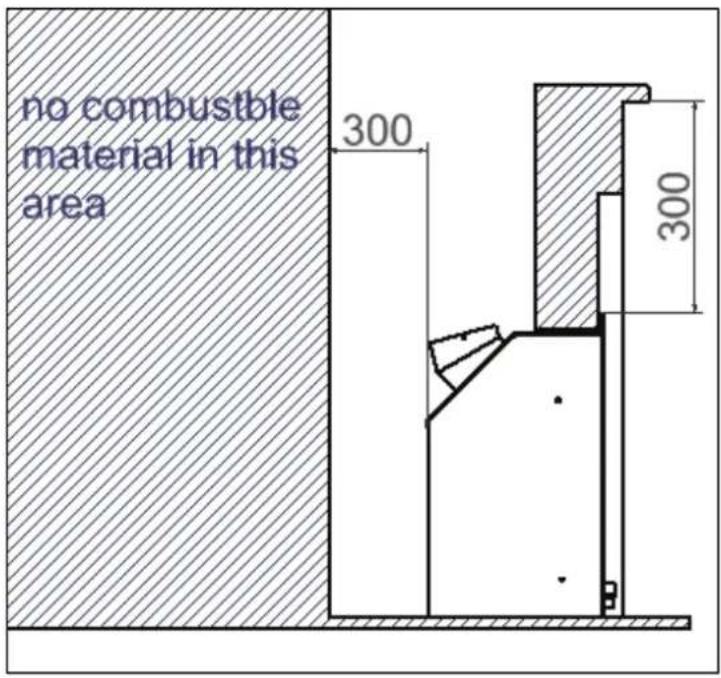
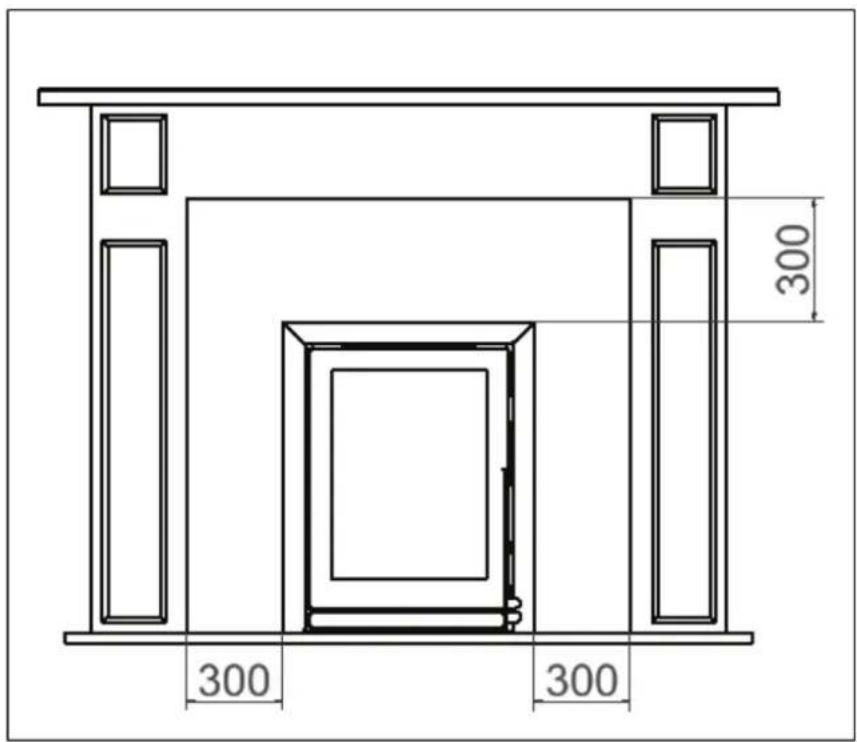
If the appliance is to be fitted with a fire surround, use the minimum clearances see Diagram, between any point of the appliance and any combustible material.
If stone, granite, marble or any other natural material is used to construct the fire surround, or any part of it, provision should be made for expansion and movement of the parts due to heating and cooling.
All fire surrounds should be suitable for use with solid fuel heating products.
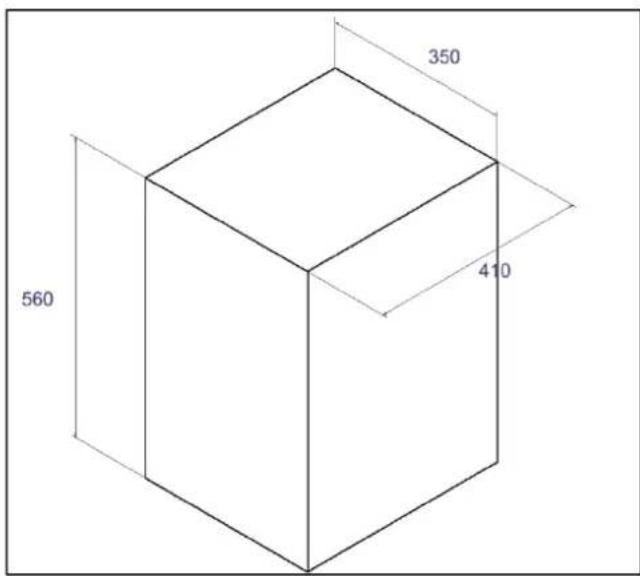
Minimum builders opening
To make installation easier make the opening larger than the minimum requirements where possible. Extra care must be taken when creating a builders opening. Pay careful attention to the distance to combustible materials recommended and ensure the housing for the appliance is built from non-combustible material.
INSTALLATION INSTRUCTIONS
Before installation and/or use of this appliance please read these instructions carefully to ensure that all requirements are fully understood.
The appliance must be fitted by a registered installer, or approved by your local building control officer.
It is very important to understand the requirements of the national Building Regulations and standards, along with any local regulations and working practices that may apply. Should any conflict occur between these instructions and these regulations then the regulations must apply.
Your local Building Control Office can advise regarding the requirements of the regulations.
The appliance must be fitted by a registered installer or approved by your local building control officer.
Asbestos: This appliance contains no asbestos. If there is the possibility of disturbing any asbestos in the course of installation seek specialist guidance and use appropriate equipment.
Metal Parts: Take care when installing or servicing the stove to avoid personal injury.
Each installation is unique to the property so it is not possible to give details to suit every setting. The installation must comply with Building Regulations and be made using "best practice" construction methods.
All local regulations, including those referring to national and European Standards need to be complied with when installing the appliance.
natural_image
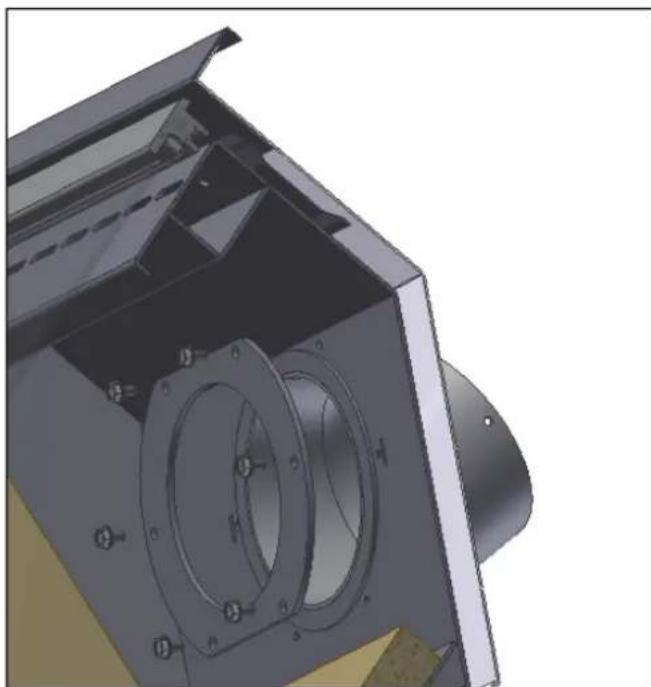
3D mechanical component with internal circular features and mounting holes (no visible text or symbols)1: Take care when installing the appliance careless handling can damage the finish.
2: Remove the 6 screws holding the flue collar
3: Remove disc and flue collar
Tools required 10mm A/F spanner /socket wrench
natural_image
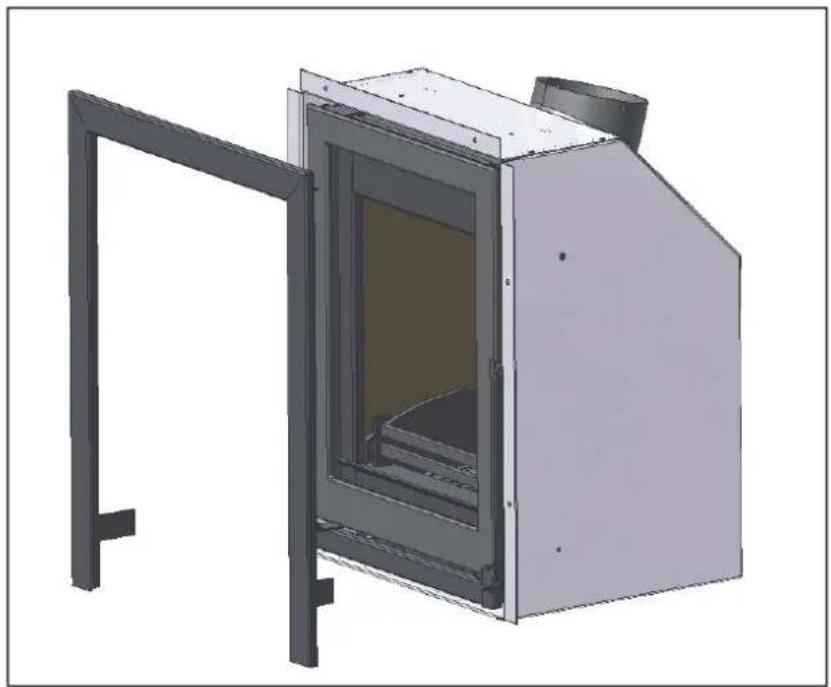
3D rendering of a metallic industrial furnace or oven with a door and vent, showing internal structure and mounting brackets (no text or symbols visible)4: Remove the trim by pulling it towards the front of the appliance.
- Slide the Marvic into the opening
- Check the fit of frame before fixing the appliance into position
Some installations may require the frame to be fitted before final fixing.
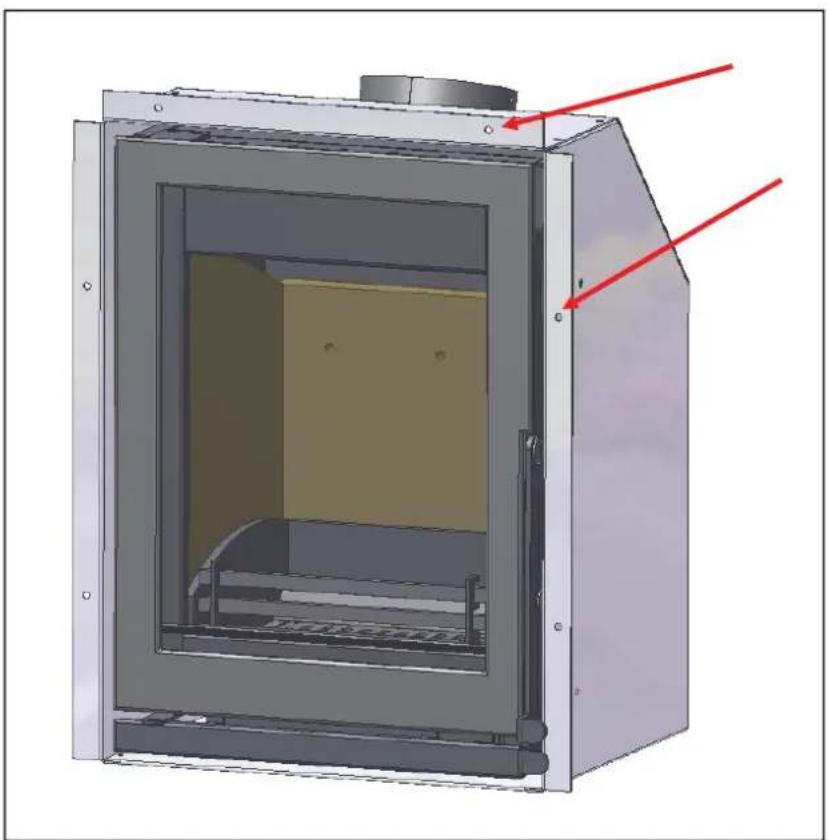
natural_image
3D rendering of a mechanical oven or chamber with internal compartments and mounting brackets (no text or symbols visible)• Fix in place using the fixing holes located on the sides and top flangesee diagram.
- Ensure that the flange is still flat against the opening after tightening the fixing screws
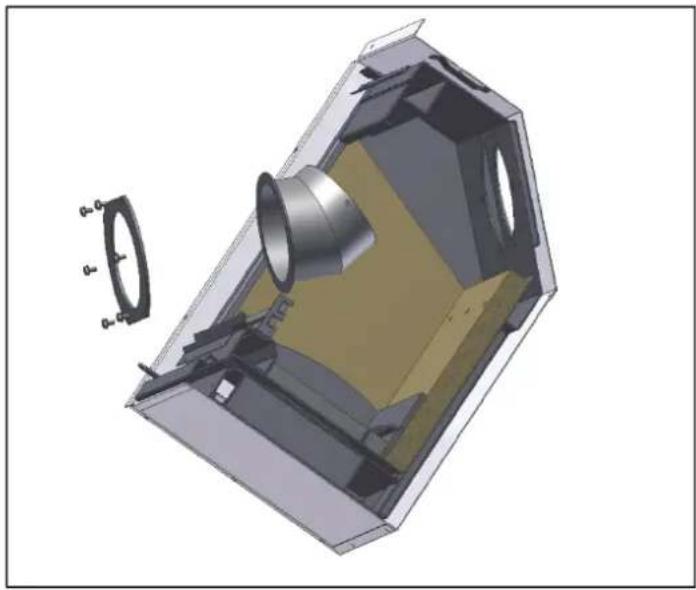
natural_image
3D cutaway view of a mechanical housing with internal components and mounting holes (no text or symbols)- Connect the flue liner and flue adaptor to the appliance by inserting the flue spigot from the inside of the Marvic
- Slide the flue pipe or liner adaptor inside the spigot
- Seal the flue to the spigot using fire cement
- Seal the spigot to the inside of the Marvic using the 6 screws and fixing ring.
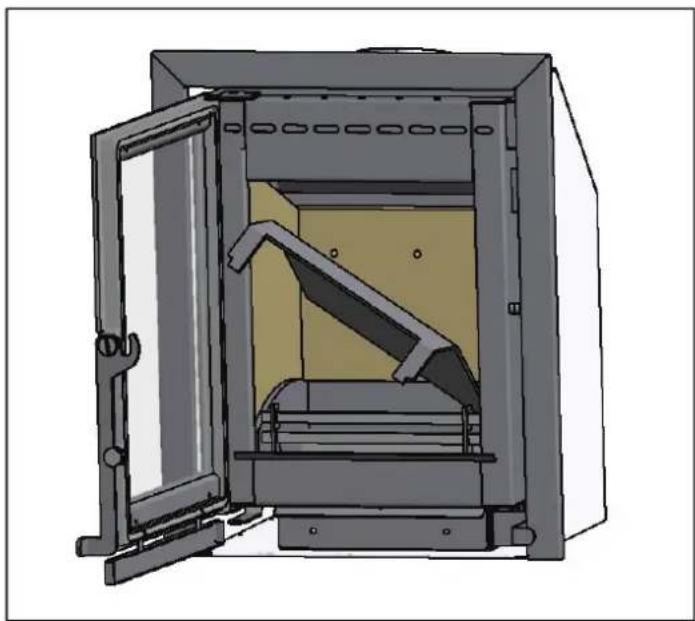
natural_image
3D rendering of a mechanical oven or furnace with open door and internal structure (no text or symbols)Baffle
- Rotate the baffle to position it on top of the fire bricks see diagram
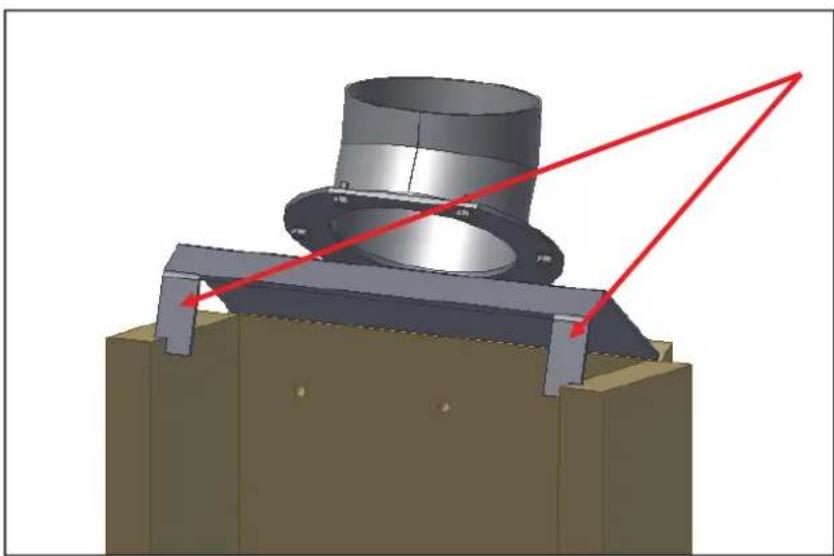
natural_image
3D mechanical assembly diagram showing a flanged component mounted on a base with red arrows indicating direction (no text or symbols)Place baffle on its support bars see diagram
COMMISSIONING
To commission:
- Replace the firebricks, baffle, and log retainer
- Check the door alignment and catch operation, adjust if required
- Check the soundness of door seals, castings and joints
- Check the operation of the air controls
Now carry out a final smoke draw test:
- First warm the flue with a blowlamp, or similar, for about 10 minutes
- Place a smoke pellet on the centre of the grate, with the air controls open
- Close the door
Smoke should now be drawn up the flue and be seen to exit from the flue terminal
- Complete test with all doors and windows closed in the room where the appliance is fitted
- If there are any extractor fans in adjacent rooms, the test must be repeated with the fans running on maximum and interconnecting doors open
- Check the effect of ceiling fans during the test
If the test fails, re-check the suitability of the flue system and ventilation. An inadequate air supply to the room is potentially dangerous.
- Light the appliance and slowly increase the temperature to operating levels
- Ensure no combustion products enter the room
- Open the main fire door when the appliance reaches operating condition and carry out a spillage test with a smoke match or pellet around the door opening
If excessive spillage occurs:
- Allow the appliance to cool and re-check the flue system and ventilation
Finally:
- Explain the safe operation of the appliance and the use of the controls to the user and the importance of only using suitable fuels
- All open flue appliances can be affected by temporary atmospheric conditions which may allow fumes to enter the house. Because of this it is recommended that an electronic carbon monoxide detector conforming to BSEN50291 be fitted and maintained.
- Explain the cleaning and routine maintenance requirements
- Explain the requirement to use a suitable fireguard when children, elderly or infirm persons are near the appliance
- Record dealer/supplier details and installer details in Instructions
- Record serial number in page 4 of Instructions
This number is required when ordering spare parts and making warranty claims
- Give the copy of the Instructions to the customer
MAINTENANCE and SERVICING
At the end of the heating season strip, inspect and clean the appliance as detailed:
- Allow appliance to cool
- Remove all of the following internal parts; baffle, firebricks, complete grate, and ash pan. For Multi fuel versions remove the complete grate and ash pan.
Take care handling firebricks, as they can become fragile after a period of use.
• Vacuum clean any remaining ash and debris from the inside of the appliance.
- Clean the internal surfaces of the appliance using a wire brush and scraper as required
Vacuum and brush the resulting debris from the appliance.
- Clean the grate parts with a wire brush, and check the parts for any damage
- Replace any damaged parts
- Check and clean the firebricks with a soft brush
- Replace broken bricks
Some surface damage will occur during use. The life of the bricks will depend on the type of fuels burnt and the level of use. Damaged bricks should be replaced as soon as possible.
• Re-fit cleaned internal parts
- Remove the door rope seal from the outer edge of the door and clean the old glue from the door sealing rope groove
Do not use abrasive cleaners to remove tar or soot deposits from the glass.
- Fit new door rope seal, gluing it in place
- Press the new door sealing rope into the locating groove, placing the joint in the middle of the lower edge of the door.
When fitting new door seals, close the appliance door and leave for at least 12 hours before using. This allows the adhesive to fully bond to the seal before use.
- Lightly oil the door catch mechanism and hinge pins Avoid getting oil onto the door seals and glass use heat resisting grease like copper grease.
The Clean Air Act 1993 and Smoke Control Areas
Under the Clean Air Act local authorities may declare the whole or part of the district of the authority to be a smoke control area. It is an offence to emit smoke from a chimney of a building, from a furnace or from any fixed boiler if located in a designated smoke control area. It is also an offence to acquire an "unauthorised fuel" for use within a smoke control area unless it is used in an "exempt" appliance ("exempted" from the controls which generally apply in the smoke control area).
The Secretary of State for Environment, Food and Rural Affairs has powers under the Act to authorise smokeless fuels or exempt appliances for use in smoke control areas in England. In Scotland and Wales this power rests with Ministers in the devolved administrations for those countries. Separate legislation, the Clean Air (Northern Ireland) Order 1981, applies in Northern Ireland. Therefore it is a requirement that fuels burnt or obtained for use in smoke control areas have been "authorised" in Regulations and that appliances used to burn solid fuel in those areas (other than "authorised" fuels) have been exempted by an Order made and signed by the Secretary of State or Minister in the devolved administrations.
The Marvic has been recommended as suitable for use in smoke control areas when burning wood. The fitting of a system to the secondary air control should be implemented within smoke control areas to ensure that the air supply holes remain 3mm open when the operator has nominally fully shut the control.
Further information on the requirements of the Clean Air Act can be found here: http://smokecontrol.defra.gov.uk/
Your local authority is responsible for implementing the Clean Air Act 1993 including designation and supervision of smoke control areas and you can contact them for details of Clean Air Act requirements
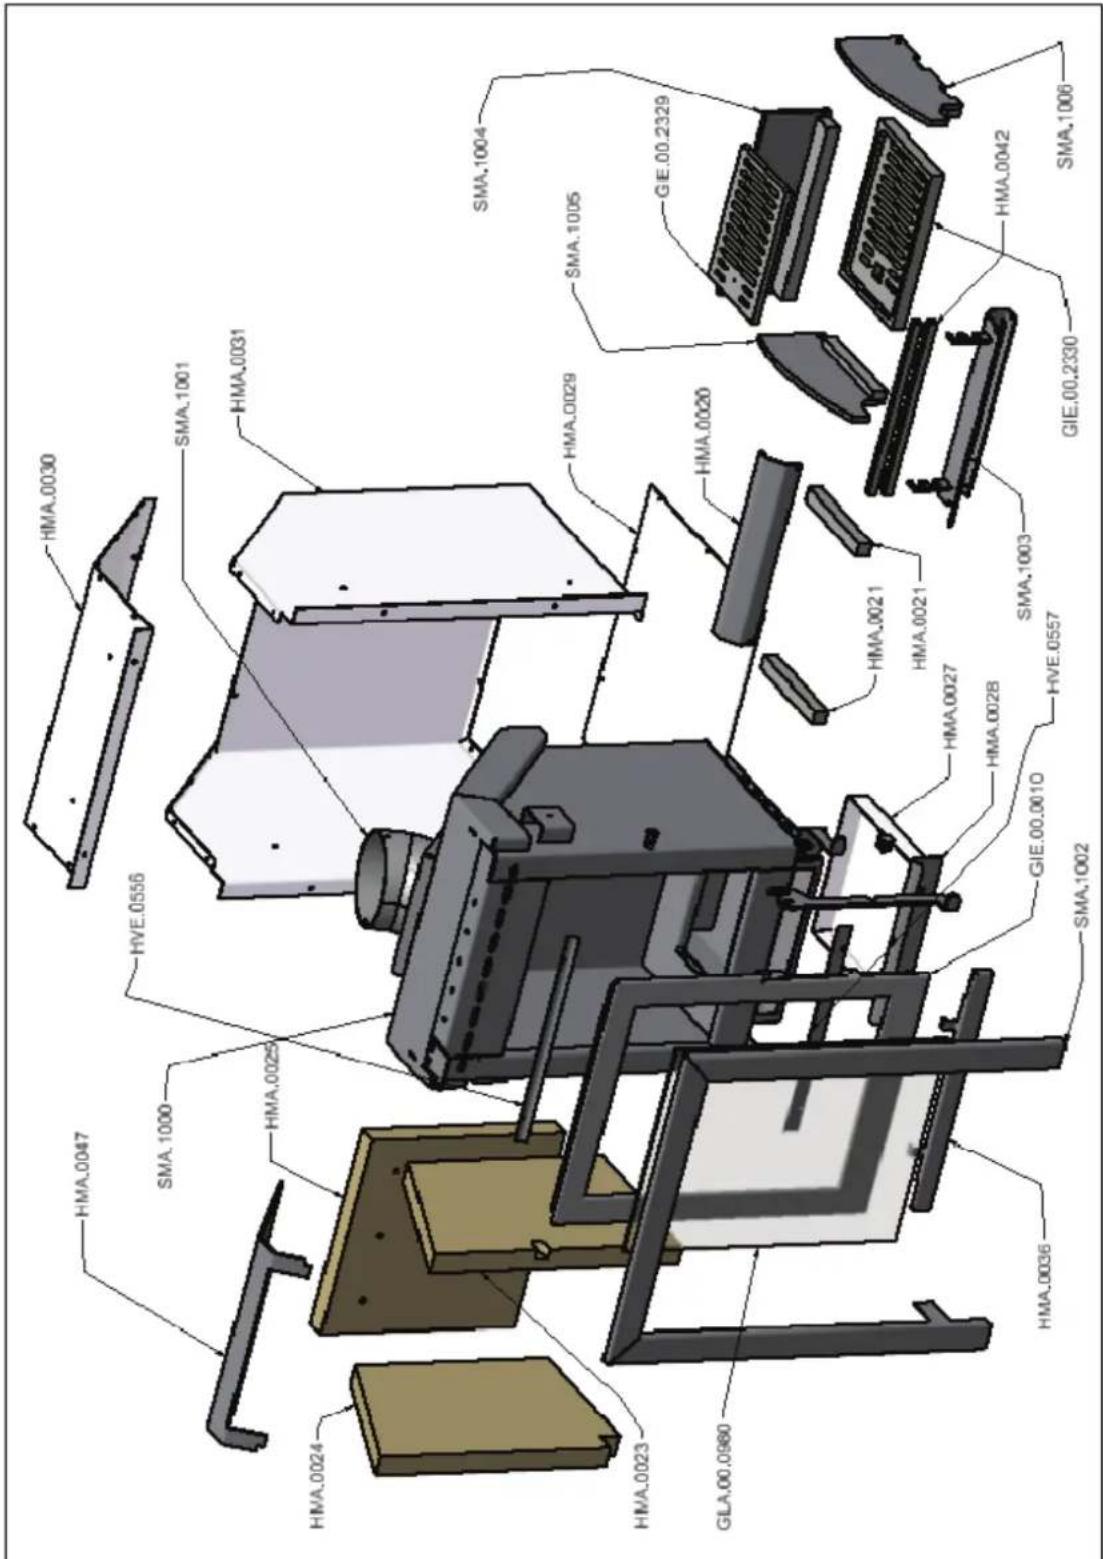
Warranty
WANDERS Metaalproducten B.V. in Netterden, the Netherlands, gives a one-year guarantee after the purchase date, provided that the fireplace is properly installed and used in accordance with the instructions in the manual.
The guarantee includes all defects which can be reduced to flaws in material and construction, in which case you will receive the new parts free of charge. Labor costs or other expenses are not covered by the guarantee. You can send defect parts (carriage paid) to WANDERS Metaalproducten B.V., Amtweg 4, 7077 AL in Netterden [The Netherlands].
The guarantee does not include: failure due to improper use; non-compliance with the installation and operating instructions; installation by a non-certified installer; negligence of the apparatus and converting the fireplace to be fired with another kind of gas.
Wanders cannot be held responsible for any cracks in stuccoed walls or discoloration of walls, ceilings and/or grates after burning the fireplace. Discoloration is caused by the burning of dust particles in the convection cover. To reduce the chance of cracks in stucco and to minimize discoloration we refer to the advice given for decorative hearths. Your installer can give you more information.
Any complaints will be dealt with after the sales firm, the installer or the gas company filed a complaint and sent a copy of the purchase receipt with purchase date. Any repairs do not entitle you to extend the guarantee term. All consequential damages or loss are excluded.
Wanders Fires and Stoves
Amtweg 4
7077 AL Netterden
The Netherlands
Tel: 0031 (0)315-386414
Fax: 0031 (0)315-386201
E-mail: info@wanders.nl
www.wanders.nl

- Marvic MF Cassette
- Instructions for Use, Installation and Servicing
- IMPORTANT
- APPLIANCE COMMISSIONING CHECKLIST
- Dealer appliance was purchased from
- Essential Information - MUST be completed
- Installation Engineer
- Commissioning Checks (to be completed and signed)
- General points
- User instructions
- Door handle
- warning
- First time use
- Wood Logs
- Solid fuel
- Lighting the appliance
- Refueling
- Air controls left open
- Burning Solid fuel
- Fuel Quality Wood
- Fuel Quality Solid Fuel
- Flue Draught
- Ash removal
- Chimney sweeping
- Stove glass blackening
- Stove operated at too low a temperature
- Problems with the flue, in particular insufficient air pull.
- Appliance is producing tar
- Technical specification
- The flue or chimney system must be in good condition.
- You must check the following:
- You must sweep and inspect the flue when the appliance is installed.
- Ventilation :
- Distance to combustible material
- Minimum builders opening
- INSTALLATION INSTRUCTIONS
- Baffle
- COMMISSIONING
- To commission:
- MAINTENANCE and SERVICING
- The Clean Air Act 1993 and Smoke Control Areas
- Warranty
Brand : WANDERS
Model : Marvic MF Cassette
Category : Heating