EConvect metal LCD - Electric heater Eurom - Free user manual and instructions
Find the device manual for free EConvect metal LCD Eurom in PDF.


| Product type | Wall-mounted electric convector |
| Brand | Eurom |
| Model | EConvect metal LCD |
| Power supply | 220-240 V ~ 50 Hz |
| Maximum power | 850 - 1000 W |
| Dimensions (W x H x D) | 73 x 32.5 x 8 cm |
| Weight | 3.3 kg |
| Installation type | Wall mounting only |
| Display | LCD screen |
| Thermostat | Integrated, adjustable |
| Programmer | 5 days (office) / 7 days (home) / cabin mode (max 40 days) |
| Overheat protection | Yes, automatic shut-off |
| Protection class | I (earthing mandatory) |
| Protection rating | IPX0 (not suitable for wet rooms) |
| Material | Metal |
| Cleaning | Dry or well-wrung damp cloth; vacuum the grilles |
| Maintenance | No components requiring maintenance |
| Supplied accessories | Suspension frame, wall plugs and screws |
| Repairability | Repair by competent and qualified person only |
| Warranty | Subject to general terms and conditions |
Frequently Asked Questions - EConvect metal LCD Eurom
User questions about EConvect metal LCD Eurom
0 question about this device. Answer the ones you know or ask your own.
Ask a new question about this device
Download the instructions for your Electric heater in PDF format for free! Find your manual EConvect metal LCD - Eurom and take your electronic device back in hand. On this page are published all the documents necessary for the use of your device. EConvect metal LCD by Eurom.
USER MANUAL EConvect metal LCD Eurom
EN - Instruction booklet
natural_image
Front view of a white rectangular solar heating unit with a digital display showing +25 and control buttons (no text or symbols on the device itself)
E - CONVECT METAL LCD
elektrische convectorkachel elektrische Konvektorheizung electrical convector heater convecteur électrique elektriskt konvektorelement elektrické konvektorové topení elektrický konvektorový ohrievač radiator-convector electric
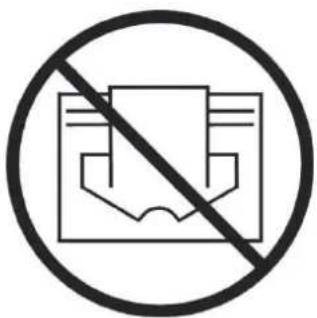
EN This symbol on your device means: do not cover!
CA=cabin (logeerkamer o.i.d.):
Type E-CONVECT METAL LCD
Supply Voltage 220-240Volt / 50Hz
Maximum capacity 850 - 1000Watt
Thermostat +
Dimensions 8 x 73 x 32,5
Weight 3,3 kg
General safety instructions
Important!
The E-convect Metal LCD may only be used when suspended on the wall. Never use it standing or lying down!
Make sure there is plenty of room around the convector, see 'Description and Installation'.
- Lesen Sie dieses Handbuch vor der Benutzung sorgfältig durch. Bewahren Sie dieses Handbuch zum späteren Nachschlagen auf.
- Before using your new heater, check it, including cord and plug, for any visible damage. Do not use a damaged heater, but send it back to your dealer for replacement.
- Do not use the heater until it is been fully installed in accordance with the instructions under the heading ‘Description and Installation’.
- This heater is strictly intended for normal domestic use. Only use it for the additional heating of your home.
- This heater in not suitable for use in wet or damp spaces such as bathrooms and laundry rooms. Do not place the heater in the vicinity of taps, bathtub, shower, pool, fountains or other sources of moisture. Make sure it cannot fall into water and prevent water from getting into the heater itself. If, at any time, the heater does fall into water, unplug it immediately! Do not use a heater that has a damp interior but have it repaired. Never immerse the heater, cord or plug in water and never touch it with wet hands.
- The supply voltage and utility frequency, specified on the machine, need to match those of the socket that is used. The socket used needs to be earthed and the electrical installation needs to be secured with a ground-fault circuit interrupter (max. 30 mAmp).
- Fully extend the cord before plugging in the heater. Make sure it does not come into contact with any part of the heater and prevent it from heating up any other way. Do not run the cord underneath carpeting; do not cover it with mats, carpet strips or similar and make sure it is not placed in any passageways. Make sure the cord cannot be stepped on and that no furniture is placed on top of it. Do not lead the cord around sharp corners and do not roll it up too tightly after use!
-
If possible, do not use an extension cord, as this poses the risk of overheating and fire. If the use of an extension cord is unavoidable, then make sure it is an undamaged, approved extension cord with a minimum diameter of 3 × 1.5 mm^2 and a minimum permissible power of 1000 Watt. To prevent overheating, always fully extend the cord!
-
To prevent the circuit being overloaded and fuses blowing, make sure no other appliances are connected to the same socket or wired to the same electrical circuit as the heater.
-
Do not use the heater outdoors and do not use it in spaces, smaller than 6 m^2 .
-
A heater contains hot and/or glowing and sparking components. Do not, therefore, use it in areas where fuels, paint, flammable liquids and/or gasses etc. are stored.
-
Do not place the heater near, under, or directly opposite a socket and do not place it near an open fire or other heat source.
-
Do not use the heater near or directly opposite furniture, animals, curtains, paper, clothes, bedding or other inflammable objects. Keep them at least 1 metre away from the heater!
-
Never cover a heater! The heater's ventin openings should never be obstructed in any way, so as to prevent the possibility of fire. Never use the heater to dry clothes and do not place anything on top of the heater.
-
Make sure that the air around the heater can circulate freely. Do not place the heater too close to walls or large objects and do not place it under shelves, cupboards or similar. For minimum free space around the heater, see 'Description and Installation'.
-
Prevent foreign objects from entering the heater via the venting openings as this may lead to electric shock, fire or damage.
-
Never leave the heater unattended when switched on. Always switch the heater off before removing the plug from the socket. Always unplug the heater when not in use! Pull on the plug to remove from the socket, never pull on the cord.
-
Always switch the heater off, unplug it and leave to cool down before:
-
cleaning the heater
- carrying out maintenance on the heater
-
touching or moving the heater.
-
This machine gets hot when in use. To prevent burns, do not let bare skin come into contact with hot surfaces.
-
Do not use a timer or a similar product to automatically switch on the heater. Always perform safety checks before using the heater!
-
Close supervision is necessary when the product is used near children or incapacitated persons. Do not let children use the appliance as a toy. The device is not suitable for use by persons (including children) with a physical, sensual or mental limitation or a lack of experience and knowledge, irrespective of whether they are being supervised or have been issued with instructions in relation to the use of the device by a person who is responsible for their safety. Always ensure that children cannot play with the device.
-
Keep the heater clean. Dust, dirt and/or a build up of deposits in the heater are a common cause of overheating. Make sure these deposits are removed regularly.
-
Do not turn on the appliance if you have discovered damage to the appliance itself, the cord or the plug, if the appliance is malfunctioning, if it has been dropped or if there are any other signs of a defect. Return the complete product to the vendor or to a certified electrician for inspection and/or repair. Always ask for the original parts.
-
Do not use attachments and/or accessories that have not been recommended or supplied by the manufacturer.
-
The appliance (incl. cord and plug) may only be opened and/or repaired by properly authorised and qualified persons.
-
Only use this heater for its intended purpose and as described in this instruction manual.
Not abiding by instructions 24, 25 and 26 may lead to damage, fire and/or personal injuries. A failure to adhere to these rules also immediately nullifies the guarantee and vendor, importer and/or manufacturer do not take responsibility for any of the consequences!
Description and Installation
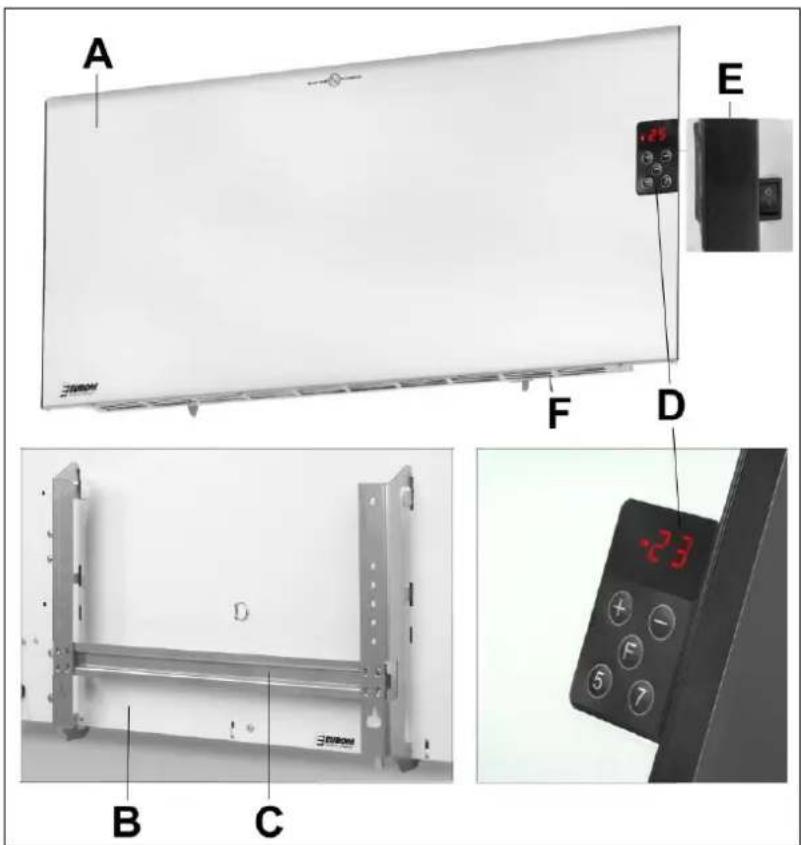
A = Convector front
B = Convector back
C = Hanging frame
D = Control panel with LCD screen
E = ON/OFF switch
F = fan opening
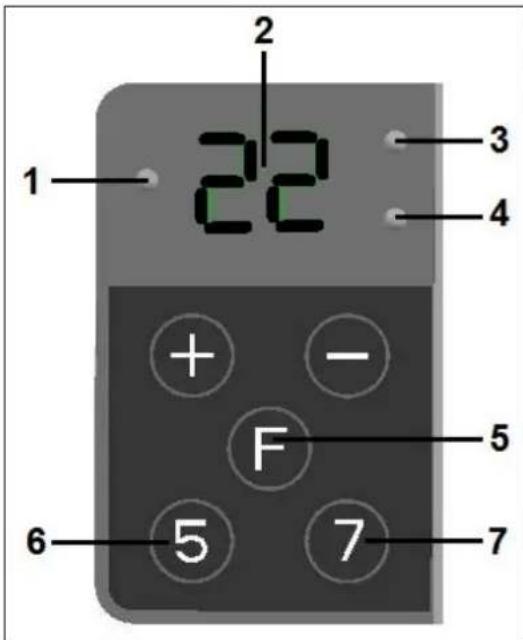
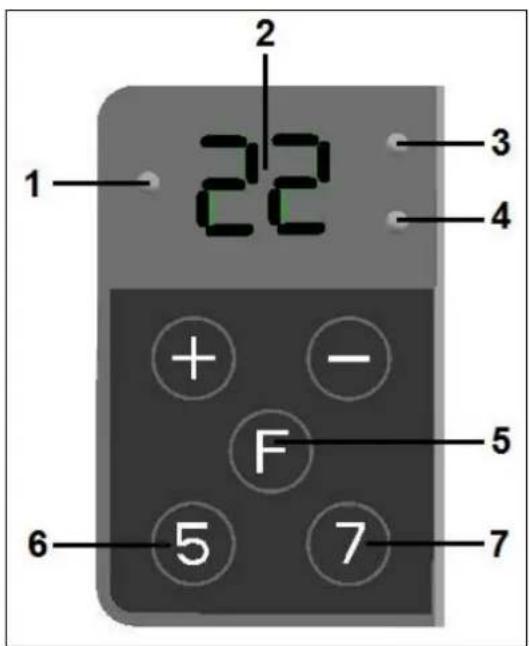
D - Control panel with LCD screen:
1 = Control light On/Off
2 = Display temperature and function
3 = Control light 5 day setting
4 = Control light 7 day setting
5 = Function button
6 = 5 day setting
7 = 7 day setting
Remove all packaging material and keep out of reach of children. After removing packaging, check the appliance for damage or other signs that could indicate a fault/defect/malfunction. In case of doubt, do not use the appliance, but contact your vendor for inspection or replacement.
Do not use the heater before it has been installed in accordance with the following instructions!
Choose a solid, flat and completely vertical wall made of non-flammable and non-melting material on which to mount the heater (i.e. no wood, synthetic materials, etc!)
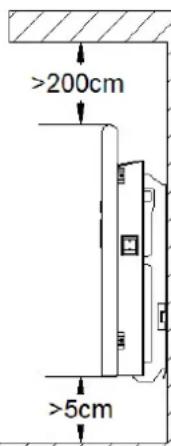
- Decide where you want to mount the heater. Make sure that the heater has sufficient space around it at all times and that no inflammable materials are located nearby (see also safety instructions). Do not place the heater behind a door! The heater's underside needs to be at least 5 cm above the floor, the sides at least 20 cm from the side walls and the top at least 200 cm from the ceiling, ceiling beams, etcetera.
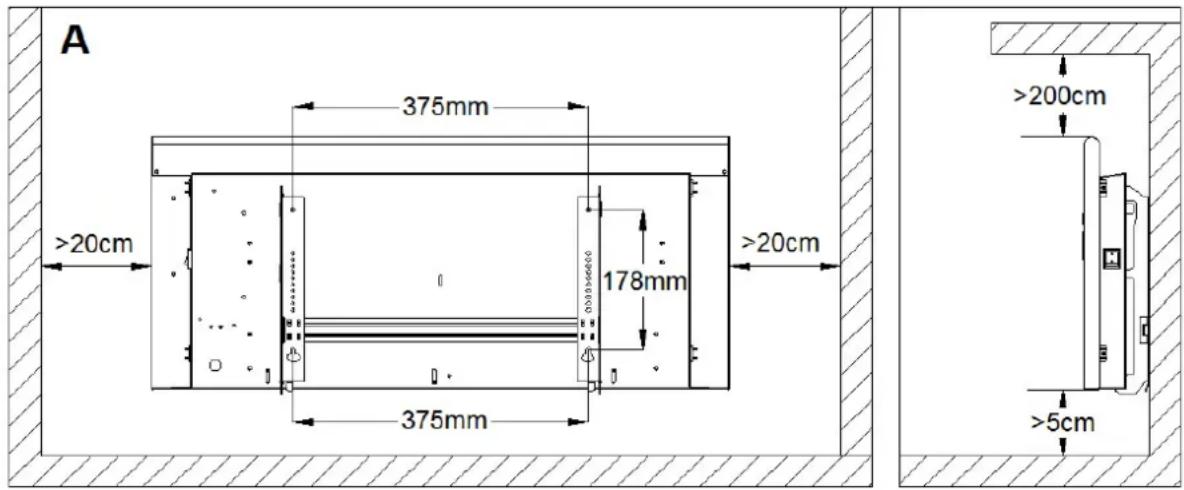
- Drill the lower two holes (diameter 8 mm, depth of 40 mm) according to diagram A.
- Push plugs into the holes and screw in 2 screws until they protrude by 1 cm (diagram B)
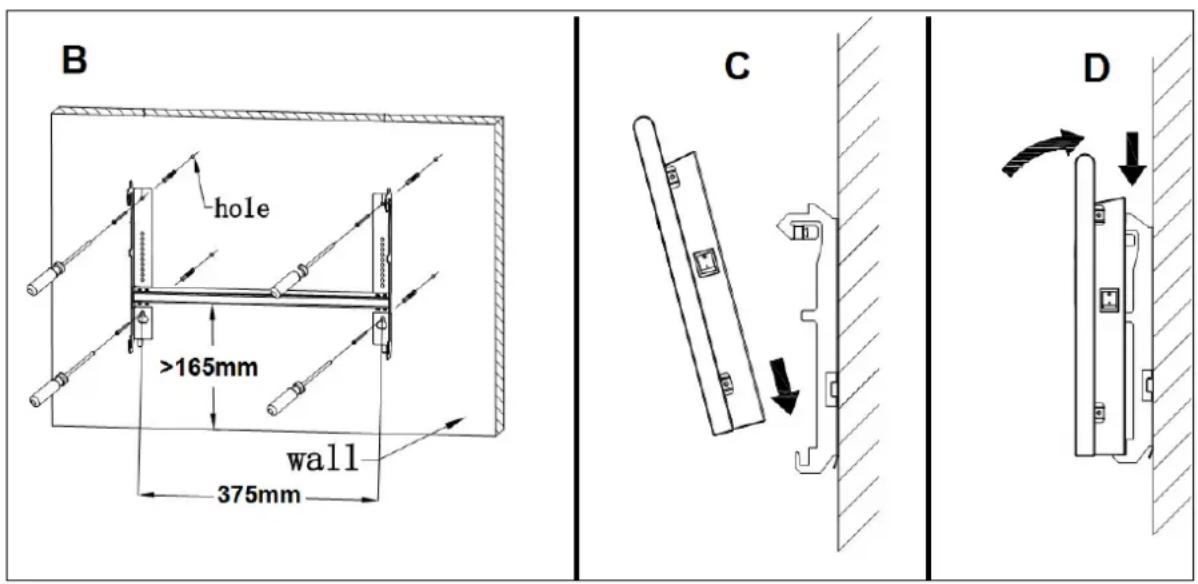
- Hang the frame over these screws and allow to drop into the grooves.
- Now mark the location of the two upper screws.
- Remove the frame, drill the upper holes and install plugs.
- Hang the frame again and screw both the upper and lower screws tightly to the wall.
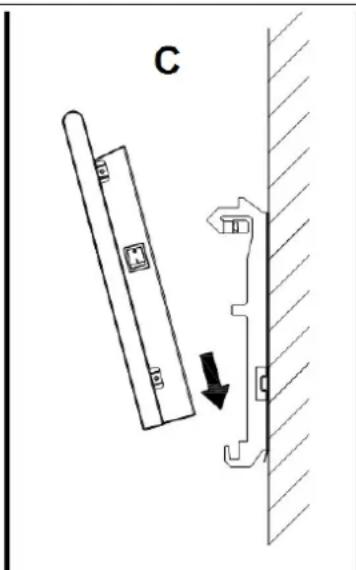
- Let the heater drop onto the hanging frame, with the fan openings in the base falling over the hooks on the frame, so that the upper hooks on the hanging frame sit in front of the recesses in the heater (diagram C).
- Now push the heater and the recesses over the upper hooks on the hanging frame. The heater will be secured to the frame via the clamps on the upper hooks. (diagram D). Check that the clamps have fallen properly inside the heater and are securing it!
Take care! In order to ensure that the clamps are sufficiently secure, they face slightly outwards and are made of slightly flexible metal. Be careful that the hooks are not turned inwards, resulting in the clamps offering insufficient securing force and the heater falling over!
Set-up and Operation
Comment: It is normal for the heater, when first used or after a long period of inactivity, to give off an odour or a little smoke. This will cease after a short period. Make sure the heater is turned off (On/Off switch to O). Now plug into an earthed, correctly functioning 220-240V / 50Hz socket. Only connect the heater to an earthed socket!
Turn the heater on by pushing the on/off switch to 'on' (I pushed in). A temperature appears on the display. If this is higher or lower than the desired temperature, you can press the + or - to set a higher or lower temperature. If the room temperature falls under the desired temperature, the heater will switch on automatically (round control light will come on) and then go off again once the desired temperature has been reached.
To switch off, click the ON / OFF-switch to off. The heater switches off. Unplug.
Programmer
The heater is equipped with a programmer which can be used to set a functioning schedule. Choose the method that best suits you:
• HO=home: Setting for 7 days per week.
- OF=office: Setting for five days per week; on Saturday and Sunday the heater doesn't work.
- CA = cabin (guest room or similar): setting for a limited number of days (max. 40).
Choose the method that best suits you:
- The heater is switched off; plug in the socket.
- Press on the F button and keep this pressed. Now switch the heater on using the On/Off switch (switch on I). The display will show: 22. After a few seconds, rE will show on the display. You can now let go of the F button. After a few blinks, HO (home) will appear on the display (blinking). By pressing on the + or – button, you can change this to OF (office) or CA (guest room). Confirm your selection by pressing on the F button once again.
- A blinking '22' will now appear on the display. Now, you can set the standard temperature by pressing the + (higher) or – (lower) button. For home use, set the highest daily temperature; for office use, the lowest night temperature and for
guest-room use a minimum temperature. Confirm your choice by pressing the F button; the display will stop blinking. If you set no temperature, the display will stop blinking after 7 seconds and will be automatically set to 22°.
HO=home
If you do nothing further, the heater will maintain the set temperature during the day and at night. Imagine, you have set the heater to 21^ C, but would like it to be set to 18^ C during working days:
- Press on a working day at 08.00 on the '5' for five seconds: the display will show an 'h' and then a blinking '05'. Use the + and – to change the figure to the desired number of hours for which you wish to reduce the temperature: from 08.00 to 16.00 is 8 hours so set '08' and confirm with the F button.
- Now the display will show a blinking 'd' and then a blinking figure. Set which (working) day it is: 1=Monday, 2=Tuesday and so on until 5 (Friday). Confirm with the F button.
- Now the display will show a blinking '°C' followed by a blinking '17'. Use the + and - buttons to set the temperature between 08.00 and 16.00 (in the example, this is 18°C). Confirm with the F button.
- The green control light '5 day setting' will now blink slowly to signal that the heater is allowing the room to cool down.
The heater will now let the room cool down to 18^ C on Monday to Friday between 08.00 and 16.00 and then heat it up again to 21^ C.
If you wish to reduce the night-time temperature (so for 7 nights), you proceed in a similar manner. Imagine you wish to set the temperature from 23.00 to 06.00 to 16°C:
-
Press on a random evening at 11.00 on the '7' for five seconds. The display will show an 'h' and then a blinking '05'. Use the + and - to change the figure to the desired number of hours for which you wish to reduce the temperature: from 23.00 to 6.00 is 7 hours so set '07' and confirm with the F button.
-
Now the display will show a blinking '°C' followed by a blinking '17'. Use the + and - buttons to set the temperature between 23.00 and 6.00 (in the example, this is 16°C). Confirm with the F button.
-
The green control light '7 day setting' will now blink slowly to signal that the heater is allowing the room to cool down.
The heater will now let the room cool down to 16^ C every day between 23.00 and 6.00 and then heat it up again to 21^ C.
OF=office:
For office use, you set the standard temperature for nights and weekends. To set the daily temperature for five working days higher, follow steps 1 to 4 under HO=home but set the daytime temperature higher than the standard temperature.
CA=cabin (guest room or similar):
For guest room use, you can set the number of days that the heater must heat the room.
- On the first day, press the '7' button in for 5 seconds. The 'd' will blink and then '01' will appear in the display. Use the + and – buttons to set the number of days for which the room must be heated. Confirm with the F button.
- Now the display will show a blinking “°C” followed by a blinking ‘10’. Use the + and – buttons to set the daytime temperature. Confirm with the F button.
- The green control lights will continue to blink while the heater is functioning.
- Your guests can alter the set temperature by pressing on + or -.
The display will always show the temperature set for that moment. You can alter the set temperature by simply pressing the + or - button.
The room temperature that was last shown on the display will be retained.
In order to permanently delete a setting, press the '5' or '7' during the set working time until the green control light goes out. You can now programme new settings. You can only programme one '5 day setting' or one '7 day setting' at the same time.
The programmer does not work on the basis of a clock, it works on a 24-hour rhythm. If you leave a setting for a long period, a time-deviation may occur after a while. If this happens, delete the setting and programme the heater again.
Safety features
In case of internal overheating, the overheating safeguard will switch the heater off. This may occur if the heater cannot give off enough heat or if it cannot draw in enough fresh air. As mentioned above, this is generally caused by (partially) covering the heater, obstructing the air intake and/or outlet grills or installing the heater too close to a wall or something similar. In case of overheating, switch off the heater and unplug. Give the heater time to cool down, remove the source of the overheating and use as normal. If the problem persists or if you have not been able to trace the source of the overheating, turn the heater off immediately and unplug. Contact a servicing point to have the heater repaired.
Cleaning and Maintenance
Keep the heater clean. Deposits of dust and dirt in the appliance are a common cause of overheating so these should be removed regularly. Switch off the heater, remove the plug from the socket and allow the heater to cool down before cleaning or carrying out maintenance work.
- Wipe the outside of the heater regularly with a dry or slightly damp cloth. Do not use aggressive soaps, sprays, cleaners or abrasives, waxes, polishes or chemical solutions!
- Use a vacuum cleaner to carefully remove any dust and dirt from the grills and ensure that the air intake and outlet openings are clean. Be careful not to touch or damage any internal parts during cleaning!
- The heater contains no other parts which need maintenance.
- At the end of the season, store the cleaned heater in the original packaging if possible. Store it upright in a cool, dry and dust-free place.
- Do not dispose of heater with household waste when it becomes worn or damaged beyond repair. Take it to your local authority's collection point for electrical appliances where any reusable materials will be collected and redistributed.
CE-statement
Euromac bv, Genemuiden-NL hereby declares that the EUROM electrical convector heater, type E-CONVECT METAL LCD, complies with the LVD guideline 2006/95/EG and the EMC guideline 2004/108/EC and meets the following standards:
EN 55014-1 :2006/+ A1 :2009/+A2 :2011 EN 60335-2-30 :2009
EN 55014-2:1997/+A1:2001/A2:2008 EN 60335-1 :2002+A11,A1:2004
EN 61000-3-2 :2006/+ A1:2009/+A2:2009 +A12,A2:2006+A13:2008
EN 61000-3-3 :2008 +A14:2010+A15:2011
EN 62233:2008
Genemuiden, 22-05-2014, W.J. Bakker, alg.dir.
Français
Données techniques
| Type | E-CONVECT METAL LCD |
| Tension | 220-240Volt / 50Hz |
| Puissance max. | 850 - 1000Watt |
| Thermostat | + |
| Dimensions | 8 x 73 x 32,5 |
| Poids | 3,3 kg |
CA = Cabin (chata, a pod.):
natural_image
Diagram showing a mechanical assembly with a rod and a bracket, no text or symbols present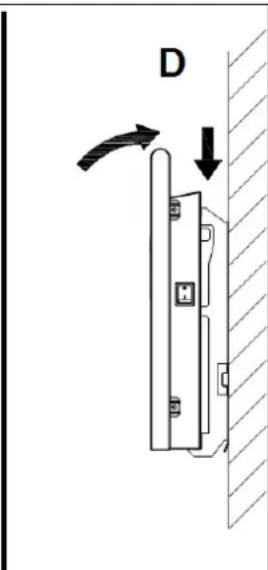
CA = cabin (chata, a pod.):
E = Comutator on/off
F = Guri de aerisire
D - Panou de control cu ecran LCD:
OF = birou (office):
EUROMAC BV., Kokosstraat 20, 8281 JC Genemuiden - NL
e-mail: info@euromac.nl www.euromac.nl
- E - CONVECT METAL LCD
- CA=cabin (logeerkamer o.i.d.):
- General safety instructions
- Important!
- The E-convect Metal LCD may only be used when suspended on the wall. Never use it standing or lying down!
- Make sure there is plenty of room around the convector, see 'Description and Installation'.
- Description and Installation
- D - Control panel with LCD screen:
- Do not use the heater before it has been installed in accordance with the following instructions!
- Set-up and Operation
- Programmer
- HO=home
- OF=office:
- CA=cabin (guest room or similar):
- Safety features
- Cleaning and Maintenance
- CE-statement
- Français
- Données techniques
- CA = Cabin (chata, a pod.):
- D - Panou de control cu ecran LCD:
- OF = birou (office):
Brand : Eurom
Model : EConvect metal LCD
Category : Electric heater