
HV111712 - Vacuum Cleaner Emerio - Free user manual and instructions
Find the device manual for free HV111712 Emerio in PDF.
| Product Type | Handheld Vacuum Cleaner |
| Brand | Emerio |
| Model | HV111712 |
| Rated Power | 600 W |
| Supply Voltage | 220-240 V ~ 50-60 Hz |
| Dust Container Capacity | Approximately 0.5 L (estimated) |
| Filter Type | Washable Cyclonic Filter |
| Included Accessories | Extension tube, floor brush, textile nozzle, crevice tool, round brush |
| Main Features | On/Off button, transparent dust container, powerful suction |
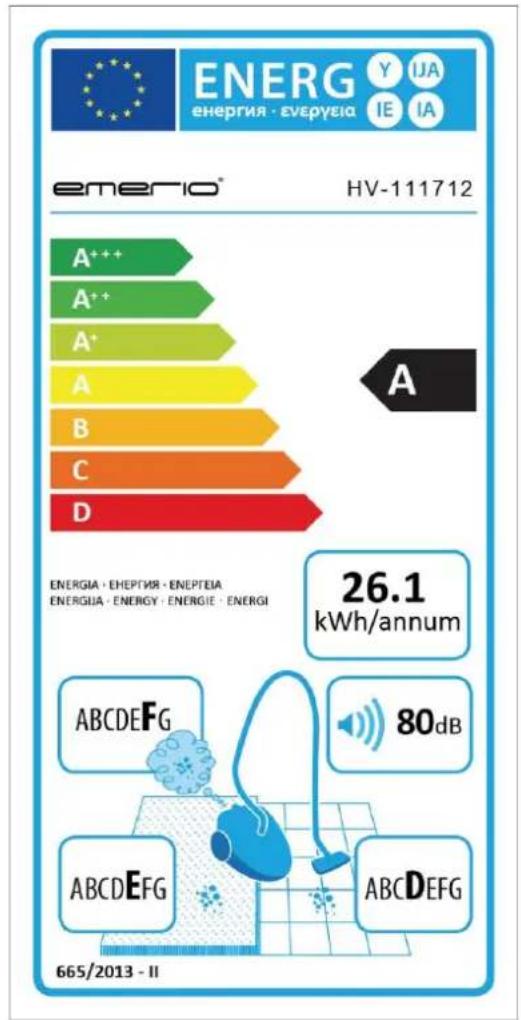
| Annual Energy Consumption | 26.1 kWh/year (class A) |
| Carpet Cleaning Efficiency | 0.754 (class E) |
| Hard Floor Cleaning Efficiency | 1.028 (class D) |
| Dust Emission | 0.30% (class F) |
| Acoustic Power Level | 80 dB(A) |
| Safety | Overheating protection, automatic shut-off in case of blockage |
| Maintenance and Cleaning | Dust container and filter washable with water (max 40 °C), air dry for 24 hours |
| Filter Life | Recommended every 3 months (depending on usage) |
| Warranty | 2 years |
| Usage | Domestic, handheld vacuum for dry surfaces |
Frequently Asked Questions - HV111712 Emerio
User questions about HV111712 Emerio
0 question about this device. Answer the ones you know or ask your own.
Ask a new question about this device
Download the instructions for your Vacuum Cleaner in PDF format for free! Find your manual HV111712 - Emerio and take your electronic device back in hand. On this page are published all the documents necessary for the use of your device. HV111712 by Emerio.
USER MANUAL HV111712 Emerio
Hand vacuum cleaner (EN)
Before use make sure to read all of the below instructions in order to avoid injury or damage, and to get the best results from the appliance. Make sure to keep this manual in a safe place. If you give or transfer this appliance to someone else make sure to also include this manual.
In case of damage caused by user failing to follow the instructions in this manual the warranty will be void. The manufacturer/importer accepts no liability for damages caused by failure to follow the manual, a negligent use or use not in accordance with the requirements of this manual.
- This appliance can be used by children aged from 8 years and above and persons with reduced physical, sensory or mental capabilities or lack of experience and knowledge if they have been given supervision or instruction concerning use of the appliance in a safe way and understand the hazards involved.
- Children shall not play with the appliance.
- Cleaning and user maintenance shall not be made by children without supervision.
- If the supply cord is damaged, it must be replaced by the manufacturer, its service agent or similarly qualified persons in order to avoid a hazard.
- Before inserting the plug into the mains socket, please check that the voltage and frequency comply with the specifications on the rating label.
- Disconnect the mains plug from the socket when the appliance is not in use and before cleaning.
- Ensure that the mains cable is not hung over sharp edges and keep it away from hot objects and open flames.
-
Do not immerse the appliance or the mains plug in water or other liquids. There is danger to life due to electric shock!
-
To remove the plug from the plug socket, pull the plug. Do not pull the power cord.
- Do not touch the appliance if it falls into water. Remove the plug from its socket, turn off the appliance and send it to an authorized service center for repair.
- Do not plug or unplug the appliance from the electrical outlet with a wet hand.
- Never attempt to open the housing of the appliance, or to repair the appliance yourself. This could cause electric shock.
- Never leave the appliance unattended during use.
- This appliance is not designed for commercial use. For household use only.
- Do not use the appliance for other than intended use.
- Do not wind the cord around the appliance and do not bend it.
- Close supervision is necessary for any appliance being used by or near children. Do not leave the system unattended while connected. Keep hair, loose clothing, fingers and all parts of body away from opening and moving parts.
- Do not use to pick up flammable or combustible liquids such as gasoline or use in areas where they may be present.
- Do not pick up anything that is burning or smoking such as cigarettes, matches or hot ashes.
- Use extra care when cleaning on stairs.
- Do not use the appliance without the dust cup filter in place.
- The use of accessory attachment not recommended by the appliance manufacturer may cause injuries.
- Do not put any objects into openings. Do not use with any opening blocked. Keep free of dust, lint, hair and anything else that may reduce air flow.
-
To reduce the risk of electric shock, do not use outdoors or on wet surfaces. Use only on dry surfaces.
-
To reduce the risk of injury from moving parts or electric shock, unplug before servicing and cleaning.
- Important: If the suction opening in the unit is blocked, switch off the appliance and remove the blocking substance before you start the unit again.
- Do not operate the appliance too close to heaters, radiators or cigarette butts.
- Before inserting the power plug into the wall outlet, make sure that your hands are dry.
- Before you start vacuuming, make sure to remove large or sharp objects that might damage the dust cup filter.
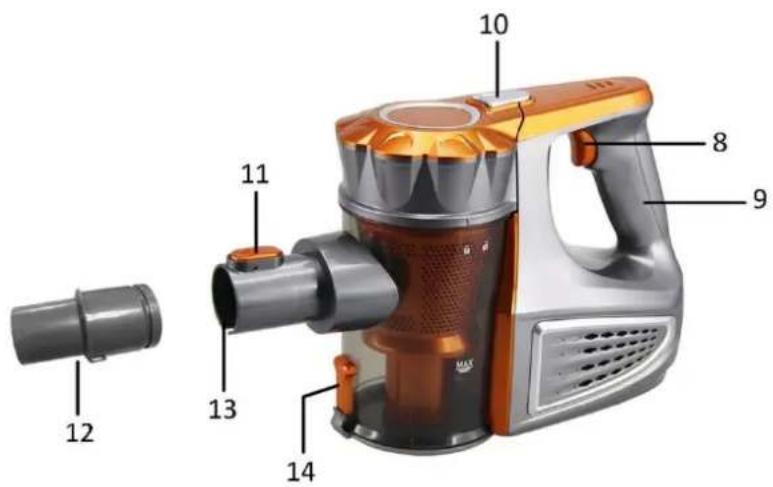
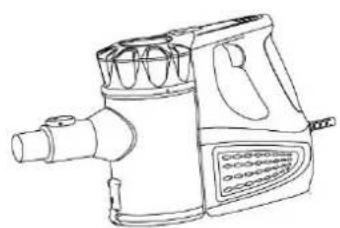
PARTS DESCRIPTION
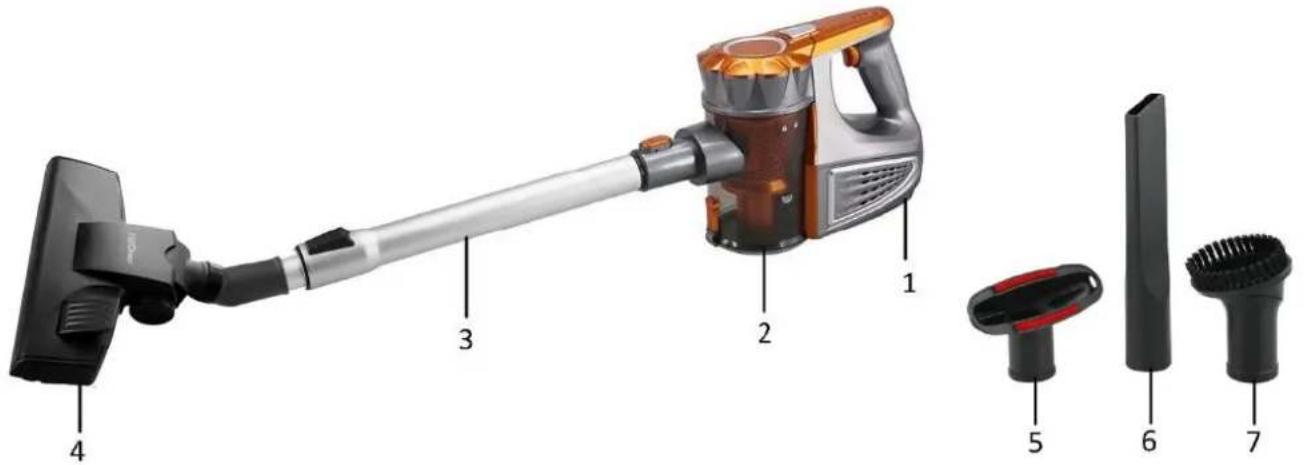
- Main unit
- Dust cup
- Extension tube
- Floor brush
- Textile nozzle
- Crevice nozzle
- Round brush
- On/off button
- Handle
- Dust cup release button
- Connection tube release button
- Connection tube
- Suction hole opening
- Locking clip
USE
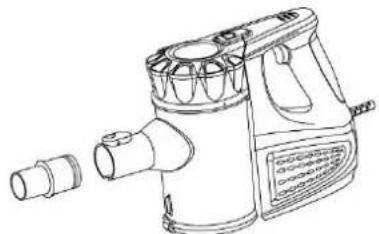
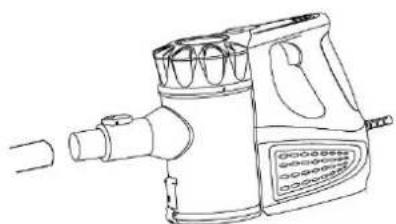
NOTE: Always remove the power plug from the wall outlet before assembling or removing accessories.
- Insert the connection tube into the suction hole opening; make sure it fits firmly. You can also press and hold the connection tube release button to remove it from the suction hole opening.
- Connect different nozzle tools / brushes onto the connection tube for different cleaning purposes. When connect the floor brush, please connect the extension tube first.
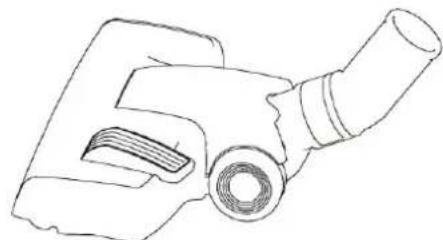
Assemble the floor brush before use: Insert the adapter (A) into the brush hole (B) and fix with the clip (C). The floor brush has two positions, one for hard and one for soft/textile surfaces - Choose the right one.

-
Plug in the appliance.
-
Press the on/off button to turn on the appliance. Press it again, the unit will be turned off.
NOTE: During use, please pay attention to the dust capacity and do not exceed the "MAX" level indicated on the dust cup. This appliance is for dry suction only.
Caution: The suction hole opening must be open and free of any obstructions at all times. Otherwise, the motor will overheat and could become damaged.
CLEANING AND MAINTENANCE
- Except for the main unit, other parts can be cleaned in warm soapy water (< 40^) . Rinse and dry them completely before reassembly. Do not immerse the main unit in water or any other liquids.
- Use only a soft moist cloth to clean the outside of the unit. Do not allow any kind of liquid to enter the unit.
- Do not use aggressive chemicals or abrasives.
- Do not use the device if the filter is broken or worn out.
- The unit does not contain parts serviceable by you, do not disassemble it and do not try to repair it yourself.
In order to achieve the best performance, empty the dust cup and clean the dust cup filter after each use.
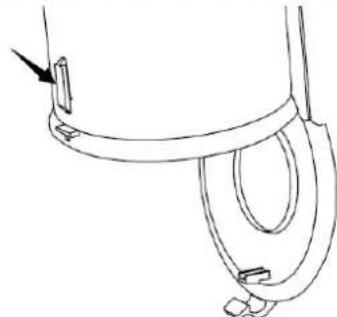
- Press the dust cup release button to remove the container from the main unit.


- Press down the locking clip on low end of the dust cup to empty dust from the container.

- Detach the upper part from the dust cup. Gently pull the dust cup filter (A) and cyclonic frame (B) out of the dust cup. Rinse them in warm water, and then air dry completely for 24 hours before placing them back in the dust cup.
Important Note: DO NOT use a washing machine to clean the dust cup filter. Do not use a hair dryer to dry it. AIR DRY ONLY.

- Put the dust cup filter and cyclonic frame carefully into the dust cup. Never operate the appliance without the dust cup filter in place.
- Attach the dust cup to the main body of the unit.
Note: It is recommended that the dust cup filter be replaced every three months (depending on usage) to ensure peak performance of the unit.
TROUBLESHOOTING
| PROBLEM | POSSIBLE REASON | SOLUTION |
| Appliance does not operate | No power in electrical outlet. | Check fuse or breaker. Replace fuse/reset breaker. |
| Appliance does not pick up or suction power is weak | 1. Dust cup is full. 2. Dust cup filter needs cleaning or replacement. | 1. Empty dust cup container. 2. Remove dust cup filter and check for object(s) in air duct and remove. Clean or replace dust cup filter. |
| Dust escaping from appliance | 1. Dust cup is full. 2.Dust cup filter is not installed correctly. | 1. Empty dust cup container. 2. Check and install the dust cup filter correctly. |
TECHNICAL DATA
Operating voltage: 220-240V 50-60Hz
Power consumption: 600W
GUARANTEE AND CUSTOMER SERVICE
Before delivery our devices are subjected to rigorous quality control. If, despite all care, damage has occurred during production or transportation, please return the device to your dealer. In addition to statutory legal rights, the purchaser has an option to claim under the terms of the following guarantee:
For the purchased device we provide 2 years guarantee, commencing from the day of sale. If you have a defective product, you can directly go back to the point of purchase.
Defects which arise due to improper handling of the device and malfunctions due to interventions and repairs by third parties or the fitting of non-original parts are not covered by this guarantee. Always keep your receipt, without the receipt you can't claim any form of warranty. Damage caused by not following the instruction manual, will lead to a void of warranty, if this results in consequential damages then we will not be liable. Neither can we hold responsible for material damage or personal injury caused by improper use if the instruction manual is not properly executed. Damage to accessories does not mean free replacement of the whole appliance. In such case please contact our service department. Broken glass or breakage of plastic parts is always subject to a charge. Defects to consumables or parts subjected to wearing, as well as cleaning, maintenance or the replacement of said parts are not covered by the warranty and are to be paid.
ENVIRONMENT FRIENDLY DISPOSAL
Recycling - European Directive 2012/19/EU
This marking indicates that this product should not be disposed with other household wastes. To prevent possible harm to the environment or human health from uncontrolled waste disposal, recycle
it responsibly to promote the sustainable reuse of material resources. To return your used device,
please use the return and collection systems or contact the retailer where the product was purchased. They can take this product for environmental safe recycling.
Emerio Deutschland GmbH (no service address)
Hofferweg 14
51519 Odenthal
Germany
Customer service:
T: +49 (0) 3222 1097 600
E: info.de@emerio.eu
SICHERHEITSHINWEISE
Declare that the product detailed below:
Product: General purpose Vacuum Cleaner
Model: HV-111712
Satisfies the requirement of the Council Directives:
COMMISSION DELEGATED REGULATION (EU) No 665/2013 of 3 May 2013 and Amending COMMISSION DELEGATED REGULATION (EU) 2017/254 supplementing Directive 2010/30/EU of the European Parliament and of the Council with regard to energy labelling of vacuum cleaners
COMMISSION REGULATION (EU) No 666/2013 of 8 July 2013 and Amending COMMISSION REGULATION (EU) 2016/2282 implementing Directive 2009/125/EC of the European Parliament and of the Council with regard to ecodesign requirements for vacuum cleaners
and technical parameters measured and calculated in accordance with (EU) No 666/2013 under Directive 2009/125/EC.
Test specification:
Standard: (EU) No 666/2013 +Amd. (EU) 2016/2282;
(EU) No 665/2013 +Amd. (EU) 2017/254;
EN 60312-1: 2013
The specific energy consumption during carpet and hard floor test: [26,1] kWh/year; Class A
The dust pick up on carpet: 0,754; Class E
The dust pick up on hard floor: 1,028; Class D
The dust re-emission:0,30%; Class F
The sound power level: 80 dB(A)
The rated input power: 600W
Note: Indicative annual energy consumption (kWh per year), based on 50 cleaning tasks. Actual annual energy consumption will depend on how the appliance is used.
Regarding maintenance information on main accessory, WEEE information and ERP label, please check the instruction manual provided with packaging.

Brand : Emerio
Model : HV111712
Category : Vacuum Cleaner