
LTF 11S112 L EU - Dishwasher HOTPOINT - Free user manual and instructions
Find the device manual for free LTF 11S112 L EU HOTPOINT in PDF.
| Brand | Hotpoint |
| Model | LTF 11S112 L EU |
| Product type | Built-in dishwasher |
| Capacity | 15 place settings |
| Dimensions (W x H x D) | 59.5 x 82 x 57 cm |
| Energy class | A+ |
| Annual energy consumption | 302 kWh |
| Annual water consumption | 3080 L |
| Water consumption per standard cycle | 11 L |
| Energy consumption per standard cycle | 1.07 kWh |
| Duration of standard program | 195 min |
| Drying class | A |
| Noise level | 42 dB(A) |
| Number of programs | 11 |
| Included programs | Eco, Auto Intensive, Auto Normal, Auto Fast Wash, Trio Wash, Delicates, Express 30', Good Night, Soak, Sanitizing, Self-Clean |
| Wash options | Delayed start (up to 12 h), Short Time, Extra Dry, Multi-function tablets, Zone Wash (selective basket) |
| Water supply pressure | 0.05 - 1 MPa (0.5 - 10 bar) |
| Electrical supply | See rating plate (230 V / 50 Hz typical) |
| Standby consumption | 5 W (on mode) / 0.5 W (off mode) |
| Safety functions | Leak protection, New Acqua Stop (on some models) |
| Cleaning and maintenance | Washable filters, removable spray arms, water inlet filter |
| Softener setting | 5 water hardness levels (0-90 °fH) |
Frequently Asked Questions - LTF 11S112 L EU HOTPOINT
User questions about LTF 11S112 L EU HOTPOINT
0 question about this device. Answer the ones you know or ask your own.
Ask a new question about this device
Download the instructions for your Dishwasher in PDF format for free! Find your manual LTF 11S112 L EU - HOTPOINT and take your electronic device back in hand. On this page are published all the documents necessary for the use of your device. LTF 11S112 L EU by HOTPOINT.
USER MANUAL LTF 11S112 L EU HOTPOINT
Operating instructions
DISHWASHER - Contents
Operating instructions,1
Precautions and advice, 3-4
Product Data, 10
Assistance, 12
Installation, 24-25
Description of the appliance, 26
Refined salt and rinse aid, 27
Loading the racks, 28-29
Detergent and dishwasher use, 30
Wash cycles, 31
Special wash cycles and options, 32
Care and maintenance, 33
Troubleshooting, 34
FR Français
Mode d'emploi
LAVE-VAISSELLE - Sommaire
Mode d'emploi, 1
MepbI npedocToPOKHOCTn u peKoMeHdaUu, 6-7-8
YCTaHOBka,59-60
Texnueckar cneunikauia n3denn,61
Onncnne n3dJIIN62
Pereheepuyooua coIb n OnonackBaTeJIb, 63
3aRpy3ka KOp3nH,64-65
MoUue CpeCTBO INCINb3OBAHne NocydomoeyHO MaunHbI, 66
IporpamMb,67
CneuaIbHbIe nporpaMMbI IN DoonIHHTeIbHbIe FyHKUIN,68
TexHnueckoe 6cbnyKbHaBHe n yxo,69
HeicnpaBHOCTn IMeToDbI INx yCtpaHEnH,70
CepBnCHoe 6cbTyKmbaHne,71
KZ
Ka3akwa
PaiandaHy HUCKayIbIfbl
blbcjyyMAUHHACbi -Ma3myHbI
PaindaHny HuyckayIbIfbl,1
CaKtbIk IapapJIapbIMeHKeHeC,8-9
Kemek, 12
Ophaty, 72-73
HIM npaKaJwacbl,74
KypbIfbl CnnaTtAmacbl,75
Ta3aHaHFaT y3 XeHe WaKoFA KEmeku 3aT,76
Taptnanapra kkykTey, 77-78
Kyfbw 3at neh bIdbc Kyy MaunHacbH KonDaHy, 79
Kyy uknlaapbl,80
Aphai kyy uKnnapbMeH onuJapbl,81
KyTIM XeHe TexHnKaJIbIK KbI3MeT KepCety, 82
AkaynbIKTapdbI KOIO,83
EN Precautions and advice
This appliance was designed and manufactured in compliance with international safety standards. The following information has been provided for safety reasons and should be read carefully.
Keep this instruction manual in a safe place for future reference. If the appliance is sold, given away or moved, make sure the manual is kept with the machine.
Read the instructions carefully, as they include important information on safe installation, use and maintenance.
This appliance was designed for domestic use or similar applications, for example:
-farmhouses;
- use by guests in hotels, motels and other residential settings;
- bed & breakfasts.
Remove the appliance from all packaging and make sure it was not damaged during transportation. If it was damaged, contact the retailer and do not proceed any further with the installation process.
General safety
- This appliance should not be operated by children younger than 8 years, people with reduced physical, sensory or mental capacities, or inexperienced people who are not familiar with the product, unless they are given close supervision or instructions on how to use it safely and are made aware by a responsible person of the dangers its use might entail.
Children must not play with the appliance. - It is the user's responsibility to clean and maintain the appliance. Children should
never clean or maintain it unless they are given supervision.
The appliance was designed for domestic use inside the home and is not intended for commercial or industrial use.
- The appliance must be used to wash domestic crockery in accordance with the instructions in this manual.
- The appliance must not be installed outdoors, even in covered areas. It is extremely dangerous to leave the machine exposed to rain and storms.
- Do not touch the appliance when barefoot.
- When unplugging the appliance always pull the plug from the mains socket. Do not pull on the cable.
- The water supply tap must be shut off and the plug should be removed from the electrical socket at the end of every cycle and before cleaning the appliance or carrying out any maintenance work.
- The maximum number of place settings is shown in the product sheet.
- If the appliance breaks down, do not under any circumstances touch the internal parts in an attempt to perform the repair work yourself.
- Do not lean or sit on the open door: this may cause the appliance to overturn.
- The door should not be left open as it may create a dangerous obstacle.
- Keep detergent and rinse aid out of reach of children.
- The packaging material should not be used as a toy.
- Knives and other utensils with sharp edges must be placed either with the points/blades facing downwards in the cutlery basket or horizontally on the tip-up compartments or in the tray/third basket, if available.
Disposal
To dispose of any packaging materials, follow local legislation so that the packagings may be reused.
- The European Directive 2012/19/EU relating to Waste Electrical and Electronic Equipment (WEEE) states that household appliances should not be disposed of using the normal solid urban waste cycle. Exhausted appliances should be collected separately in order to optimise the cost of reusing and recycling the materials inside the machine, while preventing potential damage to the atmosphere and public health.
health. The crossed-out dustbin symbol shown on all products reminds the owners of their obligations regarding separated waste collection.
For further information relating to the correct disposal of household appliances, owners may contact the relevant public authority or the local appliance dealer.
Saving energy and respecting the environment
Saving water and energy
- Only begin a wash cycle when the dishwasher is full. While waiting for the dishwasher to be filled, prevent unpleasant odours with the Soak cycle (if available, see Wash Cycles).
- Select a wash cycle that is suited to the type of crockery and to the soil level using the Table of Wash Cycles:
- For dishes with a normal soil level, use the Eco wash cycle, which guarantees low energy and water consumption levels.
- If the load is smaller than usual activate the Half Load option (see Special wash cycles and options, if available).
- If your electricity supply contract gives details of electricity-saving time bands, run the wash cycles when electricity prices are lower. The Delayed Start option can help you organise the wash cycles accordingly (see Special wash cycles and options, if available).

AnHoe n3eJne npedHa3NaYeHO Jn86bIbOBO rnn dpyrTO aHaNoRnuHOroNCN0JIb3OBaHn, HApIMep:
-B aIPOTypnCTnuecknx ycaIb6ax;
-ДЯИСПОЛБ3OBAHNY INPOXINBAIOUIMN B FOCTHINUE, MOTeNE IN B DpyrNX BpeMeHHbIX
MeCTaX pOxMbAHn;
| Product Fiche | |
| Brand | HOTPOINT ARISTON |
| Model | LTF 11S112 |
| Rated capacity in standard place settings (1) | 15 |
| Energy efficiency class on a scale from A+++ (low consumption) to D (high consumption) | A+ |
| Energy consumption per year in kWh (2) | 302 |
| Energy consumption of the standard cleaning cycle in kWh | 1.07 |
| Power consumption of the off-mode in W | 0.5 |
| Power consumption of the left-on mode in W | 5.0 |
| Water consumption per year in litres (3) | 3080 |
| Drying efficacy class on a scale from G (low efficacy) to A (high efficacy) | A |
| Programme time for standard cleaning cycle in minutes | 195 |
| The duration of the left-on mode in minutes | 12 |
| Noise in dB(A) Re 1pW | 42 |
| Built-in model | Yes |
| NOTES | |
| 1) The information on the label and fiche relates to the standard cleaning cycle, this programme is suitable to clean normally soiled tableware and it is the most efficient programme in terms of combined energy and water consumption. The standard cleaning cycle corresponds to the Eco cycle. | |
| 2) Based on 280 standard cleaning cycles using cold water fill and the consumption of the low power modes. Actual energy consumption depends on how the appliance is used. | |
| 3) Based on 280 standard cleaning cycles. Actual water consumption depends on how the appliance is used. | |
FR Fiche de produit
Before contacting Assistance:
- Check whether the problem can be resolved using the Troubleshooting guide (see Troubleshooting).
- Restart the programme to check whether the problem has ceased to exist.
- If the problem persists, contact the Authorised Technical Assistance Service.

Never use the services of unauthorised technicians.
Please have the following information to hand:
The type of malfunction.
The appliance model (Mod.).
The serial number (S/N).
This information can be found on the appliance data plate (see Description of the appliance).

Service
A If the appliance must be moved at any time, keep it in an upright position; if absolutely necessary, it may be tilted onto its back.
Connecting the water supply
Adaptation of the water supply for installation should only be performed by a qualified technician.
The water inlet and outlet hoses may be positioned towards the right or the left in order to achieve the best possible installation.
Make sure the dishwasher does not bend or squash the hoses.
Connecting the water inlet hose
To a 3 / 4 gas cold or hot water connection point (max. 60^)
- Run the water until it is perfectly clear.
- Screw the inlet hose tightly into position and turn off the tap.
A If the inlet hose is not long enough, contact a specialist store or an authorised technician (see Assistance).
The water pressure must be within the values indicated in the Technical Data table - otherwise the dishwasher may be function properly.
A Make sure the hose is not bent or compressed.
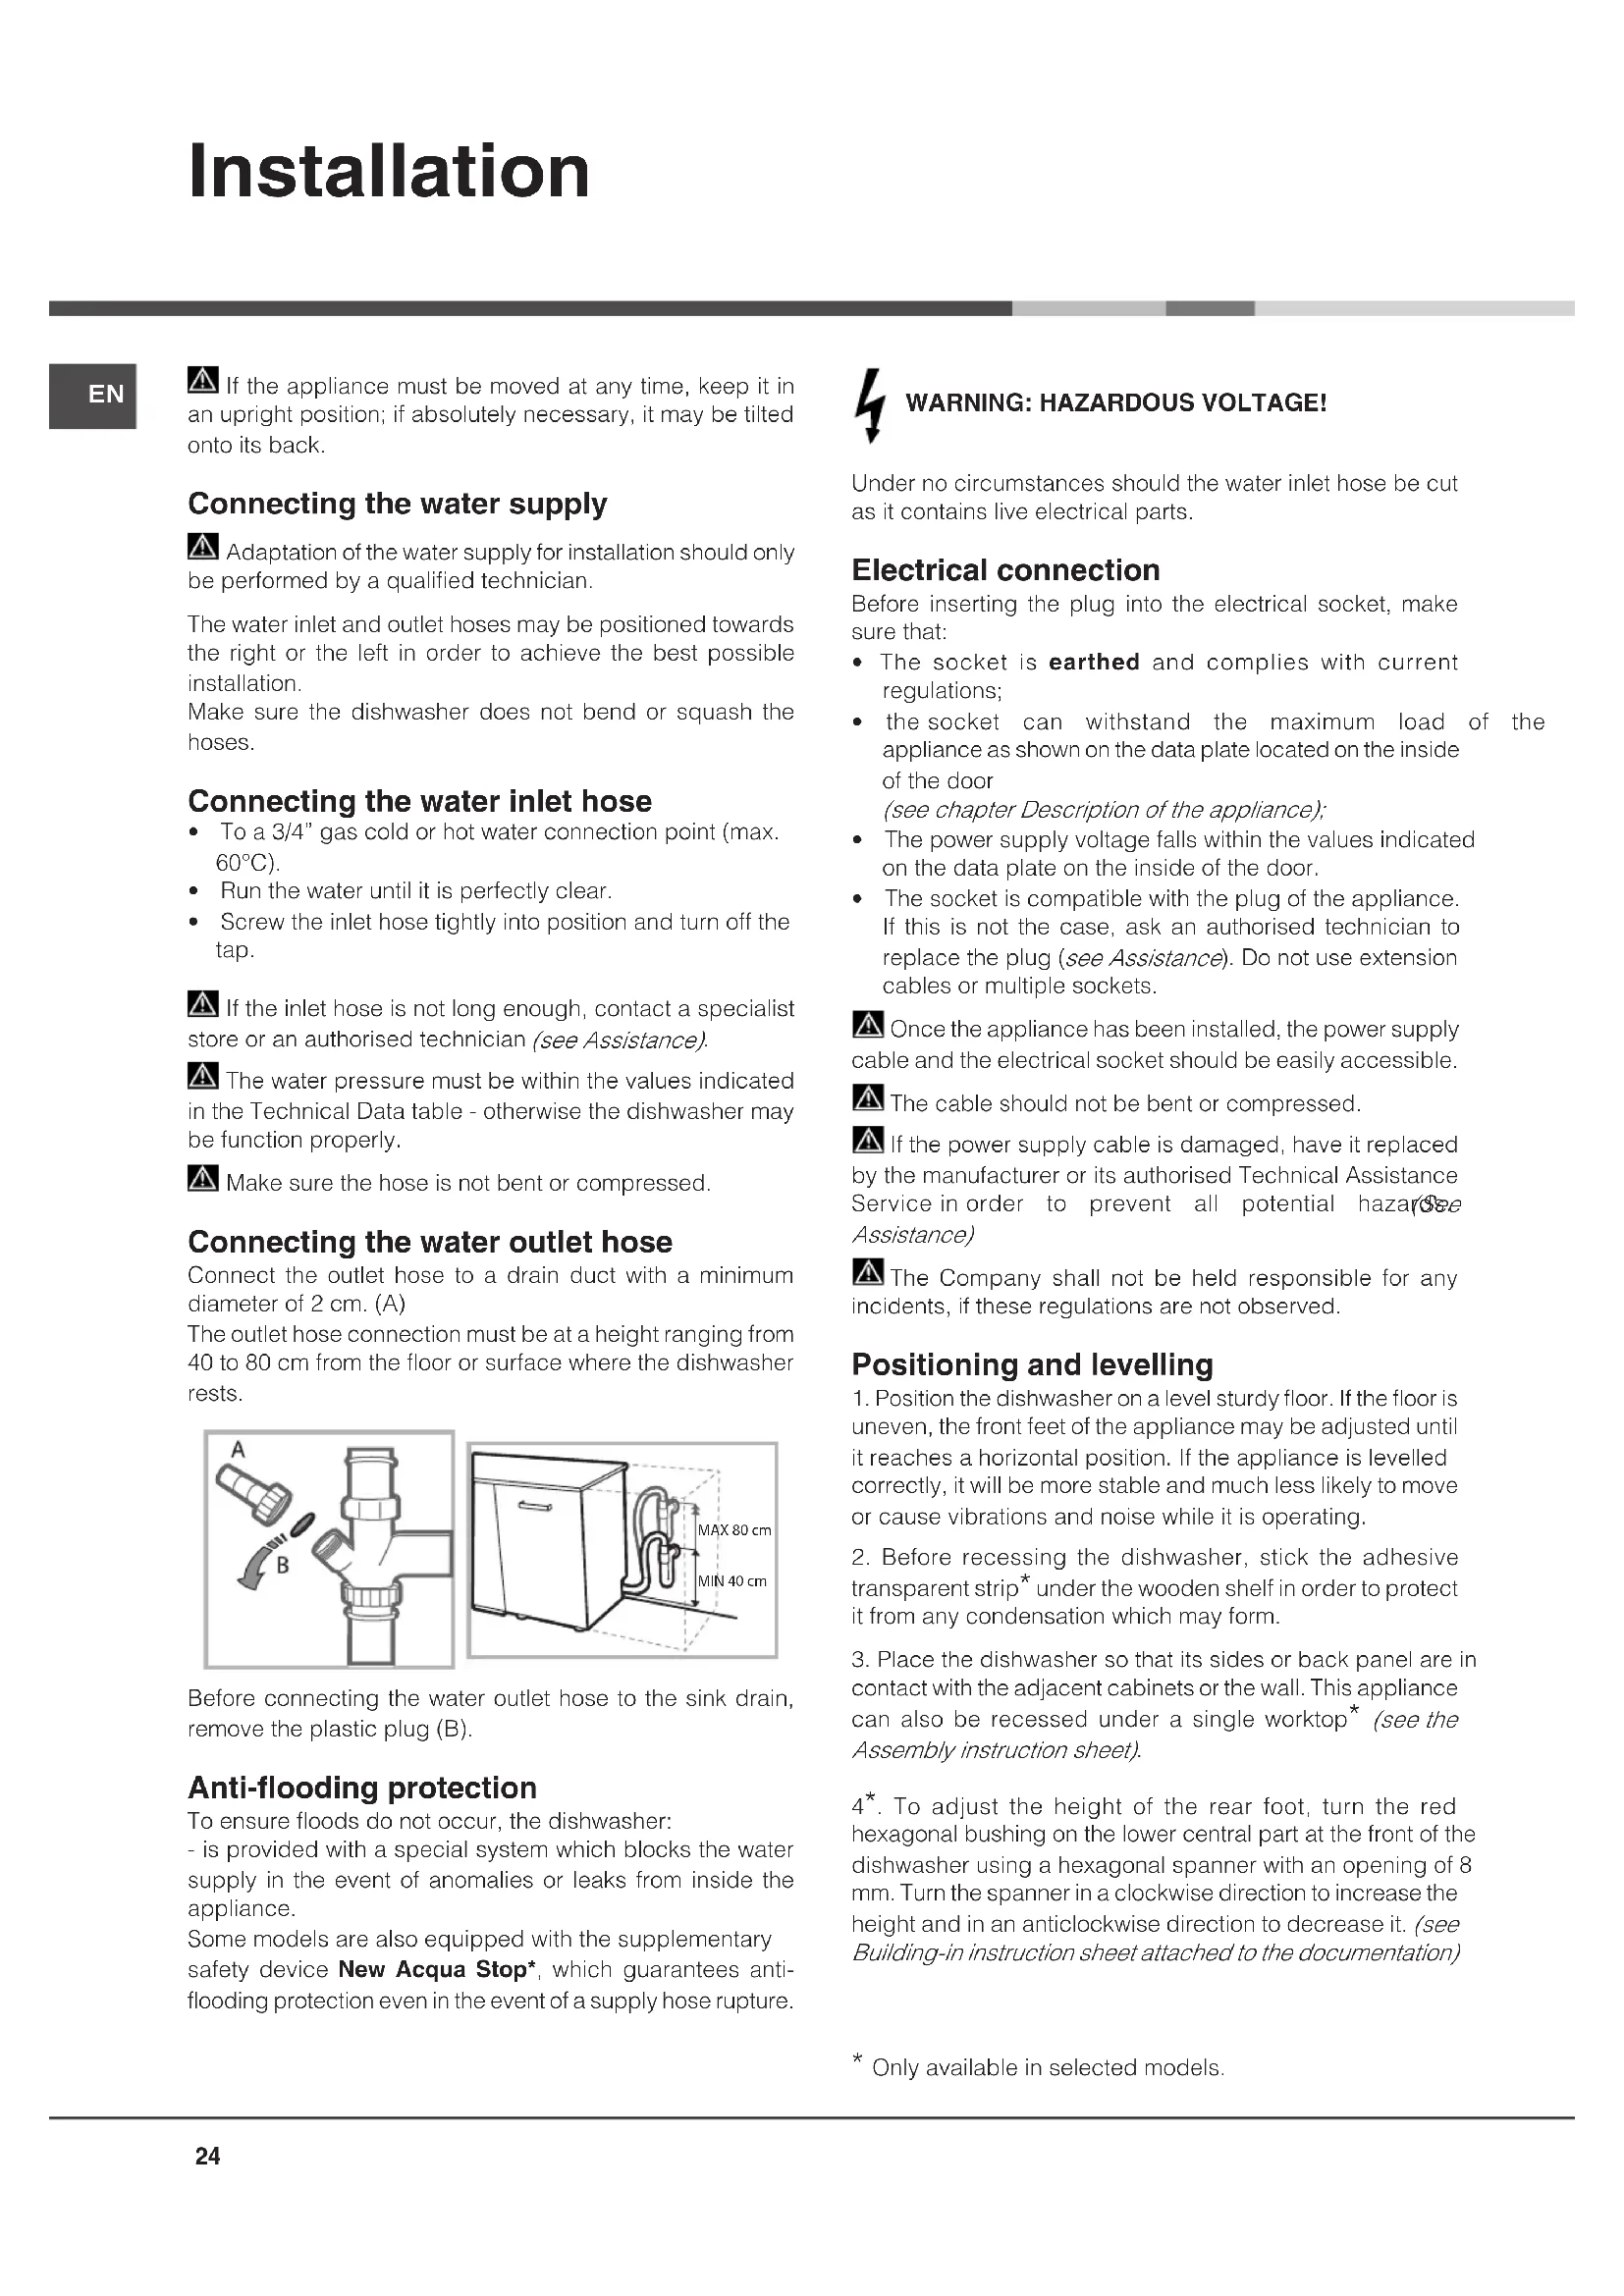
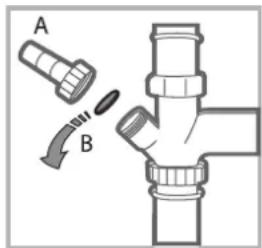
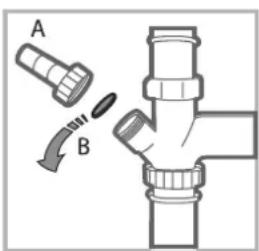
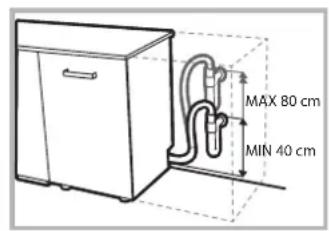
Connecting the water outlet hose
Connect the outlet hose to a drain duct with a minimum diameter of 2cm (A)
The outlet hose connection must be at a height ranging from 40 to 80~cm from the floor or surface where the dishwasher rests.
Before connecting the water outlet hose to the sink drain, remove the plastic plug (B).
Anti-flooding protection
To ensure floods do not occur, the dishwasher:
- is provided with a special system which blocks the water supply in the event of anomalies or leaks from inside the appliance.
Some models are also equipped with the supplementary safety device New Acqua Stop*, which guarantees anti-flooding protection even in the event of a supply hose rupture.

WARNING: HAZARDOUS VOLTAGE!
Under no circumstances should the water inlet hose be cut as it contains live electrical parts.
Electrical connection
Before inserting the plug into the electrical socket, make sure that:
- The socket is earthed and complies with current regulations;
- the socket can withstand the maximum load of the appliance as shown on the data plate located on the inside of the door
(see chapter Description of the appliance);
- The power supply voltage falls within the values indicated on the data plate on the inside of the door.
- The socket is compatible with the plug of the appliance. If this is not the case, ask an authorised technician to replace the plug (see Assistance). Do not use extension cables or multiple sockets.
Once the appliance has been installed, the power supply cable and the electrical socket should be easily accessible.
The cable should not be bent or compressed.
A If the power supply cable is damaged, have it replaced by the manufacturer or its authorised Technical Assistance Service in order to prevent all potential hazard (Assistance)
The Company shall not be held responsible for any incidents, if these regulations are not observed.
Positioning and levelling
- Position the dishwasher on a level sturdy floor. If the floor is uneven, the front feet of the appliance may be adjusted until it reaches a horizontal position. If the appliance is levelled correctly, it will be more stable and much less likely to move or cause vibrations and noise while it is operating.
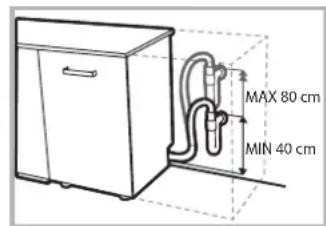
- Before recessing the dishwasher, stick the adhesive transparent strip under the wooden shelf in order to protect it from any condensation which may form.
- Place the dishwasher so that its sides or back panel are in contact with the adjacent cabinets or the wall. This appliance can also be recessed under a single worktop* (see the Assembly instruction sheet).
4^ . To adjust the height of the rear foot, turn the red hexagonal bushing on the lower central part at the front of the dishwasher using a hexagonal spanner with an opening of 8 mm. Turn the spanner in a clockwise direction to increase the height and in an anticlockwise direction to decrease it. (see Building-in instruction sheet attached to the documentation)
Advice regarding the first wash cycle
After the installation, remove the stoppers from the racks and the retaining elastic elements from the upper rack (if any).
Water softener settings
Before starting the first wash cycle, set the hardness level of the water from the mains supply. (see chapter Rinse aid and refined salt).
First load the softener tank with water, then introduce about 1kg of salt. It is perfectly normal for water to flow out.
As soon as this procedure is complete, run a wash cycle.
Only use salt that has been specifically designed for dishwashers.
After the salt has been poured into the machine, the LOW SALT indicator light* switches off.
A If the salt container is not filled, the water softener and the heating element may be damaged as a result.
| Technical data | |
| Dimensions | width 59.5 cm height 82 cm depth 57 cm |
| Capacity 15 standard place-settings | |
| Water supply | 0,05 ÷ 1MPa (0.5 ÷ 10 bar) |
| pressure | 7,25 - 145 psi |
| Power supply voltage See appliance data plate | |
| Total absorbed power See appliance data plate | |
| Fuse See appliance data plate | |
| CE | This dishwasher conforms to the following European Community Directives: -2006/95/EC (Low Voltage) -2004/108/EC (Electromagnetic Compatibility) -2009/125/EC (Comm. Reg. 1016/2010) (Ecodesign) -97/17/EC (Labelling) -2012/19/EC (WEEE) |
The machine has a buzzer/set of tones (depending on the dishwasher model) to inform the user that a command has been implemented: power on, cycle end etc.
The symbols/indicator lights/LEDs on the control panel/ display may vary in colour and may have a flashing or fixed light (depending on the dishwasher model).
The display provides useful information concerning the type of wash cycle, drying/wash-cycle phase, remaining time, temperature etc etc.
START 2END LIGHT*
Some dishwasher models are equipped with a green indicator light in the gap between the door and kitchen top providing information on the phase of the current wash cycle. One of the following operating modes can be selected:
a) Disabled function
b) When the cycle starts the light goes on for few seconds, stays off during the cycle and flashes at the end of the cycle (default mode)
c) The light stays on during the cycle and flashes at the end of the cycle. If the delayed start was set, the light goes on either for the first few seconds or the entire duration of the countdown, based on whether mode b) or c) was set.
The light goes off every time the door is opened.
To select the mode you prefer, switch on the machine, hold down button until one of the three letters appears on the display, press button until you reach the desired letter (or mode), hold down button to confirm the selection.
Description of the appliance
EN
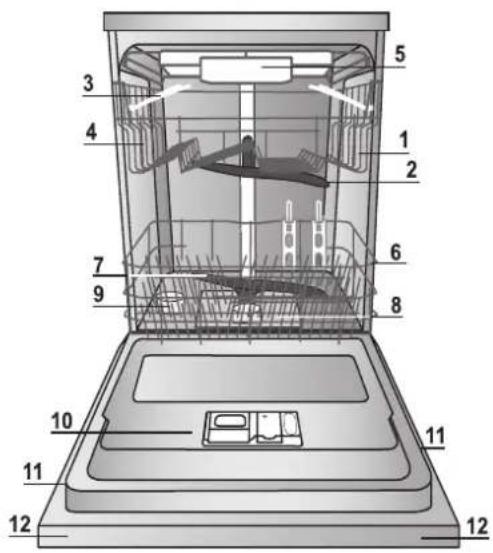
Overall view
- Upper rack
- Upper sprayer arm
- Tip-up dispensers
- Rack height adjuster
- Third rack*
- Lower rack
- Lower sprayer arm
- Washing filter
- Salt dispenser
- Detergent and rinse-aid dispensers
11.Data plate - Control panel****

Control panel
*** Only in completely built-in models.
* Only available in selected models.
The number and type of wash cycles and options may vary depending on the dishwasher model.
Only use products which have been specifically designed for dishwashers. Do not use table salt or industrial salt. Follow the instructions given on the packaging.
A If you are using a multi-function product, we recommend that you add salt in any case, especially if the water is hard or very hard. (Follow the instructions given on the packaging.)
A If you do not add salt or rinse aid, the LOW SALT and LOW RINSE AID indicator lights will remain lit.
Measuring out the refined salt
The use of salt prevents the formation of LIMESCALE on the dishes and on the machine's functional components.
It is important that the salt dispenser be never empty.
It is important to set the water hardness.
The salt dispenser is located in the lower part of the dishwasher (see Description) and should be filled:
- When the LOW RINSE AID indicator light in the control panel is lit ;
- When the green float* on the cap of the salt dispenser is no longer visible.
See autonomy in the water hardness table.
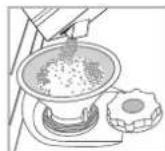
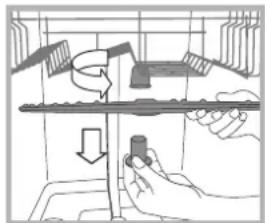
- Remove the lower rack and unscrew the container cap (anticlockwise).
- Only the first time you do this: fill the water dispenser up to the edge.
- Position the funnel (see figure) and fill the salt container right up to its edge (approximately 1kg ); it is not unusual for a
little water to leak out.
- Remove the funnel and wipe any salt residue away from the opening; rinse the cap under running water and then screw it on. It is advisable to perform this procedure every time you add salt to the container.
Make sure the cap is screwed on tightly, so that no detergent can get into the container during the wash cycle (this of damage the water softener beyond repair).
Whenever you need to add salt, we recommend carrying out the procedure before the washing cycle is started.
Setting the water hardness
For perfect water softener operation, it is essential that the adjustment be based on the water hardness in your house. Ask your local water supplier for this information. The factory setting is for medium water hardness.
- Switch the dishwasher on using the On/Off button.
- Switch it off using the On/Off button
- Hold down button P for 5 seconds until you hear a beep.
- Switch it on using the On/Off button
- The current selection level number and salt indicator light flash.
- Press button P to select the desired hardness level (see hardness table).
- Switch it off using the On/Off button
- Setting is complete!
* Only available in selected models.
| Water Hardness Table | Average autonomy salt dispenser with 1 wash cycle per day | |||
| level | °dH | °F | mmol/l | months |
| 1 | 0 - 6 | 0 - 10 | 0 - 1 | 7 months |
| 2 | 6 - 11 | 11 - 20 | 1.1 - 2 | 5 months |
| 3 | 12 - 17 | 21 - 30 | 2.1 - 3 | 3 months |
| 4 | 17 - 34 | 31 - 60 | 3.1 - 6 | 2 months |
| 5* | 34 - 50 | 61 - 90 | 6.1 - 9 | 2/3 weeks |
| For values between 0°f and 10°f, we do not recommend the use of salt. A setting of 5 may increase cycle duration. | ||||
(^ dH)= hardness measured in German degrees - ^ f = hardness measured in French degrees - mmol/l = millimoles per litre)
Measuring out the rinse aid
Rinse aid makes dish DRYING easier. The rinse aid dispenser should be filled:
- When the LOW RINSE AID indicator light on the panel/display is lit*:
- When the dark optical indicator* on the dispenser door "D" becomes transparent.
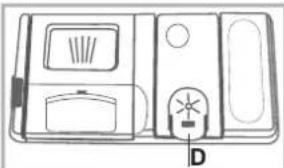
- Open the dispenser "D" by pressing and pulling up the tab on the lid;
- Carefully introduce the rinse aid as far as the maximum reference notch in the filling space - avoid spilling it. If this happens, clean the spill immediately with a dry cloth.
- Press the lid down until you hear a click to close it.
NEVER pour the rinse aid directly into the tub.
Adjusting the amount of rinse aid
If you are not completely satisfied with the drying results, you may want to adjust the quantity of rinse aid used.
- Switch the dishwasher on using the On/Off button.
- Switch it off using the On/Off button
- Press button P three times - a beep will be heard.
- Switch it on using the On/Off button
- The current selection level number and rinse aid indicator light flash.
- Press button P to select the level of rinse aid quantity to be supplied.
-
Switch it off using the On/Off button
-
Setting is complete!
If the rinse aid level is set to ZERO, the rinse aid will not be supplied and the low rinse aid indicator light will not be lit if you run out of it.
A maximum of 4 levels can be set according to the dishwasher model. The factory setting is for a medium level.
If you see bluish streaks on the dishes, set a low number (1-2).
- If there are drops of water or limescale marks on the dishes, set a high number (3-4).
Loading the racks
EN
Tips
Before loading the racks, remove all food residues from the crockery and empty liquids from glasses and containers. No
preventive rinsing is needed under running water.
Arrange the crockery so that it is held in place firmly and does not tip over; and arrange the containers with the openings facing downwards and the concave/convex parts placed obliquely, thus allowing the water to reach every surface and flow freely.
Make sure that the lids, handles, trays and frying pans do not prevent the sprayer arms from rotating. Place any small items in the cutlery basket.
Since plastic dishes and non-stick frying pans usually retain more water drops, their drying will be not so good as that of ceramic or stainless-steel dishes.
Lightweight items such as plastic containers should be placed in the upper rack and arranged so that they cannot move.
After loading the appliance, make sure that the sprayer arms can rotate freely.
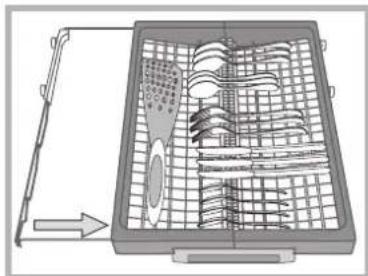
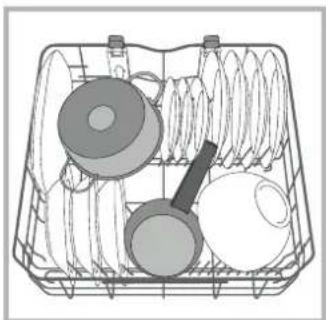
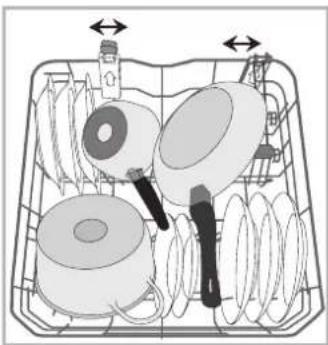
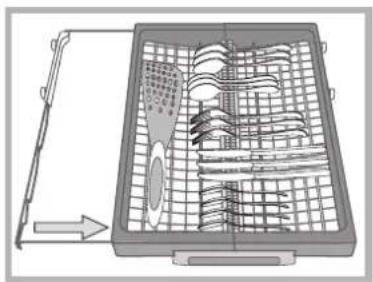
Lower rack
The lower rack can hold pans, lids, dishes, salad bowls, cutlery etc. Large plates and lids should ideally be placed at the sides.
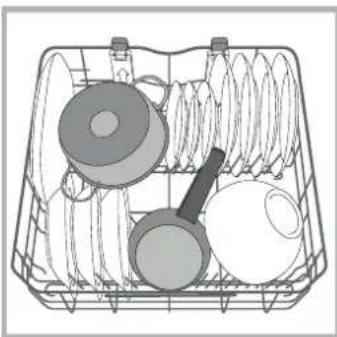
Very soiled dishes and pans should be placed in the lower rack because in this sector the water sprays are stronger and allow a higher washing performance.
and left to fit the size of the crockery.
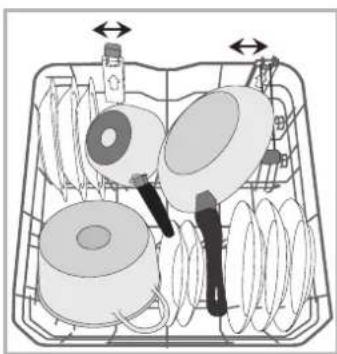
Some models are equipped with Vertical Zone, special pull-out supports*in the rear of the rack that can be used to support frying pans and baking pans in a more vertical position, thus taking up less space. In order to use it, just get hold of the coloured grip and pull it upwards while rotating it forward. The supports can slide right
Several dishwasher models are fitted with tip-up sectors. They can be used in a vertical position when arranging dishes or in a horizontal position (lower) to load pans and salad bowls easily.
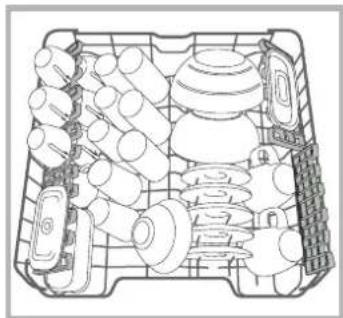
Upper rack
Load this rack with delicate and lightweight crockery such as glasses, cups, saucers and shallow salad bowls.
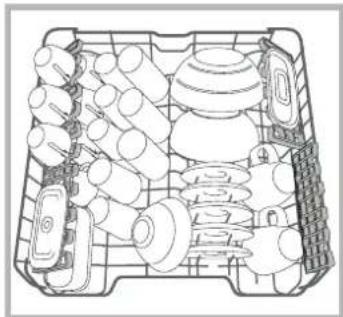
Several dishwasher models are fitted with tip-up sectors. They can be used in a vertical position when arranging tea/ dessert saucers or in a lower position to load bowls and food containers.
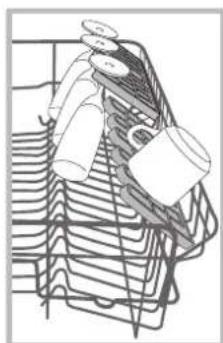
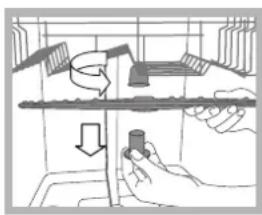
Tip-up compartments with adjustable position*
The side tip-up compartments can be positioned at three different heights to optimize the arrangement of crockery inside the rack. Wine glasses can be placed safely in the tip-up compartments by inserting the stem of each glass into the corresponding slots.
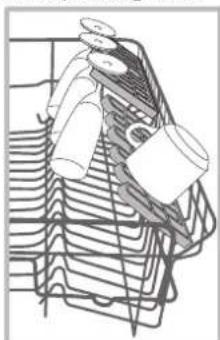
For optimum drying results incline the tip-up compartments more. To change the inclination, pull up the tip-up compartment, slide it slightly and position it as you wish.
Wine glasses can be placed safely in the tip-up compartments by inserting the stem of each glass into the corresponding slots.
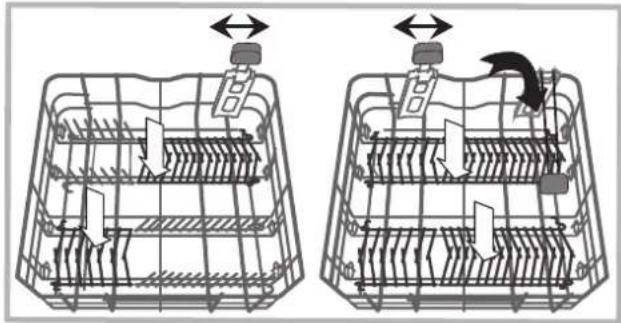
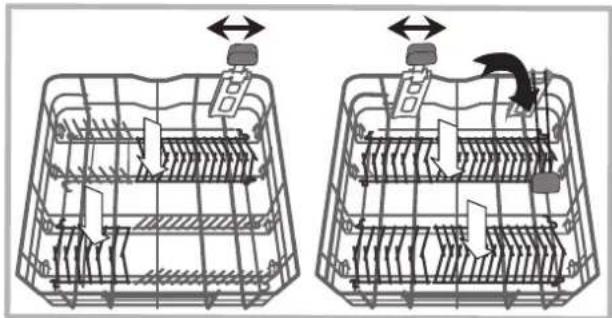
The upper rack can be adjusted for height based on requirements: high position to place bulky crockery in the lower rack and low position to make the most of the tip-up compartments/sectors by creating more space upwards.
Adjusting the height of the upper rack
In order to make it easier to arrange the crockery, the upper rack may be moved to a higher or lower position.
The height of the upper rack should be adjusted WHEN THE RACK IS EMPTY.
NEVER raise or lower the rack on one side only.
If the rack is equipped with a Lift-Up device (see figure), lift it up by holding its sides. To restore the lower position, press the levers (A) at the sides of the rack and follow the rack down.
The upper rack cannot be used in the high position and with the tip-up compartments closed in a vertical position.
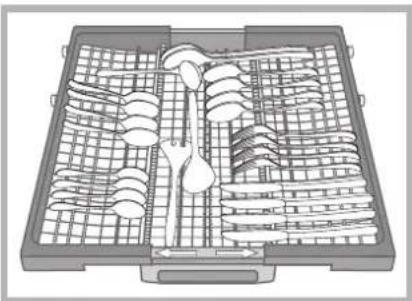
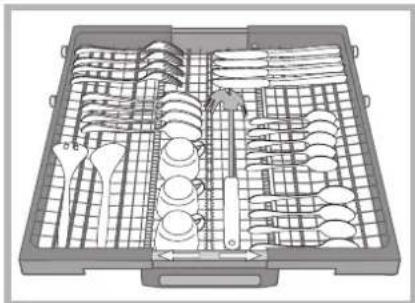
Third rack
The third rack was designed to house the cutlery. Arrange the cutlery as shown in the figure.
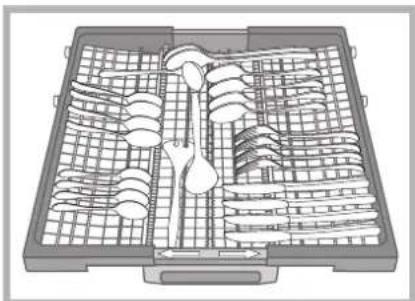
A separate arrangement of the cutlery makes collection easier after washing and improves washing and drying performance.
A "Knives and other utensils with sharp edges must be positioned with the blades facing downwards."
The geometry of the rack makes it possible to place such small items as coffee cups in the area in the middle.
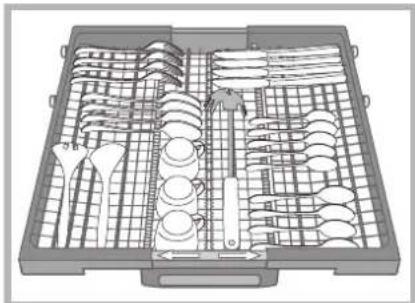
The third basket is equipped with two sliding side trays to make the most of the height of the space below.
Unsuitable crockery
Wooden crockery and cutlery.
- Delicate decorated glasses, artistic handicraft and antique crockery. Their decorations are not resistant.
- Parts in synthetic material which do not withstand high temperatures.
Copper and tin crockery.
- Crockery soiled with ash, wax, lubricating grease or ink. The colours of glass decorations and aluminium/silver pieces can change and fade during the washing process. Some types of glass (e.g. crystal objects) can become opaque after a number of wash cycles too.
Damage to glass and crockery
Caused by:
Type of glass and glass production process.
Chemical composition of detergent.
Water temperature of rinse cycle.
Tips:
- Only use glasses and porcelain guaranteed by the manufacturer as dishwasher safe.
Use a delicate detergent suitable for crockery. - Collect glasses and cutlery from the dishwasher as soon as the wash cycle is over.
Detergent and dishwasher use
EN
Starting the dishwasher
- Turn the water tap on.
- Open the door and press ON-OFF button: the ON/0 indicator lights, options and the display come on.
- Measure out the detergent. (see adjacent information).
- Load the racks (see Loading the racks).
- Select the wash cycle in accordance with the type of crockery and its soil level (see table of wash cycles) by pressing the P button.
- Select the wash options* (see Special wash cycles and options).
- Start the wash cycle by shutting the door.
-
The end of the wash cycle is indicated by beeps and by the flashing of the wash cycle number on the display. Open the door, switch off the appliance by pressing the ON/OFF button, shut off the water tap and unplug the appliance from the electricity socket.
-
Wait for a few minutes before removing the crockery, in order to avoid burns. Unload the racks, beginning with the lower level.
-
The machine will switch off automatically during certain extended periods of inactivity, in order to minimise electricity consumption.
AUTO WASH CYCLES*: some models of dishwashers are equipped with a special sensor which can be used to assess the level of soiling and automatically setting the most efficient and economic wash cycle accordingly.
The duration of the Auto wash cycles may vary due to the operation of the sensor.
If the crockery is only lightly soiled or if it has been rinsed with water before being placed in the dishwasher, reduce the amount of detergent used accordingly.
Modifying a wash cycle in progress
If a mistake was made during the wash cycle selection process, it is possible to change the cycle, provided that it has only just begun: open the door taking care to avoid the escaping steam, by pressing and holding the ON/OFF button, the machine will switch off. Switch the machine back on using the ON/OFF button and select the new wash cycle and any options desired; start the cycle by closing the door.
Adding extra crockery
Without switching off the machine, open the door, taking care to avoid the escaping steam, and place the crockery inside the dishwasher. Shut the door and the cycle will begin from the point at which it was interrupted.
Accidental interruptions
If the door is opened during the wash cycle, or if there is a power cut, the cycle stops. It starts again from the point at which it was interrupted once the door has been shut or the electricity supply is restored.
- Only available in selected models.
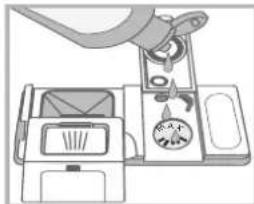
Measuring out the detergent
A good wash result also depends on the correct amount of detergent being used. Exceeding the stated amount does not result in a more effective wash and increases environmental pollution.
Based on how soiled the items are, the amount can be adjusted to individual cases using powder or liquid detergent.
In the case of normally soiled items, use approximately either 35 gr (powder detergent) or 35 ml (liquid detergent). If tablets are used, one tablet will be enough.
If the crockery is only lightly soiled or if it has been rinsed with water before being placed in the dishwasher, reduce the amount of detergent used accordingly.
For good washing results also follow the instructions shown on the detergent box.
For further questions please ask the detergent producers.
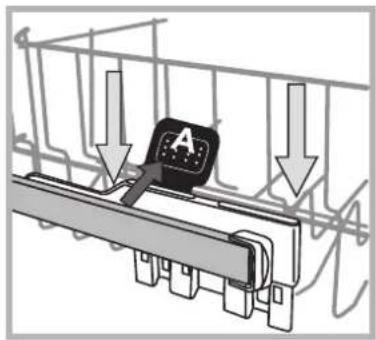
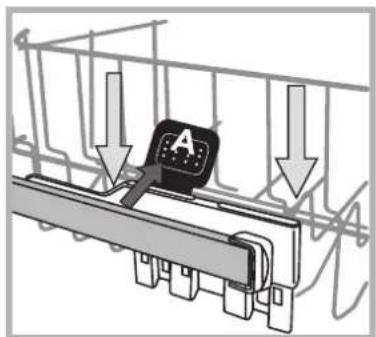
To open the detergent dispenser use the opening device "A".
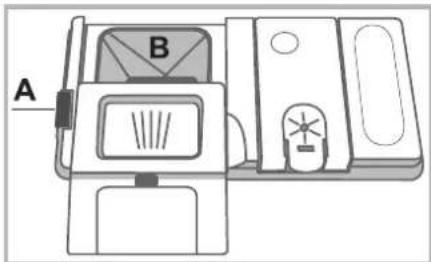
Introduce the detergent into the dry dispenser "B" only. Place the amount of detergent for pre-washing directly inside the tub.
-
When measuring out the detergent refer to the Table of wash cycles to add the proper quantity. Compartment B comprises a level showing the maximum quantity of liquid or powder detergent that can be added to each cycle.
-
Remove detergent residues from the edges of the dispenser and close the cover until it clicks.
-
Close the lid of the detergent dispenser by pulling it up until the closing device is secured in place.
The detergent dispenser automatically opens up at the right time according to the wash cycle.
If all-in-one detergents are used, we recommend using the TABS option, because it adjusts the cycle so that the best washing and drying results are always achieved.
Only use detergent which has been specifically designed for dishwashers.
DO NOT USE washing up liquid.
Using excessive detergent may result in foam residues remaining in the machine after the cycle has ended.
To achieve the best washing and drying results, the combined use of detergent, rinse aid liquid and refined salt is required.
We recommend using detergents that do not contain phosphates or chlorine, as these products are harmful to the environment.
Wash-cycle data is measured under laboratory conditions according to European Standard EN 50242. Based on the different conditions of use, the wash-cycle duration and data can change.
EN
The number and type of wash cycles and options may vary depending on the dishwasher model.
| Wash cycle | Wash cycle which include drying | Options | Approximate duration of wash cycles | Water consumption (l/cycle) | Energy consumption (KWh/cycle) |
| 1. Eco Yes | Delayed start - Tabs - Extra Dry | 03:15' 11 1,07 | |||
| 2. Auto Intensive Yes AUTO | Delayed start - Tabs - Extra Dry - Short Time - Zone wash | 02:00' - 03:10' 15 | 5 - 17,0 1,55 - 1,80 | ||
| 3. Auto Normal Yes AUTO | Delayed start - Tabs - Extra Dry - Short Time - Zone wash | 01:30' - 02:30' 15 | 0 - 16,5 1,25 - 1,40 | ||
| 4. Auto Fast No AUTO | Delayed start - Tabs | 00:40' - 01:20' 13 | 0 - 14,5 1,20 - 1,30 | ||
| 5. Trio Wash Yes | Delayed start - Tabs - Extra Dry - Short Time | 02:00' 18,0 | 1,35 | ||
| 6. Delicate | Yes | Delayed start - Tabs - Extra Dry | 01:40' | 11,5 | 1,15 |
| 7. Express 30' | No | Delayed start - Tabs | 00:30' | 9,0 0,55 | |
| 8. Goodnight | Yes | Delayed start - Tabs - Extra Dry | 03:30' | 16 | 1,05 |
| 9. Soak | No | Delayed start | 00:12' | 4,5 | 0,01 |
| 10. Sanitazing | Yes | Delayed start | 01:20' 10,0 | 1,25 | |
| 11. Self Clean | No | Delayed start | 00:50' | 8,0 | 0,85 |
Instructions on wash-cycle selection and detergent dosage
- The ECO wash cycle is the standard cycle to which the energy label data refers. It can be used to wash crockery with a normal soil level and is the most efficient cycle in terms of energy and water consumption for this type of crockery. 32gr / ml + 6gr / ml^ - 1 Tab (^ Quantity of pre-washing detergent)
- Heavily soiled dishes and pans (not to be used for delicate items). 38 gr/ml - 1 Tab
- Normally soiled pans and dishes. 32gr / ml + 6gr / ml^** - 1 Tab
- Limited quantity of daily soiling (ideal for 4 place settings) 25gr / ml - 1 Tab
- Wash spread over the three racks: normal in the upper rack and third rack for cutlery and glasses, heavy-duty in saucepans in the lower rack. 38 gr/ml - 1 Tab
- Cycle for delicate items, which are more sensitive to high temperatures 35 gr/ml - 1 Tab
- Fast cycle to be used for slightly dirty dishes (ideal for 2 place settings) 25gr / ml - 1 Tab
- Optimum performance ensured. Ideal for night-time operation. 38 gr/ml - 1 Tab
- Pre-wash while awaiting completion of the load with the dishes from the next meal. No detergent.
- High-temperature disinfecting cycle. Ideal to clean crockery and feeding bottles. 30 gr/ml - 1 Tab
- Dishwasher cleaning cycle to be used when the dishwasher is EMPTY with special detergents. Standby consumption: Left-on mode consumption: 5 W - Off mode consumption: 0.5 W.
Special wash cycles and Options
EN
Notes:
Optimum performance levels when using the "Fast" and "Express 30" cycles can be achieved by respecting the specified number of place settings.
To reduce consumption even further, only run the dishwasher when it is full.
Note for Test Laboratories: for information on comparative EN testing conditions, please send an email to the following address: ASSISTENZA_EN_LVS@indesitcompany.com
Wash options
If an option is not compatible with the selected wash cycle (see table of wash cycles), the corresponding LED flashes rapidly 3 times and beeps will sound.

Delayed start
The start of the wash cycle may be delayed for a period of time between 1 and 12 hours.
- Press the DELAYED START button: the corresponding symbol appears on the display; each time you press the button, the time (1h, 2h, etc. up to max. 12h) from the start of the selected wash cycle will be increased.
- Select the cycle and close the door: the timer will begin counting down;
- Once this time has elapsed, the indicator light switches off and the wash cycle begins.
To adjust the delay time and select a smaller period of time, press the DELAYED START button. To cancel it, press the button repeatedly until the selected delayed start indicator light switches off. The wash cycle will start automatically as soon as the door is shut.

Short Time option
This option can be used to reduce the duration of the main wash cycles while maintaining the same washing performance levels.
Having selected the option, press the Short Time button. To deselect the option, press the same button again.

Multi-functional tablets* (Tabs)
This option optimises washing and drying results. Using multi-functional tablets, press the MULTI-ONAL TABLETS button; the corresponding indicator symbol will light up. If the button is pressed again, the icon will be deselected.
The "Multi-functional tablets" option results in a longer wash cycle.
The use of tablets is only recommended for models having this option and it is not recommended with wash cycles which do not specify the use of multi-functional tablets.

Zone Wash
This option makes it possible to carry out the wash cycle in the selected rack only. Select the wash cycle and then press the ZONE WASH button: the selected rack lights up and the wash cycle starts in the selected rack only. Press the button again to deselect the option.
The option is available with the following wash cycles: Intensive and Normal.
Select the option and the Intensive cycle to start the ULTRAINTENSIVE ZONE washing. This wash cycle is ideal for very soiled mixed loads, e.g. pans and saucepans, dishes with heavy encrustation or difficult-to-clean crockery (grater, vegetable mill, dirty cutlery). The spraying pressure is stronger and the washing temperature higher, thus ensuring optimum handling of stubborn stains.
Select the option and the Normal cycle to start the SAVING ZONE washing. This function makes it possible to reduce energy consumption. Cycle duration might change.
Remember to load the crockery in the selected rack only

Extra drying
To improve the dryness level of the crockery, press the EXTRA DRYING button and the indicator light/symbol will light up. If it is pressed again, the option will be deselected. A higher temperature during the final rinsing and a longer drying phase improve the dryness level.
The EXTRA DRYING option increases the duration of the wash cycle.
- Only available in selected models.
Shutting off the water and electricity supplies
- Turn off the water tap after every wash cycle to avoid leaks.
Always unplug the appliance when cleaning it and performing maintenance work.
Cleaning the dishwasher
- The external surfaces of the machine and the control panel can be cleaned using a non-abrasive cloth which has been dampened with water. Do not use solvents or abrasive products.
- Any marks on the inside of the appliance may be removed using a cloth dampened with water and a little vinegar.
Preventing unpleasant odours
Always keep the door of the appliance ajar in order to avoid moisture from forming and being trapped inside the machine.
- Clean the seals around the door and detergent dispensers regularly using a damp sponge. This will avoid food becoming trapped in the seals, which is the main cause behind the formation of unpleasant odours.
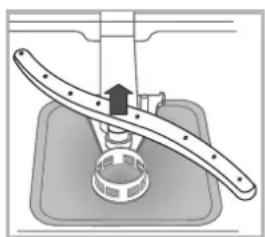
Cleaning the sprayer arms
Food residue may become encrusted onto the sprayer arms and block the holes used to spray the water. It is therefore recommended that you check the arms from time to time and clean them with a small non-metallic brush.
The two sprayer arms may both be removed.
To remove the upper sprayer arm, turn the plastic locking ring in an anti-clockwise direction. The upper sprayer arm should be replaced so that the side with the greater number of holes is facing upwards.
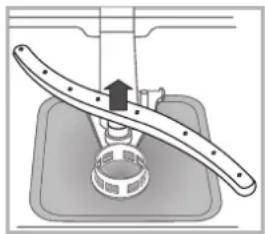
The lower sprayer arm can be removed by pressing on the side tabs and pulling it upwards.
Cleaning the water inlet filter*
If the water hoses are new or have not been used for an extended period of time, let the water run to make sure it is clear and free of impurities before performing the necessary connections. If this precaution is not taken, the water inlet could become blocked and damage the dishwasher.
A Clean the water inlet filter at the tap outlet regularly.
- Turn off the water tap.
- Unscrew the end of the water inlet hose, remove the filter and clean it carefully under running water.
- Re-place the filter and screw the water hose back into position.
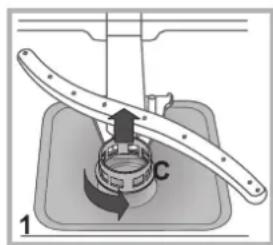
Cleaning the filters
The filter assembly consists of three filters which remove food residues from the washing water and then recirculate the water. They should be cleaned if you wish to achieve the best results when in every wash.
Clean the filters regularly.
The dishwasher should not be used without filters or if the filter is loose.
-
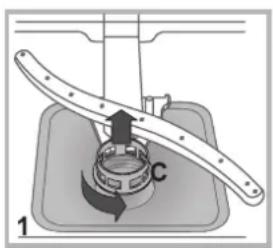
After several washes, check the filter assembly and if necessary clean it thoroughly under running water, using a non-metallic brush and following the instructions below:
-
Turn the cylindrical filter C in an anti-clockwise direction and pull it out (fig. 1).
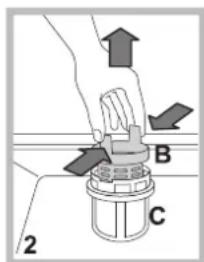
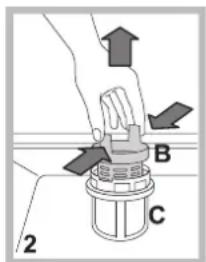
- Remove the cup filter B by exerting a slight pressure on the side flaps (fig. 2);
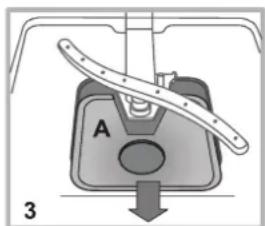
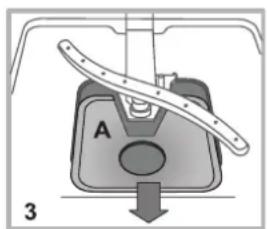
- Slide out the stainless-steel plate filter A. (fig. 3).
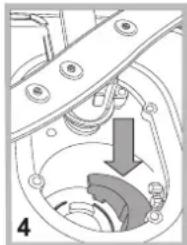
- Inspect the trap and remove any food residues. NEVER REMOVE the wash-cycle pump protection (black detail) (fig. 4).

After cleaning the filters, re-place the filter assembly and fix it in position correctly; this is essential for maintaining the efficient operation of the dishwasher.
Leaving the machine unused for extended periods
- Disconnect the appliance from the electricity supply and shut off the water tap.
- Leave the door of the appliance ajar.
- When you return, run a wash cycle when the dishwasher is empty.
* Only available in selected models.
Whenever the appliance fails to work, check for a solution from the following list before calling for Assistance.
| Problem: Possible causes / Solutions: | |
| The dishwasher does not start or cannot be controlled. | • Switch off the appliance by pressing the ON/OFF button, switch it back on after approximately one minute and reset the program. • The appliance has not been plugged in properly. • The dishwasher door has not been shut properly. |
| The door won't close. | • The lock was released. Strongly push the door until a "clacking" noise is heard. |
| No water drains out from the dishwasher. | • The dishwasher cycle has not yet finished. • The water inlet hose is bent (see Installation). • The drain duct is blocked. • The filter is clogged up with food residues. |
| The dishwasher makes excessive noise. | • The dishes are rattling against each other or against the sprayer arms. • Excessive foam presence: the detergent has not been measured out correctly or it is not suitable for use in dishwashers. (see Start-up and use). |
| The dishes and glasses are covered in a white film or limescale deposits. | • The level of the refined salt is low or the dosage setting is not suited to the hardness of the water (see Rinse aid and salt). • The lid on the salt dispenser is not closed properly. • The rinse aid has been used up or the dosage is too low. |
| The dishes and glasses are streaked or have a bluish tinge. | • The rinse aid dosage is too high. |
| The crockery has not been dried properly. | • A wash cycle without a drying programme has been selected. • The rinse aid has been used up or the dosage is too low (see Rinse aid and salt). • The rinse aid dispenser setting is not high enough. • The crockery is made from non-stick material or plastic. |
| The dishes are not clean. | • The racks are overloaded (see Loading the racks). • The crockery has not been arranged well. • The sprayer arms cannot move freely. • The wash cycle is too gentle (see Wash cycles). • Excessive foam presence: the detergent has not been measured out correctly or it is not suitable for use in dishwashers. (see Start-up and use). • The lid on the rinse aid compartment has not been shut correctly. • The filter is dirty or blocked (see Care and maintenance). • The refined salt level is low (see Rinse aid and salt). |
| The dishwasher does not take any water in - Tap shut-off alarm (beeps are heard and H appears for some minutes on the display) (the ON/OFF indicator light flashes and number 6 appears on the display). | • There is no water in the mains supply. • The water inlet hose is bent (see Installation). • Turn on the tap and the appliance will start after a few minutes. • The appliance lock has been activated because no action was taken when the beeps sounded. Switch off the machine using the ON/OFF button, turn on the tap and switch the machine back on after a few seconds by pressing the same button. Re-program the appliance and restart the wash cycle. |
- Only available in selected models.
Raccordements hydrauliques
Interruptions accidentselles
HIKOKDA He 3aJIbBaTe OOnJaCKBaTeIb HEnocpeCTBeHHOB MoeHyIO KaMepy MaunHbI.
OtperynnpyTe Do3y onoJacknBaTeIa
EcnnBac He yIOBJIeTBOpReT KaueCTBO cyuKn, MoXHO oTperyIINPOBaT Do3y onoNaCKBaTeJra.
BkIIOHTe nocydomoeyHy MaunHy c nOmoaH KHOKN BkJI.
- BbIKIOHTe HauKaTneH KaHONky BKJ./BbIK.
- HaxmTe 3 pa3a KhoNky P, nocne yero donxhen pa3daTbcra 3ByKOBoi CnHaI.
BKnHouHTe HaKaTHaEM Ha KhoNkY BKN./BbIKJ.
Miraet Homep Bb6paHHoro ypoBn INHdkaTop onoJaCKBaTeJIa.
- HaxMMTe KONKY PДЯБыбора кОЛЧЕСТВа ONОЛСКИВATEЯ.
- BbIKIOHTe HauKaTHe M KaHONky BKJ./BbIKN.
- Hac troponka 3aBepseHa!
YpOBeH onoJaCKnBaTeJI MoxHO HAcTpoNTb Ha HOJIb. B 3TOM Cnyae OOnJaCKnBaTeJI He IcNoJIb3yETcI, INHdIKaTOP OTCyTCTBnO ONaACKnBaTeJI NO npUHHe ero OTCyTCTBnE He 3aRopaAeTcI.
Moxho 3aadaMbMaKcMMy4 ypOBH B 3aBNCIMOCTN OT MoDenN nocydomoeHm MaWnHb. 3aDaHHoe 3HaueHne COOTBeTCTByET cpeHHe CTeNEHn.
- ecnHa nocyu de octaOTc8 6enbIe pa3BOObl, OTperynpyTe noaHy Ha MehBwee 3HaHeHne (1-2).
- ecn Ha nocyu e octaOTcKaIIN BObl IIN IYTHa HauIN, OtperynpyTe noay Ha 60nee BbICOKoe 3HaueHne (3-4).
3arpy3nTe KOp3nHbI
RU
Pekomehdaun
Peped 3arpy3kO KOp3H ydaHTE C nocdybIOCTaTKn Nnun, BblneTe OCTabWEEcC oedePXMoe n3 CTakaHOB uAweK.
OnonacknBaTb nocydy BDOH He Tpe6yeTcA.
Pa3mecntb nocyDy B nocydomoeyHm MaunHe npOhy, TTObI nocya He onpOKnHynacb, yCTaHOBnTb nocydy dHOM BBepx IIN 60kOM, TTObI BOda MOrJa PnOmbITb NocCy DByHTPN INCTeKaTb. PnOBepNTb, TTObI KpbIuKn, pyKn, CKOBOPoDKN IN NOHOCbI He npenrTcBOBaII BpaueHIO opocTeJe. MeJKe cTOnobBe np6Opby pa3mecntb B kOp3HKe dN rCToNObBX np6OpOB.
Пл actikobara nocya n ckoBopokn C TeФIOHOBBIM NOKpbITHeM MOrTy ydepKnbABy KaNINB OdbI, CneDObaTeJIbHO IN CyUka MoXeT 6bIT MeHee 3ΦΦeKTnBHO nO cpABHeHIO C nocydoI3 KepaMKn IIN CTaII.
Jerkyo nocydy (Hanpimep, nlaactNKOBuHy) pekomehyetcnoMecntb B BepxHIOO KOp3Hy TaK, yTo6bl nocyda He DnBraIacb.3arpy3NB nocydy, npoBepbTe, yTo6bl IOnactn opocnteJeMOrnn Cbo6oHBOpaTaBC.
HnKnKaKOp3nHa
HnKnHa Kp3Ha npEdHa3HaueHa dJa KAcTpOJb, KpbIeK, TapeNOK, canaTHnU, cTOnOBbIX pIn6OpOB n T.n. BOnBUnE TapeJIKN KpbIuKN peKOMeHdyETc pa3MeuaTb C 60KOB Kp3Hbl.
PekomeHnyeTcpa3MecTnB CnBHO rpr3HyO nocyD B HnKHei KOp3nHe, TAK KAK B 3ToI qAChTI CTpy NBObl 60Jee CnBhIe I o6ecneuBAHOT ONTMaNbHyIO MOky nocyDbI.
B HeKoToPbIX MoDenIpxnpedymatpmbaHOTcBeptnKaIbHbIe 30hbl, cneuaIbHbIe BIDBHXHbIe onOpbl,*pacnoLoXeHHbIeB3aHHe qactn Kop3HbI, KOTOpBIE MOrYT NCNoJIb3OBaTbCra DnPa3MeueHnaCKOBopoDnnnpotNBHeB BePeTnKaJIbHOM NIOXeHN CcEJIbO 3KOHOMN IpocCTpaHCTBa. InxNCNoJIb3OBAHn
HeoMOB3aBETb 3a CBETHyO pyKoTky I NOTaHyb ee BBepx, NobopauHbA Bnepe. Onopbl MoXHO nepeMeuTaB Bnpabo N BJIeBO B 3aBNCIMOCtN OT pa3Mepa Nocybl.
HekotopbIe MoDJIIN NocydomoeyhIx MaunH OChaIeHbI HAKIOHHBMN OTJeHEnrMaM*, KOTOpBIE MOKHO NcNoB3OBAbT TaKKe B BEpTKaJIbHOM NIOXKeHIM DnPa3MeUeHn TapeJIOK INB RopN3OHtAJIbHOM NIOXKeHIn (HAKIOHOM) dnn 60nee yDo6HorO pa3MeueHn KaCTPNOBJ nCaNaTHNU.
BepxHnKop3Ha
3arpyntb xpykyo nIerkyo nocydy: ctaKaHb, yawkn, bnoDa, MeKne caaTHnCb.
B HeKOTopbIX MoDEJX NOCyDOMOeHbIX MaUNH IMHeOTcR OKNDbIe CeKun* ,NCIOJIb3yEmble B BePTNKaJIbHOM NOIOXeHIN IINpa3MeUeHHraNbIX 6HIOJeu INn DecepTHbIX TapeIOueK ININ B ONUeHHOM NOIOXeHHIN DnRA pa3MeUeHHM MCOK INIIueBbIX Kopo6ok.
OTKnHbIe noJKN C BapbHyembIM noJNOKeHHem*
BokobIe OTKnIhIbe NOJIbMOnyT 6bITb yCTaHOBHeHbHa Tpex pa3HbIX yPOBHX IIN ONTNIM3aUN pa3MeUeHn NocdyB KOp3HHe.
Bokai Moxho Cta6nblbno NomeCTNb Ha OTKnHbIe NOKN, BCTaNB HOKky 6okana B cneuaNbHbIe npope3n.
Дя ONTUMn3aun cyu kn yctahOBITE OTKnHbIe NOkN NOc cambl6oBbUIM yrnom HaKNoHa. YTO6bl N3MeHNTb yrOHaKNoHa, npINOHNrTb OTKnHyIO NOkY, CmecHTb ee n yCTAHOBNTb B HxKHOM NOJoxHeHH.
BokanbMOKHO CTaBnBHO NOMeCTNb Ha OTKnDhIe NOKN, BCTaNB HOKKy 6OKana B CneuaNbHbIe npope3N.
BepxHIOKop3HMy MoXHO peryIupoBaTb NO Bbcote B 3aBnCIMOCtN OT HxJd: B BepxHE MNOXKeHN, KOrDa B HIXKeH KOp3HHe Tpe6yETc pa3MeCTNb KpyHyIO NocyD; B HIXHe NIOXKeHN -ДЯ ИСПОЛБОВАнЯ MeCTA ДЯ OTKINDbIX NOLOK, OCBO6OJDA6ONbUe MeCTa CBepxY.
Perynra nnoJoxhenBepxHeKop3nHbI
IЯ obnereHn pa3MeueHn Nocybl MoKHO OtperyNipoBaTb BBICOTy BepxHei KOp3uHbI, YcTaHOBnE ee Bblwe HnHKe.
PeKOMeHnyeTcpeRyIuPoBaTb BbICOTy BepxHei KOp3HbI E3 NOCyDbl.
HKNKOrDA He noDnHMaTe H He onyckaTe KOp3nHy, B3Bbncb 3a Hee TOnbKO cOdHO CTOpOHbl.
Ecni Kop3HnOcHaeHa Lift-Up* (CM.CXeMy) NOHNMTe K0P3NHy,B3RbUncb 3a Hee C6OKOB INpeMeCTNB ee BBepx. IIN ONyCKAHK OOP3NHBn BnH3 HaxMNTe Ha pbHuAXKn (A) C6OKOB K0P3NHBn HAnpaBBTe K0P3NHy BnH3.
A HeIb3a NcNoIb3OBA Tb BepXHIO KOp3Hy B BepXHe M NOJKeHm C BepTnKaJIbHO CNOKeHHbIM OTKnDHBIM NOJkAM.
Tpety KOp3nHa
TpEBa KOp3nHa CnyKNT Dnla pa3MeueHnna CTOnIObBix np6oPoB. Pa3MeCTNe CTOnOBbIe np6Opbl, KaK noka3aHO Ha pncyHke.
A «Hoxn ocTpBie cToIOBbI np6Opbl DoJXbI 6bITb NOBepHyTbOcTpneM BHN3.
Pa3denebHoe pa3meueHne cToNoBbIX npnbopOB o6IerHaET ux y6Opky nocne MoKn I ONTmMn3npye T KaHeCTBO IN MOKn N cyuKn.
*MHeOTcT OJIbKO B HeKOTOpbIX MoeJIaX N BapbIpyOT NO KOJIuHecTBy I paCnOJIOKeHNo.
ΦopMa KOp3HbI No3BONrE pa3MeCTnTb B ee CeHTpe TaKKe MeJkyIO NocuYd, Takiyo KaK KoFeiHbIe YaUKN.
TpEBKaKp3HaYKOMNJIeKTOBaHaDyMa6KOKBbIMN BbIDBnKbIMN NOJKAaMnIg ONTImaJIbHOrO NcONb3OBaHn HnXHeo npoctpaHCTBa B BbICOTy.
Nocya, HenpnoDnI JIINOCyDOMoeHbIX MaHH
- DepeBbHHbIe cToIOBbIe npIbOpbl nocya.
-Дeнкath纳 nocya c y3opamn, nocya pyHno pa6oTb n aHTKbapna hna nocya. Y3OpTaKaON nocydbIOBpeJrTcB nocydomoeHNO MaunHe.
-ДеталиИЗ сИнтETUHECKNX MaTePnaIOB, HeYCTOuNBBIe K BBICOKOI TempepaType.
MeHnaI OIOBHHaN NOcya. - Nocya, 3aqrpa3HeHHa nenlOM, BOCOM, Cma3OHyBMN BeueCTBaMn UIN YepHnJAMn.
Y3Opbl NO CTekny, anHomnHneBbIe n Cepe6pHbIe 3JIemEnTbI MOrTy I3MeHHTb CBoI CBETn NOINHrTb. HeKOTOpBle BNDbI CTekNa (HaNPImep, xpyctaIb) NocJe MHOROKpaTHoM MoKN MOrTy CTaTb MAToBbIMN.
KoJIHueCTBO N TINbI npOrpaMM N DOONHHTeHbIX FyHKcN BApbnpuyOT B 3aBNCMHOCTH OT MoeJIN NocydoMOeHoi MaHHbI.
Iocne YCTKN HnBTOB TOHNO yCTAHOBNTe HnBtpyOuyn y3eHa CBOE MeCTo, YTO RBLRETC BAXHBIM DnRA NCnPaBHO pa60TbI NOcyDOMoeUHO MaUNHbI.
ДиTeIbHbI npOToMmaHHbI
- OToCoeHInHe MaunHy oT ceTu 3NeKtpOnuTaHnI npeekpoTe BOOnpOBOhBi KpaH.
OCTaBtE DBePcU MaunHbI noJy-npKpbToI. -
Pocne dInTeBHoro npocToMaunHb npou3BeDHTe OINH XOIOCTOu NKJ MOKn.
-
IMeetcTOnbko B HeKoTOpbIX MoedJeX
HencpapBHOCTN
MeToIbIX yCTpaHeHnA
RU
B cnyae o6hapykeHn anomamn B pa6ote n3dienra npOBepbTe cneDyoUne nyHKtbI nepeTem, kak 6paTntbcB CepBnc TexHnueckoro 06cnykmbAHna.
| HeincpnpaBnoCTn: Bo3moXhBiE | npuHnBi / MetoDbI yctpaHEnHia: |
| Посydомочная машина He Залускaitя пп He pearspyet ha КOManDbI | •Выклочи Te машини Кноков BKЛ./БылКЛ., Вьов BKлочи Te epimperho черз оndу минуту И Вьов 3дадаite рограмmy. •Пробъte,хоршо пп Stentceльнaya влесь в сетувую розтky. •Дерца машини пloxо зakрыta. |
| Дерца He zakpbibAeTcR·ЗашелkhynC | Замok;энргийTOлкнITE Дерцу Bnnotьdo zuilechka. |
| Посydомочная машина He сныаert Вody. | •Прогрмma euple He zabepunacb. •Слвногшшанг corHyT (CM.Установka). •Засорпся спв в рakobинe. •Фильър засорен octatkamп пиши. |
| Шунаяразота поydомочнoi машинь. | •Посуda sbetcra dpyru O дурау Ил O noJonactn opocitenei. •Слшков Много пени: моюшee cpeCTBO И сользоваги в Нерравиьhom колчecтve пл He nodxOHTДЯ моукь в Спсуdомочньх Машинax. (CM.Залус и заця). |
| На поуde и сtalkaHax ocstael беловать пп ИЗвeSTKOBьн Hanel. | •ОтсутСТВуET PereHepripyUOZA сolyп ПИп rePулЯць eep cacxoDA He COOTBeTCTBvET CTepeHni ЖeCTKOCr T BoDы (CM.ОплackсьВатьи Машинax. (CM.Залус и заця). |
| •Крышka bачka солп пloxо зakрыta. •Зakончир onolackьВатьи, пп ergo do3nровka Heodctatochua. | |
| На поуde и сtalkaHax ocstael roLby6ObBatle pa3BODы пп наletы. | •Черзмернай Do3nровka onolackьВатьи. |
| Посуда плoxo БуICSuHena. •Быla ВьБа | baHa npogrрмma Moii Kaes cyuKII. •Зakончир onolackьВатьи пп hAcTpoeha HeDoCTaToCHaRe Ido3nровka (CM. OnolackьВATьи coIb). •Henrabinьно HabTpoeh paXoD onolackьВatьи. •Посуда с ТeФLOHOBBIM PokpblTneMппИЗПаCTNka. |
| Посуда плoxo БуIMbIa. •Корзинь пere | erpykeHb (CM.Загузka korpizH. •Посуда плoxo paSonoJozha B KOpzHax. •Посуда пpenYCTByET BpaUeHIO JonoacteI opocitenei. •Выбраha He3ФфКeTKIBHЯ рогрмma MoiiK (CM.Прогрмь) •Слшков Mного пени: моюшee cpeCTBO И сользоваги в Нерравиьhom колчecтve пл He nodxOHTДЯ моукь в Спсуdомочньх Машинax. (CM.Залус и заця). •ПробдzoDAОТа роглackьВATьи пIoXO ZAkpbyta. •Фильър засорен (CM.Тechнескоe obStCyKIBAHne u xyod). •ОсутСТВуET PereHepripyUOZa сolyп (CM.ОплackсьВATьи coIb). |
| Посydомочная машина He ЗалуBaTe Body - CngHaiN3aZmna ЗakрытOrTO Кранa. (BKlIOHauOTc 3BvKOBbIe CngHaiIb, И на диспee Na HeckolbKO MmHyT пokasibaTeTc"H").(Miraaet Иndikatop BKЛ./BbIKЛ., И на Ди检пeeпokasibaTeTc YncIcNo 6). | •В BodOpRoBode He T BoDы. •ВodOpRoBodni Shnahr corHyT (CM.МоNTaK). •ОТроче Кран, машини З苹CTTЯчЕЗ HeCKOLbKO MmHyT. •Машини 3a6LoKIPROBaIaIcB N3-3a OTCyTCTBny KAKIX-NIIbO DeIcTBN的新CayKOBbIX CngHaiNob. Выклоче машини Кноков BKЛ./ВыКЛ., оТкоче Кран и Chpe3 HeCKOLbKO ceKynd BVOB ВКlIOChte машини ТОж Кноков. ЛетрогрммИрYe mAsHInHy n 3苹uctiteцк. |
MbI 3a6oTUMcO CBOHX NOKyNaTeJnx I CTapaEMcR cDeNaTb cepBnCHoe 06CnyKuBaHne HAn6OJIe KaueCTBeHHbIM. MbI NOCTOARHNO COBepWeHCTByem Haun npOdyKTbI, YTO6bl cDeNaTb Bawe o6ueHne cTexHkoN pOcTBIM n npraTHbIM.
YXoD3aTexHmKoI
PpOaIITe CPOK 3KcNpyatauH N CHN3bTe BepoTHOCTb NOLOMKn TEXHNK.
BocnoIb3yIeTcB npoepccnHOaHbHbIMn CpeICTBaMn IJra yxoJa 3a TexHkoI OT Indesit Professional nIra Hau6Oonee npocToRo, aFpEKTUBHOrIO nIerKoro yxoJa 3a BaWei 6bITOBnTexHkoI.
PpOdykTbI Indesit Professional npoOn3BoJaTcB IVtaJIM C co6JIIODeHHeM BbICOKx EBPOneckx CTaHapTOB B o6NaCTN KaueCTBa, 3KoJOrnN u 6e3OnacHocTN nCNoJIb3OBAHnR u Co3DaHbC yHTom MHOrOJeTHero ONbTa npOn3BOJntEra TeXHKn. Y3HaIte NpOboHee Ha caTe www.hotpoint-ariston.ru B pa3dene «CepBnc» n cnpaunBaIte B mara3nHex BaWero ropoda.
ABTOPN3OBAHHbIe cepBnCHbIe eHTpbI
YTo6bIb 6bITb 6bnke K Haunm NOTpe6ntenam, Mbl Co3daJn WnpOKyU cepBnchyU cetb, Oco6eHHocTbO KOtopoR YBnEaTc Blicokar NoTROBkA, PnoceccNoHaJIn3M uYeCTHOCTb CepBnchbIX MaTepoB. Ha cerOJHnHn DeHb OHa HacHTbIBaET OKIo 350 cepBnCHbIX ceHTpOB Ha TeppntOpnn Poccnn n CHr.
IX KOHTaKbI Bb MoKeTe HaITn B cepBcHOM cepTnФkAte N ha caYTe www.hotpoint-ariston.ru B pa3dene «CepBcN».
EcnBamHaOo6paTbCBAcePBnchBnHcHTp:
BHHMaHHe! Pn peMOHTe Tpe6yTe NcNoJIb3OBAHnOpunHaJIbHbIX 3anaChbIX qacTe.
IpeepTeKakO6paHTbcB CepBnC TexHnueckoro 06cnyxHBnA:
- PpOBeBpTe, MoKHO JIn yCtpaHnTb HeNCnPpABHoCTb CamOcToAteJbHO (CM. HeNCnPpABHoCTn mMeTOblnx yCtpaHeHn).
BHOBB 3anyCTnTe nporpaMMy dIЯ npOBepK INCpabHoctMmaHHbl.
B npotnbHom cnyae o6paTntecb ByynonHMOOeHHb CepBnC Texnueckoro 05cIyKBAHA.
HnKorda He o6paaItecB K HeynonHomOeHHbIM TEXHNkAM.
Pn o6paueHn B CepBna Texnueckoro 06cnyKbAHH coo6uHTe:
XapakTeP HenCnpaBHOCTN
MoDJIb u3dennn (MoI.)
- cepиннын Homep ("S/N")
3Tn daHHbIe Bbl haHndeTe Ha nacnopTHoI Ta6nUKe, paCnoIOXeHHoHa n3deHN (cm. OnncAHne n3dEInna).
blblic kyy MaunHacbI TyTKeTpdi MaibicTbpIn Hemece 6acbl TpyMaHaBbHa Ke3 KekTki3iH3.
Cydbin Kipic TyTirih KaJfay
3/4" cybIK He bictbIK CY KocblnTaBH Jepre (eh Ke6i 60°C).
ToIbIbIMeH Ta3apraHua cydbI afb3bIN KOJIbIHbI3.
Kipic Tytikto ophba MbIKtan 6pan, yMeKTka6bHbI3.
Kipic Tyirihin y3bHdbfbj XeTKiikci 60nca, MaHaNbPbIraH dyKeHRe Hemece KyaHaNbPbIraH MaHaHa xa6apJacbHb3 (Kemek) 6enim KapaHb3).
CydbH KbcbmbI TexnkaBk DepeKTeP KecTeciHKeKepctiTReH MHepe apaIbIFbHda 6onybI Tnic -eITnece, bIdbc Kyy MaunHacbI Dypbc Kymblc ICTemey IMMKIH.
A Tyik MaibictbipbImaHaHbHa Hemece 6acblMaHaHbHa Ke3 XeTKi3iH3.
Cydih wibfbc TyTirih kajfay
Mbfbc Tytki DnAmetpi KEM DereHde 2 cm cy afl3y Ky6bipbHa XaIraHbI3. (A)
BbFbC TyTiri KocBnFaH Jep eEeHHHeH HeMece bDbc Xyy MaunHaCb tyPraH 6eTTeH 40-80 cm KaBbIKbKa 6onybl Tnic.
CydbIH WbIFbc TYTirih WHyfbIiHaBH aBby TYTirine Kocnac 6ypbH, nactKanbIK TbIfbIHdJI anbIN TactaHb3 (B).
Cy aIbIn KeTydeH KopFay
Cy anbIn KetyIHe kon 6epMey yuH, bDbcic kyy MaunHacbl: -KaBbnc3J KaFdaNapda Hemece KpybInfbHbH iUiHeH cy aBbIn KeTKeH Ke3Je Cy Ke3IH 6yraTTaH apHaBb Jxynemeh Xa6DbikTaRaH.
CoHda-ak, Kei6ip ynrinep New Acqua Stop* den atanaTbIH KocbIMwa Kayinci3dIK KypaIbImeH Ka6dbkTaNraH, on Tinti Kipic Tyirih Hbiptbln KetKeHHde de cy aIbIn Ketydeh KopraIdbI.
*TeK kei6ip yIyrinepe 6ap.
ECKEPTY: KAYINTI KEPHEY!
Cydibn Kipic Tyirin ew6ip kafdaa Kaiou b 60JMaHb3, ce6ebi OHda TOK etetih 3neKtp 6enikTep 6ap.
Tokka kajfay
Aibipdbi po3eTKaFa Kocnac 6ypbH, MbHa KaFdaInapFa Ke3 KEtki3ih3:
P03eTka Kepre TyuBkTaIraH XHe aRbIMdaFbI epeXeNepre ceiKec KeIeI.
p03eTka KypbInfbHbH eH Ken KyatbHa WbIaI aIaNbl. Bym mEciKTH iWki KaFbHda opHaIacKaH depeKTeP TinimueciHde KepceTinreH (KypbInfb CnntTaMaCb) TaaybiH KapaHb13);
Tok xeniciin H Kepheyi depektep tinimwecinHe kpcetinreH MHeep aykbmbHda xaTbip.
- P03eTka KypblfnbHbH wTenceIbdk yUbHa caikec Keenei. Oaai 6oJMaCa, kyanaHdbpIbnfam MaMaHdbI waKbIpTbIn, aibpIbI aybictbpbHbI3 (Kemek) 6enim KapahbI3. 3apTy ka6eJIbdepin Hemece bipHewe po3eTKaHbI KOJaHa6aHbI3.
KypbIfbl opHaTbIrfaHaHaH KeiH, TOK cbIMb MeH po3eTKaFa OHa K0J KeTki3y MymKiH 6oJIybi Tnic.
A CbIMbl MaibICTbipyfA HeMece ofaH KbICbIM caIyfa 6oImaBbl.
A TOK cbIMb 3aKbIMdAnca, 6apnbIK bIKTmAm KATEnpepdeh CaKaTHy ywiH OHbI eHdpuyi Hemece OHbIH eKIneTTi TexHnKanblk KEmek Kepcety KbI3MeTI aybICTbipyI Kepek. («KeMeK» beNimH kapaHb3)
A Byn epexelep opbHdAmaca, KomnaHnKe3 KeIreH KaftbIMcb3 OKFaJapra kayantbI 60MaJdbI.
OphaIacTbIpy kHe Ty3yney
- bIbIc kyy MaunHacbIH teric api KaIbINTbI eHeHre opHaJnactbIpbHb3. EeH Teric 6oJMaCa, KypblntbHbIH anDbHfbl aKTapbH petTen, OHbI KeJeHeH KaIbInKa JeTki3yE 6oJaBl. Kypblntbl Dpybc TsyNeHce, ON KaIbINTbl 6oJaBlx He XMyBIC ICTEN TypFaH Ke3De XbINKy Hemece dipin MeH WByIn WbIFapy MymkHdiri a3 6oJaBl.
- blbcjyy MaunhaocbH opHbHa ophanactbipmac 6ypbH, ecikti awbn, Ty3inyi MymkH KOHehcaunraan Kopfay ywH xenimmienip nentah* aaw TaptnabH actbHa xaobictbpblb3.
- blbcjyy MaunHacbHIn KaHapbl Hemece apKbI naHeni KaBnDaftb IkaqTapmeh Hemece KaBiprameH TneTihde Tpyde OphalactbPbHb3. BykpybNfBhl ti nti 6ip yctenlhi YcTHi TaKaTaNbHbAcTbHa da Kipri3yre 6ona (Ophaty BoHHa HcyckayNbI npaFbIH KapaHb3).
4*. ApTkbl aKbHbN 6nIKTirih pettey yIiH bIbIC Kyy MaunHaCbHbH KpyBIFbHbH anDbHfbl XaFbHdaFb TomeHI opta 6enirHde 8 MM teciri 6ap antbI bypbiWtbl raika kINTIH (kb3bl TycTI) 6paHb3. Cafat tini 6afbltbMeH 6ypcaHb3 6nIKTik apTaBl, an carat tiine Kapcbl 6afblTTa 6ypcaHb3, 6nIKTik a3aJbbl. (ocbl KxKaTTama da 6epinre EHdipy HcKaylbfbH kapaHb3)
BipinwixyyuKlbHaKaTbIcTbKeHec
OpaKaHHaKeIH TapTnapdAn TbIbHdApdb(6ap 0nca) KOFApFbI TapTnada KaIFaH 3JaCTNkAIBK 3JemeHTepdi anBIn TaCTaHbI3.
Cy kymcapKbIbIbHnapaMeTpnepi
AnfaKbI Kyy UnkblnB 6actam 6ypbH cy XeniciHe H KeJTeIH CydbH KaTbIbIK DeHReiH opHaTbHb3.(Llaora KEmekU3aTKeHE Ta3aJaHFaH Ty3)TapaybiH KapaHb3).
Anbimc H cy KnyblnfaH kymcapTkbiu bIdbcih caIbHb3, Oanh Kein Wamameh 1 Kr Tys KocbiHb3. Cy acbn, aBIn KETce, eWTeHe etnei.
By npoceDypa aKaTanap-aKaTanMac Kyy uKbH icKe KocbHb3.
blblic kyy MaunHaIapbHa apHaBIn KacaJraH Ty3dbI faHa KOJaHaBbHbI3.
Ty3 MaunHara KybIraHHaH KeiH, TY3 A3 INHnKaTOp 1ambl* cHeJI.
A Ty3 KOHTeHepi TOnTbipImmaca, HtNkeHne cy KymCapTkblbMeH Kblbity 6eniri 3aklmanybi MymkiH.
KypbInfblnda naDanahybifa npMeH KOJaHbInFaHbIH 6indpyre aphanrah cnHaI/yndep XnbHbI 6ap (buBcBi xyy MaunHacbiHbIH ynricHe baNaHbICTb): Kocy, uKn coHb, T.6.
Backapy TaKtAcbHdaftI DnCnneJderi TaH6anapdbIH/ HnDnKaTOp WAMdpbHbH/DnOHTapdbH Tyci eP Typni XHe KblbIKTah HeMece TpyaKtbI XapbIrB 6onybl MyMkiH (bIbIC Xyy MaunHacbHbH Yrniche BainaHbCTbl).
DncnneJe Kyy uKnblHbH Typi, KeTipy/Kyy uKnblHbH Ke3eHi, KaFHaN yaKbIT, TemnepaTypa XeHe T.6. KaTbIcTbI naaBbl aKnapat 6epinei.
START 2END LIGHT*
Keibip bIbIc kyy MaunHapbHda ecik neh yTe npacbHdaftbCaHbIayda opHaIacTaBH Kacbl INHdkaTOp 1aMbI 6ap; on aBIMdaftb Kyy UKNbIHbIH Ke3eHi TypaBl aknapat 6epei. TeMeHderi Kymbc pexmdepinH 6ipih TaHdayra 6oIabl:
a)ewipinreHyHKnna
b)zikn bactanrah ke3e wam 6iphewe cekyHka xHaadbl, kkn ke3iHne c0HIn TpyaBlj XeHe ZIKNblH coHbHda KblblkTaNbl (eDenki peXm)
c)UAMZIKIbapbcihdaJkaHbIN TpyaBjXeHE ZIKNDbIH COhIBHaXbINbIKTaui.
KeuiKtipin 6actay opHaTbIraH 60nca, b) Hemece c) peXMI opHaTbIraHbHa 6aIIaHbICTbl, 7am Kepi caHaKTbIH aIraKbI 6ipHeWe cekyHbIHda KaHaDbI Hemece Kepi caHaKa IaKTaIraHaHsa KaHbIN TpyaBl.
Kbicka yaKBbIT onuNcBcB (Short time)
Kyy khe KeTipy eHimdiirinH deHrein TEmeHneTne, Heriz Kyy uKnDapbHbH Mep3iH a3aTy yuH OcbI OnnHbI KOndaHyra 60ana.
Byon onu TaHdaJraH Ke3e KbIcKa yaKbIT TyMeciH 6acblb3. OnuHa TaHdayan WbIFapy ywiH dAn con TyMeHi TaBb 6ip pet 6acblb3.

Kocbimwa kenttipy (Extra Dry)
blblic-aaktbH Ke6y DeHRein H xkcapTy ywiH KOCbIMUA KENTIPY TYmecin 6acbHb3; TaH6a XHaNbI. KaTadaH bacInca, onnnaH 6ac TapbnaB.
CoHbI WAIKO Ke3IHderI XOFapbIpaK TemnepaTypa MeH Y3aFbIpaK KENTIPy Ke3EHKe6y DeHRein HxakcapTaDbI.

KOCbIMWA KENTIPY onuRcbl kyy uKnblhBn 03imH yapTaBl.

BipHewe yHKnncb6ap Ta6neTkanap (Ta6neTkanap-Tabs)
Byon onuynxuy xhe KeNTpy HntnxKeepin OHTaINaHbipadbl.
Bipheue yHKunrcb6ap TabneTKaIapdbKoJdaHafKe3de,
BIPHEWEyHKUcRcB6BPATSBNETKAIAP tymecin
bacnb3; Tnicti TaHa xaHaDb. Tyme KaTadaH bacInca,
onuynanbacTapbJaBbl.

«BipHeue cyHKunncb6ap Ta6neTkanaP» onuucbI 7 uKnblHbH MeP3imH y3apTaBl.

Ta6netkanapdbTeKocbOnucsb6apynrinepe 1daHraHxHxHe6ipHeweyHKnucsb6ap NetkapanapdbH KOnDaHbInyblKepcetImereh Xyy IdapbIMeH KOJaHy dypbc emec.

Benin xyy (Zone Wash)
1 Byon onn Jyy uKblbH TeK TaHaJFaH TapTnada opbHdayra MymkiHik 6epei. Jyy uKnblbH TaHan, ZONE WASH TYmecin bacihB3: TaHaJFaH TapTna XaHaBda, Jyy uKnblbTe KaHaJFaH TapTnada bactaNa. OnuHbI aBIn Tactay yuiH TyMeHi KaTaHaN bacHbI3.
ByonOnuHbTeMeHderi Kyy CukndapbHda KOJaHyFa 6oJa:KapkbHdbxHe KaIbINTbl.
ULTRAINTENSIVE ZONE yHKnncbH icke Kocy yuH B0JIIN Kyy oncncbH kHe KapkbHdbI uKJDbI TaHaDbI. Bykyy cKnbl kactpeHep MeH Tabanap, TamaK xaobcIn KaIraH TabakTap Hemece Ta3aNaHyb KiBn bIdbc-Ark (YKKiW, KeKeHic Keckiw, KipNeHReH ac KypaNdApbl) CnKtbl KaTbI NaCTAH 3atnap yuH konaNbI. WAsbpaTy KbICMbI MeH Kyy TemnepaTypacbl KofapbIpaK boJaIbI, CoBHApKaCbHda KaTnei KorTbIH daKTapDbI OHTaNbI eHDey KaMTaMaCbI 3 etineDi.
SAVING ZONE yHKnrcbH icke Kocy yuH 5EJIIN Kyy ONcRcH XHe KaBInTbI uKnDbl TaHaNbI3. Byf yHKnra TYtBiHbIaTbIH Kyat KeNeMih a3aHTyMa MymkiHik 6epei. LkN ¥3aKtBflbE3repYi MymkiH.
blblic-aakTbI TeK TaHdaNfAH Taptnapa canydbI yMbItnahbi3.
Kytim Kepcety XaHe
TexHnKaJIbIk Kbl3MeT KOpCeTy
KZ
Cy Meh TokTbi eWipy
Cy afbin KeTneyi yuih ap6ip kyy uKnbHah KeIH cy wymeri H kaybin OTbipbHb3.
KypbInfblHbTa3aNaFaH Ke3e XeHeTexHnKaNbIK KbI3MeT Kepcety KymbICTapbIH opbIHdaFAH Ke3e OHb TOKtAH axbIpaTbHb3.
bldbic xyy MaunHacbIn Ta3anay
KypblfblhihcblpTkb6eTTepiMeH6ackapy TaKTacbH cymeH bIraHaHa, a6pa3nBTi emec w6peken Ta3anayfa 6oana. EpitkiTeP hemece abpa3nBTi epiriHinep KOndahya 60maMdbI.
KypbIfBihIH iHneri Ke3 KeJIreH canTaK i3epeI cyMeH KHe a3an cipKeMeH bINrFaHaHa Hw6epeKeNkTeTpyre 6oJabl.
Xaftbimcbi3 niCtepeH anDbH aNy
KypblfblHbH iWl DbIMBilJaHbIn KeTneyi ywiH OHbIH eciriH epdaibim 6ip3 aubin ycTaHbI3.
EciKaHaJnacbHdaFb6eKITkiWTepeMeHxyfbi3aT DncneHcepepin MepimDITpyde bINFaNrykamEn Ta3anan OtbipbHbI. MyhIH HtNKeCiHne 6eKITkiWTepe TaMaK TypbIn KaImaDbI, an 6yJ KafdJ KafBMcB3 NcTepeH naJa 6onybHbIH Hei3ri ce6e6i.
To3aHdaTkbIe 3eKwepepdi Ta3anay
TamaK KaIbIKTapbTo3aHaTkBbIe3EkwenepeH6BeTIHeKaTbIN KaIbIn, cy WaaTaBH TecikTepei 6iteyi MyMkiH. CoNbIKTaH, e3EkwenepeMp3imDType TeKcepin, MetancbI3 5eTKaMeH Ta3aHaBn TypFaHbIXeH.
EkiTo3aHdaTkbIe3ekuweHi De IyIbIrapbnAnyfa 6oanaIbI.
Korapfbl To3aHdAe3ekwehi
bIfapbin any yuHnnaCTMaCCadaH
kacaIHaN KybInTay cKaHHacBH
caFt TIIHe Kapcb6afBHTta
bypabH3. Kofapfl To3aHaTkbH
e3ekweHI TecikTepi Ke6ipek KaFBH
KoFapbl KapaTbIN KaTadaH opHbHa
KOIO KepeK.
TemeHri To3aHndtKbIw 3eKuweHi 6yipnepderi WbfbHKk Xepnepdi 6acbl, OHx KofapbI Kapai Tapty apkbbl WbIfapbl anyfa 6oJadbl.
Cydibn kipic cy3ricin Ta3anay*
Cy TYIKTei KaHa Hemece y3ak yaKbIT 6oBbl KOnJaHbImaHaF 6oIc, KaNfMaC 6ypbH onap apkBnbl cy eTKi3in, Ta3a api iWHe KaIbIKTap KOK eKeHHe Ke3 XeTki3iH3. Byn caKtbK uApacbl opbldAmaca, cybln Kipic 6iteJIn, bDlc Kyy MaunHacbl 3aKbIMdanybl MyMKIH.
A WymeK XaBbHdAflc cybln Kipic cy3ricin Mep3imdi Typde Ta3anan OTbipbHb3.
-CyWymerinKa6bHb3.
-CydbH Kipic Tyirih HWeTIN BocatbIn aBHB3, OaH KeiH Cy3riHi aBbIn, OHcy aFbHbI acTBHa JkaKcbIan Ta3aIahbI3.
-Cy3iriHIOpHbHaKoBbIN,cyTytirIHOpHbHa6paHaI3.
Cy3rinepi Ta3aay
Cy3ri KINHaBc cybTaMaKa KaNDbKTapBH Ta3aNaTbH XeHe OdaH KeiH cybKaIa aHaHaNbPaTBH YW Cy3rIeH TypaBb. Op6ip Kyyda eH KaKcb HEtNKeere Kon KeTki3riH3 KeNce, onapdb Ta3anay Kepek.
Cy3rinepdi MepaMti Tpye Taanaan OtbybHbHa.
AblbcxyyMaunHacbHcy3rici3 Hemece cy3ri 6ocan keTkeh Ke3de naDanaHyra 6oImaMdbI.
- Biphewe pet xyraHHaH KeiH, cy3ri XHaFBiN TeKcepiH3 XHe KaXeT 60nca OhBi MetaIcB1 3 UeTKaMeH epi TEmeHderi HcayIapDbI opbIHdAOTbIPBIn, cy afbHbI actbIHda XaKcbIaN Ta3aHaHbI3:
1.LiHnHdpnik C cy3ricin cafat tinihe Kapcb 6aftta 6paHb3 da, cybpbn anhbl3 (1-cyper).
2. 乌HbIaRk B cy3icin KneKTepi a3an bacy apKbIbI uBIFapbl anbHbI3 (2-cyper);
3. Tot 6acnaiTBH 6onat Tinimme A cyaricih cybipbn anbHb3. (3-cyper).
4. Ty3akTbI kapan IblfblHbI 3 Da, Ke3 KeNTRe TAmaKanDbIKTapbiHaT a3apTbHbI. Kyy uKnbl copfblcBbHbIKopFay KpaJbIH (kapa Tcyti 3a) EUKKAwAH ANYUbl BOJMAHbI3 (4-cyper).
Cy3rIepi Ta3aIarAHHaH Kein, cy3ri KINHarbH opHbHa KoBbIn OHbl dypbictan 6ektiH; 6yJbIbIc Jyy MaunHaCbHbH TImDi JyMbICbl yWl H eTe MaHbI3dbI.
MaunHaHbI y3aK yaKbIT naJaHaH6ayFa KaIdbipy
KypbIFbHbTOKTaH aftbTbn, cy wMyerIH xa6bHb3.
Kypblfbcirih canaaibk KaanbipbHb3.
KaTbIn KeTReH Ke3De, bIbIc Kyy MaunHacbIH 6oc yctan Kyy UKNbIH icke KocbiHbI3.
*TeK kei6ip ynlrinepe 6ap.
KypbIybl Dypbc Kymbc icTeMei KaIraH Ke3de, KEmek KbI3MeTHe Tnepeoh COKnac 6ypbIH TeMeHderi TiImHe Hweimdi i3dHi3.
KZ
| Акayльк: blktmamсбentерi /шewimdepi: | |
| ыдьс xуу машинасы icke косьлмады hemece оны бackар муkkin emec. | • Крьлгынь KOCY/ФИРУ Туймecin bacy apкьлы ewipiniz3, одан кейн оны bip shamamen bip minhytten KeiH KOSbIn,барламаы KaIta opHaTbHbI3. • Крьлгы розтarka Дурьс КСБЛМаФан. • bldic xуу машинасы hemin eciri duypic Jazablmafan. |
| Есik xaklbmaibd. • КльпббocatbIFraH. «Тык» etken dbic ectinirenne ecikti kaTbI nteripiniz3. | |
| ыдьс xуу машинасы сан аftbtsbIMaDbl. | • bldic xуу машинасын bichukblа олiaяктalmafan. • CudbH kipic tytirim mablcgan («Орату» boimin kapaBil3). • Aftb3y tytiri xakblnbik kalran. • Cyari tamak kaildbknapimem 6iteinim kalran. |
| ыдьс xуу машинасы shaamadah Tbc шулшырады. | • Taakapb 6ip-6ipine Hemece tozahdaTbIw ezekwere tinn tarcblndaib. |
| • Shamaanb Tbc Kekb6 bony: xkybii 3at dpybc tslenhenberen Hemece on bIdbc xyy mashinapabHnda kondaHyra Konalnbl emec. («Icke Kocy xxe naJadanaHy» boimin kapaBil3). | |
| Таakapbmen ctsakhdarpbH бетидak ak tyci kaыltшamen Hemece taT kaNbIKTapbImeH kantanran. | • TazanahraT y3 MeIsepi a3 Hemece MeIsepmepe napameTpri cybH KaTbIbHbHa DpybC KoIbIMaFAN («LlAorfa KEmekuiz 3at XaHe Tz3» boimin kapaBil3. • Ty3 dinchenepinH kaknaBf DpybC XaBIMaFAN. • Shaorfa KEmekuiz 3at TaycblnFAN Hemece OhtbH MelaepneMeci TbIM TcmeH. |
| Таakapbmen ctsakhdap cbIbIFaH Hemece peHrI KeKuln. | • Shaorfa KEmekuiz 3aTbH MelaepneMeci TbIM Xofarbp. |
| ыдьс -ак дурьк кentipinmeydi. | • Kentpiy baFdpamacbyx kok xyy uKlbl TaHdaIraH. • Shaorfa KEmekuiz 3at TaycblnFAN Hemece OhtbH MelaepneMeci TbIM TcmeH («LlAorfa KEmekuiz 3at XaHe Tz3» boimin kapaBil3). • Shaorfa KEmekuiz 3at dinchenepinH napameTpri xetepliKTei Xofarbp emec. • bldic-aay kakbicsnaiTbH MaTePuaIaH Nemece pIactnkTeH JaxaIraH. |
| ТаakapbTa3a emec. | • Taptnanapra TbM KeN bIbIC caIbIHAN («Taptnanapra bIbIC cany» boimin kapaBil3). • bldic-aay duypbc peTteImeRer. • TozandatkbH ezekwelenep epkin xblnki anmaibdy. • Kyy uKlbl TbM H3iK («Kyy uZKlndapbI» boimin kapaBil3). • Shamaanb Tbc Kekb6 bony: xkybii 3at dpybc tslenhenberen Hemece on bIdbc xyy mashinapabHnda kondaHyra Konalnbl emec. («Icke Kocy xxe naJadanaHy» boimin kapaBil3). • Shaorfa KEmekuiz 3at Bclirderi kaknak duypbc XaBIMaFAN. • Cyari kip Hemece bItelin kAlran («Kytim KepceTu xaHe TexnKinaklbK kI3Met KepceTu» boimin kapaBil3). • TazanahraT y3 DeHreI Temen («LlAorfa KEmekuiz 3at XaHe Tz3» boimin kapaBil3). |
| ыдьс xуу машинасы сан -Шум ekipuynl daBbIb (cunhal ectinide jiXaHe dinchneide 6ipheue minyka H apni kcpctinened) (KOCY/ФПИРУ Иndikatop shambl Жыныltыктдыда, dinchneide 6 canbly Керsetinedi). | • Ку�ende cy xok. • CudbH KIPc Tytiri Малickan («OPhaty» boimin kapaBil3). •Шумekti aushbHb3, coNda KpybIbIb 6ipheue minHytTaN keHIN icke KcsbIaBd. • KpybIbHbHbN KByIbB 6encHdipinreH, ce6be cIruH beipinreHde ewipb opeket JxcacnmaFAN. KOCY/ФПИРУ TymecinH KemerimEn KpybIbHbN EupipH13, odan keHIN ShUyMeKTI aushbHb3 da, Дэл сол ТуIMeHII biPipHeSe cekyHdTaN keHIN bacy apkblb KpybIbHbKaItaTaN HocbHb3. KpybIbHbKaiTa bafaplamanlan, xyy zuKlbl KaItaTaN bactaHb3. |
KZ
Indesit Company Spa
Viale Aristide Merloni 47
60044 Fabriano (AN)
Italy
www.hotpoint-ariston.com