SEF 2300 D3 - Deep fryer SILVERCREST - Free user manual and instructions
Find the device manual for free SEF 2300 D3 SILVERCREST in PDF.
Frequently Asked Questions - SEF 2300 D3 SILVERCREST
User questions about SEF 2300 D3 SILVERCREST
0 question about this device. Answer the ones you know or ask your own.
Ask a new question about this device
Download the instructions for your Deep fryer in PDF format for free! Find your manual SEF 2300 D3 - SILVERCREST and take your electronic device back in hand. On this page are published all the documents necessary for the use of your device. SEF 2300 D3 by SILVERCREST.
USER MANUAL SEF 2300 D3 SILVERCREST
- Overview 3
- Intended purpose 4
- Safety information 4
- Items supplied 8
- The basics of frying 8
6.How to use 10 - Assembling the device 11
7.1Assembling the frying basket. 11
7.2Assembling the fryer 11
- Operation 11
8.1 Setting up 11
8.2 Filling in the frying fat 11
8.3 Heating the frying oil/ fat 12
8.4 Frying 12
8.5 Overheating protection 13
- Cleaning 13
9.1 Filtering and storage of frying fat/ oil 14
9.2 Disposal of frying fat/ oil 14
9.3 Cleaning 14
9.4 Re-using used frying fat 15
-
Disposal 15
-
Home-made fresh French-fried potatoes 15
12.Troubleshooting 16 - Technical specifications 16
- Warranty of the HOYER Handel GmbH 17
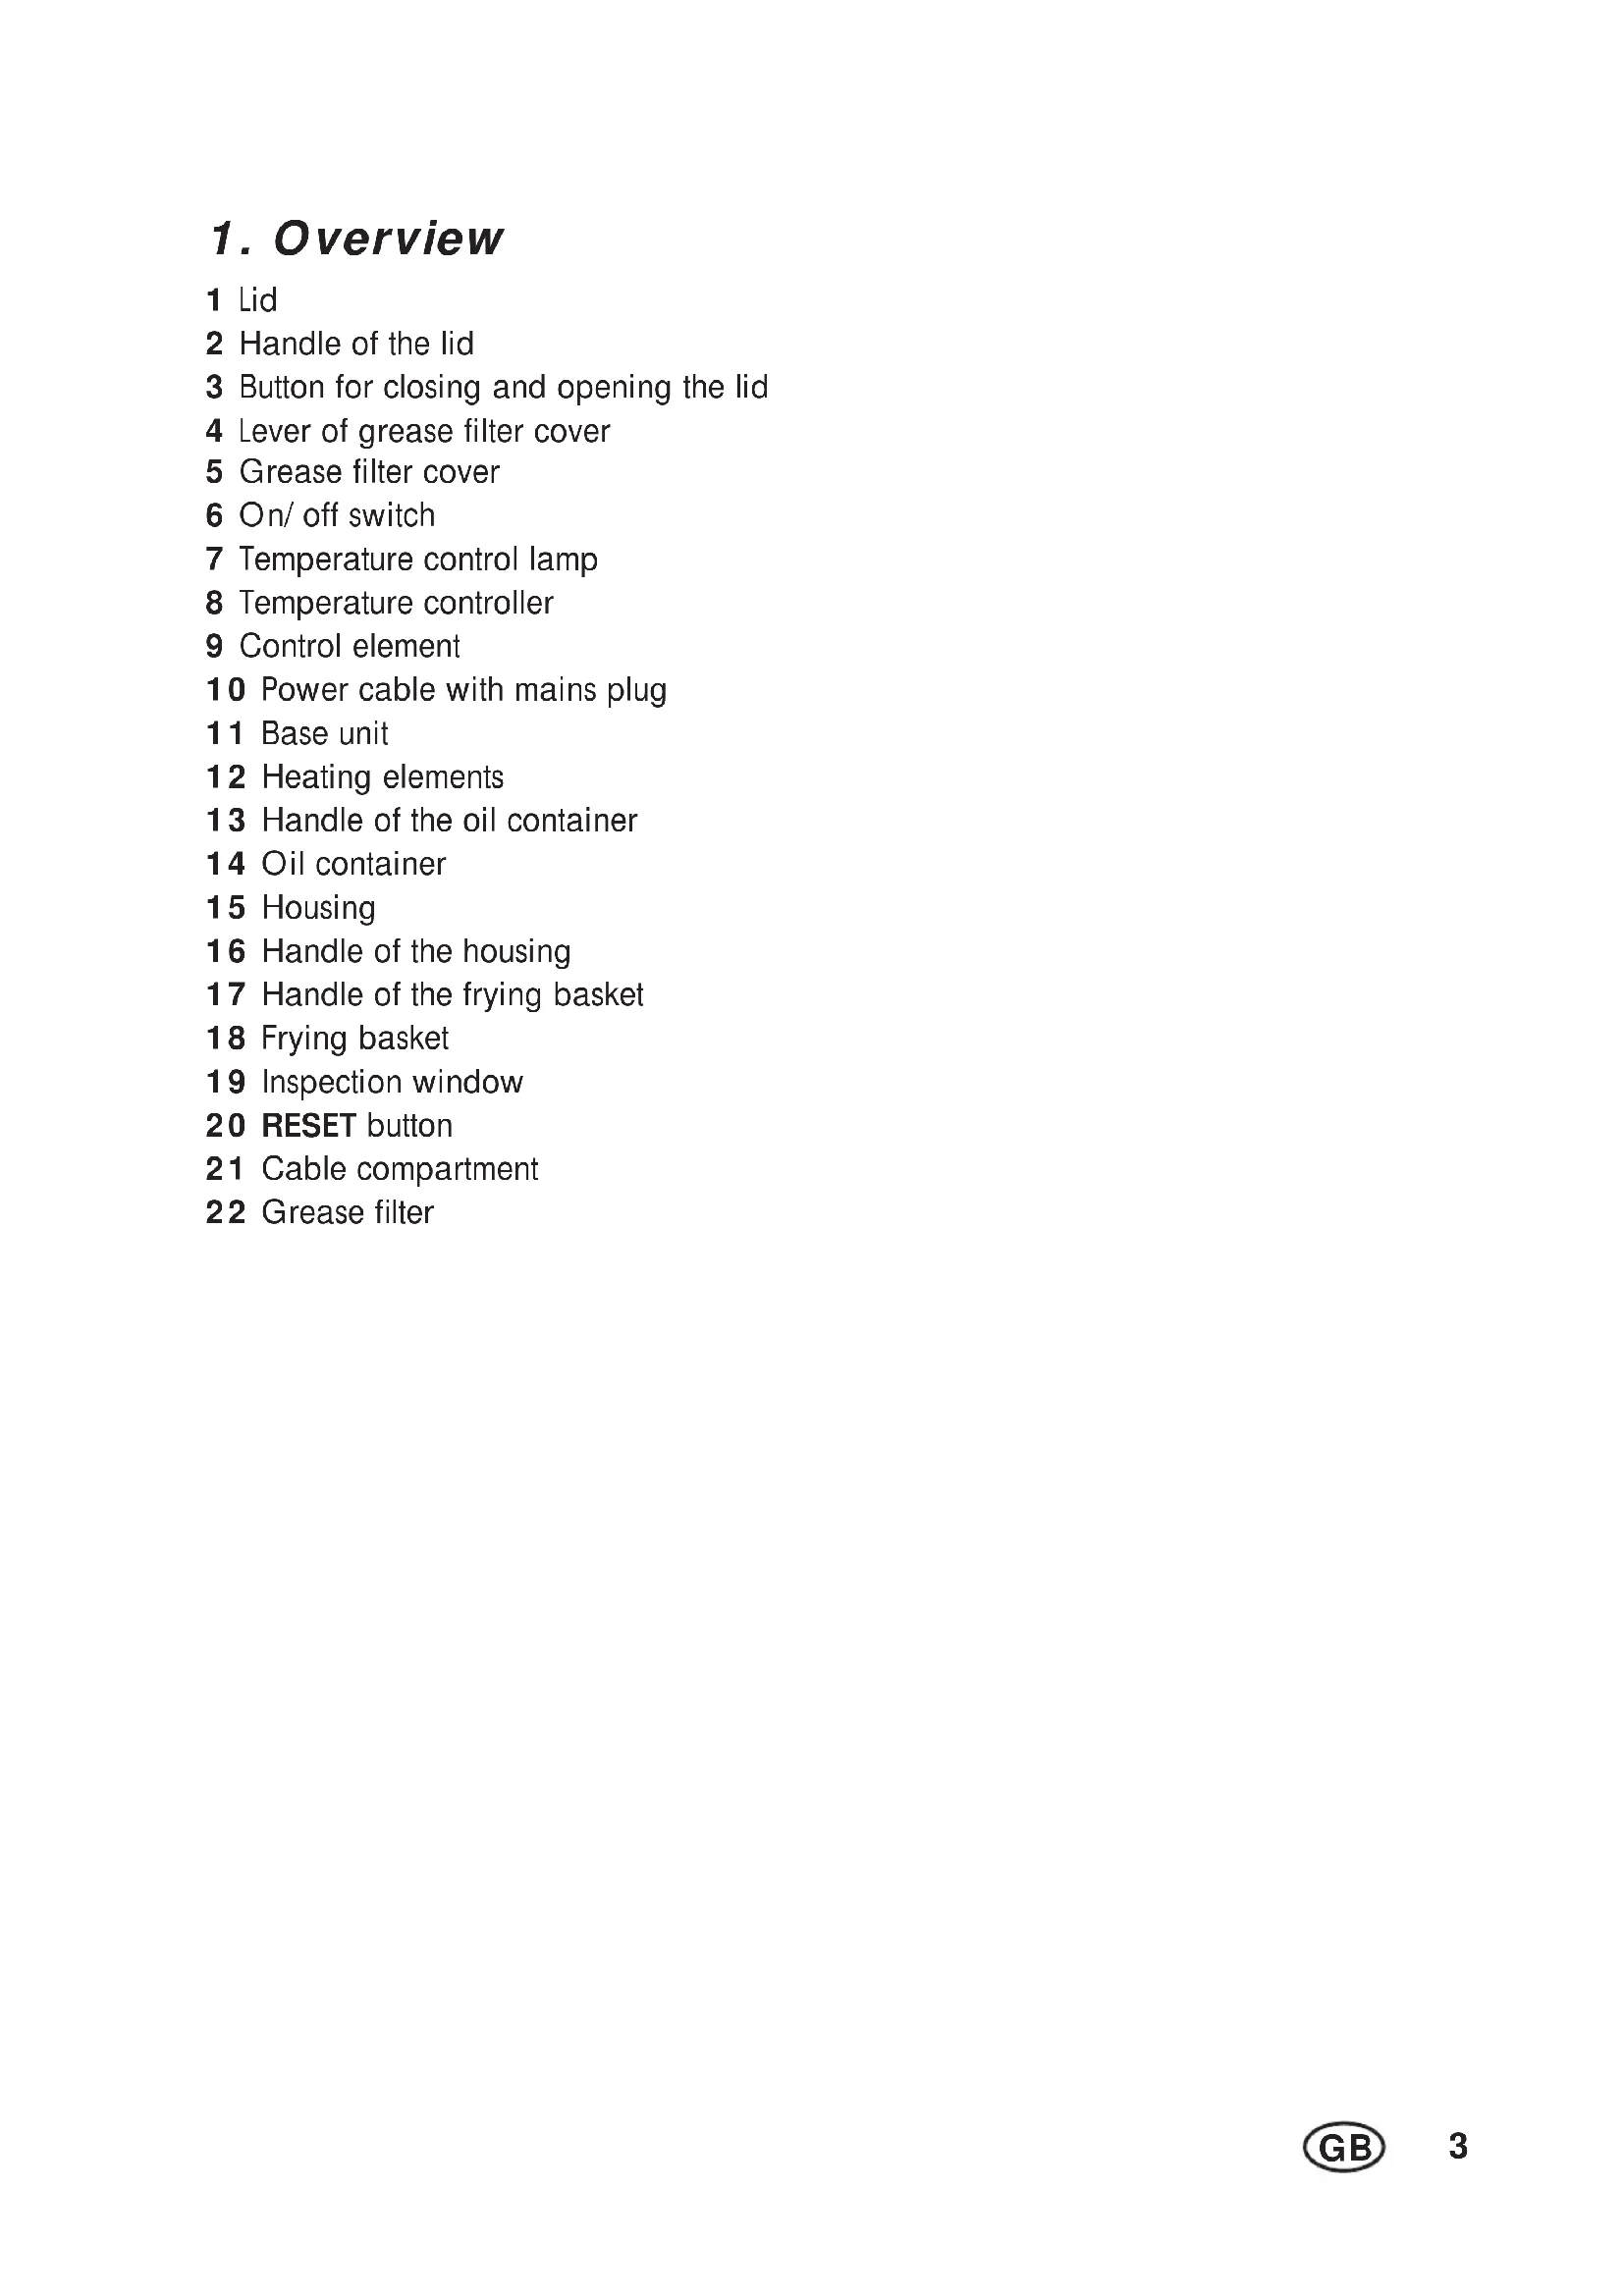
1. Overview
1 Lid
2 Handle of the lid
3 Button for closing and opening the lid
4 Lever of grease filter cover
5 Grease filter cover
6 On/off switch
7 Temperature control lamp
8 Temperature controller
9 Control element
10 Power cable with mains plug
11 Base unit
12 Heating elements
13 Handle of the oil container
14 Oil container
15 Housing
16 Handle of the housing
17 Handle of the frying basket
18 Frying basket
19 Inspection window
20 RESET button
21 Cable compartment
22 Grease filter
Thank you for your trust!
We congratulate you on your new fryer.
For a safe handling of the product and in order to get to know the entire scope of features:
- Thoroughly read these operating instructions prior to initial commissioning.
- Above all, observe the safety instructions!
- The device should only be used as described in these operating instructions.
- Keep these operating instructions for information purposes.
- If you pass the device on to someone else, please include these operating instructions. The operating instructions are a part of the product.
We hope you enjoy using your new fryer!
2. Intended purpose
The fryer is intended for cooking food in hot oil or fat at a temperature of up to max. 190^ . The fryer is designed for private, domestic use. The fryer may only be used indoors. This device must not be used for commercial purposes.
3. Safety information
Warnings
If necessary, the following warnings will be used in these operating instructions:

DANGER! High risk: failure to observe this warning may result in injury to life and limb.
WARNING! Moderate risk: failure to observe this warning may result in injury or serious material damage.
CAUTION: low risk: failure to observe this warning may result in minor injury or material damage.
NOTE: circumstances and specifics that must be observed when handling the device.
Symbols on your device
This symbol warns you against touching the hot surface.
Please observe the information in these instructions. Read these instructions before you use the device.

The food-safe material of devices with this symbol will not change the taste or smell of food.
Instructions for safe operation
This device must not be used by children aged between 0 and 8 years. This device may be used by children aged 8 years or above if they are permanently supervised. This device can be used by people with restricted physical, sensory or intellectual abilities or people without adequate experience and/ or understanding if they are supervised or instructed on how to use this device safely and if they are aware of the resulting risks.
- Keep children under the age of 8 away from the device and the power cable.
The cleaning and maintenance by the user may not be performed by children.
- Place the device in a stable position by using the handles, in order to prevent the hot liquid from spilling.
- The control element of the base unit, the lid, the power cable, and the mains plug must not be immersed in water or any other liquids.
- Do not touch any hot parts of the device such as the inspection window. The frying basket should only be touched at the handle.
During frying, hot steam escapes from the grease filter. Be careful not to put your hands into the steam.
This device is intended for use in households and in applications similar to households, such as ...
... in kitchens for employees in shops, offices and other commercial areas;
... on agricultural estates;
... by customers in hotels, motels and other residential facilities;
... in bed-and-breakfast establishments.
- This device is not intended to be operated using an external timer clock or a separate remote control system.
- If the power cable of this device should become damaged, it must be replaced by the manufacturer, the manufacturer's customer service department or a similarly qualified specialist, in order to avoid any hazards.
- Please take note of the chapter on cleaning (see "Cleaning" on page 13).

DANGER for children
- Please make sure that the hot fryer can never be pulled down (e.g. with the power cable) by children. In cases of scalding from hot oil there is danger to life!
- Packing materials are not children's toys. Children should not be allowed to play with the plastic bags: There is a risk of suffocation!

DANGER to and from pets and livestock
- Electrical devices can represent a hazard to pets and livestock. In addition, animals can also cause damage to the device. For this reason you should keep animals away from electrical devices at all times.

FIRE HAZARD
The fryer must never be used empty! Before switching on the device, the oil container must always be filled at least up to the MIN marking and it must not exceed the MAX marking.
Old or dirty frying fats and oils, as well as unsuitable fats and oils (such as margarine, butter or olive oil) can ignite when heated.
Always use suitable oils and fats. Make sure to clean and store the device carefully and to replace the frying fat/ oil in time (see "The basics of frying" on page 8).
- Never mix different fats/ oils or old and new fat/ oil.
-
If fat or oil catches fire, it must never be extinguished with water, because this would lead to a fat explosion. Quench the fire by putting the lid onto the deep fryer, or with a fire blanket or a woollen blanket.
-
Never leave the fryer unattended during operation. Thus, you will detect possible problems early on due to unusual smells or noises.
Do not use the fryer under wall units and not near to any curtains, paper or any similar inflammable objects.
The device must never be placed directly under a wall socket, as the arising heat may lead to damage to the electric system. - Keep a distance of at least 50~cm to any other objects so that they cannot catch fire.
The fryer should only be operated on a stable, flat, non-slip, dry and non-inflammable work surface, in order to prevent it from tipping over or slipping away.

DANGER! Risk of injury through burning!
Hot fat and oil results in serious burns because it is significantly hotter than boiling water.
If water drips into hot fat or oil, then this will lead to explosive deflagrations.
- Avoid any contact with hot fat/oil or splashes of fat or oil.
- Under no circumstances move or transport the fryer when containing hot fat/ oil.
- Never let water drip into the hot fat/ oil.
The frying basket and the food to be fried must be dry when they are put into the hot fat/ oil. In particular, in case of deep-frozen food any ice sticking there-to or melt water should be removed.
The fryer should only be operated with dry hands.
The frying basket, the handle, and the lid should not be immersed in water or any other liquids before use.
Make sure that all parts of the fryer are absolutely dry before they are used. Even small amounts of residual water
may lead in combination with the heated fat/ oil to explosive deflagrations.
The lid should be kept closed during heating and frying.
During frying, hot steam escapes from the grease filter. Be careful not to put your hands into the steam.
Do not touch any hot parts of the device such as the inspection window. The frying basket should only be touched at the handle.
After frying, the fryer should cool down for at least 1 to 2 hours before you empty the oil container and clean the device.

DANGER of slipping
- Avoid any splashes of oil/ fat on the floor. There is a danger of slipping!

DANGER! Risk of electric shock due to moisture
- Protect the heating unit from moisture, dripping and water splashes.
Do not use the device in the open air or near vessels filled with water, e.g. sinks. - If the heating unit has fallen into water, remove the mains plug immediately, and only then remove the device from the water. Do not use the device again, and have it checked by a specialist workshop.
- Never touch the heating unit with wet hands.

DANGER! Risk of electric shock
Do not use the device if the device or the power cable has any visible damage, or if the device has previously been dropped.
- Extension cables must be designed for a minimum of 10 ampere.
Lay the power cable and any extension cable such that nobody can step on
them, get caught on them, or trip over them.
- Before connecting the device, check that the temperature controller is set to the MIN marking.
- Connect the mains plug only to a correctly installed, easily accessible earthed wall socket with voltage corresponding to the rating plate. The wall socket must continue to be easily accessible after the device is plugged in.
- Ensure that the power cable cannot be damaged by sharp edges or hot points. Do not wrap the power cable around the device.
Even after it has been switched off, the device has not been completely disconnected from the mains. In order to fully disconnect it, pull out the mains plug. - When setting up the device, make sure that the power cable is not trapped or crushed.
To pull the mains plug out of the wall socket, always pull on the mains plug, and never on the power cable. - Disconnect the mains plug from the wall socket ...
... if there is a fault,
... if the device or the power cable is damaged;
... when you are not using the device;
... before you clean the device and ... during thunderstorms.
Do not connect another device with a high power consumption to a wall socket on the same circuit. This way you will avoid overloading the mains power supply.
Do not connect the device by using a multiple socket. By doing so the socket might be overloaded.
- To avoid any risk, do not make modifications to the device.
WARNING! Risk of material damage
Use the original accessories only.
The frying basket should always be used when frying.
The device is fitted with non-slip plastic feet. As furniture is coated with a variety of different varnishes and acrylics, and treated with different cleaning agents, it cannot be completely ruled out that components are contained in some of these substances that could damage and soften the plastic feet. If necessary, place a non-slip mat under the device.
- Splashes of fat may occur during operation. You should therefore place the device on a surface that is resistant to both heat and grease.
Frying oil and fat should not be discharged into drains or the toilet! The oil or fat solidifies so that the drains may be clogged.
- Make sure that the surface under the device is dry.
- Be careful when handling the grease filter. It can easily be damaged by squeezing or cracking.
- Never place the device on hot surfaces (e.g. hot plates) or near to heat sources or open fire.
Do not use any astringent or abrasive cleaning agents.
4. Items supplied
1 Base unit 11 (control element 9 and heating elements 12)
1 Housing 15
1 Lid of the oil container 1 with a grease filter 22
1 Oil container 14
1 Frying basket 18
1 Handle of the frying basket 17
1 Operating instructions
5. The basics of frying
Preparation of the food
- All food must be as dry as possible when used for frying, because water will deflagrate explosively if it comes into contact with hot fat. Dry the food to be fried and remove any ice from frozen food.
- Deep-frozen food should be partially thawed before frying so that the food absorbs less fat. Remove as much water and ice as possible before you put the food into the fryer.
- Meat, fish, and vegetables should be cut into small pieces.
- In case of breaded food, please make sure that the breading sticks as tightly as possible to the food to be fried. Any breading falling off the food during frying contaminates the fat.
Frying time and frying temperature
- For a tasty and healthy result, the information on the packaging should be observed very carefully when selecting the temperature and the frying time.
- Only small quantities should be fried at a time.
- The frying basket may not be filled more than up to the MAX marking. If more food to be fried is put into the basket, the temperature of the fat will drop too much, the frying process will take longer, and more fat will be absorbed by the food to be fried.
- Acrylamide may be carcinogenic. In order to reduce the formation of acrylamide as much as possible, both high temperatures (of more than 170^ ) and browning the food too much should be avoided. With temperatures of more than 175^ significantly more acrylamide will be formed.
Which types of oil and fat are suitable?
There is a wide range of different types of fat. But not all types of fat and oil are suitable for frying.
- For this fryer, we recommend to use liquid frying oil. If you would like to use solid frying fat, you should first melt it slowly in a pan at a low temperature and then pour it into the fryer. By doing so, you prevent the device from overheating and the fat from splashing.
- The fat or oil must tolerate high temperatures during frying. Be careful that the fat/ oil may be heated at least up to 200^ .
- The fats should have only a very low water content. The water evaporates when heated, and the fat starts spattering.
- Oils, which are rich in polyunsaturated fatty acids, are very healthy when used in salads, but they are not suitable for frying, because they do not have the thermal stability required.
Butter, margarine, and olive oil are not suitable. - Coconut oil or palm oil, for example, are very suitable.
Different types of fat or oil should never be mixed!
Storage of used oil
- Any contamination of the fat caused by frying reduces its shelf life. In order to remove any coarse dirt, pour the melted fat through a sieve covered with a paper towel after each frying process before storing the fat.
- Light and oxygen are harmful to the fat. Therefore it should be stored in a tightly closed container in a dark, cool, and dry place.
Under proper conditions, the fat can be stored for a few weeks.
Frying table
| Food | Tempera-ture (approx.) | Time (minutes) |
| Vegetables 130 °C 5 - 8 | ||
| Chicken legs 170 °C 15 - 25 | ||
| Chicken wings 170 °C 7 - 15 | ||
| Chicken breast fillet | 170 °C 8 | - 18 |
| French-fried pota-oes (fresh) | 170 °C 10 - 15 | |
| French-fried pota-oes (deep-frozen) | according to the manu-facturer's specifications | |
| Pork cutlet,breaded | 170 °C 15 - 25 | |
| Fish fillet (deep-frozen) | 190 °C 7 | - 15 |
Getting rid of unwanted flavours from the oil/ fat
Some food, e.g. fish, loses liquid during frying. The liquid gets into the oil/ fat and alters its smell and flavour. This flavour will then be passed on to the next food which is going to be fried in this oil/ fat.
With a simple trick, you can reduce or even completely remove such unwanted flavours.
- Heat the oil/ fat up to a temperature of approx. 150^ .
- Put 2 thin slices of bread or a bit of parsley into the frying basket.
- Put the frying basket into the fryer and close the lid.
- Wait until the oil/ fat no longer forms bubbles and then take the frying basket out of the fryer. The oil/ fat should now have its own flavour again.
How to recognise bad fat
If in the appearance of the fat you use you identify one of the following, you better replace it completely:
- pungent, bad smell;
- bad taste of the fried food;
- brown, stiff deposits;
- foam formation during heating;
- heavy smoke formation already at low temperatures.
What to do with the old fat?
WARNING! Risk of material damage!
Frying oil and fat should not be discharged into drains or the toilet! The oil or fat solidifies so that the drains may be clogged.
- Fat and oil may be disposed of in the domestic waste in customary household quantities.
- Do not put the fat/ oil directly into the wheelie bin, but put it beforehand into the original packaging or a plastic bag.
- You can also take the fat/ oil to a designated collection point for used fats.
6. How to use
- Remove all packing material.
- Check whether all accessories are present and undamaged.
- Wash the heating elements 12, the housing 15, the oil container 14, the frying basket 18, and the handle 17 of the frying basket with warm water and a mild detergent, and then dry all parts very thoroughly.
- Wipe off the lid 1 and the control element 9 with a slightly damp cloth.
- Place the device on a dry, level, non-slip surface. This surface should also be heat-resistant and not be damaged by splashes of hot fat.
NOTE: when in operation for the first time, some smoke and odour may be generated by the device. This is due to the assembly materials used for the heating element and is not a fault in the product. Ensure adequate ventilation.
7. Assembling the device
7.1 Assembling the frying basket
- Figure C: press the metal brackets on the handle 17 and put their ends into the small eyes on the inside of the frying basket 18. The rods of the handle are positioned under the metal hooks at the top of the basket.
7.2 Assembling the fryer

DANGER of burns! Risk of electric shock!
All parts must be dry and undamaged.
- Put the oil container 14 into the housing 15.
- Insert the base unit 11 at the designated place on the housing. Let the rails of the base unit 11 just slide into the openings on the housing 15.
- The basket 18 and the handle 17 should only be put into the fryer, when oil and food have already been filled in (see "Frying" on page 12).
8. Operation
8.1 Setting up

FIRE HAZARD!
The mains plug 10 should only be put into the wall socket after the oil container 14 has been filled with oil or melted fat at least up to the MIN marking.
- All parts of the fryer must be completely dry, when you use the device.
- Put the fryer on a stable, flat, non-slip, dry, and non-inflammable work surface.
- Do not use the fryer under wall units and not near to any curtains, paper or any similar inflammable objects.
- Do not place the device directly under a wall socket.
- Keep a distance of at least 50~cm on all sides.
8.2 Filling in the frying fat

FIRE HAZARD / DANGER of burns!
The level of the frying fat/ oil in its liquid state must be between the MIN and MAX markings on the inside of the oil container 14.
- Only fats and oils which are suitable for frying should be used (see "The basics of frying" on page 8).
- Approx. 3.3 (MIN) to 4.0 (MAX) litres of frying oil or approx. 4kg of solid frying fat are required.
- Solid frying fat should first be put into a pan and melted slowly at a low temperature. Only then it should be poured carefully into the oil container 14 of the fryer.
8.3 Heating the frying oil/ fat

DANGER of burns!
-
Do not touch any hot parts of the device such as the inspection window 19.
-
Close the lid 1. To do this, you press and hold the button 3 on the top of the handle 2 of the lid.
- Put the lid 1 on the oil container 14 and release the button 3.
- Insert the mains plug 10 into a readily accessible earthed wall socket whose voltage matches the voltage stated on the rating plate.
-
Set the desired temperature by using the temperature controller 8.
-
On the packaging of the food you will find recommendations for the temperature and frying time.
- The temperature control lamp 7 lights up until the set temperature is reached.
- When the device is heating again, the temperature control lamp 7 will light up again.
NOTE: we recommend to heat the frying fat/ oil for approx. 10 to 15 minutes in order to ensure that it is heated evenly.
As for the details of the temperature, please refer to the packaging of the food, the frying table (see "Frying table" on page 9) or to the temperatures indicated on the device.
| Symbol on the device / temperature | Food |
| 130°C | Prawns |
| 150°C | Chicken |
| 170°C | French-fried potatoes (fresh) |
| 190°C | Fish |
NOTE: the temperatures indicated are approximate values. The temperature may vary depending on the texture, size, and quantity of the food, as well as your taste.
8.4 Frying

FIRE HAZARD / DANGER of burns!
You should never let water drip into the hot frying fat/ oil.
The frying basket 18 and the food to be fried must be dry.
The device should only be operated with dry hands.
During frying, hot steam escapes from the grease filter cover 5. Be careful not to put your hands into the steam.
Do not put the food to be fried into the frying basket 18 while it is hanging over the hot oil. Small pieces might fall into the oil and lead to splashes.
In no event the fryer should be moved as long as it is still hot!
- Fill the food to be fried into the frying basket 18. The frying basket 18 may not be filled more than up to the MAX marking.
- When the control lamp 7 goes out, press the button 3 for opening the lid, and lift the lid 1 off.
- Now, carefully lower the frying basket 18 into the oil.
- Press and hold the button 3 on the handle 2 and put the lid on the oil container 14.
- Watch the frying process through the inspection window 19. The food cooks very quickly when being fried. Please observe the recommended frying times as precisely as possible.
- When the fried food is ready, press the button 3 for opening the lid, and lift the lid 1 off.
- Take the frying basket 18 out of the oil/ fat and hang it with the mount under the handle 17 on the front edge of the oil container 14 for dripping off.
- When the fat has dripped off, put the food into a bowl or the like.
- For additional frying processes, another temperature must be set, if applicable.
- Prior to each frying process, the device should be given time to heat up until the temperature control lamp 7 has gone out again.
- When you finish frying, switch the temperature controller 8 to MIN.
12.Pull out the mains plug 10 and allow the device to cool.
8.5 Overheating protection
Figure A: the fryer is equipped with an overheating protection which ensures that the device will automatically be switched off in case of any overheating. In this case the button RESET 20 is released.
- Lower the temperature and pull out the mains plug 10.
- Allow the device to cool down to room temperature.
- Press the button RESET 20 on the back of the base unit 11 fully to engage it, e.g. with a pencil.
- Wait a few minutes before you connect the mains plug 10 again with the mains and set the desired temperature.
9. Cleaning

DANGER of burns!
- Let the fryer cool down for approx. 2 hours before you move, empty, or clean it.

DANGER! Risk of electric shock!
Pull out the mains plug 10 from the wall socket before cleaning the fryer.
WARNING! Risk of material damage!
-
Do not use any astringent or abrasive cleaning agents.
-
Press the button 3 for releasing the lid, and lift the lid 1 off.
- Put the lid 1 into a sink or on a kitchen towel.
9.1 Filtering and storage of frying fat/ oil
- The quality of the frying fat/ oil should be checked after each frying (see "The basics of frying" on page 8).
- If the quality is still good, you should filter the fat/ oil before storing it: Pour the lukewarm fat/ oil through a sieve covered with a paper towel.
- For storage it would be best to fill the frying oil into the original bottle and to store it in a tightly closed container in a dark and cool place.
- Frying fat can be put back into the oil container, which has been previously cleaned, or you can let the fat solidify in the closed fryer and store it at a place as dark and cool as possible.
9.2 Disposal of frying fat/ oil
WARNING! Risk of material damage!
Frying oil and fat should not be discharged into drains or the toilet! The oil or fat solidifies so that the drains may be clogged.
Any fat/ oil with quality defects must immediately be disposed of (see "The basics of frying" on page 8).
9.3 Cleaning
Cleaning the frying basket, handle, and oil container
NOTE: the frying basket 18 and its handle 17, as well as the oil container 14 can be cleaned in the dishwasher.
- Press the metal brackets on the handle 17 together and pull them out of the
eyes on the frying basket 18. Remove the handle.
- Pour the melted fat out of the oil container 14.
- Wash the frying basket 18, the handle 17, and the oil container 14 by hand with very warm water and a mild detergent.
- Rinse with clear water.
- Let all parts dry completely before you put them away or use the device again.
Cleaning the lid, base unit, and housing of the oil container
NOTE: the lid 1, the base unit 11, and the housing 15 must not be cleaned in the dishwasher.
- Wipe off the lid 1, the control element 9 of the base unit, and the housing 15 with a damp cloth and a mild detergent. Be careful that no water penetrates into the lid and the control element.
- Wash the heating elements 12 of the base unit with very warm water and a mild detergent.
- Rinse with clear water.
- Let all parts dry completely before you put them away or use the device again.
Cleaning the grease filter
Figure B: the grease filter 22, which is located in the lid, should be cleaned from time to time.
- Press the lever of the grease filter cover 4 towards the handle 2 and lift the grease filter cover off.
- Take the grease filter 22 out.
- Clean the grease filter 22 in very warm water with some mild detergent.
- Rinse with clear water.
- Let the grease filter dry completely before you insert it again.
Storage
Before you put the fryer away, all parts must be completely dry.
- Assemble the parts again if you do not want to store the frying fat in the oil container 14.
9.4 Re-using used frying fat
- If you stored the frying fat outside of the fryer, it should be melted first (as with fresh fat) in a pan, before you fill it into the fryer.
- If you stored the frying fat in the fryer, it must now be heated slowly and carefully in order to avoid any splashes. Let the fryer and the fat stand for a while at room temperature, until the fat has reached room temperature.
- A fork should carefully be punched several times into the surface.
- Put the mains plug 10 into the wall socket and set the temperature controller at a temperature of 130^ .
- Wait until the fat is melted completely. Only then the temperature controller 8 should be set at the frying temperature.
10. Disposal
This product is subject to the provisions of European Directive 2012/19/EC. The symbol showing a wheelie bin crossed through indicates that the product requires separate
refuse collection in the European Union. This applies to the product and all accessories marked with this symbol. Products identified with this symbol may not be discarded with normal household waste, but must be taken to a collection point for recycling electric and electronic appliances. Recycling helps to reduce the consumption of raw materials and protect the environment.
Packaging
When disposing of the packaging, make sure you comply with the environmental regulations applicable in your country.
11. Home-made fresh French-fried potatoes
That's how the potatoes should be
- The potatoes should have a firm skin and not yet have sprouted.
Floury or mainly waxy potatoes should be used. -
The potatoes should not be too small and be of approximately the same size. This facilitates the processing.
-
Peel the potatoes.
- Cut the potatoes into stripes or slices, depending on your wishes.
- Put the potatoes in water for approx. 1 hour before frying.
- Dry the potatoes, e.g. with a paper towel.
- First frying process: The potatoes should be fried for approx. 10 - 14 minutes at a temperature of approx. 150^ .
- Take the frying basket 18 out of the oil/ fat and hang it with the mount under the handle 17 on the front edge of the oil container 14 for dripping off.
- Heat the oil/ fat up to a temperature of approx. 170^ .
- Second frying process: The potatoes should now be fried again for approx. 3 - 4 minutes at a temperature of approx. 170^ .
- Finish the frying process as soon as the desired browning level has been reached.
NOTE: deep-frozen French-fried potatoes need only be fried once.
12. Troubleshooting
If your device fails to function as required, please try this checklist first. Perhaps there is only a minor problem, and you can solve it yourself.

DANGER! Risk of electric shock!
Do not attempt to repair the device yourself under any circumstances.
| Fault | Possible causes / Action |
| No function | Has the device been connected to the power supply? Check the connection. Has the overheating protection been triggered? (see “Overheating protection” on page 13). |
| The device switched off by itself | Has the overheating protection been triggered? Press the RESET 20 button (see “Overheating protection” on page 13). |
| The food to be fried is not yet ready after the recommended frying time | Have you tried to fry a larger quantity all at once? Had the fat not been heated sufficiently so that the recommended temperature has not been reached? |
| Bad taste of the fried food | Is the fat/ oil old? Has food with a strong flavour been fried before in the same fat (e.g. fish)? Replace the fat/ oil. |
| Fault | Possible causes / Action |
| Heavy forma- tion of smoke and smell | • Is the fat/ oil old, dirty, or has moisture gotten into the fat/ oil? Replace the fat/ oil. |
13. Technical specifications
| Model: SEF 2300 D3 |
| Mains voltage: 230 V ~ 50 Hz |
| Protection class: I |
| Power rating: 2300 W |
Symbols used
| GS | Certified Safety. Devices must comply with the generally acknowledged rules of technology and the German Product Safety Act (Produktssicherheitsgesetz - ProdSG). |
| CE | With the CE marking, HOYER Handel GmbH declares the conformity with EU guidelines. |
| This symbol reminds you to dispose of the packaging in an environmentally friendly manner. | |
| 21PAP | Recyclable materials: cardboard (except corrugated cardboard) |
| The symbol identifies parts that can be cleaned in the dishwasher. |
Subject to technical modifications.
14. Warranty of the HOYER Handel GmbH
Dear Customer,
your device is provided with a 3 year warranty starting with the purchase date. In the event of product defects, you are entitled to statutory rights against the vendor. These statutory rights are not restricted by our warranty presented in the following.
Warranty conditions
The warranty period starts with the purchase date. Please keep the original purchase receipt in a safe place. This document is required to verify the purchase.
If within three years from the purchase date of this product a material or factory defect occurs, the product will be repaired or replaced by us - at our discretion - free of charge to you. This warranty implies that within the period of three years the defective device and the purchase receipt are presented, including a brief written description of the defect and the time it occurred.
If the defect is covered by our warranty, the repaired or a new product will be returned to you. No new warranty period starts with a repair or replacement of the product.
Warranty period and statutory claims for defects
The warranty period is not extended when the warranty has been claimed. This also applies to replaced and repaired parts. Any damages and defects already existing at the time of purchase must be reported immediately upon unpacking. Repairs arising after the expiration of the warranty period are subject to a charge.
Warranty coverage
The device was produced carefully according to strict quality guidelines and tested diligently prior to delivery.
The warranty applies to material or factory defects.
Excluded from the warranty are wear parts subject to normal wear and damages to fragile parts, e.g. switches, batteries, lamps or other parts manufactured from glass.
This warranty expires if the product is damaged, not used as intended or not serviced. For the proper operation of the product, all instructions listed in the operating instructions must be observed carefully. Any form of use and handling that is advised against in the operating instructions or warned against must always be avoided.
The product is only intended for private and not for commercial use. In the case of incorrect and improper treatment, use of force and interventions not performed by our authorised Service Centre, the warranty shall cease.
Handling in case of a warranty claim
In order to ensure prompt processing of your matter, please observe the following notes:
- Please keep the article number
IAN:301414 and the purchase receipt as a purchase verification for all inquiries.
- The article number can be found on the rating plate, an engraving, the title page of your instructions (in the bottom left), or as a label on the rear or underside of the device.
- If faulty operation or other defects occur, first contact the Service Centre listed in the following by telephone or email.
- Then, you are able to send a product reported as defective free of charge to the service address specified to you, including the purchase receipt and the information on the defect and when it occurred.

Please visit www.lidl-service.com to download this and many other manuals, product videos and software.
GB Service Great Britain
Tel.: 0871 5000 720 (£ 0.10/ Min.)
E-Mail: hoyer@lidl.co.uk
IE Service Ireland
Tel.: 1890 930 034
(0,08 EUR/ Min., (peak))
(0,06 EUR/ Min., (off peak))
E-Mail: hoyer@lidl.ie
MT Service Malta
Tel.: 80062230
E-Mail: hoyer@lidl.com.mt
CY Service Cyprus
Tel.: 80094409
E-Mail: hoyer@lidl.com.cy
IAN:301414
Supplier
Please note that the following address is no service address. First contact the aforementioned Service Centre.
HOYER Handel GmbH
Tasköprüstraße 3
DE-22761 Hamburg
GERMANY