
GW90770 - Environmental sensor Gewiss - Free user manual and instructions
Find the device manual for free GW90770 Gewiss in PDF.
| Product type | Wind sensor interface |
| Brand | Gewiss |
| Model | GW90770 |
| Power supply | 230 V AC - 50 Hz |
| Outputs | 2 potential-free NO contacts |
| Protection rating | IP55 |
| Response time | Approximately 15 seconds |
| Recovery time | Approximately 15 minutes |
| Wind thresholds | Adjustable from 3 to 10 Beaufort (12 to 88 km/h) |
| Test mode | Positions 1 and 2 of the rotary selector |
| Compatible sensor | GW90769 (selector in position II) |
| LED indication | Front LED for test |
| Installation | Wall mounting with supplied plugs and screws |
| Main functions | Monitor wind speed and control the raising of blinds or shutters via output contact |
| Maintenance | Clean with a dry cloth; check enclosure sealing |
| Safety | Disconnect power before any intervention; comply with electrical standards |
| Repairability | Spare parts not available; contact the manufacturer in case of failure |
| Compliance | Compliant with European directives (CE) |
Frequently Asked Questions - GW90770 Gewiss
User questions about GW90770 Gewiss
0 question about this device. Answer the ones you know or ask your own.
Ask a new question about this device
Download the instructions for your Environmental sensor in PDF format for free! Find your manual GW90770 - Gewiss and take your electronic device back in hand. On this page are published all the documents necessary for the use of your device. GW90770 by Gewiss.
USER MANUAL GW90770 Gewiss
natural_image
White rectangular electronic device with black buttons at the bottom (no visible text or symbols)GW 90 770
text_image
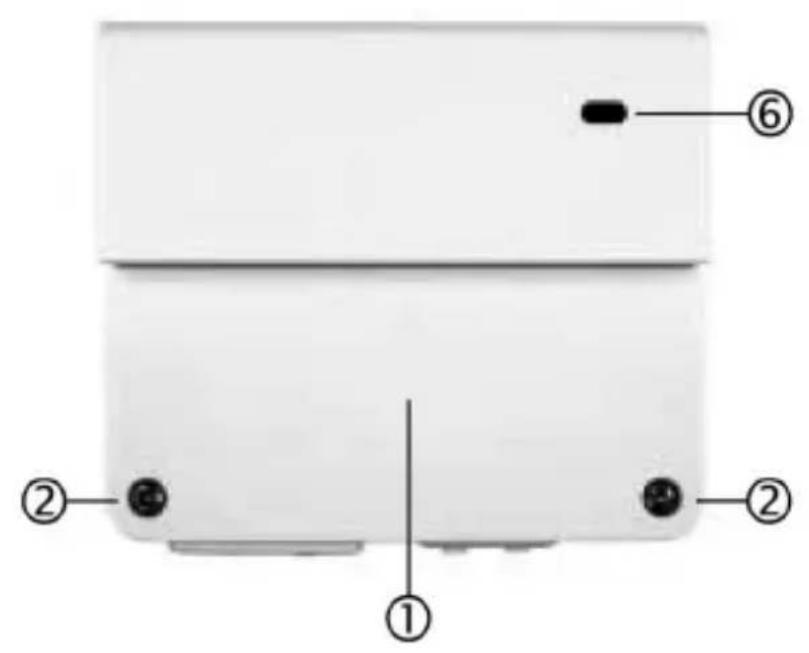
Diagram of a device rear panel with labeled components including numbered parts ①, ②, and ⑥.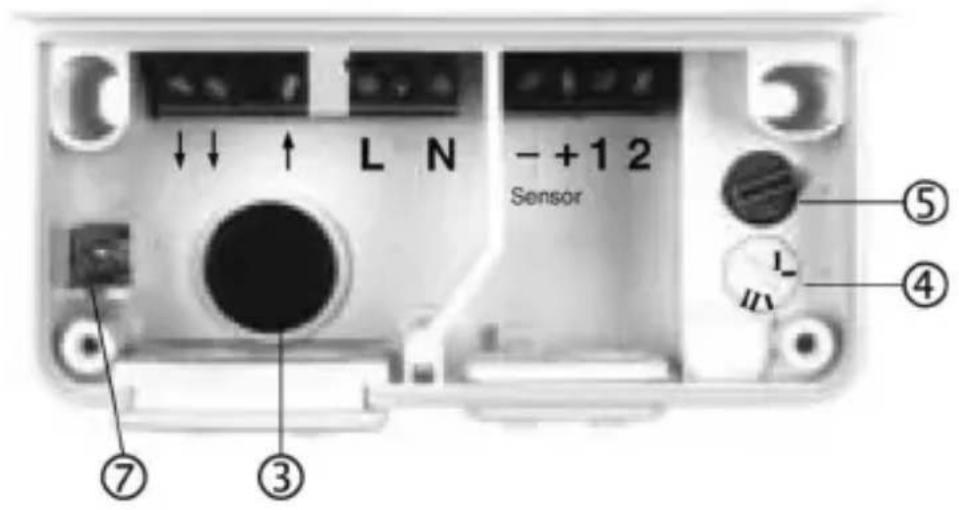
text_image
L N - +1 2 Sensor ⑦ ③ ④ ⑤ LINDICE
text_image
L N 230Vac L N - + 1 2Contatti di uscita
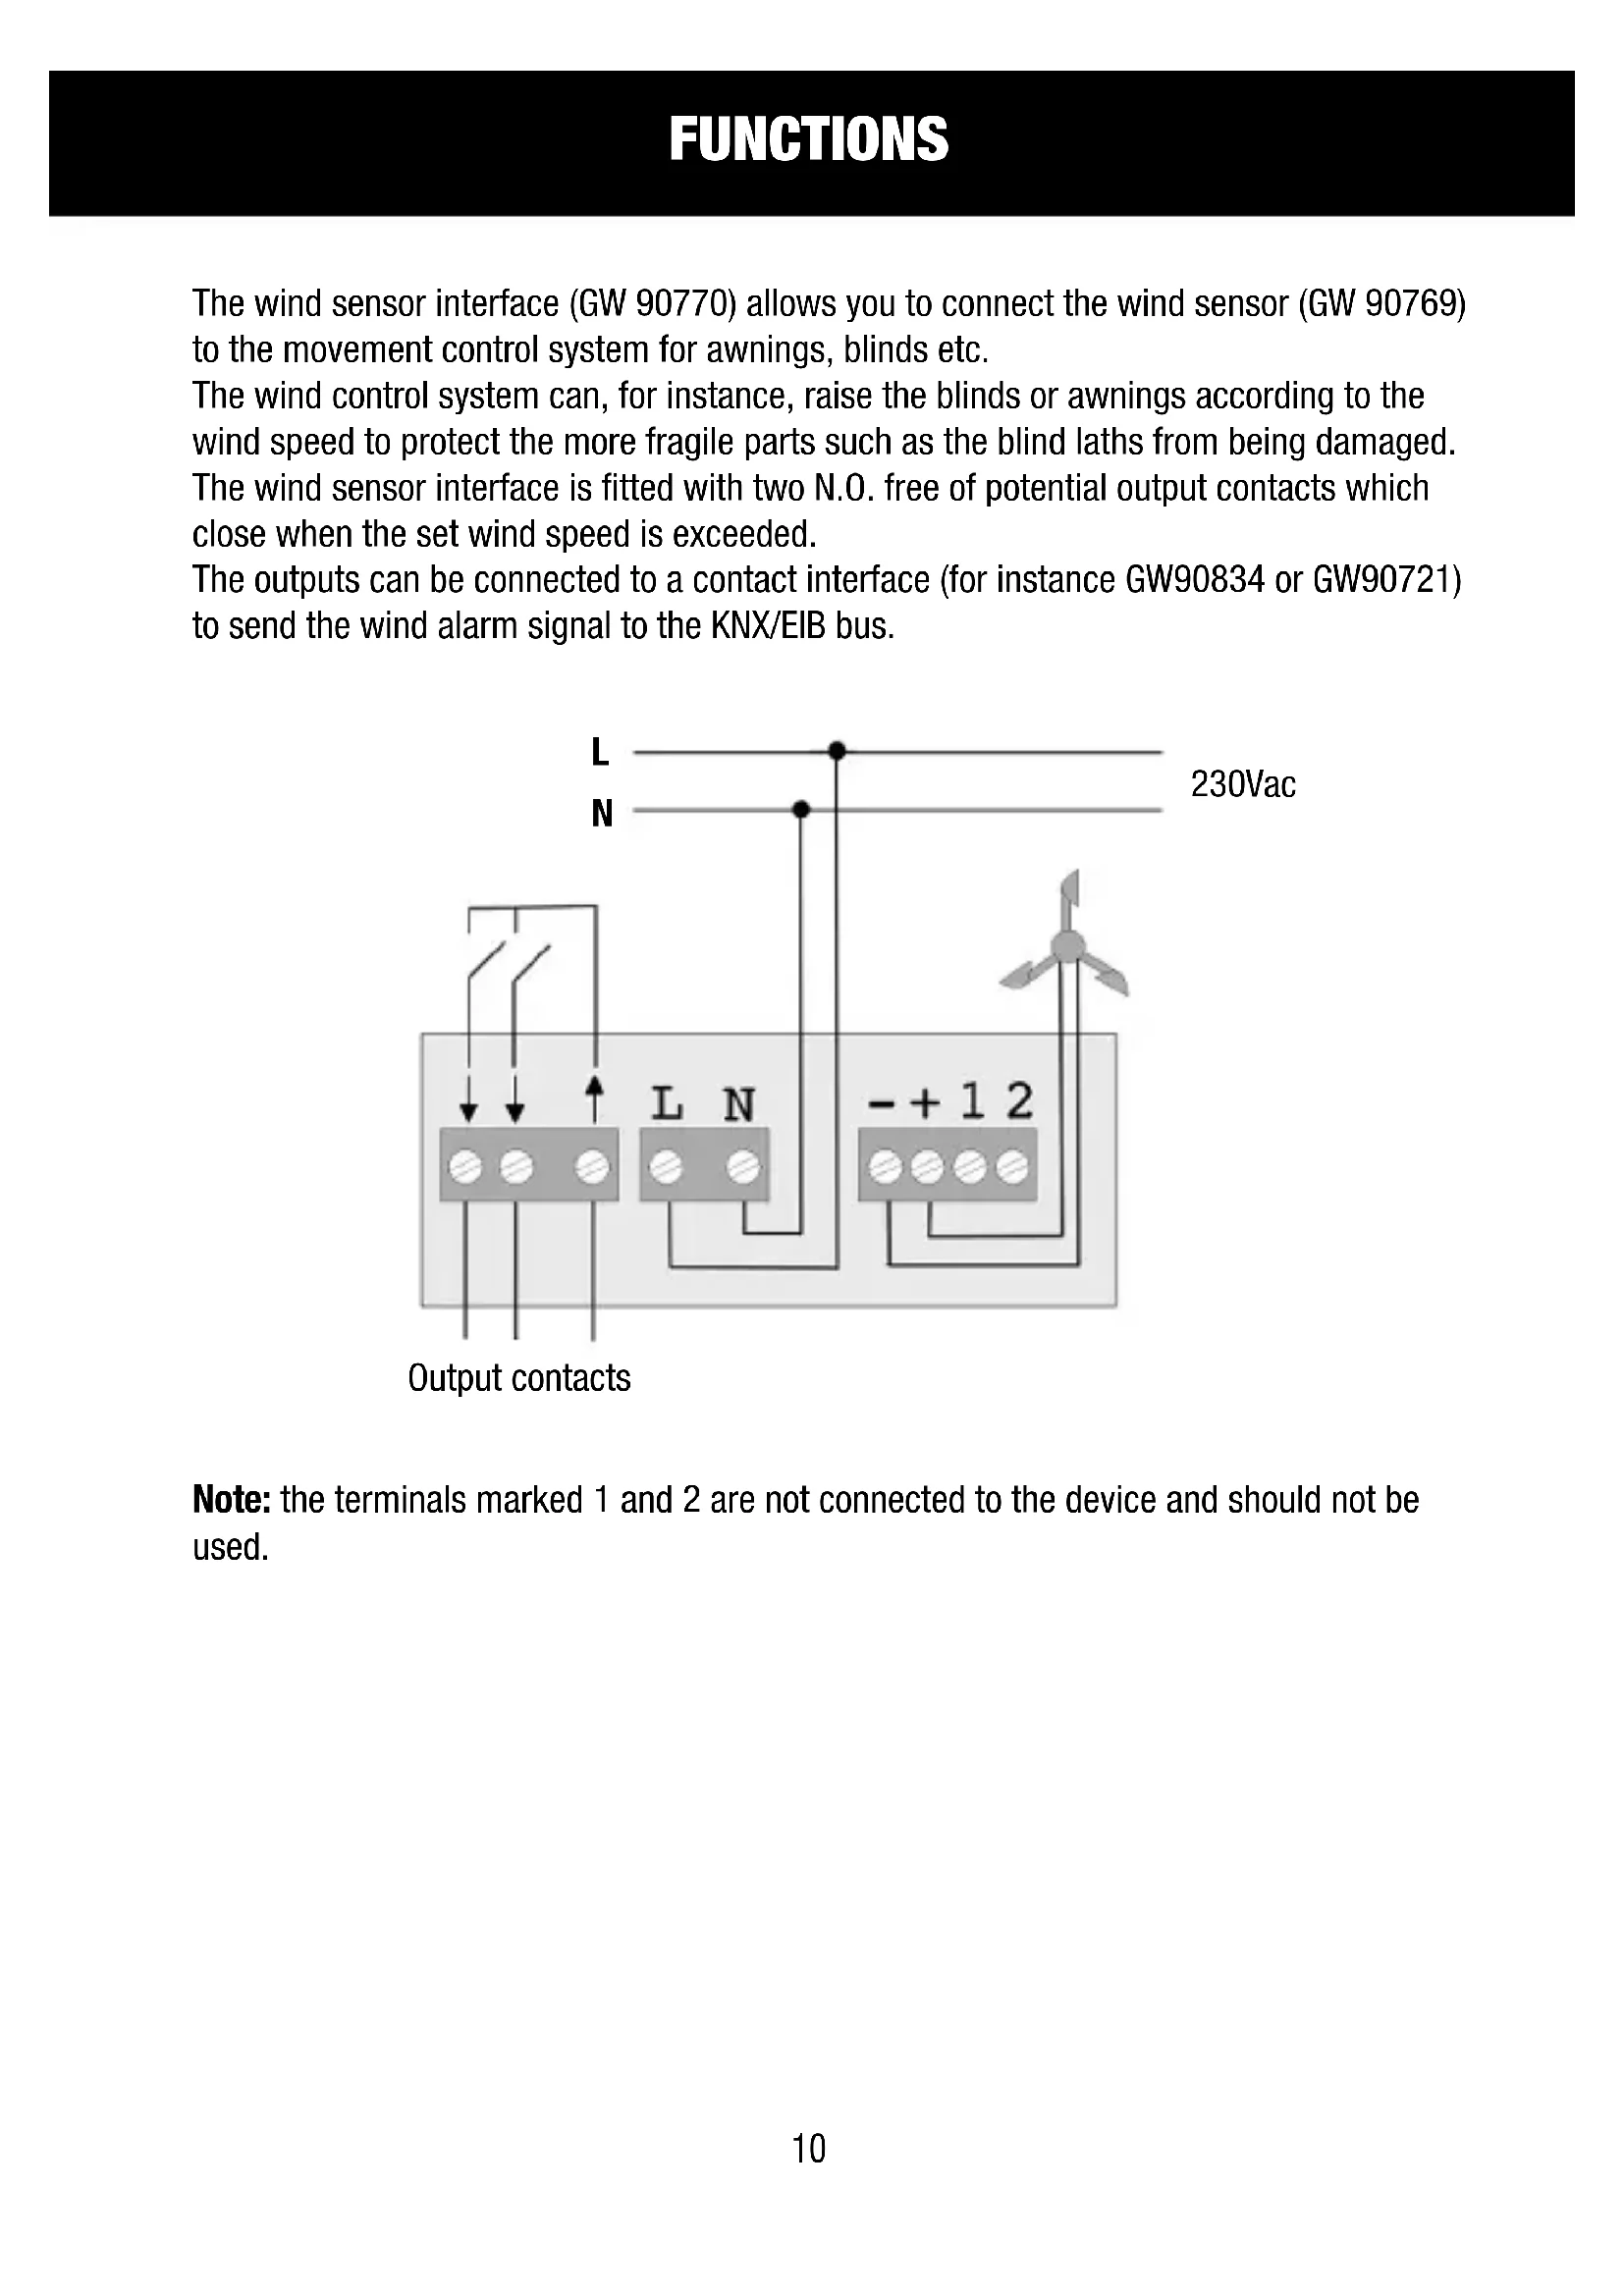
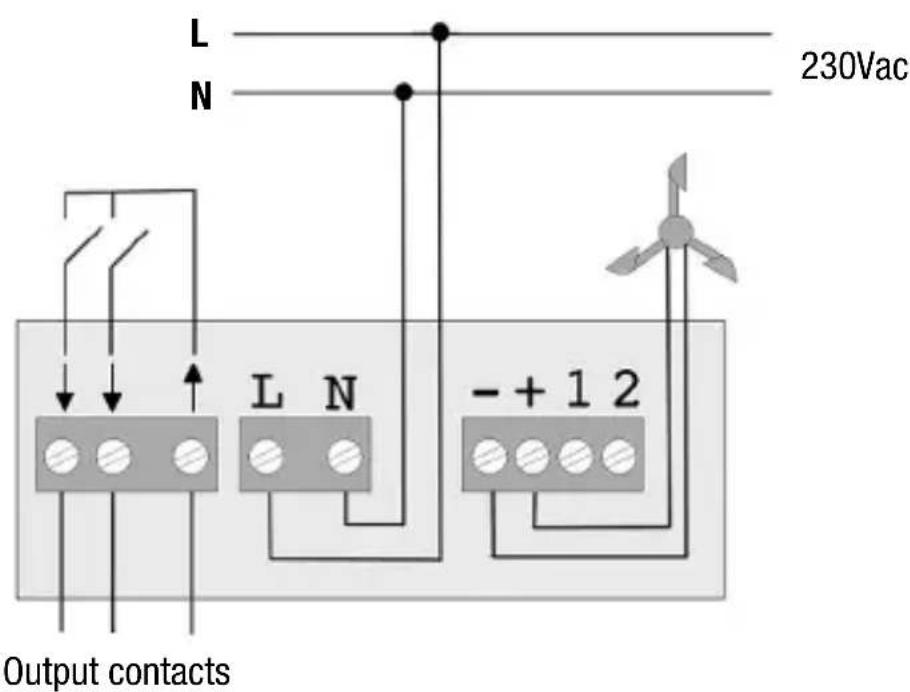
The wind sensor interface (GW 90770) allows you to connect the wind sensor (GW 90769) to the movement control system for awnings, blinds etc.
The wind control system can, for instance, raise the blinds or awnings according to the wind speed to protect the more fragile parts such as the blind laths from being damaged.
The wind sensor interface is fitted with two N.O. free of potential output contacts which close when the set wind speed is exceeded.
The outputs can be connected to a contact interface (for instance GW90834 or GW90721) to send the wind alarm signal to the KNX/EIB bus.
text_image
L N 230Vac Output contacts L N - + 1 2Note: the terminals marked 1 and 2 are not connected to the device and should not be used.
INSTALLATION
Loosen screws ② and remove the plastic container cover ① (if the cables will be inserted from the back, perforate the rubber ③ plug and thread the cables).
Fix the device in place using the screws and dowels supplied.
Lay the cables as indicated in the wiring drawing.
When you have finished the configuration procedure, replace the plastic cover.
CONFIGURATION
Select the wind sensor
To use the GW90769 wind sensor, turn the switch ④ to position II (default setting).
Selecting the test mode/setting the threshold
According to its position, the rotating switch ⑤ can be used to:
- Select the wind speed threshold
- Start the test mode
The rotating switch has 10 different positions (1, 2, 3, ... 9, 0).
Test Mode
Positions 1 and 2 start the test mode: after max 1 second, the front LED ⑥ will light up. Rotate the anemometer and LED ⑥ will light up at the same frequency as the rotation of the anemometer.
The device functions can also be tested at low rotation speeds.
Setting the wind speed threshold
Positions 3 - 0 select the wind speed threshold after which the output contact closes. The settings use the Beaufort scale:
0 = 10Bft (24.5 m/s = 88 km/h)
9 = 9Bft (20.8 m/s = 75 km/h)
8 = 8Bft (17.2 m/s = 62 km/h)
7 = 7Bft (14.1 m/s = 51 km/h)
6 = 6Bft (11.0 m/s = 40 km/h)
5 = 5Bft (8.0 m/s = 29 km/h)
4 = 4Bft (5.5 m/s = 20 km/h)
3 = 3Bft (3.3 m/s = 12 km/h)
After exiting test mode, wait for 4 seconds for the device to correctly read the selected wind speed.
If you change the threshold, please wait 4/5 minutes for the device to read and save the new value.
Helpful tips: To quickly change the thresholds, first select test mode, and set the new value from here.
Terminal ⑦ can be used to connect up to a grounding cable.
TECHNICAL DATA
Voltage: 230V ac 50 Hz
Outputs: 2 NO free of potential contacts
↑↓
Response time: around 15 seconds (after the wind speed exceeds the threshold value).
Reset time: around 15 minutes (after the wind speed returns below the threshold value).
Protection rating: IP65
SOMMAIRE
page FONCTIONNEMENT 16
INSTALLATION 17
CONFIGURATION.... 18