 — Mode d'emploi PDF")
IPV4NVR - Digital Video Recorder (NVR) EBODE - Free user manual and instructions
Find the device manual for free IPV4NVR EBODE in PDF.
| Product Type | Digital Video Recorder (NVR) |
| Brand | ebode |
| Model | IPV4NVR |
| Power Supply | AC adapter, input voltage as per product label |
| Video Outputs | VGA and HDMI |
| Network Interface | LAN Ethernet |
| USB Ports | Yes, for mouse and storage devices |
| Maximum Display Resolution | Up to 1080p |
| Recording | Manual and motion detection |
| Remote Access | Via Internet browser (LAN and WAN) |
| IP Camera Support | Yes, with supported protocol |
| Interface Languages | French among other European languages |
| Maintenance | Clean with a dry cloth, avoid humidity |
| Safety | Indoor use only, do not expose to rain or humidity |
| Compliance | Directive 1999/5/EC |
Frequently Asked Questions - IPV4NVR EBODE
User questions about IPV4NVR EBODE
0 question about this device. Answer the ones you know or ask your own.
Ask a new question about this device
Download the instructions for your Digital Video Recorder (NVR) in PDF format for free! Find your manual IPV4NVR - EBODE and take your electronic device back in hand. On this page are published all the documents necessary for the use of your device. IPV4NVR by EBODE.
USER MANUAL IPV4NVR EBODE
Contents of the kit:
1xNVR
1x DC Power Adapter

1x Resource CD
1x Quick Start Guide
1x Surveillance Sticker

1x ebode Leaflet
Technical Specification:
4-Channel 720P/960P HD IP Cam Network Video Recorder (NVR)
H.264 Main Profile Video Compression
Supports HDMI and VGA Local Display
4-Channel 960P Synchronous Playback
- Compatible with ebode HD IP Cameras
Supports ONVIF protocol, compatible with ONVIF-embedded IP Cameras
Supports USB External Storage (Flash disk, HDD)
Quick Start Guide
1. Conformity of Use
For carefree and safe use of this product, please read this manual and safety information carefully and follow the instructions. The unit is registered as a device that does not cause or suffer from radio-frequency interference. It is CE approved and it conforms with the Low Voltage Directory. The safety and installation instructions must be observed. Technical manipulation of the product, or any changes to the product, are forbidden, due to security and approval issues. Please take care to set up the device correctly - consult your user guide. Young children should use the device only under adult supervision. No guarantee or liability will be accepted for any damage caused due to incorrect use of the equipment supplied, other than indicated in this owner's manual.
Safety warnings
- To prevent short circuits, this product (except if specified for outdoor usage) should only be used inside and only in dry spaces. Do not expose the components to rain or humidity.
- Only connect the power cord to the mains after checking whether the mains voltage is the same as the values on the rating labels. Never connect a power cord when it is damaged. In that case, contact your supplier. If there is any danger of a thunderstorm, it is a good precaution to unplug the power supply from the mains network in order to protect it from lightning. The same applies if the system is to be out of action for any length of time.
- Avoid strong mechanical tear and wear, extreme ambient temperatures, strong vibrations and atmospheric humidity.
- Do not disassemble any part of the product: the device contains live parts and no user-serviceable parts are inside. The product should only be repaired or serviced by qualified and authorized service personnel. Defected pieces must be replaced by original (spare) parts.
- Batteries: keep batteries out of the reach of children. Dispose of batteries as chemical waste. Never use old and new batteries or different types of batteries together. Remove the batteries when you are not using the system for a longer period of time. When inserting batteries be sure the polarity is respected. Make sure that the batteries are not short circuited and are not disposed in fire (danger of explosion).
In case of improper usage or if you have opened, altered and repaired the product yourself, all guarantees expire. The supplier does not accept responsibility in the case of improper usage of the product or when the product is used for purposes other than specified. The supplier does not accept responsibility for additional damage other than covered by the legal product responsibility.
1. Installation Process

2. Device Connection

VGA Video Output
HDMI Video Output
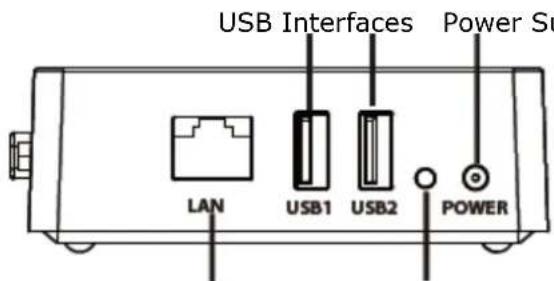
LAN Interfaces
Power Status Indicators
Procedure
- Connect the display device to the video output interface.
- Connect a router to the LAN interface. In addition, connect the router to a IPC device and a computer so that they are in the same LAN.
- Connect a mobile storage device, for example, USB drive or mobile hard drive, to the USB interface.
- Connect a mouse to the USB interface.
- Connect the power adapter to the power input interface.
3. Login
- After the NVR starts up successfully, the Power indicator LED should be green. The startup page is displayed on the screen.
- Login page. Enter username and Password, then click Login button. Default username is admin with no password.
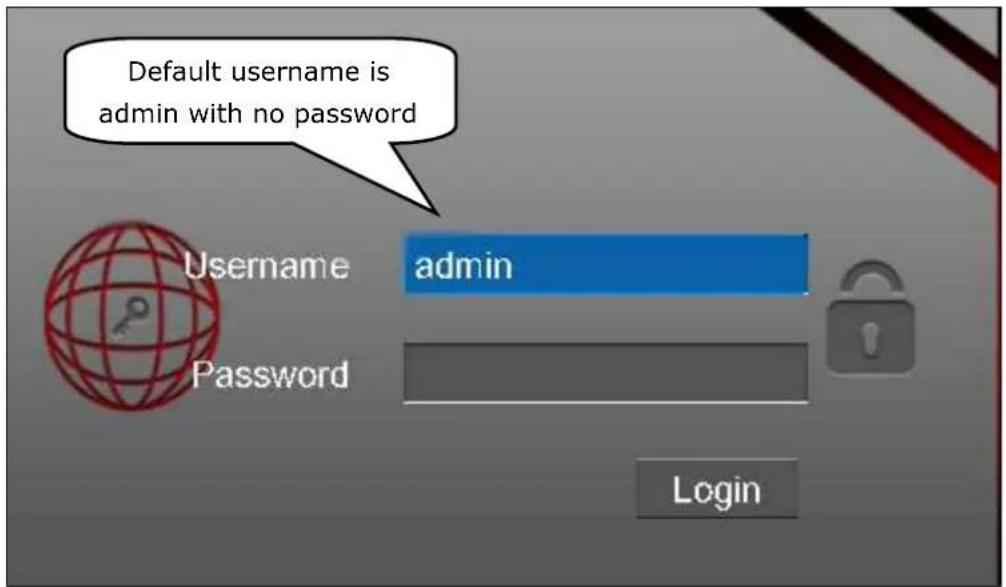
- For the initial log in, the system will pop up a message for modifying the username/password. Click OK button.

- After modifying the username/password, enter the Setup Wizard interface.
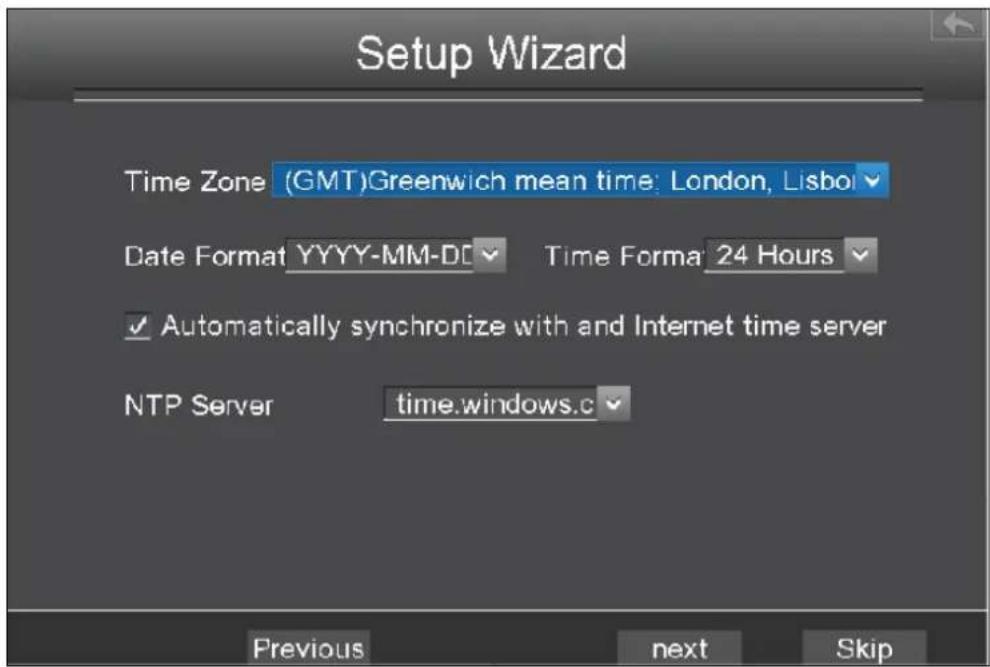
4. Setup Wizard
The Setup Wizard can walk you through some important settings of the NVR.
- Select the Language. If you don't want to use the Setup Wizard next time, uncheck the Setup Wizard checkbox.
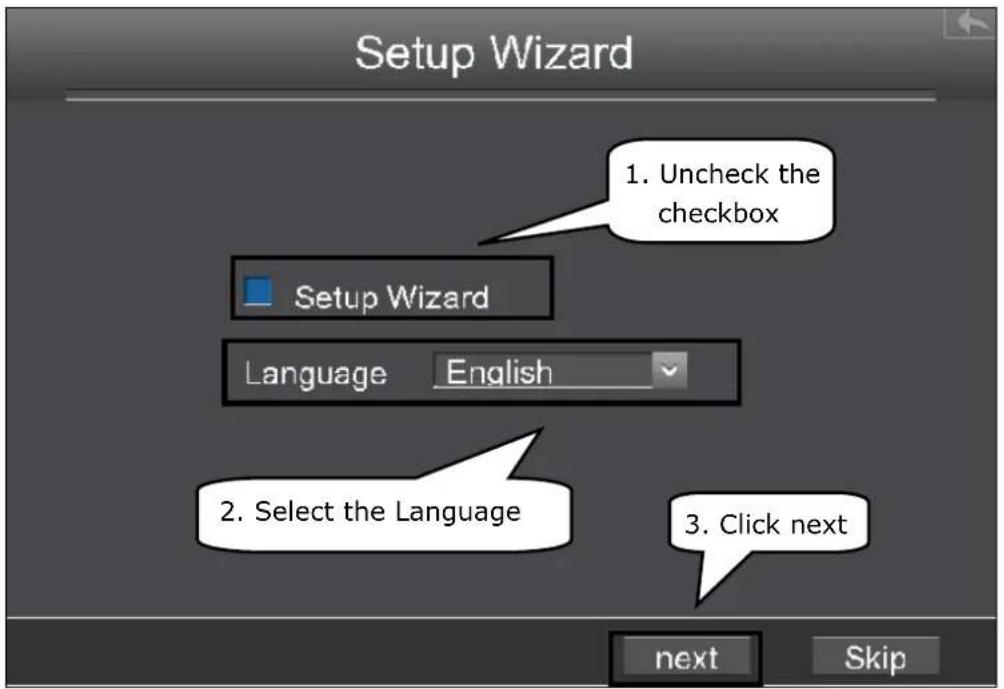
- After the time settings, click next button.
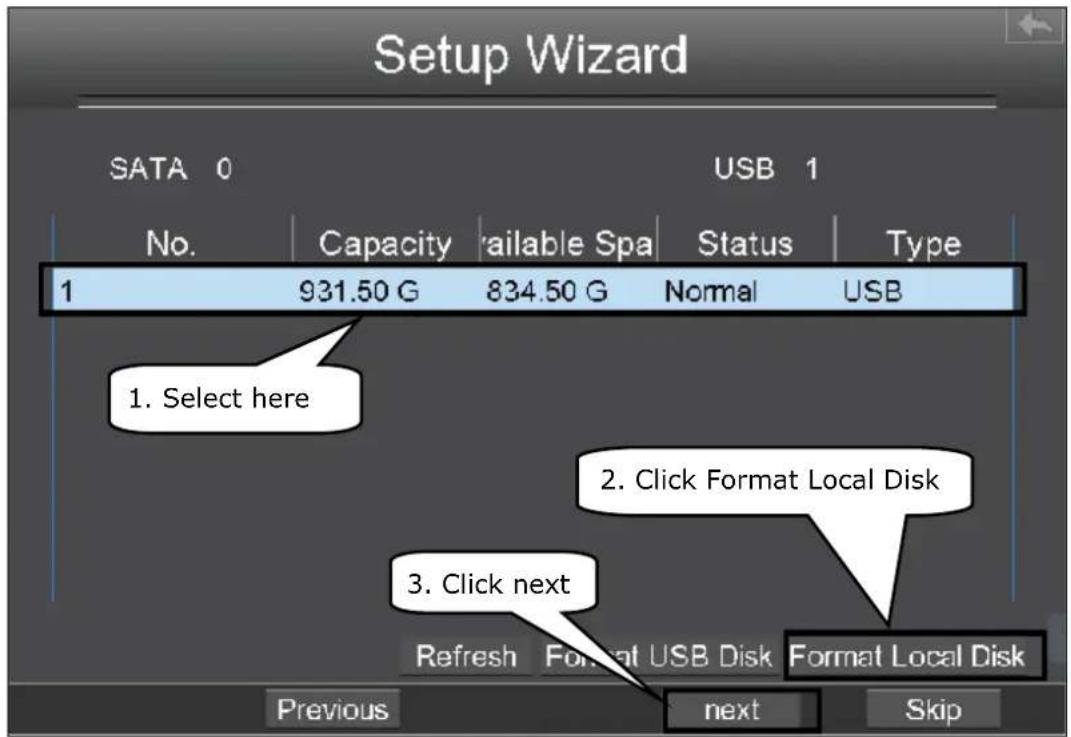
- Select the mobile storage device, then click the Format Local Disk button to initialize the mobile storage device for recording.
- You can add the online IPC device for your NVR.
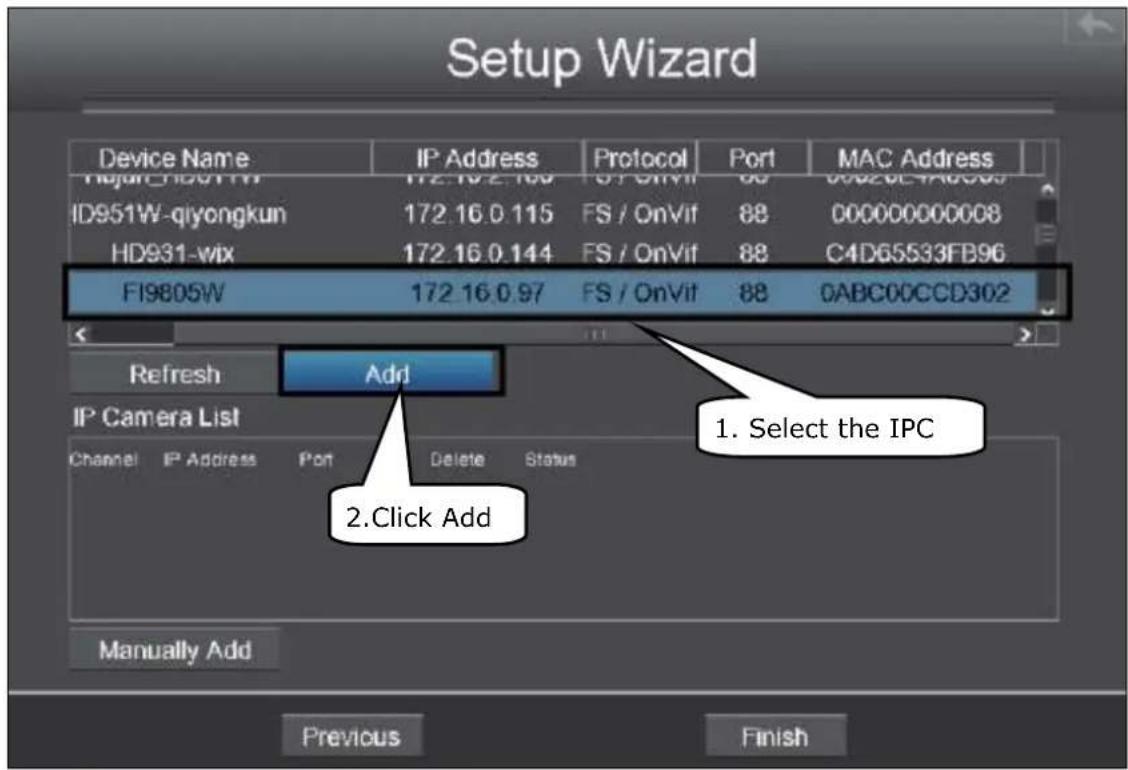
You can configure the following information of the IP Camera. Click OK button which to go back to the Setup Wizard page.

- Find the IP Camera in the IP Camera List, then click Finish button to complete the setup wizard.

The live view interface will display as shown in the figure below. Live view shows you the video image getting from each IP Camera in real time.

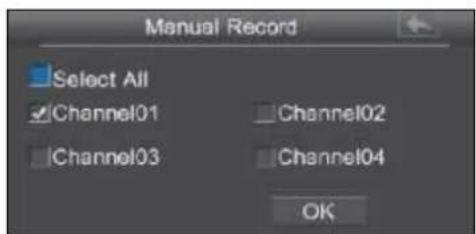
5. Manual Record
After the IPC device is added successfully to the NVR, you can enable the manual recording function in the live view mode.
- Right click the mouse in the live view mode, and the shortcut menu will pop up.
- Select the Manual Record to enter the Manual Record page.
- Check the channel which you want to enable recording. Click OK button.
- Then click icon to exit the interface.
In the live view mode, the icon is at the right bottom of the screen for the channel, indicating recording is ongoing.

Note: To disable recording, uncheck the channel checkbox on the Manual Record interface.
6. Remote Access
Assume you need to log in to your NVR from LAN or WAN via the browser. You need to perform following configurations:
Note: IPV4NVR supports 32-bit IE8 or later versions and does not support 64-bit browsers.
6.1 Network Configuration
- Configure network information.
Right click the mouse in the live view mode, choose "Menu > Settings > Network". Check the Network checkbox, configure the network information of the NVR.

It is highly recommended to set the HTTP Port range from 5000 to 65535, and the value of the HTTP Port No. for each device should be unique.
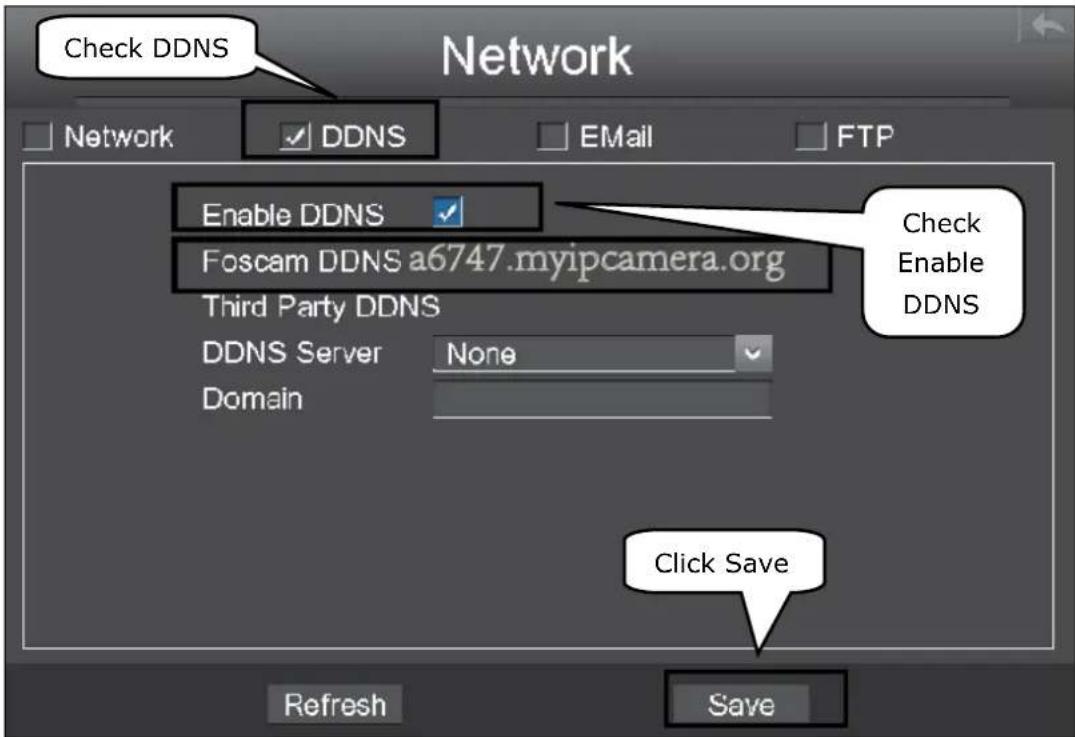
- Configure the DDNS.
Right click the mouse in the live view mode, choose "Menu > Settings > Network". Check the DDNS checkbox. Enable DDNS of the NVR. We recommend you to use the DDNS by factory default.
6.2 Access to the NVR in LAN
There are two ways to access to the NVR via the browser in LAN.
- Open the IP Camera Tool program in the resource CD. It will display the NVR's IP address and port in your LAN. Double click the NVR list here, and your default browser will open up to the login page.

- You can also access to your NVR by http://IP address:HTTP port via the browser. eg, http://172.16.0.127:88
6.3 Access to the NVR in WAN
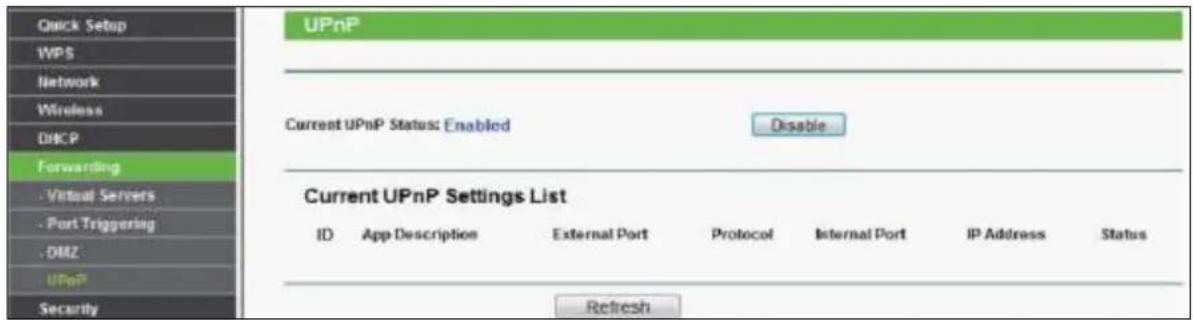
If UPnP has been enabled in the router, you do not need to perform the following steps. If UPnP is disabled, you need to select one of the following methods to configure port forwarding on your router. For these steps, we will be using the TP-LINK brand wireless router as an example.
- If there is a UPnP function in your router.
Choose "Forwarding > UPnP", make sure that the Current UPnP Status is Enabled.
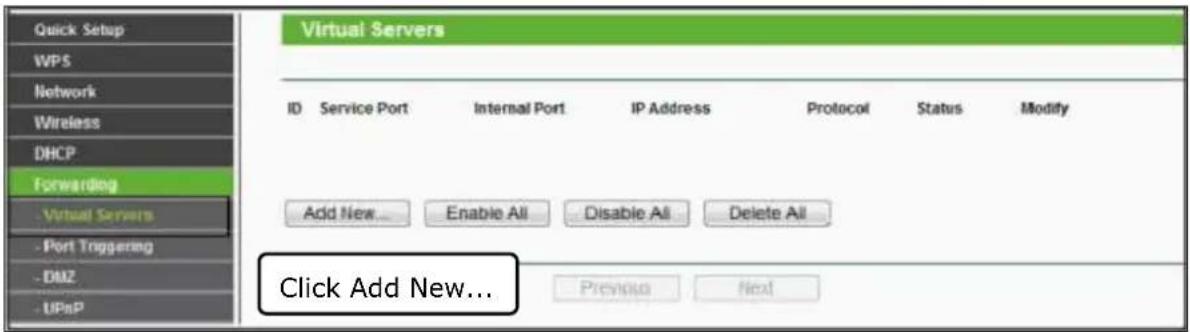
- If there is no UPnP function in your router.
You need to manually add port(HTTPS port) forwarding, refer to the following steps. You need go to the "Forwarding > Virtual Servers" panel for setup.


Now you can access your NVR by http://domain name:HTTP port via the browser. eg, http://a6747.myipcamera.org:88
7. Log Out, Reboot or Shutdown
Right click the mouse in the live view mode, and the shortcut menu will pop up. Then select Shutdown to enter the Shutdown interface.
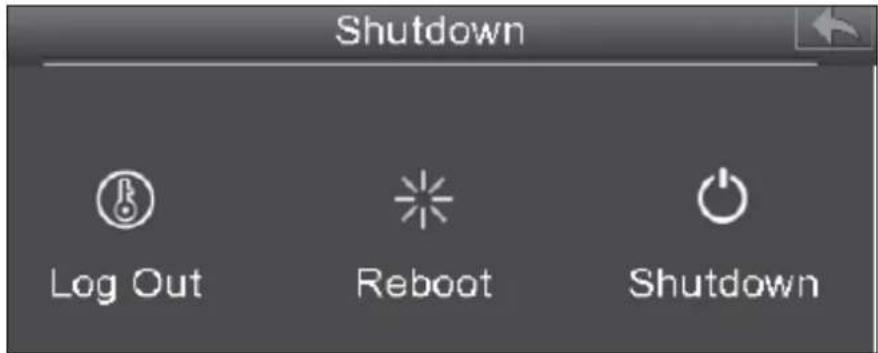
- Log Out: Select Log Out and the note message box will pop up. Click OK button to log out the NVR system.
- Reboot: Select Reboot and the note message box will pop up. Click OK button to reboot the NVR system.
- Shutdown: Select Shutdown and the note message box will pop up. Click OK button to shut down the NVR system.
Note: Please try to avoid shutting down the unit especially during recording.
8. FAQ
Why recording is not performed after motion detection is enabled?
On the "Motion Detection" page, check whether the following are correctly set:
- Check whether enable is selected. Check whether recording is selected.
- Check whether the motion detection channel is correct.
- Check whether a trigger time segment is set.
- Check whether a detection area is set.
Why can the NVR search the IPC but cannot connect the IPC?
On the "IPC management" page, check whether the following are correctly set:
- Check whether the user name and password for the IPC are correct.
- Check whether the web page port for the IPC is correct.
- Check whether the IPC also supports the protocol selected in the NVR.
- Check whether the IPC video is normal.
Why can't video files be downloaded during video playback or Shutdown downloaded files cannot be played back properly?
To save consumed resources, the server limits concurrency of video playback and file download. In this case, stop video playback and then download files or play back videos after video files are downloaded.
After the adding of the IPC successfully, the video of the corresponding channel has lost in the live view mode.
Make sure that the IPC display mode is not more than NVR display mode. For example: NVR display mode for the 4 * 960P , the IPC display mode cannot be 1080P.
Why can't opened web pages on the client be used properly after the NVR server switches to the 1080P mode?
When the NVR server switches to the 1080P mode, some functions can take effect only after the server reboots. In this case, log out of the Web client and log in to it again. In similar cases, for example, changing the IP address and HTTP port of the NVR, you need to log in to the client again.


ebode
www.ebodeelectronics.eu
DECLARATION OF CONFORMITY
Hereby, ebode electronics, declares that this ebode IPV4NVR is in compliance with the essential requirements and other relevant provisions of the following Directives:
Directive 2004/108/EC of the European Parliament and of the Council of 15 December 2004 on the approximation of the laws of the Member States relating to electromagnetic compatibility
Directive 2006/95/EC of the European Parliament and of the Council of 12 December 2006 on the harmonization of the laws of Member States relating to electrical equipment designed for use within certain voltage limits
Directive 2002/95/EC of the European Parliament and of the Council of 27 January 2003 on the restriction of the use of certain hazardous substances in electrical and electronic equipment
Directive 2005/32/EC of the European Parliament and of the Council of 6 July 2005 establishing a framework for the setting of eco design requirements for energy-using
Technical data and copies of the original Declaration of Conformity are available and can be obtained from ebode electronics: PB 25, NL-4264ZG, the Netherlands.
C
User Information for Consumer Products Covered by EU Directive 2002/96/EC on Waste Electric and Electronic Equipment (WEEE)
This document contains important information for users with regards to the proper disposal and recycling of ebode products. Consumers are required to comply with this notice for all electronic products bearing the following symbol:

Environmental Information for Customers in the European Union
European Directive 2002/96/EC requires that the equipment bearing this symbol on the product and/or its packaging must not be disposed of with unsorted municipal waste. The symbol indicates that this product should be disposed of separately from regular household waste streams.
It is your responsibility to dispose of this and other electric and electronic equipment via designated collection facilities appointed by the government or local authorities. Correct disposal and recycling will help prevent potential negative consequences to the environment and human health.
For more detailed information about the disposal of your old equipment, please contact your local authorities, waste disposal service, or the shop where you purchased the product.
DECLARATION OF CONFORMITY TO R&TTE DIRECTIVE 1999/5/EC for the European Community, Switzerland, Norway, Iceland and Liechtenstein
Product category: general consumer (category 3).
English: This equipment is in compliance with the essential requirements and other relevant provisions of the European R&TTE Directive 1999/5/EC
Also available from ebode: Bluetooth Speaker and Bluetooth receiver
HDMI Extender
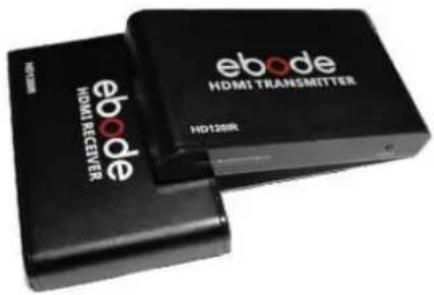
The HD120IR HDMI Extender over single CAT5e/6 with IR is designed to convert and transmit HDMI signal to standard TCP/IP by internet cable or LAN. With the advantage of TCP/IP standard with 38KHz IR, the HD120IR can transmit HDMI signals from sources such as HD STB, PS3, Blu-Ray player, HDMI display card to HD projector, LCD, LED, Full HDTV and other A/V devices over a distance up to 120 meters (CAT6), 100 meters (CAT5e) or 80 meters (CAT5).
Bluetooth Speaker Set

The best music sound ever with the ebode BTS21! Stream your music from any Bluetooth device like Smartphone, tablet or laptop to the BTS21 and you are assured of great audio quality with this wireless 2.1 stereo set. The BTS21 speakers and subwoofer will give your music an extra dimension with powerful and clear sound.
IR Link Pro Flush

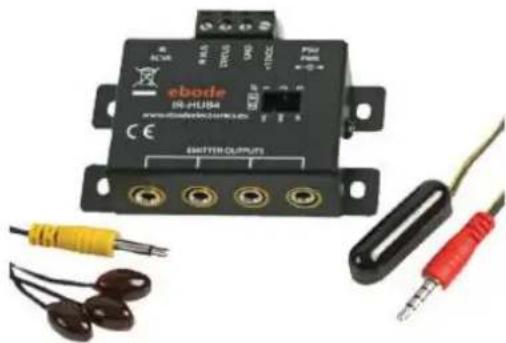
The IR Link Pro Flush is a mains powered InfraRed Extender System that allows full remote control operation of audio/video components (such as your Blu-ray Player, A/V Receiver, DVR, Satellite Box, Cable Tuner, etc.) which are located behind closed cabinet doors, in other rooms, or other concealed and/or out-of-sight locations.
IR Link Pro Mini
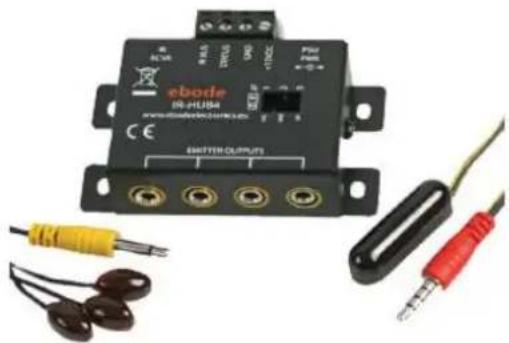
The IR Link Pro Mini is a mains powered Infrared Extender System that allows full remote control operation of audio/video components (such as your Blu-ray Player, A/V Receiver, DVR, Satellite Box, Cable Tuner, etc.) which are located behind closed cabinet doors, in other rooms, or other concealed and/or out-of-sight locations.
ebode is focusing on wireless audio and video products, that are affordable, innovative and plug & play. The products provide you with comfort in your home, help you to avoid wires, and make sure you can stream your personal audio and video to where ever you want to look or listen to it. For more ebode products and information, please visit www.ebodeelectronics.eu.
Also available from ebode: Bluetooth Speaker and Bluetooth receiver
HDMI Extender

The HD120IR HDMI Extender over single CAT5e/6 with IR is designed to convert and transmit HDMI signal to standard TCP/IP by internet cable or LAN. With the advantage of TCP/IP standard with 38KHz IR, the HD120IR can transmit HDMI signals from sources such as HD STB, PS3, Blu-Ray player, HDMI display card to HD projector, LCD, LED, Full HDTV and other A/V devices over a distance up to 120 meters (CAT6), 100 meters (CAT5e) or 80 meters (CAT5).
IR Link Pro Flush

The IR Link Pro Flush is a mains powered InfraRed Extender System that allows full remote control operation of audio/video components (such as your Blu-ray Player, A/V Receiver, DVR, Satellite Box, Cable Tuner, etc.) which are located behind closed cabinet doors, in other rooms, or other concealed and/or out-of-sight locations.
Bluetooth Speaker Set

The best music sound ever with the ebode BTS21! Stream your music from any Bluetooth device like Smartphone, tablet or laptop to the BTS21 and you are assured of great audio quality with this wireless 2.1 stereo set. The BTS21 speakers and subwoofer will give your music an extra dimension with powerful and clear sound.
IR Link Pro Mini
The IR Link Pro Mini is a mains powered Infrared Extender System that allows full remote control operation of audio/video components (such as your Blu-ray Player, A/V Receiver, DVR, Satellite Box, Cable Tuner, etc.) which are located behind closed cabinet doors, in other rooms, or other concealed and/or out-of-sight locations.
ebode is focusing on wireless audio and video products, that are affordable, innovative and plug & play. The products provide you with comfort in your home, help you to avoid wires, and make sure you can stream your personal audio and video to where ever you want to look or listen to it. For more ebode products and information, please visit www.ebodeelectronics.eu.
NOTES
ebode
www.ebodeelectronics.eu


- Contents of the kit:
- Technical Specification:
- Quick Start Guide
- Conformity of Use
- Safety warnings
- Installation Process
- Device Connection
- Procedure
- Login
- Setup Wizard
- Manual Record
- Remote Access
- Network Configuration
- Access to the NVR in LAN
- Access to the NVR in WAN
- Log Out, Reboot or Shutdown
- FAQ
- ebode
- www.ebodeelectronics.eu
- DECLARATION OF CONFORMITY
- User Information for Consumer Products Covered by EU Directive 2002/96/EC on Waste Electric and Electronic Equipment (WEEE)
- Environmental Information for Customers in the European Union
- DECLARATION OF CONFORMITY TO R&TTE DIRECTIVE 1999/5/EC for the European Community, Switzerland, Norway, Iceland and Liechtenstein
- Also available from ebode: Bluetooth Speaker and Bluetooth receiver
- HDMI Extender
- Bluetooth Speaker Set
- IR Link Pro Flush
- IR Link Pro Mini
- NOTES
Brand : EBODE
Model : IPV4NVR
Category : Digital Video Recorder (NVR)