
APPGRABBERV2 - Audio/video converter Approx - Free user manual and instructions
Find the device manual for free APPGRABBERV2 Approx in PDF.
| Product type | USB audio/video converter |
| Brand | Approx |
| Model | APPGRABBERV2 |
| Interface | USB 2.0 Hi-Speed |
| Compatible operating systems | Windows XP / Vista / 7 |
| Video inputs | Composite (CVBS) and S-Video |
| Audio input | Via USB Audio Device |
| Video output formats | MPEG-1, MPEG-2, MPEG-4, VCD, SVCD, DVD, Long DVD, WMV |
| Maximum resolutions | NTSC: 720×480 at 30 fps; PAL: 720×576 at 25 fps |
| Maximum video bitrate | Up to 9.8 Mbit/s (MPEG-2) |
| Maximum audio bitrate | 224 kbit/s (MPEG-1 Layer 2) |
| Main functions | Video capture, real-time recording, editing, DVD/VCD burning |
| Image adjustments | Adjustable brightness, contrast, saturation, color |
| Included software | Honestech VHS to DVD 3.0 SE |
| Box contents | USB grabber, USB cable, user manual, application and driver CD |
| Minimum system requirements | Pentium 4 2.8 GHz, 256 MB RAM, DirectX 9.0c compatible graphics card, USB 2.0 port |
| Power supply | Via USB port |
| Dimensions (approx.) | 8 × 5 × 2 cm (estimate) |
| Weight (approx.) | 50 g (estimate) |
| Maintenance | Keep in a dry place away from dust; do not expose to moisture |
| Safety | Use only with compliant USB ports; do not open the casing |
| Spare parts and repairability | Not specified by the manufacturer; contact Approx customer service |
Frequently Asked Questions - APPGRABBERV2 Approx
User questions about APPGRABBERV2 Approx
0 question about this device. Answer the ones you know or ask your own.
Ask a new question about this device
Download the instructions for your Audio/video converter in PDF format for free! Find your manual APPGRABBERV2 - Approx and take your electronic device back in hand. On this page are published all the documents necessary for the use of your device. APPGRABBERV2 by Approx.
USER MANUAL APPGRABBERV2 Approx
natural_image
Windows XP desktop wallpaper showing the Blue Sky with a stylized logo (no text or symbols on the screen)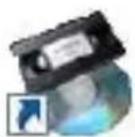
honestech VHS to DVD 3.0 SE
3.2 PASO 2 – EDITAR
natural_image
Two-panel image showing a soccer player in action and a sailboat on water with clouds in the sky (no text or symbols)3.2.3 APLICAR Y GUARDAR
- Formato DVD/VCD (MPEG)
- Formato DV-AVI
- Formato Windows Media (WMV)
1. PRODUCT INSTRUCTION
The product adopts the latest digital audio-video multimedia processing chipset and high-quality TV system tuner, supports 10-bit video decode and 16-bit audio decode. Built-in multinomial audio-video upgrading technology, with high anti-interfere ability. The chroma is vivid. It is fully compatible with USB2.0 Hi-Speed and Plug& Play standard, easily to install and use. The shape is delicate for carrying on conveniently. Use this product, you can capture and record Video/Audio, which makes your computer a family multimedia audio-video center, you can enjoy new digital audio-video life.
2. FEATURES
◆ Support USB2.0 and WINDOWS XP/VISTA/7.
Real-time record and support MPEG1/2/4.
◆ Support 24-bit real color
- The dynamic picture is smooth and can reach 30 frames per minute.
◆ High quality MPEG-1, MPEG-2 compress engine, real-time record standard VCD, DVD.
◆ Brightness, contrast, saturation and chroma adjustable.
- With VIDEO-S-VIDEO and multimedia interface, able to connect with camera, VCD or TV game Player.
3. APPLICATION
◆ Computer photographic, electronic photo.
◆ Audio-video cartoon recording and editing.
◆ VCD, DVD made, webpage made.
4. PRODUCT SPECIFICATION
◆ Support MPEGI/IIcompression.
- Reach 30 frames per second with the resolution 720x480 (NTSC DVD), reach 25 frames per second with the resolution 720x576 (PAL DVD).
◆ Support USB plug & play function.
◆ Support overlay show.
◆ Support Video-background function.
◆ Brightness, contrast, saturation and chroma adjustable.
◆ Support Windows® XP/ VISTA/ 7.
◆ Support USB2.0 (Hi-Speed) standard.
5. SYSTEM REQUIREMENTS
P4-2.8G or higher
256M memory or higher
Support display card with
Windows® XP/ VISTA/ 7
Directx9.0C
A vacant USB2.0 interface
6. PRODUCT LIST
USB Grabber 1 piece
USB Cable 1 piece
User's Manual 1 piece
Drives & Application CD 1 piece
Notice: The above list is only for reference, the list is subject to change without notice.
7. DRIVERS AND APPLICATIONS INSTALLATION
Notice: The driver installation takes Windows XP with English version as an example, but under other operating systems, it may be slightly different.
7.1 Drivers installation
7.1.1 When you put USB GRABBER via USB cable into USB interface, the system will automatically check new hardware and then will prompt the following pictures.
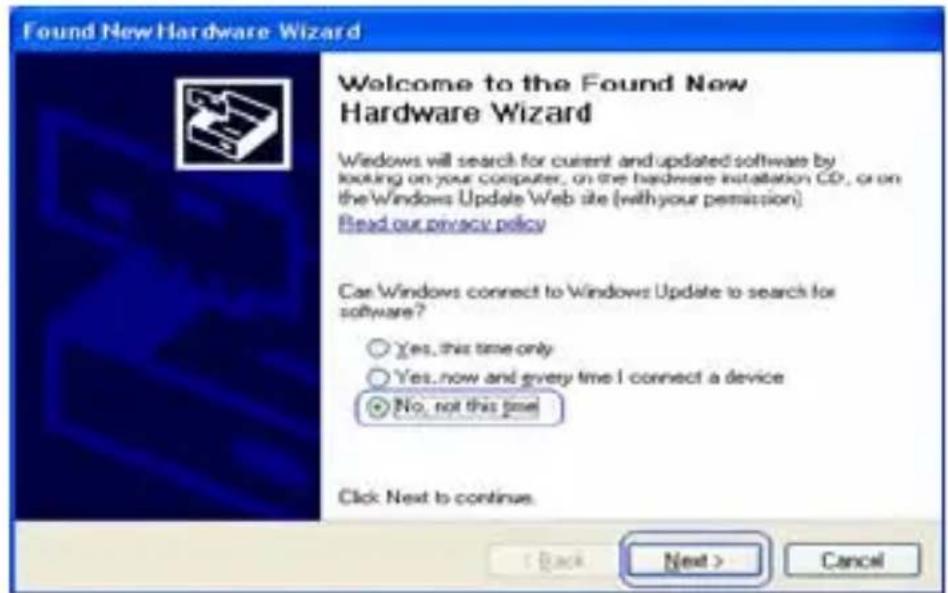
Image 1
7.1.4 Insert the Driver CD into CD-ROM (assumed to be K :). Enter the path "K:\x86" then run "Setup_X86.exe".
7.1.5 Then the following window appears.
Figure 2
7.1.6 Click “OK” button and then the following window appears.
![Hardware Installation The software you are installing for this hardware: Trident Analog Video has not passed Windows Logo testing to verify its compatibility with Windows XP. [Tell me why this testing is important] Continuing your installation of this software may impair or destabilize the correct operation of your system either immediately or in the future. Microsoft strongly recommends that you stop this installation now and contact the hardware vendor for software that has passed Windows Logo testing. Continue Anyway STOP Installation](/content/2026/03/427872/images/44b6ecfd1be1af5b08654b4afe4c4b0a4233a702b56163b841d8299e58374bc2.jpg)
Figure 3
7.1.7 Click “Continue Anyway” button and finish the driver application.
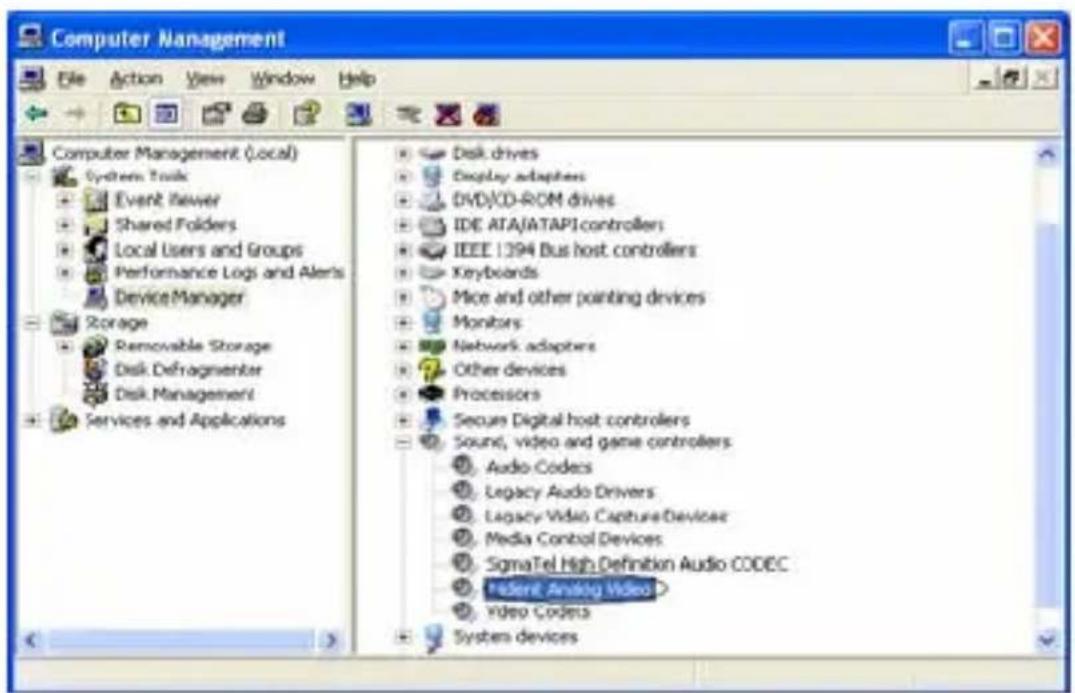
Figure 4
7.1.9 After the driver installation, please confirm "USB2.0 GRABBER" device on the device manager.
NOTE: After you finish installing driver, please restart your PC!
7.2 Application installation
Open the file of SETUP.EXE in the CD, the following window will appear, select the language you need and click “NEXT”.
The installing process will appear:
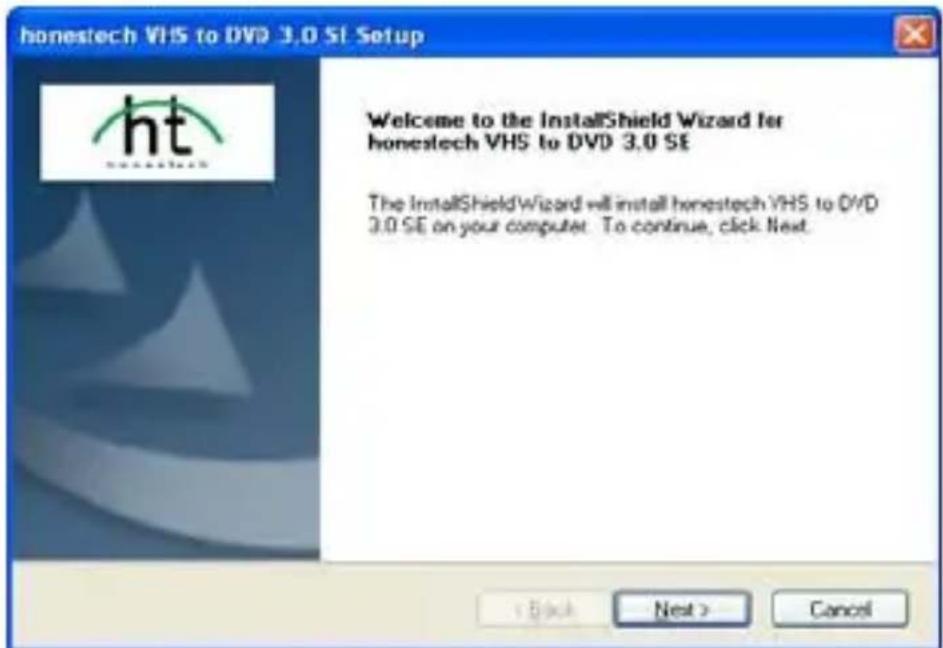
Figure 5
Click "Next"
![honestech VHS to DVD 3.0 SE Setup License Agreement Please read the following license agreement carefully. [c]Honest Technology. All rights reserved. honestech, the honestechlogo, and the honestech products referred to herein are either the trademarks or the registered trademarks of honestech. All other trademarks are property of their respective owners. Information contained herein is subject to change without notice. Software License Agreement. HONESTECH IS WILLING TO LICENSE THE SOFTWARE TO YOU ONLY ON THE CONDITION THAT YOU ACCEPT ALL OF THE TERMS CONTAINED IN THIS LICENSE AGREEMENT. This is a legal agreement between you (either an individual end-user or an entry) and honestech. By using the software, you are agreeing to be bound by the terms and conditions of the Agreement. If you do not agree to the terms of this Agreement do not install or use the software. Promptly remove the software together with all copies and return the software package and other I accept the terms of the license agreement I do not accept the terms of the license agreement Print < Back Next > Cancel](/content/2026/03/427872/images/c103b643dac144acae8aa4a6fa26388d269b8765589931325a1a16f725b3b08d.jpg)
Figure 6
Choose “I accept the terms of the license agreement” and click “Next”
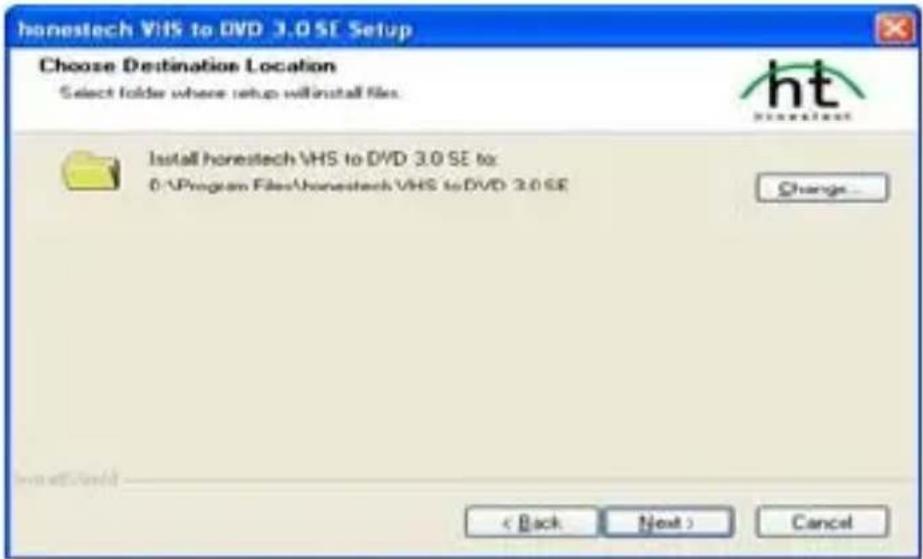
Figure 7
Click "Next"
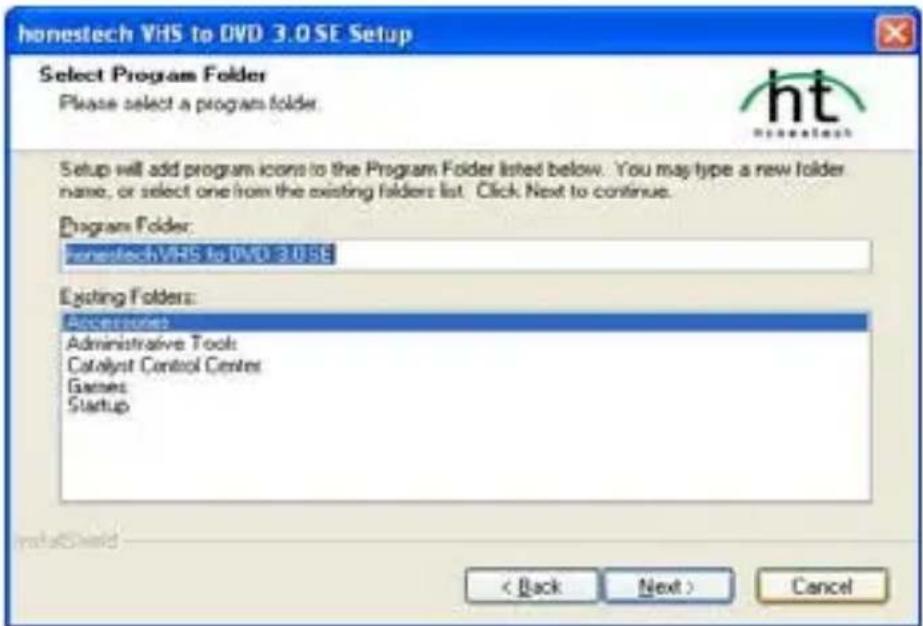
Figure 8
Click "Next"
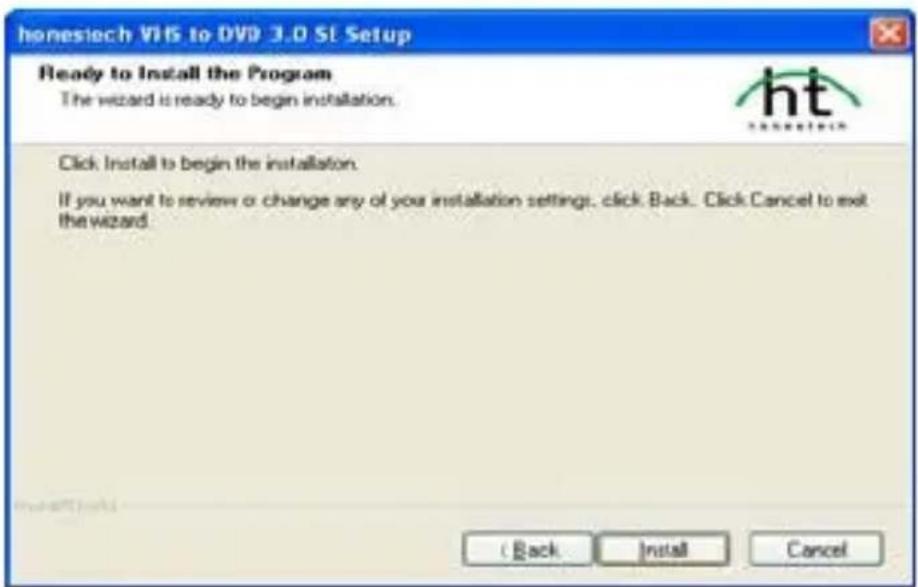
Figure 9
Click "Install".
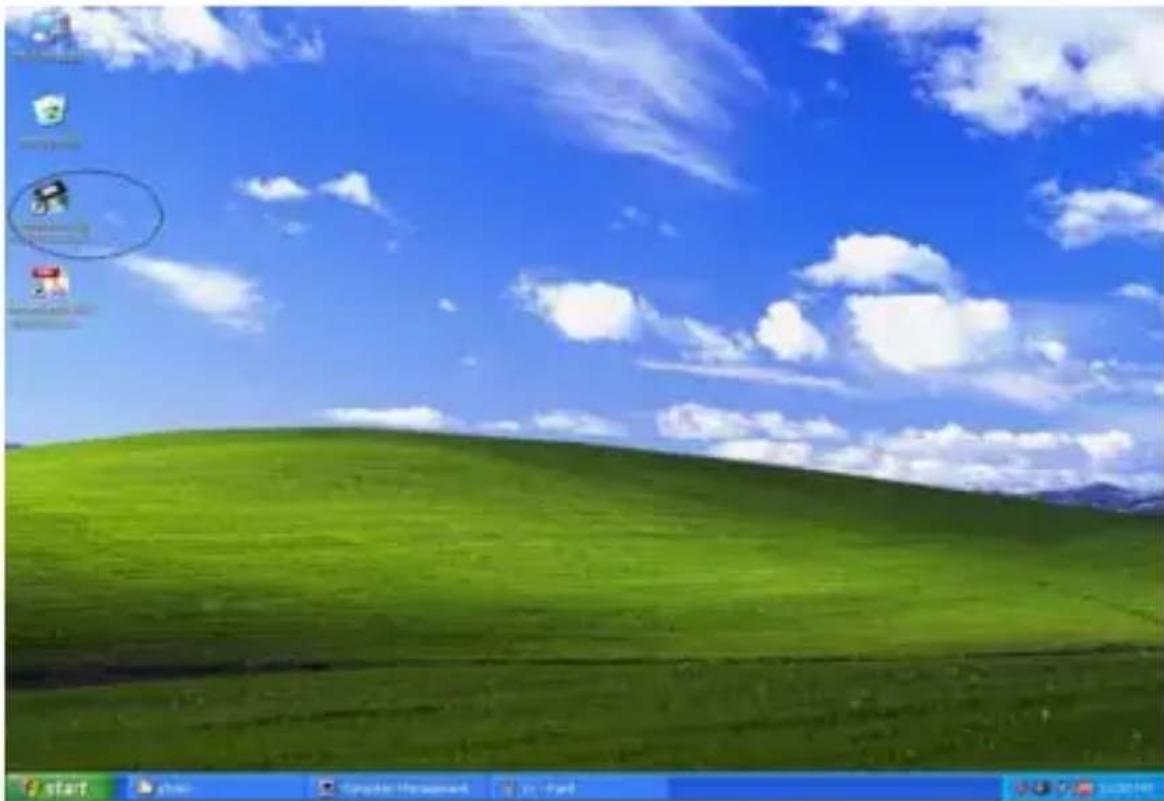
Click “Finish”, And when the following window appears, double click “honestech VHS to DVD 3.0 SE”.
natural_image
Windows XP desktop wallpaper showing a green hill under a blue sky with clouds, no visible text or symbols on the main image area.Figure 10
Open the file of “Product Key.txt”, Copy “KEY” to the following window, and click “OK”.
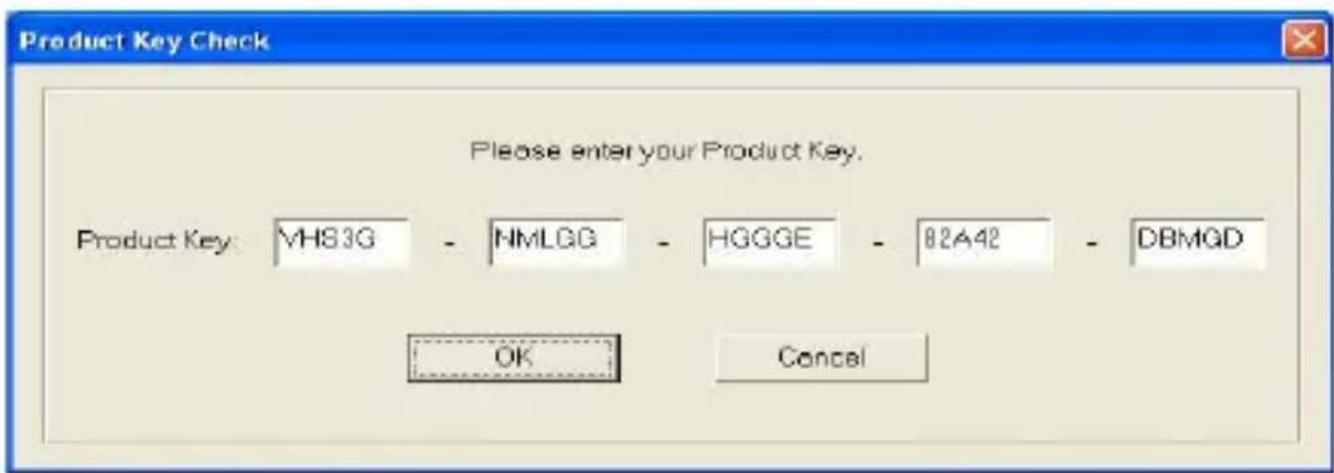
Figure 11
Please refer to the honestech VHS to DVD 3.0 SE User Guide for more operation details.
* After you finish all the installations, please restart the system!!
8 . USING HONESTECH VHS TO DVD 3.0 SE
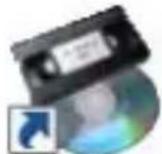
You can start honestech VHS to DVD 3.0 SE by simply double-clicking on this icon.

honestech VHS to
DVD 3.0 SE
Or you can start the program through the Start menu button by clicking Start > All Programs > honestech VHS to DVD 3.0 SE > honestech VHS to DVD 3.0 SE
Following screen will be displayed when the program starts.
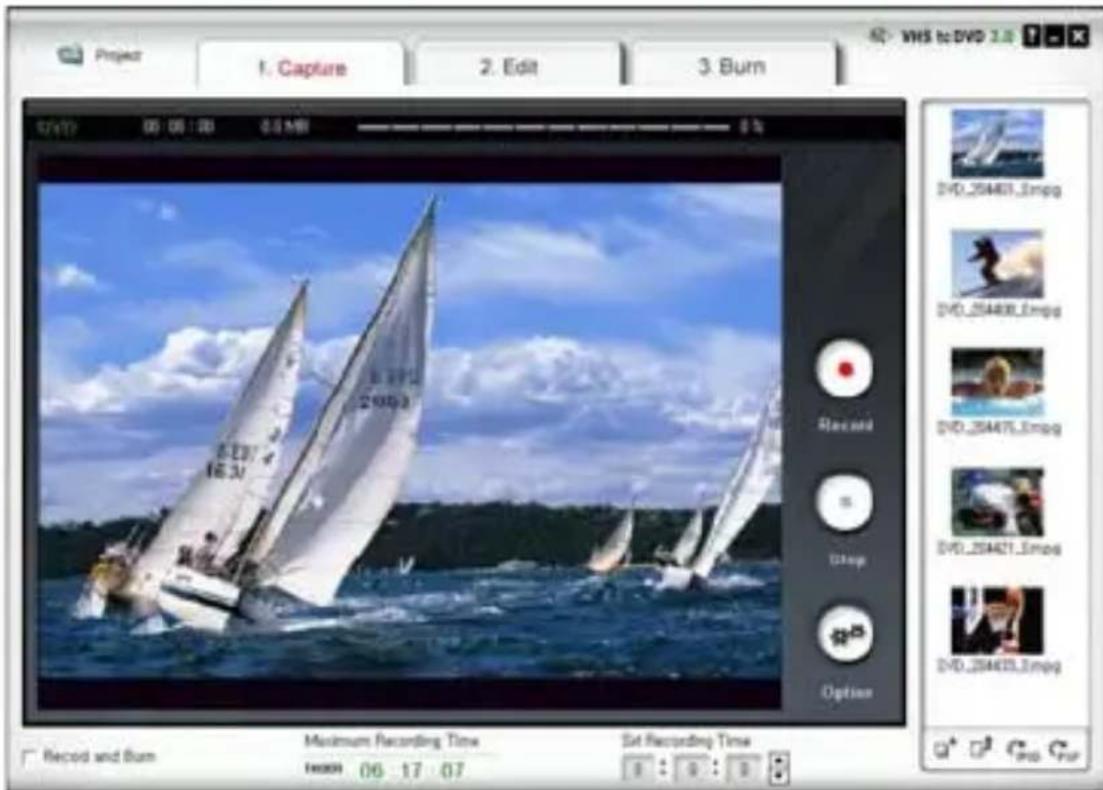
Figure 12
Project options:
- New Project
- Open Project
- Save Project.

A new project will be created when you start honestech VHS to DVD 3.0 SE for the first time. You may choose to save your current project before you exit the program so that you can continue working on the project at another time.
Button

Button

: Shows help file.
: Minimizes the program window.

Button . Exits the program.
8.1. Step 1 – Capture
1. Capture
In this phase, you will capture your video. You must select properly format depending on the type of output you want.
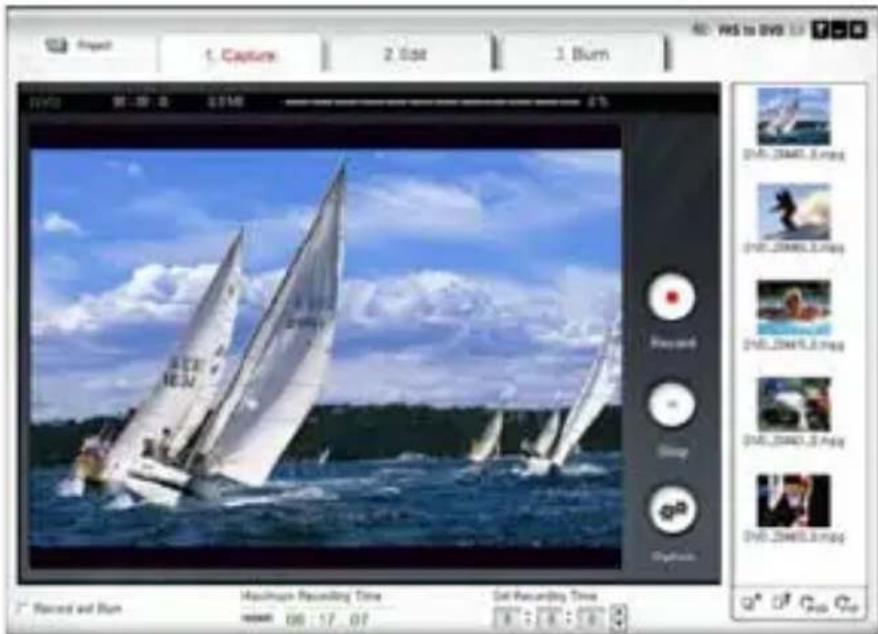
Figure 13
- Option Button

Select your input video device, audio device and the video output format.
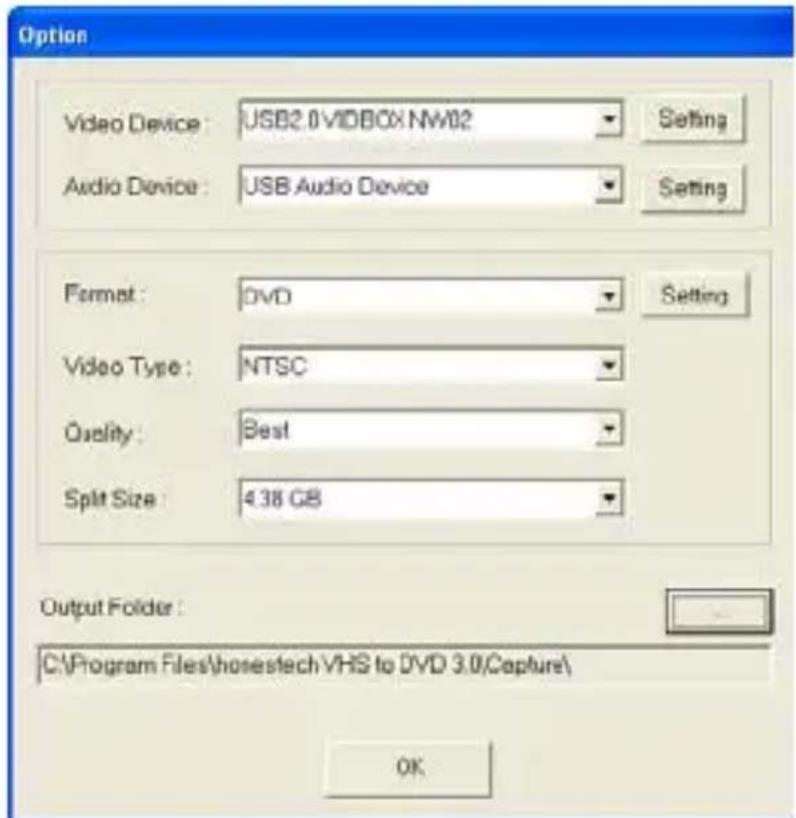
Figure 14
- Selecting Capture Device.
Video Device : USB2.0 VIDBOX NW02 Setting
Using the drop-down menu shown above, you can select the video input device. honestech VHS to DVD 3.0 SE will detect and list all available video input devices.
- Video Device.
Select the video device that you want to use from the list.
- Setting Video Device Settings.
Select input cable type for the video device you selected.
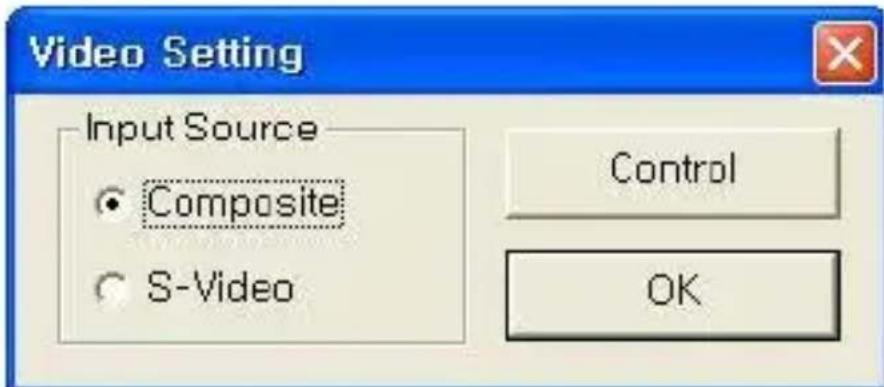
Figure 15
- Selecting Audio Device.

- Audio Device
Select the audio device that you want to use (Select USB Audio Device if you are using USB2.0 Capture Device).
- Setting Audio Device Settings.
Configure the settings of the selected audio device and adjust the volume (if allowed).

Select the output file format from drop down menu. (VCD / SVCD / DVD / LongDVD / WMV).
- Setting Video Format Settings.
- DVD, Long DVD
You can select the DVD/Long DVD Resolution (352*240(288) / 352*480(576) / 720*480(576)). Long DVD format will allow you to record longer video on your writable DVD than the normal DVD format, but it will result in slightly lower video quality.
Note: Selecting higher than the recommended resolution setting may result in dropped frames and poor video quality.
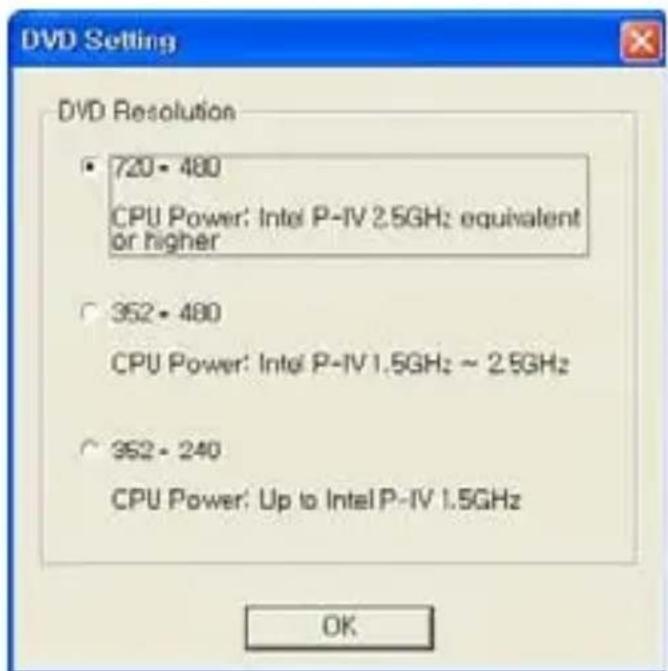
Figure 16
- WMV
Enter the Header Information on WMV files.
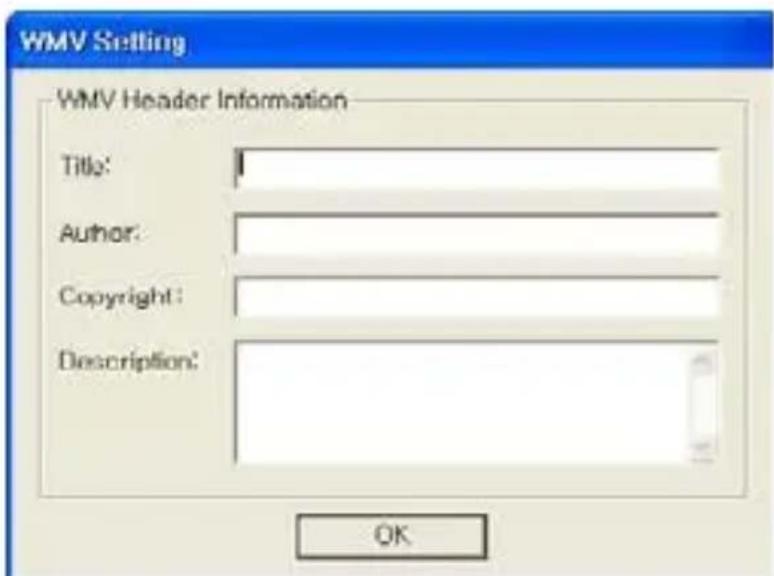
Figure 17
Video Type : NTSC
Select video type (NTSC / PAL; * Select NTSC for North America).
Quality : Best
Adjust the quality of the output file (Best / Good / Normal / Average). The higher quality will result in bigger file size, and the lower quality will allow you to burn longer video on your CD/DVD. Maximum recording time under each setting for DVD.
(This is an approximate calculation, and the result will vary depending on the video/audio type.)
1) Best: 1 hour and 10 minutes
2) Good: 1 hour and 30 minutes
3) Normal: 1 hour and 50 minutes
4) Average: 2 hours and 20 minutes
Split Size : 4.38 GB
Split Size feature automatically splits the capture video file into two or more files if it would become too large to fit on a single DVD/CD. This is a great tool if you have many long videos that cannot fit on a single DVD/CD.
Output Folder :

C:\Program Files\honestech VHS to DVD 3.0\Capture\
Specify the location where the capture video will be saved.
- Record and Burn
When checked, the recording will be made for the duration of time you set, and DVD/CD burning will start automatically afterward. This option makes the whole process automatic.
• Maximum Recording Time
This feature lets you know the maximum amount of video you can capture on your computer. The maximum recording time will depend on the output format and amount of hard drive space available. This is useful when you want to monitor and record activities at home while you are away for a short period of time (Few hours are ideal).
- Set Recording Time
Set the duration of recording, and the recording will stop automatically after the duration you set. This is very useful if you know the length of the movie you are capturing. It is recommended that you always set the recording duration time to prevent the recording from continuing until it reaches the maximum recording time. You can always stop the recording manually before the recording duration time is reached.


- Stop Button. Click to stop the recording. The recorded video will be saved in the output folder.
- Current State. Displays the recording status and the remaining time for the recording duration time or the maximum record time.

8.2. Step 2 – Edit
2. Edit
Once all your videos are captured, you can move on to the edit phase of honestech VHS to DVD 3.0 SE.
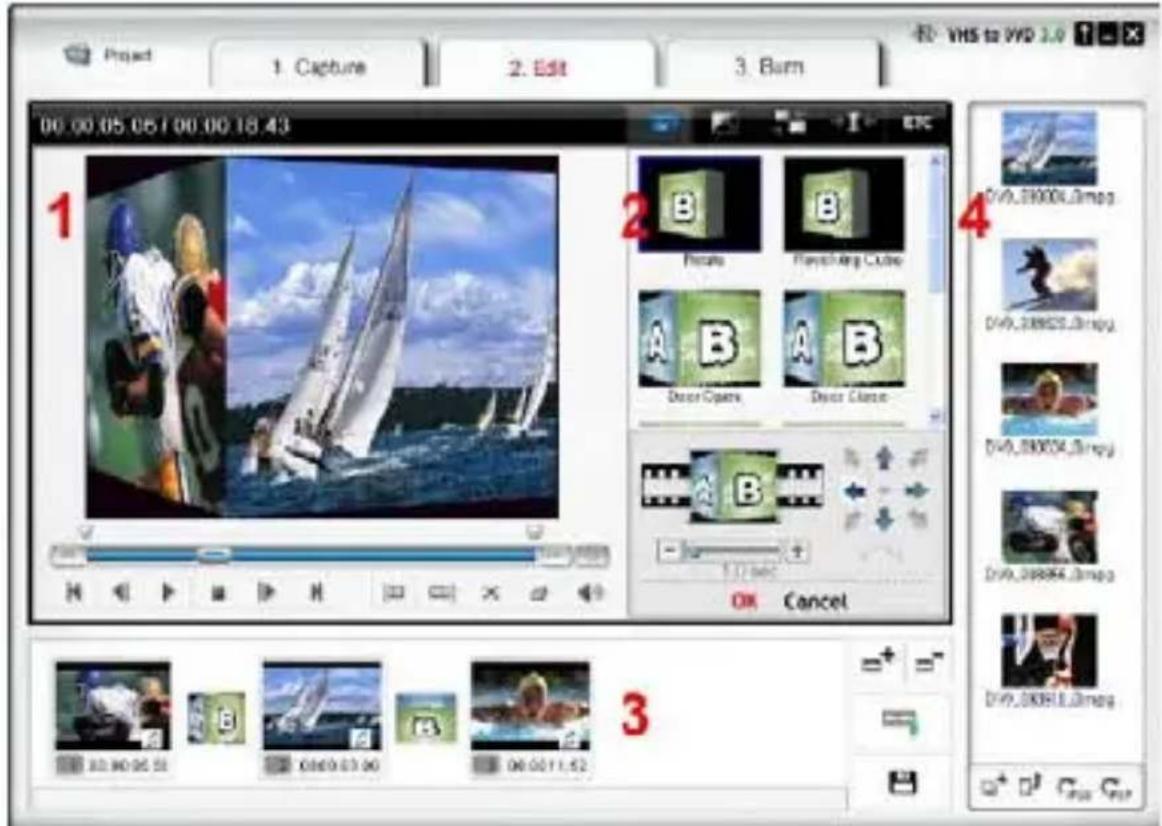
Figure 18
The above image is a screenshot of the Edit Window's Main Window. The Main Window consists of Player, Transition List, Storyboard panels and the File Pool.
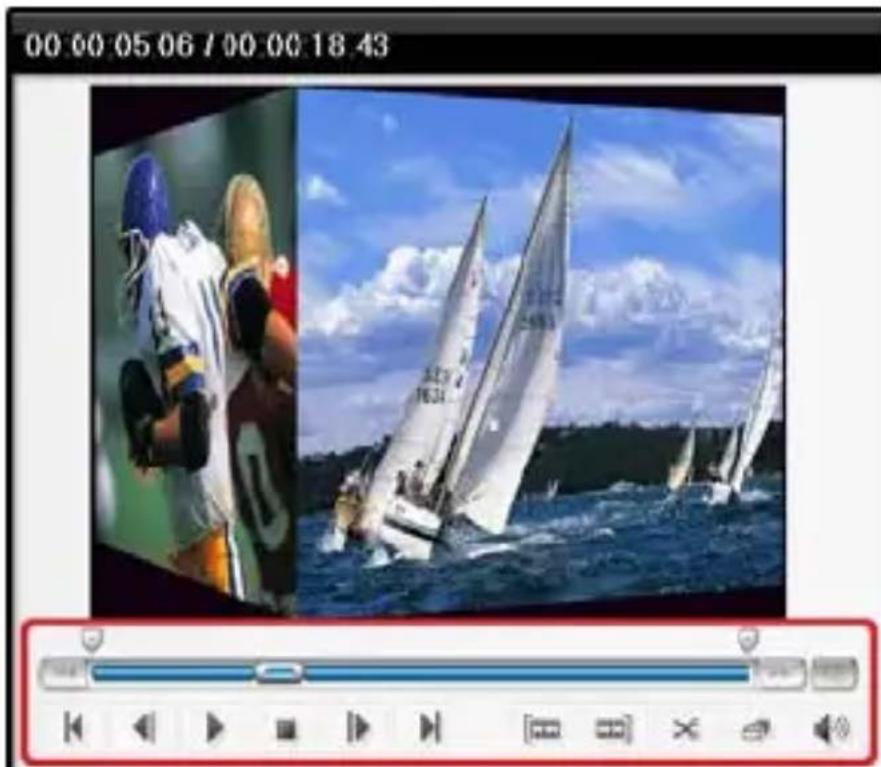
-
Player Panel. This panel has buttons for Play/Pause, Stop, Previous Frame, Next Frame, Cut Clip Start Point, and Cut Clip Endpoint functions.
-
Transition List Panel. Transition allows you to add a video transition between the two clips, like a fade-in-fade-out effect.
-
Storyboard Panel. The Storyboard panel displays clips in thumbnail format in time order.
-
File Pool. The File Pool displays clips in thumbnail format that you have captured. In the EDIT phase, you can trim out unwanted scenes from your recorded video or split one video clip into multiple clips. You can add transition effects between clips or merge multiple clips into one video clip.
- Editing in Storyboard
Editing video clips (or removing unwanted scenes).
-
Play the video in the Play Panel (Double-click on the video clip to play).
-
Position the scroll bar ( ) to the beginning of the segment that you want keep. You can also play the video and
click on Start Edit Point ( ) button at the beginning of the section that you want to keep.
- Position the scroll bar ( ) to the ending of the segment that you want to keep. You can also play the video and click on
End Edit Point ( ) button at the end of the segment that you want to keep.
-
Click on ( ) to cut the file clip. The selected segment will be placed in the Storyboard.
-
Click Merge & Save ( ) button to apply the changes and save the new file from the Storyboard.
NOTE: When you edit a video clip and save, a new clip will be created. Your original file will remain unchanged.
natural_image
Video player in action with two sailboats on water under a blue sky (no text or symbols visible)Figure 19
Merge multiple video clips and add transition effects between scenes.
- Adding a transition effect :
1) Select a transition box (between two clips).

Figure 20
2) In the Transition Properties window, select a transition effect of your choice.
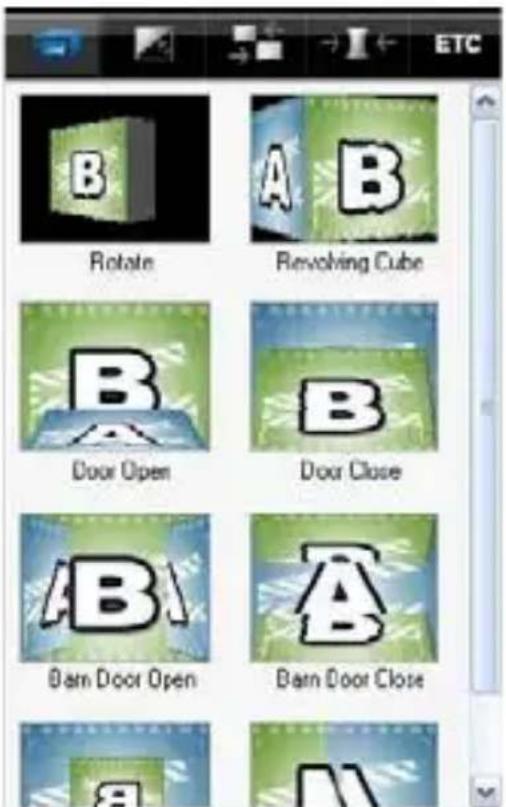
Figure 20
• To change the duration of an image clip :
1) Select an image clip.
2) Right-click on the selected image clip to display a popup menu.
3) From the popup menu, select "Set photo duration..."
4) A window opens in which you can adjust the image duration time.
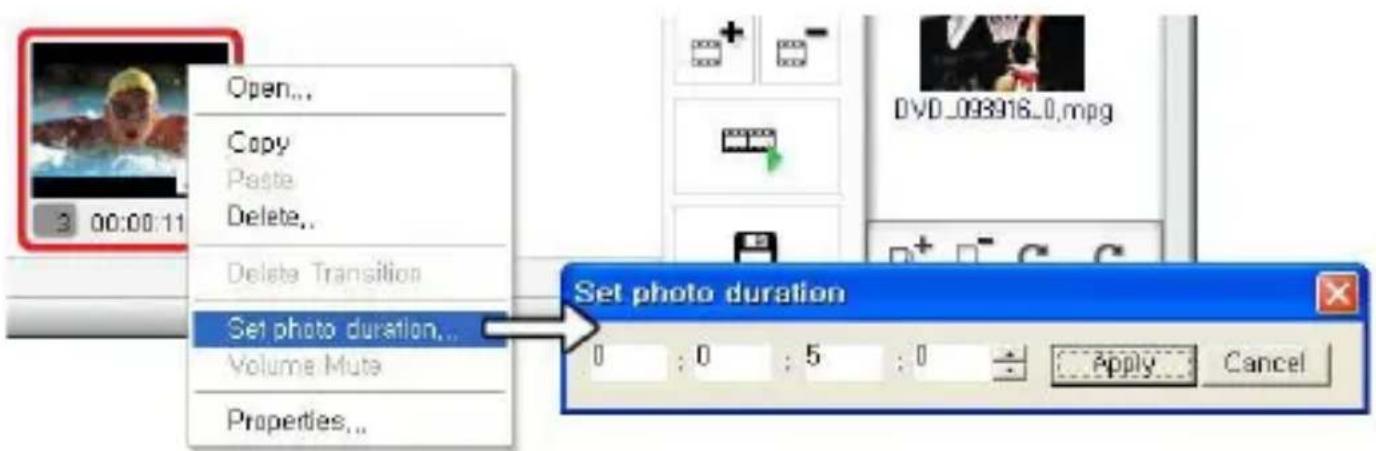
Figure 21
- Transition Effects
Various types of transition effects can be added in between the scenes (clips).

Rotate

Door Open

Door Open

Barn Door Open
Figure 22
- Adding Transition Effects To add a transition effects:
1) Drag a transition effect of your choice to the transition box (between clips) in the Storyboard other to add the transition effect.
2) Once the transition has been added, the Transition Properties window will open to the right of the screen. Here you can set the direction, background color, and number of horizontal and vertical lines.
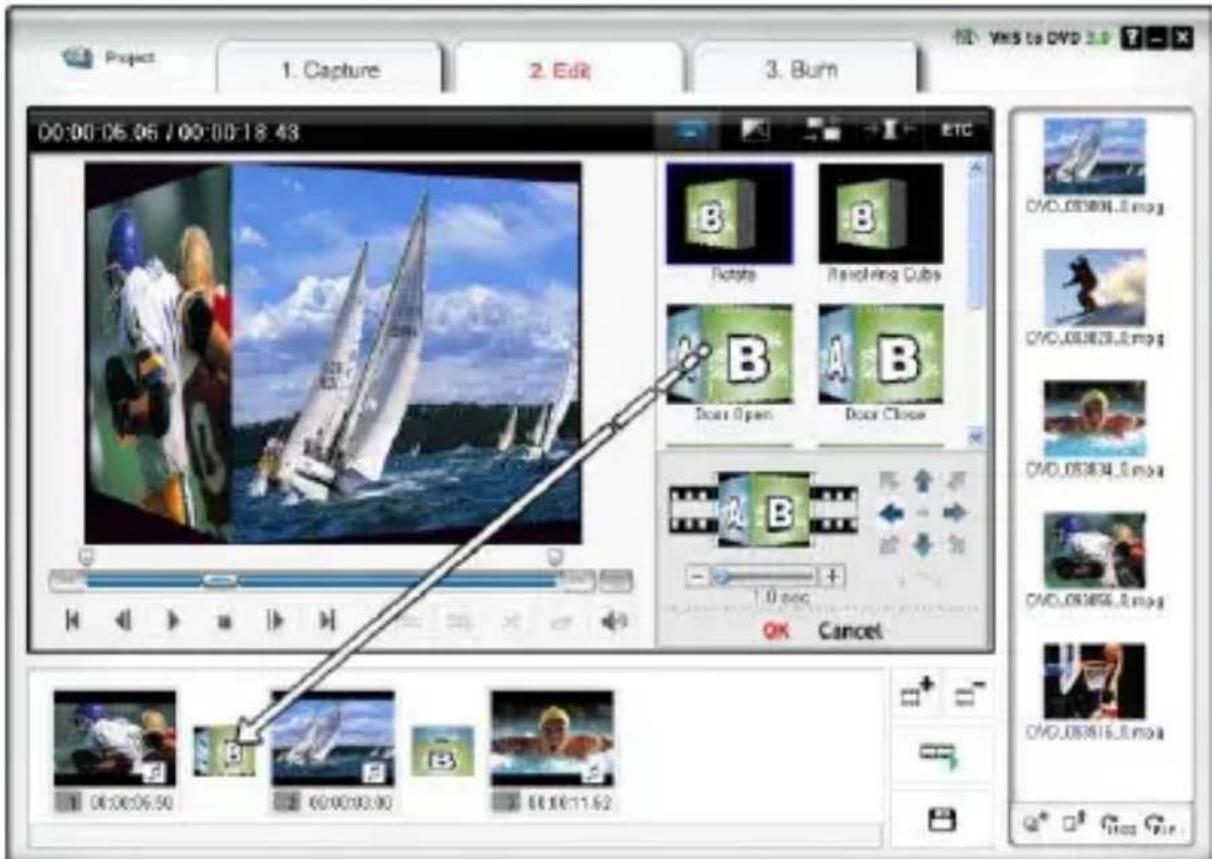
Figure 23
- Applying Transition Effects
When you click on a Transition Box (in between the clips) in the Storyboard, the Transition Properties window opens as shown below. In the Transition Properties window, you can set the
direction and background color of the transition. You can also preview your changes.
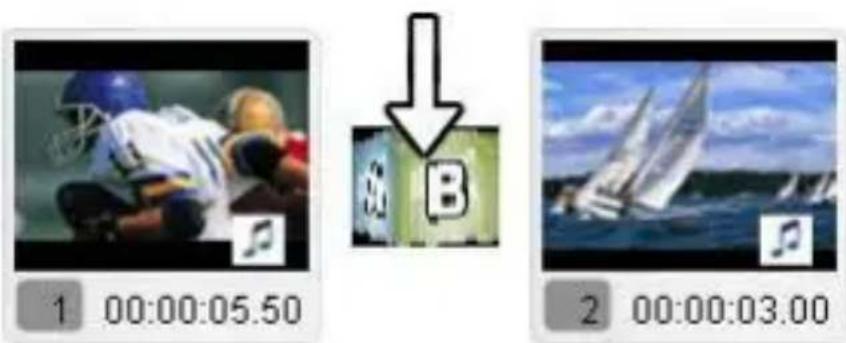
Figure 24
• Transition Properties window
- Preview Window : Provides immediate playback of the edited videos.
- Direction : Set the direction of the transition.
- Section Setup: You can adjust the section where the two clips overlap.
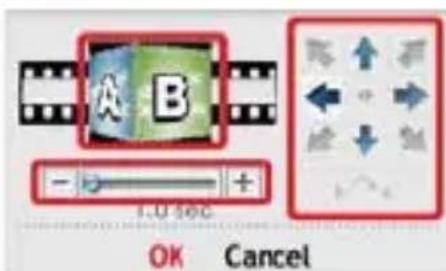
Figure 25
- Merge and Save
This saves the contents edited in Storyboard into a file.
Click button to merge the clips, apply the changes (editing), and save. There are 3 output format options.
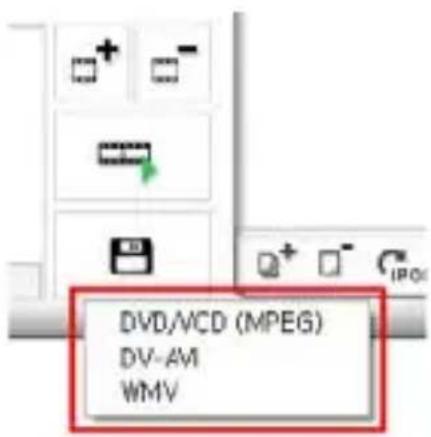
- DVD/VCD (MPEG) Format
- DV-AVI Format - DV-AVI Format
- Window Media (WMV) Format - Window M
- Saving in DVD/VCD(MPEG) Format. • Saving in DVD/VCD(MPEG)
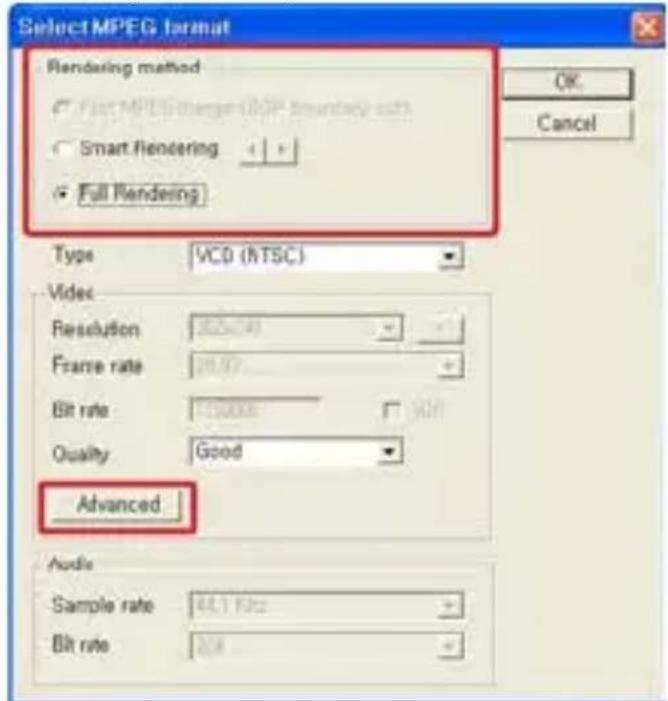
Figure 26
- Fast MPEG merge (GOP boundary cut)
1) Rendering Method : Fast MPEG merge
- All video clips must have identical MPEG formats.
- Makes inserting and deleting frames simple and fast.
- The output video format will match the original MPEG format.
- Customizing of video and audio settings is not possible; function property settings are made inactive.
2) Type : Displays MPEG format of file to be rendered.
3) Video
- Resolution: Video resolution (screen size).
- Frame Rate: Frames per second (fps).
- Bitrate: Number of data bits used per second (bps).
4) Audio
- Sampling Rate: Sampling Frequency (KHz).
- Bitrate: Number of data bits used per second (bps).
- Smart Rendering
1) Rendering Method : Smart Rendering
- Encode a portion or the whole video.
- Only the edited segments of the original video will be encoded.
- If the entire movie clip was edited, the entire movie will be re-rendered.
- When movie clips with different video formats are combined, the format of the output file will be set to match the format of the "base video file". Movie clips with formats that don't match the "base video file" will be re-rendered.
- Select the "base video file" using the Smart Rendering button.
- Although the video settings cannot be changed, the audio settings can be changed.
2) Type : Display MPEG type
3) Video
- Resolution: Video resolution (screen size).
- Frame Rate: Frames per second (fps).
- Bitrate: Number of data bits used per second (bps).
4) Audio
- Sampling Rate: Sampling Frequency (KHz).
- Bitrate: Number of data bits used per second (bps).
- Full Rendering
1) Rendering Method: Full Rendering
- Renders the entire movie. This rendering option will take longer than the other rendering options.
2) Type : Select MPEG type
- Supports MPEG-1 (VCD) and MPEG-2 (SVCD and DVD). Both NTSC and PAL standards are supported.
3) Video
- Resolution: Video resolution (screen size).
- Frame Rate: Frames per second (fps).
- Bitrate: Number of data bits used per second (bps).
4) Audio
- Sampling Rate: Sampling Frequency (KHz).
- Bitrate: Number of data bits used per second (bps).
- Advanced encoding option.
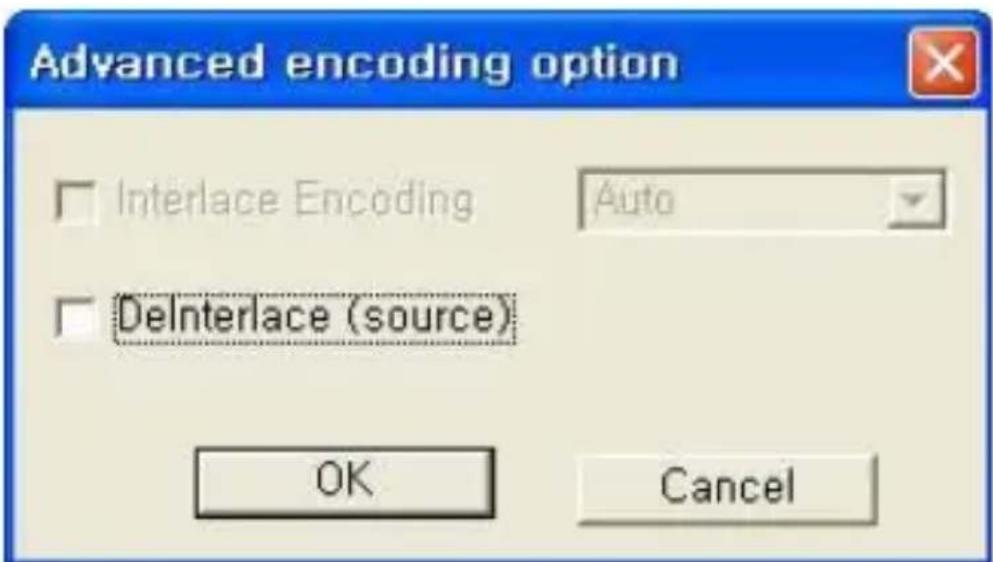
Figure 27
1) Interlace encoding mode:
Encodes each frame by separating the field units into even numbered line fields and odd numbered line fields. You can improve screen quality using this option when horizontal lines appear in the input source screen. When the Interlace Encoding Mode is set, an MPEG file whose frame type is interlaced is created. This option is available only in MPEG2.
2) De-interlace:
Removes the horizontal lines on the screen entered in the frame unit before encoding. If you select the Interlace Encoding Mode above, you don't have to use this option. In addition, if you select De-interlace, you can obtain a good quality MPEG file without using the Interlace Encoding Mode. Interlace Encoding Mode and De-Interlace are very effective when converting DV-AVI files created by Camcorders into MPEG files.
- Saving in DV-AVI Format
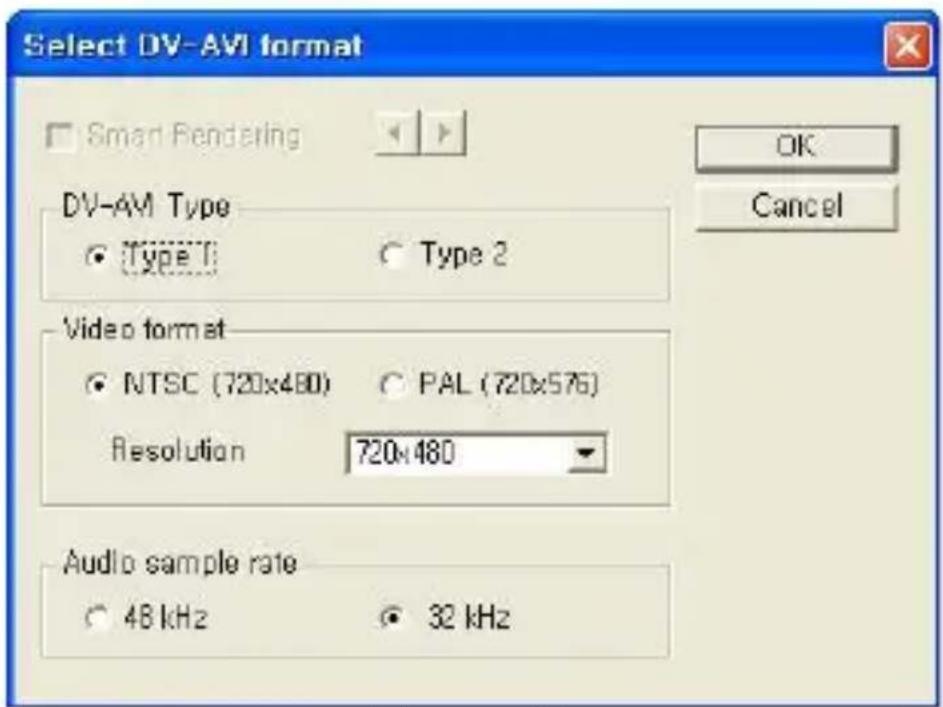
Figure 28
1) Smart Rendering (honestech's intelligent method of encoding edited segments of an original streaming video)
- Encode a portion or the whole video.
- Only the edited segments of the original video will be encoded.
- If the entire movie clip was edited, the entire movie will be re-rendered.
- When movie clips with different video formats are combined, the format of the output file will be set to match the format of the "base video file". Movie clips with formats that don't match the "base video file" will be re-rendered.
- Although the video settings cannot be changed, the audio settings can be changed.
2) DV-AVI Type
- Type 1 : Video file in Digital Video format.
1) Native video format in digital camcorder.
2) Video and audio are in the same stream.
3) Requires a splitter to divide video and audio.
- Type 2 : Video file in general AVI format.
1) Video is compressed in DV format.
2) Video and audio are in separate streams.
3) Must be converted back to type 1 to be transferred to a digital camcorder.
3) Video resolution : Select NTSC or PAL.
- NTSC: 720 x 480 resolution
- PAL: 720x 576 resolution
4) Audio sample rate : Select audio frequency.
- 32kHz
- 48kHz
- Saving Windows Media(WMV) File
- Select a CODEC from the Profile Index.
- Displays the CODEC's setting.
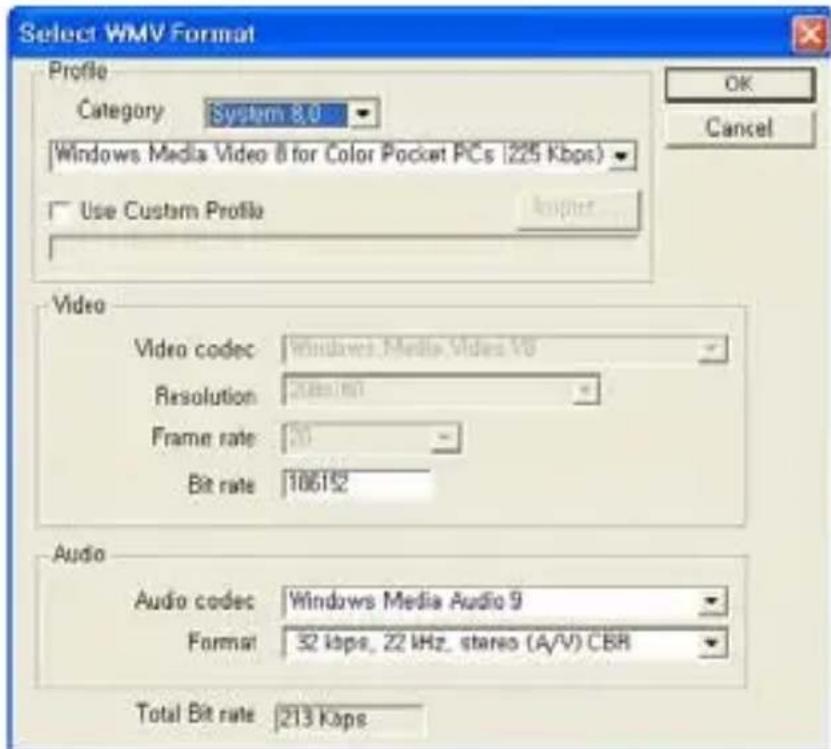
Figure 29
1) Profile: The profile includes the audio and video codec, output video size, audio sample rate, bitrate, etc. You can select a video codec and an audio codec of your choice and create your own custom profile by using Profile Generator of Windows Media Encoder.
- To output using your own custom profile,
1) Check [Use Custom Profile].
2) Click on [Import] button, and import your custom profile.
3) You can modify bitrate, audio codec, and audio format (however, this value cannot be save in the the imported profile.).
4) Click [OK] button to create an output in WMV format. For more information of making a custom profile, please refer to the manual provided by Windows Media Encoder.
- Video: Supports both NTSC and PAL standards (NTSC is used in North America and PAL in Europe).
- Resolution: Video resolution (screen size).
- Frame Rate: Frames per second (fps).
- Bitrate: Number of data bits used per second (bps).
- Audio
- Sampling Rate: Sampling Frequency (KHz).
- Bitrate: Number of data bits used per second (bps).
- Stereo: Audio presentation type (Stereo or Mono)
Contact Microsoft(R) for more information on the settings and uses of Windows Media Format (Video/Audio CODEC). All rights to Microsoft CODECs belong to Microsoft(R).
8.3. Step 3 –Burn
3. Burn
You can burn captured and edited video onto DVD/CD.
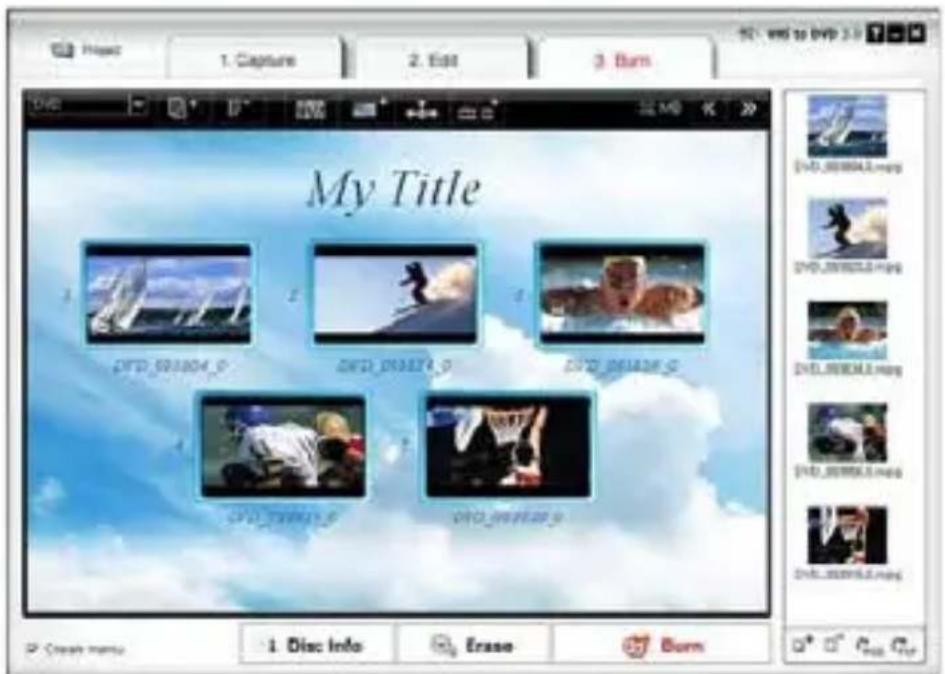
Figure 30
- Select output format

: Select your output format (DVD/Long
- Select background image

: List available background themes.

: List available background images.

: List available navigation buttons.
- Chapters
: Add chapters
- Page navigation

: Previous Page.

xt Page
- Create menu page.
Check this option to add a menu to the DVD.
• Disc management.

Disc Info

Erase
: Displays the disc information.
: Erase the re-writable disc.
- Burn disc.

Burn
: Start burning disc.
- Option:
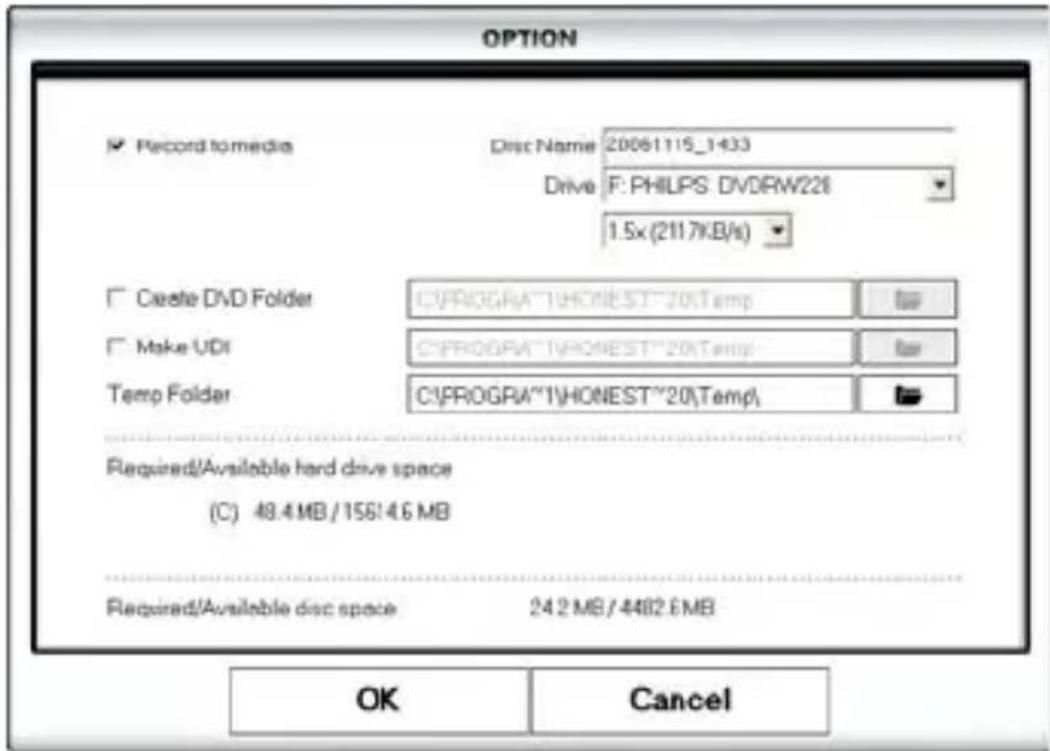
- Record to media Disc name : Enter disc name Drive : Select a DVD writer Write Speed : Select disc writing speed. - Create DVD folder Create DVD video folder (VIDEO_TS) and select a folder where you want to save the DVD video folder. - Create UDI Select a folder where disc image file will be stored. - Temp Folder Select temp folder where the temporary files/folders will be stored.
9. OUTPUT SPECIFICATION
• DVD (Digital Versatile Disk) Spec
- NTSC
- Size: MPEG-2 720 X 480 pixels.
• Video bitrate: Up to 9.8 Mbit/sec.
• Frame rate: 29.97 frames/sec.
• Audio: MPEG-1 Layer2.
- PAL
- Size: MPEG-2 720 X 576 pixels.
• Video bitrate: Up to 9.8 Mbit/sec.
• Frame rate: 25.00 frames/sec.
• Audio: MPEG-1 Layer2.
• VCD (Video CD)
- MPEG1 352 X 240 NTSC
- Size: MPEG-1 352 X 240 pixels.
• Video bitrate: 1150 kbit/sec.
• Frame rate: 29.97 frames/sec.
• Audio: 224 kbit/sec MPEG-1 Layer2.
- MPEG1 352 X 288 PAL
- Size: MPEG-1 352 X 288 pixels.
• Video bitrate: 1150 kbit/sec.
• Frame rate: 25.00 frames/sec.
• Audio: 224 kbit/sec MPEG-1 Layer2.
• SVCD (Super Video CD)
- NTSC
- Size: MPEG-2 480 X 480 pixels.
• Video bitrate: max 2524 kbit/sec MPEG-2 (if the audio is in 224 kbit/sec), audio + video max bitrate is 2748 kbit/sec. • Frame rate: 29.97 frames/sec.
• Audio: from 32 - 224 kbit/sec MPEG-1 Layer2
- PAL
- Size: MPEG-2 480 X 576 pixels.
• Video bitrate: max 2524 kbit/sec MPEG-2 (if the audio is in 224 kbit/sec), audio + video max bitrate is 2748 kbit/sec.
• Frame rate: 25.00 frames/sec
• Audio: from 32 - 224 kbit/sec MPEG-1 Layer2
- Long DVD
- NTSC
- Size : MPEG2 720 X 480 pixels
• Video bitrate : Up to 2.5 Mbit/sec
• Frame rate : 29.97 frames/sec
• Audio : MPEG-1 Layer2
- PAL
- Size : MPEG2 720 X 576 pixels
• Video bitrate : Up to 2.5 Mbit/sec
• Frame rate : 25.00 frames/sec - Audio : MPEG-1 Layer2
- WMV
- NTSC
- Size : Windows Media Video 9 352 X 240 pixels
• Video bitrate : 240 \~760 kbit/sec
• Frame rate : 29.97 frames/sec
• Audio : Windows Media Audio 9 (44.1Khz ,stereo)
- PAL
- Size : Windows Media Video 9 352 X 288 pixels
• Video bitrate : 240 \~760 kbit/sec
• Frame rate : 25.00 frames/sec
• Audio : Windows Media Audio 9 (44.1Khz ,stereo
1. INSTRUCTION PRODUIT
4. SPÉCIFICATIONS PRODUIT
Image 1
Figure 2
Figure 3
Figure 4
Figure 5
Cliquez sur «Next».
![honestech VHS to DVD 3.0 SE Setup License Agreement Please read the following license agreement carefully. [c]Honest Technology. All rights reserved. honestech, the honestech logo, and the honestech products referred to herein are either the trademarks or the registered trademarks of honestech. All other trademarks are property of their respective owners. Information contained herein is subject to change without notice. Software License Agreement. HONESTECH IS WILLING TO LICENSE THE SOFTWARE TO YOU ONLY ON THE CONDITION THAT YOU ACCEPT ALL OF THE TERMS CONTAINED IN THIS LICENSE AGREEMENT. This is a legal agreement between you (either an individual end-use or an entity) and honestech. By using the software, you are agreeing to be bound by the terms and conditions of the Agreement. If you do not agree to the terms of this Agreement do not install or use the software. Promptly remove the software together with all copies and return the software package and other I accept the terms of the license agreement I do not accept the terms of the license agreement Print < Back Next > Cancel](/content/2026/03/427872/images/b6e7d4f1907d488af969dacba51a493ccc18c7ad2c4402b79f8aca6359ee3d45.jpg)
Figure 6
Choisissez «I accept the terms of the license agreement» et cliquez sur «Next».

Figure 7
Cliquez sur «Next».

Figure 8
Cliquez sur «Next».

Figure 9
natural_image
Windows XP desktop wallpaper showing a green hill under a blue sky with clouds, no visible text or symbols on the screen.Figure 10
Figure 13
Figure 14
Figure 17
Video Type :
NTSC

C:\Program Files\honestech VHS to DVD 3.0\Capture\
•Maximum Recording Time
- Set Recording Time
natural_image
Video editing interface showing two panels: left shows a soccer player in action, right shows sailboats on water with sky background (no text or symbols)Figure 19
Figure 20
Figure 21
natural_image
Green 3D block with a white letter 'B' on its front face, set against a dark blue background (no text or symbols beyond the letter)Rotate

Door Open

Door Open

Barn Door Open
Figure 22
Figure 25
- Merge and Save
Figure 28
- Select background image

Abbildung 1
Abbildung 2
Abbildung 3
Abbildung 4
Abbildung 5
Abbildung 6
Abbildung 7
Abbildung 8
Abbildung 9
natural_image
Windows XP desktop wallpaper showing a green hill under a blue sky with clouds, no visible text or symbols on the screen.Abbildung 10
Abbildung 13
Abbildung 14
Abbildung 17
Video Type: NTSC
C:\Program Files\honestech VHS to DVD 3.0\Capture
natural_image
Video player in action with two sailboats on the water under a cloudy sky (no text or symbols visible)Abbildung 19
Abbildung 20
Abbildung 20
Abbildung 21
Abbildung 24
• Transition Properties Fenster
Abbildung 25
Abbildung 26
- Schnelles MPEG Verbinden (GOP Boundary Cut)
1) Rendering Methode: Schnelles MPEG Verbinden
1) Rendering Methode: Smart Rendering
1) Rendering Methode: Full Rendering
Abbildung 28
Figura 1
Figura 2
Figura 3
Figura 4
Figura 5
Cliccare su "Next".
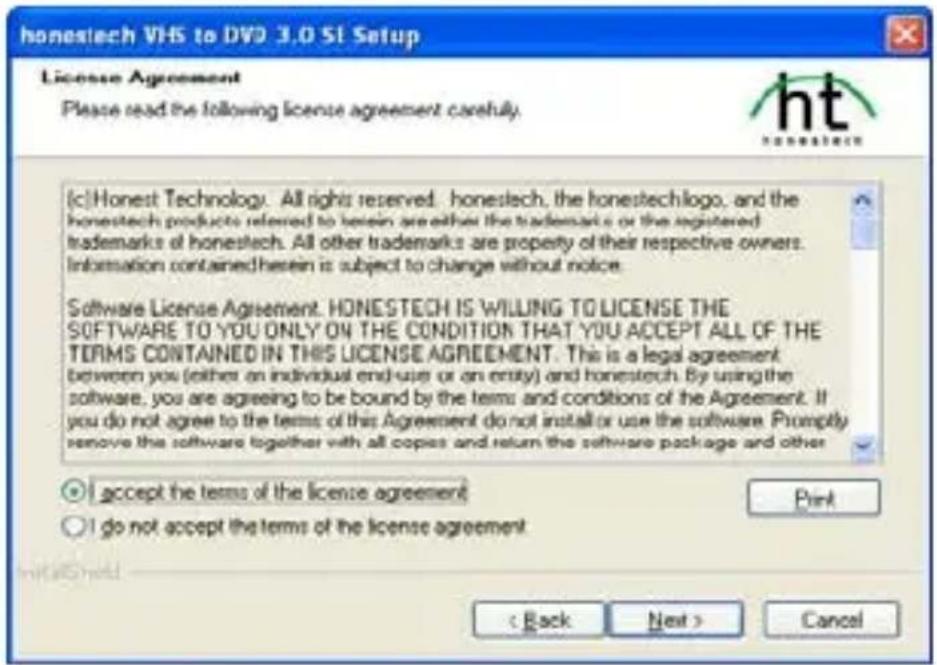
Figura 6
Figura 7
Cliccare su "Next".
Figura 8
Cliccare su "Next".
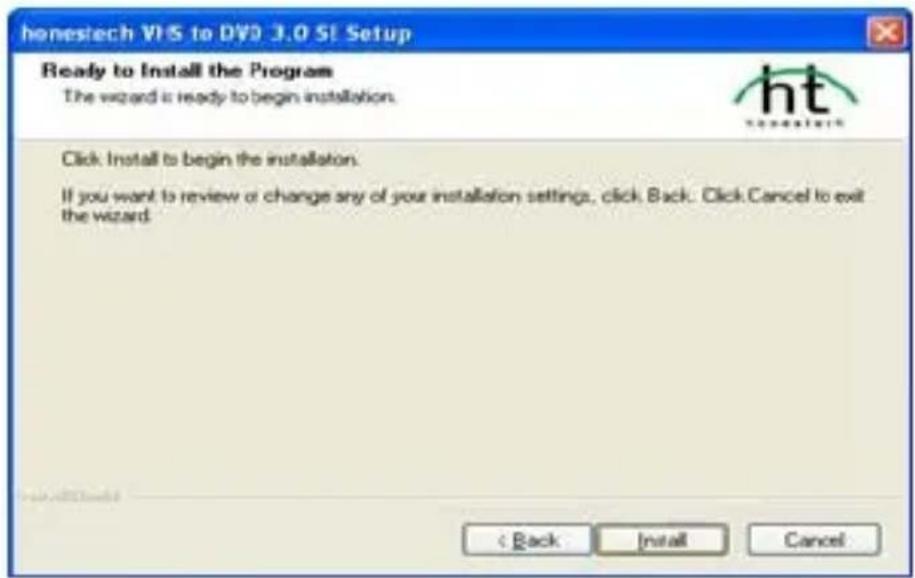
Figura 9
Cliccare su "Install"
natural_image
Windows XP desktop wallpaper showing a green hill under a blue sky with clouds, no visible text or symbols on the screen.Figura 10

honestech VHS to
DVD 3.0 SE
Figura 13

- Tasto opzioni
Figura 14
Figura 17
• Video Type: NTSC
C:\Program Files\honestech VHS to DVD 3.0\Capture
natural_image
Video player in action with two sailboats on water under a cloudy sky (no text or symbols)Figura 19
Figura 20
Figura 20
Figura 21
Figura 24
Figura 25
- Fondi e Salva
Figura 26
Figura 28
1. INSTRUÇÕES PRODUTO
Figura 1
Figura 2
Figura 3
Figura 4
Figura 5
licar em "Next". C
![honestech VHS to DVD 3.0 SI Setup License Agreement Please read the following license agreement carefully. [c]Honest Technology. All rights reserved. honestech, the honestech logo, and the honestech products referred to herein are either the trademarks or the registered trademarks of honestech. All other trademarks are properly of their respective owners. Information contained herein is subject to change without notice. Software License Agreement. HONESTECH IS WILLING TO LICENSE THE SOFTWARE TO YOU ONLY ON THE CONDITION THAT YOU ACCEPT ALL OF THE TERMS CONTAINED IN THIS LICENSE AGREEMENT. This is a legal agreement between you (either an individual end-user or an entity) and honestech. By using the software, you are agreeing to be bound by the terms and conditions of the Agreement. If you do not agree to the terms of this Agreement do not install or use the software. Promptly remove the software together with all copies and return the software package and other ○ I accept the terms of the license agreement ○ I do not accept the terms of the license agreement < Back Next > Cancel](/content/2026/03/427872/images/0aa8bc5544200dc59ea0c2f93cc63e7eab4a835af13ca5f25631eea86d51011a.jpg)
Figura 6
eleccionar “I accept the terms of the license agreement” e S clicar em “Next”.
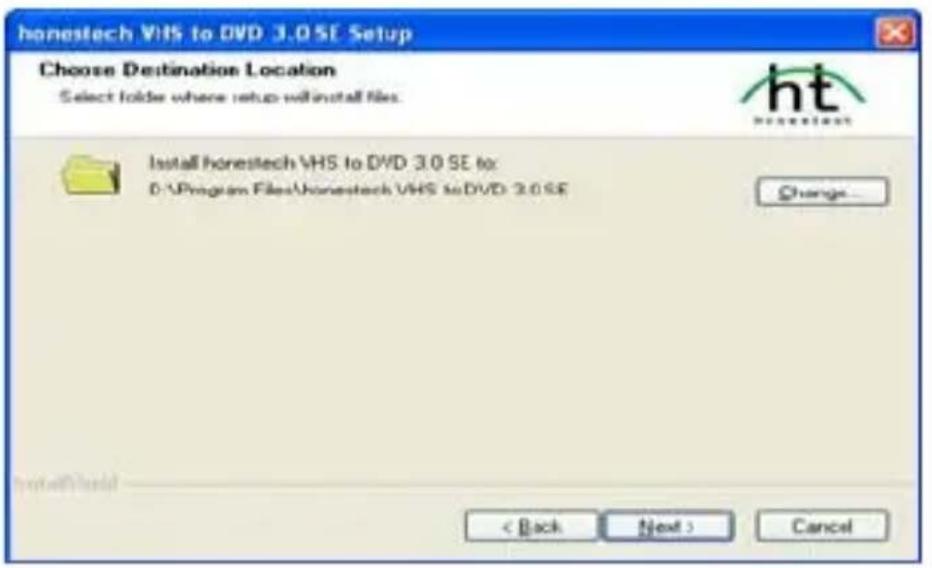
Figura 7
Clicar em "Next".
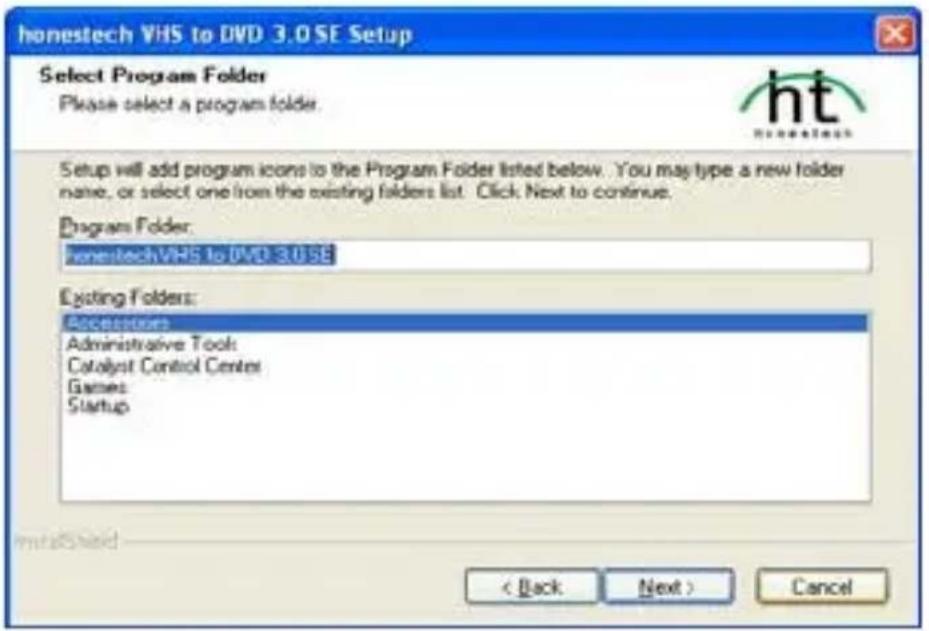
Figura 8
licar em "Next". C
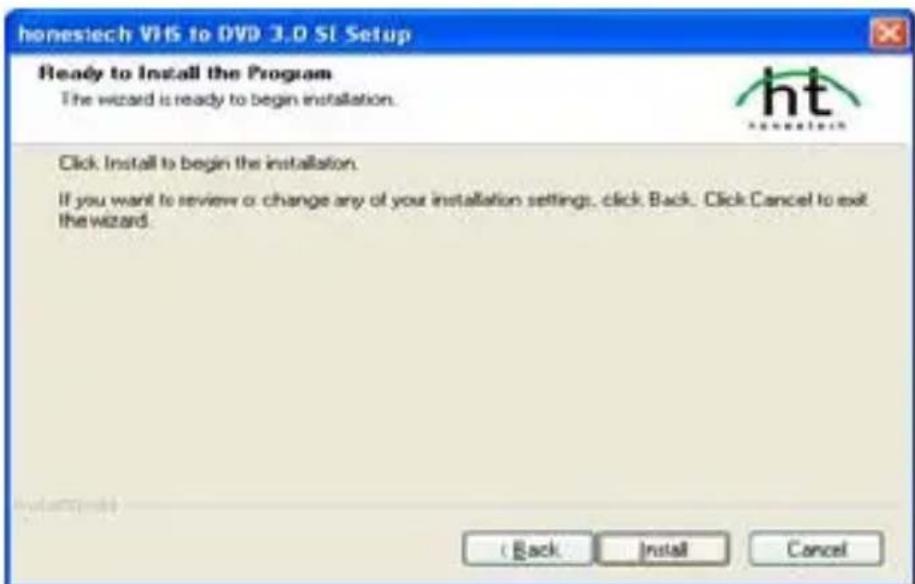
Figura 9
natural_image
Windows XP desktop wallpaper showing a green hill under a blue sky with clouds, no visible text or symbols on the main image area.Figura 10
honestech VHS to
DVD 3.0 SE
Figura 14
Figura 17

C:\Program Files\honestech VHS to DVD 3.0\Capture\
natural_image
Video editing interface showing two sailboats on water with sky background (no text or symbols)Figura 19
Figura 20
Figura 21
Figura 24
Figura 25
- Convergir e Guardar
Figura 26
- PASO 2 – EDITAR
- APLICAR Y GUARDAR
- PRODUCT INSTRUCTION
- FEATURES
- APPLICATION
- PRODUCT SPECIFICATION
- SYSTEM REQUIREMENTS
- PRODUCT LIST
- DRIVERS AND APPLICATIONS INSTALLATION
- Drivers installation
- Application installation
- . USING HONESTECH VHS TO DVD 3.0 SE
- Step 1 – Capture
- Capture
- - Option Button
- - Selecting Capture Device.
- - Video Device.
- - Setting Video Device Settings.
- - Selecting Audio Device.
- - Audio Device
- - Setting Audio Device Settings.
- - Setting Video Format Settings.
- - DVD, Long DVD
- - WMV
- - Record and Burn
- • Maximum Recording Time
- - Set Recording Time
- Step 2 – Edit
- Edit
- - Editing in Storyboard
- - Adding a transition effect :
- • To change the duration of an image clip :
- - Transition Effects
- - Adding Transition Effects To add a transition effects:
- - Applying Transition Effects
- • Transition Properties window
- - Merge and Save
- - Smart Rendering
- 3) Video
- 4) Audio
- - Full Rendering
- - Advanced encoding option.
- 1) Interlace encoding mode:
- 2) De-interlace:
- - Saving in DV-AVI Format
- Step 3 –Burn
- Burn
- OUTPUT SPECIFICATION
- • DVD (Digital Versatile Disk) Spec
- - NTSC
- - PAL
- • VCD (Video CD)
- - MPEG1 352 X 240 NTSC
- - MPEG1 352 X 288 PAL
- • SVCD (Super Video CD)
- - Long DVD
- INSTRUCTION PRODUIT
- SPÉCIFICATIONS PRODUIT
- - Fondi e Salva
- INSTRUÇÕES PRODUTO
- - Convergir e Guardar
Brand : Approx
Model : APPGRABBERV2
Category : Audio/video converter