Steampower Ultimate AntiCalc FV9606 - Iron TEFAL - Free user manual and instructions
Find the device manual for free Steampower Ultimate AntiCalc FV9606 TEFAL in PDF.

Frequently Asked Questions - Steampower Ultimate AntiCalc FV9606 TEFAL
User questions about Steampower Ultimate AntiCalc FV9606 TEFAL
0 question about this device. Answer the ones you know or ask your own.
Ask a new question about this device
Download the instructions for your Iron in PDF format for free! Find your manual Steampower Ultimate AntiCalc FV9606 - TEFAL and take your electronic device back in hand. On this page are published all the documents necessary for the use of your device. Steampower Ultimate AntiCalc FV9606 by TEFAL.
USER MANUAL Steampower Ultimate AntiCalc FV9606 TEFAL
natural_image
Black and white image of a Tefal iron iron with visible branding and handle (no text or symbols on the device itself)
text_image
Diagram showing a hazard symbol (cross) with an arrow indicating direction, next to a device labeled 'X.X.X' and a warning icon.fig.1
natural_image
Diagram of a mechanical iron with a rotating handle and adjustment knob (no text or symbols)fig.2 fig.3

text_image
Diagram illustrating iron ironing process with labeled component 'BOX' and no power line symbol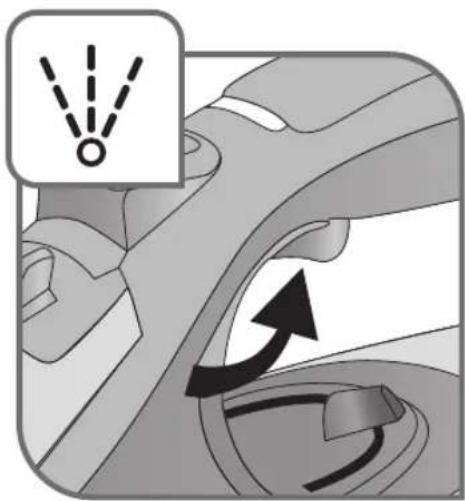
natural_image
Mechanical component diagram showing a belt drive mechanism with no text or symbols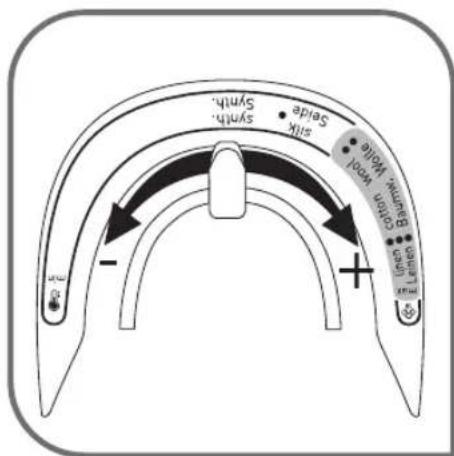
text_image
Syrth Silk Sprink Bare Sprink Sprink Sprink Sprink Sprink Sprink Sprink Sprink Sprink Sprink Sprink Sprink Sprink Sprink Sprink Sprink Sprink Sprink Sprink Sprink Sprink Sprink Sprink Sprink Sprink Sprink Sprink Sprink Sprink Sprink Sprink Sprink Sprink Sprinkfig.4
natural_image
Abstract grayscale illustration of a mechanical or architectural component with no visible text or symbolsfig.5 fig.6
natural_image
Diagram of a car interior showing exhaust airflow and ventilation system (no text or symbols)fig.7
text_image
max screw wool make down +fig.8 fig.9
natural_image
Illustration of a person using an iron to clean clothing, showing the iron being compressed and moving down (no text or symbols)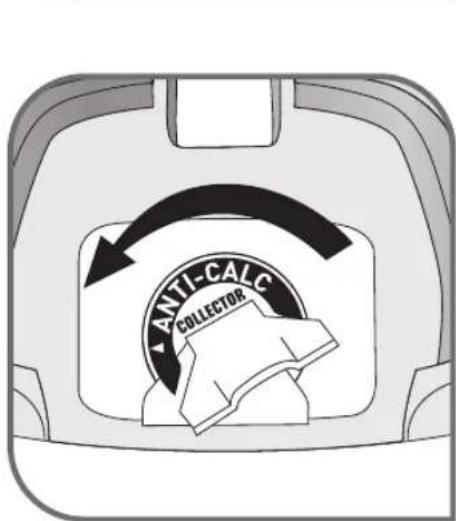
text_image
ANTI-CALC COLLECTOR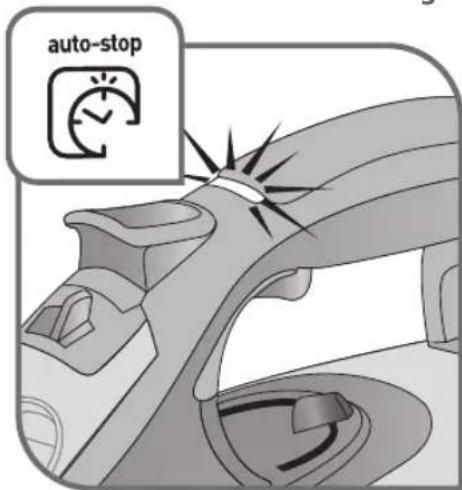
text_image
auto-stopfig.10
text_image
ANTI-CALC COLLECTORfig.11 fig.12
text_image
ANTICALC Collectionfig.13
natural_image
Line drawing of hands connecting a pipe to a sink (no text or symbols)fig.14 fig.15
flowchart
graph TD
    A["Step ①"] --> B["Flow Direction"]
    B --> C["Step ②"]

text_image
CLICK!fig.16
natural_image
Close-up of a hand using a screwdriver to adjust a mechanical component (no text or symbols visible)fig.17 fig.18
natural_image
Illustration of a hand holding a small mechanical component with a diagonal line crossing it (no text or symbols)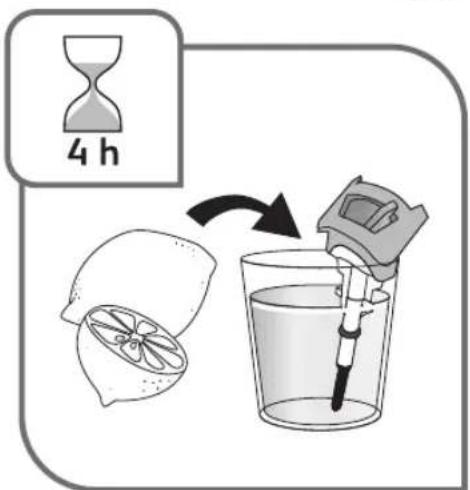
text_image
4 hfig.19

text_image
CLICK!fig.20 fig.21

natural_image
Illustration of hands ironing a steam iron with motion lines indicating process (no text or symbols)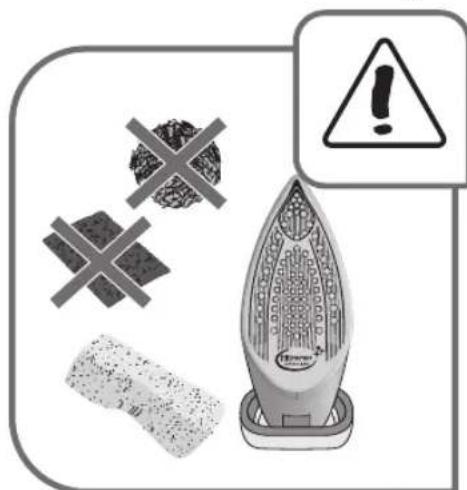
text_image
Warning sign with warning symbol, crossed-out plastic fragments, and a power iron device labeled 'Powering' (Powering)fig.22
text_image
30 min.fig.23 fig.24

natural_image
Illustration of a steam iron being placed on a cord with a power plug, showing rotational motion (no text or symbols)EN Please refer to safety booklet before using your appliance.
DE Bitte lesen Sie sich vor der Benutzung Ihres Geräts die Sicherheitshinweise der Broschüre durch.
FR Merci de lire les recommandations de sécurité avant toute utilisation du produit.
NL Raadpleeg het veiligheidsboekje vóór het gebruik van uw apparaat.
ES Por favor, consulte el folleto de seguridad antes de usar su aparato
PT Queira consultar o folheto de segurança antes de utilizar o aparelho.
IT Consultare il libretto di istruzioni prima di utilizzare l'apparecchio.
DA Læs venligst sikkerhedsbrochuren, før apparatet tages i anvendelse.
SV Läs igenom häftet om säkerhet innan du använder apparaten.
NO Se sikkerhetsheftet før du begynner å bruke apparatet.
FI Lue turvaohjevihko ennen laitteen käyttöä.
EL Ανατρέξτε στο εγχειρίδιο ασφαλείας πριν να χρησιμοποιήσετε τη συσκευή σας.
HU Kérjük, hogy a készülék használatát megelőzően olvassa el a biztonsági tájékoztatót.
CS Předtím, než budete zařízení používat, si přečtěte bezpečnostní brožuru.
SK Pred použitím prístroja si prečítajte brožúru o bezpečnosti.
SL Prosimo vas, da pred uporabo naprave preberete varnostna navodila.
SR Molimo vas da pre upotrebe aparata pročitate brošuricu o sigurnosti.
HR Molimo pogledajte knjižicu o sigurnosti prije uporabe aparata.
RO Vă rugăm să consultați manualul de instrucțiuni înainte de a folosi aparatul.
BG Моля, направете справка с брошурата за безопасност преди да използвате уреда.
TR Lütfen, kullanmadan önce güvenlik bilgileri kitapçığına bkz.
UK Перед використанням пристрою ознайомтесь із довідником із техніки безпеки.
RU Перед использованием устройства обратитесь к руководству по технике безопасности.
PL Przed rozpoczęciem użytkowania urządzenia prosimy przeczytać informacje dotyczące bezpieczeństwa.
ET Enne oma seadme kasutamist tutvuge palun ohutusjuhistega.
LV Pirms ierīces izmantošanas, lūdzu, skatiet drošības bukletu.
LT Prieš naudojantis prietaisu prašome perskaityti saugos instrukcijas.
Description
- Spray
- Cover for filling tank
- Steam control
- Anti-calc valve
- Anti-calc valve release button
- Turbo steam button
- Auto-Stop* safety light (depending on model)
- Power cord
-
Easycord system
-
Thermostat light
- Extra-stable heel
- Spray trigger
- Thermostat control
- Gliss/Glide Protect™ Autoclean soleplate (depending on model)
- Limescale Anti-calc collector unlock tab
- Limescale Anti-calc collector
Before using for the first time
Read the instructions for use carefully.
Remove any labels from the soleplate before heating the iron.
- Before using your iron for the first time in the steaming position, we recommend that you let it function for a few moments in the horizontal position and away from your clothes. Press the turbo steam button several times in this position.
- On first use you may notice a small amount of smoke and odour or a small discharge of particles. This is normal and will quickly disappear.
Preparation
What water to use?
- Your iron has been designed to work with untreated tap water. It is however necessary to clean the scale collector regularly, eliminating all residues.
- Types of water not to use: Heat concentrates the elements contained in water during evaporation. The types of water listed below may contain organic waste, mineral or chemical elements that can cause spitting, brown staining or premature wear of the appliance: water from clothes dryers, scented or softened water, water from refrigerators, batteries, air conditioners, rain water, boiled, filtered or bottled water. Do not use pure distilled nor pure demineralised water. These types of water should not be used in your TEFAL iron.
If your water is very hard, you are able to mix 50% untreated tap water with 50% store bought distilled water.
Filling the tank
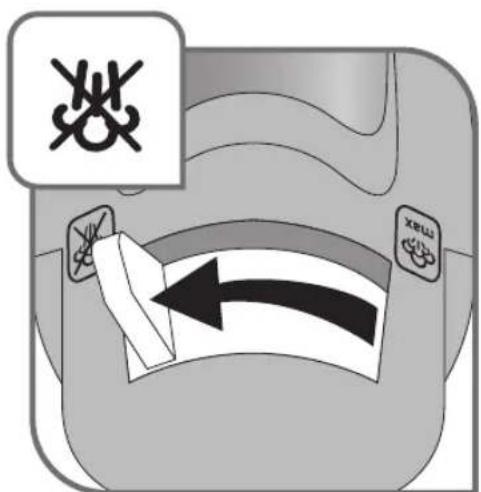
Do not fill your iron through the scale collector orifice. Do not exceed the tank's MAX marking. Do not fill your iron directly under the tap. Do not remove the anti-calc valve to fill the tank.
- Unplug your iron before filling it.
- Set the steam control to fig.1.
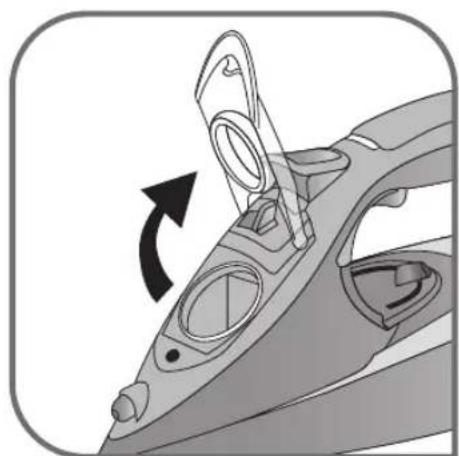
- Hold the iron in one hand and tilt it slightly, pointing the soleplate upwards.
- Open the tank cover – fig.2.
- Fill the tank to the "MAX" marking – fig.3.
- Close the tank cover.
Use
Adjusting the temperature and steam
- Adjust the thermostat control – fig.4, by referring to the table below.
- The light comes on. It will go out when the soleplate is sufficiently hot – fig.5.
| FABRIC | POSITION OF THERMOSTAT CURSOR STEAM SETTING |
| LINENCOTTONWOOL | MAX●●●●● |
| SILK / SYNTHETIC (Polyester, Acetate, Acrylic, Nylon) | ● |
= STEAM ZONE
According to the type of fabric selected, your iron automatically and accurately determines the temperature and steam flow, to guarantee the best result.
RECOMMENDATIONS
- Your iron heats up quickly: start with fabrics that require a low heat, then finish with those that need higher temperatures.
-
If you lower the thermostat, wait for the light to come back on before starting to iron again.
-
If you are ironing a fabric comprising a mixture of fibres: adjust the temperature to the most delicate fibre.
- If you put your thermostat in the "MIN" position, the iron does not become hot.
Using the water spray trigger (spray)
Check that there is water in the tank before using the spray trigger.
- When ironing with the steam or dry function, press the spray trigger several times in succession to remove stubborn wrinkles – fig.6.
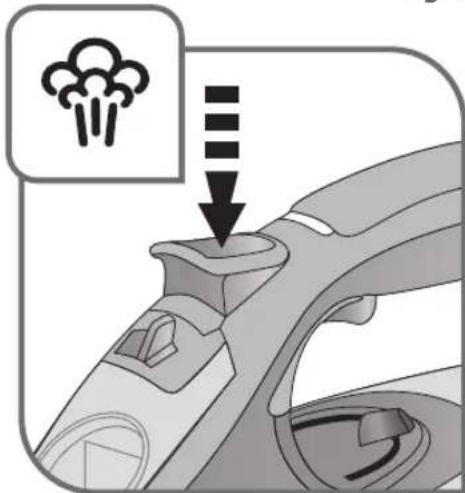
Obtaining more steam
- Set the thermostat control to "MAX" or "●●●".
- Press the turbo steam button from time to time – fig.7.
- To avoid water dripping onto your clothes, wait a few seconds before pressing again.
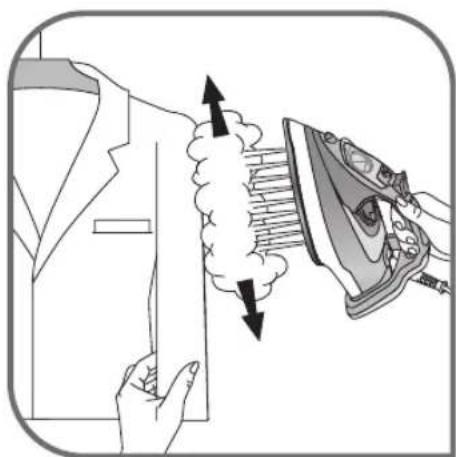
Smoothing garments vertically
Hold the iron a few centimetres from the fabric so as not to burn delicate fabrics.
- Hang the garment on a hanger and hold the fabric using one hand. The steam is very hot so you should always do this with the garment on a hanger – never while someone is wearing it.
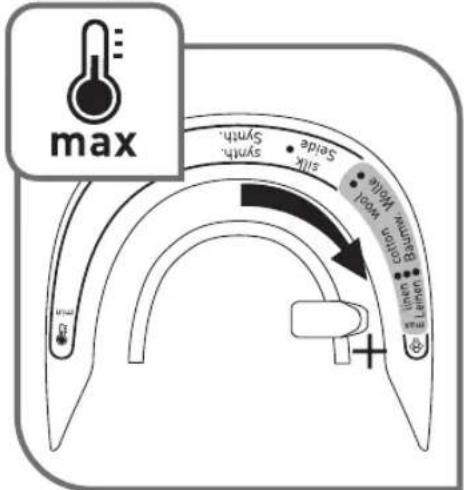
- Set the thermostat control to "MAX" – fig.8.
- Pulse the turbo steam button 🎨 – fig.7 and move from top to bottom – fig.9.
Dry Iron function
- Adjust the temperature to the fabric being ironed.
- Set the steam control to fig.1.
- You can iron when the light goes out.
Additional functions
Gliss/Glide Protect™ autoclean soleplate (depending on model)
- Your iron is equipped with a catalytic self-cleaning soleplate.
- Its exclusive coating permanently eliminates impurities generated during normal use.
- It is recommended that you always rest your iron on its support base to preserve its self-cleaning coating.
In normal use, the auto-stop light is on!
Auto-stop safety function (depending on model)
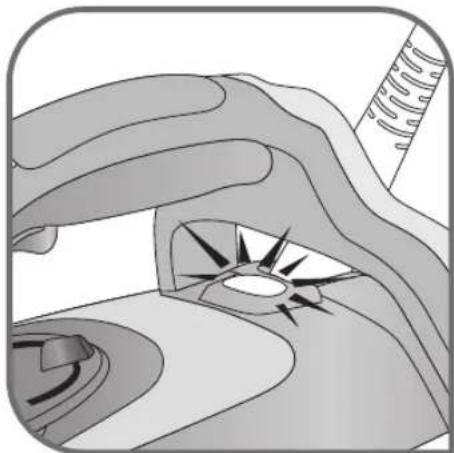
- The electronic system cuts the power and the auto-stop light flashes if the iron is placed on its support base for more than 8 minutes or left flat for more than 30 seconds – fig.10.
- To restart the iron, simply shake it gently until the light stops flashing.
Anti-drip function
- The automatic steam selection function is based on the fabric being ironed, which is integrated into your iron, reduces the steam flow at low temperatures and prevents the iron from dripping onto your clothes.
Cleaning and maintenance
Descale your steam iron easily
Do not put any descaling products (vinegar, industrial descaling agents...) to rinse out your iron: they could damage it.
- To prolong the steam performance, your iron is equipped with an integrated limescale collector. This collector, which is located on the iron's support base, automatically collects limescale that forms inside the iron.
- It is recommended that you clean the collector every 4 months. The amount of scale collected will depend on the hardness of the water.
- BE CAREFUL: this operation should only be carried out when the iron has been unplugged for more than one hour and has cooled down completely. To carry out this operation, the steam iron must be close to a sink so that water can flow from the tank when opened.
- Hold the iron in one hand and tilt it slightly, pointing the soleplate upwards.
To descale the iron:
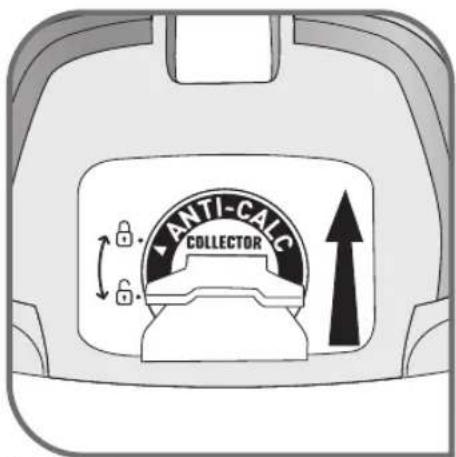
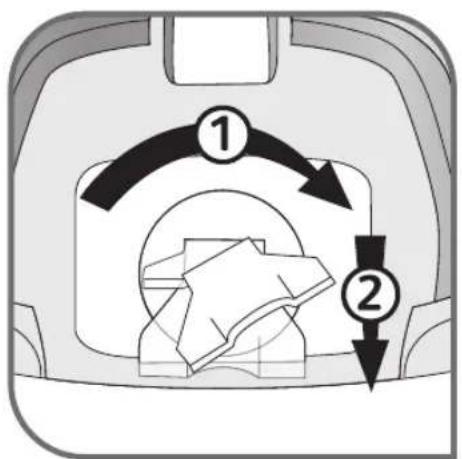
- Once the steam iron has completely cooled down, raise and turn the tab to unlock it – fig.11-12.
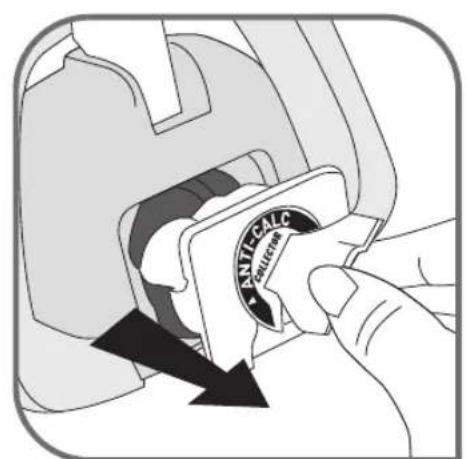
- Remove the collector from the iron, it contains the limescale collected in the iron – fig.13.
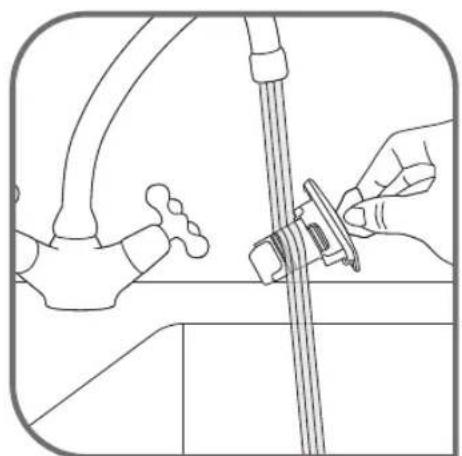
- To clean the collector thoroughly rinse in water to remove the limescale inside – fig.14.
- Reposition the collector in its housing and turn the tab a quarter turn to the right in order to lock the collector and ensure it is watertight – fig.14 and 15.
In addition to this regular maintenance, it is recommended that the self-clean function is performed once a year.
- If you live in a very hard water area, perform the self-cleaning operation on a more regular basis.
- Put the steam button on DRY – fig.1.
- Place the iron on its base with a full tank and set the thermostat to the “MAX” position – fig.8.
- When the light goes out, disconnect the iron and place it over a sink.
- Remove the anti-calc valve.
- Shake the iron lightly and horizontally above a sink until part of the water (with the impurities) flows from behind the appliance – fig.21.
- Once you have finished this operation, replace the anti-calc valve, inserting it until you hear a click – fig.20.
- Plug in your iron and let it stand on its base for 2 minutes in order to clean the soleplate.
- Unplug your iron and when the soleplate is lukewarm, dry it with a soft cloth.
- When you next use your iron, switch it on in the horizontal position, holding it away from you, to remove any water and limescale residue left in the baseplate.
WARNING!
The iron does not work without the limescale collector.
Clean the anti-calc valve (every 4 months)
Warning!
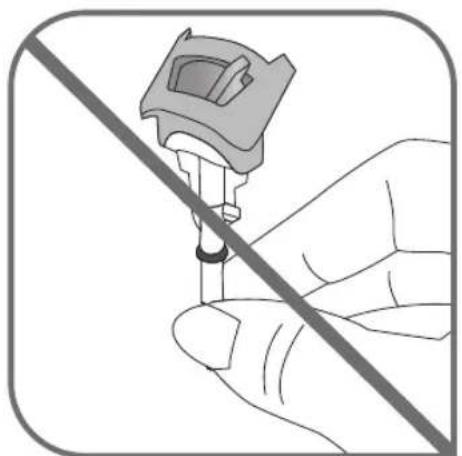
- Never touch the end of the valve – fig.18.
-
The iron does not work without the anti-calc valve.
-
Unplug your iron and empty the tank.
- Set the steam level to dry.
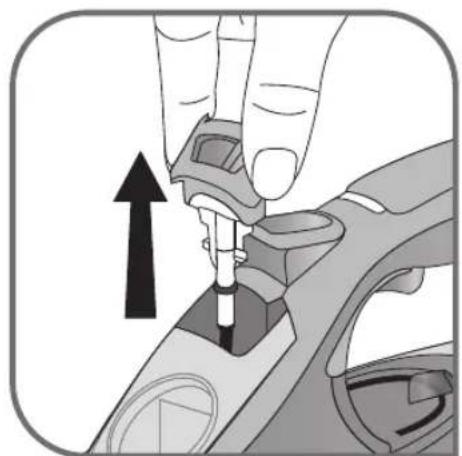
- To remove the anti-calc valve, press the self-clean extraction button fig.16 and pull the valve upwards – fig.17.
- Let the valve soak for 4 hours in a glass of commercially available white vinegar or natural lemon juice – fig.19.
- Rinse the valve under tap water.
- Reposition the anti-calc valve; push it until it clicks – fig.20.
Cleaning the soleplate
Your steam iron is equipped with a self-cleaning soleplate (depending on model):
- Its exclusive active coating continuously eliminates all impurities that can be generated under normal conditions of use.
- Ironing using the incorrect temperature could however leave traces that require manual cleaning. In this case, it is recommended that you use a soft damp cloth on the still warm soleplate so as not to damage clothing.
Your steam iron is equipped with the Ultragliss soleplate (depending on model):
- Clean with a damp non-metallic sponge or damp soft cloth while the soleplate is still warm.
Warning! Using any abrasive sponge damages the self-cleaning coating (according to model) of your soleplate – fig.22.
Do not use corrosive or abrasive products.
Storing your iron
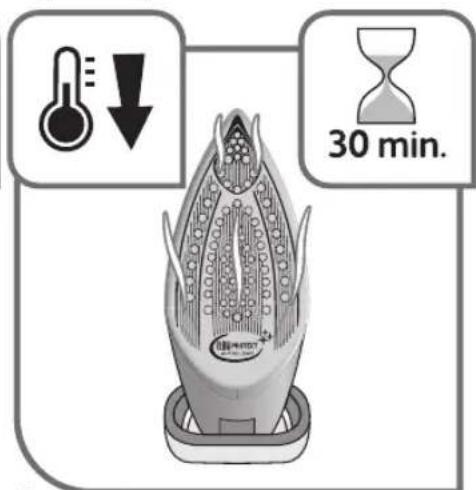
- Unplug it and wait for the soleplate to cool down – fig.23.
- Empty the tank and set the steam control to . A little water may remain in the tank.
- Wind the cord around the heel of the iron. Position the iron on its support base – fig.24.
A problem with your iron?
| PROBLEM POSSIBLE CAUSES SOLUTIONS | ||
| Water flows through the holes of the soleplate. | You are using the steam function when the iron is not hot enough. | Wait for the light to go out. |
| You are using the turbo steam button too often. | Wait a few seconds between each use. | |
| You have stored the iron flat, without emptying it and without setting the control to | See the section «Storing your iron». | |
| The anti-calc valve is not properly positioned. | Correctly position the anti-calc valve: push it until it clicks. | |
| You have put water in the anti-calc collector housing. | Never put water in the anti-calc collector housing. | |
| Brown drips are coming out of the soleplate and staining your clothes. | You are using chemical descaling products. | Do not put any descaling product into the water tank. |
| You are not using the correct water. | Perform a self-clean and consult the «What water to use?» section. | |
| Your clothing has not been rinsed sufficiently or you are ironing a new garment before washing it. | Make sure that your laundry is rinsed sufficiently so as to remove any deposits of soap or chemical products on new clothes. | |
| Fibres have built up in the holes on the soleplate and are burning. | Perform a self-clean. Clean the soleplate with a non-metallic sponge. Vacuum the soleplate occasionally. | |
| The soleplate is dirty or brown and may stain clothes. | The temperature is too high. | Clean the soleplate as advised above. Refer to the temperature chart to adjust the thermostat. |
| You are using starch or you are using starch. | Clean the soleplate as advised above. Spray the starch on the opposite side to that being ironed. | |
| Your iron produces little or no steam. | The tank is empty. Fill it. | |
| The anti-calc valve has collected too much scale. | Clean the anti-calc valve. | |
| Your iron has limescale. | Clean the anti-calc valve and perform a self-clean. | |
| Your iron has been used with the dry function for too long. | Perform a self-clean. | |
| The soleplate is scratched or damaged. | You have positioned your iron flat on a metallic iron support. You have cleaned your soleplate with an abrasive or metallic sponge. | Always rest the iron on its support base. Refer to the section «Cleaning the soleplate». |
| Your soleplate emits particles. | Limescale is starting to build up on your soleplate. | Perform the cleaning and maintenance specified in the instructions. |
| Water is flowing from the tank cover. | You have not closed the cover properly. | Check that the tank cover is properly closed. |
| The iron releases steam or water on filling the tank. | The steam control button is not set to | Check that the steam control button is set to |
| The spray does not release water. | The tank is not full enough. Add water to the | tank. |
| The water flows from the back of the iron. | The collector is not properly positioned in its housing. | Reposition the collector in its housing. |
If you have any problems or queries please contact our Customer Service helpline as listed below.
Environment protection first!
i Your appliance contains valuable materials which can be recovered or recycled.
Leave it at a local civic waste collection point.
Beschreibung
= DAMPFAUSLASSBEREICH
EMPFEHLUNGEN
- Ustaw regulator pary na SEC – fig.1.