
DAB18 - Radio DENVER - Free user manual and instructions
Find the device manual for free DAB18 DENVER in PDF.
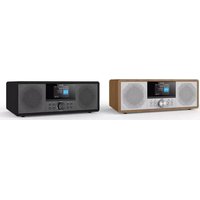
| Product type | DAB+ / FM / Bluetooth / AUX Radio |
| Model | DAB-18 |
| Brand | Denver |
| Mains power supply | Power adapter 100-240 V ~ 50 Hz, output 5 V / 1 A |
| Battery power | 4 C-type batteries (LR14) not included |
| Power consumption | 5 W in operation, 0.082 W standby |
| Radio frequency bands | FM 87.5-108 MHz; DAB 174-240 MHz |
| Bluetooth | Version not specified, frequency 2.45 GHz, range up to 10 m |
| Audio output power | 2 x 2 W (stereo speakers) |
| Main functions | DAB/FM radio, Bluetooth, auxiliary input, alarm, clock, 10 presets per band |
| Display | LCD with backlight, station information display |
| Settings | Volume, tuning, select, scan, info, preset, alarm, wake-up |
| Auxiliary input | 3.5 mm jack socket |
| Antenna | Built-in telescopic antenna |
| Care and cleaning | Wipe with a soft, dry cloth. Do not use abrasive products or solvents. |
| Safety | Do not expose to water or moisture. Do not open. Keep out of reach of children. Use only the supplied adapter. |
| Operating temperature | 0 °C to 40 °C |
| Repairability | Not user-serviceable. Contact qualified service personnel. |
| General information | Compliant with Directive 2014/53/EU. Manufactured by Blue Iron Holdings Limited, Hong Kong. Imported by Denver A/S, Denmark. |
Frequently Asked Questions - DAB18 DENVER
User questions about DAB18 DENVER
0 question about this device. Answer the ones you know or ask your own.
Ask a new question about this device
Download the instructions for your Radio in PDF format for free! Find your manual DAB18 - DENVER and take your electronic device back in hand. On this page are published all the documents necessary for the use of your device. DAB18 by DENVER.
USER MANUAL DAB18 DENVER
- Do not install this equipment in a confined or building-in space such as a book case or unit, and remain a well ventilation conditions at open site. The ventilation should not be in by covering the ventilation openings with items such as newspaper, table-cloths,curtailscent.
- WARNING: Only use attachments/accessories specified or provided by the manufacturer (such as the exclusive supply adapter, batteryetc).
- WARNING: To reduce the risk of fire or electric shock, do not expose this apparatus to any moisture. The apparatus shall not be exposed to dripping or splashing and that objects fill liquids, such as vases, shall not be placed onapparatus.
- WARNING: The batteries (battery pack or batteries installed) shall not be exposed to excess heat such as sunshine, fire or the like.
- WARNING: The direct plug-in adaptor is used as disconnect device, the disconnect device remain readily operable.

- Correct Disposal of this product. This marking indicates that this product should not be disposed with other household wastes throughout the EU. To prevent possible harm to the environment or human health from uncontrolled waste disposal, recycle it responsibly to promote the sustainable reuse of material resources. Toretum your used device, please use the return and collection systems or contact the retailer where the product was purchased.
Safety information
Please read the safety instructions carefully before using the product for the first time.
and keep the instructions for future reference.
- This product is not a toy. Keep it out of reach of children.
- Keep product out of the reach of children and pets to avoid chewing and swallowing.
- Product operating and storage temperature is from 0 degree Celsius to 40 degree
Celsius. Under and over this temperature might affect the function.
- Never open the product. Touching the inside electrics can cause electric shock. Repairs or service
- Do not expose to heat, water, moisture, direct sunlight!
- Please protect your ears against loud volume. Loud volume can damage your ears and risk in
hearing loss. - Bluetooth wireless technology operates within a range of about 10m (30 feet). The maximum communication distance may vary depending on the presence of obstacles (people, metal objects, walls, etc.) or the electromagnetic environment.
- Microwaves emitting from a Bluetooth device may affect the operation of electronic medical
devices. - The unit is not waterproof. If water or foreign objects enter the unit, it may result in fire or electric
shock. If water or a foreign object enters the unit, stop use immediately - Only charge with supplied Adaptor. The direct plug-in adapter is used as disconnect device, the disconnect device shall remain readily operable. So, make sure there is space around the power outlet for easy access.
- Do not use non original accessories together with the product as this can make the product functionality abnormal.
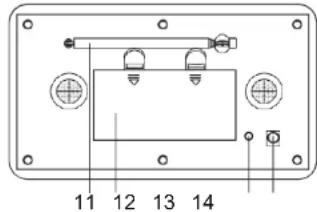
LOCATION OF CONTROLS
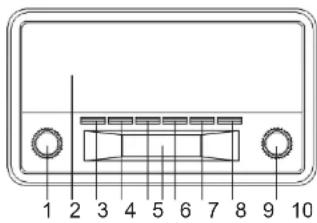
- Volume knob
- Speakers
- Standby
- Scan button
- Preset button
- LCD display
- Info button
- Alarm set button
- DAB/FM/AUX/BLUETOOTH
- Tune/Select knob
- Antenna
- Battery compartment
- AUX in jack
- DC jack
OWER SUPPLY
Insert one end at the supplied power cord to the DC 5V IN Jack located at the rear of the unit. Another end into the Wall outlet.
When the First time used the cord has to be firmly pushed into the socket if does not work or try again to be sure for a positive connection.
To play your unit on batteries, the AC power cord must be disconnected from the player.
Unplug the AC power cord from the unit and insert 4 size "C" batteries (not provided) in the core. Close the battery compartment door.
Note: Ch eck your batteries regularly. Old or discharged batteries should be replaced. If the unit to be used for sometime or is being run exclusively on AC electrical current, remove batteries 1 battery compartment to avoid leakage.
Warning: Before using the unit. Check that the local mains supply is compatible with the Unit D plug or unplug the power cable when your hands wet.
When planning not to use this unit for long periods of time (i.e. Vacation etc.) disconnect the p the wall outlet.
BATTERY SAFETY PRECAUTIONS:
Keep batteries away from children and pets.
Insert the batteries observing the proper polarity (+/-) . Failure to properly align the battery polarit cause personal injury and/or property damage.
Remove old or discharged batteries from the product. Remove the batteries when the product was used for extended periods of time to prevent damage due to rusted or corroded batteries.
Never throw batteries into a fire, do not expose batteries to fire or other heat sources.
Battery Disposal: Old or discharged batteries must be properly disposed of and recycled in com with all applicable laws. For detailed information, contact your local solid waste authority.
Follow the battery manufacturer's safely, usage, and disposal instructions.
OPERATION
Press the Power button to turn the unit on.
IN DAB MODE
Press the DAB/FM/AUX/BT button to select DAB radio mode
Auto select: Press the SCAN button, "SCANNING" will show on the display, and the number of stations will shown on the upper right corner, and it will automatically play the first station. Tune to press the TUNE/SELECT knob to choose the next or previous station.
Manual select: Press and hold the INFO button and tune the "TUNE/SELECT" knob until the "N TUNE" icon shown on the display, then tune the TUNE/SELECT knob to choose the station.
Note: you many have to wait for the unit to tune in to the new channel.
DAB Radio stations presetting:
To receive the desired DAB station, press and hold the PRESET button, "Preset Store" < 1 (E will appear on the display.
Tune the TUNE/SELECT knob to choose your desired program number (1-10) you want stored. Then press TUNE/SELECT knob to store it.
Repeat the same procedures until all the desired radio stations were stored into the program li. Recall the memory, press PRESET button and tune the TUNE/SELECT knob to select the store station as desired. Press the TUNE/SELECT knob to confirm.
IN FM MODE
Press the DAB/FM/AUX/BT button to select FM radio mode, press the SCAN button, when a n found, the frequency on display will stop running and start playback automatically.
If reception is no good, tune the TUNE/SELECT knob to fine tune. FM radio preset is same radio preset
INFO Button
A. The UNIT has DAB information modes which are shown on the bottom line of the display, press the INFO key and tune "TUNE/SELECT" knob to see the available types, press "INFO turn back.
- Full Scan
Full scan the DAB radio channels - Manual Scan
Scan the DAB radio channels manually - Dynamic range compression (DRC) (Off/ High/ Low) This function reduces the difference between the loudest and quietest audio being broadcast.
Effectively, this makes quiet sounds comparatively louder, and loud sounds comparatively c
Note: DRC only works if it is enabled by the broadcaster for a specific station.
- Station Order
The station order can be by alphanumeric or ensemble
- Prune (Yes/No)
Yes- this removes all invalid stations.
No- Keep all stations.
- System
Time
I. Set Time/Date
II. Auto Update
III. Set 12/24 hour format
IV. Set Date formal
Backlight
I. Timout
II. On level
III. Dimmer level
- Languages
Factory Reset
Choose "YES" to clear all settings
SW version
The UNIT has FM information modes which are shown on the bottom line of the display. The INFO key and tune "TUNE/SELECT" knob to see the available types, press "INFO" to
Scan Setting
To select the Strong stations or All stations.
- Audio Setting
To select Forced mono or Stereo allowed
- System
Time
- Set Time/Date
II. Auto Update
III. Set 12/24 hour format
IV. Set Date format
Backlight - Timout
II. On level
III. Dimmer level
Languages
Factory Reset
Choose "YES" to clear all settings
SW version
ALARM 1 SETTINGS
Alarms will only function when the unit is On (mains or battery power) or in Standby mode (M power only).
Alarms can be switched on or off in standby mode (see below), however, the alarm parameters only be set when the unit is on.
To setalarms
Tum the uniton.
To set or change alarm 1, press "ALARM" once, then press "TUNE/SELECT". To set or change 2, press "ALARM" twice, then press "TUNE/SELECT". To exit alarm setting mode, press "ALAR" again.
The alarm setup prompts you for the following parameters. Select a value for each parameter to turn the "TUNE/SELECT" knob and press "TUNE/SELECT" to confirm and move on to the net parameter.
Parameters
- On time - hours and minutes
Duration-15 | 30 | 45 | 60 | 90minutes
If the alarm is not cancelled the unit returns to standby after this time period.
Source-Buzzer/DAB/FM
If DAB or FM is chosen as the audio source you will also be prompted to select the Last plk or one of the preset stations (if set). - Daily | Once | Weekends | Weekdays
Choose the days on which the alarm is active.
Note: if you choose 'Once', you are prompted to enter the required date. - Alarm-Off | On
USING THE AUX INPUT
Connect the AUX connect wire from the out jack of your Personal Player such as portable MP to the AUX input jack.
Press the DAB/FM/AUX/BT button to select AUX mode, "Auxiliary Input" will show on the LCD.
Tum on your Personal Player to begin playing, adjust the volume to desire listening level.
IN Bluetooth MODE
Press the DAB/FM/AUX/BT button to select BLUETOOTH mode
To pair the radio with your phone:
Turn on the Bluetooth function in the phone or tablet. For instructions, see your mobile phone guide.
a. Place the phone within 20 cm (8 inches) of theradio.
b. Please make sure the radio is in BT mode. Choose "DAB-18" on your phone to connect radio Bluetooth. After connected, your phone will show "BTConnected".
c. Enjoy your music with the radio now!
Hereby, Denver A/S declares that the radio equipment type DAB-18 is in compliance with Direc 2014/53/EU. The full text of the EU declaration of conformity is available at the following interr address:Denver.eu and then click the search ICON on topline of website. Write modelnumber: 18Now enter product page, and red directive is found under downloads/other downloads
- Operating Frequency Range: FM 87.5-108.0MHz, DAB174-240MHz
2.Max Output Power:2x2W - Bluetooth frequency: 2.45 GHz
| EN | |
| Manufacturer's name or trade mark, commercial registration number and addre | Blue Iron Holdings Limited Suite Q, 18/F, International Industrial Cie 2-8 Kwei Tai Street, Folan, Shalin, NT, Hong Kong 68231699-000-09-19-5 |
| Model identifier | B112T-050100-BdV |
| Input AC frequency | 100-240V |
| Input voltage | 50Hz |
| Output voltage | 5V |
| Output current | 1A |
| Output power | 5W |
| Average active efficiency | 73.78% |
| Efficiency at low load (10%) | 65.90% |
| No-load power consumption | 0.082W |

denver

ALL RIGHTS RESERVED, COPYRIGHT DENVER A/S
Electric and electronic equipment contains materials, components and substances that can be hazardous to your health and the environment, if the waste material (discarded electric and ele equipment) is not handled correctly.
Electric and electronic equipment is marked with the crossed out trash can symbol, seen above.
symbol signifies that electric and electronic equipment should not be disposed of with other household waste, but should be disposed of separately.
All cities have established collection points, where electric and electronic equipment can either be submitted free of charge at recycling stations and other collection sites, or be collected from the households. Additional information is available at the technical department of your city.
DENVER A/S
Omega 5A, Soofan
8382 Hinnerup
Denmark
Denver.eu
facebook.com/Denver.eu
German
Duur-15 | 30 | 45 | 60 | 90 minutes
Fuld kanalsegning after DAB-radiostationer
- Manuel kanalsogning
Manuel sogning after DAB-radiostationer
DEN 4
- Komprimering af dynamisk omrade (DRC) (Fra/ Hoj/Lav)
- Indstilling for sogning
Fonle - Campainha/ DAB/ FM
FOR A UNNGA FARE FOR STROMSTOT, MA STOPSLETS BREDE BEN GAN INI I KONTAKTENS BREDE SPALTE. STIKK STOPSLET HELT INN.
Advarsel:
ALARM 1-INNSTILLINGER
Alarmen vil fungere bare hvis encheten er slatt Pa (med strom aller batteri)ller om den star i by-modus (bare pa strom).
Alarmer kan slas pa erler av i standby-modus (se longer ned). Alarmenes parameter kan derimo endres kun dersom encheten er slatt pa.
Stille inn alarmer
10. After-sales support contact
| Contact | |
| Nordics | Germany |
| Headquarter | Denver GmbH Service |
| Denver A/S | Gütenbergstraße 1 |
| Omega SA, Soften | 94036 Passau |
| DK-8582 Hinnerup | |
| Denmark | Phone: +49 851 379 369 40 |
| Phone: +45 86 22 51 00 | |
| (Push 2: for support) | service-germany@intersales.eu |
| Fairflixx GmbH | |
| Fortechnical questions,please sewricleto | Repair and service |
| support@denver.eu | Rudolf-Diesel-Str. 3 TOR 2 |
| For all other questions please write to: | 53859 Niederkassel |
| Intersales@intersales.eu | (for TV, E-Mobility/Hoverboards/Balanceboards, Smartphones & Tablets) |
| Benelux/France | Tel: +49 851 379 369 69 |
| E-Mail:denver@fairflixx.de | |
| Denver BENEUXB.V. | Austria |
| Barwoutswarender 13C-D | |
| 3449 HE Woerden | |
| The Netherlands | |
| Phone: +51 348 420 029 | Lurf Premium ServiceGmbH |
| Deutschstrasse 1 | |
| 1250 Wien | |
| E-Mail: support-nl@intersales.eu | Phone: +43 1 904 3085 |
| E-Mail:denver@lurfservice.at | |
| Spain/Portugal | |
| Denver SPAIN S.A. | Ifyourcountry is notlistedabove, please write an email to |
| C/Mascu,1 Pol.lnd.MasdeTous | |
| 46185 La Poblade Vallbona | |
| Valencia (Spain) | |
| Spain | |
| Phone: +34 960 046 883 | |
| Mail: service@technico.denver@intersales.eu | |
| Portugal | |
| Phone: +35 1255 240 294 | |
| E-Mail:denver.service@satfli.com | |


Brand : DENVER
Model : DAB18
Category : Radio