KS 9837 - Freezer SEVERIN - Free user manual and instructions
Find the device manual for free KS 9837 SEVERIN in PDF.
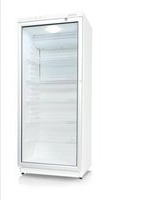
| Product type | Freezer |
| Brand | SEVERIN |
| Model | KS 9837 |
| Dimensions (H x W x D) | 510 x 439 x 470 mm |
| Weight | 16 kg |
| Power supply | 220-240 V ~ 50 Hz |
| Energy class | A++ |
| Annual consumption | 117 kWh/year |
| Freezing capacity | 3 kg/24h |
| Total capacity | 30 L |
| Power failure autonomy | 15 hours |
| Climate class | N, ST, T |
| Noise level | 40 dB |
| Defrost type | Manual |
| Refrigerant | R600a (isobutane) |
| Door reversibility | Yes |
| Thermostat | Adjustable from 1 to 5 |
| Cleaning | Warm water and mild detergent |
| Warranty | 2 years |
Frequently Asked Questions - KS 9837 SEVERIN
User questions about KS 9837 SEVERIN
0 question about this device. Answer the ones you know or ask your own.
Ask a new question about this device
Download the instructions for your Freezer in PDF format for free! Find your manual KS 9837 - SEVERIN and take your electronic device back in hand. On this page are published all the documents necessary for the use of your device. KS 9837 by SEVERIN.
USER MANUAL KS 9837 SEVERIN
GB Instructions for use Freezer 1 0
Before using the appliance, read the following instructions carefully and keep this manual for future reference. The appliance must only be used by persons familiar with these instructions.
Connection to the mains supply
The appliance should only be connected to an earthed socket installed in accordance with the regulations. Make sure that the supply voltage corresponds with the voltage marked on the rating label. This product complies with all binding CE labelling directives.
Do not operate this unit by means of a transformer.
- To prevent noise vibration, ensure that the power cord does not touch any part of the rear of the unit.
General information
This compressor-freezer unit is designed for deepfreezing and long-term storage of deep-frozen food, as well as for making ice-cubes.
- Refrigeration appliances are classified into certain climate classes. Please refer to the product data sheet for information on the classifi cation for this unit; the data sheet can be found at the end of this manual.
- No responsibility is accepted if damage results from improper use, or if these instructions are not complied with.
Important safety instructions
This appliance is intended for domestic or similar applications, such as
- in shops, offices and other similar working environments,
-in agricultural areas,
- by customers in hotels, motels etc. and similar establishments,
- in bed-and breakfast type environments.
- This appliance is not intended for commercial use, nor for use in the catering business or similar wholesale environments.
The cooling circuit in this appliance contains the refrigerant isobutane (R600a), a natural gas with a high level
of environmental compatibility, which is nevertheless flammable. Ensure, therefore, that none of the components of the refrigerant circuit become damaged during transportation and installation of the appliance. If damage to the cooling circuit does occur, do not switch on or connect the appliance to the mains power. In the case that there is an open fire or any other sources of ignition in the vicinity of the refrigerant gas, make sure it is removed immediately from this area and that the room is then thoroughly ventilated.
- Warning: Keep ventilation openings, in the appliance enclosure or in the built-in structure, clear of obstruction. Suffient ventilation must be ensured at all times.
- Warning: Do not damage the cooling circuit. Any escaping refrigerant causes damage to the eyes; there is also a danger of the gas igniting.
- Warning: Do not use any external device (eg heaters or heating fans) to accelerate de-frosting; follow only the methods recommended in this manual.
- Warning: Do not operate any electrical appliances (e.g. ice makers) inside the storage compartment that are not specifically permitted in these instructions.
Before it is connected to the mains power, the unit must be thoroughly checked for transport damage, including its power cord. In the event of any such damage being found, the appliance must not be connected to the mains.
- This appliance is not designed for the storage of explosive substances such as aerosol cans with a flammable propellant.
- If the unit is sold, handed over to a third party or disposed of at a suitable recycling facility, attention must be drawn to the presence of the insulation agent 'cyclopenthane' as well as to the refrigerant R600a. For additional information on correct recycling please refer to the section Disposal.
In order to comply with safety regulations and to avoid hazards, any repairs or modifi cations to this unit must be carried out by our authorised service personnel, including the replacement of the power cord.
- This appliance may be used by children (at least 8 years of age) and by persons with reduced physical, sensory or mental capabilities, or lacking experience and knowledge, provided they have been given supervision or instruction concerning the use of the appliance and fully understand all dangers and safety precautions involved.
Children must not be permitted to play with the appliance.
Children must not be permitted to carry
out any cleaning or maintenance work on the appliance.
- For frequent cleaning we recommend the use of warm water with some mild detergent. For detailed information on cleaning the appliance, please refer to the section De-frosting and cleaning.
- To prevent the risk of personal injury or damage to the unit, it must only be transported while in its original packaging. For unpacking and installation, 2 persons are needed.
- Caution: Keep any packaging materials well away from children: there is a risk of suffocation.
- The ice removed from the unit during de-frosting is not suitable for human consumption.
- The power cord should be regularly examined for any signs of damage. In the event of such damage being found, the appliance must no longer be used.
- To avoid the risk of fire, do not place any electric appliances on top of the unit. Do not place liquid containers on top of the unit, to prevent any leaking or escaping liquid damaging the electrical insulation.
This unit is designed for storing food only.
Alcoholic substances may be stored only in properly sealed containers and in upright positions. - Do not store any glass bottles containing carbonated or other 'freezable' liquids in the unit: such bottles may burst during the freezing process.
- To avoid the risk of food poisoning, do not consume food after its storage time has expired. Thawed foods must not be frozen a second time.
- Do not lean or put undue weight on the shelves, compartments, door etc.
- Protect the inside of the appliance at all times from open fl ames and any other sources of ignition.
- Remove the plug from the wall socket
-in case of any malfunction,
- before de-frosting,
- during cleaning,
-
before maintenance or repair work is carried out.
-
When removing the plug from the wall socket, never pull on the power cord; always grip the plug itself.
If the unit is not used for an extended period of time, we recommend keeping the door open.
We reserve the right to introduce technical modifications.
Familiarisation

- Temperature control (at the rear)
- Vapouriser with storage rack
- Adjustable front feet
- Door
Before using for the first time
- Remove any exterior and interior packaging materials completely, including the adhesive strips.
Before it is connected to the mains, the unit must be thoroughly checked for transport damage, including its power cord.
Clean the unit according to the instructions given in the De-frosting and cleaning section below.
The unit should only be transported in its vertical position; do not tilt any more than 30^
Once the unit has been positioned, wait for about 30 minutes before it is connected to the mains.
If the unit has been tilted more than 30^ during transport, allow it to stand upright for at least 4 hours before it is connected to the mains. - When the unit is first switched on, a slight smell may be noticed. However, this will disappear once the cooling process has begun.
Installation
The appliance should be set up in a well-ventilated, dry room.
It should be operated in conditions where the relative humidity is no more than 70% .
The product data sheet at the end of this manual contains details of the ambient temperature range suitable for this appliance.
Do not use the appliance outdoors.
- Ensure that the plug is accessible and can be removed from the wall socket at any time.
- Do not expose the appliance to direct sunlight, and do not position it next to any heat sources (radiators, cookers etc.). If this cannot be avoided, however, suitable insulation must be in installed between the heat source and the unit.
The unit must not be installed inside a cabinet, nor directly below a hanging cupboard, shelf or similar object.
In the case of uneven floors, the adjustable foot on the unit can be used to compensate and ensure optimum
stability.
Ventilation
Ensurer that there is enough space around the unit so that the air circulation round and behind it is not obstructed. (Rear 7.5 cm, sides 5 cm, top 10 cm.)
Reversible door
If required, the door may be reversed, i.e. from right-hinged (default installation) to left-hinged.
Warning: Always disconnect the unit from the mains before any maintenance or repair work is carried out.
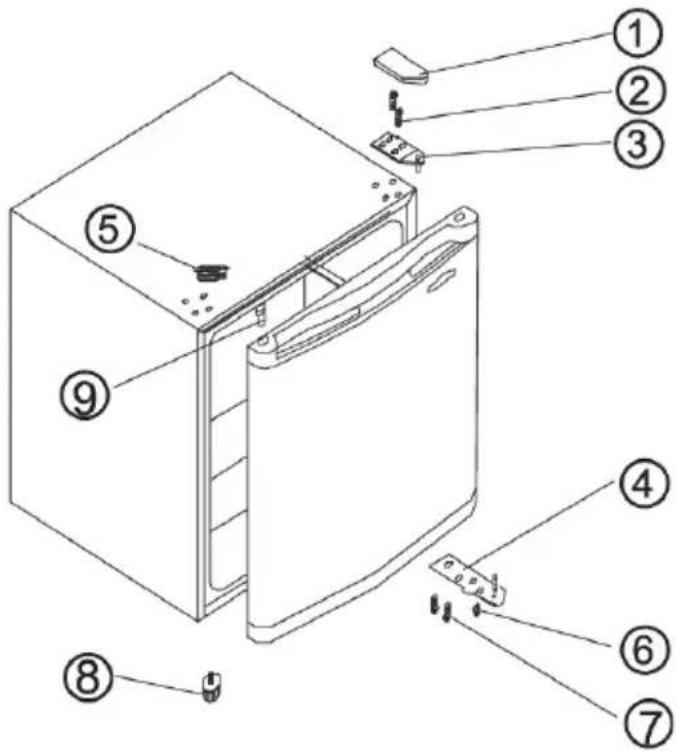
- Remove the hinge cover (1).
- Use a suitable pointed tool to remove the cover (5).
- Use a suitable screw-driver to remove the two screws (2) holding the upper hinge (3) to the housing.
- Carefully lift up the door and place it on a soft surface to protect it from scratches.
- Remove the blind covers for the hinge mounting holes (9) and fit it in the corresponding place on the right. Ensure that the cover is firmly pushed down into the hole.
- Pull out the two screws (7) which hold the lower right hinge plate (4) and the adjustable foot (6) in position. Take off the hinge plate (4) and the adjustable foot (6) and replace and tighten the two screws again.
- Remove the adjustable foot (8) on the left and insert it into the corresponding thread on the right.
- Unscrew the two screws on the left-hand side and install the lower hinge plate (4) with the two screws (7) on this side. Caution: Do not yet tighten the screws.
-
Replace the door in its new position. Ensure that the hinge pin is inserted into the guide bushing (hole) on the lower part of the door.
-
Install the upper hinge (3) on the left-hand side. Ensure that the hinge pin is inserted into the guide bushing (hole) on the upper part of the door. Caution: Do not yet tighten the screws.
- Adjust the closed door to its proper position and tighten the screws of the upper and lower hinge plates.
- Replace the cover (5) in the corresponding holes on the right.
- Replace the hinge cover (1) on the upper hinge.
- Put the unit back in its intended position and wait for about four hours before connecting it to the mains.
Temperature control
The unit is activated by connecting it to the mains. It is only switched off completely when the plug is removed from the wall socket.
The temperature in the cabinet can be adjusted by setting the temperature control.
Temperature settings from 1 - 5 are available.
Turning the control clockwise will decrease the temperature, while turning it anti-clockwise will increase it.
We recommend setting the control initially to position 3. After a certain time, the actual temperature should then be checked with a thermometer, and adjustments made if necessary.
Note: The operating temperature in the freezer largely depends on factors such as the ambient temperature and that of the food to be newly frozen. It also depends on how often the door is opened and how long it remains open. If necessary, the temperature control setting may be adjusted accordingly.
Following a power interruption, or if the unit has been switched off on purpose, it may take 3 to 5 minutes before it switches on again.
Freezer door
To ensure that frozen food will not de-frost prematurely, the freezer door should be kept closed at all times. This will also prevent an undue build-up of ice and frost. Ensure, therefore, that the door is only opened briefly to place food inside or to remove it.
Freezing and storing food
- The temperature inside freezer cabinet depends mainly on the ambient temperature, the temperature control setting and the amount of food stored.
- This freezer unit is designed for deep-freezing and long-term storage of deep-frozen food, as well as for making ice-cubes.
- Prior to freezing, fresh food (e.g. meat, fish, minced meat) should be divided into smaller portions suitable for use after defrosting).
To ensure that nutritious elements such as vitamins are not lost, fresh food should be deep-frozen right through as quickly as possible. To that effect, the prepared food
should be placed into the freezer compartments, properly spaced in one or two rows.
- Avoid contact with food that has already been frozen.
- Caution: Do not exceed the maximum freezing capacity per day. The product data sheet at the end of this manual contains details of the maximum daily freezing capacity.
- When storing pre-frozen food, strict attention should be paid to the manufacturer's information provided on the packaging. If no such information is to be found, however, a storage period of 3 months from the date of purchase must not be exceeded.
- When buying frozen food, verify that the food is properly frozen, and that the packaging does not show any sign of damage.
- To maintain the quality of deep-frozen food, it should be transported only in suitable containers and then placed inside the freezer without delay.
- Carefully check the packaging when buying frozen food: if the packaging shows signs of moisture, has bubbled up or is bulging, it indicates that the food may not have been stored properly and has spoiled.
- The storage times for frozen foods largely depend on the ambient temperature, the temperature control setting, the type of food and the time between shop and freezer, but mainly also on how often the freezer door is opened and how long it remains open. Always follow the instructions given on the food packaging, and do not exceed the specified maximum shelf life.
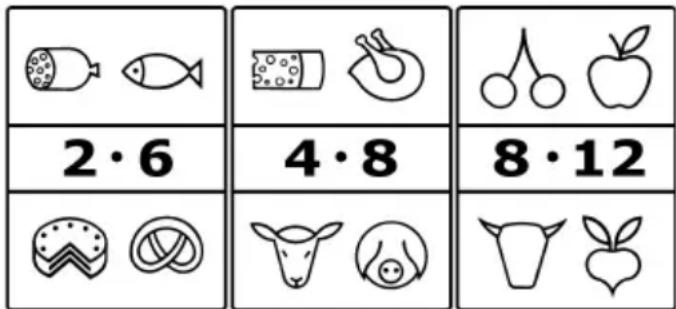
- Suitable packaging materials for frozen food are transparent (i.e. non-coloured) plastic foil, bags or aluminium foil. The packaging materials should be well aired before use and then checked for air-tightness before freezing the food. We strongly recommend that you label every item stored in the freezer with all relevant information such as type of food, freezing date and use-by date.
Use-by dates for frozen food are specified (in months) in the table below.
| 2·6 | 4·8 | 8·12 |
Do not exceed these storage times.
However, always observe the manufacturer's use-by dates for the frozen food.
If the unit remains switched off for an extended period (eg during a power failure), the door should be kept closed; this will help to maintain the lowest possible temperature in the cabinet. The product data sheet at the end of this manual
contains detailed information of the maximum safe storage time in case of malfunction.
Even a slight rise in the inside temperature will shorten the storage life of the food.
Making ice cubes
A special ice-cube tray is provided for making ice cubes. Fill the tray 3/4 full with drinking water and place it in the freezer. The ice cubes are easier to remove from the tray if the tray is left standing at room temperature for 5 minutes.
De-frosting and cleaning
Always remove the plug from the wall socket before cleaning.
Do not pour water over the unit.
Do not use abrasives or harsh cleaning solutions.
After a certain period of operation and depending on several factors (e.g. how often the door has been opened), a layer of ice will form inside the freezer compartment. Once the build-up of ice has reached a thickness of 3 to 5mm the unit must be de-frosted.
The build-up of ice increases the power consumption of the appliance.
The freezer should be thoroughly cleaned at least twice a year.
- When de-frosting the unit, ensure that the plug has been removed from the wall socket.
- Remove all food from the compartment and store it in a cool location, eg together with pre-frozen freezer-packs in a closed plastic container. Note that, even with a slight increase in temperature, the storage life will be shortened and the food should be used as soon as possible.
- Leave the freezer door open.
- To accelerate defrosting, one or several containers with hot (but not boiling) water may be placed inside the freezer.
- Do not pour water over or inside the unit.
- Warning: Do not use any external device or other means (e.g. heaters or heating fans) to accelerate de-frosting.
- For frequent cleaning we recommend the use of warm water with some mild detergent. Any accessories should be cleaned separately with soapy water. Do not put them in a dishwasher.
- Do not use abrasives or harsh cleaning solutions or any cleaning agents that contain alcohol.
After cleaning, thoroughly clean all surfaces again with fresh water before wiping them completely dry. - When re-inserting the plug into the wall socket ensure that you have dry hands.
Take care not to remove or damage the rating plate inside the cabinet during cleaning.
To save energy, the compressor (at the rear) should be cleaned carefully at least twice a year with a brush or a vacuum cleaner.
Energy saving tips
- The appliance should be set up in a well-ventilated, dry room.
- Do not expose the appliance to direct sunlight, and do not position it next to any heat sources (radiators, cookers etc.). If this cannot be avoided, however, suitable insulation must be installed between the heat source and the unit.
- Do not cover the ventilation openings and grilles, and ensure suffient air circulation behind the unit.
- The compressor (at the rear) should be cleaned at regular intervals. Accumulated dust causes an increase in energy consumption.
Warm food should be allowed to cool down before it is stored inside. - To prevent an increased build-up of ice, do not leave the freezer door open for too long when loading or taking out food.
- Frequent de-frosting helps to save energy. For detailed information on cleaning the appliance, please refer to the section De-frosting and cleaning.
- Do not set a lower-than-necessary temperature. For detailed information on the temperature settings, please refer to the section Temperature control.
Trouble-shooting
Certain typical sounds can be heard when the appliance is switched on. These sounds are:
- Caused by the electrical motor within the compressor assembly; during compressor start-up the sound level will be slightly higher for a limited period of time.
- Caused by the cooling agent flowing through the circuit.
The following table lists the possible malfunctions, their probable causes and solutions. In the event of operational problems, check first whether a solution can be found using this table. If the problem persists, disconnect the appliance from the mains power and contact our Customer Service Department.
| Problem Possible cause and solution | |
| The unit is not working. | Check that • power is supplied. • the switch in your home installation fuse box is switched on. • the wall socket is working. This can be done by connecting another electrical device to the socket and checking for function. |
| The unit seems to generate insufficient cooling power. | Check whether • too much food has been stored in the unit. • the thermostat is set to position 1 or 2 (in this case, set it to a suitable higher value). • the door is not properly closed. • there is too much dust on the condenser. • the unit is too close to a wall or other object at the rear or to the sides. |
| The normal operating sound changes or becomes louder. | Check whether • the unit has been properly positioned. • any objects or obstructions are touching the rear of the unit. • there are any objects on top of the unit which might be vibrating. |
Transporting the appliance
To prevent damage to the unit during transport, ensure that all accessories and components inside and around the appliance are securely fastened.
The unit must only be transported in its vertical position; do not tilt any more than 30^ .
Once the unit has been positioned, wait for about 30 minutes before it is connected to the mains.
If the unit has been tilted more than 30^ during transport, allow it to stand in an upright position for at least 4 hours before it is connected to the mains.
Disposal
Devices marked with this symbol must be disposed of separately from your household waste, as they contain valuable materials which can be recycled. Proper disposal protects the
environment and human health. Your local authority or retailer can provide information on the matter. The refrigerant and the chemical agent in the insulation foam must be disposed of through a competent agency. Take special care not to damage the cooling circuit before the unit is handed over for competent disposal.
Guarantee
This product is guaranteed against defects in materials and workmanship for a period of two years from the date of purchase. Under this guarantee the manufacturer undertakes to repair or replace any parts found to be defective, providing the product is returned to one of our authorised service centres. This guarantee is only valid if the appliance has been used in accordance with the instructions, and provided that it has not been modified, repaired or interfered with by any unauthorised person, or damaged through misuse.
This guarantee naturally does not cover wear and tear, nor breakables such as glass and ceramic items, bulbs etc. This guarantee does not affect your statutory rights, nor any legal rights you may have as a consumer under applicable national legislation governing the purchase of goods. If the product fails to operate and needs to be returned, pack it carefully, enclosing your name and address and the reason for return. If within the guarantee period, please also provide the guarantee card and proof of purchase.
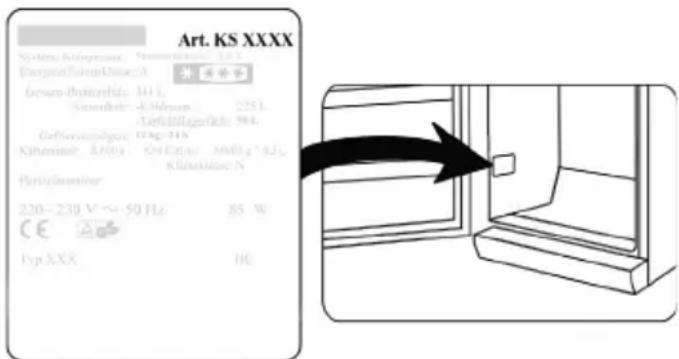
Information needed by the Customer Service
Should repairs to the appliance become necessary, please contact our Customer Service, providing a detailed fault description and quoting the article number KS ... on the rating plate of the appliance (see picture). This information will help us to handle your request efficiently.
Product data sheet for refrigerating appliances *
| Art. no. KS 9837 | |
| Household refrigerating appliance category 8 - Freezer | |
| Energy efficiency classification | A++ |
| Energy consumption in kWh/year 117 | |
| Usable refrigerator capacity (litres) -- | |
| Usable capacity * * * * - Freezer unit (litres) | 30 |
| Frost-free : refrigeration unit -- | |
| Frost-free : freezer unit no | |
| Safe storage time in case of malfunction, hrs 15 | |
| Freezing capacity, kg/24h 3 | |
| Climate classifi cation N, ST, T | |
| Ambient temperature range, °C 16-43 | |
| Noise emission in dB(a) 40 | |
| Dimensions (H x W x D) in mm 510 x 439 x 470 | |
| Weight (kg) 16 | |
| Electrical specifi cations | See rating plate |
) In accordance with EU directive 1060/2010 Annexe III
*) The actual consumption depends on the pattern of use and the location of the appliance
As per 25.01.2017
Congélateur
Chere cliente, Cher client,
Regulator temperature
PerylnpoBka TemnepaTpybI
Pnp6op Haunhaet paobTaB npn noKnHoueHn erK cTeN. POnHocTbO OH OTKnHouaETcra TOnbKO nocne n3BNeueHn CteBOB BuKN u3 p03eTKn.
TemnepaTpa BHTPN MOpO3NlBHoro 1kaopa peryInpyeTcnyKoTepmoCTata.
Tepmoctat IMeET NOLOXeHnpeyIuPObKn ot 1 do 5. Pn noBopTe pyuKn no yacOBn CTpeNke TemnepaTypa nONHXaETcA, a npn noBopTe npOTNB YACOBn CTpeNkn - NOBbIuaetc.
Mby peKOMeHnye m Chaayala yCTaHOBnTb pykY B NOLOXKeHne 3. IIO nCTeueHm HekOTOpO R BpeMeH NMOxHO pNOBepNT b TeKyUyTe MtnepaTy npN NOMOu TepMOMeTp a,ecnI Heo6xoDmo,OTperyInpOBaTb ee.
PpmeaHne. PaOyAra TemepaTpa MOp03nIbHO rKaopa Oeyb 3aBNCIT OT TaKnx PafKTOpOB KAK OkpykaIOUaTeMnpa TEmnpaTypa npOdyKTOB dIra HOBOI 3Amop03Kn. OHa TaKke 3aBNCIT OT YaCTOTbI OTKpbIBAHIN DBepCb I NpoOJXHTeNbHOCTN HAXOXDeHNr DBepCb I BOTKpBTOM NOLOXeHN. Ppi Heo6xOIMOCn YcTABKy TEMpeaTpbl MOxHO NoDpeRyInpoBaTb COOTBeTCTBYIOUM o6pa3om.
Ipi aBapHOM OTKIOUeHn PHTaHn IIN npi HamepeHOM OTKIOUeHn Pn6opa MoKet IpoTn O T 3do 5 MNHyT, Ipexde Yem OH BKIOUHTc CHOba.
DBepua MOp03nIbHoro uka
UTo6bI He DoNyCTnTb npexDeBpeMeHHoro pa3MopaxHBHna 3aMopoXeHHbIX npOyKTOB, DBepca MOp03INbHoro WkaΦa DOJXHa Bcerda 6bITb 3akpbIToi. 3TO TAKKe NOMOXET n36ExKaTb N3NJuHrero O6pa3OBaHnra NbDa i INHe. IooTomy CneDInTe 3a TEM, UTo6bI DBePca OTKpbIBaNacb KpaTKOBpeMeHHo H TOlbKO dJIra TORO, UTo6bI NOIOXHTb npOyKTB B MOp03INbHbI WkaΦ INN B3rTb INX.
3amopaxnBaHne XpaHeHne npOdyKTOB
Tempepatya BHTPN MOpO3NtBHOro 6KaΦa 3aBnCTB OCHOBHOM OT OkpykaUoSeI TempepatpyI, NIOXKeHryuKN TepMoCTaT N KOJIInCeTb XpaHmblx IpOdyKToB.
ДаанньКOMпсссорьМОрзиьHишkaфпразнадзачендяглбokо3amop03кИДNTeЛьнохраан�няглбok03amopoxeHHbIX npodyKTOB,aTaKKeДЯпriROTOBNeHnKy6NKOBJbda.
- Pered 3amopaxnBaHne CBexne npOdykTbI (To eCTb Mco, pb6a, MChOH qapu) DOJXhbl 6b1b pa3deJeHbHa MeJKNe NOpU, npuOrHbIe DnI NCNoJIb3OBaHn IocJIe OTaUNBaHn).
4To6bI o6ecneHTb coXpaHeHnE TaKNX NITaTeJIbHbIX 3JIeMeHTOB KAK BNTAMINHbI, CBEXNE PpOdyKTb I OJINHbI 6bITb NOBBePrrHyTb rny60KO3aMOpO3Ke KaK MoXHO 6bICTpee.ДЯ STOROPnIROTOBNeHHbIe DЯ XpaHeHn PpOdyKTbI HxKHO nIOJoxNtB B OTDeJIeHn MOpO3NJbHO JkAmePbI, OCTaBJIra MExdY HmN IpOMexKyTKN B OOnH ININ DBA pRda.
He donyckaIte nx cOpnKOCHOBeHnC yKe 3amopOKeHHbIMn npDyKTAMN.
- PpeynpexKeHne! He npeBbIaIte MaKcMaJIbHyo MOuHOCTb 3aMopaxINBaHnB B DeHb. MaKcMaJIbHa r MOUHOCTb 3aMopaxINBaHnB C cytKN yKa3aHa B Ta6Ntue c TexHNueckmX xapaKTepNCtIKaMn np6opa, NOMeUeHHoB KOHc DaHHOrO pyKOBOdCTBa.
IpnXpaHEnn npEaBapntbHo 3amOpOKeHHbIX npOyKTOB OOC6oe BHMMaHHe CneDyET 6paTNTb Ha yKa3aHn npOn3BOuTeJI, HaxoJUeCEHa yNaKOBKe. Ecn TAKoN nHΦopMaun Ha yNaKOBKe He, BpeMxpaHEnn npOyKTOB NocNe DaTbI IN NOKyPKN He DoJIHX npEbIaTaB 3 MeCraueB.
Прип поунке 3amopoxeHHbIX npOdyKTOB cIeIyET npOBepnTB,чTo npOdyKtbl 3amopoxeHbI HaIneKaIIMобразOM ИTO ha ynaKOBKe HET HnKaKINx CJIeIob NOBpeKdEHHa.
YTo6bI CoXpaHNTb KaueCTBO Iy60KO3aMopoXeHHbIX npOdyKTOB, INx CNeJyET NepeBO3nTb TOJIbKO B CNEuJaHbIX KOHTeHepax, a 3aTeM HEmEJIeHHO NOMeUaTb B MOpO3NlHbI WkaΦ.
TuaTeNbHO npOBepyIte ynaKOBky npn NOKynke 3aMOpOKeHHbIX npOdyKTOb: ecn Ha ynaKOBKe IMeHOTc CJIeDbI BnAri, OHa Ny3bIPNTcN JIN BCnyeHa, 3TO CBnDETeJbCTByET O TOM, YTO npOdyKtbl MOrJIH HePpABNJbHo XpaHHTbcr NcNOPTNlncb.
CpOKn XpaHEnHna 3amOpOKeHHbIX npOdyKTOB B 60JIbWoI CTeNEHn 3aBNCrT OT OkpyKaIOUeN TeMnePaTypbI, OT yCTaBKn TempePaTybl, OT TnPa npOdyKTOB N
BpeMeHn, KOtOpoe pOuJIO OT NOKyKn PPOyKTOB Do IIX NOMeUeHnB MOpO3NbHbI WkaΦ, HO rnaBHbIM O6pa3OM TaKKe OT TORO, KaK YaCTO OTKpbBaJacb DBePca MOpO3NbHoro WkaΦa N KaDOnrO OH OCTaBANc ROTKpbITbIM. Bcerda CneJyTe yKa3AHm Ha yNaKOBKe PPOdykTa n He npeBbIaJte Yka3aHHbI Ha yNaKOBKe MaKcMaJIbHbI CpOK rODHOCTn.
B KauecTbe ynaKoBOUHbIX MaTePnAIOB dIa 3amOpOKeHHbIX npOdyKTOB DOJIKNbI NCNOJb3OBAtbcr npOzpaHbIe (T. e. HeOKpaWeHHbIe) NOIMepHaar PHeHka, NaKeTbI, INI aIINOMHHeBa foJIbra. IpeE 3amopaxJBAHmE npOdyKTOB ynaKoBOUHbIE MaTePnAJIbI Heo6xOJIMTO TuaTeJIbHO npOBeTpNTb, a 3aTEM pOBePTb, He npOnyCKaHT JIn OHN BO3dYx. Mbl HactoTeBHo peKomeHdyem Bam HaHocNTb 3TNKeTKy Ha KaJdbI npoDyKT, XpaHЯuNcR B Mopo3NJIbHOM WkaFy, C yka3aHmE TaKo Heo6xOJIMo INΦopMaun KAK TUN, DaTa 3amopaxJBAHnI N cPoka rOdHOCn npOdyKTa.
CpokroDHOCTn 3aMOpOKeHHbIX npOdyKTOB yKa3aHbI (B Mecaux) B HxKepeBedeHHoT a6nue.
He npeBbIaIte 3Tu cPOnxpaHEnn.
KpOme toro, Bcerda co6JIOdaIte cPOn xpaHEnn
3AmOpOKeHHbIX pOdyKTOb, yKa3aHHbIe pOn3BOdnteNeM.
EcnM MOpO3nIbHbI WkaΦ OCTaεTcR OTKJIOnHeHHbIM Ha ДЛNTeIbHbI NepNoB BpeMeHn (HaNPmEp, PnI NepepbIbe ВЗHEPROCHa6KeHn), DepxNte DBePcU 3aKpbITo; 3TO NOMOXET COxpaHnTB B np6ope MaKcImaNbHO BO3MOXHyIO Hn3KyIO Tempepatpy. B KOHc ZeAHORO pyKOBODCTBa NOMEseHa Ta6nua C TexHnueckmN XapaKTepNCtHKamN Pp6opa, B KOTOPoI cODePxNtCra INΦopMaunr O MAKcImaNbHO BO3MOxHOM BpeMeHn 6e30NaCHO rXpaHEnr PPOyKToB B np6ope B clyuae erO HeNCnPabHocTn.
Дахе He6oIbwoe NOBbiIeHne TempepaTpybl BHyTpIn MOpO3nIbHorO WkaPpIpuBeTeK COKpaUeHIO Cpoka RoDHOCTN npOdyKTOB.
PnuroToBneHne Ky6koB Jbda
Mop03nHbHbI WkaΦ yKOMnJIeKTOBaH CneuHaJbHbIM JOTKOM
IЯ npiroTOBHeHra Ky6NKOB Iba. HAnOpHNTe loTOK Ha 34 nITbeBOI BOOIN IOCTaBBte B MOp03nHbHbI WkaΦ.
Ky6KN IbDa I3BNeKaIOrCn I3 NOTKa IerYe, ecN OCTaBHTb
ero Ha 5 MNHyT pRn KOMHaTHoI TEMpepaType.
Pa3mopaxnBaHne n uCtka
Bcerda BbHMaIte ceTeByIO BuJky u3 po3eTKn nepei YNCTKOIMOP03NJbHorO WkaFa.
HeJeTe Body Ha MOpO3NJIbHbI uKaΦ.
He nCnoJIb3yIte a6pa3nBhIe MaTePnAbl nNn CnJIbHOJeCTByIOUne MOIOUne paCTBOPbl.
Iocne 3KcNpyataun MOpO3nHbHO WkaΦa B TeueHne HEKOtOPo BpeMeHN B 3aBNCIMOCTN OT HeCKoJIbKnx AKTopoB (HaNPmEep,OT TORO,Ka YacTo OTKpbBaJnacB DBepua),B MOpO3nHbHom WkaFy o6pa3yETc cNo Jbda. Korda ToJIuHa cNoar Nbda DoCTnHet 3-5 MM, WkaΦ HxHo pa3MopO3nTb.
06pa3oBaHne Ibda yBeJIuNHaeT nTope6JIeHne 3Heprn.
Mop03nHbHm KKaΦ Heo6xOaHMO TuaTeIbHO MbITb Hc MeHee 2 pa3 B roD.
- Pepepa3MopaaKbHaHne MOp0aHbHoro 1kaBbIbTe wTeNceMbHyO BnKy n3 ceTeBOy po3eTKn.
BbHbTe n3 ukaFa Bce npOdyKtby I noIIOxNte nx B npoxlaHoe MeCTo, HnnpMep, B nIaCTNKOBbl KOHTeHep BmEcTe C npEaBapntbHo 3amOpOxeHHbIMn aKKyMyJrTopamx xoNoa. O6paTne BnHaMaHne Ha TO, YTO daKe npHe3NaHTeJbHOM NOBbIWeHIn TEMnepaTypbI cPOK xpaHeHnI npOdyKTOB cOKpaUaetcN INx CJIeDyET ynoTpe6uMb KaK MoXHO CKopee.
OctabTe DBepu MOpO3nJIbHOro 1kaΦa OTKpbIToI.
UTo6bI yCKOpntb pa3MOpaxINBaHne,B MOpO3nIbHbIu KaΦ MoXHO NOCTaBNTb OdHy NII HecKOJIbKO eMKoCTeC TropueB Odoi (HO He C KInIaTkom).
HeJeIe Bovhy MOpO3nBHy IuKaΦ NIN BHYTpB Hero. - PpeynpeXdHne. He nCnoJb3yIte noctopOHnHe yCTpoiCTBa IIn DpyrIe cpeiCTBa (HaNPmEp, HarpeBaTeIN IIn TEIIIOBEHTINJrTOpbl) IIn yCKOpeHn pa3MOPaKJBaHn.
Дя TekyшчNTMbl peKOMeHnyem NcNoIb3OBAbT TeNJIyIO BODY C MRAKIM MOIOUIM CpeIcTBOM. IprHaIeXHOCTN HxHNOMbITb OTdeJIbHO B TEnIOI MbInbHO BoJe. He MoTe INB NOcyDOMoeHoi MaunHe.
He nCnoJb3yIte a6pa3nBhIe BeueCTBa nn CnJIbHOeNCTByUOuNE MOUuNE paCTBOpbl, a TaKKe CnIPTOCoDEpXaUne YnCTAunE cpeDCTBa.
Iocne YnCTKN TuaTeNbHO O6MoTe BCE NOBepxHOCTH YnCTOn BDOi, Nocne Yero BbITpuTe IN HAcyxo. - PpexJeH BCTaBnTb CeTeByIO BuNkY B po3eTKy, y6eINTecb, YTO y BaC cyxne pyKn.
BybTe BHMMaTeIbHbI, YTo6bI He OTOpBaTb Nn He NOBpeNTb BO Bpemr YnCTKn 3aBOdCKyO Ta6NHy BHyTpN MOp03nIbHO rKapa.
Дясберженnotpeблениэнгтрсерн Heo6xodmoTuaTeIbHoOuIaTbKOMPpeccop(Ha 3aHHeCteHKe np6opa)He Mehee DByx pa3B roJ 电TKOJIINIIJIeCOCOM.
Pone3HbIe COBeTbI NO 3KoHOMM 3NeKtpO3Heprnn
Mop03nBbHbI uKaΦ DoJIkeH 6bITb yCTaHOJIeH B cyXoKOMHaTe C XOPOWeB EHTNJIaCneH.
He npDBepraTe MOpO3nBbHbI WkaΦ BO3DeICTBnIO nprMoTO COJIeHNO CBeta I He yCTaHaBnBaIte erO B6n3n NIO6bIX NCTOCHNKOB TENJa (paNaTOpOB, KxOHbIX NNIT N.T.D.). EcJIN 3TOrO n36ExKaTb HEnb3y, Heo6XoIMO yCTaHOBNbCOOTBEcTBYIOUyIO N3OJIaCIO MEXdy npi6OpOM IN CTOUYHKOM TENJa.
He 3akpbiaIte BeHTnIaHIOHHbIe OTBepCTnI n peWeTkn I o6ecneYbTe DoCTaTOHyU cIpyJIauu BO3dYa BOKpyI np6opa.
Heo6xoJIMO peyIpaH OuIaTb KOMPecCOp (Ha 3aIHei CTeHKe np6opa). HakaJIINBaIOUaIcR Ha KOMPecCope PbIb PnBOiN T K yBJIueHIO nOTpe6JIeHn IJIeKTPo3Heprnn.
IpeKJe Yem noJoxNtB TeJIbIe npOyKtBi B MOpO3nHbI WkaΦ, DaIte NM IOCTaTOUHO OCTbITb.
YTo6bI He DonyCTnTb yBEnuyeHna OTJIOKeHna Nbda, He OCTaBnIe CnUkOM DoJIro OTKpbIToN DBepuy MOpO3nIbHO rO uKaΦa, KOrDa Bbl KlaJeTe NIN DoCTaeTe npOdyKtbl.
- YacToe pa3MopaxuBaHHe cnoc6c7ByeT c6epexeHIO 3NeKtpo3Hepn. YTo6bI nOlyuHTb 60Jee nOdpo6HyO INΦopMaUIO NO OChTE KpU6Opa, 6paTtEcB, IoxaanyCTa, K pa3dEny Pa3MopaxuBaHue u Ouchmka.
He yctaHaBnBaIte TempeaTy pHxke Heo6xOIMoH. TTo6bl nOnyUHTb 60Jee nOpRo6HyIO INΦopMauio O peryIIpOBKe TeMnepaTypbI, noXaJIyNCTa, K pa3dEny Pezynupo8ka memnpamypbl.
Ponck nyctpaHHe HeNCnpaBHOcTei
Korda npnbop BKNIOueH, MOXHO yCbIaTb HEKOtOpbl TINuHbIe Wymbl. 3TN Wymbl:
PON3BOJTCB
3JIeKTPoDBNraTeJIeM
B KOMnpeccOpor
y3JIe; BO Bpem
3aIycca KOMnpeccopa
yPOBeHb UyMa
B 6yIDet BblIe B
TeYeHne HeKOtOporo
BpEMeHN;
- PpOIN3BOIDaTcXJaIaReHTOM, CInPKyIInpyUIOIM BCNTeME.
B npBHeHNo 3dEc bTa6nue nepeHcneHb BO3MOXHbIE HeoJaKn, INx BO3MOXHbI epuHbI n CnOCO6bl ycTpaHEny. Pn BO3NkHOBeHN np6JIem BO BpEma 3KcNlYataun MOpO3NbHOrO uKaFa Chauana npOBepbTe HAnuHe BO3MOXHOrO cnOCo6a INx ycTpaHEnra B aToi Ta6nue.
B4-061/062 NO,181 Exhibition Road
Jiangdong District, Ningbo
Tel.: +86 400 166 0336
Fax.: +86 0574 55331669
Web: www.nbautin.com.cn
Web: www.autin.com.cn
Czech Republic
BVZ Commerce s.r.o.
Parkerova 618
CZ 25067 Klecany
Tel.: +420 233 55 94 74
Fax:+420233558159
Danmark
F&H of Scandinavia A/S
Gl. Skivevej 70
DK-8800 Viborg
Tel.: +45 8928 1300
Fax:+4589281301
26 Oaktree Business Park
Trim Co., Meath
Tel.: 046 94 83100
Fax:0469483663
Web: www.bluestone.ie
Italia
ASSISTENZA POST-VENDITA
NUMERO VERDE 800224155
E-Mail: assistenza@severinitalia.it
Indonesia
PT. Setai Modern Elektronik
Email: info@severin.co.id
Web.: www.severin.co.id
Jakarta
Komp. Glodok Plaza Blok F No. 9, JI. Pinangsia Raya,
Jakarta Barat
02165911888/0216592889
Medan
JI. Apel No. 88 Kom. Cemara Asri
0616620186/0616625836
Surabaya
Pergudangan Mutiara Margo Mulyo Indah,
Blok DC No. 2
Telp:(031)749 1012, (031)749 1016
Banjarmasin
Pergudangan Sumber Baru Jin A. Yani KM 17.9 Gudang B
15,Gambut
05116730101
Tangerang
JI. Industri Raya III Blok AD No. 3, Cikupa
021 5902219-21
Cirebon
501, Megaventuretower 77-9
Moonrae-Dong 3ga, Yongdeungpo-Gu
Seoul, Korea
Tel.: +82-22-637 3245~7
Fax: +82-22-637 3244
Service Hotline: 080-001-0190
Kuwait
Mohammed Abdulrahman Al Bahar
Al Bahar Building P.O. Box 148
Safat 13002 Kuwa
Tel.: +965 4810855
Latvia
SIA GTCL BALTIC
Piedrujas iela 7
LV-Riga 1073
Tel.: +371 29119989
Fax:+37167297769
Lebanon
Khoury Home
7th Floor, Cité Dora 3 Building, Dora
P.O.Box 70611
Antelias, Lebanon
Tel.: +961 1 244200
Fax:+9661253535
E-Mail: info@khouryhome.com
Internet: www.khouryhome.com
Luxembourg
Ser-Tec
A.A.K & Partners L.L.C.
P.O Box:-1650, Muttrah
Postal Code - 114
Sultanate of Oman
Tel.: +968 24834470
Fax.: +968 24835186
E-Mail: aakplc@gmail.com
Philippines
COLOMBO MERCHANT PHILIPPINES, INC.
Mezzanine 1, South Center Tower
2206 Venture Street, Madrigal Business Park
Alabang, Muntinlupa City
Tel.: 8093441
E-Mail: severinconsumercare@colombophils.com.ph
Polska
Severin Polska Sp.z 0.o.
Al.Jerozolimskie 56 C
00-803 Warszawa
Tel.: +48 882 000 370
Serbia and Montenegro
Tel.: +381-21-524-638
Tel.: +381-21-553-594
Fax:+381-21-522-096
Singapore
Beste (S) Pte. Ltd.
Tagore Building
6 Tagore Drive, #03-04
Singapore 7
Tel.: +65 6455 0005
Fax:+6564554010
Web: www.beste.com.sg
E-Mail: info@beste.com.sg
Slovenia
SEVTIS d.o.o.
Smartinska 130
1000 Ljublj.
Tel.: +386 1542 1927
Fax:+38615421926
Slowak Republic
PREMT S.R.O.
Skladova 1
91701Trnava
Tel.: +421 33 55 45 007
Fax:+421335545007
E-Mail: premt@premt.sk
South Africa
AL&CD Ashley (PTY) Ltd.
3rd Floor, Grove Exchange
9 Grove Avenue
Claremont
South Africa
7708
Tel: +27 21 674 0294
Fax:+27 216740295
Web: http://www.alcdashley.co.za
Mail: service@alcdashley.co.za
Svenska
Rakspecialisten HS
Mollevängsgatan 34
214 20 Malmö
Tel.: +46 40 12 07 70
Fax:+46406110335
E-Mail: info@rakspecialisten.se
Switzerland
BLUEPOINT Service Sagl
Via Cantonale 14
CH-6917 Barbengo
Tel.: +41 91 980 49 72
Fax:+41916053755
E-Mail: info@bluepoint-service.ch
Thailand
Verasu Ltd. part.
83/7 Wireless Rd., Lumpini,
Patumwan, Bangkok 10330
Tel.: +662 254 81 008
E-Mail: askverasu@verasu.com
United Arab Emirates
Juma al Majid Est
P.O.Box 156
Dubai U.A.E.
Tel.:042665210
Fax: 04 262 3431
E-Mail: shahid-saleem@al-majid.com
Web: www.al-majid.com
United Kingdom
Homespares Centres Limited
Firwood Industrial Estate
Thicketford Road
Bolton. BL2 3TR
Tel.: 01204 558160
Fax: 01204 558169
E-Mail: offi ce@hslc.info
Web: www.hscl.info
Vietnam
Brand Partner
W.22, D. Binh Thanh
180/38 Nguyen Huu Canh Street
Ho Chi Minh City. Vietnam
Tel.: +84 862 899 648
Fax:+84 862 899 649
E-Mail: info@brandpartner.vn
Stand: 10.2016