
GDE max Professional - Electric router BOSCH - Free user manual and instructions
Find the device manual for free GDE max Professional BOSCH in PDF.
| Brand | BOSCH |
| Model | GDE max Professional |
| Product type | Electric router |
| Rated power input | 1300 W |
| No-load speed | 11000 – 28000 rpm |
| Speed preselection | Yes, 6-position wheel |
| Constant electronic | Yes |
| Compatible collet | 6 / 8 mm |
| Plunge stroke | 55 mm |
| Weight according to EPTA 01:2014 | 3.5 kg |
| Power supply | Mains, 230 V (cord) |
| Dust extraction | Yes, adapter for Ø 35 mm hose |
| Main functions | Routing of grooves, edges, profiles, slots, template routing |
| Machinable materials | Wood, plastics, lightweight materials, non-ferrous metals (reduced speed) |
| Safety | Double insulation, spindle lock, switch with lock |
| Maintenance | Clean ventilation slots, use dust extraction |
| Spare parts | Available via Bosch after-sales service, 10-digit reference |
| Repairability | Only by qualified personnel, original parts |
| Included accessories | Parallel guide, curved guide, routing compass/rail adapter, copying ring, chip guard |
| Protection rating | IP20 (estimated) |
Frequently Asked Questions - GDE max Professional BOSCH
User questions about GDE max Professional BOSCH
0 question about this device. Answer the ones you know or ask your own.
Ask a new question about this device
Download the instructions for your Electric router in PDF format for free! Find your manual GDE max Professional - BOSCH and take your electronic device back in hand. On this page are published all the documents necessary for the use of your device. GDE max Professional by BOSCH.
USER MANUAL GDE max Professional BOSCH
GOF 130 Professional
Robert Bosch Power Tools GmbH
70538 Sullgart
GERMANY
www.bosch-pt.com
160992A5MU1'2021.03T768

1609 92A 5MU
en Original instructions
fr Notice originale
pt Manual original
zh 正本使用说明书
zh原始使用说明
thnnaa
24614
id Peturiqi Peturiuk untuik
Paragunaar Original
Ban goc hurong dan sur dung
ar 1
fa 1

English Page 7
Francais.. Page 12
Portugues.. Pagina 18
中文 页25
繁體中文. 29
Inu. 34
General Power Tool SafetyWarnings
WARNING
Read all safety warnings, instructions, illustrations and specifica
tions provided with this power tool. Failure to follow all instructions listed below may result in electric shock, fire and/ or serious injury.
Save all warnings and instructions for future reference.
The term "power tool" in the warnings refers to your mains-operated (corded) power tool or battery-operated (cordless) power tool.
Work area safety
- Keep work area clean and well lit. Cluttered or dark areas invite accidents.
- Do not operate power tools in explosive atmospheres, such as in the presence of flammable liquids, gases or dust. Power tools create sparks which may ignite the dust or fumes.
- Keep children and bystanders away while operating a power tool. Distractions can cause you to lose control.
Electrical safety
Power tool plugs must match the outlet. Never modify the plug in any way. Do not use any adapter plugs with earthed (grounded) power tools. Unmodified plugs and matching outlets will reduce risk of electric shock.
- Avoid body contact with earthed or grounded surfaces, such as pipes, radiators, ranges and refrigerators. There is an increased risk of electric shock if your body is earthed or grounded.
Do not expose power tools to rain or wet conditions. Water entering a power tool will increase the risk of electric shock.
Do not abuse the cord. Never use the cord for carrying, pulling or unplugging the power tool. Keep cord away from heat, oil, sharp edges or moving parts. Damaged or entangled cords increase the risk of electric shock.
When operating a power tool outdoors, use an extension cord suitable for outdoor use. Use of a cord suitable for outdoor use reduces the risk of electric shock.
If operating a power tool in a damp location is unavoidable, use a residual current device (RCD) protected supply. Use of an RCD reduces the risk of electric shock.
Personal safety
Stay alert, watch what you are doing and use common sense when operating a power tool. Do not use a power tool while you are tired or under the influence of drugs, alcohol or medication. A moment of inatten
tion while operating power tools may result in serious personal injury.
Use personal protective equipment. Always wear eye protection. Protective equipment such as a dust mask, non-skid safety shoes, hard hat or hearing protection used for appropriate conditions will reduce personal injuries.
Prevent unintentional starting. Ensure the switch is in the off-position before connecting to power source and/or battery pack, picking up or carrying the tool. Carrying power tools with your finger on the switch or energising power tools that have the switch on invites accidents.
- Remove any adjusting key or wrench before turning the power tool on. A wrench or a key left attached to a rotating part of the power tool may result in personal injury.
- Do not overreach. Keep proper footing and balance at all times. This enables better control of the power tool in unexpected situations.
Dress properly. Do not wear loose clothing or jewellery. Keep your hair and clothing away from moving parts. Loose clothes, jewellery or long hair can be caught in moving parts.
If devices are provided for the connection of dust extraction and collection facilities, ensure these are connected and properly used. Use of dust collection can reduce dust-related hazards.
Do not let familiarity gained from frequent use of tools allow you to become complacent and ignore tool safety principles. A careless action can cause severe injury within a fraction of a second.
Power tool use and care
Do not force the power tool. Use the correct power tool for your application. The correct power tool will do the job better and safer at the rate for which it was designed.
Do not use the power tool if the switch does not turn it on and off. Any power tool that cannot be controlled with the switch is dangerous and must be repaired.
- Disconnect the plug from the power source and/or remove the battery pack, if detachable, from the power tool before making any adjustments, changing accessories, or storing power tools. Such preventive safety measures reduce the risk of starting the power tool accidentally.
- Store idle power tools out of the reach of children and do not allow persons unfamiliar with the power tool or these instructions to operate the power tool. Power tools are dangerous in the hands of untrained users.
- Maintain power tools and accessories. Check for misalignment or binding of moving parts, breakage of parts and any other condition that may affect the power tool's operation. If damaged, have the power tool repaired before use. Many accidents are caused by poorly maintained power tools.
8 | English
- Keep cutting tools sharp and clean. Properly maintained cutting tools with sharp cutting edges are less likely to bind and are easier to control.
Use the power tool, accessories and tool bits etc. in accordance with these instructions, taking into account the working conditions and the work to be performed. Use of the power tool for operations different from those intended could result in a hazardous situation. - Keep handles and grasping surfaces dry, clean and free from oil and grease. Slippery handles and grasping surfaces do not allow for safe handling and control of the tool in unexpected situations.
Service
Have your power tool serviced by a qualified repair person using only identical replacement parts. This will ensure that the safety of the power tool is maintained.
Safety information for routers
Hold the power tool by insulated gripping surfaces only, because the cutter may contact its own cord. Cutting a "live" wire may make exposed metal parts of the power tool "live" and could give the operator an electric shock.
Use clamps or another practical way to secure and support the workpiece to a stable platform. Holding the work by your hand or against the body leaves it unstable and may lead to loss of control.
The permitted speed of the cutting bit must be at least equal to the maximum speed marked on the power tool. If cutting bits run faster than their rated speed, they may break and fly off.
- Routers and other accessories must be able to fit exactly in the tool holder (collet) of your power tool. Application tools that do not fit exactly in the tool holder of the power tool will turn unevenly, vibrate heavily and may cause a loss of control.
Only bring the power tool into contact with the workpiece when switched on. Otherwise there is danger of kickback if the cutting tool jams in the workpiece.
Do not put your hands in the routing area or close to the router. Grip the auxiliary handle with your other hand. Holding the router with both hands avoids injury.
- Never rout over metal objects, nails or screws. The router could become damaged and cause increased vibration.
Use suitable detectors to determine if utility lines are hidden in the work area or call the local utility company for assistance. Contact with electric lines can lead to fire and electric shock. Damaging a gas line can lead to explosion. Penetrating a water line causes property damage or may cause an electric shock.
Do not use blunt or damaged routers. Blunt or damaged routers cause increased friction, create imbalances and may become jammed.
Always wait until the power tool has come to a complete stop before placing it down. The application tool can jam and cause you to lose control of the power tool.
Hold the power tool firmly with both hands and make sure you have a stable footing. The power tool can be more securely guided with both hands.
Products sold in GB only:
- Your product is fitted with an BS 1363/A approved electric plug with internal fuse (ASTA approved to BS 1362).
- If the plug is not suitable for your socket outlets, it should be cut off and an appropriate plug fitted in its place by an authorised customer service agent. The replacement plug should have the same fuse rating as the original plug.
- The severed plug must be disposed of to avoid a possible shock hazard and should never be inserted into a mains socket elsewhere.
Product Description and Specifications

Read all the safety and general instructions. Failure to observe the safety and general instructions may result in electric shock, fire and/or serious injury.
Please observe the illustrations at the beginning of this operating manual.
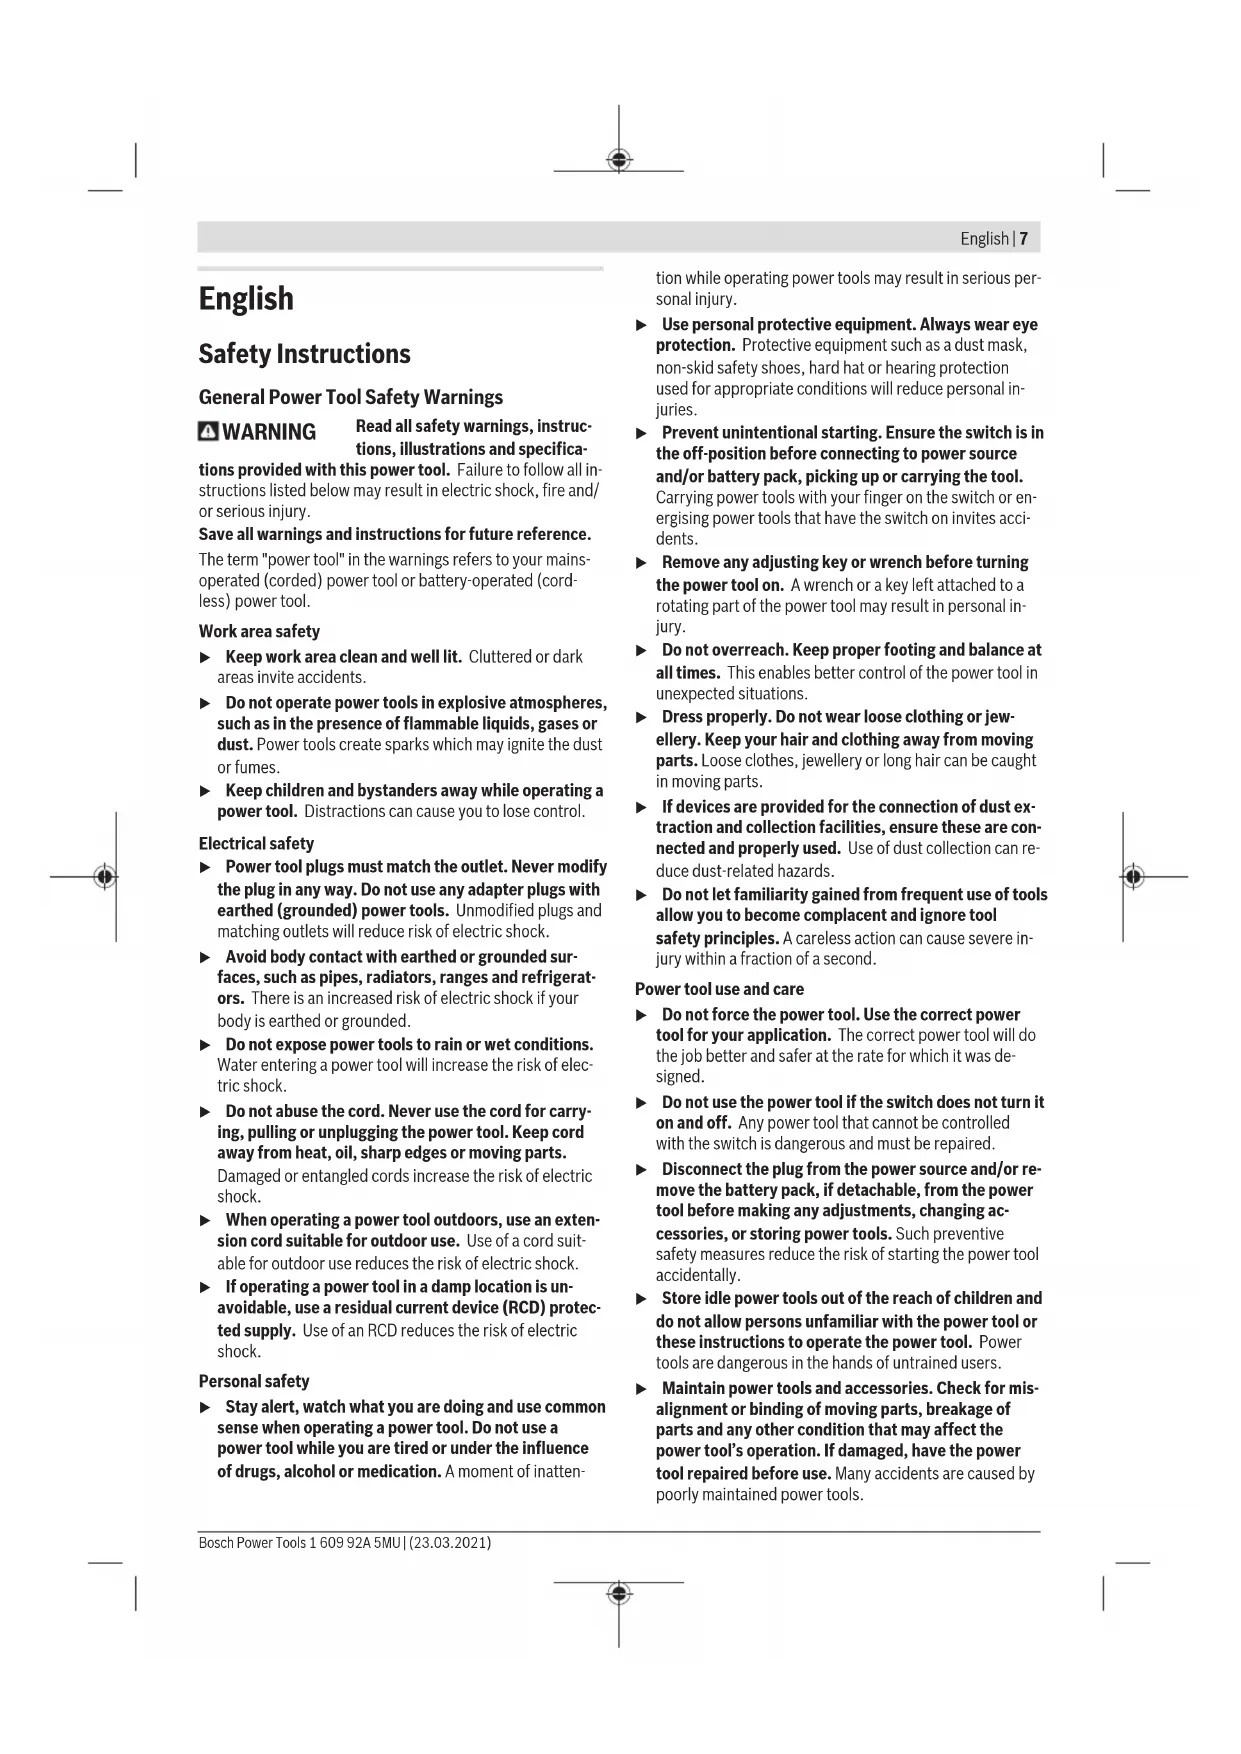
Intended use
The power tool is intended for copy routing as well as routing grooves, edges, profiles and elongated holes in wood, plastic and light building materials while resting firmly on the workpiece.
Can even be used to machine non-ferrous metals when used at a low speed with the appropriate router bits.
Product features
The numbering of the product features refers to the diagram of the power tool on the graphics page.
(1) Lock button for on/off switch
(2) Right handle (insulated gripping surface)
(3) Spindle lock button
(4) Wing bolt for parallel guide rods (2x)
(5) Chip protection
(6) Base plate
(7) Guide plate
(8) Holder for parallel guide rods
(9) Step buffer
(10) Protective sleeve
(11) Wing bolt for depth stop adjustment
(12) Slide with index mark
(13) Depth stop
(14) Scale for setting routing depth
(15) Left handle (insulated gripping surface)
(16) Clamping lever for locking the routing depth
(17) Unlocking lever for guide bushing
(18) Router bita
(19) On/off switch
(20) Speed preselection thumbwheel
(21) Cap nut with collet
(22) Open-ended spanner (19 mm)
(23) Extraction hose (dia. 35 mm)a
(24) Dust extraction adapter
(25) Knurled screw for dust extraction adapter (2x)
(26) Guide rod for parallel guide (2x)
(27) Parallel guide
(28) Centring pin
(29) Wing bolt for centring pin
(30) Curve guide
(31) Router compass/guide rail adapter
(32) Handle for router compassa
(33) Wing bolt for router compass coarse adjustment (2x) ^a)
(34) Wing bolt for router compass fine adjustment (1x)^a)
(35) Knob for router compass fine adjustment
(36) Centring screw
(37) Guide rail3
(38) Spacer plate (part of the router compass set)
(39) Guide bushing
a) Accessories shown or described are not included with the product as standard. You can find the complete selection of accessories in our accessories range.
Technical data
| Router GOF 130 | ||
| Article number | 3601 FB7 0.. | |
| Rated power input W 1300 | ||
| No-load speed min | 1 | 11000-28000 |
| Speed preselection ● | ||
| Constant electronic control ● | ||
| Connection for dust extraction ● | ||
| Compatible collets mm | inches | 6/8 1/4 |
| Router cage stroke mm 55 | ||
| Weight according to EPTA-Procedure 01:2014 | kg | 3.5 |
| Protection class | ☐/II | |
The specifications apply to a rated voltage [U] of 230V . These specifications may vary at different voltages and in country-specific models.
Fitting
Pull the plug out of the socket before carrying out any work on the power tool.
Inserting the router bit (see figure A)
Wearing protective gloves while fitting and changing router bits is recommended.
Router bits are available in a wide variety of designs and qualities depending on the intended application.
Router bits made of high-performance high-speed steel
(HSS) are suited to machining soft materials such as softwood and plastic.
Router bits with carbide tips are especially suitable for hard and abrasive materials such as hardwood and aluminium.
Original router bits from the extensive range of Bosch accessories are available from your specialist dealer.
Only use undamaged and clean router bits.
- Pull the chip protection (5) downwards.
- Press and hold the spindle lock button (3). If necessary, turn the motor spindle manually until it is locked in place.
- Loosen the cap nut (21) with the open-ended spanner (22) (width across flats of 19mm ) by turning it in direction ①.
- Slide the router bit into the collet. The shank of the router bit must be pushed at least 20mm into the collet.
- Tighten the cap nut (21) with the open-ended spanner (22) (width across flats of 19mm ) by turning it in direction ②. Release the spindle lock button (3).
- Pull the chip protection (5) upwards.
Do not insert a router bit with a diameter larger than 50mm when the guide bushing is not mounted. These router bits will not fit through the base plate.
Do not, under any circumstances, tighten the collet with the tightening nut until a router bit has been fitted. The collet may otherwise become damaged.
Dust/Chip Extraction
The dust from materials such as lead paint, some types of wood, minerals and metal can be harmful to human health. Touching or breathing in this dust can trigger allergic reactions and/or cause respiratory illnesses in the user or in people in the near vicinity.
Certain dusts, such as oak or beech dust, are classified as carcinogenic, especially in conjunction with wood treatment additives (chromate, wood preservative). Materials containing asbestos may only be machined by specialists.
- Use a dust extraction system that is suitable for the material wherever possible.
- Provide good ventilation at the workplace.
- It is advisable to wear a P2 filter class breathing mask. The regulations on the material being machined that apply in the country of use must be observed.
10 | English
Avoid dust accumulation at the workplace. Dust can easily ignite.
Fitting the dust extraction adapter
The dust extraction adapter (24) can be fitted to the front or the back using the hose connection. When fitting with the hose connection to the front, the chip protection (5) must first be removed. Fasten the dust extraction adapter (24) to the base plate (6) using the two knurled screws (25).
To ensure optimum extraction, the dust extraction adapter (24) must be cleaned regularly.
Connecting the dust extraction system (see figure B)
Attach an extraction hose (dia. 35mm 23) (accessory) to the fitted dust extraction adapter. Connect the dust extraction hose (23) to a dust extractor (accessory).
The power tool can be directly connected to the plug socket of a Bosch all-purpose dust extractor with remote starter. This dust extractor is started up automatically when the power tool is switched on.
The dust extractor must be suitable for the material being worked.
When extracting dry dust or dust that is especially detrimental to health or carcinogenic, use a special dust extractor.
Fitting the chip protection (see figure C)
Push the chip protection (5) into the guide from the front so that it clicks into place. To remove it, hold the sides of the chip protection and pull it forwards.
Operation
▶ Products that are only sold in AUS and NZ: Use a residual current device (RCD) with a nominal residual current of 30 mA or less.
Pay attention to the mains voltage. The voltage of the power source must match the voltage specified on the rating plate of the power tool. Power tools marked with 230V can also be operated with 220V .
Starting Operation
Preselecting the speed
You can preselect the required speed using the speed preselection thumbwheel (20), even during operation.
1-2 low speed
3-4 medium speed
5-6 high speed
The values shown in the table are guide values. The required speed is dependent on the material and the work conditions and can be determined by practical trials.
| Material Router bit | diameter [mm] | Thumbwheel position |
| Hardwood (beech) 4-10 | 12-20 | 5-6 |
| 3-4 | ||
| 22-40 | 1-2 |
| Material Router bit | diameter [mm] | Thumbwheel position |
| Softwood (pine) 4-10 | 5-6 | |
| 12-20 | 3-6 | |
| 22-40 | 1-3 | |
| Chipboard 4-10 | 3-6 | |
| 12-20 | 2-4 | |
| 22-40 | 1-3 | |
| Plastics 4-15 | 2-3 | |
| 16-40 | 1-2 | |
| Aluminium 4-15 | 1-2 | |
| 16-40 | 1 |
Switching On and Off
Before switching on/off, set the required routing depth.
To switch on the power tool, first press the lock button (1), then press and hold the on/off switch (19).
Press the lock button (1) again to lock the on/off switch (19).
To switch off, release the on/off switch (19). If the on/off switch (19) is locked with the lock button (1), briefly press the on/off switch (19) and then release it.
Constant electronic control
The Constant Electronic keeps the speed at no load and under load virtually consistent, guaranteeing uniform performance.
Setting the routing depth (see figure D)
The routing depth must only be set while the power tool is switched off.
To set the rough routing depth, proceed as follows:
- Place the power tool with a fitted router bit onto the workpiece you want to machine.
- Set the step buffer (9) to the lowest step; the step buffer audibly clicks into place.
- Loosen the wing bolt on the depth stop (11) so that the depth stop (13) moves freely.
- Push the clamping lever for locking the routing depth (16) in direction ① and slowly move the router down until the router bit (18) is touching the surface of the workpiece. Release the clamping lever for locking the routing depth (16) again to lock this depth. If necessary, push the clamping lever for locking the routing depth (16) in direction ② to fully lock it.
- Press the depth stop (13) down until it is resting on the step buffer (9). Set the slide with the index mark (12) to position 0 on the routing depth scale (14).
- Set the depth stop (13) to the required routing depth and tighten the wing bolt on the depth stop (11). Take care not to accidentally move the index mark (12).
- Push the clamping lever for locking the routing depth (16) in direction ① and move the router to the highest position.
For larger routing depths, you should perform the cut in several phases, so that only a small amount of material is re
moved after each cut. You can use the step buffer (9) to divide the routing process into several steps. To do this, set the required routing depth with the smallest step of the step buffer and, for the first cutting phases, select the higher steps to start with.
Working Advice
Protect router bits against shock and impact.
Pull the plug out of the socket before carrying out any work on the power tool.
Routing direction and routing process (see figure E)
- Routing must always be carried out with the workpiece being moved against the direction in which the router bit (18) is turning (up cut). If the workpiece is moved in the same direction as the router bit is turning (down cut), the power tool may be pulled out of your hands.
Set the required routing depth.
Place the power tool with a fitted router bit onto the workpiece you want to machine and switch on the power tool. Push the clamping lever for locking the routing depth (16) down and slowly move the router down until it reaches the set routing depth. Release the clamping lever for locking the routing depth (16) again to lock this depth. If necessary, push the clamping lever for routing depth stop (16) up to fully lock it.
Carry out the routing process with a uniform feed.
When routing is complete, move the router back to the highest position.
Switch the power tool off.
Routing with an auxiliary guide (see figure F)
For machining large workpieces, e.g. when routing grooves, you can fasten a board or straight edge securely to the workpiece as an auxiliary guide. The router can be guided along the path of this auxiliary guide. Move the router on the flattened side of the guide plate along the auxiliary guide.
For edge and profile routing without a parallel guide, the router bit must be fitted with a pilot pin or a ball bearing. While it is switched on, guide the power tool towards the workpiece from the side until the pilot pin or the ball bearing of the router bit is touching the side of the workpiece edge that you want to machine.
Guide the power tool along the workpiece edge. Pay attention that the router is positioned perpendicularly. Too much pressure can damage the edge of the workpiece.
Routing with a parallel guide (see figures G-H)
Slide the parallel guide (27) with the guide rods (26) into the base plate (6) and tighten it with the wing bolts (4) according to the required dimension.
While it is switched on, guide the power tool along the workpiece edge with a uniform feed and while applying lateral pressure to the parallel guide.
Routing curves (see figures I-J)
Turn the parallel guide (27) so that the guide surface is visible on top.
Slide the parallel guide (27) with the guide rods (26) into the base plate (6) and tighten it with the wing bolts (4) according to the required dimension.
Fit the centring pin (28) with the wing bolt (29) through the hole on the parallel guide (27).
Push the centring pin (28) into the marked centre point of the curve and carry out the routing process with a uniform feed.
Routing with the curve guide (see figures K-L)
Slide the parallel guide (27) with the guide rods (26) into the base plate (6) and tighten it with the wing bolts (4) according to the required dimension.
Fit the curve guide with guide roller attached (30) through the hole on the parallel guide (27).
Guide the power tool along the workpiece edge, applying light pressure to the sides.
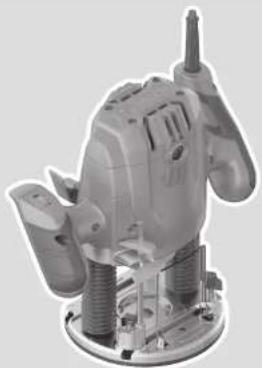
Routing with a router compass (see figure M)
You can use the router compass/guide rail adapter (31) for circular routing work. Fit the router compass as shown in the figure.
Screw the centring screw (36) into the thread of the router compass. Position the tip of the screw in the centre point of the curve you want to rout; make sure the tip of the screw reaches the surface of the workpiece.
Roughly set the required radius by moving the router compass and tightening the wing bolts (33) and (34).
Then loosen the wing bolt (34) and use the knob (35) to fine-adjust the length. One revolution corresponds to an adjustment range of 2.0mm . Each of the graduation marks on the knob (35) changes the adjustment range by 0.1mm .
Switch the power tool on and move it over the workpiece using the right handle (2) and the handle for the router compass (32).
Routing with a guide rail (see figure N)
You can use the guide rail (37) to rout in straight lines.
To level out the height difference, you must fit the spacer plate (38).
Fit the router compass/guide rail adapter (31) as shown in the figure.
Fasten the guide rail (37) to the workpiece using suitable clamping devices, e.g. screw clamps. Put the power tool with mounted guide rail adapter (31) on the guide rail.
Routing with the guide bushing (see figures O-P)
Using the guide bushing (39), you can transfer contours from templates or patterns to the workpiece.
Select the guide bushing that is suitable for the thickness of the template or pattern. Due to the protruding height of the guide bushing, the template must have a minimum thickness of 8 mm.
Move the release lever (17) and push the guide bushing (39) into the base plate (6) from below. The coding
12 | Français
cams must audibly click into the recesses of the guide bushing.
- Select a router bit with a diameter that is smaller than the interior diameter of the guide bushing.
To rout with the guide bushing (39), proceed as follows:
- Switch the power tool on and move it with the guide bushing towards the template.
- Push the clamping lever for locking the routing depth (16) down and slowly move the router down until it reaches the set routing depth. Release the clamping lever for locking the routing depth (16) again to lock this depth. If necessary, push the clamping lever for locking the routing depth (16) up to fully lock it.
- Move the power tool with the protruding guide bushing along the template, applying pressure to the sides.
Maintenance and Service
Maintenance and Cleaning
Pull the plug out of the socket before carrying out any work on the power tool.
To ensure safe and efficient operation, always keep the power tool and the ventilation slots clean.
In extreme conditions, always use a dust extractor if possible. Clean ventilation slots frequently using a brush and install a residual current device (RCD) upstream. When machining metals, conductive dust can settle inside the power tool, which can affect its protective insulation.
In order to avoid safety hazards, if the power supply cord needs to be replaced, this must be done by Bosch or by an after-sales service centre that is authorised to repair Bosch power tools.
After-Sales Service and Application Service
Our after-sales service responds to your questions concerning maintenance and repair of your product as well as spare parts. You can find explosion drawings and information on spare parts at: www.bosch-pt.com
The Bosch product use advice team will be happy to help you with any questions about our products and their accessories.
In all correspondence and spare parts orders, please always include the 10-digit article number given on the nameplate of the product.
Malaysia
Robert Bosch Sdn. Bhd.(220975-V) PT/SMY
No.8A, Jalan 13/6
46200 Petaling Jaya
Selangor
Tel.: (03) 79663194
Toll-Free: 1800 880188
Fax: (03) 79583838
E-Mail: kiathoe.chong@my.bosch.com
www.bosch-pt.com.my
You can find further service addresses at:
www.bosch-pt.com/serviceaddresses
Disposal
The power tool, accessories and packaging should be recycled in an environmentally friendly manner.

Do not dispose of power tools along with household waste.
Français
Robert Bosch Morocco SARL
53, Rue Lieutenant Mahmoud Mohamed
20300 Casablanca
Tel.: +212 5 29 31 43 27
E-Mail: sav.outillage@ma.bosch.com
www.bosch-pt.com/serviceaddresses
www.bosch-pt.com/serviceaddresses
Eliminação
www.bosch-pt.com/serviceaddresses
处理废弃物
www.bosch-pt.com/serviceaddresses
廢棄物處理
JolwHnJnJnJnJnJnJnJnJnJnJnJnJnJnJnJnJnJnJnJnJnJnJnJnJnJnJnJnJnJnJnJnJnJn
JauuovuaivaiiaIwWvovnuwVwovnuwauuauauauauauauauauauauauauauauauauauauauauauauauauauauauauauauauauauauauauauauauauauuuuuuuuuuuuuuuuuuuuuuuuuuuuuuuuuuuuuuuuuuuuuuuuuuuuuuuuuuuuuuuuuuuuuuuuuuuuuuuuuuuuuuuuuuuuuuuuuuuuuuuuuuuuuuuuuuuuuuuuuuuuuuuuuuuuuuuuuuuuuuuuuuuuuuuuuuuuuuuuuuuuuuuuuuuuuuuuuuuUU
nannnnnnaaannnnnnaanennnnnnaanennnnnnaan
aunnnaalwngnduaayuanuundu nnunnuanrnnn anlwnn
aunnnnnae annne nannnne aannnnnne
aalnnae aen nannan anan anan anan anan anan anan anan anan anan anan anan anan anan anan anan anan anan anan anan anan anan anan anan anan anan anan anan anan anan anan anan anan
wnlunnnnnaeannnnnneennnnnnnnnnnnnnnnnnnnnnnnnnnnnnnnnnnnnnnnnnnnnnnnnnnnnnnnnnnnnnnnnnnnnnnnnnnnnnnnnnnnnnnnnnnnnnnnnnnnnnnnnnnnnnnnnnnnnnnnnnnnnnnnnnnnnnnnnnnnn nn
A
yuvnnnnuovnuovnuovnuovnuovnuovnuovnuovnuovnuovnuovnuovnuovnuovnuovnuovnuovnuovnuovnuovnuovnuovnuovnuovnuovnuovnuovnuovnuovnuovnuovnuovnuovnuovnuovnuovnuovnuovnuovnuovnuovnuovnuovnuovnuovnuovnuovnuovnuovnuovnu
aunlalwunnnaanrnnnnae
nauuuaanuauuauuuuauuuuuuuuuuuuuuuuuuuuuuuuuuuuuuuuuuuuuuuuuuuuuuuuuuuuuuuuuuuuuuuuuuuuuuuuuuuuuuuuuuuuuuuuuuuuuuuuuuuuuuuuuuuuuuuuuuuuuuuuuuuuuuuuuuuuuuuuuuuuuuuuuuuuuuuuuuuuuuuuuuuuuuuuuuuuuuuuuuuuuuuuuuuuuuuuuuuuuuuuuUU
yannnnnnaaennnnnnaanrnnnnae
aannanenanaanen ananen ananen ananen ananen ananen ananen ananen ananen ananen ananen ananen ananen ananen ananen ananen ananen ananen ananen ananen
1 1
nnaananaananaananaananaananaananaananaananaananaananaananaananaananaananaananaananaananaananaananaananaananaananaananaananaananaananaananaananaananaananaananaananaananaananaananaananaananaananaananaananaananaananaananaananaananaananaananaananaananaananaanaraannnnnnnnnnnnnnnnnnnnnnnnnnnnnnnnnnnnnnnnnnnnnnnnnnnnnnnnnnnnnnnnnnnnnnnnnnnnnnnnnnnnnnnnnnnnnnnnnnnnnnnnnn
aannnnnnae aennnnnne nnnnne nnnnne nnnnne nnnnne nnnnne nnnnne nnnnne nnnnne nnnnne nnnnne nnnnne nnnnne nnnnne nnnnne nnnnne nnnnne nnnnne nnnnne nnnnne nnnnne nnnnne nnnnne nnnnne nnnnne nnnnne
aannnnnnae annnnnne nnnnne aannnnnne
m
aannnnaananaananaananaan anananaananaananaananaananaananaananaananaananaananaananaananaananaananaananaananaananaananaananaananaananaananaananaananaananaananaananaananaananaananaananaananaananaananaananaananaananaananaananaananaananaananaananaananaananaananaananaananaananaananaan ana
nunnnnaaannnnnaanennnnaaannn (39)
- 1nnaaunnnnnae nnne nnnnnae naan
- nannnnn nn nnnnnnnnnnnnnnnnnnnnnnnnnnnnnnnnnnnnnnnnnnnnnnnnnnnnnnnnnnnnnnnnnnnnnnnnnnnnnnnnnnnnnnnnnnnnnnnnnnnnnnnnnnnnnnnnnnnnnnnnnnnnnnnnnnnnnnnnnnnnnnnnnnnnnnnnnnnnnnnnnnnnnnnnnnennn
- 1
T
mTuVnuaaannnae
Wanlwaonannnnaaunauuua
Wnnuuunnuuauuaaannnnn
nntnnn nnnnnn nnnnnnnnnnnnnnnnnnnnnnnnnnnnnnnnnnnnnnnnnnnnnnnnnnnnnnnnnnnnnnnnnnnnnnnnnnnnnnnnnnnnnnnnnnnnnnnnnnnnnnnnnnnnnnnnnnnnnnnnnnnnnnnnnnnnnnnnnnnnnn nn nannn nannn nannn nannn nannn nannn nannn nannn nannn nannn nannn nannn nannn nannn nannn nannn nannn nannn nannn nannn nannn nannn nannn nannn nannn nannn nannn nannn nannn nannn nannn nannn nannn nannn nn annn nn annn nn annn nn annn nn annn nn annn nn annn nn annn nn annn nn annn nn annn nn annn nn annn nn annn nn annn nn annn nn annn nn annn nn annn nn annn nn annn nn annn nn annn nn annn nn annn nn annn nn annn nn annn nn annn nn annn nn annn nn annn nn annn nn ann
nwnnnnaanrnnnnaaannnnn nnnnnn
nnuuunnuuunnuuunnuuuuunnuuuu uuuuuuuuuuuuuuuuuuuuuuuuuuuuuuuuuuuuuuuuuuuuuuuuuuuuuuuuuuuuuuuuuuuuuuuuuuuuuuuuuuuuuuuuuuuuuuuuuuuuuuuuuuuuuuuuuuuuuuuuuuuuuuuuuuuuuuuuuuuuuuuuuuuuuuuuuuuuuuuuuuuuuuuuuuuuuuuuuuuuuuuuuuuuuuuuuuuuuuuuuUU
ywnnnnnynnynnnnnnnnnnnnnnnnnnnnnnnnnnnnnnnnnnnnnnnnnnnnnnnnnnnnnnnnnnnnnnnnnnnnnnnnnnnnnnnnnnnnnnnnnnnnnnnnnnnnnnnnnnnnnnnnnnn
lnu
lnu wun Iwun wwn
15
2525 4
10110
In: +66 2012 8888
wn: +66 2064 5800
www.bosch.co.th
y
2
10/11 my 16
www.bosch-pt.com/serviceaddresses
#
a
wunwunwnnnnnaaennnnnne

WwJnJGdJWnJUuJyau!
Bahasa Indonesia
Keselamatan personnel
Palma Tower 10th Floor
Jalan RA Kartini II-S Kaveling 6
Pondok Pinang, Kebayoran Lama
www.bosch-pt.com/serviceaddresses
Caramembuang
Cac may phay co luoi cat kim loai cung (HM)
Lap Bo Phan Hut Ghep Noi
Cut noi ong hut (24) co the duoc lap ra truc hoac ra sau bang dau noi ong. Khi lap voi dau noi ong phia truc, truc do phai thao tam chan vo bao (5). Co dinh cut noi ong hut (24) voi 2 vit dau co khia (25) tai chan de khuon bao (6).
De dam bao su hut duoc tohhat, bo phan hut (24)
ghep noi thai duoc lam sach thuong xuyen.
Noi Thiiet Bi Hut Bui (xem Hinh B)
Cám ñng hút (Ø 35 mm) (23) (phu kien) vao cut noi ñng hút dā láp. Nài ñng hút (23) vói mot chiec may hút bui (phu kien).
Dung cu dien co the duoc két noi truc tiep voi 6 cam qua may hut bui da nang Boschbang thiet bi khoi dong tu xa. May hut chan khong khoi dong tu dong khi may duoc ma.
May hut bui phai thich hop dang cho loai vat lieu danggia cong.
Khi hut bui kho loai dac biét gay nguy hai dén suc khoe hoac gay ra ung thu, hay su dung may hut bui loai chuyen dung.
Lap tam chan vobao (xem Hinh C)
Dat tam chan vo bao (5) tu phia truc vao ranh dan huong sao cho no khop vao. De thao, hay cam vao ben canh cua tam chan vo bao va keo ve truc.
Vân Hanh
Hay can than voi nguon dien! Dien the nguon phai dung voi dien the da ghi ro tren nhan may. Dung cu dien duoc ghi 230 V cung co the duoc van hanh o 220 V.
BàT Dàu VAn Hành
Chon Truc Toc Do
Voi num vān de chon truoc toc do (20), ban co the chon truoc so vong quay can thiet ca khi dang vanh.
1-2 so vong quay thap
3-4 so vong quay trung binh
5-6 sô vong quay cao
Cac tri so trinh bay trong biieu do la cac tri so chuan. Toc do can co tuy thuoc vao vat lieu va dieu kien hoat dong, vao cth xac dinh duoc bang th nghiem thuc te.
| Nguyên vát liếu | Dếng kinh phay [mm] | Vẻ Trú cúa Núm Xoay |
| Gō cóngx (gǒ dè gai) | 4-10 | 5-6 |
| 12-20 | 3-4 | |
| 22-40 | 1-2 | |
| Gō mēm (gǒ thùng) | 4-10 | 5-6 |
| 12-20 | 3-6 | |
| 22-40 | 1-3 | |
| Ván dǎm (ván okal) | 4-10 | 3-6 |
| 12-20 | 2-4 | |
| 22-40 | 1-3 | |
| Nhú a mù | 4-15 | 2-3 |
| 16-40 | 1-2 | |
| Nhôm | 4-15 | 1-2 |
| 16-40 | 1 |
BàT Mò và Tát
Hay thiet lap do sau phay truc khi bat/tat.
De Bāt dung cu dien, truoc hét hay nhán nut ham (1), sau do nhàn cóng tac bāt/tat (19) va nhân giū.
De khoa cng tac bat-tat (19) hay nhan lai nut ham (1).
De Tāt thā cóng tāc bāt/tāt (19). Neu ban dung nut hām (1) dé khöa cóng tāc bāt/tāt (19), hay nhān nhanh cóng tāc bāt/tāt (19) va sau do nhā ra.
www.bosch-pt.com/serviceaddresses
Su thai bo
May, linh kien va bao bi phai duoc phan loai de tai che theo huong than thien voi moi truong.

Khong duoc thai bo dung cu dien vao chung voi rac sinh hoat!
Iooal jno yolll Jaaowu yao
aJ 100000000000000000000000000000000000000000000000000
Uoal ju 10a caiaiJI JuiJ 0aLgU
Jol
oJg aaiuag ala lo g uaglg uas
auius ooc oaaui X. Jauu uua jy
jU Uo nglo sic gl ueo nglo
olU psc.aoggl gl gaoJI g Udo
se auiuoi oall poaiu sic oalg abll .Oubu Uo! Uy
sIg .aauuill aauu Ijqni -dR
aauuul iujai ulj y aegl ujuu lai
uuuug uall no aagll elios aunuull
wuiuaggl ggl ggaln qjz1n o aqlgl
jno auiuagll oall laoiu ogp u
Jg 1 g Jg j 1 g 1 g 1 g 1 g 1 g 1 g 1 g 1 g 1 g 1 g 1 g 1 g 1 g 1 g 1 g 1 g 1 g 1 g 1 g 1 g 1 g 1 g 1 g 1 g 1 g 1 g 1 g 1 g 1 g 1 g 1 g 1 g 1 g 1 g
Jolc .aabllp wllg lag 4
Ls caww .lals cljlg Lc ag
Cgal ju Jkwl jq pail
.ao gio j
y 8.aaiaaai yjLp 4
J 1 Lg Jg aalal
J 1 J 1 J 1 J 1 J 1 J 1 J 1 J 1 J 1 J 1 J 1 J 1 J 1 J 1 J 1
JgIg g baw jj JgJ 1
Lgolsswaiag agogog LgJ no sS
bawu JgJ pdsWl Jy .pW Lk
. jlln aiaa lalaae 1
8ylo y ayur SsJ o dss W 2
aayu laaon Jolr sglg Jlaag
auiyssi oaswl sse Ige geil
ugpsdawwyy .qolsswol
no jaj G
auiyjSll piaawlg aolao jnnae iaiiipaiwI jglall uaaaybaj 4
. 111111111111111
0sall abwlg loljg jsiu Jssu Jsu
. jgsldlaJ Lyaiaiaiaiaiaiaiaiaiaiaiaiaiaiaiaiaiaiaiaiaiaiaiaiaiaiaiaiaiaiaiaiaiaiaiaiaiaiaiaiaiaiaiaiaiaiaiaiaiaiaiaiaiaiaiaiaiaiaiaiaiaiaiaiaiaiaiaiaiaiaiaiaiaiaiaiaiaiaiaiaiaiaiaiaiaiaiaiaiaia
JlKlI JdJl
J 1 J
JgJgJgJgJg
A
. 1000000000000000000000000000000000000000000000000000000000
UaIg aJdI IaIaIaI 1
(auijgSJI aaiuJg)alauu (auijgSJI auiuJI auiuJI auiuJI auiuJI auiuJI auiuJI auiuJI auiuJI auiuJI auiuJI
Jusu Jka Jlo
.
Udui dLig Ue JuaI Uaig u
g jg g jll jslj l jla jl jl j 1111 1111 1111 1111 11
Uo 1uui 100
. 100000000000000000000000000000000000000000000000
jUJQULUo
auiuJU 0 JU Uy uUuJU 0 auiuU uUgU
jbi) aagai gajgss sall 2y jll ylgall aaa . (yjlljus
aogolgawu
gglgglg 1sllkLg 10gS loic aui jglu lo sall jbs 1j .Jy Jogo g ojo daw
aJb021 Jc aJy 1J aJyR
auijus oedll 11111111111111111111111111111111111111111111111111111111
| ### | |
| ### | |
| ### | |
| ### | |
| ### | |
| ### | |
| ### | |
| ### | |
| ### | |
| ### | |
| ### | |
| ### | |
| ### | |
| ### | |
| ### | |
| ### | |
| ### | |
| ### | |
| ### | |
| ### | |
| ### |
aiaJI cuiJI
aalaiiall alil 1c laaiia aao jso
gwwJJJgblgaballoLduiogaiJl
jIgblgaoaJUlogloJIg aouill
www.bosch-pt.com:
EcluaolaiwBosch j
Lgio ggsy Jlwaow | 1 JnS 13
.qljlaLog
aagg g aaii g jaiai jj
Uulb gI Jluwawl uJluwJ sic gioJIgio
JUC
U
Robert Bosch Morocco SARL
gjoo oo ojjoll gJw,53
LJ1J120300
+212529314327:
sav.outillage@ma.bosch.com: ≤
:doall jglic jaojall
www.bosch-pt.com/serviceaddresses
aui j 10
gglgglgduuJgSJJdssu
aiuI Lc abglo aayjby Ulaill aoJso
aIgai jgj yjI aI gJ 1s Jy Iy
dawg nn Jg jI gJ .sinj Jy
SjIy Jn Jn Jn Jn Jn Jn Jn Jn Jn Jn Jn Jn Jn Jn Jn Jn Jn Jn Jn Jn Jn Jn Jn Jn Jn Jn Jn Jn Jn Jn Jn Jn Jn Jn Jn Jn Jn Jn Jn Jn Jn Jn Jn Jn Jn Jn Jn Jn Jn Jn J.
1Jl 1000000000000000000000000000000000000000000000000000000000000000000000000000000000000
sglwj j. swhg wu 1
. g j cij g l
Jl g j Jg w g
sglwJd j gds oikws
sglawj CwI koo Cjg g sio
. g uo
JlWg Jlwl g jy d G
S O Sg aL Wg Lg jc g jk
ds g w jabos y, cwI osw dljl jgc
OlaWg qai CwJd jlwg n
Jc g jk UJlwg j OlaWl .gog
. jy Jy Jc g jy Jl Jw igaa
j0sglgaw jil gaw cbl sui 1w l koo .g w qai | gaoi .gauu jl gus ujc jalajgj
wJl
1g
gglgglgglgglgglgglgglgglgglgglgglgglgglgglgglgglgglgglgglgglgglgglgglgglgglgglgglgglgglgglgglgglgglgglgglgglgglgglgglgglgglgglgglgglgglgglgglgglgglgglg
.
1j
.
gJyIjI jI JolscJgW .wU
Josuwolab 1sluw
4.1Jd jg j
jSg ju sl uJ g o w qul ygs dU Jg gos JLdabq Jus CwI .CwI U
4oJc g oIgIwS 54
JLLaIgjUgWJbIaI aagjJLS Egi gSJS Jw g Suu.
j jjjl oai
Jauo, Suw oJgaw
dus sds jg g jgl sIg 1sJ Jg g iol ojj sl .iuao
uugjw
Jauaiau a bao jy Jlai Jn Jy J
JUaI UaI Lba jg Ege Js
Jai d s w ao cuy J. laoi o slaw
JJJauai law o
jSLj jSjGai! Slaiai (G)
CwSJUgBwJbG JyJjI 4
JLsUwBwUoJNkOJIy
.1JgogKsws
(1)
9 sigw"qurJlola"Jj CjRjI jI
.
62|s
aJgJgLJdaw (32)
j9 jy jai yj Sg (33)
(a(2x)
(a)
(a_j) 15 (a_j)
(a) (S) S. 20 (36)
(^aL_air) 137
ggo"j9 jμ" cww s) dolg (38)
(ω)
LgLgLgUgUw (39)
Gai jilolw oJgogjgbi
wjg jI J Caleio Jolc wJ Lab.Jg
aaij wulgolalso aui
giäo
| GOF 130 | jls kly jfr olkss |
| 3601 FB7 0.. | jg oJah |
| W1300 gol ng jln g | |
| min1100d28000 tJdS dJdS | |
| ● | CJcJyJil |
| ● | Lg jg jll oiiS cJt |
| ● | Jlq g JdS oJdS lJal |
| 6/8 | mm |
| 1/4 | inch |
| 55 | mm |
| 3,5 | kg |
11/回
gsljgl230[U]
iLglaio jao 100.000000000000
uai
jJlJlJil JUwJdWgS,
jg ajj jJlJg
(Aggi duiEgj)
aai 15g aai g w dgi
j1 jg jg 9
.
gLoJooj jGSLo aJy Jggo
.
1g jj w jxg g 1s l s
pji gssilopj slgo[5gJ UJS Jc(HSS)
SiiuwoLio SuWg
(HM)jg w jg w y s1s sLwjg a
Jg Jg g Jg Jg Jg Jg Jg Jg Jg Jg Jg Jg Jg Jg Jg Jg Jg Jg Jg Jg Jg Jg Jg Jg Jg Jg Jg Jg Jg Jg Jg Jg Jg Jg Jg Jg Jg Jg Jg Jg Jg Jg Jg Jg Jg Jg Jg Jg Jg Jg Jg Jg J g J g J g J g J g J g J g J g J g J g J g J g J g J g J g J g J g J g J g J g J g J g J g J g J g J g J g J g J g J g J g J g J g J g
gJgJgWJgS OJgJgKgJg- .sO slaiU (JSL aB) oJlo dggjI Lw JSL JLo dS SswL dAgi - .sUy Jd gJgJgSglq Wg 123456789012345678901234567890
LdJggsjgss Jgao jao g jilga .sis agj sks labe g jgo jolaiw .sis Sgla Jl Joo Juc g jg gaojI .sigw Jauo Jiwu u jilgi o juc g j
Sso oLgJgJgJgJgJgJgJgJgJgJgJgJgJgJgJgJgJgJgJgJgJgJgJgJgJgJgJgJgJgJgJgJgJgJgJgJgJgJgJgJgJgJgJgJgJgJgJgJgJgJg
Sls Jalpo jjg jj SLo gac sgo j
Sos y .sis |jai jios dui ju 1j Sjw
abw jss pJ
Gac jgbio n jy .sis paawj jhy cJg
Jn jy aBw nn jy LgJ 1j olgs JSLj
Ld JSL dao ng g g kiaa glaw
. lai fai i J glaw jn j
Lac Ulsj
cbsla ju g dpa yj j j j 1
jglg jgls agg pjl ju u 4 jui jil jil aal ggs kjjl .
(Eg y d g) 15j jd g C
Cg jyolgomdy lgsjjd
.(cfo) s y pai (18) jj wS
(2)jjwSs jy Sj jj J
LJ Lw Cws jI Gj J I J W J Ss (ggo
.
. 10g jjg gac J5 dabg sG oW cai jg daL i jg jjI .
16jgacnJgSlyuS Jg p
duauiI JyLb jg g dJw yU yI
CswD OoWpabii SjSjGac U dyIy
gac uJcSgluyuS Jg
Sgi Gac U dyS WOJgU (16) Sjg
Sjg UyS JgPogU gU 5. gW C
U U,dyuWgUyU (16) Sjg Gac U dyS
Sis Cui Uq U
Ssplal csiK Uy U yLg jg LAC
UyUyUyUyU Cuaq, SjLg jg Uy U y
JyUyUyUyUyUyUy
is gaj) SoS ojjl qj Fgai
sJg j 1 JIg i Jg i Jg i Jg i Jg i Jg i Jg i Jg i Jg i Jg i Jg i Jg i Jg i Jg i Jg i Jg i Jg i Jg i Jg i Jg i Jg i Jg i Jg i Jg i Jg i Jg i Jg i Jg i Jg i Jg i Jg i Jg i Jg i Jg i J g i J g i J g i J g i
jg(u|jus)aog
la uuguaa aagaaa aauuauauauauauauauauauauauauauauauauauauauauauauauauauauauauauauauauauauauauau
gac uus Lbs 15gJLswg jy
uuuus bs dss uus J (11) gJw
.iss csa dljl gab (13) gJWgac
gac nss lao sU s Uo p
9dunu 0 uuaa uu (16) sJj
uauuauuauuauuauu (17) uuuu (18) uuuu
uauuauuauuauuuuu (19) uuuu uuuu
uauuauuuuuuuuuuu (16) uuuu
uauuuuuuuuuuuu (17) uuuu uuuu
uauuuuuuuuuuuu (16) uuuu uuuu
JUw 13)gac Jus Sbs - j9 (9)aw jn ool s gj U uu jug 12) w coIc ly I ygss. J4 (14) 5j jgac ss d0 cgo
gac 13) gac jus sb - (59) Sswgjag oolg j. d aS0a 11) gac jus sb coIc y gus ds wduqdi
goc uJgSlyuS Jg p 1 gss Jw0 1 (16) jLj .sUcUcgo UjIyUy
124uimssusjssl
JU 37) lai J U
U. jui .uS ooo Js aabg sgi y
laim J u (31) lai J u
Egj) (SLS LsLlLgLw Ly SLSj9 (O-ugaiu
Jg 39)S L S U gUuS Ss a
10aab (sg) I u uuUu U Uu Jb
aigai LgLgLgJgLgJgLgJgLgJgLgJgLgJgLgJgLgJgLgJgLgJgLgJgLgJgLgJgLgJgLgJgLgJgLgJgLgJgLgJgLgJgLgJgLgJgLgJgLgJgLgJgLg
(6)du daa Js uJy j1 (39) 5Lg Lg Ula (SgJUauu (204 yu) slalss. uJy Jg (SgJUauu yu) ggb duy (LgLo yu) .uuu Lg Lg Uglu
1gglw jj0s1jjg 4 .siS ylaI gJL sW
39 5gS gLgUgUwUgSjgSj
GgUgUgUgUgUgUgUgUgUgUgUgUgUgUgUgUgUgUgUgUgUgUgUgUgUgUgUgUgUgUgUgUgUgUgUgUgUgUgUgUgUgUgUgUgUgUgUgUgUgUg Ug Ug Ug Ug Ug Ug Ug Ug Ug Ug Ug Ug Ug Ug Ug Ug Ug Ug Ug Ug Ug Ug Ug Ug Ug Ug Ug Ug Ug Ug Ug Ug Ug Ug Ug Ug Ug Ug Ug Ug Ug Ug Ug Ug Ug Ug Ug Ug Ug Ug
g(2) CwJ Cwaw dws J O w jw gj jj J 32
www.bosch-pt.com/serviceaddresses
olwJgJg0jI
gblsui sii daiu g alao,
yjgajləsjjCuwjbbsJJ
.
j1sui j 1j j
!sjilui

2609200143


- GOF 130 Professional
- General Power Tool SafetyWarnings
- WARNING
- Work area safety
- Electrical safety
- Personal safety
- Power tool use and care
- | English
- Service
- Safety information for routers
- Products sold in GB only:
- Product Description and Specifications
- Intended use
- Product features
- Fitting
- Inserting the router bit (see figure A)
- Router bits made of high-performance high-speed steel
- Dust/Chip Extraction
- | English
- Fitting the dust extraction adapter
- Connecting the dust extraction system (see figure B)
- Fitting the chip protection (see figure C)
- Operation
- Starting Operation
- Preselecting the speed
- Switching On and Off
- Constant electronic control
- Setting the routing depth (see figure D)
- Working Advice
- Routing direction and routing process (see figure E)
- Routing with an auxiliary guide (see figure F)
- Routing with a parallel guide (see figures G-H)
- Routing curves (see figures I-J)
- Routing with the curve guide (see figures K-L)
- Routing with a router compass (see figure M)
- Routing with a guide rail (see figure N)
- Routing with the guide bushing (see figures O-P)
- | Français
- Maintenance and Service
- Maintenance and Cleaning
- After-Sales Service and Application Service
- Malaysia
- Disposal
- Français
- Eliminação
- 处理废弃物
- 廢棄物處理
- A
- m
- T
- mTuVnuaaannnae
- nwnnnnaanrnnnnaaannnnn nnnnnn
- lnu
- #
- Bahasa Indonesia
- Keselamatan personnel
- Caramembuang
- Lap Bo Phan Hut Ghep Noi
- Noi Thiiet Bi Hut Bui (xem Hinh B)
- Lap tam chan vobao (xem Hinh C)
- Vân Hanh
- BàT Dàu VAn Hành
- Chon Truc Toc Do
- BàT Mò và Tát
- Su thai bo
- aiaJI cuiJI
- aui j 10
- wJl
- 1g
- uugjw
- jSLj jSjGai! Slaiai (G)
- Lac Ulsj
- is gaj) SoS ojjl qj Fgai
- jg(u|jus)aog
- Egj) (SLS LsLlLgLw Ly SLSj9 (O-ugaiu
- 1gglw jj0s1jjg 4 .siS ylaI gJL sW
- olwJgJg0jI
Brand : BOSCH
Model : GDE max Professional
Category : Electric router