
Alpatec Paradiso Ceramic 1500W - Heating TAURUS - Free user manual and instructions
Find the device manual for free Alpatec Paradiso Ceramic 1500W TAURUS in PDF.
| Brand | Taurus |
| Model | Alpatec Paradiso Ceramic 1500W |
| Product type | Wall-mounted ceramic heater |
| Power | 1500 W |
| Power supply | 220-240 V ~ 50/60 Hz |
| Operating modes | Comfort, Economy, Frost Free, Holiday, Chrono, Turbo/Boost, Economy 17°C, Pilot Wire (France) |
| Special functions | Open window detection, Child safety (power reduction 40%/50%/60%), Adaptive temperature control (ASC), Time programming P1/P2/P3, Key lock, kWh consumption meter |
| Temperature range | 7 °C (Frost Free) to 32 °C (Max Comfort) |
| Installation | Wall mounting with supplied bracket. Min. distance to floor: 15 cm, above: 35 cm, sides: 15 cm |
| Maintenance and cleaning | Clean with a damp cloth and mild detergent. Do not use solvents, abrasive or acidic products. Do not immerse. |
| Safety | Thermal protection device against overheating. Integrated child safety lock. |
| Weight | Approximately 4 kg (estimate) |
| Dimensions (W x H x D) | Approximately 60 x 45 x 12 cm (estimate) |
| Warranty | Compliant with applicable legislation. Authorized Taurus technical support. |
Frequently Asked Questions - Alpatec Paradiso Ceramic 1500W TAURUS
User questions about Alpatec Paradiso Ceramic 1500W TAURUS
0 question about this device. Answer the ones you know or ask your own.
Ask a new question about this device
Download the instructions for your Heating in PDF format for free! Find your manual Alpatec Paradiso Ceramic 1500W - TAURUS and take your electronic device back in hand. On this page are published all the documents necessary for the use of your device. Alpatec Paradiso Ceramic 1500W by TAURUS.
USER MANUAL Alpatec Paradiso Ceramic 1500W TAURUS
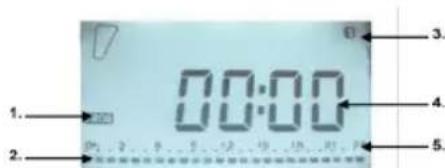
A Digital control cover
B Digital control
C Main transmitting body
CONS
1- FIL PILOTE mode *Only on specified models
2-COMFORT mode
3-ECONOMIC mode
4-ANTIFRUST mode
5-HOLIDAY Mode
6-TIME Mode
7-TURBOXOCTMode
8- ECONC O Mode 17C
9- OPEN WINDOW DETECTION
10- ADAPTEMPERATURE CONTROL (ASC)
11- CHILD SAFETY
12- POWER LEVEL INDICATOR
13- BLOCK
14- KWh CONSUMPTION METER
15- CONSUMPTION INDICATOR
16- P1P2P3PROGRAM
17- 7DAYS OF THE WEEK
18- TIME SLOTS
19- 88:88TEMPERATURE / TIME / CONSUMPTION
BUTTONS
16-ON/OFF-STANDBY
17- PLUS AND MINUS KEYS
18- MODE
19-TIMER
20-PROGRAM
USE AND CARE:
Fully unroll the appliance's power cable before each use.
Do not use the appliance if the on/off switch does not work.
Do not use the appliance at an angle or turn it over.
Do not turn the appliance over while it is in use or connected to the mains.
If you use the appliance in a bathroom or similar place, unplug the appliance from the mains when it is not in use, even if it is only for a short while, as proximity to water involves a risk, even if the appliance is disconnected.
Unplug the appliance from the mains when not in use and before undertaking any cleaning task.
Store this appliance out of reach of children and/ or those with reduced physical, sensory or mental abilities or who are unfamiliar with its use
Do not store the appliance in a vertical position.
Do not put the appliance away if it is still hot.
Keep the appliance in a dry, dust-free place, out of direct sunlight.
Never leave the appliance unattended while in use.
Never leave the appliance connected and unattended if not in use. This also saves energy and prolongs the life of the appliance.
Do not use the appliance to dry garments of any kind.
Turning the thermostat control to the minimum (MIN) setting does not guarantee that the iron is switched off completely.
INSTALLATION
Be sure to remove all packaging material from inside the appliance.
Ensure that the appliance is level with respect to the floor.
Keep the appliance away from flammable material such as textiles, cardboard or paper, etc.
Ensure that neither the air inlet or outlet becomes totally or partially covered by drapery, clothing, etc., as this increases the risk of fire.
In the event of installation in the bathroom, position the wall fitting so that the base, socket, power supply cable, switches or other controls cannot be reached by a person in a bath, shower or washbasin.
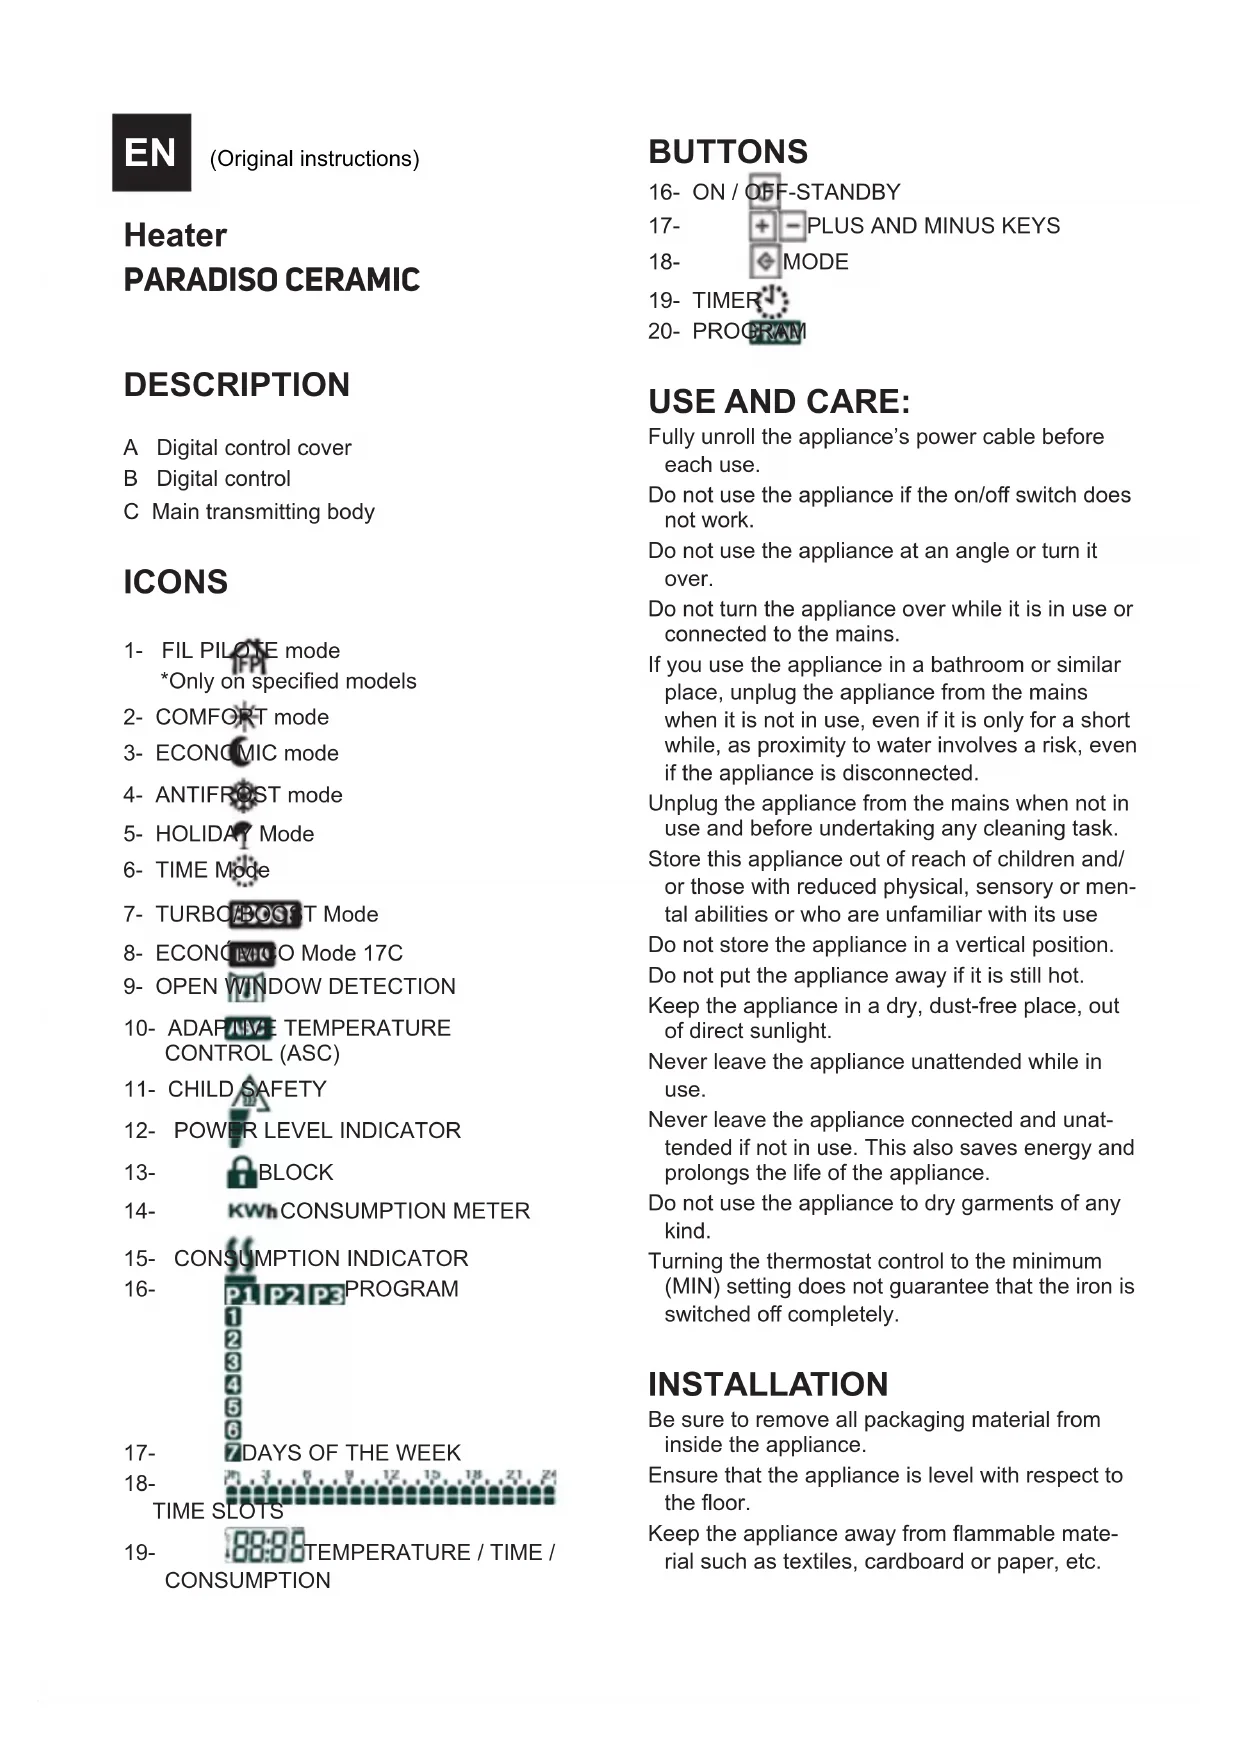
The appliance must be fixed to a wall. The minimum distance between the bottom of the appliance and the floor is 15cm (Fig.1).
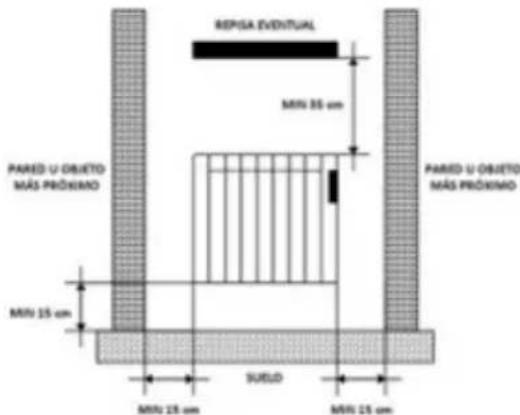
Fig.1
The appliance needs to be correctly ventilated in order to operate correctly. Leave a space of 35 cm above it and 15 cm on both sides.
Do not cover or obstruct any openings in the appliance.
The plug must be easily accessible so it can be disconnected in an emergency.
For greater efficiency, the appliance must be installed in a location in which the ambient temperature is between 12 to 32^ .
To achieve the highest efficiency from the appliance and so as to be able to install the appliance on a cold wall (an exterior wall) and below a window. But never obstructing or covering a ventilation area.
The appliance should work well with its wall support attached or with its base/feet attached.
The appliance is equipped with a wall bracket (Fig2), which must be fixed to the wall.
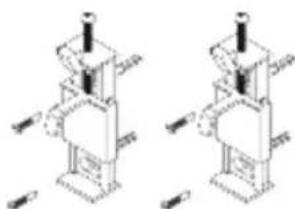
Fig. 2
FIXING TO THE WALL (FIG.3):

Fig.3
The appliance has a wall support (FIG2) to support the product.
Using the drilling template, mark the position of the fixing dowels on the wall, taking into account the above-mentioned distances between the device and the wall.
Drill on the marks and introduce the plugs (Fig.3). Fit the support, lining up its holes with those of the plugs, and screw on (Fig.3).
Make sure that the bracket is firmly fixed; it should be able to support twice the weight of the appliance.
Fit the appliance into the wall support.
Secure the radiator to the bracket using the screws provided (Fig. 4).
Fig.4
USE
BEFORE USE:
Remove the appliance's protective film.
Make sure that the entire product's packaging has been removed.
Some parts of the appliance have been lightly greased, consequently, the appliance may give off a light smoke the first time it is used. After a short time, this smoke will disappear.
To eliminate the smell given off by the appliance when used for the first time, it is recommended to have it on at full power for 2 hours in a well-ventilated room.
Prepare the appliance according to the function you wish to use.
USE:
ON/OFF (STAND-BY)
Press the On/Off (Stand-by) button, to switch the radiator on or to set the off/stand-by mode.
If the off/stand-by mode is activated, the corresponding icon will appear on the display and two 0.5 second beeps will sound and the time will be displayed.
When the device is switched on, a beep will sound for one second, and the icon will disappear.
MAIN FUNCTIONS

PILOTEMode:(FORUSEIN FRANCELY).
In this mode, the radiator is controlled by a control unit with this system.
To activate it, follow the following steps:
-Press the "Mode" button repeatedly until the

icon appears on the display. From then on, operating mode of the radiator is determined by the control unit.

CONFORT mode:
This is the standard operating mode of the radiator to maintain the temperature desired by the user.
To activate it, follow the following steps:
Press the "Mode" button repeatedly until the icon appears on the display.
Select the desired temperature using the buttons
and The minimum value that can be programmed is equal to the value of the temperature programmed in economy mode plus 0.5^ . The maximum value is 32^ .
ECONOMIC mode: By selecting this mode, the radiator maintains the room temperature at the selected room temperature.
To activate it, follow the following steps:
Press the "Mode" button repeatedly until the icon appears on the display.
Select the desired temperature using the buttons and The maximum value that can be programmed is equal to the value of the COMFORT temperature minus 0.5^ . The minimum value is 7^ .
NOTE: The COMFORT and ECONOMIC temperatures are the determining values for programming. It is not possible to select a temperature value for the ECONOMIC mode higher than the value for the COMFORT temperature, as this is not allowed by the electronic thermostat. During use, it is possible to change the temperature by simply pressing the buttons and

ANTIFROST mode:
By selecting this mode, the room temperature is set to 7^ . To activate it, press the "Mode" repeatedly until the icon appears on the display.

HOLIDAY mode:
By selecting this mode, the radiator enters ANTI-FROST mode for a period of time set by the user.
To activate it, follow the following steps:
Press the "Mode" button repeatedly until the icon appears on the display.
Using the button and, it is possible to select the length of the holiday period, from 12 hours to 40 days, with an increase of one hour from 12 to 24 hours and with an increase of one day from 24 hours.

TIMER mode:
In this mode, the room temperature is maintained at the COMFORT or ECONOMIC temperature depending on the programmes set for the different time slots of the day (P1, P2 or P3).
To activate it, follow the following steps:
Press the "Mode" button repeatedly until the

icon appears on the display.
Press the TIMER button to select one of the pre-set factory programmes (Pnd) or P2 the user-configurable programme (P3
For P3 configurable programming, refer to section "4.PROGRAMMING" in the manual.
The pre-established P1 and P2 programmes are:

1 Comfort mode
2 Night mode
3 Days 1 until 5 (Monday to Friday)
4 Days 6 until 7 (Saturday and Sunday)

TURBO/BOOST mode:
This mode can be used when you want to heat the room more quickly.
To activate it, follow the following steps:
Press the "Mode" button repeatedly until the BOOST icon appears on the display.
Pressing the buttons and, it is possible to select the duration of the TURBO/BOOST period from 5 to 120 minutes. When this function is activated, the radiator operates at maximum power, controlling that the room temperature does not exceed 32^ . When the programmed time (indicated by a countdown on the display) expires, the radiator returns to the previously set mode.
ECO NOMY mode 17^ : When this mode is activated, the radiator operates at a preset temperature of 17^ , which cannot be changed. This function allows for lower consumption when, for example, the room or house is empty for an indefinite period of time.
To select this mode, press the "Mode" button
repeatedly until the icon appears on the display.
OTHER FUNCTIONS AND ICONS
OPEN WINDOW DETECTION:
The radiator is able to detect if a window has been opened by a sudden drop in temperature (5 °C within a maximum of 30 minutes). If this happens, the device switches off for 30 minutes and then resumes operation in the previously set mode if it detects continuous temperature increases of one degree (e.g. because the window has been closed). If this is not the case, the device will remain switched off for an additional 30 minutes.
When the open window detection is activated, the corresponding symbol will flash on the display (except in off/stand-by mode). When deactivated, the symbol disappears.
To activate this function, see section "4. PROGRAMMING".

HILD SAFETY:
When this function is activated, the temperature of the front of the radiator is reduced so that it is safe in the presence of children. In addition, this function allows the same radiator to be used in smaller rooms than the one in which it is installed without significant changes in the room temperature.
When this function is activated, the power level at which the radiator operates is set by the user (40% - 50% - 60%).
To activate this function, see section "4. PROGRAMMING".

ASC (ADAPTIVE TEMPERATURE CONTROL):
When this function is activated, the appliance switches on before the time set in the programming (maximum 2 hours before) to ensure that the room will be at the programmed temperature at the set time.
When this function is activated, the corresponding
icon appear on the display (except in off/stand-by mode).
To activate this function, see section "4. PROGRAMMING".

POWER LEVEL INDICATOR:
It appears on the left side of the display and depends on the programmed temperature level. The higher the set temperature, the higher the number of bars shown on the icon. This is a display of the instantaneous consumption, since the higher the set temperature, the higher the energy consumption.

LOCKING FUNCTION:
It is possible to lock the radiator to prevent misuse by children or, for example, in a public area.
To lock/unlock the buttons, press and hold the
"Mode" button for about 3 seconds, until the icon appears (locked) or disappears (unlocked).

ISUMPTION MEASUREMENT ACTION:
This function allows you to read the consumption of the radiator expressed in kWh. To do so, the transmitter power must be adjusted beforehand by following the steps below:
Unplug the appliance from the mains.
Simultaneously press buttons and
While keeping them pressed, plug the appliance into the mains socket for at least 5 seconds until the power setting function is displayed, as shown in the picture:

Use buttons and to select the power of your radiator in watts.
Confirm your selection by pressing the button.
This operation only needs to be done the first time and will be saved; it is not necessary to repeat it every time you want to consult consumptions.
It is now possible to read the consumption for
various time periods as follows:
Switch the radiator to off/stand-by mode.
Press the button for over 3 seconds, until the consumption information appears on the display.
Using buttons and, you will scroll through the consumption menu.
Icons will appear on the right-hand side of the screen. Each of them shows the kWh consumed during the corresponding time period, detailed below:
= current day
= previous day
3 = current week
4 = previous week
5 = current month
= previous month
= current year
0+2previous year
+total
+7 radiator power indicator

CONSUMPTION INDICATOR:
When the room temperature falls below the set temperature, the radiator thermostat powers the heating element and the symbol lights up on the display, thus consuming energy. As soon as the room temperature reaches the selected temperature, the thermostat stops powering the heating element and the icon disappears from the display, it is no longer consuming energy.
IMPORTANT NOTE: If the display shows "ALL" the temperature sensor is broken or damaged and the radiator is not working. Contact our technical service.
PROGRAMMING
PROGRAMMING OF DAY AND TIME
Switch the radiator to off/stand-by mode. The icon will be displayed.
Press the button for more than 3 seconds until the functions are displayed. Using the button, you can scroll through the following options: "ted" (time and date), "prog" (programming) and "ofst" (temperature probe calibration).
Select the "ted" option and confirm by pressing the button.
Enter the current year (15-99) using the and buttons. Press the button to confirm your selection.
Enter the current month (1-12) using the and buttons. Press the button to confirm your selection.
Enter the current day (1-31) using the and buttons. Press the button to confirm your selection.
Enter the day of the week (1=Monday, 2=Tues- day, 3=Wednesday, 4=Thursday, 5=Friday, 6=Saturday, 7=Sunday) using the and buttons. Press the button to confirm your selection.
The display should then show the current time with the digits flashing. The time can be changed using the and buttons. Press the button to confirm your selection.
The minute digits are shown flashing. The time can be set using the and buttons. Press the button to confirm your selection.
A double beep will be heard to confirm that the date and time settings have been saved.
P3 PROGRAMME CONFIGURATION
You can set your own operating schedule (P3) for each day of the week by following the steps below:
Switch the radiator to off/stand-by mode. The con will be displayed.
Press and hold the button for more than 3 seconds. Using the button, you can view the following options: "ted"
(time and date), "prog". (programming) and "ofst" calibration of the temperature probe).
Select the "Prog" option and confirm by pressing the button.
Programming will start on the first day of the week (1=Monday), and at 0 hours. The day is divided into 1-hour slots.
1 Programming function
2 Comfort / Economy selection by time slot
3 Day of the week
4 Selected time slot
5 Time slots (0-24h)
Press the button to select the COMFORT mode in that time slot (the entire time slot will be highlighted). Press the button to select the ECONOMY mode in that time slot (half the time slot will be highlighted). And so on until the 24 hours of the day 1=Monday are completed.
Confirm your programming by pressing the button.

Automatically, it will switch to day 2=Tuesday's programming, maintaining the programming established for Monday. If you wish to maintain it, press the button directly to confirm and move on to the next day. Otherwise, you can change using the and buttons and programming as you wish.
Follow the same steps for each day of the week until you reach 7=Sunday.
NOTE: no action on any of the buttons for a few seconds, the device automatically returns to the standby state. The programming previously carried out is automatically registered.
CALIBRATION OF THE TEMPERATURE PROBE
If the radiator is not installed in an optimal location to properly detect the room temperature (e.g. it is installed on a cold wall or there are draughts...) the measured room temperature may differ from the actual room temperature. For maximum efficiency, it is advisable to eliminate this temperature difference.
To do so, follow the following steps:
Switch the radiator to off/stand-by mode. The icon will be displayed.
Press and hold the button for more than 3 seconds. Using the button, you can view the following options: "ted" (time and date), "prog" (programming) and "ofst" (temperature probe calibration).
Select the "ofst" option and confirm by pressing the button.
Use the and buttons to set the differential between the room temperature (measured by a thermometer) and the temperature detected by the radiator. This differential can be adjusted between -5^ and +5^ . Press the button to confirm your selection.
ACTIVATING OTHER FUNCTIONS

OPEN WINDOW DETECTION
Switch the radiator to off/stand-by mode. The icon will be displayed.
Press the button for more than three seconds, until the icon is displayed.
Press the again to activate or deactivate the open windows function (ON=activate; OFF=deactivate).
Press the button to confirm the selection and move on to the next function:

(ADAPTIVE TEMPERATURE CONTROL)
Press the to activate or deactivate the ASC function (ON=activate; OFF=deactivate).
Press the button to confirm the selection and move on to the next function:

CHILD SAFETY
Press the to activate or deactivate the child safety function (ON=activate; OFF=deactivate).
Press the button to confirm your selection. If you have selected OFF, the radiator will automatically switch to off/stand-by mode. If, on to the contrary, you have selected to activate it (ON), you can program the desired power percentage among the following values: 40% / 50% / 60% . Using the button, select one or the other.
Confirm the desired percentage with the button. This will save all changes made in the previous functions, and the radiator will return to its off/stand-by state
ONCE YOU HAVE FINISHED USING THE APPLIANCE:
Turn the appliance off, using the on/off switch.
Unplug the appliance to the mains.
Let the radiator cool down
Clean the appliance.
SAFETY THERMAL PROTECTOR
The appliance has a safety appliance, which protects the appliance from overheating.
When the appliance switches itself on and off repeatedly, for reasons other than the thermostat control, check to ensure that there are no obstacles that impede correct air entry or expulsion.
If the appliance turns itself off and does not switch itself on again, disconnect it from the mains supply, and wait for approximately 15 minutes before reconnecting. If the machine does not start again seek authorised technical assistance.
CLEANING
Disconnect the appliance from the mains and let it cool before undertaking any cleaning task.
Clean the equipment using a damp cloth with a few drops of washing-up liquid and then dry.
Do not use solvents, or products with an acid or base pH such as bleach, or abrasive products, for cleaning the appliance.
Do not let water or any other liquid get into the air vents to avoid damage to the inner parts of the appliance.
Do not submerge the appliance in water or any other liquid or place it under a running tap.
If the appliance is not kept clean, its surface may deteriorate, which will inevitably shorten the appliance's useful life, as well as making it unsafe to use.
Note: When the appliance is switched on during the heating function, after a long period stopped or operating only in fan mode, it is possible that at first it releases some smoke, without any consequence, because dust and other particles accumulated in the heating element are burning. This phenomenon can be avoided by cleaning up previously and through the vents of the appliance and its interior with the help of a vacuum cleaner or with a jet of compressed air.
16-MARCHE(ARRET-VEILLE
17-

18- MODE
19-TEMPORISATEUR
20-PROGRAMME
FIXING TO THE WALL (FIG.3):
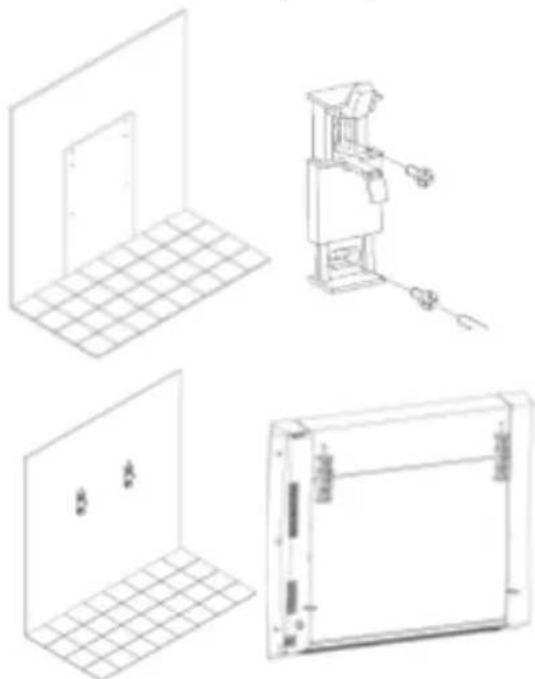
Fig.3
It appears on the left side of the display and depends on the programmed temperature level. The higher the set temperature, the higher the number of bars shown on the icon. This is a display of the instantaneous consumption, since the higher the set temperature, the higher the energy consumption.

FONCTION BLOCAGE :
Wstepnie ustalone programy P1 i P2 to:

This product enjoys the recognition and protection of the legal guarantee in accordance with current legislation. To enforce your rights or interests you must go to any of our official technical assistance services.
You can find the closest one by accessing the following web link: http://taurus-home.com/
You can also request related information by contacting us.
You can download this instruction manual and its updates at http://taurus-home.com/
François
GARANTIE ET ASSISTANCE TECHNIQUE
ggl 1d dddg lss slll lss
http://taurus-home.com
COUNTRY ADDRESS PHONE
| Algeria Zone d'Activite, N° 62, Constantine 213770777756 | ||
| Argentina Av. del Libertador 1298,(B1638BEY), Vicente López (Pcia. Buenos Aires) | 541153685223 | |
| Belgium Mariëndonkstraat 5, 5154 EG, Elshout 31620401500 | ||
| Bulgaria | 265,Okolovrasten Pat, Mladost 4, 1766, Sofia | 35929211120 / 35929211193 |
| Congo (Republic of) 98 Blvd General Charles de Gaulle, Pointe Noire 242066776656 | ||
| Cyprus 20, Bethlehem Str. / P.O.Box 20430, 2033, Strovolos | 35722711300 | |
| Czech Republic | Milady Horakove 357/4, 568 02, Svitavy | 420 461 540 130 |
| Equatorial Guinea | SN Av Patricio Lumumba y C/ Jesus B, Bata | 00240 333 082958 / 00240 333 082453 |
| Equatorial Guinea | Calle de las Naciones Unidas, PO box 762, Malabo | 240333082958 / 240333082453 |
| Espana | Avda Barcelona, S/N, 25790 Oliana (Lleida) atencioncliente@taurus.es | 902 118 050 |
| France | Za les bas musats 18, 89100, Malay-le-Grand | 03 86 83 90 90 |
| Ghana | Ederick Place, Accra-Ghana | 302682448 / 302682404 |
| Gibraltar | 11 Horse Barrack Lane, 54000, Gibraltar | 00350 200 75397 / 00350 200 41023 |
| Greece Sapfous 7-9, 10553, Athens | +30 21 0373 7000 | |
| Hong Kong | Unit H,13/F., World Tech Centre, Hong kong | (852) 2448 0116 / 9197 3519 |
| Hungary | Késmárk utca 11-13, 1158, Budapest +36 1 370 4519 | |
| India | C-175, Sector-63, Noida, Gautam Budh Nagar - 201301, Delhi | (+91) 120 4016200 |
| Ivory Coast 01 Rue Des Carrossiers-Zone 3, B.P 3747, Abidjan 01 (RCI) | 22521251820 / 225 21 353494 | |
| Luxembourg Mariëndonkstraat 5, 5154 EG, Elshout 31620401500 | ||
| Marruecos Big distribution society 4 Rue 13 Lot. Smara Oulfa, Casablanca | (+212) 522 89 40 21 | |
| Mauritania 134 Avenue Gamal Abdener Ilot D, Nouakchott 2225254469 / 2225251258 | ||
| Mexico Rosas Moreno N° 4-203 Colonia de San Rafael C.P. 06470 – Delegación Cuauhtémoc, Ciudad de México | (+52) 55 55468162 | |
| Montenegro Rastovac bb, 81400, Niksic +382 40 217 055 | ||
| Netherlands Mariëndonkstraat 5, 5154 EG, Elshout 31620401500 | ||
| Nigeria 8, Isaac; John Str,G.R.A Ikeja Lagos 23408023360099 | ||
| Paraguay Denis Roa 155 c/ Guido Spano, Asunción 21665100 | ||
| Peru Calle los Negocios 428, Surquillo, Lima (511) 421 6047 | ||
| Portugal | Avenida Rainha D. Amélia, n°12-B, 1600-677, Lisboa | +351 210966324 |
| Romania | Dudesti Pantelimon 23, 410554, Bucharest | 031.805.49.58 |
| Serbia | Rastovac bb, 81400, Niksic +382 40 217 055 | |
| Slovakia | Milady Horakove 357/4, 568 02, Svitavy | 420 461 540 130 |
| Southafrica | Unit 25 & 26, San Croy Office Park, Die Agora Road, Croydon, Kempton Park, 1619, Johannesburg | (+27) 011 392 5652 |
| Tunisia | 2, Rue de Turquie, Tunis | 21671333066 |
| Ukraine | Block 6, Ap Housing Estate Topol-2, B, 49000, Dnepropetrovsk | 380563704161 / 380563704161 |
| Uruguay | Luis Alberto de Herrera 3468, 11600, Montevideo | 598 2209 28 00 |
| Vietnam | Lot 7 Ind. Zone for, Ha Noi | 84437658111 / 84437658110 |
taurus
www.taurus-home.com


- CONS
- BUTTONS
- USE AND CARE:
- INSTALLATION
- FIXING TO THE WALL (FIG.3):
- USE
- BEFORE USE:
- USE:
- ON/OFF (STAND-BY)
- MAIN FUNCTIONS
- PILOTEMode:(FORUSEIN FRANCELY).
- CONFORT mode:
- ANTIFROST mode:
- HOLIDAY mode:
- TIMER mode:
- TURBO/BOOST mode:
- OTHER FUNCTIONS AND ICONS
- OPEN WINDOW DETECTION:
- HILD SAFETY:
- ASC (ADAPTIVE TEMPERATURE CONTROL):
- POWER LEVEL INDICATOR:
- LOCKING FUNCTION:
- ISUMPTION MEASUREMENT ACTION:
- CONSUMPTION INDICATOR:
- PROGRAMMING
- PROGRAMMING OF DAY AND TIME
- P3 PROGRAMME CONFIGURATION
- CALIBRATION OF THE TEMPERATURE PROBE
- ACTIVATING OTHER FUNCTIONS
- OPEN WINDOW DETECTION
- (ADAPTIVE TEMPERATURE CONTROL)
- CHILD SAFETY
- ONCE YOU HAVE FINISHED USING THE APPLIANCE:
- SAFETY THERMAL PROTECTOR
- CLEANING
- FONCTION BLOCAGE :
- François
- GARANTIE ET ASSISTANCE TECHNIQUE
Brand : TAURUS
Model : Alpatec Paradiso Ceramic 1500W
Category : Heating