CO110 - Gas detector VOLTCRAFT - Free user manual and instructions
Find the device manual for free CO110 VOLTCRAFT in PDF.
Document temporarily unavailable
The manual is currently being transferred to our new server. It will be accessible again in a few hours. Thank you for your patience.
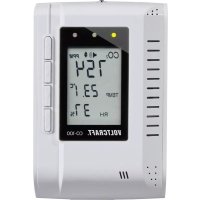
| Product type | Gas detector / CO2 monitor |
| Brand | Voltcraft |
| Model | CO110 |
| Weight | 180 g (with stand) / 165 g (without stand) |
| Power supply | DC 5 V (±0.25 V) via USB Type-C port |
| Power consumption | 160 mA (peak), 40 mA (average at 5 V) |
| CO2 measurement range | 0-5000 ppm |
| CO2 display resolution | 1 ppm (0-1000), 5 ppm (1000-2000), 10 ppm (>2000) |
| Temperature measurement | Range: 0 °C to 90 °C, resolution 0.1 °C |
| Humidity measurement | Range: 5-95%, resolution 1%, accuracy ±5% |
| Main functions | CO2, temperature, humidity measurement; audible and visual alarms; LCD display; trend graph; Human and Plant modes; automatic and manual calibration; max/min display; °C/°F unit selection |
| Maintenance and cleaning | Unplug before cleaning; use a dry, lint-free cloth; do not use harsh cleaning products |
| Safety | Indoor use only; avoid moisture and extreme temperatures; keep out of reach of children; do not modify the product |
| Operating conditions | 0 °C to +50 °C, 0-95% humidity |
| Storage conditions | -20 °C to +60 °C, 0-95% humidity |
| Package contents | CO2 monitor, USB Type-C cable, stand, user manual |
Frequently Asked Questions - CO110 VOLTCRAFT
User questions about CO110 VOLTCRAFT
0 question about this device. Answer the ones you know or ask your own.
Ask a new question about this device
Download the instructions for your Gas detector in PDF format for free! Find your manual CO110 - VOLTCRAFT and take your electronic device back in hand. On this page are published all the documents necessary for the use of your device. CO110 by VOLTCRAFT.