
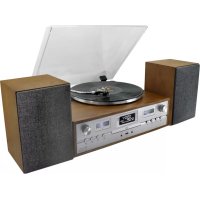
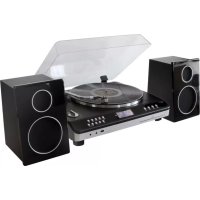
PL905 - Turntable Soundmaster - Free user manual and instructions
Find the device manual for free PL905 Soundmaster in PDF.

Frequently Asked Questions - PL905 Soundmaster
User questions about PL905 Soundmaster
0 question about this device. Answer the ones you know or ask your own.
Ask a new question about this device
Download the instructions for your Turntable in PDF format for free! Find your manual PL905 - Soundmaster and take your electronic device back in hand. On this page are published all the documents necessary for the use of your device. PL905 by Soundmaster.
USER MANUAL PL905 Soundmaster
natural_image
Vintage portable vinyl record with open lid and control panel (no visible text or symbols)DEUTSCH
ENGLISH
FRANÇAIS
NEDERLANDS
Hersteller
natural_image
Diagram of a battery internal structure with an arrow indicating direction (no text or symbols)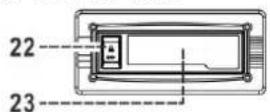


Vorsicht:
natural_image
Diagram showing a cassette tape being inserted into a device, labeled Fig.1 (no text or symbols on the diagram itself)FM-Radio codieren
natural_image
Diagram showing a cassette tape being inserted into a display case (no text or symbols present)LAUF
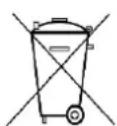
Do not dispose of this product with the normal household waste at the end of its life cycle. Return it to a collection point for the recycling of electrical and electronic devices. This is indicated by the symbol on the product, user manual or packaging
The materials are reusable according to their markings. By reusing, recycling or other forms of utilization of old devices you make an important contribution to the protection of our environment.
Please contact your local authorities for details about collection points.
| WARNING | ! | |
| Risk of electric shockDo not open! |
Caution: To reduce the risk of electric shock, do not remove the cover (or back). There are no user serviceable parts inside. Refer servicing to qualified service personnel.

This symbol indicates the presence of dangerous voltage inside the enclosure, sufficient enough to cause electric shock.

This symbol indicates the presence of important operating and maintenance instructions for the device
Used batteries are hazardous waste and NOT to be disposed of with the household waste! As a consumer you are legally obligated to return all batteries for environmentally responsible recycling – no matter whether or not the batteries contain harmful substances*)
Return batteries free of charge to public collection points in your community or shops selling batteries of the respective kind.
Only return fully discharged batteries
*) marked Cd = cadmium, Hg = mercury, Pb = lead
- Only use mercury and cadmium-free batteries.
- Used batteries are hazardous waste and NOT to be disposed of with the household waste!!!
- Keep batteries away from children. Children might swallow batteries.
- Contact a physician immediately if a battery was swallowed.
- Check your batteries regularly to avoid battery leakage.
- Batteries shall not be exposed to excessive heat such as sunshine, fire or the like.
- CAUTION: Danger of explosion if battery is incorrectly replaced
- Replace only with the same or equivalent type
CAUTION - INVISIBLE LASER RADIATION WHEN OPENING THE COVER OR PRESSING THE SAFETY INTERLOCK. AVOID EXPOSURE TO THE LASER BEAM.

To prevent possible hearing damage, do not listen at high volume levels for long periods
- Use the device in dry indoor environments only.
- Protect the device from humidity.
- This apparatus is for moderate climates areas use, not suitable for use in tropical climates countries.
Safety, Environmental and Setup Instructions
- No objects filled with liquids, such as vases, shall be placed on the apparatus.
- The mains plug or an appliance coupler is used as the disconnect device, the disconnect devices shall remain readily operable.
- Connect this device to a properly installed and earthed wall outlet only. Make sure the mains voltage corresponds with the specifications on the rating plate.
- Make sure the mains cable stays dry during operation. Do not pinch or damage the mains cable in any way.
- A damaged mains cable or plug must immediately be replaced by an authorized service center.
- In case of lightning, immediately disconnect the device from the mains supply.
- Children should be supervised by parents when using the device.
- Clean the device with a dry cloth only.
- Do NOT use CLEANING AGENTS or ABRASIVE CLOTHS!
- Do not expose the device to direct sunlight or other heat sources.
- Install the device at a location with sufficient ventilation in order to prevent heat accumulation.
- Do not cover the ventilation openings!
- Install the device at a safe and vibration-free location.
- Install the device as far away as possible from computers and microwave units; otherwise radio reception may be disturbed.
- Do not open or repair the enclosure. It is not safe to do so and will void your warranty. Repairs only by authorized service/ customer center.
- No naked flame sources, such as lighted candles, should be placed on the unit.
- When you are necessary to ship the unit store it in its original package. Save the package for this purpose.
- In case of malfunction due to electrostatic discharge or fast transient (burst), remove and reconnect the power supply.
- If the unit is not using for a long period of time, disconnect it from the power supply by unplugging the power plug. This is to avoid the risk of fire.
BATTERY INSTALLATION
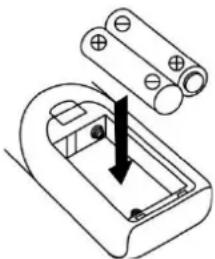
The battery compartment is located on the back of the remote control.
- Remove the battery compartment door by pressing in on the tab and lifting it off.
- Insert two (2) AAA size batteries (not included) into the battery compartment following the polarity markings inside the battery compartment.
- Replace the battery compartment door.
natural_image
Diagram of a battery pack with an arrow indicating downward motion (no text or symbols)Battery Precautions
● Replacement of batteries must be done by an adult.
- Do not mix old and new batteries.
- Do not mix alkaline, standard (carbon-zinc) or rechargeable (nickel-cadmium) batteries.
● The supply terminals are not to be short-circuited.
● Non-rechargeable batteries are not to be recharged.
● Exhausted batteries are to be removed.
- Only batteries of the equivalent type are to be used.
● Batteries are to be inserted with the correct polarity.
- Dispose of batteries properly. Do not dispose of batteries in fire. The batteries may explode or leak.
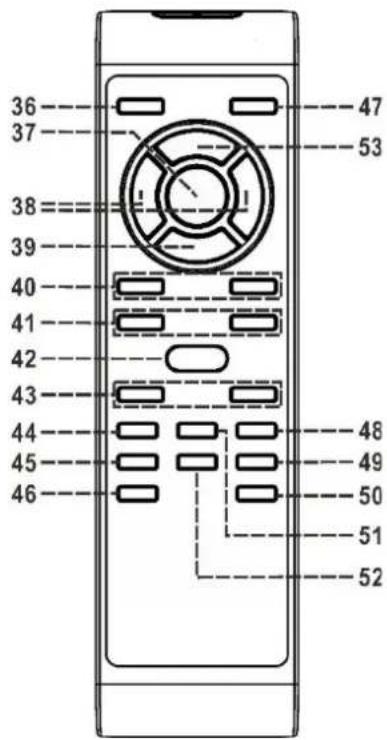
Remote control transmitter
Battery installation (battery not provided)
The infra-red transmitter requires 2 pc AAA size battery for operation
Button description
36) In CD mode: to open/close the CD door
37) Play/Pause▶In CD/USB mode, press once to start playback.
Press again to enter pause mode.
38) Skip up▶▶/down◀◀ Press to select previous / next tracks in CD mode
39) Stop■/ST/Mono In Recording/Encoding mode: Press to confirm function.
In CD/USB mode, press to stop playback.
In FM Radio mode: Press to Select FM Stereo/Mono Mode
40) Folder/Preset In Radio mode: Press to recall radio preset channel
Up ▲ /Down ▼ channel upward/downward In USB mode: Press to select Music Folder up/down
41) Volume +/- Press to adjust the volume level
42) Record ● Press to active Record/Encode function
43) Rec Level+/- Press to select CD-R record level
44) Erase Press to erase file in USB thumb drive or CD-RW
45) Clear Press to delete the latest track of programmed tracks
46) Repeat In CD/USB mode: Press to activate CD Repeat 1/all
47) Function Press to change the function mode such as Tuner, CD, USB...etc
48) Finalize Press to Finalize the CD-R/RW disc after recording
49) Display Press to change CD/USB playback time information on LCD
50) Random In CD/USB mode: Press to activate shuffle play function
51) Auto / Manual Press to activate Auto or Manual TS (Track Separation) function
52) TS Press to activate the Manual Track Separation function
53) Program In CD/USB/Tuner mode, press to active programming function
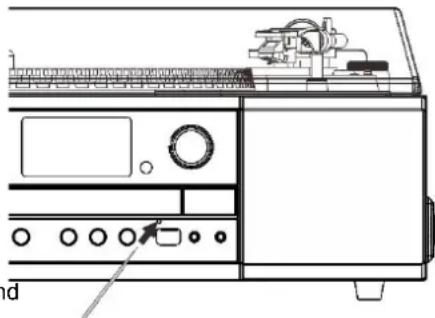
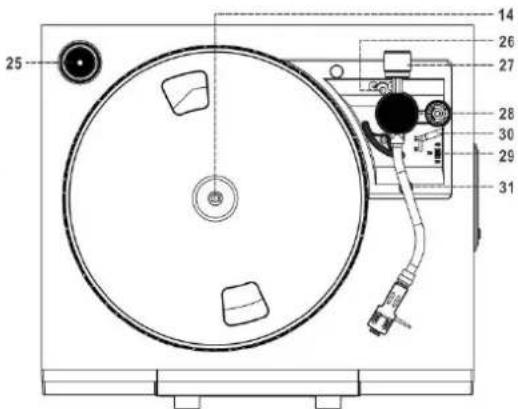
Location of Controls
- Remote Sensor
- Standby LED indicator
- LCD display
- POWER/ FUNCTION button
- Left Speaker
- CD tray Open/Close button
- CD tray
- CD tray eject hole
-
Volume +/- button
-
Track button
-
Stop FM-ST/MONO Button
-
Record button
-
Skip down /skip up button
-
Turntable Platter
-
CD Play/ Pause Button
-
Folder / Pre-up button
-
Finalise button
-
Earphone Jack
-
Aux in Jack
-
Right Speaker
-
USB socket
-
Cassette forward/eject knob
-
Cassette slot
-
Dust Cover
-
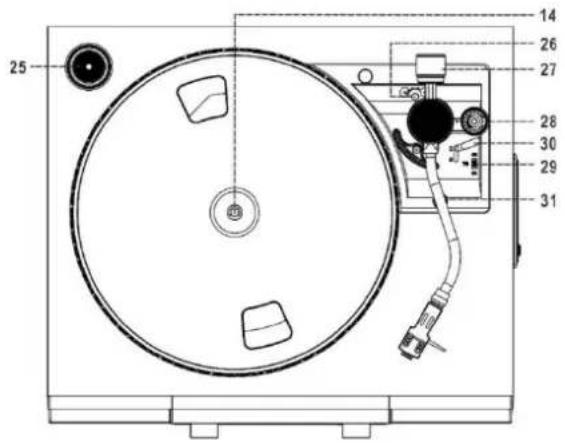
Spindle adaptor - this is a small round insert that goes in the middle of a 45-rpm Record so it can be played on the LP or 78 rpm size spindle of your Turntable.
-
Alignment screw with rubber cover
-
Counter weight
-
Pitch adjust
-
Turntable speed selector
-
Cueing lever
-
Tone arm lock
-
Line out jack
-
FM antenna
-
AC Line cord
-
Erase button
Remarks : control location from 36-53 on remote control
mentioned at last page of this I/M
Caution:
Usage of controls or adjustments or performance of procedures other than those specified herein may result in hazardous radiation exposure.
This unit should not be adjusted or repaired by anyone except qualified service personnel.
Precautions for use
Installation
- Unpack all parts and remove protective material.
• Do not connect the unit to the mains before checking the mains voltage and before all other connections have been made.
• Do not cover any vents and make sure that there is a space of several centimeters around the unit for ventilation.
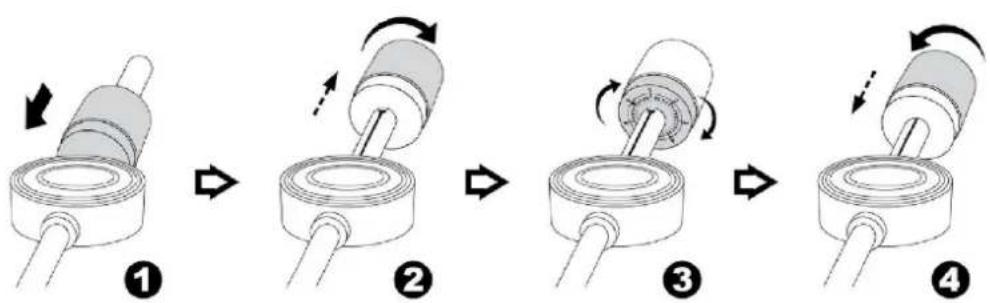
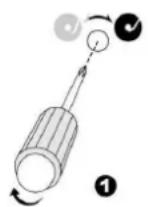
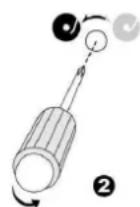
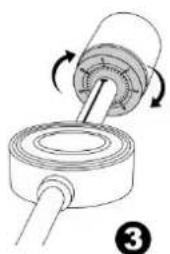
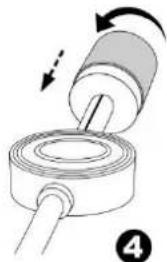
Installation of counter weight
- Slide in the counter weight completely into the rear of the tone arm until it reach the end, turn it clockwise until it click with pit inside.
- Twist the counter weight clockwise & backward until it reach the white line as figure 2
- Twist the counter marking until it reach "1" position
- Twist the counter weight anti-clockwise & inward until it reach the appropriate working pressure.
flowchart
graph TD
    A["Step 1: Roll arrow"] --> B["Step 2: Rotation arrow"]
    B --> C["Step 3: Rotation arrow"]
    C --> D["Step 4: Rotation arrow"]
Remark : The working pressure of the provided stylus is from the range 4 – 6 grams. According to the cartridge manufacturer. All stylus has it own working pressure and please refer to the specification respectively.
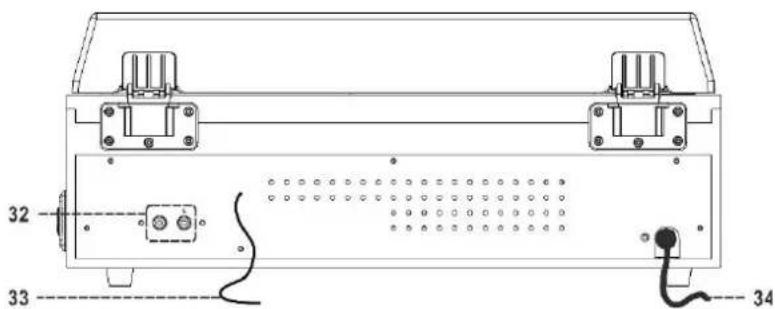
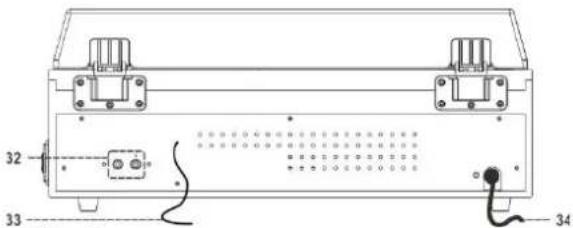
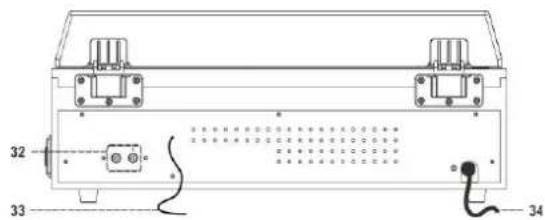
Connection
- Connect the AC line cord (34) to AC outlet.
- Press the Power/Function button (4) and if standby LCD display light on, it's mean the power supply is normal. Now your system is ready to play the music.
Listening to radio
Manual tuning
- Press the Power/Function button (4) to switch on the unit and rotate the Power/Function button (4) to select "FM" mode.
- Press and hold the TUNE or TUNE button for 1-2 seconds and then release
- The unit will start seeking automatically and stop until a radio station is reached.
- Repeat step 2 & 3 until the desired radio station is being reached.
- Adjust volume up/down button (9/41) to the desired volume level.
Preset stations (by remote control)
You can store up to total of 30 radio stations in the memory.
- Press the Power/Function button (4) and the LCD display (3) will light up and starts in FM mode.
- Tune to the desired Radio Station using either the Manual or Automatic tuning methods as described above.
- Press the Program button (53) on your Remote Control. The PROGRAM indicator will appear on the LCD display (3) on the main unit showing 'P-' plus a flashing program number.
- Press the ◀◀ or ▶▶ buttons (13) to select the desired station pre-set number.
- Now press the Program button (53) on your Remote Control to lock the Radio Station onto the selected pre-set number.
Repeat steps 2-5 to store other Radio Stations.
The pre-set memories will be cancelled completely if switching off the main power button on system. You are recommended to switch the system into power off mode for convenience usage.
After 5 seconds (when NO buttons are pressed) the main unit always automatically returns to normal Tuner mode.
YOU CAN OVERWRITE A PRESET STATION BY STORING ANOTHER FREQUENCY IN ITS PLACE. USING YOUR REMOTE CONTROL
FM & FM-stereo reception
- Press the ■/ST/MO button (11) to switch between Stereo and Mono reception mode.
- This enables the device to receive FM radio stations in either Stereo or Mono. We recommend that you use the Mono reception mode when Stereo signals are weak.
- System defaulted in stereo mode. The FM-stereo icon "ST" will light up on LCD display (3) show FM stereo program is receiving. In particular when stereo signal are weak. It is preferable to receive the program in mono by /ST/MO button on remote control.
Hints for best reception:-
- FM : The receiver has a built-in FM wire antenna hanging at the rear cabinet. This wire should be totally unraveled and extended for best reception.
Playing compact disc
- Getting start
- Press the Power/Function button (4) to switch on the unit and rotate the Power/Function button (4) to select "CD" mode. The LCD display will show "--bUSY" and then "NO disc" if the CD compartment is empty.
- Then press the CD tray open button ▲ to open the CD tray.
- Place a CD with the printed side facing up inside the tray & then press the CD tray open button ▲ to close the CD door.
- Focus search is performing and LCD display (3) will show “---bUSY” and then display the total number of tracks & total playing time.
- Play / Pause mode ▶II
- Press the "CD Play/Pause ▶" button to start playback, the first track will start playback.
- To interrupt, press the "Play/Pause ▶II" button once, the playing time will be freeze on the LCD display. Press again to resume normal playback.
- Stop mode
- If "CD Stop" button is pressed during play or pause mode. It will go to stop mode and display total number of track on the LCD display (3).
- Skip mode (skip up ▶/ skip down ◀)
- During play or pause mode, if "Skip up▶" button is pressed. It will go to next track and display the track no. and then the next track will start playing automatically.
- During play or pause mode, if "Skip down" button is pressed. It will go back to the previous track and play the track.
Remark:-
Before pressing the “CD tray open ▲” button for changing disc. Press the “CD stop ■” button first and ensure the LCD resume to the original information.
- The reaction time of the CD burner is longer than normal CD player due to the complicity system.
- Keep pressing with all difference function within a short time may cause mal-function of the system. Please re-start the unit if this is happen.
- The reading and playback time of CD-R(W) disc is various from brand to brand. It depends on the compatibility of the used disc.
- This device only design for normal compact disc format. Is not support any MP3/WMA format.
- Repeat mode (by remote control)
Press the Repeat button before or during playback, a single track or all the tracks can be played in difference mode as follow:-
(1) repeat all track → (2) repeat 1 → (3) off mode

| Play mode | Indicatoron LCD display |
| Repeat all | C |
| Repeat 1 | C 1 |
| Off mode | ---- |
● Random mode (by remote control)
Press the RANDOM button on your Remote Control before or during play, you can listen to all the MP3 files in a random order and the display will show" RAN". Press RANDOM button to turn off the function.
CD disc programming (by remote control)
Up to 32 tacks can be programmed for CD playing. Before use, be sure the system is at stop mode before programming:-
- Set in CD mode & stop the disc playback.
- Press the "Program" button at remote handset, "PROGRAM" indicator will appear on LCD display. Moreover, the program no. (00 1P-01) will show on LCD display.
- Select a desired track by pressing CD skip up ▶▶ or down ◀◀ buttons.
- Press the "Program" button to store the trace into memory.
- Repeat steps 3 and 4 to enter additional tracks into the memory if necessary.
- When all the desired tracks have been programmed, press CD "Play/Pause ▶" button to play the disc in assigned order.
- To cancel the programmed file, press "Stop" button until "PROGRAM" indicator is disappear on LCD display.
Remark:-
- After program play and you can delete the programmed track in the order from the last one to the 1 ^st one after the programmed track start to played. Press stop button to set the unit in stop mode first, press "Clear" button at remote control once, then press stop button to enter clear mode, press the Clear button again once by once. The programmed track will delete one by one from the memory.
Recording function
Apart from the CD playback function, it can perform the CD recording function either from Phono / Tape / Aux and USB mode respectively. All the recording track will be stored at "audio-CD" format:-
Before start, place a CD-R or CD-RW disc in the CD tray. The disc is able to record only if the LCD display show "NO TOC".
Remark : CD-R disc can be recorded once only and not support erase or re-record function. The playback quality of either CD-R(W) disc is various from differences kind of audio CD player device.
Important notices:-
- The revolving speed of CD burner is higher than normal CD mechanism. Thus, some mechanical noise and vibration of unit cabinet may occur during operation. This is not the malfunction of the system.
- Due to the variety on the quality and the compatibility of CD-R(W) disc from the market. Please change other brand if you found the used one is not able to record or the performance is not so stable.
- Since the CD burner was complicate equipment, in case the power was interrupt or wrong operation during the CD burner is running, it may cause the system will locked and cannot eject the CD tray, switch off the power and use a stick to stab the hole which near by the CD tray (8), then the CD tray will eject portion mechanically, pull out the CD tray completely by manual and remove the disc, then re start the system again.
natural_image
Technical line drawing of a kitchen appliance with control panel and door (no text or symbols)A) Recording mode
I) Phono recoding
1) Rotate the Function button to select "Phono" mode. Place the recorded vinyl & get ready for playback.
2) Press "Rec" button (9) and then the LCD display will show "--Cd" and REC.
3) After few seconds, the LCD will show the time counter and now the system is start recording process. Now start the playback of the vinyl at phono.
4) After completing of recording, press the "Stop ■" button and then stop the playback of vinyl.
5) When the recording has finished, press the STOP ■ button (12) - then stop playback of the vinyl record
6) Listen to your recorded disc like already mentioned before.
8) "Finalize" the recorded disc, as described at point "III) Finalize CD-R/(W) disc" in this manual.
II) Cassette recording
1) Rotate the Function button to select "Tape" mode. Place the recorded cassette tape to the cassette slot to get ready for playback.
2) Press "Rec" button (9) and then the LCD display will show "---Cd" and REC.
3) After few seconds, the LCD will show the time counter and now the system is start recording process. Now push the cassette tape to the cassette compartment to start playback of which the track you prepare to record.
4) After completing of recording, press the "Stop ■" button and then stop the playback of the cassette tape.
5
5) To stop playing your Cassette Tape, press the Fast Forward/Eject button ▲▶ (24) next to the Cassette Door (on the side of the main unit) firmly and fully inwards.
8) "Finalize" the recorded disc, as described elsewhere in this manual.
III) Aux-in recording
1) Rotate the Function button to select "Aux" mode. Connect the headphone output at the audio device (such as mp3 player, CD player etc) to the 3.5mm aux-in jack via a 3.5 mm connecting cable (not provided).
2) Repeat the same procedures from step 2 as described on other recording model from above then start playback your external device.
3) Adjust the volume output level at your audio player device if the recording level is too high.
IV) USB recording
1) Insert the USB media device into the USB port (21).
2) Turn the Power/ Function button (4) until the LCD display (3) reads "USB"
3) Select between recording one track or all tracks or programmed track in a USB:
- One track:
i) Select the songs you wish to record by using Skip forward ▶/ back ◀◀ button (14/15) and/or FOLDER/PRE ▲/ ▼ button of the remote and press playback
ii) Press the ●REC button
- All tracks in a USB
i) Press the Play/pause button to start playback of the USB
ii) Press the Auto/Manual button once on the remote control and the display will show "AUTO TRACK"
iii) Press the ●REC button
- Programmed tracks in a USB
i) Select the desired tracks by following the previous “ MP3 Program “ procedures and press Play/Pause button (12) at the end of programming
ii) Press the ●REC button
4). The system will start recording.
5). After recording has finished, the LCD display will go back to normal and resume playback of the tracks. "Finalise" the recorded disc.
Remark:-
- The recording speed is 1:1 and according to the actual plying time of the playing source
- To suspend the recording process, press the “Play/Pause ▶II” button, “busy” briefly appear on LCD and the recording is in pause. To re-start, press again the “Play/Pause ▶II” button until the play indicator “▶” show on LCD display.
- When the CD-R or CD-RW is full, the LCD display will show 'full'. Press the CD Stop button (11) and change to another empty CD-R disc to continue recording.
B) Recording setting
I) Recording level
Record level can be adjust by REC LEVEL +/- button at remote handset to avoid distortion once the record source level was too high.
II) Track separation
You can divide the recording music track by track during recording by auto or manual mode:-
A) Auto mode
Press the "Auto/Manual" button when prepare the recording function, the LCD will show -20db, -30db, -40db, the "AUTO TRACK" icon will appear on LCD.
When the recording sound level has dropped below the -20 / -30 / -40 dB (record signal) respectively, the current track will terminate and then generate a new track & continue the recording mode automatically.
Thus, you are recommended to set lower record level for the music source with clear performance such as USB and higher record level for higher noise music source such as vinyl:-
“ – 20db or – 30db “ – for recording of USB or Aux-in with digital music source
“ – 30db or – 40db “ – for recording of Tape or Phono mode
“----” – auto mode off
Remark:-
The above is just a recommendation, the actual performance is various and depend on difference music source time by time. thus, if the cut-off is always mis-judge for certain music file, please use manual mode instead.
B) Manual mode
1) Select the Manual Track Separation mode by pressing the AUTO/MANUAL Recording button on your Remote Control repeatedly until ‘---’ is displayed on the LCD display (3).
2) Anytime when press the " track separate " T5 " button once during recording at any mode, the system will generate a new track and continuous the recording. the word "--bUSY" will briefly show on LCD display, it mean the unit is creating a new track successfully.
III) Finalize a CD-R(W) disc
You must convert the CD-R(W) disc into standard CD before playing at other audio CD player. This process is knows as finalizing and a table of contents (TOC) will written to the CD on the same time:-
1 · Select CD function mode and place the CD-R(W) disc you are going to finalize.
2 · Press the finalize button during CD stop mode. " Fin-dIC " appears on the LCD display (press the " CD stop ■ " button to quite finalize mode if necessary)
3 · Press the “Play/Pause ▶” button to start finalizing and the LCD will show “---bUSY” during the process.
4 · After completion, the CD door will open automatically and the "OPEN" indicator will disappear from LCD.
Remark:
- The time for finalizing is subject to the contents of recorded and it may take up to 15 minutes in some cases.
- No button is working during finalize process.
- Never turn off the power or un-plug the power cord during finalize process.
- The CD-R disc cannot be recorded again after finalizing.
Although finalized CD-R disc may be played on ordinary CD players, remember that finalized CD-RW disc may not play on ordinary CD players. - Owing to the variance of the compatibility of CD-R or CD-RW disc from the market. Please change to other one if the recording cannot perform or you find the recording performance of existing one is not up to satisfaction. This is not the malfunction of the system.
IV) Erase or un finalize a CD-RW disc
It is possible to erase the last recorded track or erase a whole record disc.
If erase the last track of the finalized CD-RW, must un finalized the CD-RW first
A) Un finalize a CD-RW disc
- Set at CD function mode and place the CD-RW disc you would like to un finalize.
- Press the "Erase" button on remote handset at CD stop mode & display will show "un UNF-dIC" then press the "CD Play/Pause ▶II" button to start erasing and "--bUSY" disappear on the LCD.
- After finish the un finalized display will show total track nr. and total playing time of the disc and "NO TOC" indicator will appear
B) Erase one track
- Set at CD function mode and place the un finalized CD-RW disc you would like to delete the track.
- Press the "Erase" button at CD stop mode & "ErS" and the last track nr. appear on the LCD
- Press the "CD Play/Pause ▶II" button to start erasing the last track and "---bUSY" disappear on the LCD.
- After finish the track erasing display will show total track nr. and total playing time of the disc and "NO TOC" indicator will appear
- Repeat step 5 and 7 to continue the erasing.
C) Erase all track
- Set at CD function mode and place the CD-RW disc you would like to delete the track.
- Press the "Erase" button at CD stop mode repeatedly until "Er ALL" appear on the LCD
- Press the "CD Play/Pause ▶II" button to start erasing and display appear "---bUSY" during erasing
- The LCD will show "0000000" to confirm the erase process is completed.
Remark :
- This operation cannot be undo.
- The copy CD-RW disc from other system cannot be erase one by one in this unit but may be erase all is possible.
Playback of MP3 song via USB storage media
Connecting
The system is able to decode and playback all MP3 file which stored in the memory media with USB connecting port.
- Set the system at standby mode first or other function except USB mode.
- Plug-in the USB pen-drive with the face up & make sure it going into completely or insert the memory card in the direction of the arrow as shown in the label on the underside of the memory card slot. Insert straight without bending.
- Connecting the USB upside down or backwards could damage the audio system. Check to be sure the direction is correct before connection.
-
Turn the Power/Function button to select "USB mode.
-
The system will start reading the storage media automatically after connecting, and LCD display will show the total number of MP3 files being detected.
● Play / pause mode ▶II
- To interrupt, press the USB "▶" button once, and the playing time will be freeze & flashing on the LCD display. Press again to resume normal playback.
- Stop mode
- Press and the USB stop ■ button during play or pause mode, system will go to stop mode.
- Skip mode (skip up ▶/ skip down ◀)
-
During play or pause mode, if "USB skip up▶▶1" button is pressed. It will go to next track and display the track no. And then remain the play or pause mode.
-
During play or pause mode, if "USB skip down◀◀" button is pressed. It will go to the previous track and change to play mode.
- Select an MP3 Folder
-
Press the FOLDER/PRE ▲ or FOLDER/PRE ▼ button on your Remote Control or press the FOLDER/PRE-UP (16) on the main unit.
-
The folder number on the media device will change accordingly.
-
Press the USB Track Skip forward button ➤ or Track Skip back button ◀ on your Remote Control.
-
The track number on the media device will change accordingly.
-
When the desired folder and track has been selected, press the ▶III/CD STOP button on the Remote Control to begin play.
Remark
- The system can detect and read the file under MP3 format only though the USB port.
- If connect the system to MP3 player via the USB socket, due to variances in MP3 encoding format, some MP3 player may not be able to play via the USB socket. This is not a malfunction of the system. - USB port does not support connection with USB extension cable and is not designed for communication with computer directly
MP3 track format requirement:-
- MP3 bit rate : 32 kbps\~256 kbps.
- The performance of playing MP3 file is various from the quality of recording disc and the method of recording.
- Play mode
A file or all your files can be played repeatedly.
Simply press the REPEAT button on the Remote Control before or during play.
Each press of the REPEAT button will cycle through the Play options (the selected Play mode will display on the LCD display) as follows:
(1) Repeat a single MP3 file 1C

(2) Repeat all tracks in all folders
(3) Repeat mode OFF.
- Repeat Folder
Press the Stop button first. The display will show total number of track and "Folder". Press FOLDER/PRE ▲ or FOLDER/PRE ▼ button on your Remote Control or press the FOLDER/PRE-UP (16) on the main unit to select the folder. Then press Repeat button once with display showing ⬇. Press the Play/Pause button ▶ to play all tracks in the folder repeatedly.
- Random play
You can listen to all the MP3 files in a random order by selecting this function and the display will show "RAN". Press RANDOM button (50) to turn off the function.
USB programming
Up to 30 tacks can be programmed for MP3 play in any order. Before use, be sure to press the "USB stop ■" button
-
Set in USB mode & stop the playback.
-
Press the "PROGRAM" button, "PROGRAM" will appear on LCD display. Moreover, it will indicate program no. 00 1P-01.
-
Select a desired track by pressing skip up▶▶ or down ◀◀ buttons.
-
Press the "PROGRAM" button (53) to store the track into memory.
-
Repeat steps 3 and 4 to enter additional tracks into the memory if necessary.
-
When all the desired tracks have been programmed, press "▶II" button to play the disc in assigned order.
-
Press "stop button to terminate program play.
- Press "stop ■" button at USB stop mode to cancel all programmed memory.
- Press the “ folder / pre-up ” button to select the 1 ^st track of next folder directly and hence to speed up the song selection.
- The programming model will automatically stop if no button is being pressed in a period of about 10 seconds after pressing the “PROGRAM” button.
General operation
The Unit can digitally encode (convert) normal CDs/Vinyl Records/Aux in/Cassette Tape music tracks into MP3 format files, and record them onto a USB Memory Stick via the USB port (21).
Encode a single track or an entire Audio CD to USB in MP3 format
- Insert your USB Memory Stick into the USB port (21) on the main unit. Ensure there is sufficient space available for encoding.
- Select 'CD' mode by turning the Power/Function button (4).
- The LCD display (3) will show '---bUSY' for a second, then change to 'NO disc'.
- Press the CD Open/Close button (S) to open the CD tray.
- Place your CD (print side up) inside the CD Drawer (7).
- Press the CD Open/Close tray button ↗ close the CD tray.
- The system will perform a search and the LCD display will show '---bUSY'.
- Please be patient.
- Once the CD mechanism recognize all the tracks of the CD and display the total number of tracks.
To record one track: select the desired track to record and start playback. Then press the Record button (12) once. - To record all tracks: press Play/Pause button (15) to start playback the CD. Then press Auto/Manual button once and the display will show “---AU” and “AUTO TRACK”. Press the Record button (12) once.
- The LCD display (3) will show '---bUSY' and the system will now check the USB storage device. After a few seconds the icons will show on the LCD display with flashing icon. Encoding is now starts.
- The encoding will stop automatically once completed and the unit will continue playback of the next tracks. You may press stop button (11) to stop the CD playing.
- You can also press the Stop button (11) to stop the encoding anytime.
Encode a record or Aux to USB in MP3 format
- Insert your USB Memory Stick into the USB port (21) on the main unit. Ensure there is sufficient space available for encoding.
- Turn the Power/Function button (4) to select PHONO (record player) or AUX mode (for an external audio player) or Bluetooth.
- For Phono: Place the vinyl record you wish to record to CD on the turntable and get it ready for playback.
- For Aux-in: Connect an external audio device (such as an MP3 player, CD player, DAB Radio, etc) via its the headphone or other output socket to the 3.5mm dia. Aux-in jack (21) on this unit (a connecting cable with 3.5mm dia. stereo input plug will be required – not supplied).
- For Bluetooth: Connect the Bluetooth with the external Bluetooth device and select the track you wish to record and get it ready for playback.
- Press the Record button (12) once, the LCD display (3) will show “---Cd”. Then press it a 2nd time until the display shows “---USb”.
- Press Play/Pause button (15) to start the encoding process - the LCD will show (REC) and the USB icon will flash - encoding has started now.
- After completing the encoding, press the Stop button (13) to stop the encoding. Then stop the media playing.
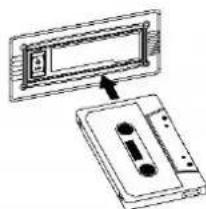
Encode a CASSETTE TAPE
- Turn the Power/Function button (4) to select 'TAPE' mode.
-
Place the recorded Cassette tape into the Cassette Slot (23) on the side of the main unit. Do not fully insert the tape.
-
Press the Record button (12) once, the LCD display (3) will show “---Cd”. Then press it a 2nd time until the display shows “---USb”.
-
Press Play/Pause button (15) to start the encoding process - the LCD will show (REC) and the USB icon will flash - encoding has started now.
-
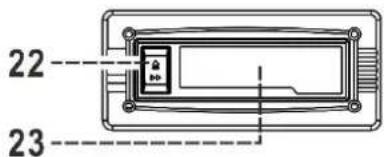
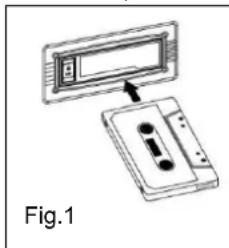
Fully insert a Cassette Tape into the Cassette Door (23) see fig 1, which is situated on the right side of the main unit.
-
The System will start playing the Cassette Tape automatically.
-
After completing the encoding, press the Record button (12) again to stop the encoding
-
To stop playing your Cassette Tape, press the Fast Forward/Eject button ▲▶ (22) next to the Cassette Door (on the side of the main unit) firmly and fully inwards.
-
The Cassette Tape will stop playing and eject.
natural_image
Diagram showing a cassette tape being inserted into a device, labeled Fig.1 (no text or symbols on the diagram itself)Encode FM radio
- Insert your USB Memory Stick into the USB port (21) on the main unit. Ensure there is sufficient space available for encoding.
- Turn the Power/Function button (4) to select FM radio and tune to the desired radio that you wish to encode.
- Press the Record button (12) once, the LCD display (3) will show “---USb”
- Press Play/Pause button (15) to start the encoding process - the LCD will show REC and the USB icon will flash - encoding has started now.
- After completing the encoding, press the Stop button (11) to stop the encoding.
Remark:
- The system will create a 'RECORD' folder on the USB memory stick and then store the encoded tracks within this folder.
- The recording format is set at MP3 bit rate - 128 kbps, and has a sampling rate of 44.1kHz.
- No song title will be recorded during the encoding mode.
- To interrupt a recording, simply press the Record button (9) on the main unit at any time during 'Record mode'.
Separate Tracks
You can divide the music being recorded track by track during encoding from Phono (vinyls), Cassette Tape, FM radio, and Aux in play functions.
- Press and hold the TS (USB Track Separation) button (52) for 3-4 seconds during encoding
- The system will generate a new track and encoding will continue with flashing ↩ icon on the display.
- The unit has now created a new track successfully and encoding will continue.
Delete file stored in a USB (by remote control)
To delete a SINGLE FILE (by remote control)
A.
- Turn the Power/Function button (4) to select USB mode.
- Select the file you would like to delete by pressing the Skip forward button ▶ or Track Skip back button ◀ on your Remote Control.
- Press and hold the Erase button on your Remote Control for 2-3 seconds.
- The LCD display will show "ErS ALL", then press the Erase button again until showing "ErS xxx".
- Press the Play/Pause button on your Remote Control to confirm the deletion and the display will show "---bUSY".
- The LCD display will now show the total number of MP3 files still on the USB memory stick after the delete has been completed.
To delete ALL FILES (by remote control)
- Turn the Power/Function button (4) to select USB mode.
- Press and hold the Erase button on your Remote Control for 2-3 seconds.
- The LCD display will show "ErS ALL".
- Press the Play/Pause button on your Remote Control to confirm the deletion and the display will show "---bUSY".
- The LCD display will now show 'ALL 0' (i.e. no files) after the delete has been completed.
Listing to tape
General operation
Select the function button to select Tape mode. The LCD display will show "TAPE"
Cassette playback : The system will start the playback automatically after inserting of cassette tape
Stop and ejection : Press the "Tape forward / Eject" button completely inwards and the cassette tape will be ejected though the cassette door cover. The "Tape forward / Eject" button will keeping at lowest height position.
Fast forward : Press the “Tape forward / Eject” button half inwards during Playback mode, the tape winding forward direction. The “Tape forward / Eject” button will keeping at middle height position.
Slightly press the "Tape forward / Eject" button again to resume normal playback. The "Tape forward / Eject" button will resume to the highest position.
Remark
Make sure the direction is correct when inserting the tape into the system.
- There is some searching noise can be heard and the system cannot perform normal playback function during fast forward mode.
This is recommended to take out the cassette tape from the system every times after listening and don't leave the cassette tape inside the system when not under playback mode.
PLAY
FAST FORWARD
EJECT
natural_image
Diagram of a cassette tape being inserted into a rectangular device (no text or symbols present)Phono Operation
- Remove the stylus protector.
- Be sure that the tone arm is being detached from the tone arm rest before operating and re-secured again afterwards.

- Rotate the function button to select phono mode. The LCD display will show "PHONO"
- Set the speed selector to the proper position depending on the record to be played.
- Place the record on the platter (use the spindle adaptor if required).
- Set the cueing lever to the up position.
- Lift the tone arm from the rest and slowly move it to the record side. The platter will start to rotate and position the tone arm over the desired position of the record.
- Pull down the cueing lever. The tone arm will come slowly on the recorder and start playback.
- At the end of record, the tone arm will return to the rest position automatically.
- To stop manually, lift the tone arm from the record and return it to the rest.
- Play suspension
Set the cueing lever to the up position will life up the tone arm and then stop playback temporarily.
Remark :
- Due to the auto return system was mechanical design and reset point will affected after transportation. Thus, the tone arm will return to the rest automatically when first time place the tone arm to the platter and it was not the malfunction.
- Due to the length of the record is various, if you find the tone arm cannot return automatically after playback the record. Please press the eject button and return the tone arm back to the rest position
- Users should not change to a magnetic cartridge system, otherwise unit cannot be connected anymore to other music-centre
Adjustments
Pitch adjust control
- The pitch adjust control is made adjust the turntable speed lightly.
Tone arm stopping position alignment
- The position of the tone arm complete playback and return to the rest station can be adjusted at the alignment screw (26) as follow:-
- Before starting the alignment, please take out the hole covering rubber:-
A) If the system cannot complete the playback of record and return earlier
1) Use a cross head screw driver and turning the alignment screw inside the hole clockwise, the stopping and eject position of the tone arm will move more inward to the center of the record before playback completion.
B) if the system cannot return to rest position automatically after playback of record
2) use a cross head screw driver and turning the alignment screw inside the hole anti-clockwise, the stopping and eject position of the tone arm will move more away from the center of the record before playback completion.
Remark:-
- The stopping position is very subjective among difference customer, please select the most suitable position based on your own record collection. The ex-factory setting is based on the most common template.
- Please check the stopping position time by time during adjustment and avoid over turning of the screw inside.
Line out connection
You can connect the system to your whole hi-fi system by connecting the line out socket to the auxiliary input socket with a RCA cable (not included).
Remark : Due to ErP stage two requirement and to protect the environment, the unit will switch to standby mode automatically once no any music playing over 15 minutes.
PROTECTION DE L'ENVIRONNEMENT
natural_image
Diagram of a battery pack with an arrow indicating direction, showing internal components and battery casing (no text or symbols)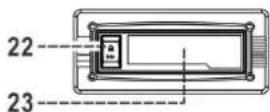
Attention :
Installation du contrepoids
natural_image
Diagram of a mechanical device with rotating shaft and housing, showing motion direction (no text or symbols)→
natural_image
Diagram of a mechanical device with rotating components and a shaft, no text or symbols present→
natural_image
Diagram of a mechanical assembly with rotating components and directional arrows (no text or symbols)- Mode Lecture /Pause ▶II
natural_image
Technical line drawing of a mechanical device with control panel and fan (no text or symbols)● Mode Lecture /Pause ▶II
natural_image
Diagram showing a cassette tape being inserted into a device, labeled Fig.1 (no text or symbols on the diagram itself)Encoder la radio FM
natural_image
Diagram showing two components of a cassette tape device, one with an arrow pointing to it (no text or symbols present)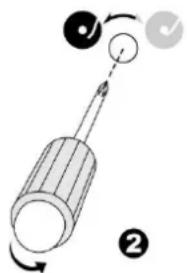
natural_image
Diagram of a battery internal structure with arrows indicating direction (no text or symbols)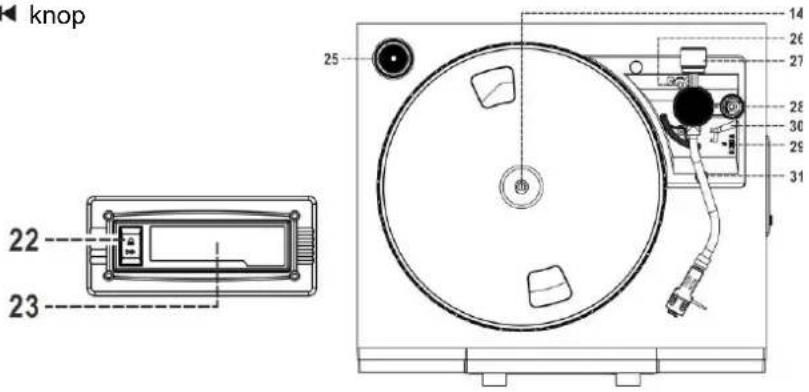
flowchart
graph TD
    A["Step ①: Top cylindrical component"] --> B["Step ②: Rotated cylindrical component"]
    B --> C["Step ③: Circular component with rotation arrow"]
    C --> D["Step ④: Final cylindrical component with rotational arrow"]
natural_image
Technical line drawing of a mechanical device with control panel and buttons (no text or symbols)natural_image
Diagram showing a device with an attached screen and a cassette tape, labeled Fig.1 (no text or symbols on the diagram itself)Codeer FM-radio
natural_image
Diagram showing a cassette tape being inserted into a display case (no text or symbols present)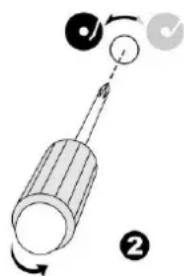
D 90556 Cadolzburg, Germany
Tel: +49 9103 71 67 0
Fax: +49 9103 71 67 12
E-Mail: info@soundmaster.de
Hereby, Wörlein GmbH declares that this device is in compliance with the essential requirements and other relevant provisions of Directive 2014/53/EU.
A copy of the declaration of conformity can be obtained from the above address.
- Vorsicht:
- FM-Radio codieren
- BATTERY INSTALLATION
- Battery Precautions
- Remote control transmitter
- Button description
- Location of Controls
- Caution:
- Precautions for use
- Installation
- Installation of counter weight
- Connection
- Listening to radio
- Manual tuning
- Preset stations (by remote control)
- FM & FM-stereo reception
- Hints for best reception:-
- Playing compact disc
- - Getting start
- - Play / Pause mode ▶II
- - Stop mode
- - Skip mode (skip up ▶/ skip down ◀)
- Remark:-
- - Repeat mode (by remote control)
- ● Random mode (by remote control)
- CD disc programming (by remote control)
- Recording function
- Important notices:-
- A) Recording mode
- I) Phono recoding
- II) Cassette recording
- 5
- III) Aux-in recording
- IV) USB recording
- B) Recording setting
- I) Recording level
- II) Track separation
- A) Auto mode
- B) Manual mode
- III) Finalize a CD-R(W) disc
- Remark:
- IV) Erase or un finalize a CD-RW disc
- A) Un finalize a CD-RW disc
- B) Erase one track
- C) Erase all track
- Remark :
- Playback of MP3 song via USB storage media
- Connecting
- Remark
- - Play mode
- - Repeat Folder
- - Random play
- USB programming
- General operation
- Encode a single track or an entire Audio CD to USB in MP3 format
- Encode a record or Aux to USB in MP3 format
- Encode a CASSETTE TAPE
- Encode FM radio
- Separate Tracks
- Delete file stored in a USB (by remote control)
- To delete a SINGLE FILE (by remote control)
- A.
- To delete ALL FILES (by remote control)
- Listing to tape
- Phono Operation
- - Play suspension
- Adjustments
- Pitch adjust control
- Tone arm stopping position alignment
- A) If the system cannot complete the playback of record and return earlier
- B) if the system cannot return to rest position automatically after playback of record
- Line out connection
- PROTECTION DE L'ENVIRONNEMENT
- Attention :
- Installation du contrepoids
- - Mode Lecture /Pause ▶II
- ● Mode Lecture /Pause ▶II
- Encoder la radio FM
- Codeer FM-radio
Brand : Soundmaster
Model : PL905
Category : Turntable