LM302141 - Blender MOULINEX - Free user manual and instructions
Find the device manual for free LM302141 MOULINEX in PDF.
| Product type | Blender |
| Brand | Moulinex |
| Model | LM302141 |
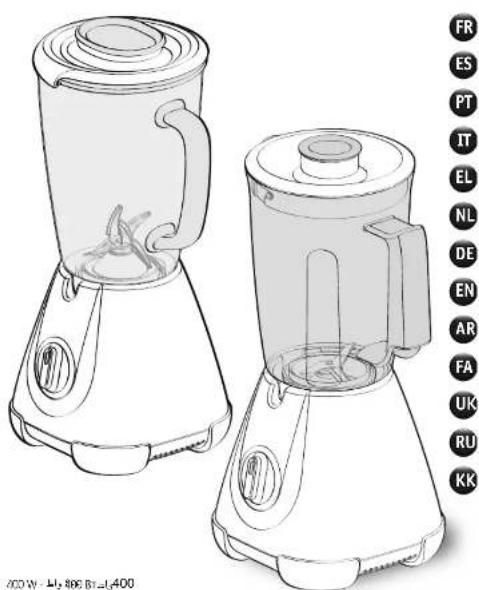
| Blender jar capacity | 1.25 L for thick mixtures, 1 L for liquid preparations |
| Included accessories | Herb mill, Spice mill (depending on model) |
| Jar material | Glass or plastic depending on model |
| Number of speeds | 2 speeds + pulse function |
| Maximum continuous operating time | 3 minutes |
| Safety | Safety lock: the appliance only operates if the jar or accessory is correctly positioned and locked. |
| Maintenance and cleaning | Blender jar (glass): dishwasher safe (top rack, ECO/light soil program); plastic jar and accessories: hand wash with warm soapy water; motor unit: damp cloth, never immerse. |
| Spare parts and repairability | Spare accessories: additional blender jar, herb mill, spice mill; repair by authorized service center. |
| Power supply | Mains plug (voltage not specified, European standard) |
Frequently Asked Questions - LM302141 MOULINEX
User questions about LM302141 MOULINEX
0 question about this device. Answer the ones you know or ask your own.
Ask a new question about this device
Download the instructions for your Blender in PDF format for free! Find your manual LM302141 - MOULINEX and take your electronic device back in hand. On this page are published all the documents necessary for the use of your device. LM302141 by MOULINEX.
USER MANUAL LM302141 MOULINEX
FR P.1-4
5-8
p.9-12
H p. 13-16
EL p. 17-20
NL p. 21-24
DE p. 25-28
EN p. 29-32
AR p. 36-33
FA p.40-37
UKp.41-44
RU p.45-48
K3 p. 49-52
400W-800BT-400
* Bloc form séion modulo "Conjunto de cuillas según el modulo" "Bloce de larnas consecutiva o modulo"- Supporto para secondo modulo""Tremma Klimax ayea y en paraxe - Meseeneld: athonielk van het mode - Meseet block je roch Mode - Bloce un decenoing on model - "Bleve abditeio" abi - "Bleve abditeio" abi - "Madel - Bloce eneae la nucnncnne ene - Xyepedh hori varirie bcknch
DESCRIPTION DE L'APPAREIL
PPIN ANO THN PQTH XPHSE
BESCHRIJVING VAN HET APPARAAT
WERKEN MET HET APPARAAT
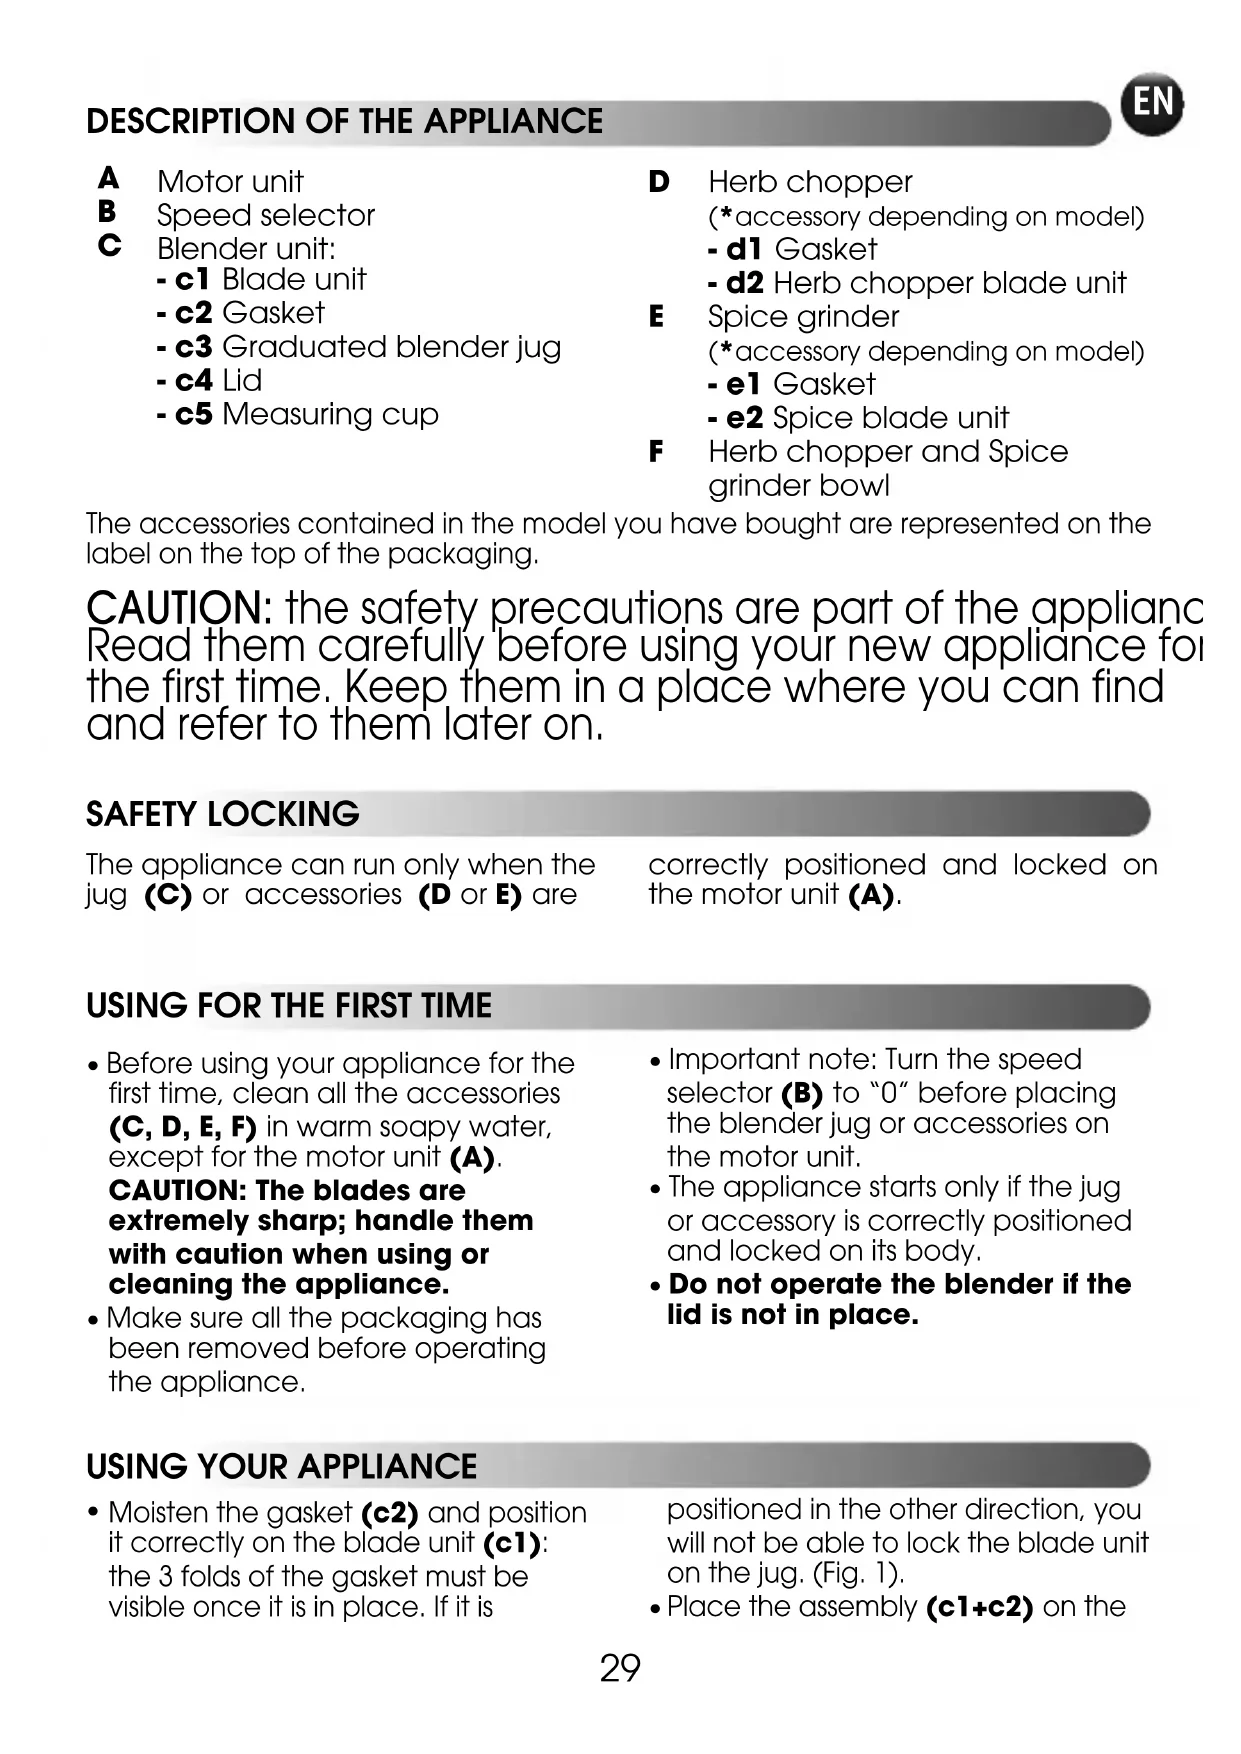
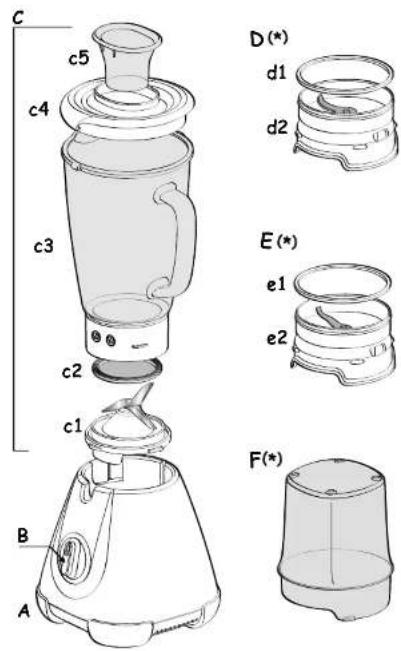
-c1 Blade unit
-c2 Gasket
- c3 Graduated blender jug
-c4Lid
- c5 Measuring cup
D Herb chopper
(*accessory depending on model)
-d1 Gasket
- d2 Herb chopper blade unit
E Spice grinder
(*accessory depending on model)
-e1 Gasket
- e2 Spice blade unit
F Herb chopper and Spice grinder bowl
The accessories contained in the model you have bought are represented on the label on the top of the packaging.
CAUTION: the safety precautions are part of the applianc Read them carefully before using your new appliance for the first time. Keep them in a place where you can find and refer to them later on.
SAFETY LOCKING
The appliance can run only when the jug (C) or accessories (D or E) are
correctly positioned and locked on the motor unit (A).
USING FOR THE FIRST TIME
- Before using your appliance for the first time, clean all the accessories (C, D, E, F) in warm soapy water, except for the motor unit (A).
CAUTION: The blades are extremely sharp; handle them with caution when using or cleaning the appliance. -
Make sure all the packaging has been removed before operating the appliance.
-
Important note: Turn the speed selector (B) to "0" before placing the blender jug or accessories on the motor unit.
- The appliance starts only if the jug or accessory is correctly positioned and locked on its body.
- Do not operate the blender if the lid is not in place.
USING YOUR APPLIANCE
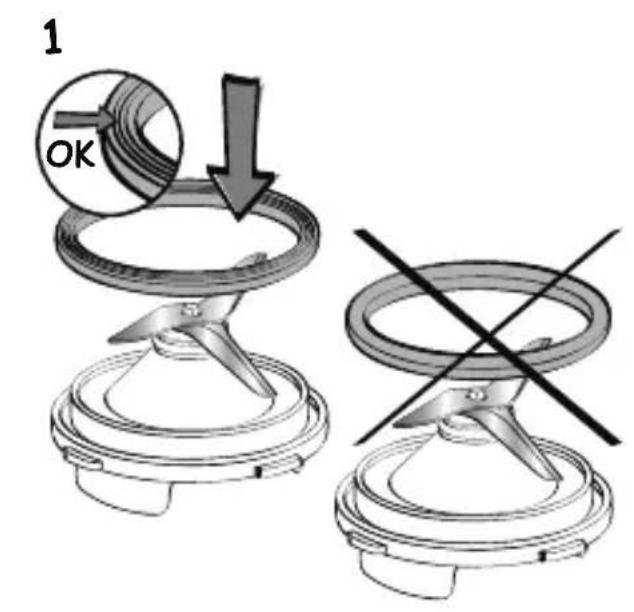
- Moisten the gasket (c2) and position it correctly on the blade unit (c1): the 3 folds of the gasket must be visible once it is in place. If it is
positioned in the other direction, you will not be able to lock the blade unit on the jug. (Fig. 1).
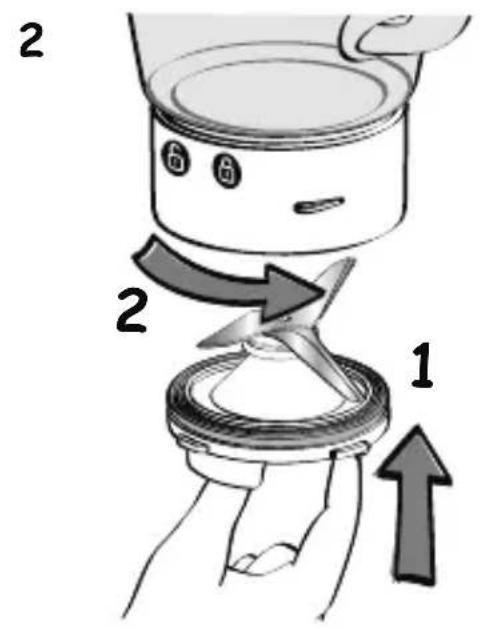
- Place the assembly (c1 + c2) on the
base of the jug (c3). Lock it by rotating the blade unit through a quarter turn in the anticlockwise direction. (Fig. 2).
-
Introduce the ingredients into the assembled jug without exceeding the maximum level indicated:
-
1.25L for thick mixtures
-
1L for liquid preparations.
-
Lock the lid (c4) on the jug. Place the measuring cup (c5) in its recess on the lid.
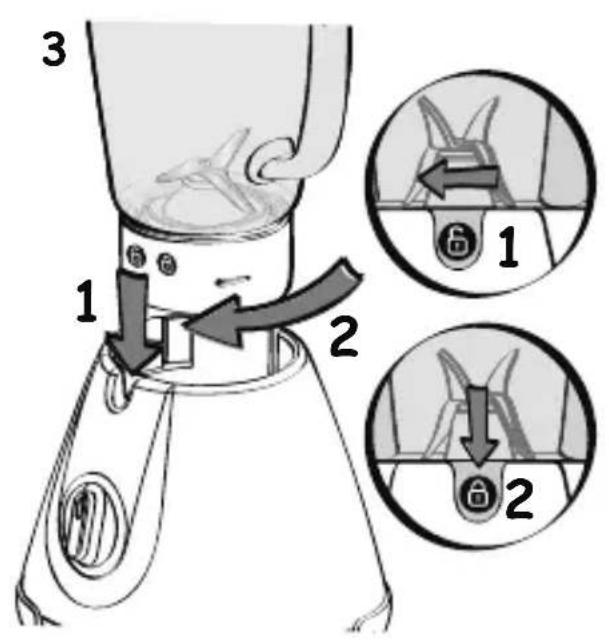
- Place the blender jug assembly (C) on the motor unit (A). The red lock (open aligned in the slot on the motor unit. (Fig. 3 - position 1)
- Then rotate the blender jug (C) through a quarter turn until the green lock (closed) appears. (Fig. 3 - position 2).
2 jug positions are possible: handle on the right or left of the motor unit.
- Do not use the blender for more than three minutes at a time.
- With the herb chopper (D) you can chop ingredients like onions, garlic, meat (cut into pieces) and dry fruits in a few seconds, make crumbs (rusk).
Do not use the herb chopper for liquid preparations (fruit juices, etc.)
- With the spice grinder (E) you can grind spices in a few seconds: coriander seeds, pepper, etc.
These accessories are equipped with a bowl (F) that prevents access to the blades during use.
1- Rotate the bowl (F) and pour the ingredients.
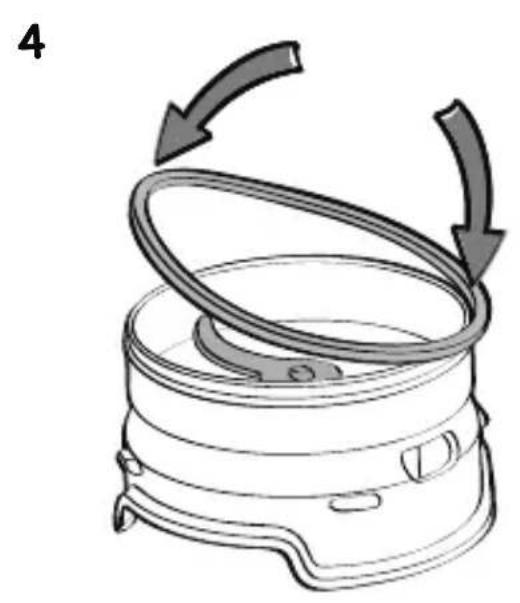
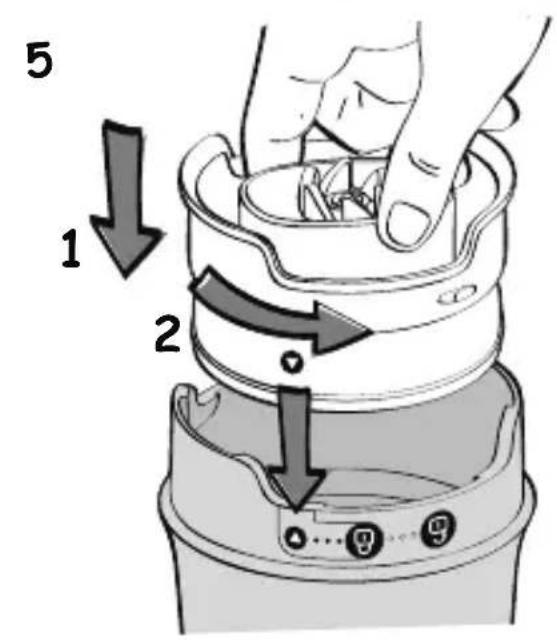
2- Position the gasket (d1) or (e1) in its recess on the blade unit (d2 or e2). (Fig. 4). Position the blade unit on the bowl aligning both the marks on the bowl and the blade unit. Lock the accessory by rotating the blade unit through a quarter turn in the anticlockwise direction. (Fig. 5).
Caution: leaks can occur if the accessory is not locked correctly.
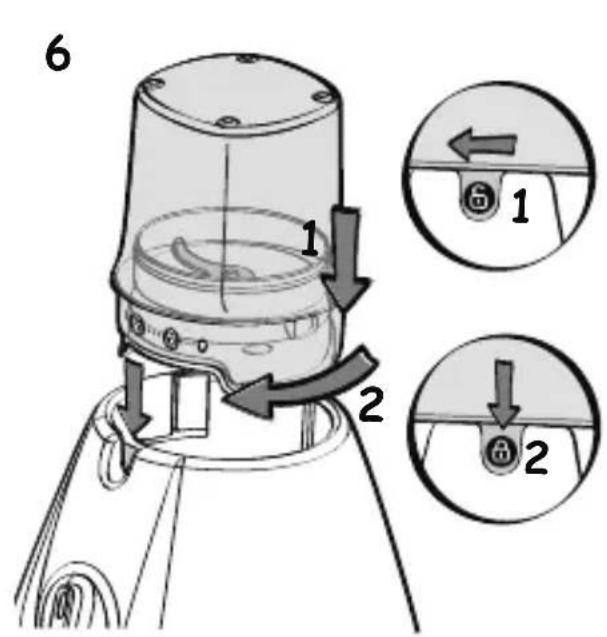
3- Rotate the assembled assembly (D or E) and position it on the motor unit. The red lock (open) aligned in the slot on the motor unit. (Fig 6 - position 1)
4- Then rotate the assembled accessory (D or E) through a quarter turn clockwise until the green lock (closed) appears. (Fig. 6 - position 2).
5- Plug in the appliance and turn the speed selector (B) to the desired position or apply a few pulses. Hold the bowl (F) when the appliance is running. To stop the appliance, turn the speed selector (B) back to position "0".
6- Unlock the accessory by rotating it through a quarter turn in the anticlockwise direction, until the red lock (open) appears. Remove the assembled accessory (D, E) from the motor unit. Turn it over on the worktop before unlocking the blade unit (d2, e2) from the bowl (F) in the reverse order of the assembly. The blades are very sharp: handle them with caution to avoid injury. You can then collect the preparation in the bowl.
- The colour of the bowl may change after blending certain very hard ingredients: (cloves, cinnamon, etc.).
| Ingredients | Quantities (max.) | Operating time | Accessory |
| Apricots / figs 40 g 3 s / speed 2 | D | ||
| Crumbs 1 rusk 10 seconds per pulse | D | ||
| Onions 60 g 6 sec / speed 1 | D | ||
| Shelled almonds / hazelnuts 60 g 30 seconds per pulse | D | ||
| Parsley / fresh coriander 10 g In pulses | D | ||
| Coriander seeds 40 g 30 sec / speed 2 | E |
CLEANING YOUR APPLIANCE
- Unplug the appliance and remove the accessories
- Handle them with caution: the blades on the blender jug and accessories are sharp.
- Remove the jug and rinse it and its lid under running water.
To clean the motor unit (A), use a moist cloth. Dry it carefully. - Never immerse the motor unit (A) in running water.
-
For easy cleaning, be sure to wash the removable parts in water and a little washing-up liquid immediately after use.
To clean the blender jug (c) easily, unlock the blade unit (c1) by rotating it through a quarter turn in the anticlockwise direction. Remove the gasket (c2) and clean them under running water or in the dishwasher. -
GLASS BOWL VERSION (depending on model):
The glass bowl (C) can be cleaned in the dishwasher on the upper rack - use the 'ECO' or 'LOW SALT' programme.
The accessories (D, E) cannot be cleaned in the dishwasher. - PLASTIC BOWL VERSION (depending on model):
The plastic bowl (C) and the accessories (D, E) cannot be cleaned in the dishwasher.
| Problems | Causes | Solutions |
| Product does not work. | The plug is not fitted correctly into the socket. | Plug the appliance into a socket and switch on. |
| The jug or accessory is not correctly positioned or locked on the motor unit. | Check that the jug or accessories are correctly positioned and locked onto the motor unit as shown in the figure in the manual. | |
| Excessive vibrations. | The product is not placed on a flat, stable, heat-resistant surface. | Place the product on a flat surface. |
| Volume of ingredients is too high. | Reduce the quantity of ingredients processed. | |
| Leak from the lid. | Volume of ingredients is too high. | Reduce the quantity of ingredients processed. |
| The lid is not correctly positioned. | Lock the lid correctly on the blender jug. | |
| Leak from the base of the blender jug. | The blender jug gasket (c2) is not positioned correctly or is missing. | Reposition the gasket and lock the blade holder correctly. |
| Leak from the base of the accessories. | The gasket on the blade unit (d2) or (e2) is not positioned correctly or is missing. | Reposition the gasket on the blade unit (d2) or (e2) and lock it correctly onto the bowl (F). |
| The blade does not turn easily. | Pieces of food too large or too hard. | Reduce the size or quantity of ingredients processed. Add liquid |
| Impossible to lock the blade unit with the gasket (c1+c2) on the jug (c3). | The gasket (c2) is not positioned correctly. | Reposition the gasket, the 3 folds should be visible as shown in Fig. 1. |
Your blender still does not work?
Contact an approved service centre (see list in service booklet).
You can customise your blender and obtain the following accessories from your usual dealer or from an approved
service centre: Herb chopper accessory (D), Spice grinder accessory (E), or an additional blender jug (C).
C
J
J
J
J
J
J
J
J
J
J
J
J
J
J
J
J
J
J
J
J
J
J
J
J
J
J
J
J
J
J
J
J
J
J
J
J
J
J
J
J
J
J
J
J
J
J
J
J
J
J
J
J
J
J
J
J
J
J
J
J
J
J
J
J
J
J
J
J
J
J
J
J
J
J
J
J
J
J
J
J
J
J
J
J
J
J
J
J
J
J
J
J
J
JL JIJI 1111111111111111111111111111111111111111111111111111111111111111
J 5 J.
KJgJdI 3
A
1gbi 6 (2g) jai 1
(1-6K)
4
(2-6K) (Joo)
-5
aBaaag aBaaag B
(B) 0
6
$$ \therefore \text {l} _ {\text {j}} \text {g} \text {i} \text {a} \text {b} \text {o} \text {c} \text {l} _ {\text {r}} \text {j} \text {i} \text {s} \text {d} \text {e} 1 - $$
$$ \therefore \text {a n b a l l} g \cup L i c k \text {L o r d o s c l o g F} $$
D
E
$$ \ddot {J} _ {\mathrm {s}} \dot {J} _ {\mathrm {s}} $$
$$ \ddot {a} c y \dot {u} \dot {u} \dot {u} \dot {u} $$
$$ b \downarrow \downarrow \downarrow \dots $$
A
B
C
$$ \begin{array}{c} \text {a l} \ \text {b r e a d} \ \text {c 1 -} \end{array} $$
$$ b \dot {y} \dot {z} \dot {u} \omega \left[ \ddot {a} _ {i} \right] c 3 - $$
$$ \mathrm {c 4} - $$
$$ \omega \text {l} \text {a l l} \text {b o l d s y m b o l {c 5}} - $$
1 111111111111111111111111111111
aJ 1
(A) all
Jg Jg baa Ia Joo 0 (E g D) dall (C)
yI yll Jaaay
lc(B)acjullg:olalao
1 1
Jdall
1 1
1c jlaaog. 2aal pjklo
$$ \cdot C _ {2} ^ {\prime \prime} $$
y
$$ \therefore \angle 1 = \angle 2 $$
Jus JyI yll jaiu J 1
(A) 150
j:
slll aie g jao Jolal
J
iJ 1
$$ \therefore \mathrm {L o a g} (\mathrm {L i s}) $$
jll
- 1
1 1
$$ . (1 \leq k) $$
c3) 1 (c2+c1)
(c2)
J 1
$$ \left. \right.\left. \right.\left. \right.\left.\left.\left.\left.\left.\left.\left.\left.\left.\left.\left.\left.\left.\left.\left.\left.\left.\left.\left.\left.\left.\left.\left.\left.\left.\left.\left.\left.\left.\left.\left.\right.\right.\right.\right.\right.\right.\right.\right.\right.\right.\right.\right.\right.\right.\right.\right.\right.\right.\right.\right.\right.\right.\right.\right.\right.\right.\right.\right.\right.\right.\right. $$
D
$$ \ggg $$
A
$$ \therefore c _ {j} = \sum_ {i = 1} ^ {n} a _ {i} $$
B
$$ j S b g l i o d a l $$
C
E
$$ \mathbf {c 1} - $$
$$ \text {c 2} - $$
$$ \therefore \sum_ {i = 1} ^ {n} b _ {i j} = \sum_ {i = 1} ^ {n} c _ {i i} - $$
$$ \dot {s} \omega \quad c 4 - $$
$$ \leqslant \sum_ {i = 1} ^ {n} \sum_ {j = 1} ^ {m} \sum_ {k = 1} ^ {n} c _ {5} - $$
J 1
jolal jl jll"lab. 1s w kss jy bblal alalalb l 1 1 1 1 1 1 1 1 1 1 1 1 1 1 1 1 1 1 1 1 1 1 1 1
J
.
Sii 1000000000000000000000000000000000000000000000000000
a
LjSb0o Sii JUJrJU
B
E 1
S = S
s
. 1
J 1
(A) (F.E.D.C)
1
pks:ssssjybsb
blal 1 oks sss
.
j
.
Laiolssjolal
L
(1
(c3)(c2+c1)
在 Rt ABN 中:
(c2)
3: (c1)
山
,
ONMC PNPCTPOIO
A BLOK MOTOPY
B Nepemkauch WbndKocTi
C Kopnyc 6JeHepa:
-c1 BloK HOxIB
-c2 Ppokladka
-c3 rpaaynoBaHa yaa
-c4 Kpnwka
-c5MipHa yaSha
D HacaKaДЯpo3MeJIHOBaHHa TpaB(*HaBHiCTbakcecyapa 3aJIeKHTb BiD MoDeIi)
-d1 PpoklaKa
-d2 bloK HOXiB dIpa03MeJIIOBaHHaTpaB
E HacaKa IЯ po3MeIIOBaHnIcneiI
(^*H aBhictb akcecyapa 3aJexnTb BiM MoJIi)
-e1 IpoKlaJaKa
-e2БLOKHOJIBДЯ pO3MeJIIOBAHnCnei
F YashaДлЯpo3MeIIOBaHнЯ TpaB i cneui
Akccecyapn, 0no nocTaayoTbcra i3 npu6aHOIO moeJIIO, onncahi Ha etNKeTci, 0pO3taWOBaHa Ha BepxHi CTOpOHi naKyBaIbHoI Kopo6Kn.
YBAG! InctpyK3 3 texhikn 6e3neKn BxOJaTb do KOMPJIekTaCi DaHOro npncTpoU. O3naHOMTeC8 3 HmN yBaJHO neped nepShm BnKOpNCtAHnM npncTPOU. 36epiraIteci InctpyK3 yIeKoJocTyHnHomymicci, 0o6 MaTN 3MOrY 3BepHyTnC8 Do HNX y 6yDb-jaKN MOMENT.
3AXICHE BLOKYBAHNA
Ipnctpi MoKe npaIOBaTn, TIlbKn kso yaa (C) a6o akcecyapn (D u
E) npabnIbHo po3TaawObaHi Ta 3aΦikCoBaHi Ha 6loci DvnryHa (A).
ПЕРШЕ ВИКОРЦАнHA
- O6OB'raKoBO 3HIMiTb yci naKyBaIbHi MaTepiAII, nepu HIX BnKOpNCTOBvBaTn npncTpI.
BaxnBa npimitka: yctaHOBiTb nepemkauch wBndkocti (B) B noLoXeHHN «0», nepu HIX npneDHyBaTu yauy a6o akcecyapn Do 6loKa DBNrHa.
- Pnncptpi 3anyckaTbcra, Nlle KoJn yawa a6o akcecyapn npaBnIbHo po3TaWOBaHi Ta 3aphiKcObaHHa Noro Kopnyci.
He BnKOpNCTOByTe 6IeHdep, kUo He 3aKpnto KpnkU.
- HablaЖHeTe - 3MoOiTb npOKnAky (c2) ta npabInIbHo po3TaWyIe ii Ha 6IoCi HOxIB (c1): 3 BnHn IpOKnAKn MaOTb 6yTN BnIMMn, kIoo BOHa npabInbHO po3TaWoBaHa. kIoo po3TaWyBaTu II B npOTnJIeXHOMy HAnpMyK, He BdAcTbcr npEaHaTu 6Iok HOxIB Do qaWi. (pnc. 1)
-
Ппсднaite 3i6paHn6LOK (c1+c2)do OCHOBu aushi (c3).3aФikcyuTe Noro, NOBepHyBUn 6LOK HOxIB Ha 90 rpaDyciB npOTn rOdnHHNKOBoi cTpiIKN. (pnc. 2)
-Доаnte iHrpeiEHTN B 3i6paHy yaSy, He nepeBnIyOuN Bka3aHm MaKcImMaJbHn pIBeHb: -
1,25 л дя густ nx symiшew
-
1 n对阵piДКиХ npOукTiB
3aikcyte Kpnky (c4) Ha yawa. YctahOBiMb MHy yawy (c5) y BiIDnOBiHn OTBip Ha Kpwnu.
- YctaHOBIb 3i6paHy yawy (C) Ha 6noci DnryHa (A). YepBOHn 3amok (BiDKpTuN)
MaC cyMiuaTnca 3 OTBOPOM Ha 6loci DnryHa. (pnc. 3 - noLoXeHHa 1)
- Notim NOBephiTb yawy 6IeHepa (C) Ha 90 rpaDyciB, 3'YBvBCa 3eJeHn 3aMOK (3akpntn) pnc. 3 - noJoxeHHra 2)
UaWy MoXHa BCTaHOBnTu y 2 noLoXeHHa: i3 pyuKoIO npabOpuy a60 IibOpuy BiD 6loKa DBrHyHa.
He BnKOpncToBvTe 6IeHep IOBwe, HIX 3 XbUInHn Nocnilb.
3a donomoroHacaKn Inna nodpi6HeHH 3eJIeHi (D) moKHa 3a KInbKa ceKuHd nokpnHTn TaKi iHrpeDiEHTn, kU6yJra, uacnK, M'aco (nopizane Ha mMaToQn) Ta cyXi pkyTn, a TakoN noDpi6HHTn cyxapi dI naHipyBaHH.
He BnKOpncToBvIe Hacady IJRAPO3MeJIIOBaHHra TpaB IJIa IprHrOryBaHHRApiKnx npOdyKTIB (ppyKTOBIX COKIB TOIO)
3a donomoroHn Hacdkn IJp03MeIIOBaHHcneui (E) MoXHaPO3MOJOTn Cneii 3a KjIbKa ceKyHd: 3epHaKopiAnpy, nepeuToio.
- Li akcecyapn obnaHaHni yaweio (F), 0o 6Iokye doctyn Do HoxiB iD qac BnKOpNCtAHN.
1-ПовернiTbЧашу(F)ТаДодайт eIHRpeDiIeHTn
2- YctaHOBIb npOKlaIky (d1) a6o (e1) y BiINOBiIDHe 3arIn6JIeHnHa 6loci HOXIB (d2 a6o e2).(pnc.4)
Po3micitb 6loK HOxIB y yawi, BnpiBnBwn No3Nauchkn Ha yawi Ta Ha 6noci HOXIB.
3aФiKcUTe aKcecyap, NOBepHyBUn 6Iok HOxIB Ha 90 rpaDyci npOTn rOuHHNKOBoi CTpiIKN. (pnc.5)
PonepeJxehn: kIoo He 3aikcybaTn akceCyap HaleXHM uHOM, MoKe BHHKHyTN Teya
3-ПовернiTь 3i6paин akcescyap (D a6o E) Ta po3TaWyIte NOrO Ha 6NoCi DvNryHa. YepBOHn 3aMOK (BIDKpNTMaC cyMiUaTncr 3 OTBOPOM Ha 6NoCi DvNryHa. (pnc.6- noLoJKeHHr 1)
4-ПOTIM NOBepHITb 3i6paHn aKcecyap (Da6oE)Ha90 rpaDyciB,io6 3'YBnBCa3eJIeHn 3aMOK (BiIDKpNTuP (pnc.6 -NoIooKeHHr2)
5-ПiДКЛЮчITb Ппстрійdo eileKTPnHoi pO3eTKn Ta BCTaHOBIr NapeMnKaU WbNdkocTi (B)Вnotpi6He noloxeHna abo 3actocyIte KInbKa imnyIbCHnx onepaici. YtpmYIte qawy (F) NiD yac po60tNi pncTpoH.
Uo6 3yunnHnTn npncpti, yCTaHOBiTb nepemkauch wBnDkocti (B) ha3aJ y noLoXeHHA 0
6-Po36koIte akcecyap, nobepHyBn nooro Ha 90 rpaucib npotn roaHHNKOBoi cTpiIKn, nOKn He BiO6pa3ntbc4 chepBOHn 3amok (BiKpNTn)6BHimiTb 3i6paHn akcecyap (D,E)i3 6loka DBNrhya.
IpeBepHITb Ioro Ha cTilbHuci, nepsh HIX BiD'EDHyBaTu 6LoK HOxIB (d2,e2) BiD yauSi (F), NOBepTaUOuN Ioro y 3BOpOTHomy Hanpymky.
Picra yoro moxha 3i6patn roTObi npOdykTn.
- Kolip yawi moxe 3miHNTncn iicna 3miuBaHHn neBnX dYx e TBepnX ihrpeDiEHTIB, TaKnx k RBO3dNka, Kopuca Too.
KypbIfblHbIH XyMbICbIH TOKTaTy YwiH
XblIaMdbIKTbI aybICTbIPbl-KOCKblWTbl (B) "0"
XaFdaNbiHa aybICTbIPbl3.
- CbIMdbIbIKTbIKb3bl TYCTI KYbITbIH (aMbK) 6eHecmaaJa 60FaHwa caFaT tIIHe Kapama KapcbI 6aftTa 6ip Wnpek aHaBIMFa 6pay apKbIbI b6YaTTaH 5bIFapbIHbI3. XnHaFah KypblmbiD (D, E) KO3FaNTKbiW 6loriHeh aNbIHbI3.
Пьшak 6lorih (d2, e2) cibimdbilbiktah (F) any ywiH onbl xMbic 6eTInHe 6paHbI3 - 6oIweKteydi kepi TApTInTe xypri3iHi3.
Ehdi daibin 6oIFaH eHIMdi CbIbIMdbIbIKTaH anyfa 6oIaBl.
- Kei6ip oTe KaTbI Kypam 6oNikTepei (Kanamnp, dapwbln XHe T.6.) YcaKaTaFaHHaH KeiH CbiBIMDbIbIKTbIH TYCI Θ3repYi MymKiH.
| Курам б养老金ер | Мошени (ен кел) | ЖуMbIC ictey yaKbITbl | Керек-жарak |
| Өрikтер | 40 r | 3 c / 2 кылдамдык | D |
| Керken нан 1 кенken нан | серпilICTi ржимde 10 c | D | |
| Пяз 60 r 6 c / 1 кылдамдык | D | ||
| Бадam / орман жан-faктары 60 r | серпilICTi ржимde 30 c | D | |
| Акжелken / кунze 10 r Сokкыларmen | D | ||
| Кориандр дэндeper 40 r 30 c / 2 | Жылдамдык | E |
K¥PbIJIfblHbl TA3AJAY
KypbIbHbI 3JIeKTp KeiicHeHaXbIpaTbIHb3 XaHe 6apblk KepeK-JapaKTapDbI axbIpaTbIHbI3.
- Onapdbi caKtbkneH KOJaHbIHbI3: 6JeHep KymbpacbIHda XaHe 6aKa KepeK-XapaKTapdaFbl NbIaKTap eTe oTKip.
KyMbipaHbI aIbIHb3 XaHe OHbl XaHe KaKaNTbI aFbIN TyPfAH cy aCTbIHda KyybIHb3.
Ko3FaTkbl 6Iorih (A) Ta3aay ywiH bIrfaIy6epeKti KOJaHaHbIHbI3. MKNrT KeNTipiH3.
Ko3FaTkbl6nOrIH (A) aFbIn TypFaH cy actbHa cAlMaHbI3.
Kypblfbln aIbH6aIbI 6eIweKTepiH KOJaHbIn 6oJFaHHaH KeiH 6ipDeH ca6blH KocblFaH Xblbl Cyda KyFaH OHaBbIpaK 6oJaBl.
- BileHdeepdiN KymbipacbiH (C) yyydbI bHfainbl eTy YwiH nbIwaK 6lorih (c1) caFAT tiliHe Kapama-KapcbI 6aFbITTa 6ip wnepeKke 6pay apkblbl OHbl aXbipaTbIHbI3. Tecem
caKnHaCbH (c2) aIbIHb3, 6apblk 6eKeTepdi aFbIN TpyFaH cy aCTbIHda actbHda HeMece bIDbic KyaTbIH MaUNHaJa Xyblb3.
- IIbIHbl K¥MbIPACbl BAP H¥CKA (yrlire 6aJIaHbICTbl):
- HbIbI KMbipaHbI (C) «ECO» Hemece «KEHJI JACTAHFAH» 6aFdapnaMaJapbH KOJaHy apKbIbI bIDbc JyAtbH MaunHaDa JyyFa 6oJadbl.KepeK-JapaKaTapdbI (D,E) bIDbc JyAtbH MaunHaDa JyyFa 6oJMaJdbI.
- ПЛACTИК КМыРАСы БAP HYСКА (Улгire 6аиlaHbICTbl): Пл actик KМыр a (C) MeH KepeK-JakapTapdbi (D, E) bIDbIC KyaTbIH Maшнада Кууfa 6Олмайды.
EREP K¥PbIJfbl X¥MbIC ICTEMCE HE ICTEY KEPEK?
| AKAYLAP CEBEN | TEP 7EWSIMDEP | |
| Булыхим XXмбic icTeMeiDi | Ол элекtrжелicine Жалfasнбafan | Курьлгынс сайкес керneyi бар Злекtrpo3eTKacbHa Na KocbHb3. |
| Куmbыра Неме сеpek- жарakтap дурьс орhalacnafahн Hemece КозfaNTKbIsh 6loriHde БуfasTTaMaFah | Курьларынс Неме сеpek- жарakтapдын Тиессii Tурde орhalackaHbHa JэHe КозfaNTKbIsh 6loriHde осы НУСКayЛьКТаБi CурТke сэйkec БуfasTTaFaHbHa Na Ke3 JxetKiz3iH3. | |
| KaTыdi ripin | Булыm Teric emec 6eTTe орhalackaH | Буүлмды Teric 6eTke орhalackbpyHb3. |
| Курам 6олшектepdiH, оte кoN Мeilsepi | Чаделетин Курам 6олikтepdiH, МeilsepiH a3aɪMbHb3. | |
| KaKnaftbHaHn aFaDbI | Курам 6олшектepdiH, ote кoN Мeilsepi | Чаделетин Курам 6олikтepdiH, МeilsepiH a3aɪMbHb3. |
| Кaknap dýpbic opHaTbIImaFah | КaknapТы 6лендер Курмлрасында Тиессii Tурde БуfasTTaHb3. | |
| Бленир Куmbірасын Тубінен aFaDbI | Куmbіранын Тссem саIGNacbI (c2) dýpbic opHaTbIImaFah Hemece oJ xOK. | Тссem саIGNacbHн Тиессii Турde opHaTbIb3 JэHe nblaak YCTaFbIbH b6YfaTTaHb3. |
| Kepek-жарakтbH, Тубінен aFaDbI. | Пышak 6loriHin,Tseem саIGNacbI (d2) Hemece (e2) ДурbacopHaTbIImaFahн Hemece Ол xOK. | Тссem саIGNacbHн nblaak 6loriHne (d2) Hemece (e2) Тиессii Tурde opHaIaCTbIbHb3 ЖэHe onb cblbIMdbIbKtA (F) БуfasTTaHb3. |
| Пышak Кшпен айналды | ΘнimderdiH, 6олikтepi Ote Унkeн Hemece oTe KaTbI | БөліктрdiH, 6ол璧emH КшipeитiiH3 Hemece Чн徵еитин Курам 6олikтepdiH, МeilsepiH a3aɪMbHb3. СуьltbIbKtBn KocbHb3. |
| Пышak 6loriH JэHe Тссem саIGNacbHn (c1+c2) KуmbiPada (c3) 6yfaTTay MUMkIn emec | Тссem саIGNacbI (c2) Тсссii Турde opHaTbIImaFah. | Тссem саIGNacbHn 1 cypetke сэйkec Тсссii Tурde OPHaTbIb3. |
Бленьдер 6урьIHfblcblHwa XXMbIC icTeMei Me?
YakineTTi Kbl3MeT KOpCETy OpTaIbIFHa
xa6apnacblHb3 (TiImDi Kbl3MeT
KOpCETy KiTaIaWacbIHaN KaPaHbI3).
BleHdePdi DnIepDeH HeMece
yakineTTi Kbl3MeT KOpCETy
OpTaIbIFbIHaN CaTbIN aNyFa
60aTbH Keleci KepeK-JapaKTapMeH
ToIbIKTbIPyFa 60aDbI: Kokke
apHaIFaH YcaKaTbIw (D),
dAmdeyiIeTpRe apHaIFaH
YHTaKaTbIw (E), 6neHepdiH,
KocbIMwa KMbipacbi (C).