SHTR 2200 D3 - Hair dryer SILVERCREST - Free user manual and instructions
Find the device manual for free SHTR 2200 D3 SILVERCREST in PDF.
| Product type | Hair dryer with ionic function |
| Brand | SilverCrest |
| Model | SHTR 2200 D3 |
| Supply voltage | 230-240 V ~ 50 Hz |
| Power | 2000-2200 W |
| Protection class | II |
| Number of speeds | 2 (slow and fast) |
| Temperature settings | 3 (low, medium, high) |
| Cool shot function | Yes, dedicated button |
| Ionic function | Yes, with LED indicator |
| Included accessories | Swiveling styling nozzle, swiveling diffuser, swiveling curl nozzle |
| Cable length | Approx. 1.8 m |
| Weight | Approx. 0.5 kg (without accessory) |
| Dimensions (L x W x H) | Approx. 25 x 8 x 18 cm |
| Housing material | Plastic |
| Removable filter | Yes |
| Hanging loop | Yes |
| Warranty | 3 years |
| Care and cleaning | Clean the grille and filter regularly with a brush; housing with a damp cloth |
| Safety | Overheat protection with automatic shut-off; do not use near water |
| Intended use | Drying and styling human hair |
Frequently Asked Questions - SHTR 2200 D3 SILVERCREST
User questions about SHTR 2200 D3 SILVERCREST
0 question about this device. Answer the ones you know or ask your own.
Ask a new question about this device
Download the instructions for your Hair dryer in PDF format for free! Find your manual SHTR 2200 D3 - SILVERCREST and take your electronic device back in hand. On this page are published all the documents necessary for the use of your device. SHTR 2200 D3 by SILVERCREST.
USER MANUAL SHTR 2200 D3 SILVERCREST
Operating instructions
IAN 106522
FR NL B
DE AT CH GB
Francais 2
Nederlands 12
Deutsch 22
English 32
ID: SHTR 2200 D3_A1_14_V1.2
Aperçu de l'appareil / Overzicht / Übersicht / Overview
Sommaire
- Overview 32
- Intended purpose 33
- Safety information 34
- Items supplied 36
- Operation 36
- Cleaning 38
7.Storage 38 - Disposal 38
- Trouble-shooting 39
- Technical specifications 39
- Warranty of the HOYER Handel GmbH 39
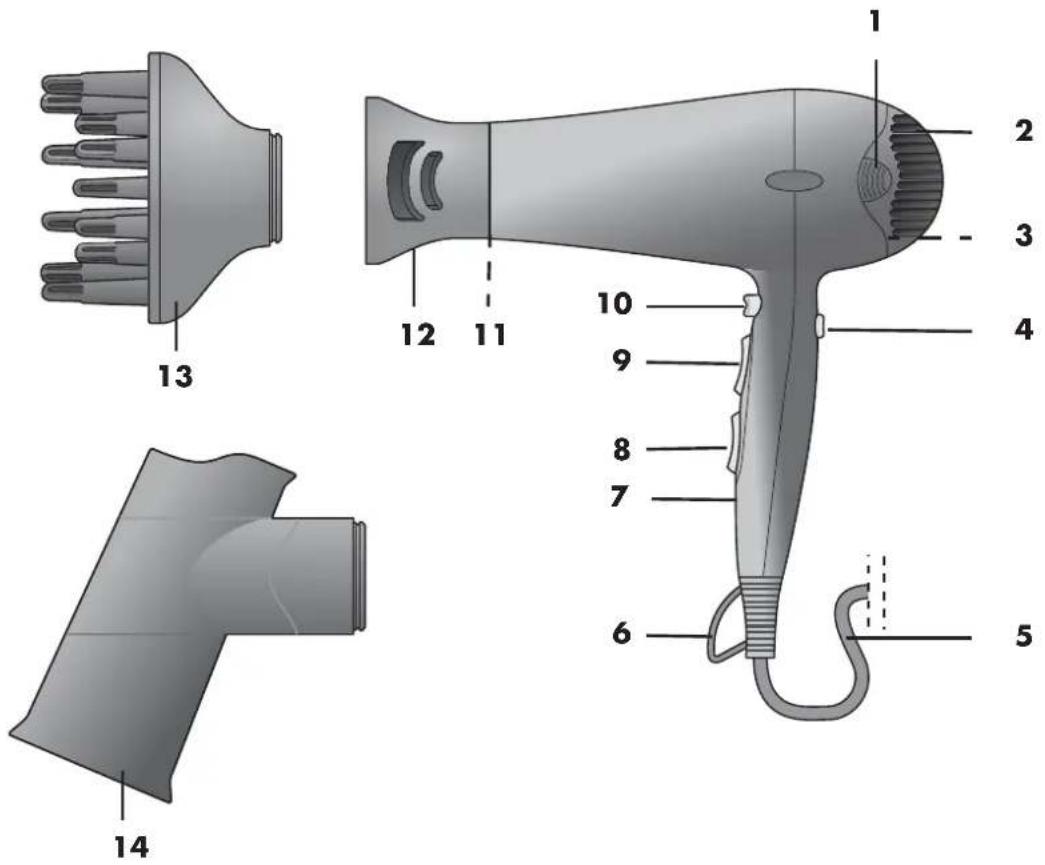
1. Overview
1 Protective grid
2 Air inlet (with detachable protective grid)
3 Fine filter (under the protective grid)
4 Slide switch for ion function
5 Cable with mains plug
6 Hook loop
7 LED, lights up when the ion function is active.
8 On/off switch and switch for speed settings:
0 (off) / (slow) / (fast)
9 Switch for hot air settings:
(low)/medium)/ (sh)
10 button for cooling function
11 Air outlet (with protective disc)
12 Styling attachment (rotatable and detachable)
13 Diffuser (rotatable and detachable)
14 Curling attachment (rotatable and detachable)
Thank you for your trust!
Congratulations on your new hair dryer with ion function.
For a safe handling of the product and in order to get to know the entire scope of features:
- Thoroughly read these operating instructions prior to initial commissioning.
- Above all, observe the safety instructions!
The device should only be used as described in these operating instructions. - Keep these operating instructions for reference.
- If you pass the device on to someone else, please include these operating instructions.
We hope you enjoy your new hair dryer with ion function!
2. Intended purpose
The hair dryer is intended exclusively for the purpose of drying and styling real, own human head hair.
The device is designed for private home use and must not be used for commercial purposes.
The device must only be used indoors.
Foreseeable misuse
WARNING! Risk of injury!
Do not use the hair dryer for drying any other body parts, animals or objects. Do not use the device for artificial hair or with extensions.
3. Safety information
Warnings
If necessary, the following warnings will be used in these operating instructions:

DANGER! High risk: failure to observe this warning may result in injury to life and limb.
WARNING! Moderate risk: failure to observe this warning may result in injury or serious material damage.
CAUTION: low risk: failure to observe this warning may result in minor injury or material damage.
NOTE: circumstances and specifics that must be observed when handling the device.
Instructions for safe operation
- This device can be used by children from the age of 8 and people with restricted physical, sensory or intellectual abilities or people without adequate experience and/or understanding, if they are supervised or instructed on how to use this device safely and if they are aware of the resulting risks. Children must not play with the device. Cleaning and user maintenance must not be performed by children unless they are older than 8 years and supervised.
Children under the age of 8 must be kept away from the device and the power cable. - If you use the hair dryer in a bathroom, always pull out the mains plug afterwards because of the safety risks when it is close to water. The proximity of water represents a hazard even when the device is switched off.
- If the mains cord is damaged it must be replaced by the manufacturer or its service agent or a similarly qualified person, to avoid danger.
- Installation of a residual current device (FI/RCD) with a rated residual operating current of no more than 30mA is recommended to provide additional protection. Ask your electrician for advice. The installation should only be carried out by a qualified electrician.

DANGER for children
- Packing materials are not children's toys. Children should not be allowed to play with the plastic bags: there is a risk of suffocation.


DANGER! Risk of electric shock due to moisture
Do not use this device in the vicinity of bathtubs, showers, washbasins or other vessels containing water.


- Never place the device anywhere that it could fall into water while plugged in.
Protect the device from moisture, water drops and water spray.
The device, the cable and the mains plug must not be immersed in water or any other liquids.
If liquid gets into the device, remove the mains plug immediately. Have the device checked before reusing.
If the device has fallen into water, pull out the mains plug immediately, and only then remove the device from the water. Do not use the device again, and have it checked by a specialist. - Never touch the device with wet hands.

DANGER! Risk of electric shock
Do not use the device if the device or the power cable has any visible damage, or if the device has previously been dropped.
Lay the power cable such that no one can step on it, get caught on it, or trip over it.
Only connect the mains plug to a properly installed and easily accessible wall socket whose voltage corresponds to the specifications on the rating plate. The wall socket must continue to be easily accessible after the device is plugged in.
Ensure that the power cable cannot be damaged by sharp edges or hot points. Do not wrap the power cable around the device (risk of cable damage!).
Ensure that the power cable cannot be trapped or crushed.
To pull the mains plug out of the wall socket, always pull on the mains plug, and never on the power cable.
Disconnect the mains plug from the wall socket...
... after every use,
... if there is a fault,
... when you are not using the device, ... before you clean the device, and
... during thunderstorms.
To avoid any risk, do not make modifications to the product. You also must not replace the power cable yourself. Repairs must be carried out by a specialist workshop or the Service Centre.
- Never attempt to remove dust or foreign bodies from inside the device using a pointed object (e.g. with a tail comb).

DANGER! Fire hazard!
- Never leave the device unattended while it is plugged in.
- Never cover the device or place it on soft objects (e.g. towels).
Ensure that the air inlet and outlet are always kept free. Keep the air inlet away from long hair or objects that could get sucked in.
This appliance is protected against overheating. In the event of overheating, e.g. because the air inlet or outlet is covered, the device switches off automatically. In this case, set the on/off switch to 0 (off), pull the mains plug out of the wall socket and allow the device to cool down adequately. Ensure that no hair or foreign bodies are blocking the air inlet before switching the device back on. - Never switch on the device at the same time as there is another device with a high power consumption attached to the same multi SOCKET power strip.
Do not use an extension cable.

DANGER! Risk of injury through burning!
Do not direct the flow of hot air into eyes, onto hands, or onto any other heat-sensitive body parts.
Do not touch the hot surfaces of the device.
- Allow the device to cool down completely before you clean it or put it away.

- Allow all attachments to cool down before removing it from the device.
WARNING! Risk of material damage
Only use the original accessories.
- Never place the device on hot surfaces (e.g. hob plates) or near heat sources or open fire.
Do not use any astringent or abrasive cleaning agents.
Do not expose the device to temperatures below -10^ or above +40^ .
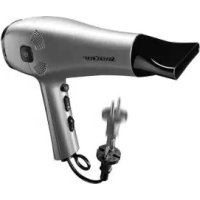
4. Items supplied
1 hair dryer
1 styling attachment 12
1 diffuser 13
1 curling attachment 14
1 set of operating instructions
5. Operation
NOTE: before using for the first time, switch the device on for a few minutes and allow it to run at the highest speed and temperature settings. As a result of the manufacturing process, you may notice a slight odour. This is normal and only occurs during first use. Ensure that the room is well ventilated.
Switching on/off and adjusting speed
- Connect the mains plug 5 with an easily accessible wall socket.
- Using the on/off switch 8 and the switch for the speed settings, you can switch the device on and select the desired speed for the air flow:
$$ \begin{array}{l} \mathbf {0} = \circ f f \ = \text {s l o w}; \text {g e n t l e} \ = \text {f a s t}; \text {s t r o n g} \ \end{array} $$
- After drying, switch the on/off switch 8 to 0 (off) and pull out the mains plug.
Selecting the temperature
Use the switch for the hot air settings 9 to select the desired temperature for the air flow:
= low temperature
≈ = medium temperature
= high temperature.
Cooling function
In order to improve the durability of your hair style, you can cool the hair after it has been styled with hot air using the button 10.
Keep the button 10 held down during drying in order to get a cool air flow, irrespective of the starting temperature.
When you no longer require the cool air flow, release the button 10.
Ionisation function
You can use the ion switch 4 to additionally activate the ionisation function, whatever setting you are using. This then continuously applies ions to the hair.
This reduces the static loading of the hair and improves its stylability.
The hair becomes soft, smooth, glossy, and easier to style.
- lofnuction on,LED 7 lights up
- Iossfunction off,LED 7 off
Styling attachment
The styling attachment 12 makes it possible to direct the air flow onto specific sections of hair.
- Place the styling attachment 12 onto the front of the hair dryer, so that it locks into position.
- The styling attachment 12 can be rotated into any position desired.
- Do not remove the styling attachment 12 from the hair dryer until it has cooled down.
Curling attachment
With the curling attachment 14 you can easily create curls and waves. Since your hair is exposed to significantly less heat, it is not damaged as much as with a curling iron.
NOTE: the result is influenced by the following factors:
- your hair type;
- the humidity of the hair;
- your hair length;
- the thickness of the strand of hair you dry in one step;
-
the pretreatment of the hair.
-
Wash your hair with regular shampoo.
NOTE: do not use any conditioner. It would reduce the formation of curls.
- Towel-dry your hair.
- Brush the hair and ensure that all knots are untangled.
- Place the styling attachment 12 onto the front of the hair dryer, so that it locks into position.
- Only dry the hair at the hairline.
- Take off the styling attachment 12.
- Place the curling attachment 14 onto the front of the hair dryer, so that it locks into position.
- Separate your hair into individual strands and treat each strand one by one.
- Figure A: slightly curl in a strand and put it into the curling attachment 14 from above.
-
Select the highest temperature setting and the highest speed setting on the hair dryer The strand of hair is turned in the air flow of the curling attachment.
-
Slowly move the hair dryer up and down. The strand must be run through the curling attachment from the hair ends almost all the way to the hairline until it is dry.
- In order to stabilise the shape by means of cool air press and hold the button 10 during the last phase of drying.
- Proceed accordingly with the remaining strands of hair.
- Turn off the hair dryer and let the hair cool off.
- Then untwist the individual curled strands.
- Now you can continue styling your hair as you would like. For example, you can loosen the hair with your fingers or brush it.
- If you like, you can use hairspray to set the style.
- Do not remove the curling attachment 14 from the hair dryer until it has cooled down.
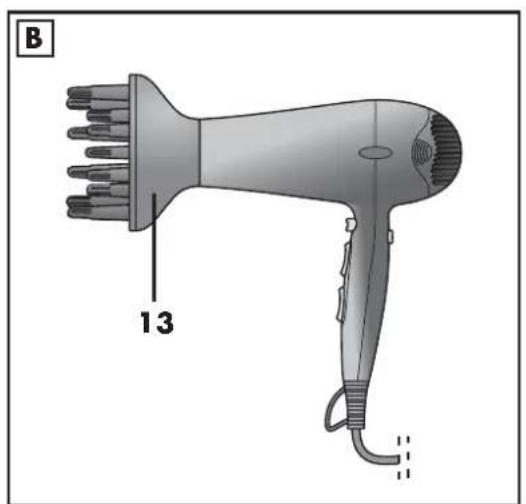
Diffuser
Use the diffuser attachment 13 to create curls and gentle waves in the lengths and tips, as well as for body and volume at the roots of the hair.
-
Figure B: Place the diffuser 13 onto the hair dryer.
-
Switch on the hair dryer.
3.Use:
- For long hair: draw diffuser 13 through to the tips, and style the hair into gentle waves in the direction of the roots.
-
For short hair: use the diffuser 13 to work on the hair around the roots, generating body and volume.
-
Do not remove the diffuser 13 from the hair dryer until it has cooled down.

6. Cleaning

DANGER!
Pull the mains plug 5 out of the wall socket before you clean the hair dryer. WARNING! Risk of material damage!
Do not use any astringent or abrasive cleaning agents.
Clean the device regularly. Particularly ensure that the air inlet and outlet are free of dust, hair and fluff.
- Wipe down the casing, the protective grid 1 over the air inlet, and the styling attachment 12 using a damp cloth.
- Remove the styling attachment 12 or the diffuser 13 from the hair dryer. Hold the hair dryer with the air outlet 11 pointing downwards. Clean the protective discs using a brush.
Cleaning the protective grid
- Squeeze the protective grid 1 slightly at the sides and then remove it.
- Remove the filter 3.
- Hold the hair dryer with the air inlet pointing downwards. Clean the inside and the outside of the protective grid and the filter 3 using a brush.
- Replace the filter 3 and the protective grid 1.
Cleaning the attachments
- Do not remove an attachment (12, 13, 14) from the hair dryer until it has cooled down.
- Wipe the attachment (12, 13, 14) with a damp cloth.
- Allow the attachment (12, 13, 14) to dry completely before you use it again.
7. Storage
WARNING! Risk of material damage! Do not wrap the cable around the device (risk of cable damage!).
- You can use the hook loop 6 to safely and practically hang up the device for storage purposes.
8. Disposal
The symbol showing a wheelie bin crossed through indicates that the product requires separate refuse collection in the European Union.
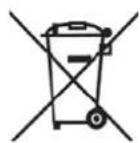
This applies to the product and all accessories marked with this symbol. Products identified with this symbol may not be discarded with normal household waste, but must be taken to a collection point for recycling electronic and electronic appliances. Recycling helps to reduce the consumption of raw materials and protect the environment.
Packaging
When disposing of the packaging, make sure you comply with the environmental regulations applicable in your country.
9. Trouble-shooting
If your device fails to function as required, please try this checklist first. Perhaps there is only a minor problem, and you can solve it yourself.

DANGER! Risk of electric shock! Do not attempt to repair the device yourself under any circumstances.
| Fault | Possible causes / Action |
| No function | • Has the device been con- nected to the power supply? • Has the overheating protec- tion switched off the device? Set the on/off switch to 0 (off), pull the mains plug out of the wall socket and allow the device to cool down adeq- equately. Ensure that no hair or foreign bodies are blocking the air inlet before switching the device back on. |
10. Technical specifications
| Model: SHTR 220D3 |
| Mains voltage: 230-240 V ~ 50 Hz |
| Protection class: II ☐ |
| Power rating: 2000 - 2200 W |

Subject to technical modification.
11. Warranty of the HOYER Handel GmbH
Dear Customer, your device is provided with a 3 year warranty starting with the purchase date. In the event of product defects, you are entitled to statutory rights against the vendor. These statutory rights are not restricted by our warranty presented in the following.
Warranty conditions
The warranty period starts with the purchase date. Please keep the original purchase receipt in a safe place. This document is required to verify the purchase.
If within three years from the purchase date of this product a material or factory defect occurs, the product will be repaired or replaced by us - at our discretion - free of charge to you. This warranty implies that within the period of three years the defective device and the purchase receipt are presented, including a brief written description of the defect and the time it occurred. If the defect is covered by our warranty, the repaired or a new product will be returned to you. No new warranty period starts with a repair or replacement of the product.
Warranty period and statutory claims for defects
The warranty period is not extended when the warranty has been claimed. This also applies to replaced and repaired parts. Any damages and defects already existing at the time of purchase must be reported immediately upon unpacking. Repairs arising after the expiration of the warranty period are subject to a charge.
Warranty coverage
The device was produced carefully according to strict quality guidelines and tested diligently prior to delivery.
The warranty applies to material or factory defects. This warranty does not include product parts that are subject to standard wear and therefore can be considered wear parts; the same applies to damages at fragile parts, e.g. switches, rechargeable batteries or parts made of glass.
This warranty expires if the product is damaged, not used as intended or not serviced. For the proper operation of the product, all instructions listed in the operating instructions must be observed carefully. Any form of use and handling that is advised against in the operating instructions or warned against must always be avoided.
The product is only intended for private and not for commercial use. In the case of incorrect and improper treatment, use of force and interventions not performed by our authorised Service Centre, the warranty shall cease.
Handling in case of a warranty claim
In order to ensure prompt processing of your matter, please observe the following notes:
Please keep the article number IAN:106522 and the purchase receipt as a purchase verification for all inquiries.
- If faulty operation or other defects occur, first contact the Service Centre listed in the following by telephone or email.
- Then, you are able to send a product reported as defective free of charge to the service address specified to you, including the purchase receipt and the information on the defect and when it occurred.

Please visit www.lidl-service.com to download this and many other manuals, product videos and software.

Service Centre
GB Service Great Britain
Tel.: 0871 5000 720 (£ 0.10/Min.)
E-Mail: hoyer@lidl.co.uk
IE Service Ireland
Tel.: 1890 930 034
(0,08 EUR/Min., (peak))
(0,06 EUR/Min., (off peak))
E-Mail: hoyer@lidl.ie
IAN: 106522

Supplier
Please note that the following address is no service address. First contact the aforementioned Service Centre.
HOYER Handel GmbH
Kühnhöfe 5
22761 Hamburg
Germany


HOYER HANDEL GMBH
Kühnhöfe 5
22761 Hamburg
Germany
Version des informations · Stand van de informatie