Ingenieur Automatic 3239 - Watch IWC - Free user manual and instructions
Find the device manual for free Ingenieur Automatic 3239 IWC in PDF.
Frequently Asked Questions - Ingenieur Automatic 3239 IWC
User questions about Ingenieur Automatic 3239 IWC
0 question about this device. Answer the ones you know or ask your own.
Ask a new question about this device
Download the instructions for your Watch in PDF format for free! Find your manual Ingenieur Automatic 3239 - IWC and take your electronic device back in hand. On this page are published all the documents necessary for the use of your device. Ingenieur Automatic 3239 by IWC.
USER MANUAL Ingenieur Automatic 3239 IWC
MANUAL DE INSTRUÇÕES

bar
| Category | Value | |---|---| | Category 1 | 100 | | Category 2 | 100 | | Category 3 | 100 | | Category 4 | 100 | | Category 5 | 100 | | Category 6 | 100 | | Category 7 | 100 | | Category 8 | 100 | | Category 9 | 100 | | Category 10 | 100 | | Category 11 | 100 | | Category 12 | 100 | | Category 13 | 100 | | Category 14 | 100 | | Category 15 | 100 | | Category 16 | 100 | | Category 17 | 100 | | Category 18 | 100 | | Category 19 | 100 | | Category 20 | 100 | | Category 21 | 100 | | Category 22 | 100 | | Category 23 | 100 | | Category 24 | 100 | | Category 25 | 100 | | Category 26 | 100 | | Category 27 | 100 | | Category 28 | 100 | | Category 29 | 100 | | Category 30 | 100 | | Category 31 | 100 | | Category 32 | 100 | | Category 33 | 100 | | Category 34 | 100 | | Category 35 | 100 | | Category 36 | 100 | | Category 37 | 100 | | Category 38 | 100 | | Category 39 | 100 | | Category 40 | 100 | | Category 41 | 100 | | Category 42 | 100 | | Category 43 | 100 | | Category 44 | 100 | | Category 45 | 100 | | Category 46 | 100 | | Category 47 | 100 | | Category 48 | 100 | | Category 49 | 100 | | Category 50 | 100 | | Category 51 | 100 | | Category 52 | 100 | | Category 53 | 100 | | Category 54 | 100 | | Category 55 | 100 | | Category 56 | 100 | | Category 57 | 100 | | Category 58 | 100 | | Category 59 | 100 | | Category 60 | 100 | | Category 61 | 100 | | Category 62 | 100 | | Category 63 | 100 | | Category 64 | 100 | | Category 65 | 100 | | Category 66 | 100 | | Category 67 | 100 | | Category 68 | 100 | | Category 69 | 100 | | Category 70 | 100 | | Category 71 | 100 | | Category 72 | 100 | | Category 73 | 100 | | Category 74 | 100 | | Category 75 | 100 | | Category 76 | 100 | | Category 77 | 100 | | Category 78 | 100 | | Category 79 | 100 | | Category 80 | 100 | | Category 81 | 100 | | Category 82 | 100 | | Category 83 | 100 | | Category 84 | 100 | | Category 85 | 100 | | Category 86 | 100 | | Category 87 | 100 | | Category 88 | 100 | | Category 89 | 100 | | Category 90 | 100 | | Category 91 | 100 | | Category 92 | 100 | | Category 93 | 100 | | Category 94 | 100 | | Category 95 | 100 | | Category 96 | 100 | | Category 97 | 100 | | Category 98 | 100 | | Category 99 | 100 | | Total (Total) |- 5 -
BEDIENUNGSANLEITUNG
Deutsch
- 19 -
OPERATING INSTRUCTIONS
English
-33-
MODE D'EMPLOI
Français
- 47 -
ISTRUZIONI D'USO
Italiano
- 61 -
MANUAL DE INSTRUÇÕES
Português
text_image
Technical diagram showing a mechanical assembly with labeled parts and directional arrows indicating process steps.natural_image
Pure electrical circuit lines without any symbolsnatural_image
Pure electrical circuit lines without any symbolstext_image
Technical diagram showing a screwdriver pressing into a component with numbered callouts indicating steps 2 and 3.____ Welcome to the small circle of individuals who, if we are to be absolutely precise, demand slightly more of a watch than absolute precision. Appreciation of a watch is more than mere appreciation of the correct time. It is enthusiasm for an ingenious idea. For the interplay between precision and imagination. Between time and timelessness. Between boundaries and infinity. Between laws to which the entire world is subject, and taste, which cannot be dictated to anyone. That is why, since 1868, we have been devoting rather more of our time to watches that must not only run with absolute precision but which also, with every passing second, exert a fascination with the great achievements of master craftsmanship: a fascination with new inventions of a technical, material or formal nature, even if they are concealed in minute details that are perhaps not even visible. You are now the owner of a beautiful new example of this IWC tradition. We would like to congratulate you on your choice and send you our best wishes for the time you will spend with your watch, which perhaps cannot be described with any greater accuracy than it is here.
IWC MANAGEMENT
THE TECHNICAL REFINEMENTS OF THE INGENIEUR AUTOMATIC
Your IWC watch shows you the time in hours, minutes and seconds, together with the date. The watch is water-resistant 12 bar and protected by a sapphire glass of hardness grade 9 on Mohs' scale. The mechanical movement with automatic winding has a power reserve of approximately 42 hours when fully wound. The soft-iron inner case provides protection against magnetic fields. To ensure that this extraordinary watch continues to perform faultlessly in the future, it is essential to observe a few important operating instructions.
text_image
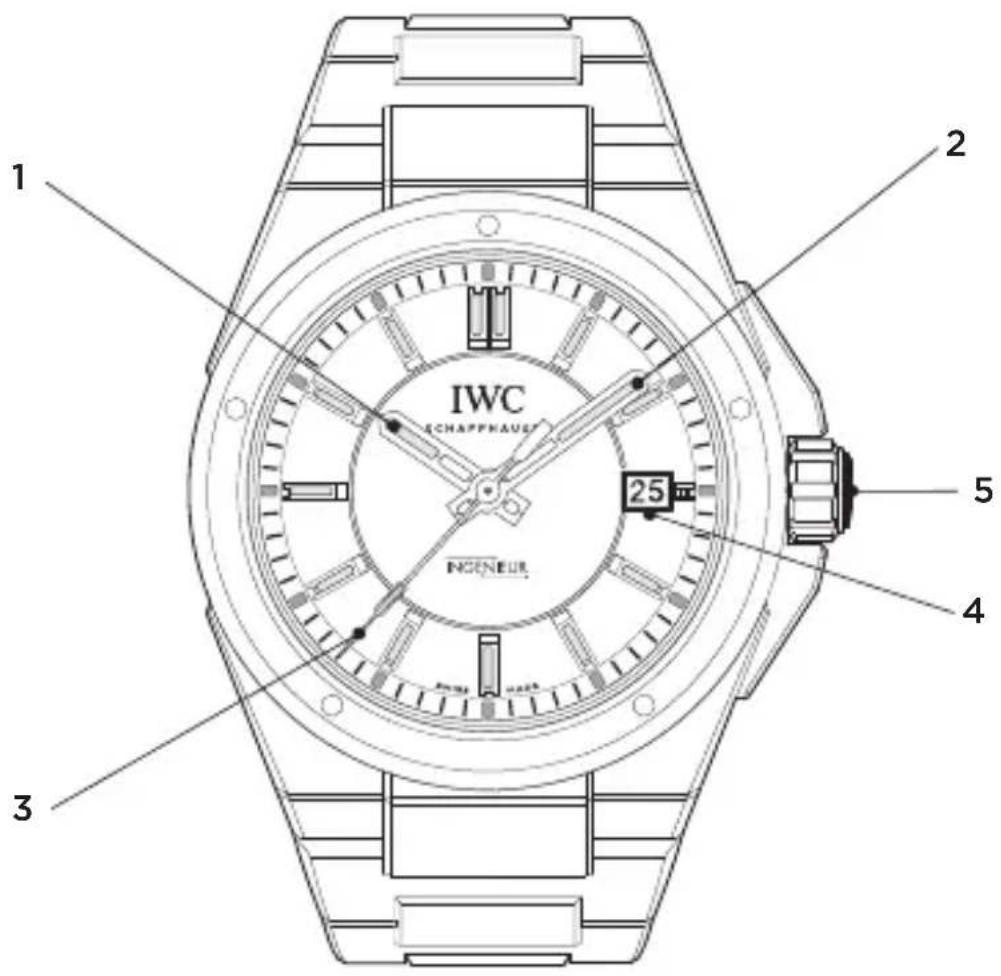
1 2 IWC SCHAFFENZAUS 25 5 4 3 INGENEUR1 Hour hand : Date display 4
2 Minute hand : Screw-in crown 5
3 Seconds hand
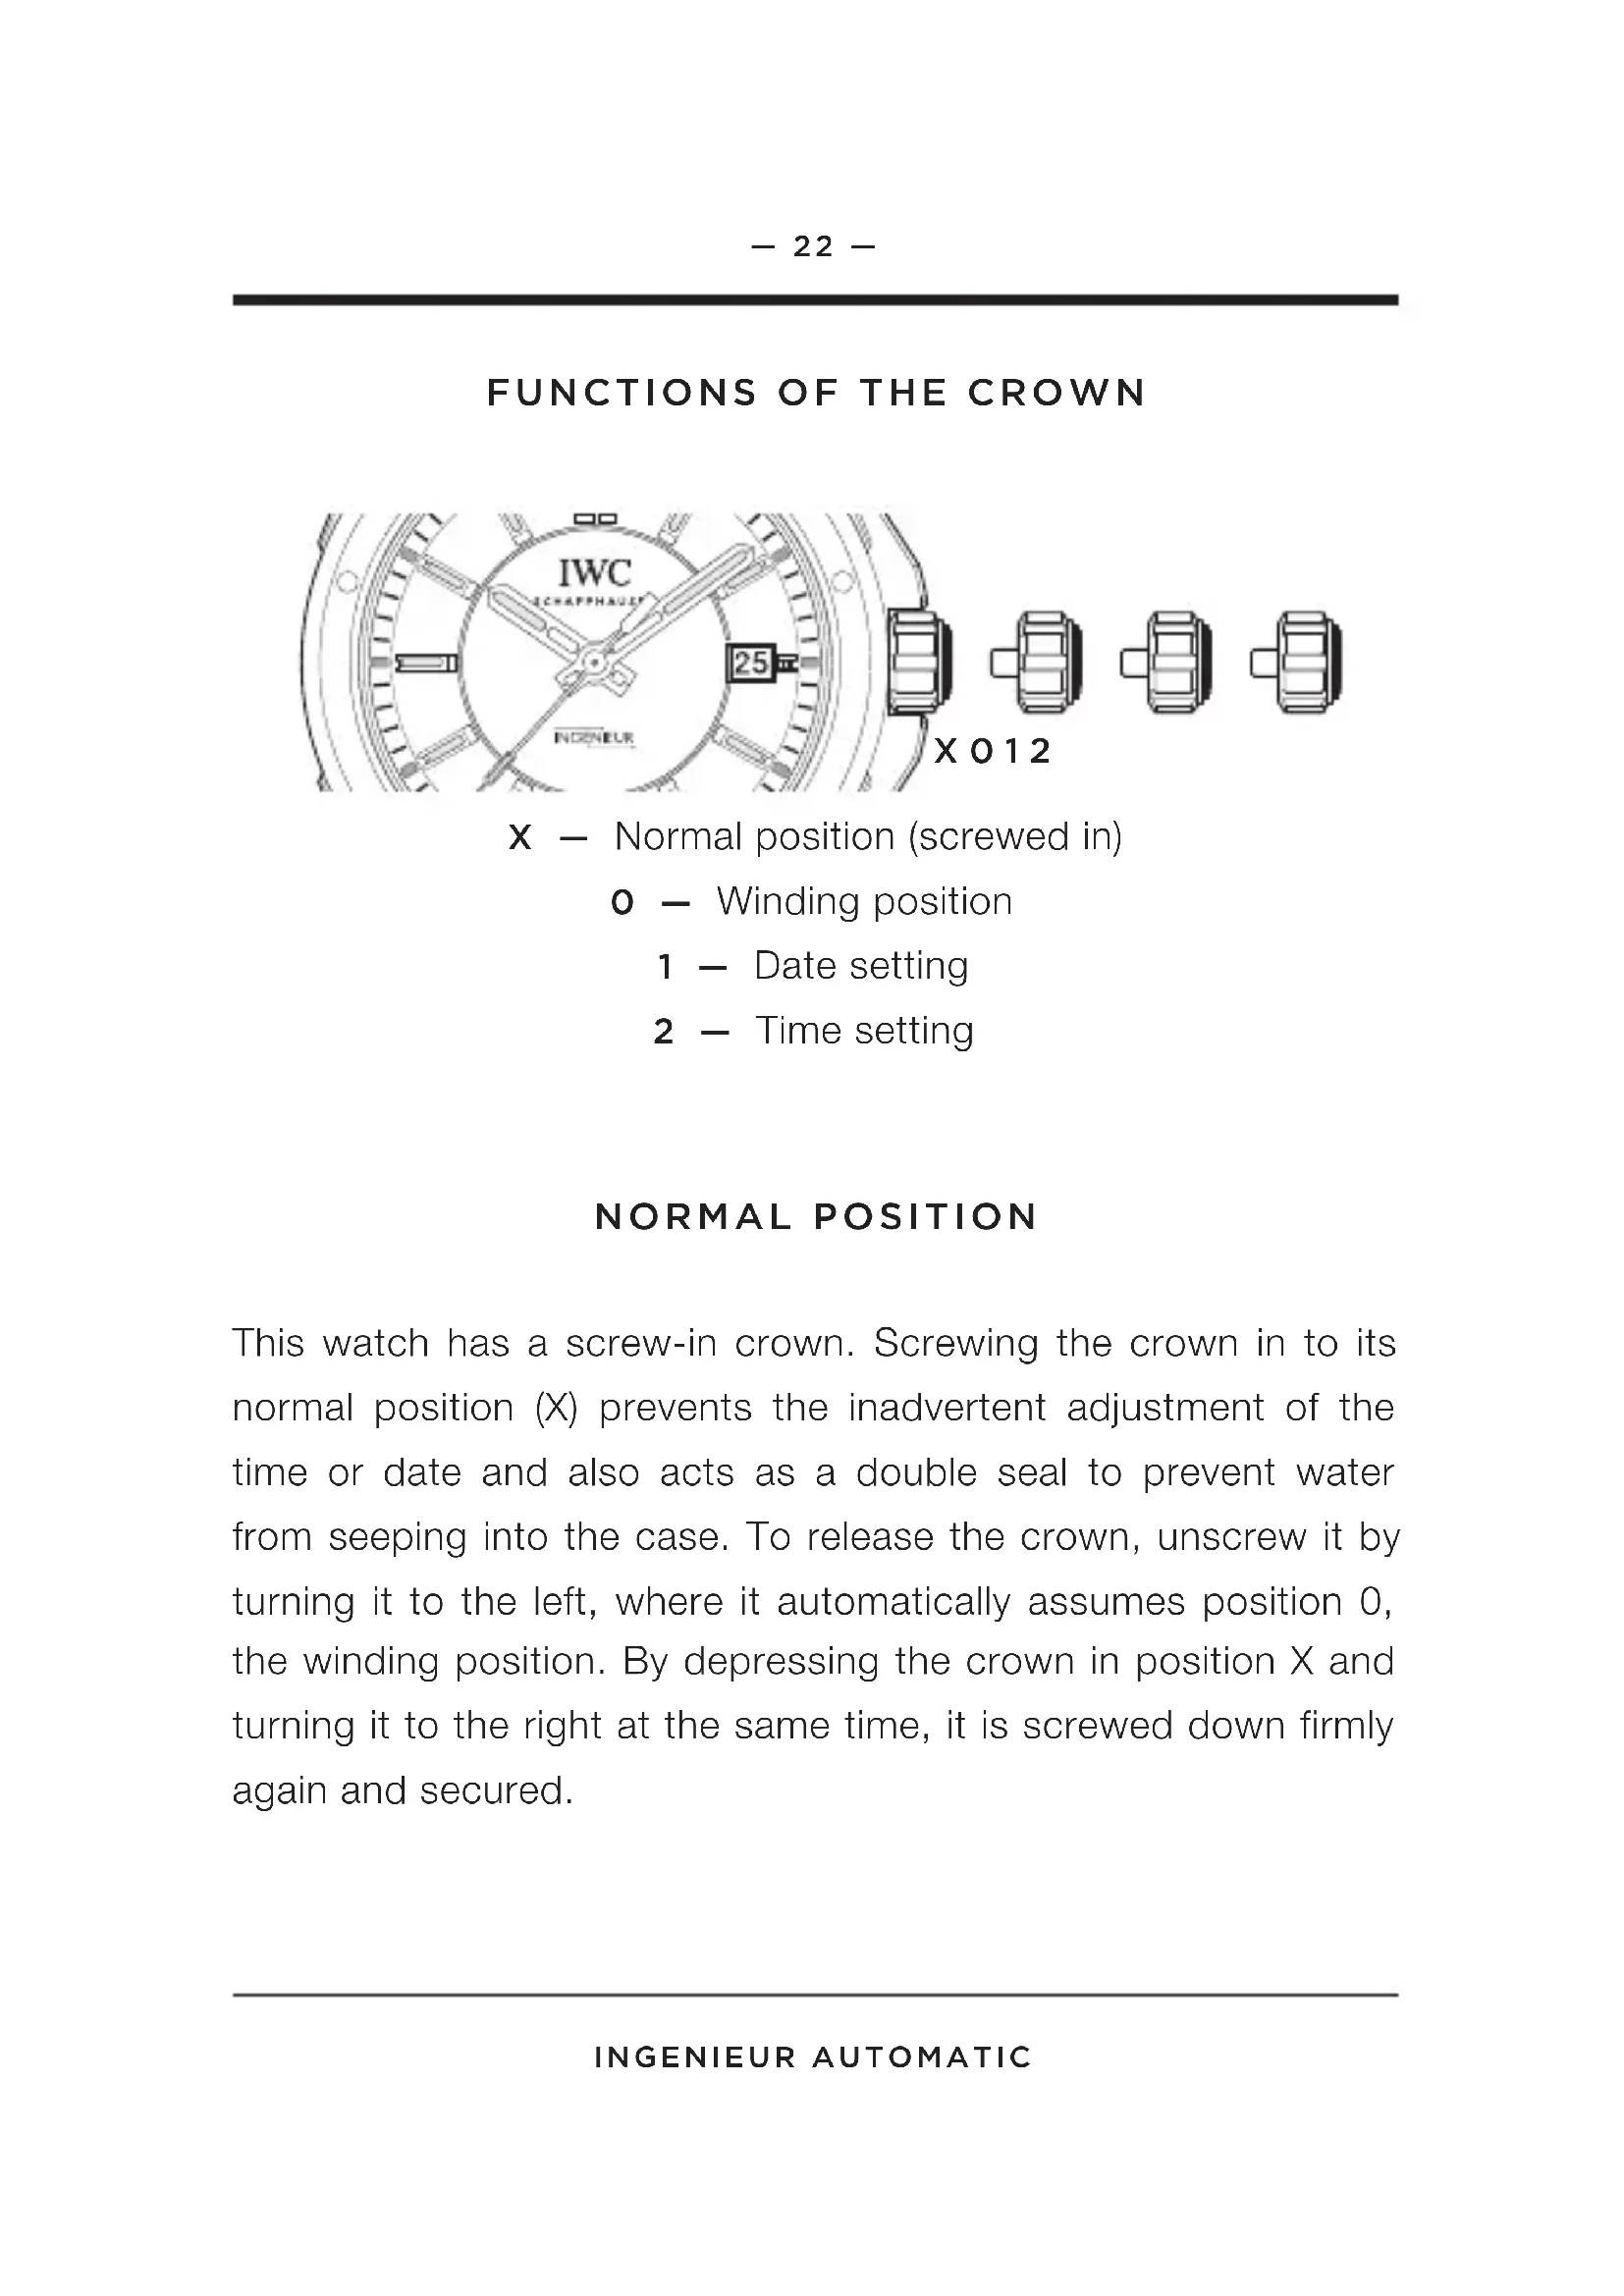
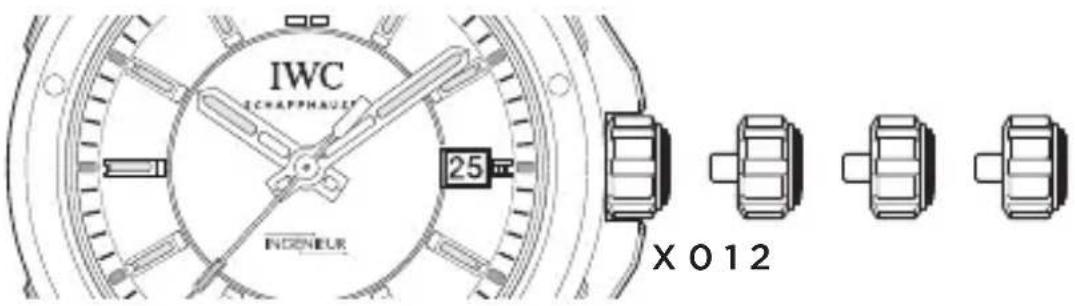
FUNCTIONS OF THE CROWN
text_image
IWC SCHAFFHAUER 25 INDONEUR X 0 12X - Normal position (screwed in)
0 - Winding position
1 - Date setting
2 - Time setting
NORMAL POSITION
This watch has a screw-in crown. Screwing the crown in to its normal position (X) prevents the inadvertent adjustment of the time or date and also acts as a double seal to prevent water from seeping into the case. To release the crown, unscrew it by turning it to the left, where it automatically assumes position 0, the winding position. By depressing the crown in position X and turning it to the right at the same time, it is screwed down firmly again and secured.
WINDING POSITION
With the crown in the winding position (0), you can also wind the automatic movement by hand. A few revolutions of the crown are enough to start the movement. However, it is better to wind the watch by turning the crown through approximately 20 revolutions as this will ensure maximum accuracy.
DATE SETTING
If a month has fewer than 31 days, you will need to set the date manually to the first day of the following month. Release the screw-in crown and pull it out to position 1. You can now set the date by turning the crown to the left (direct advance). You should not use the rapid-advance function between 8 p.m. and 2 a.m. because the movement automatically advances the date during this period.
TIME SETTING
Pull out the crown to position 2. This will stop the movement. To set the time accurately to the second, it is best to stop the movement as the seconds hand passes 60. Now move the minute hand a few minute strokes beyond the time to be set. Then position the minute hand by moving it gently backwards until it is exactly above the correct minute stroke. This ensures that the minute hand begins to move immediately when you restart the movement. To start the seconds hand, push in the crown to position 0. When setting the time, please be aware of the date change, which always takes place at 12 midnight. If this change has already taken place at 12 noon, you must move the hands forwards by 12 hours.
Important: Although the watch is water-resistant in positions 0, 1 and 2, the crown should always be screwed in again for normal use (position X).
READING THE TIME IN THE DARK
Both the dial and the hour and minute hands of your watch have luminescent elements that allow you to read the time effortlessly, even in total darkness. The luminescent element at 12 o'clock serves as a reference point.
ADJUSTING AND SETTING THE METAL BRACELET
The metal bracelet has been designed so that you can comfortably adjust it to the size of your wrist. You can make this adjustment yourself by removing or adding individual bracelet links.
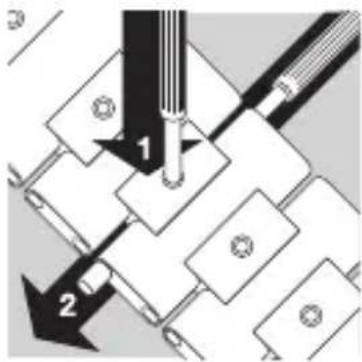
TAKING THE BRACELET APART
text_image
Technical diagram showing a mechanical assembly with labeled parts and directional arrows indicating movement or assembly.Open the folding clasp by pressing the button on the side. Lay the bracelet with the outside on a firm base. To avoid scratching the bracelet and base, place a cloth underneath the bracelet. Using the special tool provided, you can now push down the securing pin at the desired point of separ-
ation (1) and, at the same time, slide the hinged link with the help of the second tool about 3 millimetres sideways (2).
natural_image
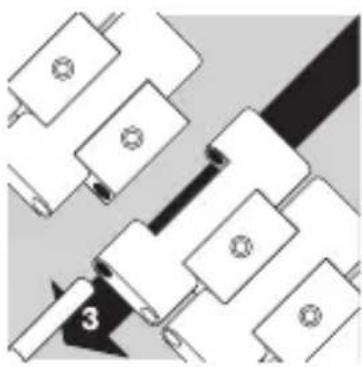
Pure electrical circuit lines without any symbolsPull the protruding hinged link out of the bracelet (3). The bracelet is now separated.
DETERMINING HOW MANY LINKS TO REMOVE

text_image
5 3.2 3.2 3.4Place the watch with the folding clasp closed around your wrist and use the overlap to estimate the number of surplus bracelet links that you can now remove as described below. If you need to take out several links, we recommend removing the same number of links from each side of the
bracelet, if possible, to ensure that the clasp can be worn more or less in the centre of the wrist.
REMOVING INDIVIDUAL LINKS AND ATTACHING THE BRACELET
natural_image
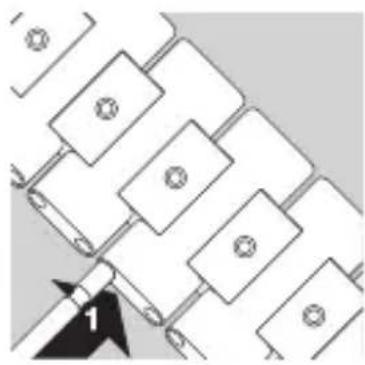
Pure electrical circuit lines without any symbolsRepeat steps 1 to 3 at the distance from the first point of separation you have just determined.
Remove the unnecessary links and reassemble the shortened bracelet. Slide the hinged link into the bracelet sideways (1).
text_image
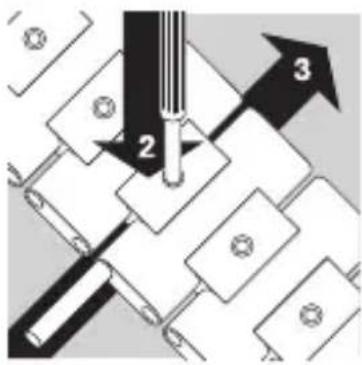
Technical diagram showing a mechanical assembly with numbered components and directional arrows indicating process flow.Using the special tool provided, you can now push down the fixing bolt (2) and, at the same time, slide the hinged link back into the bracelet until it lies flush (3). The fixing bolt must be aligned with the upper edge of the securing link.
To finish, check that the fixing bolts are sit-
ting correctly. Keep the surplus links and separating tool in a safe place for use in any adjustment at another time.
WATER-RESISTANCE
The water-resistance of IWC watches is stated in bar and not in metres. Metres, which are often used elsewhere in the watch industry to indicate water-resistance, cannot be equated with dive depth because of the test procedures that are frequently used. Water-resistance shown in metres provides no indication as to actual use of the watch in the presence of moisture and wetness, and in or under water. Recommendations for use in connection with the water-resistance of your watch can be found on the Internet at www.iwc.com/water-resistance. Your authorized IWC Official Agent will also be pleased to provide you with information.
To ensure that your watch continues to function perfectly, you should have it checked by an IWC service centre at least once a year. Your watch should also be tested after exposure to unusually harsh conditions. If the tests are not carried out as stipulated, or if the watch is opened by unauthorized persons, IWC will accept no warranty or liability claims.
Recommendation: Your authorized IWC Official Agent must carry out a water-resistance test whenever your IWC watch is opened and serviced.
SERVICING YOUR INGENIEUR AUTOMATIC
Although the parts in this watch are all manufactured from top-quality materials, a number of components are subject to natural wear and tear. It is particularly important to ensure that the points at which wear occurs are always well lubricated and that oil contaminated by metal abrasion is regularly removed. For this reason, we recommend that you have your watch serviced approximately every 5 years. Please contact an authorized IWC Official Agent or send your watch directly to the IWC Customer Service Department in Schaffhausen.
Effective from December 2012. Technical specifications subject to change.
text_image
Technical diagram showing a mechanical assembly with labeled parts and directional arrows indicating movement or assembly.natural_image
Pure electrical circuit lines without any symbolsnatural_image
Pure diagram of a circular object with horizontal and vertical lines, no text or symbols presentnatural_image
Pure electrical circuit lines without any symbolstext_image
Technical diagram showing a mechanical assembly with numbered components and directional arrows indicating process flow.text_image
Technical diagram showing a mechanical assembly with labeled parts and directional arrows indicating movement or assembly.natural_image
Pure electrical circuit lines without any symbolstext_image
Technical diagram showing a circular component with dimension lines and labeled sections (A, B, C, D)natural_image
Pure electrical circuit lines without any symbolstext_image
Technical diagram showing a screwdriver pressing into a component with numbered callouts indicating steps 2 and 3.text_image
Technical diagram showing a mechanical assembly with labeled parts and directional arrows indicating movement or assembly.natural_image
Pure mechanical assembly diagram without any text, numbers, or symbolsnatural_image
Pure electrical circuit lines without any symbolstext_image
Technical diagram showing a mechanical assembly with numbered components and directional arrows indicating process flow.text_image
Technical diagram showing a mechanical assembly with labeled parts and directional arrows indicating movement or assembly.natural_image
Pure electrical circuit lines without any symbolsRemova agora o pino articulado que sobressai da bracelet (3). Agora a bracelet está separada.
natural_image
Pure electrical circuit lines without any symbolstext_image
Technical diagram showing a mechanical assembly with numbered components and directional arrows indicating process flow.Branch of Richemont International SA
Baumgartenstrasse 15
CH-8201 Schaffhausen
Switzerland
Phone +41 (0)52 635 65 65
Fax +41 (0)52 635 65 01
info@iwc.com
www.iwc.com
© Copyright 2012
IWC Schaffhausen, Branch of Richemont International SA Printed in Switzerland

FSC
www.fsc.org
MIX
From responsible sources
FSC® C016687

bar
| Category | Value | |---|---| | Category 1 | 100 | | Category 2 | 100 | | Category 3 | 100 | | Category 4 | 100 | | Category 5 | 100 | | Category 6 | 100 | | Category 7 | 100 | | Category 8 | 100 | | Category 9 | 100 | | Category 10 | 100 | | Category 11 | 100 | | Category 12 | 100 | | Category 13 | 100 | | Category 14 | 100 | | Category 15 | 100 | | Category 16 | 100 | | Category 17 | 100 | | Category 18 | 100 | | Category 19 | 100 | | Category 20 | 100 | | Category 21 | 100 | | Category 22 | 100 | | Category 23 | 100 | | Category 24 | 100 | | Category 25 | 100 | | Category 26 | 100 | | Category 27 | 100 | | Category 28 | 100 | | Category 29 | 100 | | Category 30 | 100 | | Category 31 | 100 | | Category 32 | 100 | | Category 33 | 100 | | Category 34 | 100 | | Category 35 | 100 | | Category 36 | 100 | | Category 37 | 100 | | Category 38 | 100 | | Category 39 | 100 | | Category 40 | 100 | | Category 41 | 100 | | Category 42 | 100 | | Category 43 | 100 | | Category 44 | 100 | | Category 45 | 100 | | Category 46 | 100 | | Category 47 | 100 | | Category 48 | 100 | | Category 49 | 100 | | Category 50 | 100 | | Category 51 | 100 | | Category 52 | 100 | | Category 53 | 100 | | Category 54 | 100 | | Category 55 | 100 | | Category 56 | 100 | | Category 57 | 100 | | Category 58 | 100 | | Category 59 | 100 | | Category 60 | 100 | | Category 61 | 100 | | Category 62 | 100 | | Category 63 | 100 | | Category 64 | 100 | | Category 65 | 100 | | Category 66 | 100 | | Category 67 | 100 | | Category 68 | 100 | | Category 69 | 100 | | Category 70 | 100 | | Category 71 | 100 | | Category 72 | 100 | | Category 73 | 100 | | Category 74 | 100 | | Category 75 | 100 | | Category 76 | 100 | | Category 77 | 100 | | Category 78 | 100 | | Category 79 | 100 | | Category 80 | 100 | | Category 81 | 100 | | Category 82 | 100 | | Category 83 | 100 | | Category 84 | 100 | | Category 85 | 100 | | Category 86 | 100 | | Category 87 | 100 | | Category 88 | 100 | | Category 89 | 100 | | Category 90 | 100 | | Category 91 | 100 | | Category 92 | 100 | | Category 93 | 100 | | Category 94 | 100 | | Category 95 | 100 | | Category 96 | 100 | | Category 97 | 100 | | Category 98 | 100 | | Category 99 | 100 | | Total (Total) |