Baby Kangoo RB203BL - Baby monitors Rimax - Free user manual and instructions
Find the device manual for free Baby Kangoo RB203BL Rimax in PDF.
| Product type | Digital baby monitor with video camera |
| Brand and model | Rimax Baby Kangoo RB203BL |
| Screen | 2.4-inch LCD screen, 240x320 pixel resolution |
| Frequency | 2.4 GHz wireless |
| Range | Up to 300 meters in open space |
| Night vision | 6 infrared LEDs, automatic detection |
| Monitor dimensions | 9.7 x 10.4 x 3.8 cm |
| Camera dimensions | 7.0 x 12.8 x 7.2 cm |
| Monitor weight | 137 g |
| Camera weight | 120 g |
| Power supply | Monitor: rechargeable Li-ion battery + DC 6V 800 mA adapter; Camera: DC 6V 800 mA adapter |
| Main features | Two-way audio (intercom), digital zoom, feeding alarm, lullabies, temperature sensor, sound detector (VOX), night light, supports up to 4 cameras |
| Care and cleaning | Wipe with a soft, dry cloth. Do not use liquid or abrasive products. |
| Safety | Keep cables and adapters out of reach of children. Do not place the monitor in the crib or cover it. Do not expose to water or heat. |
| Spare parts and repairability | No user-serviceable parts except the battery. Do not disassemble the device. |
| General information | Manual available for free download. Complies with directive 1999/5/EC. |
Frequently Asked Questions - Baby Kangoo RB203BL Rimax
User questions about Baby Kangoo RB203BL Rimax
0 question about this device. Answer the ones you know or ask your own.
Ask a new question about this device
Download the instructions for your Baby monitors in PDF format for free! Find your manual Baby Kangoo RB203BL - Rimax and take your electronic device back in hand. On this page are published all the documents necessary for the use of your device. Baby Kangoo RB203BL by Rimax.
USER MANUAL Baby Kangoo RB203BL Rimax
natural_image
Blue and white mobile phone with camera module and 'nimax' branding (no visible text beyond branding)
natural_image
Blue rimax mobile phone displaying a photo of a baby being held, with no visible text or symbols on the device itself.rimaxbaby
Manual del usuario
ES
Baby Kangoo RB203
Índice
natural_image
Diagram of a device with an open lid and internal components, labeled as Figure 1 (no text or symbols on the device itself)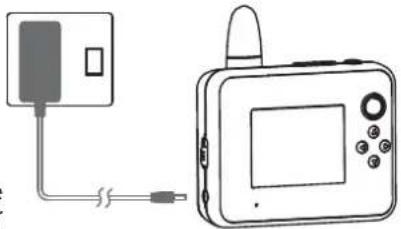
natural_image
Diagram showing a device connected to a rectangular panel with a cable, no text or symbols presentFigura 2
natural_image
Line drawing of a handheld device with directional arrows indicating rotation (no text or symbols)Figura 3
Manual del usuario

Baby Kangoo RB203
Tipo de colocación
natural_image
Simple line drawing of a mobile phone connected to a wall-mounted device (no text or symbols)Figura 4
Tipo de colocación
- Important Notes 15
- Overview of Baby Monitor 16
- Installation Instructions 17-19
- Operating Instructions 20
Power Switch 20
Volume Control 21
Dialogue Function 21
Feeding Alert 21
Zoom In /Out 21
Night Light/ Night Vision 22
Operating Menu 22
Alert Ringtone [ ] 22
Screen Display [ ] 22
Lullabies [ ] 23
Sound Sensor Detection [ ] 23
Temperature [ ↓ ] 23
Language [ ] 23
Exit [ ] 23
Pairing/Newly-added Camcorder System 23 - Troubleshooting 25
- Statement of Compliance 25
User Manual

Baby Kangoo RB203
1. Important Notes
Before using the Digital Vision Baby Monitor, please read this User Manual very carefully and keep it properly for future reference. Incorrect use of the product may cause damage to the product or cause body injuries.
* Please keep the transformer and wires away from the children.
* Please be careful to protect the transformer and wires to avoid tearing or man-made damage.
* Please avoid danger of suff ocation caused by children playing with the wires.
* Please use the recommended transformer for the products, the use of other substandard transformers may lead to mechanical damage.
* Please ensure that the transformer voltage rating matches the requirements of relevant countries and regions.
* Do not put the monitor into the bedding, drawer, or cover it with a cloth.
* Do not wet the monitor or immerse it into water or other liquids.
* Do not place the monitor outdoors or at open space, or expose it to hot places such as heaters, stove, etc..
* Do not dismount the unit. This can cause damage to the internal parts and will automatically invalidate the warranty.
User Manual
EN
Baby Kangoo RB203
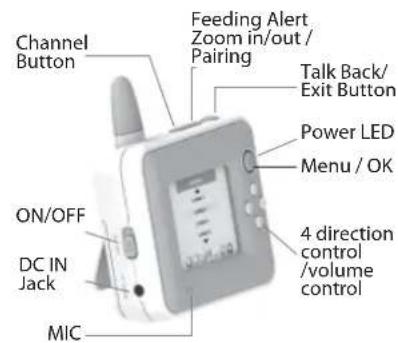
- Overview of monitor unit
text_image
Channel Button Feeding Alert Zoom in/out / Pairing Talk Back/Exit Button Power LED Menu / OK ON/OFF DC IN Jack MIC 4 direction control /volume control
text_image
Strap Holder Multi Purpose Stand/clip Li Battery Door SpeakerOverview of camera unit
text_image
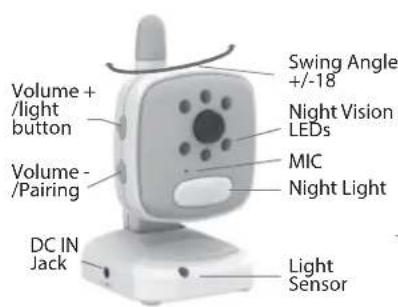
Volume + /light button Volume - /Pairing DC IN Jack Light Sensor MIC Night Light Nighting LEDs Swing Angle +/-18
text_image
Velcro System or Wall Mount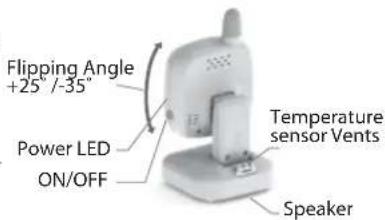
text_image
Flipping Angle +25°/-35" Power LED ON/OFF Temperature sensor Vents SpeakerUser Manual
EN
Baby Kangoo RB203
3. Installation instructions
Monitor Unit System
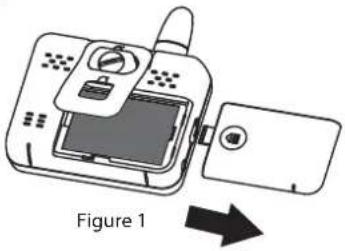
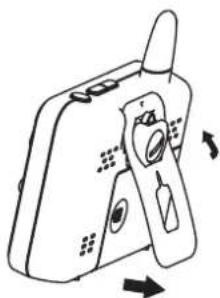
- Raise the hanging buckle, remove the battery cover (as shown in Figure 1), and then insert the li-ion battery. Make sure the battery contacts are well connected to the metal contact points on the chassis, then close the battery cover.
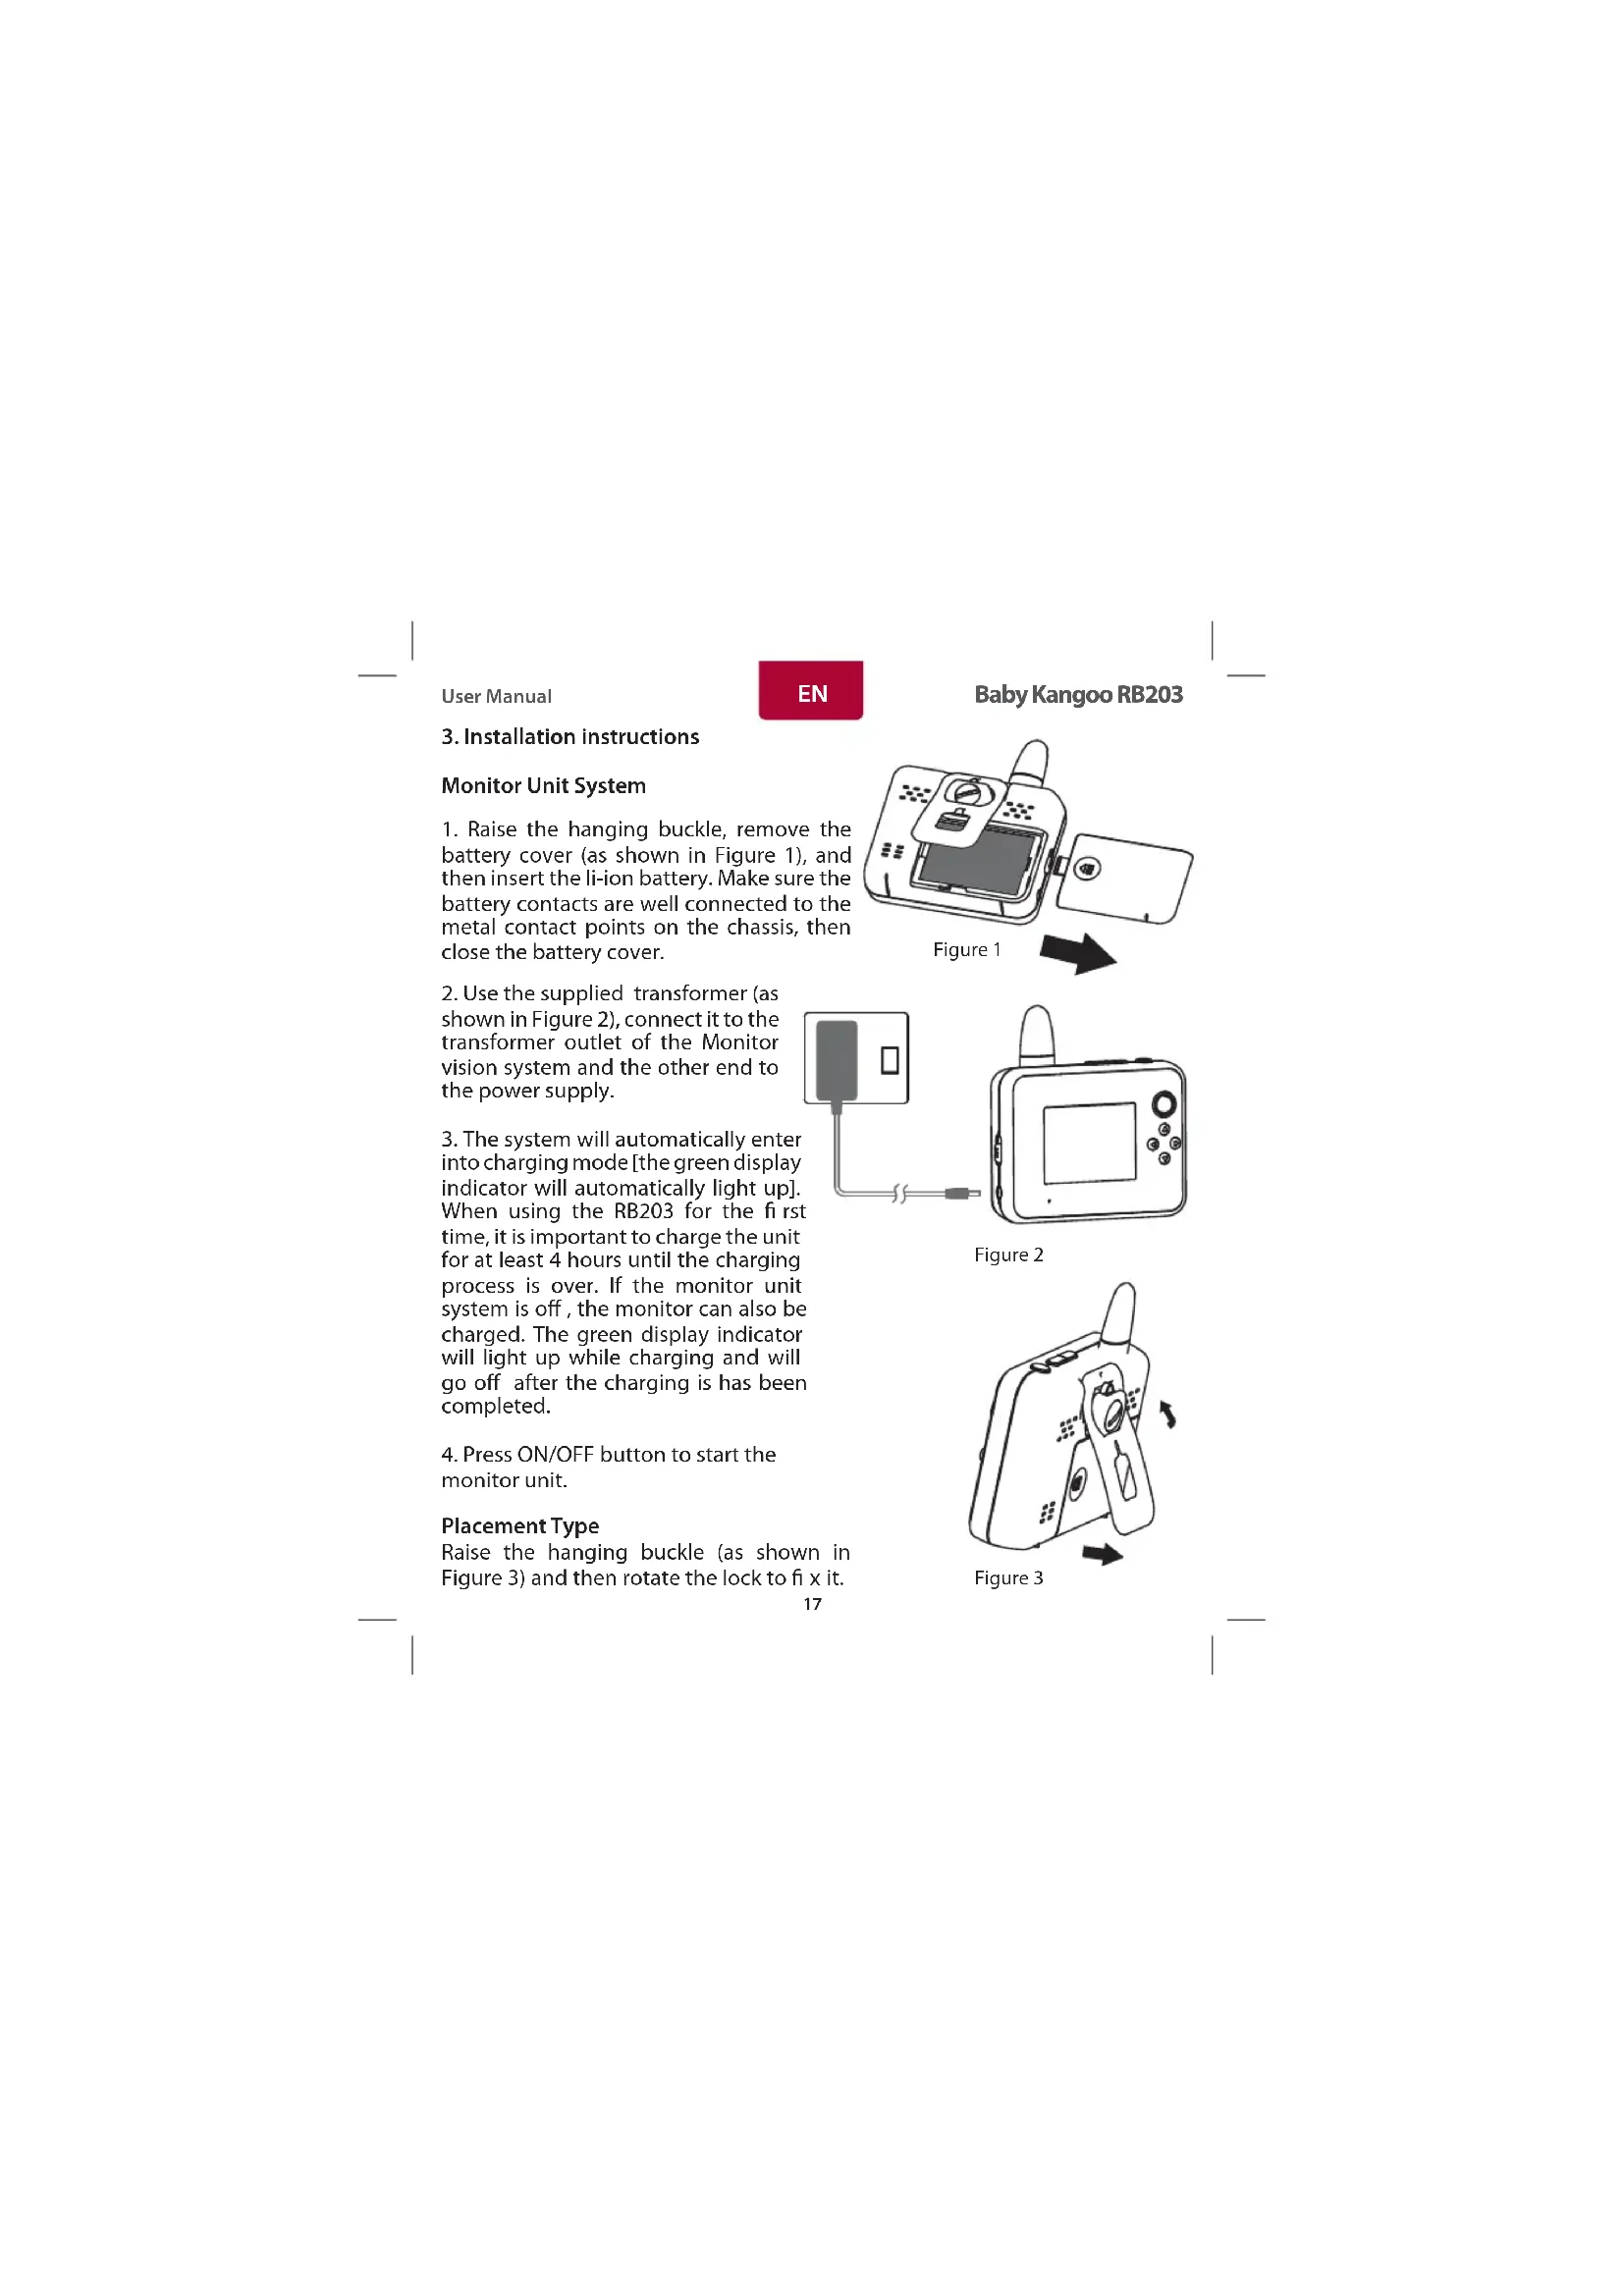
- Use the supplied transformer (as shown in Figure 2), connect it to the transformer outlet of the Monitor vision system and the other end to the power supply.
- The system will automatically enter into charging mode [the green display indicator will automatically light up]. When using the RB203 for the fi rst time, it is important to charge the unit for at least 4 hours until the charging process is over. If the monitor unit system is off, the monitor can also be charged. The green display indicator will light up while charging and will go off after the charging is has been completed.
- Press ON/OFF button to start the monitor unit.
Placement Type
Raise the hanging buckle (as shown in Figure 3) and then rotate the lock to fi x it.
natural_image
Diagram of a device with an open lid and internal components, labeled as Figure 1 (no text or symbols on the device itself)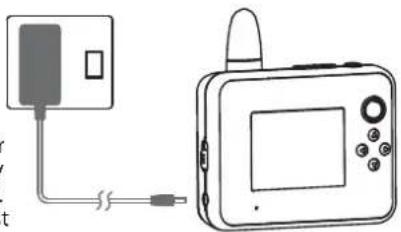
natural_image
Simple line drawing of a device connected to a rectangular box (no text or symbols)Figure 2
natural_image
Diagram of a handheld device with directional arrows indicating rotation or movement (no text or symbols)Figure 3
User Manual

Baby Kangoo RB203
Camera Unit System
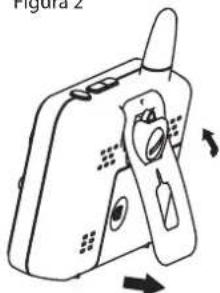
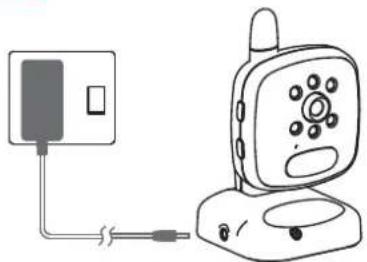
- Connect one end of the transformer to the camera unit system (as shown in Figure 4) and connect the other end of the transformer to the power supply.
- Press ON/OFF button to start the camera unit system.
natural_image
Simple line drawing of a mobile phone connected to a wall-mounted device (no text or symbols)Figure 4
Placement Type
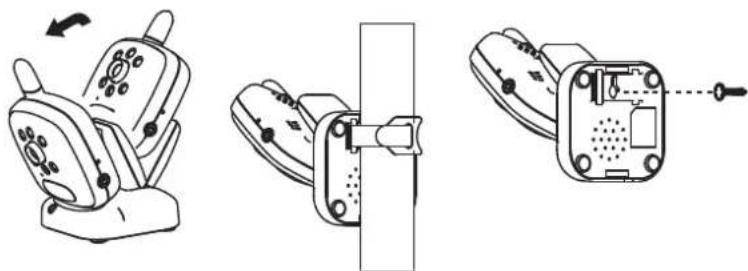
Stand Type: The stand can be placed on 4 angles (i.e., front, rear, right and left). adjust the desired angle and position.
Wall Mount Type: Fix a screw into the wall and leave a distance of about 8-9 mm away from the wall. Hang the camera unit system.
Velcro Type: Put the velcro belt through the camera unit system base and tie it to the cylinder (Note: it cannot be tied to the crib).
natural_image
Three technical line drawings of a mobile phone seat assembly, showing front, side, and top views with no visible text or symbols.Stand type Velcro belt type Wall mount type
User Manual

Baby Kangoo RB203
text_image
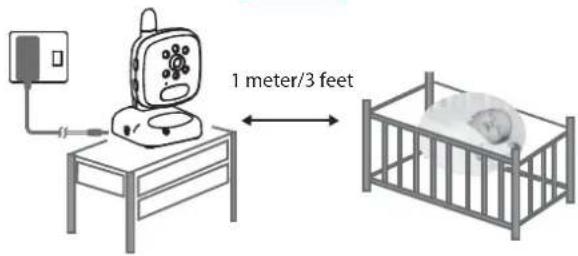
1 meter/3 feetRegardless the stand type, wall mount type or magic belt type, it must be kept 1m away from the crib (as shown above).
(Note: Please keep the camcorder system, transformer and wires away from the children).
Technical Specifications
| Monitor Unit Camera Unit | |||
| Display 2.4" Panel | Resolution 240x320 Frequency 2 | 4 GHz Wireless transmission | |
| Frequency 2.4 GHz | wireless transmission Night version | on 6 IR LEDs | |
| Signal range Up to | 300 Meters in open area Image sensor | Sensor Color CMOS sensor | |
| Image sensor Color | CMOS sensor Switches Power, Volume control | Pairing, Light on/off | |
| Intercom VOX | 2-Way Voice Transmission | Temperature | Built -in Temperature sensor |
| Microphone | Built in microphone | Lullabies | Preset Lullabies |
| Alert indicator | FeedingLow BatteryTemperature signal range | Mood light | Blue color |
| Expandability | Support 4 Cameras | Microphone | Built in microphone |
| Battery | Rechargeable Lithium battery | Mounting: | Velcro system or wall mount |
| A/C Power | DC 6V 800 mA | A/C Power: | DC 6V 800 mA |
| Dimension 9.7 x 10 | 4 x 3.8 cm Dimension | 7.0 x 12 | 2.8 x 7.2 cm |
| Weight 137 g | Weight | 120 g | |
* Specifications subject to change without notice.
User Manual

Baby Kangoo RB203
4. Operation Instructions Power Switch
- Press the power switch ON/OFF to start the monitor unit system. The power indicator (green) will light up.
- Start the camera unit system, press the power switch ⏻. The power indicator (green) will light up to indicate the unit is now on.
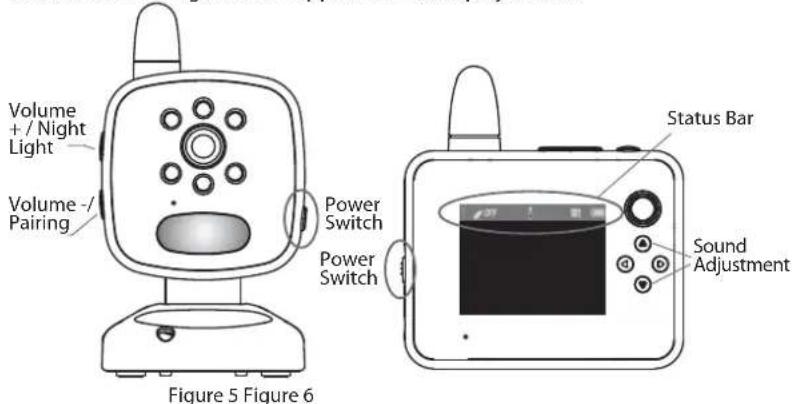
- Once the monitor unit system is on, the Rimax logo screen will appear and the system will automatically enter into monitoring status mode. The status bar as shown in Figure 6 will appear on the display screen.
text_image
Volume + / Night Light Volume - Pairing Power Switch Power Switch Status Bar Sound Adjustment Figure 5 Figure 6Note: The Feeding alert option is set to OFF [OFF] as shown on the above picture (figure 6). The viewing camera Channel N° is set to [1] as shown on the above (figure 6). If in the case Channel 1 does not appear, press the [2] located on the top of the display screen to select Channel 1. The RB203 is set to the above factory default settings.
4. To turn off the monitor unit system, simply press the ON/OFF button. To turn off the camera unit system, simply press the ON/OFF button for approximately two seconds.
User Manual
EN
Baby Kangoo RB203
- The monitor unit system should be placed at least 1 m away from the camera unit system. In the case the Monitor and the camera are too close to each other, a "BeBe" sound will be heard. (The BM0903 is designed to perform normal situations as the camera and Monitor should be placed in 2 different rooms
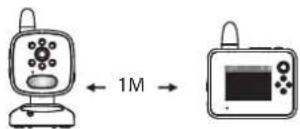
Figure 7
Volume Control
Press [A] button located on the left side of the monitor unit to adjust the volume control.
Press [☐] to increase the volume. Press [☐] to decrease the volume. The display indicates the sound volume level.
Talk back Function
Press and hold the talk back function [💡] located at the top of the monitor unit. Speak to the microphone and release the talk back function button to receive the other side's response. Adjust the sound volume to an appropriate level. Press the [💡] [💡] button located on the left side of the camera unit system to adjust the sound volume from the receiver.
Feeding Alert
Press the [icon] button located at the top of the monitor unit system. Select the desired time you wish the unit to buzz. The following options are available: from 30 minutes to 4 hours with intervals of 30 min. Press OFF to deactivate the Feeding alert. The monitor will automatically buzz once the time has elapsed. Press any button on the monitor unit system to stop the alarm. If no button is pressed, the feeding alert will repeat for 3 times with an interval of 3 minutes.
Zoom In /Out
Press and hold the [💡] button located at the top of the monitor unit to expand the image. [☐] will appear on the status bar. Press [💡] to set the appropriate position for monitoring.
User Manual

Baby Kangoo RB203
Night Light/Night Vision
Press and hold [0] button on the camera unit for approximately 3 seconds to On or Off the night light function. The night vision function can sense the surrounding environment of the camera unit and automatically start the monitoring. The monitoring is available even under full darkness.
Operating Menu
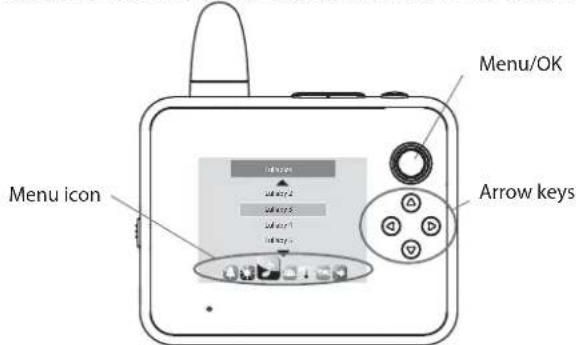
Press [◎] button to enter into the operation menu interface (as shown below):
text_image
Menu/OK Menu icon Arrow keysAlert Ringtone [ ]
Press [M] to enter into alert ringtone:
* Low battery alert: Select ON/OFF
* No network connection alert. Select ON/OFF
Screen Display [ ]
* Brightness Adjustment: press [◎] button and select [ ] Press [◎] button again. You can choose 1-5 to adjust the brightness.
* LCD Sleep Mode: press [💡] button to set sleep time options such as Keep On, 10 seconds, 30 seconds, 1 minute and 3 minutes
The RB203 has a built-in VOX function which after entering into the standby mode for energy saving, the monitor unit system will turn off the screen display. Meanwhile, the VOX function will automatically start to detect the ambient sound volume around the camera unit. If in the case the camera detects any sound, the monitor will automatically switch on and display the image. If VOX is set to [off] this function will be disabled.
User Manual
![Rimax Baby Kangoo RB203BL - Screen Display [ ] - 1](/content/2026/02/419952/images/1d6d81cd773b545f042ae8a62fabcc7e1d0f91b3a416f613b16065b318adae78.jpg)
Baby Kangoo RB203
Lullabies [ ]
Press [◎] and select the [icon to access the menu of lullabies to play 8 different songs. These can be played once, repeated, stopped or played in order. Once the lullaby starts to play, you can decrease the volume to 0 on the monitor so this way the lullaby will only play from the camera and where the baby is located.
Voice Sensor Detection [ ]
The sound sensor can detect the ambient sound volume around the camera unit.
Press [A] to select the sound volume sensing degrees (low, medium and high / or off).
Temperature[↓]
Press Scale to select Fahrenheit / Celsius. Press the min/max to set the temperature parameters. When the temperature reaches the max or min temperatures, the monitor will automatically alert. To off the temperature control, simply select Alert Off.
Language [ ]
Enter into the language menu and press [💡️] to select the desired language.
Exit
Press [ ] Exit to come out from the main menu.
Press [▲▼] to select Yes or No to exit.
Press [💡] to directly exit and return to the monitoring screen.
Pairing/Newly-added Camera unit System
Note: The monitor unit system and camera unit system have been paired when they are delivered from the factory. Under normal circumstances, it is not recommended to re-pair them.
The system can support up to 4 camera units. The operations for adding a camera unit system are as follows:
- Turn off the monitor unit and the camera unit.
User Manual

Baby Kangoo RB203
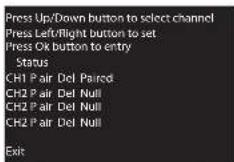
- Press and hold [ ] meanwhile, push the ON/OFF button. The pairing list screen will appear as follows:
- Press [ ⏻ ] and [ ⏻ ] buttons located at the right side of the camera unit at the same time for 2 seconds and release after the indicator lights up.
- Press the arrow keys to select Ch2 and Pair, press [ ⏻ ], the following screen will appear:
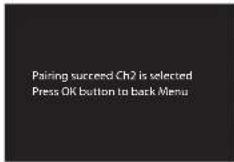
Press [M] again, Ch2 Paired will appear in the monitor screen. This means that the CH2 has been successfully paired. See below picture:
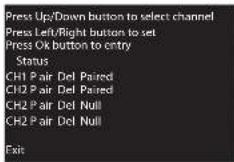
Press EXIT and press [M] once more to return to the screen of the monitor unit.
- Repeat steps 1-4 to pair Ch3 and Ch4.
User Manual
EN
Baby Kangoo RB203
5. Troubleshooting
If you are not getting any signal at all:
* Make sure the camera and the monitor are turned on.
* Make sure the power plugs are pushed all the way in.
* Check that the channel on the camera and the monitor are set to the same number.
If you have seen the opening screen, but nothing appears afterwards.
* Please check if your Camera unit is turned on. The green Power LED will light up and indicate the system is on.
* Make sure the Camera unit and Monitor Unit are within the appropriate range of each other. For trouble shooting purpose, you should remove all the obstacles between the two devices. Try a shorter distance.
* Please remove the battery and unplug the A/C adapter. Wait for 10 minutes.
* Plug the A/C adapter back to the Monitor Unit and retry to power on the Monitor Unit.
If all above steps fail, you are advised to pair the Monitor Unit and Camera Unit.
* Please following the steps mentioned in Pairing/New Added Camera Unit.
* If you would like to return to the default settings, press and hold [◎], meanwhile push on/off, and then press[◎]. The setting will be restored.
6. Statement of Compliance
Flamagas S.A. hereby certifies that the model Rimax Baby Kangoo RB203 complies with the basic requisites and other requirements of Directive 1999/5/EC.

A full copy of the statement of compliance can be found at:
www.electronicafl amagas.com
natural_image
Diagram of a device with an open lid and internal components, labeled as Figure 1 (no text or symbols on the device itself)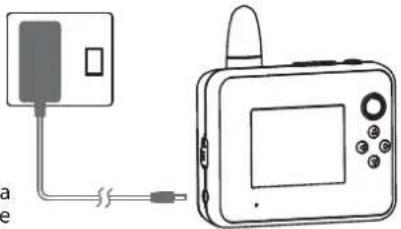
natural_image
Diagram of a device connected to a rectangular panel with a cable, showing no text or symbols.Figure 2

natural_image
Line drawing of a handheld device with directional arrows indicating motion (no text or symbols)Figure 3
natural_image
Simple line drawing of a mobile phone connected to a wall-mounted device (no text or symbols)Figure 4
natural_image
Three technical line drawings of a device with adjustment knobs and a lock mechanism (no text or symbols)Type base Type velcro Type montage mural
Chansons berceuses [ ]
natural_image
Diagram of a device with an open lid and internal components, labeled 'Figura 1' (no text or symbols on the diagram itself)![Rimax Baby Kangoo RB203BL - Chansons berceuses [ ] - 1](/content/2026/02/419952/images/c3e07fd87b9cb574646fb8f1f56eddc68a05ea3d2de85991f4ed974c55553fe0.jpg)
natural_image
Simple line drawing of a device connected to a rectangular box with a cable (no text or symbols)Figura 2
![Rimax Baby Kangoo RB203BL - Chansons berceuses [ ] - 2](/content/2026/02/419952/images/18102b978f9ea177efd281e10ccfaae9d2c1b4843ba73a3a9615fe8233edd3f0.jpg)
natural_image
Line drawing of a handheld device with directional arrows indicating rotation (no text or symbols)Figura 3
natural_image
Illustration of a mobile phone connected to a wall-mounted device, labeled Figure 4 (no text or symbols on the device itself)Figura 4
natural_image
Line drawing of a mobile phone with a scroll wheel and control panel (no text or symbols)Base
![Rimax Baby Kangoo RB203BL - Chansons berceuses [ ] - 3](/content/2026/02/419952/images/99b8f543c6efe9106665daa2664bd27e1f1ed16b4162d9016bc3085a739f8608.jpg)
natural_image
Technical line drawing of a mechanical clamp or bracket assembly (no text or symbols)Velcro
![Rimax Baby Kangoo RB203BL - Chansons berceuses [ ] - 4](/content/2026/02/419952/images/b107018bb8d42675954bafeb8b7dc72ddf9b7efbc0058440e7dd0c0a64bd41fd.jpg)
natural_image
Technical line drawing of a mechanical component with no visible text or symbolsParede