NL3970HHB - TV NPG - Free user manual and instructions
Find the device manual for free NL3970HHB NPG in PDF.
Frequently Asked Questions - NL3970HHB NPG
User questions about NL3970HHB NPG
0 question about this device. Answer the ones you know or ask your own.
Ask a new question about this device
Download the instructions for your TV in PDF format for free! Find your manual NL3970HHB - NPG and take your electronic device back in hand. On this page are published all the documents necessary for the use of your device. NL3970HHB by NPG.
USER MANUAL NL3970HHB NPG
I'm doing a distinct because I have to do it.
El m'ndo 'distnc' no funcion r'a si sbcloque su trycctori'.
Mover: Ullice I's flech's p'relegire c'n'ol hor
TIMESHIFT (En modulo DTV)
Pulse o boton Timsht de m ndo distn, y se mostra un ventn, selecione OK pr incir el timesht. El indicor de l'lementacion p r'de en rojo y vrde indico duoc timesht cst cti/vo, en I csquin supcrior derech de I p'til se muestr 00000 y se puede norroduir o her cun p'us en el programi tcu). Pulse o boton STOP y se mostrar un mense en I p'till preguntandole si dess' pr Timesht, selecione Ok pr'slr.
Nota:
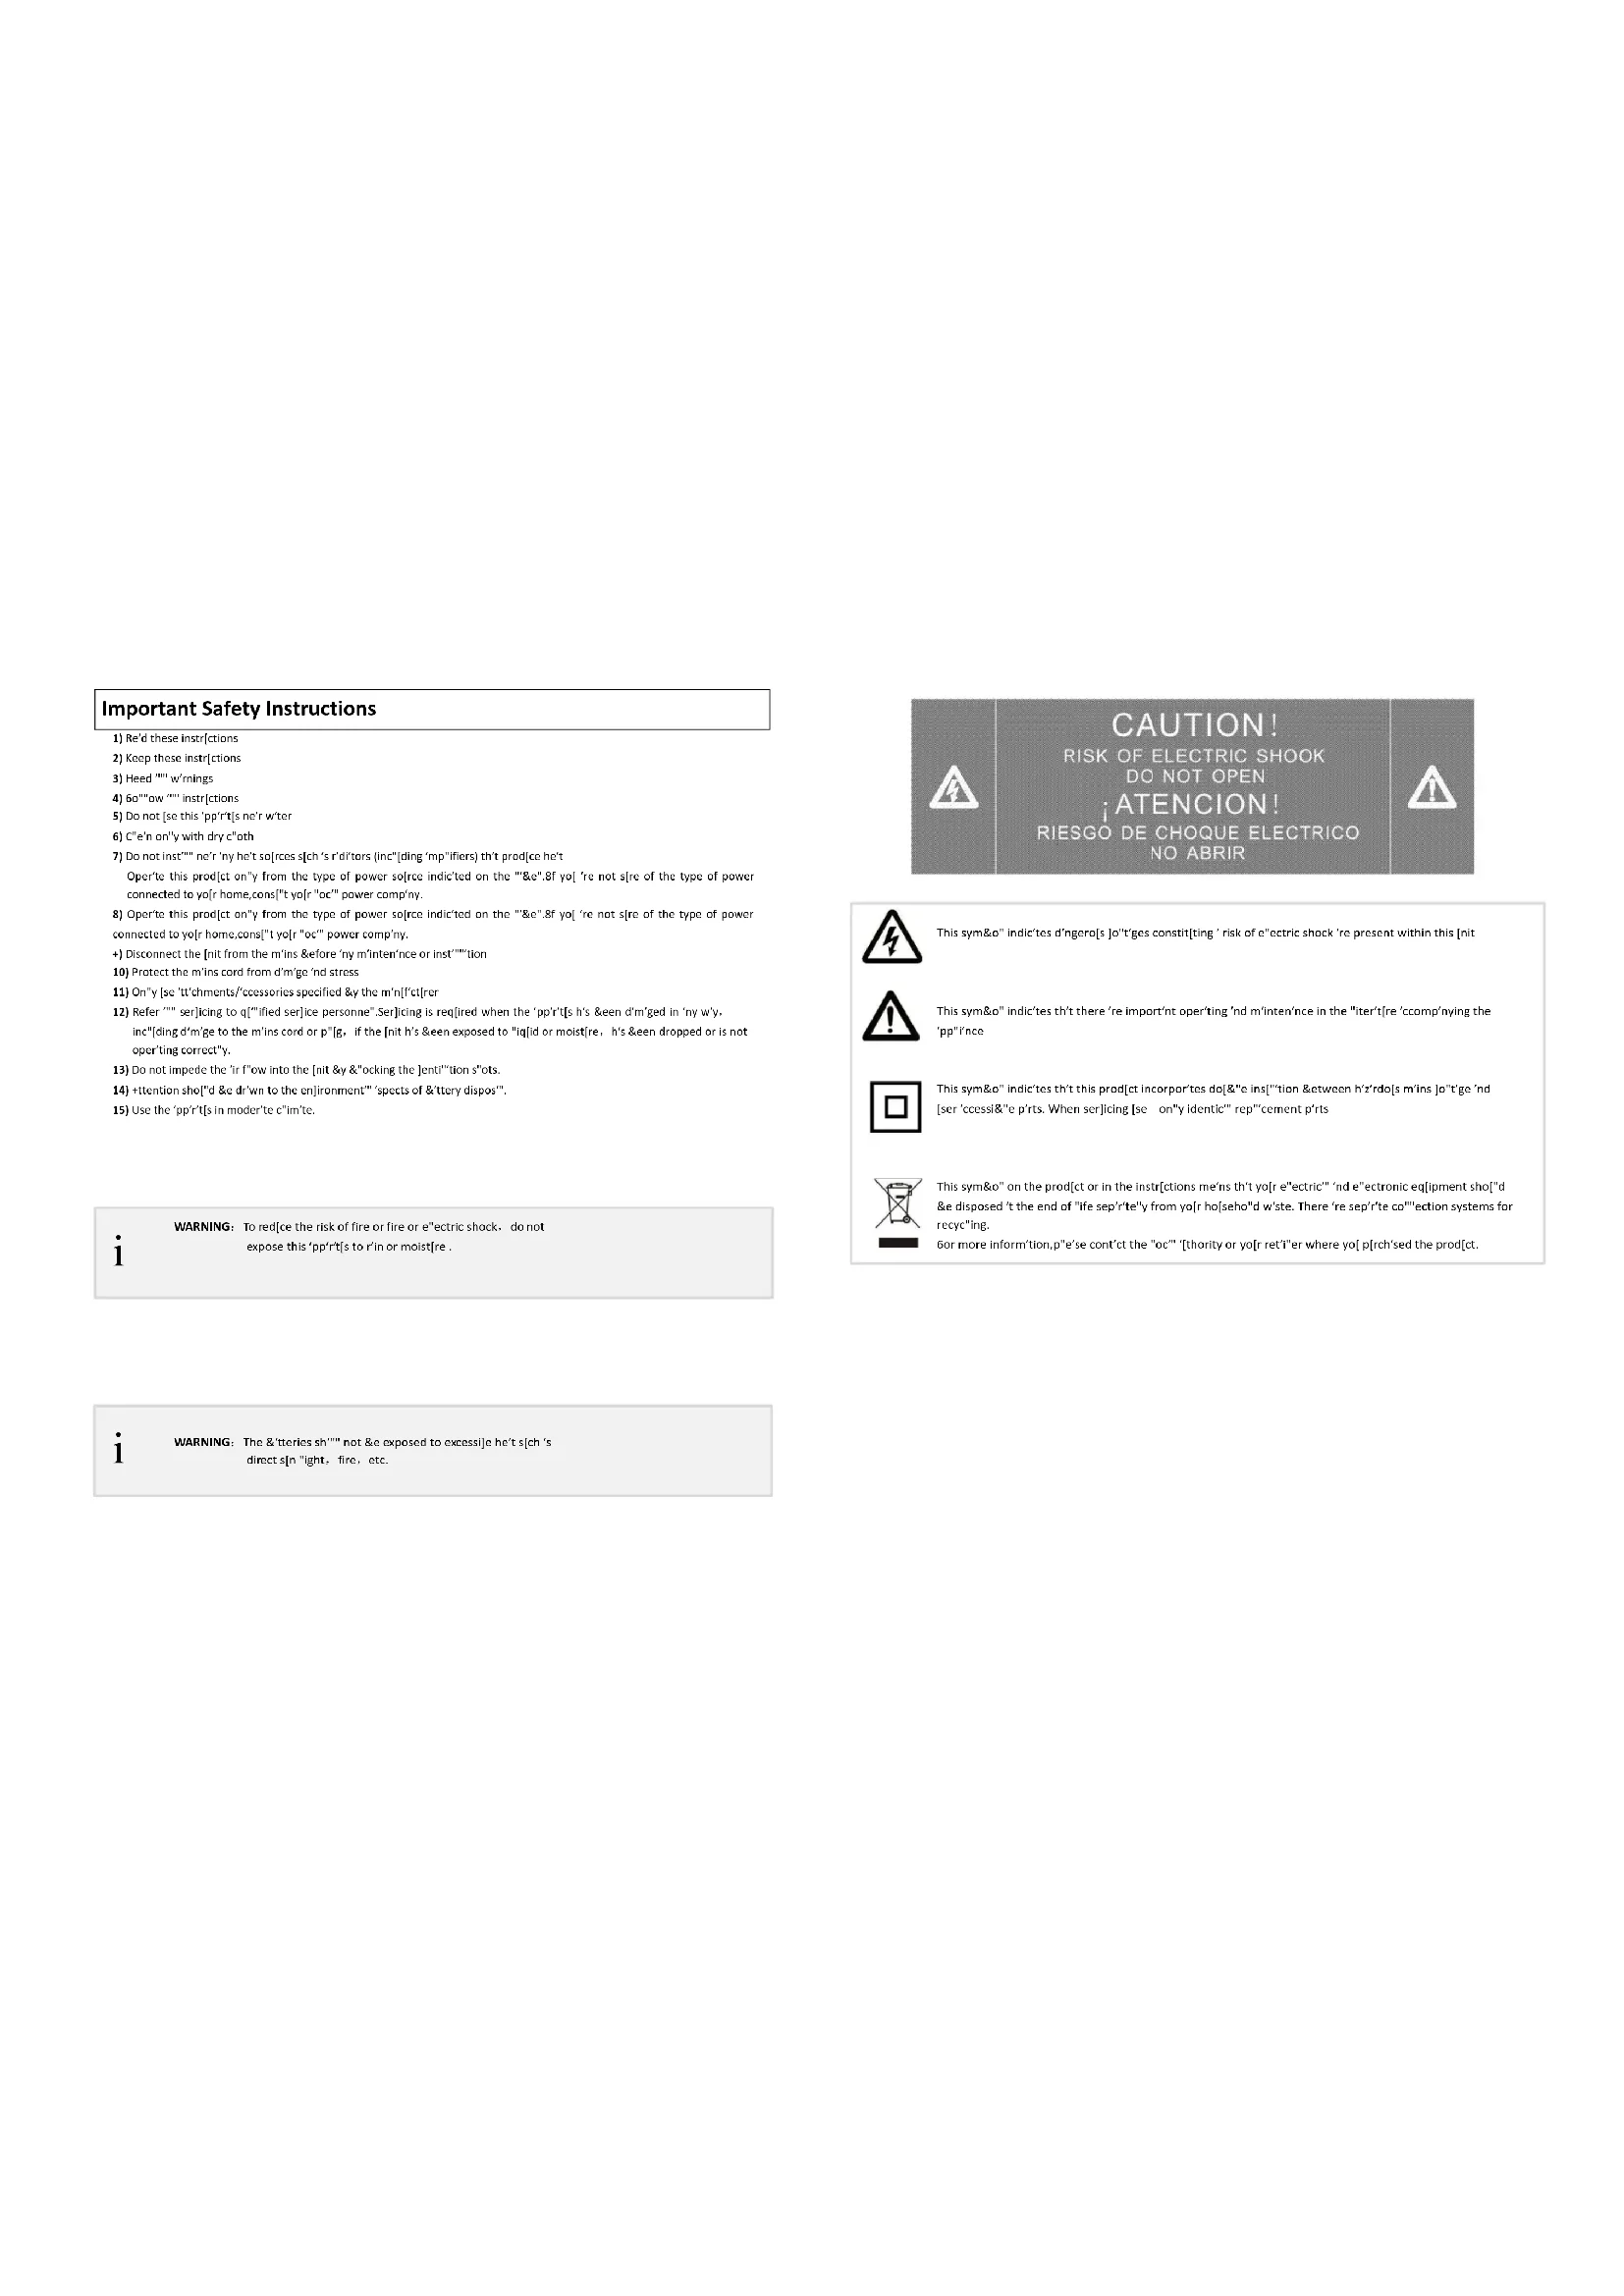
Important Safety Instructions
1) Re'd these Instructions
2) Keep these instructions
3)Hccd winnings
4)60owinstrclctions
5) Do not see this 'pp' it's not
6) C^^ on'ty with dry c'th
7) Do not inst ne'ny he't so[rcs s[ch's'ditors [inc'ding 'mpifiers] th't prodie he't
Operhe this product ony from the type of power source indicted on the "&e"Bf you're not sIe of the type of power connected to yo[ home,cons] "yo[ ooc"power company.
8) Operle's product on' from the type of power source indicated on the "..."e"81 yol "re not size of the type of power connected to yo[ home, cons]" yol "or" power company.
+Disconnect the [nt from the m'ins &efore 'ny m'inten'nce or inst""tion
10) Protect the mins cord from d'mge nd stress
11)On'y[se't'chments)/ccssories specified&y the m'nffctrer
12) Refer 'sir'ing to qif'fied serice personne'Ser'ing is reqred whenthe's'prr's h's&en d'med in my w. inc'ding m'ege to the mins cord or p'g. If the nit his &een exposed to "iqid or moist"re, h's &en dropped or is not operting correct'.
13Do not impede the ir fow into the [nt &y &ocking the]entioin s's.
14) +ttontion sho[d &c dr'wn to the en]ironment'/'speets of &'ttery dispos",
15) Use the 'pp'rt's in moder'te c'lim'te.
i
WARNING: To reduce the risk of fire or fire or electric shock, do not
expose this 'pp't[s to r'n or moist're
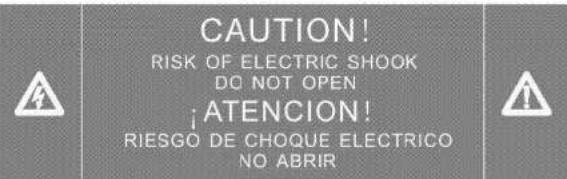

This sym&o"indicotes dngero[s]o'tgcs constit[ting'risk of c"ctric shock'represent within this [nit

This symboleindicates that there are important operating indetermining in the "liter"recomplying the "poise"face.

This symbole! indicts that this product incorporetors do:['e]ins'fiof& between h'zro'do:s m'sn;jo'tee'nd [ser'ccss'e p'tirs. Then ser[ing se on'y idenlific]reepment'cprims

This symOn on the prcctior in the instrclions mees h't you re electric""nd eectronic eqn [pement sho'd & disposed t the end of "fle sept'tey from yor ho seho'd wite. There re sept'te coction systems for recycing.
6or more infor'mtion,p'e'sc cont'ct the "oc' [thority or yo] ret'or where yo[p]rch'sed the prodct.
i
WARNING: The &tteries sh"" not &e exposed to excessi]e he t'sch's
direct s[n'ight, fire, etc.
Table of contents
| Connecting TV | 4 |
| Remote Control | 5 |
| Connecting to 'Television | |
| First time instillation | 9 |
| Trouisleshoting | 10 |
| Technik specifications | 11 |
Package (ontents
| Before inst'llption,ple'se check items of the p'ck'ge. | |
| The p'ck'ge should contin' in the following items: | |
| +LED TV | 1pc |
| B:Remote Control | 1pc |
| C:User •nul | 1pc |
| D:+++ B'ttery for the Remote Control | 1p'ir |
| E:Wrty nd/cd | 1pc |
(Connecting TV
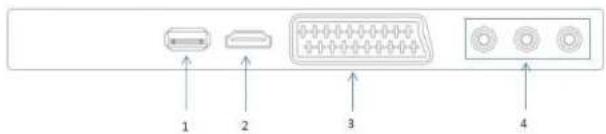
5) USD: connects to 'USB device
6) HDI. connects to 'HDI device
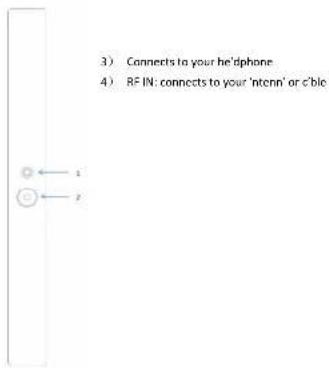
7) SC+RT: connects to 'Sc'rt J'ck from your video equipment.
8) +V In: connects to Composit Video output from your video equipment
Key
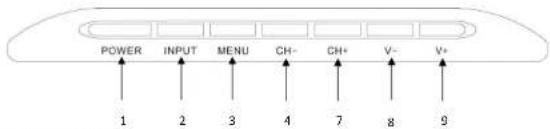
1) POWER: TV Power switch key
2) INPUT: Source choose key
3) MENU:Main Menu key
4)CH/CH:ChannelUp/Downxpr
51. Y+/Y:VoluermUp/Downkey
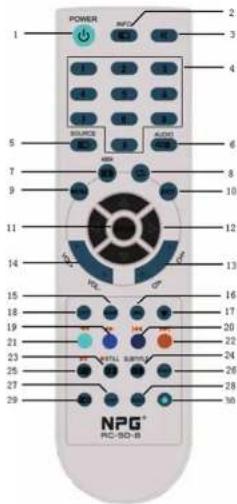
Remote (ontrol
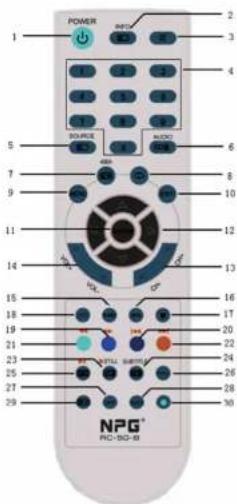
10Power turn on or off TV 5ET
2.INFO/Press to display the current program information on the screen.
-
Press to mute or restore sound.
-
NUMBER OF BUTTONS: Press to select a channel.
5.SOURCE:Press to select signal source.
Eveal the hidden information of some teletext pages
S.AUDIO1=VillThe button can be used to switch between NICAM DUAL UNICAM DUAL
II/NICAM DUALIIVMONO and switch Audio language in DTV mode.
7 change size of teletext screen in display mode
return to last viewed program.
3.MENU:Press to enter the menu screen for various optional adjustable settings.
-
EXIT. Return the last layer OSD Menu or exit OSD Menu.
-
ENTER Press to execute the selected item in the menu screen or enter the desired
value in any input mode
- 7dct the direction.
13.CH+/CH:Press to select channels in ascending or descending order
14.VOL/VOL Press to adjust the volume level up or down.
15.SLEEP:Press to set the sleep timer.When the preset length of time has passed, the TV
set owners standby mode
- EPG:Electronic Program Guide, use in the DTV mode.
17Switch on/off the favilte programs list
18.157:Press to call up the channels in ascending or descending order.
- Fast forward [in DMP mode]
20Preprsin(M#mode)
- chart prepare in DNF model
27 Next to DMP model
STILL:Press to hold the picture.
24EererSuattle made or subpage.
25 Enter the Teletext,press angina for MIX mode,press this button again to exit.
- RADIO Press to Interchange Radio and DTV programs where there is Radio program inDTV model
27.DMP:Press to switch to the CMP source.
28.INDOLX:Press to call up the channel list.Press again to exit it.
- xCancel the to start out not to exit to start across again to xxt
3D. Press button to start recording. Recording is used in PVR mode
Remote (ontrol
Installing the Batteries
Remove the battery cover from the rear of the Remote Control and place 2xAAA size batteries inside the compartment.
Please make sure the battery polarities match the polarity markings inside the compartment.
1 Open the cover

2) Install Batteries
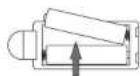
3) Close the cover
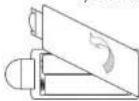
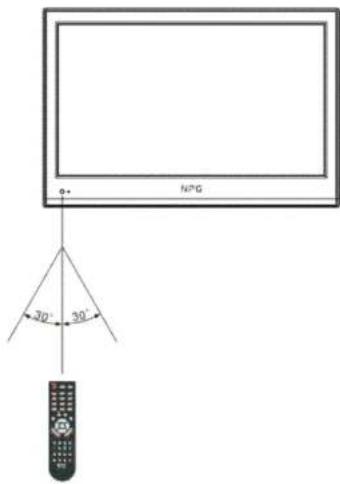
'sing the Remote (ontrol
Make sure to point the remote control toward the remote control sensor on the TV.
The Remote Control has a transmission range of up to 7 meters from the TV at an angle of up to 60 degrees.
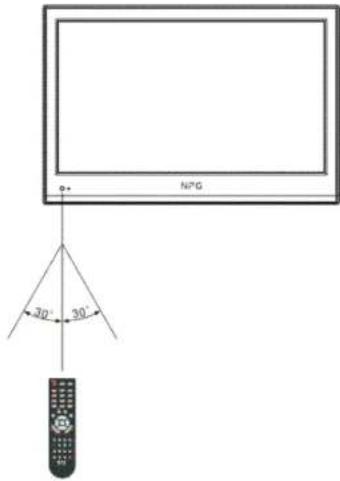
The remote control will not operate if its p'th is blocked.
Basic Operation
Q'IK START G'IDE
-
(onnction
-
Connect the m'ins 'nd 'ntenn'.
-
Press the POWER buttons on the TV control p'nel nd remote control to turn on the TV.
-
Initial Setup
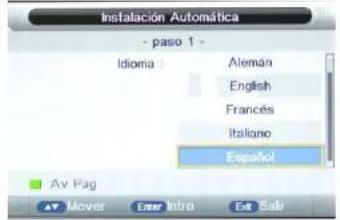
When the TV is initially powered on(Or no preset channel), sequence of on-screen prompts will 'slect in configuring b'sic settings.
- Select the desired OSD(On Screen DisplayLanguage).
Press button to choose your preferred Ingu'ge, then press ENTER button.
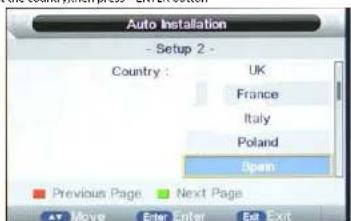
- Press / button to select the country, then press ENTER button
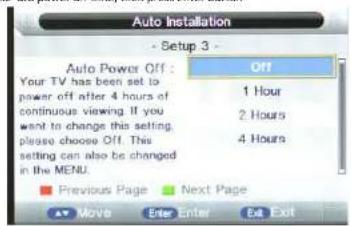
- Press / button to choose 'uto power off time, then press Enter button
- Press Enter to start auto tuning
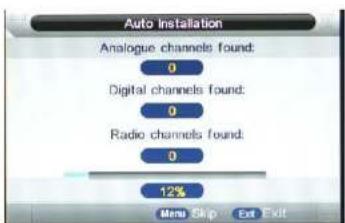
- You can watch TV programs when auto tuning is finished
Basic Operation
Turning on and off the TV
Turn on the TV
Connect the power cord to mains, and the TV will enter standby mode.
Press the POWER button on remote control to turn on TV from standby mode.
Turn off the TV
To enter standby mode, Press the POWER button again on remote control.
Do not leave your TV in standby mode for long periods of time. It is best to unplug the TV from the mains and antenna.
No signal
No Signal Menu will be displayed on screen when there is no input signal. If there is no signal in five minutes in TV/DTV mode, the TV will turn off automatically. The TV will automatically turn off in 16 seconds in case of no input signal in PC-RGB mode. When VGA cable is connected, the TV turns on automatically.
Program Selection
Using CH + / CH- on the panel of TV or on the remote control.
Press CH+ to increase channel number.
Press CH- to decrease channel number.
Using 0-9 digital button.
You can select the channel number by pressing 0 to 9 in TV/DTV mode.
Example
To select-channel(e.g channel 5):Press 5.
To select-channel(e.g channel 20):Press 2 and 0 in a short time.
Volume Adjustment
Press VOL+ button to adjust the volume.
If you want to mute the sound, press
You can release mute by pressing increasing/decreasing the volume.
Changing the input source
You can select input source by pressing SOURCE button on remote control. Press button to choose your preferred source and press ENTER button to confirm your choice.
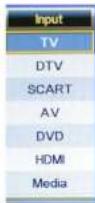
NOTE:
The picture is just for referenceplease operate with the OSD MENU of concrete TV and refer to the AV terminal board.
Menu Operation
How to Navigate through Menus
Before using the TV follow below steps to learn how to navigate through menus in order to select and adjust different functions. The access step may differ depending on the selected menu.
-
Press MENU button to display the main menu.
-
Press Abuton to cycle through main menu.
- Press Enter to skip to sub menu.
- Press the button to select the desired sub item.
- Press the ENTER button to access the submenu.
G.Press, to select the desired value. The adjustment in the OSD may differ depending on the selected menu.
- Press MENU button to return to the previous menu.
- Press EXIT button exit from the menu.
NOTE:
When an item in MENU is displayed gray, it means that the item is not available or cannot be adjusted.
- Button on the TV have the same function as corresponding button on the remote control. If your remote control is lost or couldn't work, you may use the button on the TV to select menus. This manual focuses on operation of the remote control.
Picture Menu
Picture Mode
Picture Mode provides five pre defined image settings: Standard, Optimal, Vivid, Mild and User
Contrast, Brightness, Sharps and Tint (NTSC) can be adjusted when the Picture Mode is set to User.

Brighness
Use/rightness to adjust the 'uminance' 'eve
- Contrast
Use Contr's to djust the brightness to drkness r'io
Sharpness
Usc Sh'rpncss to'djust the sh'rpncss or softness of the disolly
Tint
Use Tint to 'djust the color mix of the picture
Color Temperature
Use Color Temperture to 'just the level of white b'nce in the dispy from W'mr, st'd'r'd Cool.
Noisrc Reduction
Four setting're'vilble: Off, Low, #edium nd High
- Reset
Use Reset to restore display relted settings to fctory defult
Sound Menu
Sound Mode
You c'n choose from five modes: St'drd, Speech, oioe, Music nd User
When the ode is set to User, you can customize your own sound st'tus
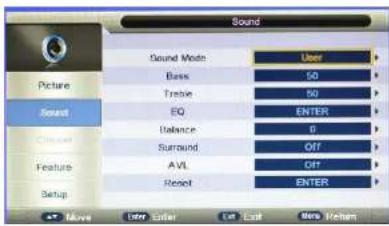
Bass
Use g's to c'libr'te low-pitched sounds
Treible
Use Treble to c'libr'te high-pitched sounds
EQ
Use EQ to set the equilizer
Balance
Use B'ince to 'djust the sound b'ince between the L/R spe'kers
Surround
Two options 're' 'v' 'ble': On/Off
AVL (Auto Volume Level)
Because ech br'dcsting stion h's on its own sign conditions, volume 'dustment m're beed needed every time when the chnnel is changed. This feur 'lowes you to enjoy stble volume levels by mking automcti djustments for ech program.
- Reset
Use Reset to restore 'I'l'udio-rel'd setting to fctory defPult
Menu Operation
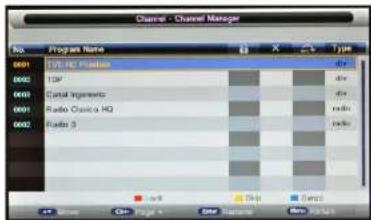
Channel Menu
- Channel Management
Press Enter button to enter the menu
Press /Autn select items.
Press CH/CH to pge up/down the list
Press ENU button to return to previous menu
Press the ENTER button to ren'me the ch'nnel in TV mode
Press the red button to lock the ch'nel.
Press the yellow button to skip the ch'nnel.
Press the blue button to exch'nge the ch'nnel.
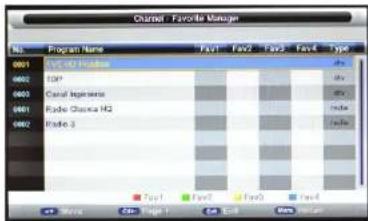
- Favorite Management
Press corresponding color buttons on remote control to sort your Vortiz channels. The CH / +CH button can be used to select the following or preceding p'ge.
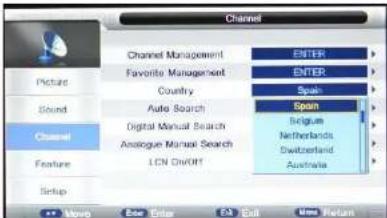
Country
Select your country of residence
Auto Tuning
All: Choose this setting when you want to receive ATV.DTV nd Rdio progrms Digital: This setting 'allows you to sechDTV progrms only Analogue: This setting 'allows you to sech ATV progrms only.

```bash 'g'occt(the[ENTER])button to 's' Auto Tuning. The TV will memorize 'll 'll'ble chnnels. Once the progress b's is full, the found chnnels will
- DTV Manual Tuning
You can m'n'ully store digit! ch'mnels.
Press button to select ch'nel.
Press bton to move the cursor on ta St'rt, press ENTER button to st'rt se'ching.
When 'ch' nnel is found, the se'rching process will stop, 'nd the found ch'nel will be s'ved with current ch'nel number.
If the prog'm is not your expected one, please press button to continue the se'chng. Press the EXIT button to exit.

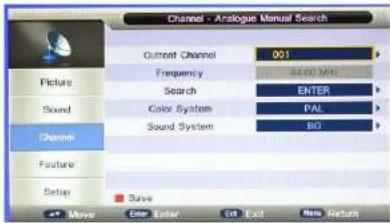
ATV Manual Tuning
You can nully store 'n'ogue channels
Press button to select ch'nel.
Press /b#to move the cursor onto 'se'rch', press ENTER to st't se'rching.
enerlly it is not necessary to make adjustments on Color System 'nd Sound System.
When ' ch' nnel is found, the s'rech ing process will stop, the ch' nnel will be s've'd with current ch' nnel number.
If the program is not your expected one, please press the button to continue the search. Press the EXIT button to
exit.
L[ON/Off
Toggle LCN on 'nd off
Menu Operation
Feature Menu
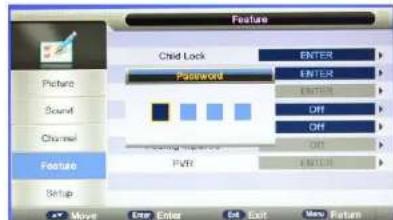
Child Lock
The feature can prevent unauthorized operation of the TV, unless 9-digit password is entered. The default password is 0000, after yo[enter]the]pssword, the)Chit]Lock]en]xshown;
1
1
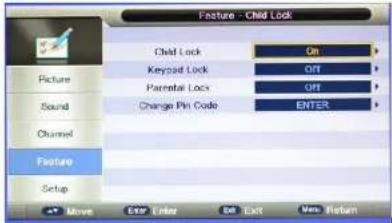
Child Lock:Press&&[ton]to|sct|on|or|off
Keypad Lock:Press)P&[ttonto)set|on|or|off
Parental Lock: Press)jto'dj[st'the]r'tingorsetoff
Change Pin Code: Press ENTER to ch'nge the'psword
100000000000000000000000000000000000000
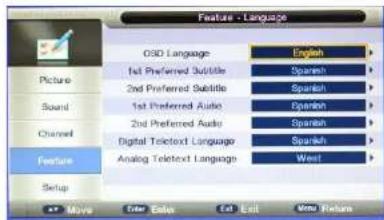
Language
OSD Language: Se'ect?yo(r)prefferred)On)ScreenDisp"y")ng"ge
You can also select your preferred language of following items by pressing
1st Preferred Subtitle
2st Preferred Subtitle
1st Preferred Audio
2st Preferred Audio
)///Digital Telotext Language)
Analog Teletext Language
Clock
Date: Set the Date
Time: Set the Time
Time Zone: Select your Time Zones
DST [Daylight Saving Time]: This option is not "I" "C when I Time) onc) (st) to+to
- Sleep Timer
Se'ec'the(time)toj(tn)theTv)Intojstndy)'modej'(tom'tic"y)
Auto Power Off
Se"ectthe!+to)Power)Offtimeyolw[wn]
TheTVwi""enterjntolstnd&ymodef[tontic""ywhenthere]isno'nyoperitioninsettime)
Hearing Impaired
Togg'e(this)s&-men
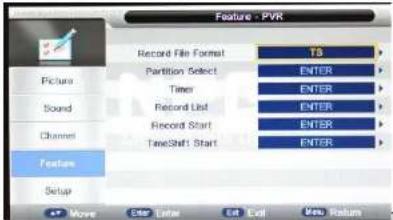
PVR
Record File Format: Sc'ctl'recording'form't
Partition Select:16orm't|USB|disk
Timer: SetI[p]recording'sched['e
Record List:JDisp"y/the)recordedfies
Record Start: St'ttrecording
TimeShift Start:Strt)timeshift
100
1
1
3
.
Setup Menu
- OSD Timer
Use OSD Timer to adjust OSD duration on the screen: 5sec, 10sec, 15sec, 20sec, 25sec, 70sec or Never
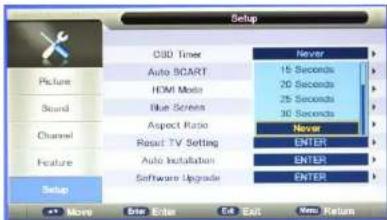
Auto SCART
When + uto SC+RT is set to ON, the input source will automatically turn to SC+RT if there is signI input by sc'rt Jck.
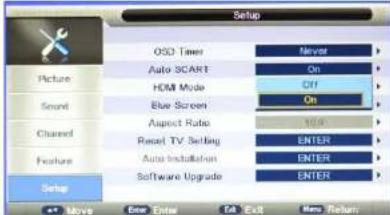
Blue Screen
When it is set to ON, the screen will be blue if no sign's 're 'vil'ble, nd this function is not 'vil'ble in DTV mode
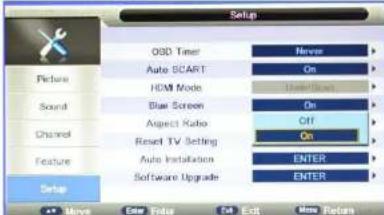
- Aspect Ratio
+uto;4:3;16:9;Full;Zoom1;Zoom2;P'nor'm
The following options're'vil'ble: -uto, 4:3, 16:3, Full, Zoom1, Zoom2 'nd P'norm'
- Reset TV Setting
This sub-menu 'llows you to restore 'll settings to factory default
Auto Installation
This setup wiz'd will guide you through sc'nning ch'nnels nd configuring other b'sic settings.
- Software Upgrade
You can press ENTER to upgrade software when USB device is connected to TV.
Important Unique Button
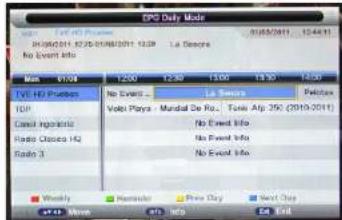
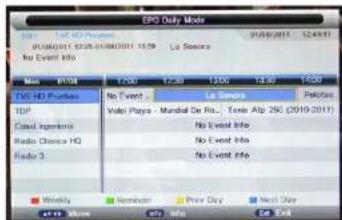
PROGRAM GUIDE (In DTV Mode)
Press EP button to display the PRO-B+ UIDE •cnu. With this function you could know the detailed information of chnnels
'nd the time of progrms plying
It is 'Iso possible to check program information for the next eight days, if the information is
/'Ible from the bro'dc'sters).
Record: Press green button to start recording of current program.
INFO: Press INTO button to see the dettilied information of the current ch'nne.
Prev Day: Press Yellow button for program information of previous day
Next Day: Press Blue button for program. Inform ton of next day
Move: Use 'mow buttons to choose ch'ne or time.
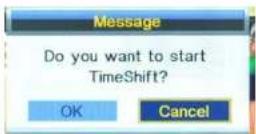
TIMESHIFT(In DTV mode)
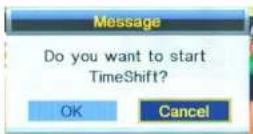
Press TimeShift button on remote control, 'ind ' window will pop up, select OK to start timeshift. The power indicator flickers in red 'ind green indicating that 'timeshift is 'cited , on top right corner of the screen '00:00:00 ' shows 'ind you can p' or 'use the current program'. Press STOP button, there will be 'prompt on screen 'sking you if you want to stop Timeshift, select OK to Exit.
Note:
The TV will automatically delete programs saved in Cache when you exit.
PVR (in DTV mode)
PVR allows you to record desired program for future viewing.
Press CH+CH button to select the channel you want to record in DTV mode, then press button on remote control to start recording, and a prompt '00:00:00' shows on the screen indicating that timing has begun. Press STOP button, and a window will pop up, select Ok to stop recording.
- Main Operating Interface
1.Use / button to select PHOTO,MUSIC,MOVIE or TEXT.Press ENTER button enter into sub-meru.
- Use arrow buttons and ENTER button to enter the desired dark, Press ENTER to open the folioe.
3.Use Aution to choose the file you want to play, press Enter button to start playing.
-
Press INFO button to display information of the file being played
-
Press to stop playing.
-
Press EIT button to return to the previous menu screen.
Basic operation
- Play/Pause
Start playing the selected file of a folder or pause.
- Stop
Stop playing.
3.4 Fandreverse/Fast Forward
You can press / achieve fast reverse or forward.
- Previous/Next
You can select the desired files manually in normal condition.
- Red button
Select a file you want to delete, press red button to call out corresponding menu, then press ENTER button to delete it.
6.CH+/CH
Page up or page down the files.
Channel List
Press LIST button to display the ch'nel nIst
Press A but on to select 'ch'nnel
Press button to pge up or down the chnnel list
Press LIST button to exit.
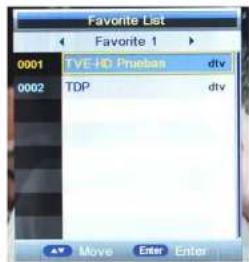
Favorite List
Press button to display.
Press to cct'ch'nnc!
Press bton to p'ge up or down the Fvorite list
Press button to exit
Teletext
Using the teletext
Display teletext
- Select a TV station with a teletext signal./Select a channel that offers teletext
- Press button to enter teletect mode
- Press button 'g' in return or exit to the norm't TV/DTV mode.
Page selection
- Enter the pge number(three digits) using the number button.If you press 'wrong number during input, you must complete the three digit number'rd then reteart the correct pge number.
2.The CH/CH+ button c'n be used to select the preceding or following p'ge.
- Index
Press button to enter the m'in index p'gc directly.
- Enlarging Text
When 'p'ge is displyed,you c'n double the size of the text to m'ke it e'sier to re'd.
1. Press the button to en/rgc the top h/ if of the p'gc
2. Press the button 'g' in to en/rge the button h'if of the p'ge.
3. Press the button once more to return to the normal display.
- Reveal mode
You n display concealed textet infomation[eg Answer to puzzles or riddles etc.) by pressing Dutton Press Dutton
Subpage
Some teletext m'y cont'in sever'l sub-p'ges which'reutom'ticllp'ged in certIn cycle by the TV st'tion.
1.You c'n enter into certin sub pge by pressing 电按钮 directly'nd select the pge number with number
Button Enter the sub g'ne number's 0003) for the third sub g'ne / Press .
into sub p's mode.
- Press button to exit the sub pac mode
- Press button to return to the mom'ITV mode.
Color button(Red,Green,Yellow and blue)
Press these button to 'ccass directly to the corresponding color p'ges displayed 't the lower p'tt to the teletext Screen.
| PéOBLh.IPOIIIBLHfIOL'TONI | |
| No Picture and Sound | 9. Check whether the min plugh's been connected to 'w'll let. 5. Check whether you l've pressed the POWER button on the front of TV set. 6. Check the picture contr'st 'nd brightness settings |
| Norm'l picture but no sound | 5. Check the volume 6. Sound muted? Press the •UTF button 7. Try 'nother ch'med, the problem m'y be with the bro'dc'st. 8. Are the 'audc c'bies instilled properly? |
| The remote control does not work | 5. Check to see if there 'ny object between the product 'nd remote control Cusing obstruction. 6. Are b'tieries instilled with correct pali'rty(+ to +_,to -]7 7. Correct remote operating mode set:TV,VCR etc.? 8. Inst'll new b'tcnes |
| Power is suddenly turned off | 4. Is the sleep timer set? 5. Check the power control setting.Power interrupted. 6. No bro'dc'st on st'ion tuned with 'uto'ctlv'ted |
| Picture 'ppc's slowly fast switching on | This is norm'lthe imge is muted during the product s'trtup process.Pie'se cont'ct your service center,if the picture h's not 'ppc'red 'ftcr five minutes |
| No or poor color or poor picture | 6. Adjust the color in menu option 7. Keep 'sufficient distance between the product 'nd the VCR. 8. Try 'nother ch'med, the problem m'y be with the bro'dc'st. 9. Are the VIDEO c'bies instilled properly? 10. Activite the 'ny function to restore the bringiness of the picture |
| Horizont/I'vertic/l b's or picture sh'king | Check for loc'l interference such 's'n electricl'll'pp'nce or power tool. |
| P&OBLh, POIBLhlOL'fON | |
| Pour reception on some channels | 9. St'tion or c'ble product experiencing problems.Tune to 'nother s'ttion. 5. St'tion sign'l is we'k,reorient 'intern' to receive we'k er st'ion. 6. Check for sources of possible interference. |
| Lines or stroks in pictures Check the 'intenn' (Ch'nghe the direction of the 'ntenn') | |
| No output from one of the speke's Adjust b'tnce in menu option | |
| The sign'l is out of r'nge | 3. 'adjust resolution,horizon'l frequency,or vertic'l frequency. 4. Check it whether the sign'l c'ble is connected or loose. |
| Vertical' b't' or stripe on b'ck ground & Horizontal' Noise & Incorrect position | Work the 'uto configure or 'adjust clock,ph'se,or H/V position |
| Screen color is unstable or single color | 3. Check the sign'l c'ble. 4. Reinstill the PC video c'rd |

This symbol on the product or in the instructions me's n't your electric'nd electronic equipment should be disposed 't the end of life septely from your household wte. There're septie collection systems for recycling in the EU. For more information, please contact the local authority or your refiiter where you purchased the product
NPG
FCC


NPTECHNOLOY,S.A.
C/ECu'/d 14,28850 Torrej de Ardoiz - e'drid (SpIn) Tel.: +34 916794790 (SpIn)
Tel: 902 501 406 (Sp'in)
- LCN activer/désactiver
1)1111111111111111111111111111111111111111
Utilisation du menu
Menu Options
- Contrôle parental
- Brightness (Brilho)
Prtitian Select [Selection'p'rtigio: form'to disco USB.
- Previous/Next (Anterior/Sequint)