NT-249B-P - Television NPG - Free user manual and instructions
Find the device manual for free NT-249B-P NPG in PDF.


| Product Type | LED TV |
| Screen Size | 24 inches (approx.) |
| Power Supply | 100-240V~ 50/60Hz |
| Remote Control | Yes, with AAA batteries (2 x 1.5V) |
| Signal Inputs | RF, AV, VGA, HDMI |
| USB Playback | Photo (JPEG, BMP, PNG), Music (MP3, AAC), Movie (MPEG-1/2/4, TS, RM), Text (TXT) |
| DVR Function | Yes (via USB, DTV only) |
| Teletext | Yes |
| OSD Menu Languages | Multiple languages (selectable) |
| Sleep Timer | Yes, adjustable |
| Parental Lock | Yes (password protected) |
| Panel Lock | Yes (locks front buttons) |
| Auto Sleep | Yes (default 4 hours) |
| Cleaning | Dry cloth for screen and cabinet; mild detergent for screen if needed |
| Safety Certifications | CE, WEEE compliant |
| Disposal | Do not dispose with household waste; recycle according to local regulations |
Frequently Asked Questions - NT-249B-P NPG
User questions about NT-249B-P NPG
0 question about this device. Answer the ones you know or ask your own.
Ask a new question about this device
Download the instructions for your Television in PDF format for free! Find your manual NT-249B-P - NPG and take your electronic device back in hand. On this page are published all the documents necessary for the use of your device. NT-249B-P by NPG.
USER MANUAL NT-249B-P NPG
natural_image
Black NPG monitor with a blank screen, no visible text or symbols on the screen or background.NT-249B-P
OPERATION MANUAL MANUAL DE USUARIO
Please read this manual carefully before operation. Por favor lea este manual atentamente antes de su uso.
Contents
Warning....2
Safety Instructions....4
Introduction......6
Installing Batteries....6
Cable Installation....7
Remote Control....8
Operation....10
Turning on and off the TV.... 10
No signal....10
Choosing a TV channel....10
Volume adjustment.... 10
Input Source....11
Using the Function....11
Channel Menu....11
Picture Menu....12
Sound Menu....13
Time Menu....14
Option Menu....14
Lock Menu....17
STORAGE....18
TELETEXT....19
Trouble Shooting....20
Maintenance....21

natural_image
Black triangular warning sign with a white lightning bolt symbol (no text)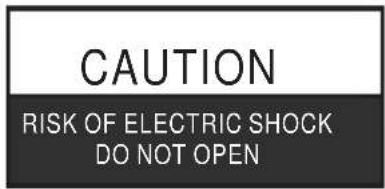

natural_image
Black triangular warning symbol with exclamation mark (no text or numbers)WARNING:
TO REDUCE THE RISK OF ELECTRIC SHOCK DO NOT REMOVE COVER(OR BACK).NO USER SERVICEABLE PARTS INSIDE. REFER TO QUALIFIED SERVICE PERSONNEL.

The lightning flash with arrowhead symbol, within an equilateral triangle, is intended to alert the user to the presence of uninsulated "dangerous voltage" within the products enclosure that may be of sufficient magnitude to constitute a risk of electric shock to persons.

The exclamation point within an equilateral triangle is intended to alert the user to the presence of important operating and maintenance(servicing) instructions in the literature accompanying the appliance.
REGULATORY INFORMATION
This equipment generates, uses and can radiate radio frequency energy and, if not installed and used in accordance with the instructions, may cause harmful interference to radio communication. However, there is no guarantee that interference will not occur in a particular installation. If this equipment does cause harmful interference to radio or television reception, which can be determined by turning the equipment off and on, the user is encouraged to try to correct the interference by one or more of the following measures:
-Relocate the receiving antenna.
-Increase the separation between the equipment and receiver.
-Connect the equipment into an outlet on a circuit different from that to which the receiver is connected.
-Consult the dealer or experienced radio/TV technician for help.
Any changes or modifications not expressly approved by the party responsible for compliance could void the user's authority to operate the equipment.
Warning
CAUTION:
DO not attempt to modify this product in any way without written authorization from suppiler. Unauthorized modification could void the user's authority to operate this product.
It is not recommended to keep a certain still image displayed on the screen for a long time as well as displaying extremely bright images on screen.
WARNING:
To Reduce The Risk Of Fire Or Electric Shock, Do Not Expose This Apparatus To Rain Or Moisture.
The Apparatus shall not be exposed to dripping or splashing and no objects filled with liquids, such as vases, shall be placed on the apparatus.
The Mains plug is used as the disconnect device, and the disconnect device shall remain readily operable.
The product needs electrostatic prevention. Restart the product when fail to start due to the static caused by product terminals such as TV, AV, SCART, HDMI.
CAUTION connecting the Power Cord
Most appliances recommend they be placed upon a dedicated circuit; that is, a single outlet circuit which powers only that appliance and has no additional outlets or branch circuits.
Do not overload wall outlets. Overloaded wall outlets, loose or damaged wall outlets, extension cords, frayed power cords, or damaged or cracked wire insulation are dangerous. Any of these conditions could result in electric shock or fire. Periodically examine the cord of your appliance, and its if appearance indicates damage or deterioration, unplug it, discontinue use of the appliance, and have the cord replaced with an exact replacement part by an authorized servicer. Protect the power cord from physical or mechanical abuse, such as being twisted, kinked, pinched, closed in a door, or walked upon. Pay particular attention to plugs, wall outlets, and the point where the cord exits the appliance.
On Disposal
- The fluorescent lamp used in this product contain a small amount of mercury.
- Do not dispose of this product with general household waste.
- Disposal of this product must be carried out in accordance to the regulations of your local authority.
Safety instructions
IMPORTANT SAFETY INSTRUCTIONS
- Read these instructions.
- Keep these instructions.
3.Heed all warnings.
4.Follow all instructions.

natural_image
Cartoon illustration of a smiling computer monitor holding a document (no text or symbols present)5.Do not use this apparatus near water.

natural_image
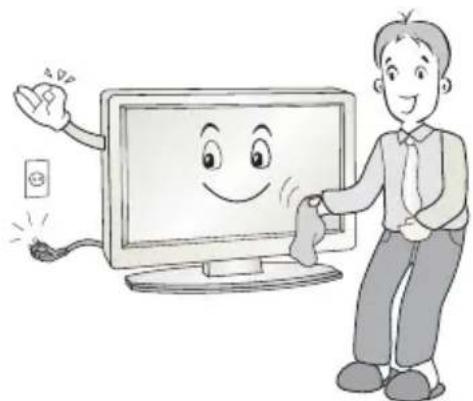
Cartoon illustration of a computer monitor with a smiling face and a money bag, symbolizing online shopping or digital finance (no text present)- Clean only with a dry cloth.
natural_image
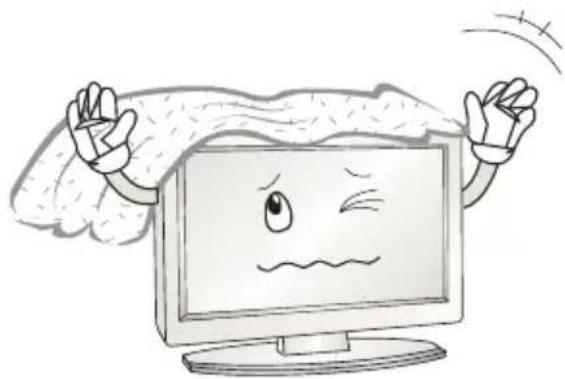
Cartoon illustration of a smiling man holding a computer monitor with a power cord, no text or symbols present- Do not block any of the ventilation openings. Install in accordance with the manufacturer's instructions.
natural_image
Cartoon illustration of a computer monitor with a sad face and waving hands, surrounded by clouds (no text or symbols)8.Do not install near any heat source such as radiators,heat registers, stoves,or other apparatus(including amplifiers)that produce heat.

natural_image
Cartoon illustration of a distressed computer monitor with a sad face and waving hands, next to a printer (no text or symbols)- Do not defeat the safety purpose of the polarized or grounding type plug. A polarized plug has two blades with one wider than other. A grounding type plug has two blades and a third grounding prong. The wide blade or the third prong is provided for your safety. When the provided plug does not fit into your outlet, consult an electrician for replacement of the obsolete outlet.
Safety instructions
- Protect the power cord from being walked on or pinched particularly at plugs, convenience receptacles, and the point where they exit from the apparatus.

natural_image
Cartoon illustration of a computer monitor with an angry face and electrical plug, showing a hand holding the screen and a fuse with lightning bolts (no text or symbols)-
Only use the attachments/ accessories specified by the manufacturer.
-
Use only with a cart, stand, tripod, bracket, or table specified by the manufacturer, or sold with the apparatus. When a cart is used, use caution when moving the cart/ apparatus combination to avoid injury from tip-over.

natural_image
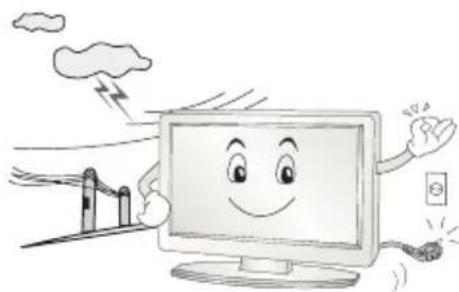
Symbolic icon of a person climbing a ladder inside a circle (no text or symbols)- Unplug this apparatus during lightning storms or when unused for long periods of time.
natural_image
Cartoon illustration of a smiling computer monitor with wind and lightning symbols above, next to a bridge and cloud (no text or symbols)- Refer all servicing to qualified service personnel. Servicing is required when the apparatus has been damaged in any way, such as power supply cord or plug is damaged, liquid has been spilled or objects have fallen into the apparatus, the apparatus has been exposed to rain or moisture, does not operate normally, or has been dropped.

natural_image
Illustration of a smiling computer monitor and a worker in a hard hat, both pointing at a box (no text or symbols present)Note
- If the TV feel cold to the touch, there may be a small "flicker" when it is turned on. This is normal, there is nothing wrong with TV.
- Some minute dot defects may be visible on the screen, appearing as tiny red, green, or blue spots. However there have no adverse effect on the monitor's performance.
- Avoid touching the screen or holding your finger(s) against it for long periods of time. Doing so may produce some temporary distortion effect on the screen.
Introduction
Installing Batteries
1
Push down to open the battery cover.
2
Insert two1.5V AAA size batteries in correct polarity.
Don't mix old or used batteries with new ones.
3
Close up the cover until the lock clicks.
NOTE: The batteries (battery pack or batteries installed) shall not be exposed to excessive heat such as sunshine, fire or the like.
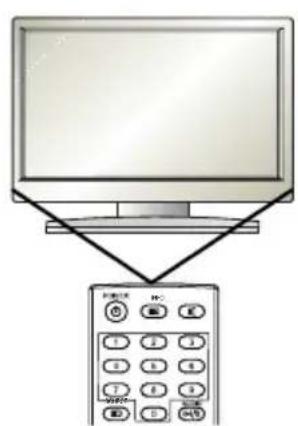
- Point the remote towards the remote control sensor of the wireless TV and use it within 7 meters.
- Put the used batteries into the recycling bin since it can negatively affect the environment.
Introduction
Cable Installation
- Before the installation and use, please read carefully the relevant content in "Notice for Maintenance and Safety".
- Take the LCD TV from the wrapping package and put it in a drafty and LCD place.
Notice:
When you plug or unplay the LCD TV, computer or other equipments, you must make sure that the AC power has been already shut down; when unplugging the power cable or signal cable, please hold the plug(the insulated part), do not draw the body of the cable.
- The RF output terminal can be connected with the RF input port of the TV.
- The output AV terminal of DVD can be connected with the AV input port of the TV through AV cable.
- Connect one end of the VGA cable with the VGA port on computer, connect the other end of the VGA cable with the VGA port on the TV, and tighten the bolts clockwise on the each end of VGA cable.
Notice:
While connecting the 15-pin VGA, please do not insert the plug overexertedly, for fear the pin might be broken.
- Connect one end of the HDMI cable with HDMI output port, connect the other end of the HDMI cable with the HDMI port on the TV.
Notice:
While connecting the HDMI, please aim at carefully, do not insert overexertedly, for fear the pin might be broken.
- Check and make sure that all AV cables are connected with the corresponding ports correctly.
- Connect the AC power cable with 100V-240V\~ power supply.
- Connect the other end of the AC power cable with the AC power port on the TV.
Caution: The range of power input for the LCD TV is 100-240V\~50/60Hz, do not connect the TV power input port with the AC power out of the above range.
Please hold the insulated part of the plug when you are unplugging the power cable, do not touch directly the metallic part of the cable.
Remote Control
The buttons of the original remote control are as following:

NOTE:
● All pictures in this manual are examples, only for reference, actual product may differ from the pictures.
-
Power, switch on or off TV set.
-
INFO: Press to display the current program information on the screen.
≡i: Go to the index page.
-
MUTE: Press to mute or restore sound.
-
NUMBER BUTTONS: Choose channels or password importation.
-
SOURCE: Press to select signal source. ☐ : Reveal the hidden information for some teletext pages.
-
AUDIO(∞ I / II): The button can be used to switch among NICAM DUAL I, NICAM DUAL II, NICAM DUAL I+II, STEREO, MONO. And switch Audio language in DTV mode.
-
MENU: Press to enter the menu screen for various optional adjustable settings.
-
EXIT: Return the last layer OSD Menu or exit OSD Menu.
-
ENTER: Press to execute the selected item in the menu screen or enter the desired value in any input mode.
-
←/→/▲/↓: To select the direction.
-
CH+/CH-: Press to select channels in ascending or descending order.
-
VOL+/VOL-: Press to adjust the volume level up or down.
-
INDEX: Press to enter the Record list.
-
REPEAT: Press to select the repeat play mode (in Storage mode). LIST: Press to call up the channel list. Press again to exit it.
-
SLEEP: Press to set the sleep timer. When the preset length of time has passed, the TV set enters standby mode.
Remote Control

- EPG: Electronic Program Guide, use in the DTV mode.
- ♥ : Switch on/off the favorite programs list.
- RECALL: Return to last viewed program.
- Red button: Fast Control Keys.
◀: Fast reverse (in Storage mode).
20. Green button: Fast Control Keys.
▶: Fast forward (in Storage mode).
21. Yellow button: Fast Control Keys.
◀: Previous (in Storage mode).
22. Blue button: Fast Control Keys.
▶: Next (in Storage mode).
23. ☐: Hold the teletext page on display, press again to release. STILL: Press to hold the picture.
■: Stop (in Storage/DVR mode).
24. RADIO: Press to interchange the Radio and DTV programs when there is Radio program ( In DTV mode ).
25. ☐ : Enter the teletext, press again for MIX mode, press this button again to exit.
▶: Play / Pause (in Storage mode).
26. : The button can be used to select the size of the screen display.
: Change size of teletext screen in display mode.
27. SUBTITLE: Enter into subtitle mode or subpage.
28. ☒X: Cancel the teletext but not to exit teletext, press again to exit.
29. Press button to start recording. Recording in use. Press button to zoom the record menu. (in DVR mode).
Turning on and off the TV
TURN ON LCD TV
- Connect the AC input cable then turn on the power switch of the TV. At this time the TV will enter standby mode.
- Press ⏻ button on TV or ⏻ button on remote control can turn on LCD TV from standby mode.
TURN OFF LCD TV
Press ⏻ button or ⏻ button on the remote control to enter standby mode.
No signal
- There is No Signal menu on screen when there is no input signal. In TV/DTV/VGA mode, if there is no signal in five minutes, the LCD TV will turn off automatically.
NO SIGNAL
Choosing a TV channel
-
Using the CH+/CH- on the panel of TV or on the remote control.
-
Press CH+ to increase channel number.
-
Press CH - to decrease channel number.
-
Using 0-9 digital buttons
You can select the channel number by pressing 0 to 9. (In TV, DTV mode)
-
Example:
-
To select - channel (e.g. Channel 5): Press 5 .
- To select -- channel (e.g. Channel 20): Press 2 and 0 in a short time.
Volume adjustment
- Press VOL+/- to adjust the volume.

- If you want to switch the sound OFF, press the MUTE.
- You can release mute by pressing MUTE or VOL+.
Input Source
You can select the input source by pressing the SOURCE button on the remote control. Press [▲] / [▼] button or Source button to cycle through the input source.
Or you can select input source by pressing TV/AV button on television. [CH+] / [CH-] button is used to cycle through different input sources. You can press TV/AV button to confirm after choose some input source. If you do not confirm the input source within 1 minute, TV will automatically enter into certain source. For example:

NOTE: The picture is just for reference. Please operate with the OSD MENU of concrete TV and refer to the AV terminal board.
Using the Function
Menu overview
Many function settings and adjustments of the LCD TV will begin from the menu choosing. All operation can be followed as help bar shows. Press 【MENU】 button to display the main menu; Press MENU button or 【←】 / 【→】 button to cycle through the main menu: Channel, Picture, Sound, Timer, Option ,Lock. Press 【↑】 / 【↓】 button to highlight the item to be adjusted.
Press【←】/【→】button to adjust the submenu or subitem. When you satisfied with your adjustment, press【EXIT】button to exit the main menu.
When an item in MENU is displayed gray, it means that the item is not available or cannot be adjusted.
Channel Menu (In TV, DTV mode)
Press MENU button on the TV set or on the remote control to select the Channel menu. Shown as below:
•Channel
To display the current channel number and press 【←】/【→】button to adjust it.
•Sound System
Four modes to be selected : D/K, I, B /G, L (In TV mode) .

•Auto Search
Select the [→] button to start auto search. Once the progress bar is full, the found channels will be stored and the unit will proceed to the search for TV, DTV, Radio. If you press M ENU button in TV searching, the Auto Searching will skip to DTV searching as the suggestive picture shows.
- Manual Search
Mannul search option allows you to preset programs one by one. The first Source Sel. is TV, the other one is DTV. The display that you are searching program on screen. Press red button to save your choice of program.
Source Sel.: Two modes to select: TV, DTV.
Current CH: To display the current physics channel .number.
Frequency: To display the frequency of the searching program.
Search: To decrease and increase frequency you want. (In TV mode)
Fine: To little adjust the frequency (In TV mode).
After adjustment, the current channel number changes yellow.
NOTE: In DTV mode, when highlighting Current CH or Frequency, the TV begin DTV Manual Search.
- Skip
Skip the current program. When setting the program skip as on, 【CH+/CH-】 button cannot select it. But you can select the skipped program by pressing the number buttons directly. After adjustment, the current channel number changes to red.


Picture Menu
Press MENU button on the TV set or on the remote control to select the Picture menu. Shown as below:
◆Picture mode
Select the Picture mode.
The manufacture's recommendation mode is HOME.
•Contrast / Brightness
Press 【←】/【→】button to adjust the contrast / brightness of the picture.
•Saturation
Press[←]/[→]button to adjust the colour saturation.

- Sharpness
Press【←】/【→】button to adjust the Sharpness level of the picture.
•Tint (NTSC)
Press[←]/[→]button to adjust the tint of the picture.
•Screen (In PC-RGB mode)
Auto Adjust :Press [→] button to adjust the position of the picture automatically.
H Position / V Position : Press 【←】/【→】 button to adjust the horizontal / vertical position.
Size /Phase:Press【←】/【→】button to adjust the size / phase of picture.
- Advance
ZOOM:Press 【←】/【→】button to select the ZOOM mode.
Colour Temp : Press [←] / [→] button to select the Colour Temp mode.
DNR :Provide the picture with dynamic noise reduction treatment.


Sound Menu
Press MENU button on the TV set or on the remote control to select the Sound menu. Shown as below:
- Sound mode
Select the Sound mode.
•Treble / Bass
Press【◀】/【▶】button to increase and decrease the level of the high-pitcher / low-pitcher sounds.
•Balance
Press 【←】/【→】button to adjust the audio output between left and right speakers.
•AVL
AVL(Automatic Volume Control) is used to control the volume automatically.
•Surround
Press【←】/【→】button to switch the surround sound.

Timer Menu
Press MENU button on the TV set or on the remote control to select the Timer menu.
Shown as below:
•Clock
Display the System time gotten from DTV signal stream or set the system time.
-Off Time
Press【→】button to set the time for turning off the TV.
• On Time
Press [→] button to set the time for turning on the TV.
•Sleep
Press【←】/【→】button to select the Sleep Time you want.
•Auto Sleep
Press [←] / [→] button to select the Auto Sleep mode.
The TV will enter into standby mode autoatically when there is no any operation in set time (the set time is 4 hours when leave the factory).
•Time Zone
Press 【←】/【→】button to select the time one.

Option Menu
Press MENU button on the TV set or on the remote control to select the Option menu. Shown as below:
•Country
Press 【←】/【→】button to select country.
•Language
Press 【←】/【→】button to select OSD language.
-Panel Lock
Press 【←】/【→】button to switch the Panel Lock. When the Panel Lock is set as On, all of the buttons are locked, losing their functions (Press any button for more than 5 seconds to release it). When it is set as Off, the buttons of TV are in normal mode.
•CI Information
Note: The function can only be gotten when CI slot is available.
To watch encrypted programs under DTV mode, please insert CI card.
Operation: Please insert CI card into the PCMCIA slot according to the arrow on the CI card. Notice: Please do not insert or pull out the CI card when power on. Do not insert or pull out the CI card frequently so as to avoid any damages of the TV and the CI card.

CryptoWorks Conditional Access
Main Menu
CryptoWorks
Language
CI-Module
Information Message
Press"OK" to select; Press"EXIT" to return
During initialization of the CI card, please don't operate the TV.
CryptoWorks: Different cards have different information, taking CryptoWorks as a example. Enter this menu to look through the provider information of Cryptoworks.
Language: To set the language of menu.
CI- Module : Enter this menu to set module information and software download. Information Message: To receive the mail information from TV station.
- System
Press [→] button to display the System Information: Software Information and Signal Information (Signal Information only in DTV mode).
-Default
Press [→] button to clear all programs or resume default setting.
- Advance
Audio Language/ Subtitle Language:
Press 【←】/【→】 to set the default Audio Language/the default Subtitle Language.
Hearing Impaired:
When hearing Impaired is ON, the TV screen will give some information to the people whose hearing are impaired when Hearing Impaired is Off, the information will be hidden.
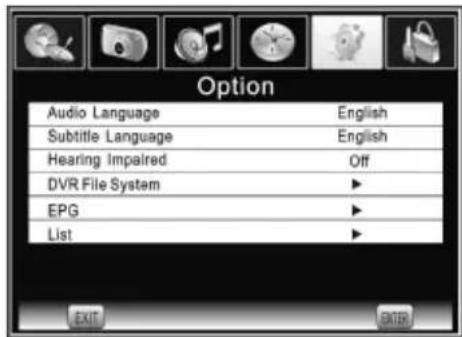
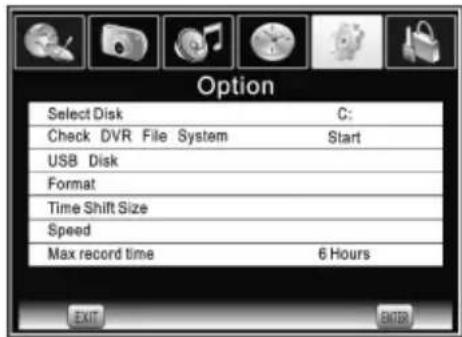
DVR File System (DVR only use for DTV source)
Select Disk
Select the disk used for DVR.
Check DVR File System
Check the file disk, and set the size recording file system.
USB Disk
USB activated or not.
Format
Format USB disk, and create DVR file system.
Time Shift Size
Show the time to do TSR.
Speed
Read and write speed of the storage device.
Max record time
Record time biggest can establish time as 6 hours.
Warning: Make sure you have a backup of your external memory data which you use for recording function (DVR)
Digital program recording
Insert a U disk, select Settings menu under the DVR File System option, and before it you should copy your information. In the USB, in case lose the information. Select check DVR File System option, if not previously formatted USB disk, the system will automatically prompt U disk formatting.
If you choose the greater the capacity, then you can burn more of the time.
◆ Carve-recording begins when Press ● button, and it can recording all the time till press ■ button or the memory is full. Recording in use. Press ● button to zoom the record menu.
◆ After the completion of recording, go to storage mode of play.
NOTE:
USB disk at least the capacity with 512MB.
When the format tons, notice thurns, will drop all contents deletie save important data, please back up the data before formatting. If USB disk in some virus meeting formats turn failure.
DVR function is only available in DTV.
If the usage contains many ambulation hard drives that divide area, can at DVR File System the menu win election to choose DVR to in response to the disk sign.
If DVR recording system is used all the time, it will exit DVR system automatically. USB memory must be support USB2.0 high-speed sepcification.
EPG ( In DTV mode):
This function let you know the detailed information of the channel, indicating the time of the program playing. From the EPG it is possible to check the program information for the next eight days( If the information is available from the broadcaster).
ENTER: Press to change channel.
INFO: Press to see the detailed information of the current channel.
DATE: Press the yellow button to see the detailed information of the next eight days, and you can press [←] / [→] button to select the concrete date information.
Reminder : Press the blue button to book program.

List(In TV/DTV mode):
Press [→] button to display the List picture. The list of program include TV, DTV, Radio. When press
【↑】/【↓】button to change programs, the signal quality, singal strength, frequency will display on screen.(Only frequency in TV mode.)
DELETE:Press red button to delete the channel.
FAV:Press green button to set the channel as you favorite channel.
MOVE:Press yellow button to move the position of channel.

Lock Menu
Press MENU button on the TV set or on the remote control to select the Lock menu.
Shown as below:
- Lock System
When Lock System is on and the system is locked, we must input the system password at Auto Search, Manual Search, Clear All Programs or List. Press the right number buttons for the password.
The default password is "0000".
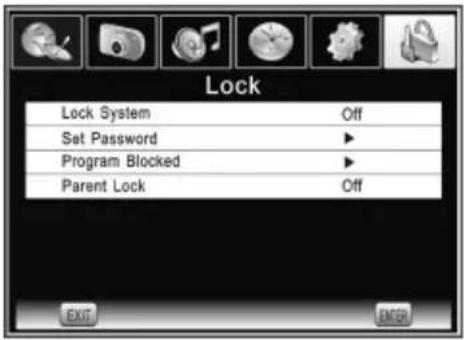
※After a password correction has been confirmed, please remember it for entering into the Parent Guide menu, all functions can not be activated until the correct password is entered. If you forget, the super password of "1225" still valid.
Press the number buttons on the remote control to set the new password. When the new password has been input twice, the setting is finished successfully. The TV will go back to previous menu.
- Set Password
Press [→] to see the Set Password submenu. Press the number buttons to enter the password. You can set your private password.
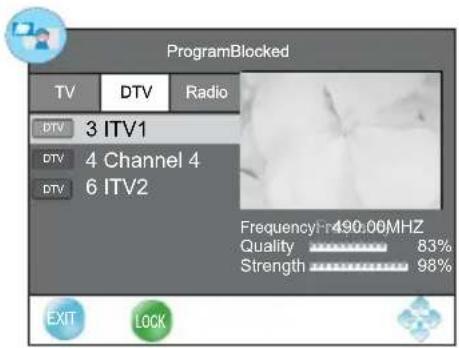
•Program Blocked(In TV,DTV mode)
Press the green button "LOCK" to lock the available program you want. Press the green button again to unlock it.
•Parent Lock (In DTV mode)
Limit the proper age children to watch the program which they can accept.
STORAGE
Connect an USB device. Press the SOURCE button to display the signal source menu, then press [♠] / [♦] button to select the Storage.
Press【←】/【→】to select
Press【EXIT】button to return.
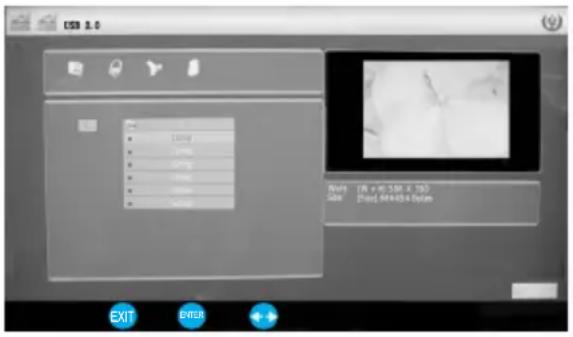
It can play PHOTO, MUSIC, MOVIE or TEXT files.
Photo Format Support: JPEG, BMP, PNG.
Music Format Support : MP3, AAC.
Movie Format Support: MPEG -1 / MPEG-2/MPEG-4, TS, RM.
Text Format Support: .txt.
NOTE: Special algorithm documents may not be or well be supported by the USB.
Basic operation
- Play/ Pause
Start playing the selected file of a folder or pause.
- Stop
Stop the playing files.
- ←/ Fast Reverse/Fast Forward
Fast Reverse: There are 2/4/8/16 levels of rewind speed.
Fast Forward: There are 2/4/8/16 levels of fast forward speed.
- 📄/ 📄Previous/Next
You can select the desired files manually in normal condition.
- REPEAT
Select repeat play mode.

Circulating play for single file.
Circulating play for all file.
No circulating play.
6.【←】/【→】
Page up or page down the files.
- ZOOM
Press button to zoom Movie Picture.
TELETEXT Operation
Display teletext
- Select a TV station with a teletext signal.
- Press the Ⓔ button to enter teletext mode.
- Press the ☐ button 2nd to enter Mix mode, this function enables you to superimpose the teletext page over the TV program.
- Press the Ⓔ button 3rd return or exit to the normal TV/DTV mode.
Page selection
- Enter the page number (three digits) using the number buttons. If you press a wrong number during input, you must complete the three digit number and then reenter the correct page number.
- The [↑] / ↓ button can be used to select the preceding or following page.
Hold
You can press the button to hold a page, and press it again to release the page.
Index
Press the ☐ button to enter the main index page directly.
Enlarging Text
When a page is displayed, you can double the size of the text to make it easier to read.
- Press the ⏻ button to enlarge the top half of the page.
- Press the ⏻ button again to enlarge the bottom half of the page.
- Press the Ⓔ button once more to return to the normal display.
Reveal mode
You can display concealed teletext information(e.g.Answer to puzzles or riddles etc.) by pressing ☐ button.Press ☐ button again to remove the information from the display.
Subpage
Some teletext may contain several sub-pages which are automatically paged in a certain cycle by the TV station.
- Yon can enter into a certain subpage by pressing the SUBTITLE button directly and select the page number with number buttons. Enter the subpage number (e.g.0003) for the third subpage.
- Press the button again to exit the subpage mode.
- Press the button to return to the normal TV mode.
Colour buttons(Red, Green, Yellow, Cyan)
Press these buttons to access directly to the corresponding colour pages displayed at the lower part of the teletext screen.
Trouble Shooting
Before contrast the service technician, perform the following simple checks. If any program still persists, unplug the LCD TV and calling for serving.
| PROBLEM | POSSIBLE SOLUTION |
| No sound and picture | - Check whether the main plug has been connected to a wall let.- Check whether you have pressed the POWER button on the front of TV set.- Check the picture contrast and brightness settings. |
| Normal picture but no sound | - Check the volume.- Sound muted? Press the MUTE button.- Try another channel, the problem may be with the broadcast.- Are the audio cables installed properly? |
| The remote control does not work | - Check to see if there any object between the product and remote control Causing obstruction.- Are batteries installed with correct polarity(+ to +,- to -).- Correct remote operating mode set: TV, VCR etc.?- Install new batteries |
| Power is suddenly turned off | - Is the sleep timer set?- Check the power control settings. Power interrupted.- No broadcast on station tuned with auto activated. |
| Picture appears slowly after switching on | - This is normal, the image is muted during the product startup process. Please contact your service center, if the picture has not appeared after five minutes. |
| No or poor colour or poor picture | - Adjust the colour in menu option.- Keep a sufficient distance between the product and the VCR.- Try another channel, the problem may be with the broadcast.- Are the VIDEO cables installed properly?- Activate the any function to restore the brightness of the picture. |
| Horizontal/vertical bars or picture shaking | - Check for local interference such as an electrical appliance or power tool. |
| Poor reception on some channels | - Station or cable product experiencing problems. Tune to another station.- Station signal is weak, reorient antenna to receive weaker station.- Check for sources of possible interference. |
| Lines or streaks in pictures | - Check the antenna(Change the direction of the antenna). |
| No output from one of the speaks | - Adjust balance in menu option. |
| The signal is out of range. | - Adjust resolution, horizontal frequency, or vertical frequency.- Check it whether the signal cable is connected or loose.- Check the input source. |
| Vertical bar or stripe on back ground&Horizontal Noise&Incorrect position. | - Work the auto configure or adjust clock, phase, or H/V position. |
| Screen colour is unstable or single colour. | - Check the signal cable.- Reinstall the PC video card. |
NOTE: There is a problem in VGA mode (Only VGA mode applied).
Maintenance
Early malfunctions can be prevented. Careful and regular cleaning can extend the amount of time you will have your new TV. Be sure to turn the power off and unplug the power cord before you begin any cleaning.
Cleaning the screen
- Here's a great way to keep the dust off your screen for a while. Wet a soft cloth in a mixture of lukewarm water and a little fabric softener or dish washing detergent. Wring the cloth until it's almost dry, and then used it to wipe the screen.
- Make sure the excess water is off the screen, and then let it air-dry before you turn on your TV.
Cleaning the cabinet
To remove dirt or dust, wipe the cabinet with a soft, dry, lint-free cloth. Please be sure not to use a wet cloth.
Extended Absence

If you expect to leave your TV dormant for a long time(such as a vacation), it's a good idea to unplug the power cord to protect against possible damage from lightning or power surges.
-The ventilation should not be impeded by covering the ventilation openings with items, such as newspapers, table-cloths, curtains, etc;
- No naked flame sources, such as lighted candles, should be placed on the apparatus;
-Attention should be drawn to the environmental aspects of battery disposal. Don't throw used batteries in dustbin. Please contact your retailer in order to protect the environment.
-Don't use the apparatus in tropical climates;
-The apparatus shall not be exposed to dripping or splashing and that no objects filled with liquids, such as vases, shall be placed on the apparatus.
-Where the mains plug is used as the disconnect device, the disconnect device shall remain readily operable. The main plug shall remain readily operable.
-Keep minimum distances(5cm)around the apparatus for sufficient ventilation;( Minimum distance around the apparatus for sufficient ventilation.)
Disposal of old electrical appliances

The European directive 2002/96/EC on Waste Electrical and Electronic Equipment (WEEE), requires that old household electrical appliances must not be disposed of in the normal unsorted municipal waste stream. Old appliances must be collected separately in order to optimize the recovery and recycling of the materials they contain, and reduce the impact on human health and the environment.
The crossed out “wheeled bin” symbol on the product reminds you of your obligation, that when you dispose of the appliance, it must be separately collected.
Consumers should contact their local authority or retailer for information concerning the correct disposal of their old appliance.
Contenido
Advertencia....23
Control Remoto....29
Operaciones.... 31
natural_image
Black triangular warning symbol with a white lightning bolt and downward arrow (no text)ATENCIÓN
natural_image
Black triangular warning symbol with exclamation mark (no text or numbers)ADVERTENCIA:
natural_image
Cartoon illustration of a smiling computer monitor character holding a document (no text or symbols present)natural_image
Cartoon illustration of a computer monitor with a hand holding a document, reacting with a falling fish and a money bag (no text or symbols)natural_image
Cartoon illustration of a smiling man holding a computer monitor with a smiley face, next to an electrical outlet (no text or symbols)natural_image
Cartoon illustration of a computer monitor with arms and a sad face, surrounded by clouds (no text or symbols)natural_image
Cartoon illustration of a distressed computer monitor with angry faces and a distressed printer nearby (no text or symbols)natural_image
Cartoon illustration of a computer monitor with an angry face and power plug, showing electrical shock (no text or symbols)natural_image
Symbolic icon of a person pushing a cart inside a circle (no text or symbols)natural_image
Cartoon illustration of a smiling computer monitor character with arms and legs, surrounded by clouds and a bridge (no text or symbols)natural_image
Illustration of a smiling computer monitor and a worker pointing at a box (no text or symbols)Nota
- Manual Search
- Contrast / Brightness
Bloqueo del menú
- OPERATION MANUAL MANUAL DE USUARIO
- Contents
- Warning....2
- Safety Instructions....4
- Introduction......6
- Remote Control....8
- Operation....10
- Trouble Shooting....20
- Maintenance....21
- WARNING:
- REGULATORY INFORMATION
- Warning
- CAUTION:
- CAUTION connecting the Power Cord
- On Disposal
- Safety instructions
- IMPORTANT SAFETY INSTRUCTIONS
- Note
- Introduction
- Installing Batteries
- Cable Installation
- Notice:
- Remote Control
- NOTE:
- Turning on and off the TV
- TURN ON LCD TV
- TURN OFF LCD TV
- No signal
- Choosing a TV channel
- Volume adjustment
- Input Source
- Using the Function
- Menu overview
- Channel Menu (In TV, DTV mode)
- •Channel
- •Sound System
- •Auto Search
- - Manual Search
- - Skip
- Picture Menu
- ◆Picture mode
- •Contrast / Brightness
- •Saturation
- - Sharpness
- •Tint (NTSC)
- •Screen (In PC-RGB mode)
- - Advance
- Sound Menu
- - Sound mode
- •Treble / Bass
- •Balance
- •AVL
- •Surround
- Timer Menu
- •Clock
- -Off Time
- • On Time
- •Sleep
- •Auto Sleep
- •Time Zone
- Option Menu
- •Country
- •Language
- -Panel Lock
- •CI Information
- CryptoWorks Conditional Access
- - System
- -Default
- Audio Language/ Subtitle Language:
- Hearing Impaired:
- DVR File System (DVR only use for DTV source)
- Select Disk
- Check DVR File System
- USB Disk
- Format
- Time Shift Size
- Speed
- Max record time
- Digital program recording
- EPG ( In DTV mode):
- List(In TV/DTV mode):
- Lock Menu
- - Lock System
- - Set Password
- •Program Blocked(In TV,DTV mode)
- •Parent Lock (In DTV mode)
- STORAGE
- Basic operation
- TELETEXT Operation
- Display teletext
- Page selection
- Hold
- Index
- Enlarging Text
- Reveal mode
- Subpage
- Colour buttons(Red, Green, Yellow, Cyan)
- Trouble Shooting
- Maintenance
- Cleaning the screen
- Cleaning the cabinet
- Extended Absence
- Disposal of old electrical appliances
- Contenido
- Advertencia....23
- Control Remoto....29
- Operaciones.... 31
- ADVERTENCIA:
- Nota
- - Contrast / Brightness
- Bloqueo del menú
Brand : NPG
Model : NT-249B-P
Category : Television