FCLBC 4500 TF - Fridge Fulgor Milano - Free user manual and instructions
Find the device manual for free FCLBC 4500 TF Fulgor Milano in PDF.
| Brand | Fulgor Milano |
| Model | FCLBC 4500 TF |
| Product type | Multifunctional refrigerator with fast cooling, freezing, slow cooking and rising functions |
| Net weight | 38 kg |
| Gross weight | 40 kg |
| Power supply | 220-240 V ~ 50 Hz, 2.5 A, 300 W (cooling) / 220 W (heating) |
| Power cable | Schuko plug 16 A |
| Refrigerant | R290 |
| Climate class | SN (subnormal) |
| Cooling capacity | 3 kg |
| Freezing capacity | 3 kg |
| Number of grids | 3 |
| Main functions | Pre-cooling, fast cooling, freezing, cooling, drinks, storage at 0°C, fresh fish (sanitation), defrosting, ready to serve, slow cooking, rising |
| Display | Touch 4.3 inch |
| Core probe | Included for internal temperature measurement |
| Maintenance and cleaning | Clean with a soft cloth and mild detergent. Do not use abrasive products or steel wool. |
| Safety | Fuse, circuit breaker, double safety circuit breaker, temperature probe |
| Use | Domestic |
| Installation | By authorized personnel, requires an air chimney of at least 250 cm² |
Frequently Asked Questions - FCLBC 4500 TF Fulgor Milano
User questions about FCLBC 4500 TF Fulgor Milano
0 question about this device. Answer the ones you know or ask your own.
Ask a new question about this device
Download the instructions for your Fridge in PDF format for free! Find your manual FCLBC 4500 TF - Fulgor Milano and take your electronic device back in hand. On this page are published all the documents necessary for the use of your device. FCLBC 4500 TF by Fulgor Milano.
USER MANUAL FCLBC 4500 TF Fulgor Milano
INSTRUCTIONS FOR INSTALLATION AND USE
INSTRUCTIONS POUR L'INSTALLATION ET L'UTILISATION
INSTALLATION UND GEBRAUCH
we would like to thank you and congratulate you on your choice.
This new product has been carefully designed and built using top quality materials, and meticulously tested to ensure that it meets all your culinary requirements.
Please read and observe these simple instructions, which will enable you to achieve excellent results from the very first time you use it. This state-of-the-art appliance comes to you with our very best wishes.
THE MANUFACTURER

Italiano

English

Français

Deutsch

Espanol

Portugues
THIS PRODUCT IS DESIGNED FOR DOMESTIC USE.
THE MANUFACTURER DECLINES ALL RESPONSIBILITY FOR DAMAGES TO THINGS OR PEOPLE DERIVING FROM INCORRECT INSTALLATION OR IMPROPER, ERRONEOUS OR UNSUITABLE USE.
THE APPLIANCE MUST NOT BE USED BY PEOPLE (INCLUDING CHILDREN) WITH PHYSICAL, SENSORIAL OR
MENTAL IMPAIRMENTS, OR BY PEOPLE WITHOUT THE NECESSARY EXPERIENCE OR KNOWLEDGE, UNLESS THEY ARE SUPERVISED OR INSTRUCTED IN THE USE OF THE APPLIANCE BY A PERSON RESPONSIBLE FOR THEIR SAFETY.
CHILDREN MUST BE SUPERVISED TO ENSURE THAT THEY DO NOT PLAY WITH THE APPLIANCE.

Summary
1. INSTALLATION 3
1.1 General instructions 3
1.2Warnings 3
1.3 Introduction 3
1.4 Transportation and handling 4
1.5 Unpacking 4
1.6 Basic Safety Rules 5
2. INSTALLATION 5
2.1 Label data 5
2.2 Electrical connection 5
2.3 Positioning 5
2.4 Ambient temperature and air exchange 6
2.5 Final checks 6
2.6 Safety and control systems 7
3. USE 7
3.1 Notes for the user 7
3.2 Internal preparatory cleaning 7
3.3 The core probe 7
3.4 The containers and lids to be used during the cycles 8
3.5 Food arrangement 8
3.6 Effective chilling and freezing cycles 8
3.7 Storage of blast chilled or deep frozen foods 8
3.8 Programs 9
3.9 The display and user interaction 10
3.10Iconskey 11
3.11 Turning on and off 12
3.12 Program selection 12
3.12.1 End of the program 13
3.12.2 Pre-cooling 13
3.12.3 Blast chilling 13
3.12.4 Deep freezing 14
3.12.5 Cooling 15
3.12.6 Beverages 16
3.12.7 0^ Preservation 17
3.12.8 Raw fish 17
3.12.9 Thawing 18
3.12.10 Ready to serve 18
3.12.11 Slow cooking 19
3.12.12 Raising 20
4. ROUTINE MAINTENANCE 22
4.1 Basic Safety Rules 22
4.2 External surface cleaning 23
4.3 Inner liner cleaning 23
4.4 Inactivity periods 23
5. NON-SCHEDULED MAINTENANCE 23
5.1 Malfunctions 23
5.2 Appliance disposal 24
6.TROUBLESHOOTING 24
6.1 Alarm table 24
7. TECHNICAL DATA 25
7.1 Dimensions 25
9. INFO 27
9.1 Service 27
9.2 Customer data 27
1. INSTALLATIONN
1.1 General instructions
This manual contains instructions about installation, use and safety. Read these instructions carefully.
Store this manual for future reference and keep it with the appliance if sold.
During installation, handling and transport, rest the appliance base on a flat surface, avoiding inclined posit for prolonged periods.
The appliance cannot be used by children or persons with reduced physical, sensory or mental capabilities or lack of experience or knowledge, without the supervision of an adult or a tutor.
Children must not play with the appliance. User cleaning and maintenance must not be performed by unsupervised children. The power cable and the plug must be accessible when the appliance is installed. The cable must not be bent or squashed as this may compromise the insulation.
Once the installation is complete the ventilation outlets must not be obstructed. All electrical parts as well as the parts of the cooling circuit must be checked regularly by authorized technical personnel.
The manufacturer is not responsible for damage due to incorrect operation, improper use, or as a consequence of unauthorized repairs or modifications.
1.2Warnings
This manual is an integral part of the product and provides all the necessary information for proper installation and maintenance of the machine.
It is mandatory that the user and the installer read this manual carefully and always refer to it; it must be kept in a well-known place, accessible to all authorized operators (installer, user, maintainer).
The manual must be kept in a dry place.
The manufacturer declines all responsibility and obligations for any damage to the appliance, people and property, that may be attributable to:
- incorrect installation and/or failure to comply with applicable laws;
- modifications or improper maintenance;
- use of non-genuine spare parts or spare parts not suitable for the model;
- total or partial non-compliance with the instructions in this manual;
- non-compliance with safety instructions and applicable laws during installation.
1.3 Introduction
The installation must be performed only by authorized and qualified personnel, observing the warnings, instructions and requirements contained in this document.
Before installing the appliance ensure that the existing electrical systems comply with the law and correspond to the data on the appliance label to be installed in terms of voltage [V], frequency [Hz] and input power [W].
The manufacturer of this equipment declares the conformity of each appliance with the regulations in force.
1.4 Transportation and handling

Loading and unloading of the appliance from the truck must be performed by appropriate means, such as a trolley, without which at least two people are required..
Warning! During handling operations every precaution that may be necessary to avoid harm to persons, property or to the appliance must be observed. Specific instructions are given on the package.
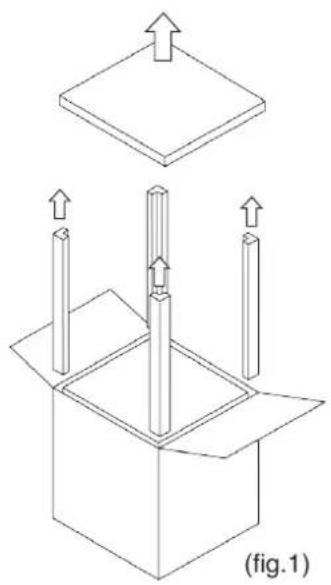
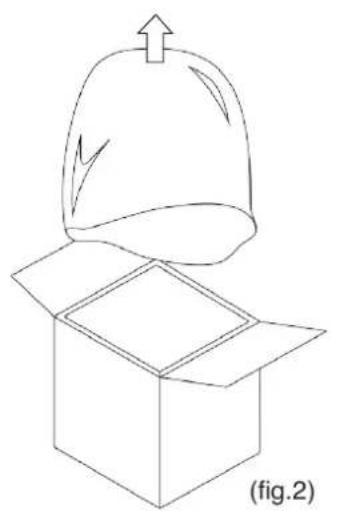
1.5 Unpacking
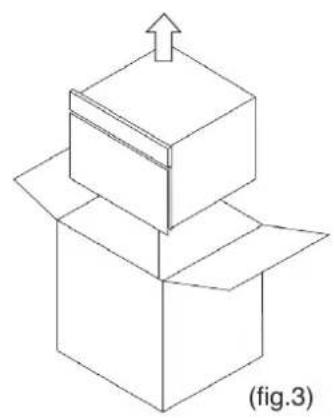
Open the top of the box by bending back the side flaps to operate more easily, then remove the top cover and the side polystyrene angle protection (fig.1). Remove then the protective bag (fig.2), then, using the appropriate lifting handles, remove the equipment from the box by lifting it upwards (fig.3).
After removing the packaging, and before any other operation, make sure the appliance is free of damage. In case of abnormalities do not turn on the appliance and contact your dealer.
The materials of the packaging must be disposed of according to the regulations in the country where the appliance is used and never dumped irresponsibly.
Lift the machine with a suitable tool, using protective gloves, and place it in position. Remove any protective film, removing any traces of adhesive with a soft cloth and a neutral detergent. Do not use scouring pads or sponges that could irreparably scratch the surfaces.
Warning! The materials of the packaging can be potentially dangerous for children and animals.
1.6 Basic Safety Rules
The user is responsible for operations carried out on the appliance without following the instructions provided in this manual.
The following are the main safety rules to be observed for the installation:
- disconnect the appliance from the power supply before working on it;
- to disconnect the appliance do not pull the power cable;
- do not touch the appliance with wet or damp hands/feet or without suitable protections (e.g. suitable gloves and shoes);
- do not insert screwdrivers, kitchen utensils or objects between the grids and into moving parts.
2. INSTALLATION
2.1 Label data
The appliance data are indicated on a label on the side (Fig. 4).
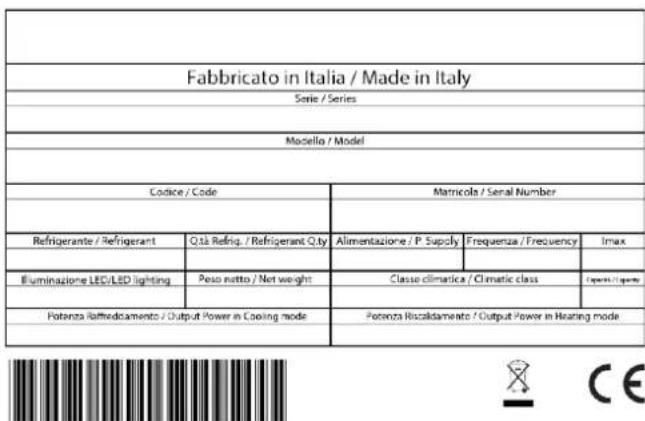
Fig.4 Product data label
Note: do not remove, alter, damage or modify the data label.
2.2 Electrical connection
Before installing the appliance ensure that the existing electrical systems comply with the law and correspond to the data on the appliance label to be installed in terms of voltage [V], frequency [Hz] and input power [W]. The appliance has a power cable with a 16A Schuko plug.
Warning! Once the installation is complete the plug must be accessible. If this is not possible, the power supply system must be equipped with a disconnector.
Warning! Do not wind up the power cable and make sure it is does not hinder or endanger people passing through the area.
Warning! Make sure the power cable is not crumpled, squashed or bent.
Warning! The power cable must not get wet, come into contact with sharp or hot objects, or be exposed to corrosive substances.
Warning! Avoid contact between the power cable and children or animals.
2.3 Positioning
Do not install in places with poor ventilation and high temperatures, or locations in direct sunlight or subject to weathering. Avoid proximity to heat sources.
Warning! Make sure, once the installation is complete, there are no obstacles to the door opening.
Warning! Do not use extensions to the power cable in order to avoid overheating problems..
Note: for the proper operation of the appliance an air flue of at least 250~cm^2 is required (Fig. 5) on the rear of the appliance
Warning! Once the positioning is complete, secure the appliance with suitable screws.

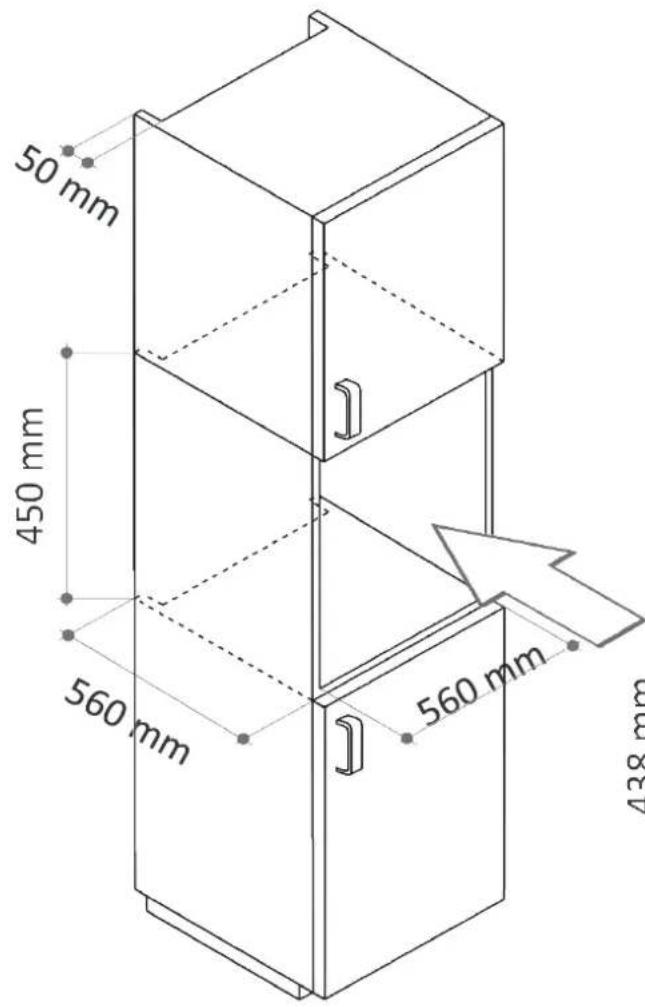
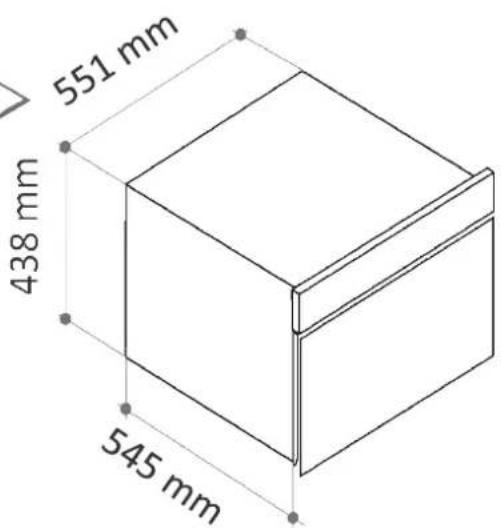
Fig.5 - Size of the built-in niche
2.4 Ambient temperature and air exchange
Appliance performance is guaranteed up to an air temperature of 32^ provided that the air exchange is as described in paragraph 2.3.
2.5 Final checks
Once the positioning and electrical connections are complete check the following:
- the electrical connection is correct;
- wait at least 4 hours before turning on the appliance to allow the thermodynamic circuit to stabilise.
2.6 Safety and control systems
The appliance is equipped with systems that ensure safety and allow control during operation:
- general protection fuse on the power cable to protect against short circuits and overloads;
- temperature cut-off on the compressor in the event of overload or operating anomalies;
- double temperature cut-off on the heating element;
- inner liner temperature probe, controlled by the power board.
3. USE
This appliance is intended mainly for blast chilling and deep freezing food. If cooked and rapidly chilled, the foods retain their organoleptic properties for 5-7 days; if rapidly frozen, thawed foods retain their consistency and their original flavour.
3.1 Notes for the user
- Read this manual carefully and always refer to it;
- if there is any noticeable fault in the appliance, such as the power cable is damaged or a failure in the control panel, switch off the appliance and contact the service centre;
-
this appliance is not intended for use by children or persons with reduced physical, sensory or mental capabilities, or lack of experience and knowledge, unless supervised or instructed regarding use. Children must not play with the equipment;
-
do not introduce explosives, such as aerosol cans with a flammable propellant, inside the appliance;
- this appliance is intended for domestic use;
- while operating and according to the selected program the appliance may become hot. Take adequate precautions before working inside the appliance.
Warning! While operating the appliance may become hot. Keep children away.
- This appliance is intended for the use for which it was designed: chilling, freezing, thawing, leavening, slow cooking, warming, sanitising foods and cooling beverages at home. Any other use is considered improper and potentially dangerous.
3.2 Internal preparatory cleaning
Once the electrical connections and the positioning are complete and before turning on the appliance it is necessary to deep clean the inner liner, using a soft cloth and a neutral detergent.
Do not use steel wool, scrapers or abrasive, acidic or aggressive substances as this may damage the inner surfaces. Remove any detergent residue.
3.3 The core probe
The core probe is a device used for measuring the temperature inside the food. In programs that require the use of the core probe, the process ends automatically when the setpoint temperature is reached.
Correct use of the probe requires the probe to be inserted into the food before starting the program.
Note: the core probe must be inserted into the core of the food so that it cannot come out.
In the event that the core probe is not inserted in the food because it was forgotten on the bottom of the cell or because it came out from the food, the appliance automatically switches to "Recipe" mode.
Handle the probe carefully and pay attention to its tip. When the core probe is no longer needed, clean it with a soft cloth using warm water, and then store it.
Tip: in order to improve the effectiveness of the programs, insert the probe into the largest piece of food.
Some programs feature the "Recipe" mode. In this mode the core probe is not necessary: the process is automatic and depends on the program settings.
Note: while in "Recipe" mode, the use of the core probe has no effect on the program.
3.4 The containers and lids to be used during the cycles
Trays and shallow containers are preferred as they facilitate internal ventilation.
Tip: to increase the effectiveness of blast chilling and deep freezing, spread out the food portion in the air flow as much as possible; avoid covering the trays and containers as this increases the insulation. Make sure containers are compatible with low-temperature applications (-40^)
Tip: metal or ceramic containers and materials suitable for temperatures up to 75^ are recommended for those programs with hot functions.
3.5 Food arrangement
Whenever possible avoid stacking food in the tray, instead spread out the food as much as possible over a large area to maximise internal ventilation.
3.6 Effective chilling and freezing cycles
The best results in terms of chilling and freezing are obtained by introducing the food immediately after cooking, avoiding exposure at room temperature since this will lead to the loss of humidity and deterioration in the original colour, aroma and flavour.
Tip: the chilling and freezing programs are shorter and lead to better results if a pre-cooling cycle is run first.
3.7 Storage of blast chilled or deep frozen foods
At the end of blast chilling or deep freezing programs the appliance keeps foods at the setpoint temperature; however, the food should not be stored for a long time inside the appliance but stored in the refrigerator or freezer.
Since the rapidly frozen products can be stored for long periods (6-12 months), they should be identified with a label referring to its contents and date of expiry.
The proper place of storage of blast chilled foods is the refrigerator while those of deep frozen food is the freezer; it is therefore recommended to use such equipment.
Tip: to further enhance the shelf-life of chilled foods vacuum packaging is recommended, with equipment suitable for the purpose and observing the regulatory requirements of temperatures and times.
3.8 Programs
| BLAST CHILLING With this program it is possible to store food in the refrigerator for 5-7 days. The rapid cooling to +3°C stops the evaporation of water from freshly baked products. By reducing the exposure of the food in the temperature range of bacteria proliferation, it lengthens the storage time of the food itself. | |
| DEEP FREEZING The rapid cooling process to -18°C allows foods to be stored for several months. The organoleptic qualities of the food: flavour, aroma and appearance are maintained by the rapid solidification of the water, that avoids tearing the fibres. | |
| PRE-COOLING Pre-cooling optimises preparation times in the kitchen as it takes place during the preparation of the recipes. Pre-cooling reduces the execution time of programs that include operations such as blast chilling and deep freezing very hot foods by cooling the internal parts of the equipment. | |
| COOLING When freshly cooked food cannot be consumed immediately because it is too hot, this program ac-celerates the cooling process without having to wait for natural acclimatisation. | |
| BEVERAGES A wine cellar is used to store beverages at the desired temperature. However, blast chillers are very helpful when there is not enough time to cool down a bottle. This program reduces the temperature of a drink according to the available time. | |
| 0°C PRESERVATION This program aims to preserve the organoleptic properties of raw foods and it is suitable for preserving foods such as meats, fish and vegetables for before their preparation. | |
| RAW FISH Incorrect storage of fishery products may cause health risks in relation to contamination by Anisakis, a parasite that can be eliminated by prolonged cooking processes or freezing and storage at -30°C (sanitation). This program uses the high performing chiller to reproduce the sanitisation process at home. |
GB
a few

| THAWING This brings food from freezing temperature to 1-3°C without loss of liquids and without starting the cooking process, avoiding the protein processing that happens, for example, when defrosting meat in the microwave. | |
| READY TO SERVE This program warms a previously cooked food kept in the refrigerator, so it can be served at the correct temperature. | |
| SLOW COOKING This cooks a recipe at a constant temperature for the desired time. This technique, thanks to limited water evaporation from the food, maintains the quality and tenderness of the food. | |
| RAISING The raising program creates a microclimate in controlled temperature and humidity conditions. Fermentation can then take place in optimum conditions, producing the natural swelling of the dough. By programming the duration of the leavening it is possible to reduce the amount of yeast in the recipe, obtaining a lighter and more digestible product, at the same time favouring the desired aroma. |
3.9 The display and user interaction
The control panel is composed of a 4.3" touch display and a power button on the side
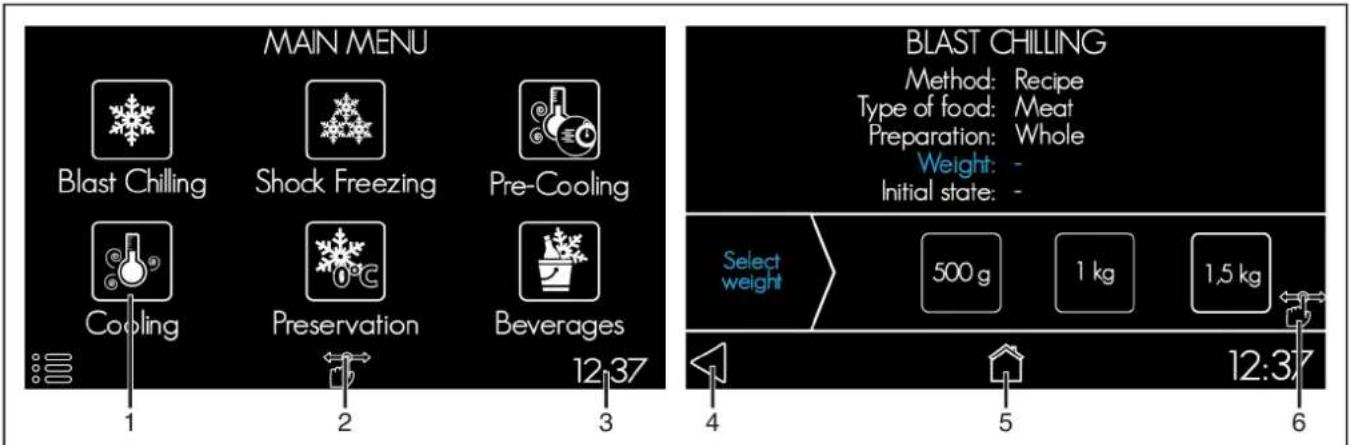
Fig. 6 - The main menu and an example selection screen
- Function icon: tap the icon to run the desired program.
- Settings menu: enter and set the language, time, display brightness and volume of the buzzer.
-
Current time: shows the system clock.
-
"Back" button: return to previous screen.
- "Main Menu" button: return to the program selection screen.
- Swipe icon: indicates the screen area that can be scrolled through to see all the options.
3.10 Icons key
Regardless of the selected program, some icons are recurrent in several screens during user interaction with the display. Their meaning is described below.
| HOME To return to the Main Menu. All entered data are deleted. | |
| SETTINGS MENU To enter the edit mode of the main settings: display brightness, buzzer volume, language, clock. | |
| BACK To return to the previous screen. If on a selection screen, the data on the previous screen are saved. | |
| START To start the selected program. After pressing this button, the icon for the program in execution will turn blue, to indicate the state of operation of the appliance. |


STOP
To suspend the running program.
It is necessary to confirm the cancellation by pressing "yes" on the following screen. The program will be interrupted and the display will return to the Main Menu.

LIGHTING
To turn on/off the internal lighting: the light will be switched on or off depending on the bulb colour (either black or white). After prolonged absence of user interaction the light switches off.
3.11 Turning on and off
To turn on the appliance press the ON/OFF button located to the side of the display for at least 2 seconds. The logo is displayed for a few seconds, then the "Main Menu" screen appears.
In the absence of interaction for 5 minutes, the appliance turns into power save mode, displaying the current time.
To turn off the appliance press and hold the ON/OFF button to the side of the display for at least 2 seconds. This can be done at any time. If you switch the appliance off while a program is running, a message appears on the display and the program is stopped.
3.12 Program selection
The operating mode is chosen in the "Main Menu", by tapping the desired icon. Press and hold an icon to display a "Help" screen, displaying some brief information about the program (fig.7).
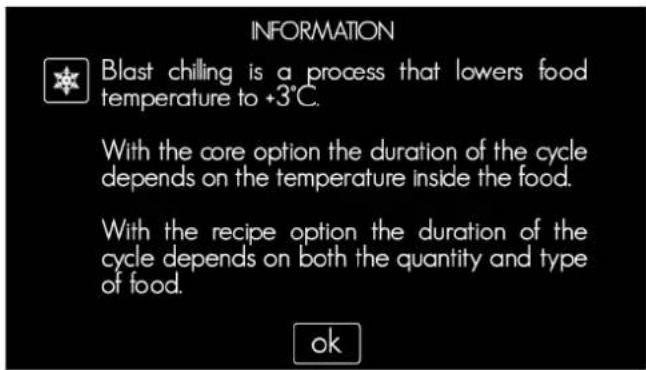
Fig.7 - Example of "Help" screen
Each program features a power-saving screen (screensaver) that is automatically activated if the user does not interact with the display. The screen shows the current time or, if a program is running, the program icon.
To exit the screenshot tap anywhere on the screen.
3.12.1 End of the program
At the end of each program the appliance will beep to signal that it is possible to remove the tray. Some programs automatically switch to a preservation mode if the user does not remove the tray, alerting the user with an appropriate screen. To stop the preservation mode simply press the "OK" icon.
The "Deep freezing", "Raw fish" and
Preservation" programs also include an automatic defrosting stage at the end of the program, or when the program is interrupted by the user. Defrosting is indicated by a special screen and lasts about 20 minutes, after which the display returns to the Main Menu. Automatic defrosting can be interrupted at any time by pressing the "OK" button, then confirming with "yes".
GB
3.12.2 Pre-cooling
To reduce the cycle time of the blast chilling and deep freezing it could be useful to prepare the equipment with a pre-cooling cycle.
| PRE-COOLING | |
| Before starting | It is possible to verify the information in the summary screen. |
| During the program | The display shows the settings and the remaining time to the end of the program. |
| AT THE END OF THE PROGRAM | |
| The device beeps and displays an information message. No preservation action is carried out and the appliance is ready to start other programs. | |
3.12.3 Blast chilling
With this program it is possible to store food in the refrigerator for 5-7 days at +3^ . Rapid cooling stops the evaporation of water and the loss of vitamins, protein and mineral salts from freshly baked products. By reducing the exposure of the food in the
temperature range of bacteria proliferation, it lengthens the storage time of the food itself. It is also possible to blast chill foods which have just been cooked even at temperatures of 90^
BLAST CHILLING
It is possible to choose from two blast chilling modes: "Recipe" and "Core".
Recipe mode does not require the use of the core probe but it is necessary to indicate the weight of the food and its initial tray temperature.

| RECIPE MODE | |
| Options | Type of food: specify the type of food to be chilled. Preparation: specify if the food on the tray is whole or in a different form (i.e.: sliced, diced, in pieces, etc.). Weight: select the quantity of food on the tray. Initial state: if the food has just been baked or if it's hot, select "hot". If it's at room temperature or warm, select "Room temp." |
| Before starting It is possible to verify the information in the summary screen. | |
| During the program | The display shows the settings and the remaining time to the end of the program. |
| CORE MODE | |
| Options | Type of food: specify the type of food to be chilled. Preparation: specify if the food on the tray is whole or in a different form (i.e.: sliced, diced, in pieces, etc.). Before starting It is possible to verify the information in the summary screen. |
| During the program | The display shows the settings and the remaining time to the end of the program. |
| AT THE END OF THE PROGRAM | |
| For any blast chilling operation mode, at the end of the program the appliance beeps and displays an information message. It then switches to preservation mode which maintains the temperature of +3°C at the food core until the user intervenes. | |
Note: opening the door during blast chilling introduces warm and moist air, increasing the duration of the process. In the "Recipe" mode the duration of the program is fixed: repeatedly opening the appliance door could lead to imperfect blast chilling. Do not open the appliance door during the blast chilling program.
3.12.4 Deep freezing
Deep freezing is a rapid cooling process that allows foods to be stored for numerous months if kept in a freezer at -18^ . The
aroma and appearance are maintained by the rapid solidification of the water, that avoids tearing the fibres.
organoleptic qualities of the food: flavour,
| DEEP FREEZING | |
| It is possible to choose from two blast chilling modes: “Recipe” and “Core”. Recipe mode deep freezing does not require the use of the core probe but it is necessary to indicate the weight of the food and its initial temperature in the tray. Core mode deep freezing allows the temperature at the core of the food to be read accurately and the user only needs to enter a few pieces of information. | |
| RECIPE MODE | |
| Options | Type of food: specify the type of food to be chilled. Preparation: specify if the food on the tray is whole or in a different form (i.e.: sliced, diced, in pieces, etc.). Weight: select the quantity of food on the tray. Initial state: if the food has just been baked or if it's hot, select "hot". If it's at room temperature or warm, select "Room temp". |
| Before starting It is possible to verify the information in the summary screen. | |
| During the program | The display shows the freeze settings and the remaining time to the end of the program. |
| CORE MODE | |
| Options | Type of food: specify the type of food to be chilled. Preparation: specify if the food on the tray is whole or in a different form (i.e.: sliced, diced, in pieces, etc.). The above settings are necessary to determine which program will produce optimal freezing. |
| Before starting It is possible to verify the information in the summary screen. | |
| During the program | The display shows the settings and the remaining time to the end of the program. |
| AT THE END OF THE PROGRAM | |
| In any deep freezing operation mode, at the end of the program the appliance beeps and displays an information message.It then switches to preservation mode which maintains the temperature of -18°C at the food core until the user intervenes. At the end of all steps a defrosting cycle is carried out. | |
Note: opening the door during deep freezing causes the introduction of warm and moist air, increasing the duration of the process. In the "Recipe" mode the duration of the program is fixed: repeatedly opening the appliance door could lead to imperfect deep freezing. Do not open the appliance door during the deep freezing program.
3.12.5 Cooling
Freshly cooked food is not at the correct temperature for serving or for further processing and therefore there is a waiting
period for natural acclimatisation. The cooling program reduces these waiting times in the kitchen.
| COOLING | |
| Options | Air temperature: select the desired temperature for cooling the food. Cycle length: select the duration of the cooling program. |

| Before starting It is possible to verify the information in the summary screen. | |
| During the program | The display shows the settings and the remaining time to the end of the program. |
| AT THE END OF THE PROGRAM | |
| The device beeps and displays an information message. No temperature preservation function is carried out to ensure the food is served correctly. | |
3.12.6 Beverages
Blast chillers are very helpful when there is not enough time to prepare beverages for drinking. This program reduces the temperature of a drink according to the available time.
Note: this appliance is not bottle cooler and does not replace the wine cellar. Excessive cooling of the bottles could lead to freezing of the liquid inside them and cause the containers to break.
| BEVERAGES | |
| Options | Number of bottles: select the number of bottles to be cooled, up to 6 bottles Cycle length: select the duration of the cycle needed to reach the desired temperature. |
| Before starting It is possible to verify the information in the summary screen. | |
| During the program | The display shows the settings and the remaining time to the end of the program. |
| AT THE END OF THE PROGRAM | |
| The device beeps and displays an information message. No temperature preservation function is carried out to ensure the food is served correctly. | |
Note: The bottle type is a 75cl "Bordeaux"; please consider that a glass container has higher insulating properties than an aluminium container, therefore it will be easier to cool a canned beverage than one in glass of the equivalent capacity.
3.12.7 0^ Preservation
Microbe growth in foods is a natural phenomenon that occurs depending on environmental conditions. Temperature is a factor that can influence reproduction and multiplication of the bacteria that cause the degradation of foods. With this program the appliance reproduces the environmental conditions of a zero degree refrigeration appliance.
the growth,
Note: this appliance is not a refrigerator. For long-term preservation, please use an appliance designed for the purpose.
| 0°C PRESERVATION | |
| Before starting It is possible to verify the information in the summary screen. | |
| During the program | The display shows the settings and the remaining time to the end of the program. |
| AT THE END OF THE PROGRAM | |
| This program maintains a constant temperature of +1-3°C inside the appliance, until the intervention of the user and for no longer that 36 hours. During this phase, the appliance automatically defrosts. | |
3.12.8 Raw fish
Incorrect storage of fishery products may cause health risks in relation to contamination by Anisakis, a parasite that can be eliminated by prolonged cooking or freezing processes. This program involves
a special freezing process lasting 24 hours at -30^
Warning! The manufacturer declines any responsibility arising from incorrect use of the appliance or violation of the applicable rules for health and safety.
| FRESH FISH | |
| Before starting It is possible to verify the information in the summary screen. | |
| During the program | The display shows the settings and the remaining time to the end of the program. |
| AT THE END OF THE PROGRAM | |
| The device beeps and displays an information message.It then switches to preservation mode which maintains the temperature of -18°C inside the appliance until the intervention of the user and for a maximum of 24 hours. During this phase, the appliance automatically defrosts. | |
3.12.9 Thawing
This cycle brings foods from freezing temperature to +2^ without loss of liquids and without starting the cooking process,
avoiding the protein processing that happens, for example, when defrosting meat in the microwave.
| AUFTAUEN | |
| Options | Type of food: specify the type of food to be chilled. Preparation: specify if the food on the tray is whole or in a different form (i.e.: sliced, diced, in pieces, etc.). Weight: select the quantity of food on the tray. |
| Before starting It is possible to verify the information in the summary screen. | |
| During the program | The display shows the settings and the remaining time to the end of the program. |
| AT THE END OF THE PROGRAM | |
| The device beeps and displays an information message. It then switches to preservation mode which maintains a temperature of +2°C inside the appliance until the intervention of the user. | |
3.12.10 Ready to serve
This program warms previously cooked food kept in the refrigerator, or foods which have been acclimatised to normal room temperature, allowing them to be served at the correct temperature.
Warning! When operating in this mode, accessible parts may become very hot: keep children away. Be careful not to touch the hot surfaces of the appliance and always use oven gloves to remove or insert accessories or heat-resistant cookware.
| READY TO SERVE | |
| Sie It is possible to choose from two warming modes: “Ready” and “Delayed”. In the “Ready” operating mode, warming immediately begins when the cycle is started. In the “Delayed” operating mode, warming takes place after a waiting period, during which the appliance preserves the food at +4°C, thus allowing you to start the program in the morning and have your food at the right temperature for lunch or dinner. | |
| READY MODE | |
| Options | Temperature: select the desired temperature of the air inside the appliance. Cycle length: select the duration of the cycle. |
| Before starting It is possible to verify the information in the summary screen. | |
| During the program | The display shows the settings and the remaining time to the end of the program. |
| DELAYED MODE | |
| Options | Temperature: select the desired temperature of the air inside the appliance. Cycle length: select the duration of the cycle. Delay: select how many minutes after the start of the program you would like the heating to start. |
| Before starting It is possiible to verify the information in the summary screen. | |
| Waiting period | The display shows the selected settings and the warming start and finish times. |
| During the program | The display shows the settings and the remaining time to the end of the program. |
| AT THE END OF THE PROGRAM | |
| The device beeps and displays an information message. If the user does not remove the tray, the appliance automatically extends the warming for a further 30 minutes, then it switches to preservation mode at +4°C until the intervention of the user. | |
3.12.11 Slow cooking
This slow cooking technique, or low temperature cooking, cooks the food evenly, preserving the cell structure and withholding more water and fats during the process that other high temperature cooking methods, thus resulting in tastier, more tender food. Depending on the recipe, slow cooking may require a greater degree of moisture. In this
case insert a baking tray of water in the appliance, below the tray with the food.
Achtung! When operating in this mode, accessible parts may become very hot: keep children away. Be careful not to touch the hot surfaces of the appliance and always use oven gloves to remove or insert accessories or heat-resistant cookware.
SLOW COOKING
It is possible to choose from two cooking modes: "Ready" and "Delayed". In the "Ready" operating mode cooking immediately begins when the cycle is started. In the "Delayed" operating mode cooking takes place after a waiting period, during which the appliance preserves the food at +4^ , thus allowing you to start the program in the morning and have your food cooked and ready for lunch or dinner time.
| READY MODE | |
| Options | Cycle length: select how long you want to cook the food for.Temperature: select the temperature you want to cook the food at. |
| Before starting It is possible to verify the information in the summary screen. | |
| During the program | The display shows the settings and the remaining time to the end of the program. |
| DELAYED MODE | |
| Options | Cycle length: select how long you want to cook the food for.Temperature: select the temperature you want to cook the food at.Delay: select how many minutes after the start of the program you would like cooking to start. |
| Before starting It is possiible to verify the information in the summary screen. | |
| Waiting period | The display shows the selected settings and the cooking start and finish times. |
| During the program | The display shows the settings and the remaining time to the end of the program. |
| AT THE END OF THE PROGRAM | |
| The device beeps and displays an information message.If the user does not remove the tray, the appliance automatically maintains the temperature for a further 30 minutes, then it switches to preservation mode at +4°C until the intervention of the user. | |
3.12.12 Raising
The raising program creates a microclimate in controlled temperature and humidity conditions to help to activate and transform the yeast. Fermentation can then take place in optimum conditions, producing the natural swelling of the dough. By programming the duration of the leavening it is possible to reduce the amount of yeast in the recipe, obtaining a lighter and more digestible
product, and at the same time favouring the desired aroma.
For an optimal raising, put the dough in an open container covered with a damp cloth before putting it in the appliance.
If a highly humid environment is desired, insert a bowl of hot water inside the appliance beside the container with the dough.
| RAISING | |
| It is possible to choose from three raising modes: “Ready”, “Preserved” and “Delayed”. In the “Ready” operating mode raising begins immediately. If you want raising to begin immediately but are not able to remove the dough once risen, keep the dough at the right temperature using the “Preserved” mode. If you want raising to start a few hours after the dough is put in the appliance, use the “Delayed” option. | |
| READY MODE | |
| Options | Temperature: select the desired temperature for the fermentation of the yeast. Raising length: select the duration of the raising. Humidity: select the degree of humidity inside the appliance. If a highly humid environment is desired, then put a bowl of water beside the container with the dough. |
| Before starting It is possible to verify the information in the summary screen. | |
| During the program | The display shows the settings and the remaining time to the end of the program. |
| PRESERVED MODE | |
| Options | End of cycle: select when to end the full cycle. Temperature: select the desired temperature for the fermentation of the yeast. Raising length: select the duration of the raising. The appliance immediately starts the raising; when the raising period is over the dough is kept at +4°C (preservation) to stop fermentation, then warmed to +15°C (reawakening). Humidity: select the degree of humidity inside the appliance. If a highly humid environment is desired, then put a bowl of water beside the container with the dough. |
| Before starting It is possible to verify the information in the summary screen. | |
| During the program | The display shows the settings and the remaining time to the end of the program. |
| DELAYED MODE | |
| Options | End of cycle: select when to end the full cycle.Temperature: select the desired temperature for the fermentation of the yeast.Raising length: select the duration of the raising. The appliance goes into standby mode during which the dough is kept at +4°C (preservation) and then at +15°C (reawakening); when the waiting period is over, raising takes place.Humidity: select the degree of humidity inside the appliance. If a highly humid environment is desired, then put a bowl of water beside the container with the dough. |
| Before starting It is possible to verify the information in the summary screen. | |
| During the program | The display shows the settings and the remaining time to the end of the program. |
| AT THE END OF THE PROGRAM | |
| Regardless of the operating mode, the device beeps and displays an information message. It then switches to preservation mode which maintains a temperature of +15°C inside the appliance until the intervention of the user. | |
Note: to guarantee the correct preservation of the dough, an intermediate preservation period at +10^ is possible. This has a maximum duration of 3 hours: after this period the appliance automatically switches to +4^ to allow optimal preservation.
4. ROUTINE MAINTENANCE
4.1 Basic Safety Rules
It is recommended to perform routine cleaning and maintenance operations safely, scrupulously observing the following rules:
- disconnect the appliance from the power supply before working on it;
- to disconnect the appliance do not pull the power cable;
-
do not touch the appliance with wet or damp hands/feet or without suitable protections (e.g. suitable gloves and shoes);
-
do not insert screwdrivers, kitchen utensils or objects between the grids and into moving parts.
During routine maintenance operations it is forbidden to disconnect or remove the safety devices: the manufacturer declines all responsibility for accidents caused by infringement of this obligation.
4.2 External surface cleaning
Body: the external stainless surfaces should be cleaned with a soft cloth or sponge and neutral detergent in the direction of the satin finishing. Av wool, scrapers or abrasive, aggressive or acidic substances which could permanently damage the stainless steel surfaces.
After cleaning, protect the external surfaces with specific oil-based products for stainless steel.
Warning! The data label contains important and useful information for the technical assistance service: do not remove it while cleaning.
Display: for easy cleaning of the glass display use specific products for g surfaces and a soft cloth.
4.3 Inner liner cleaning
Internal cleaning of the liner is necessary to ensure the hygiene and quality of processed products, so after each use it is recommended that you clean the appliance. The round shape of the internal parts and the arrangement of the liner accessories are designed for easy cleaning, to be carried out with a soft cloth or non-scratch sponge and neutral detergent.
Avoid steel wool, scrapers or abrasive, aggressive or acidic substances which could permanently damage the stainless steel surfaces. After cleaning, rinse with warm water and dry thoroughly.
4.4 Inactivity periods
If the appliance is not being used for an extended period it is advisable to unplug it from the power supply and thoroughly cleate both inside and outside following the instructions in paragraphs 4.2 and 4.3. It is also advisable to leave the door slightly open for the entire period of inactivity. On first reuse, perform the preliminary cleaning operations described in paragraph 3.2.
5. NON-SCHEDULEDMAINCEPTION
5.1 Malfunctions
glass Maintenance and/or replacement of any part of the appliance must be carried out by qualified and authorized technicians. Maintenance and/or replacement must be performed by qualified and authorized technicians for the lighting system as well.
Note: in case of any malfunction, before calling the support service, make sure the power cable is correctly plugged in and that there is power. If the malfunction persists, call the support service communicating:
- the data on the data label applied on the side of the appliance (par. 2.1, fig. 4);
the date of purchase; - any visible alarm code on the display.
Note: any attempt to change or repair the appliance will void the warranty. Rely on qualified and authorised technicians only.
5.2 Appliance disposal
INFORMATION FOR THE USERS

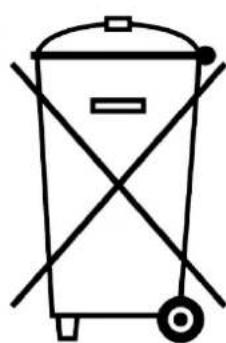
Pursuant to Directives 2011/65/EU and 2012/19/ EU regarding the reduction of hazardous substances in electrical and electronic equipment as well as waste disposal. The crossed bin symbol on the appliance or on
its packaging indicates that at the end of the product's life it must be disposed of separately from other waste.
PACKAGING DISPOSAL:
packaging components (bags, films, polystyrene) are potentially dangerous for children and animals (risk of suffocation). The packaging is made of materials that can be recycled according to the directives of the country where the equipment is to be disposed of.
6. TROUBLESHOOTING
6.1 Alarm table
| CODE | DESCRIPTION | ACTION |
| AS1 | Faulty inner liner probe | Call the Service Centre for a replacement probe |
| AS4 | Lack of data communication | Call the Service Centre for a replacement power board |
EQUIPMENT DISPOSAL:
the user must dispose of the equipment at the appropriate collection centres for electronic and electrical waste, or return it to the dealer when buying a new equivalent product.
Appropriate separate collection of parts for recycling, or environmentally friendly treatment or disposal helps to avoid possible negative effects on the environment and on health, and promotes the reuse and/or recycling of the parts themselves.
Illegal disposal of the equipment by the user entails the application of administrative sanctions provided for by law. The main materials the equipment is made up of are:
- Steel;
- Plastic;
Copper;
Aluminium; - Polyurethane.
7. TECHNICAL DATA
| Blast chilling capacity | 3 kg |
| Deep freezing capacity | 3 kg |
| Number of grills | 3 |
| Electrical power parameters | 220/240V 50Hz |
| Maximum input current | 2,5 A |
| Maximum power (cooling mode) | 300 W |
| Maximum power (heating mode) | 220 W |
| Power cable | 16A Schuko plug |
| Refrigerant | R290 |
| Climate class | SN |
| Net weight | 38 Kg |
| Gross weight | 40 Kg |
GB
7.1 Dimensions
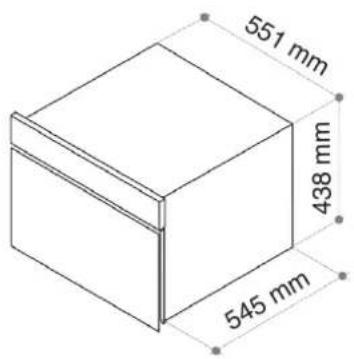
Fig.8-Built-in dimensions
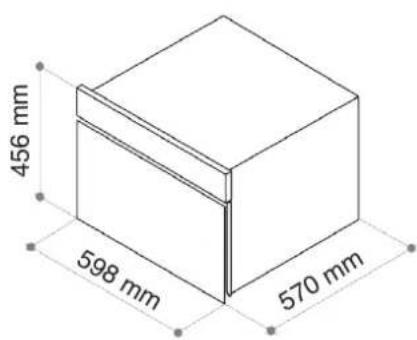
Fig.9-Overall dimensions
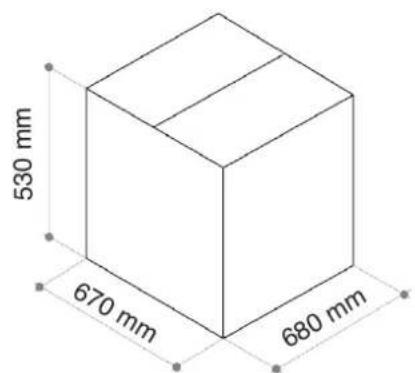
Fig.10 - Packaging dimensions
8. WIRING DIAGRAM

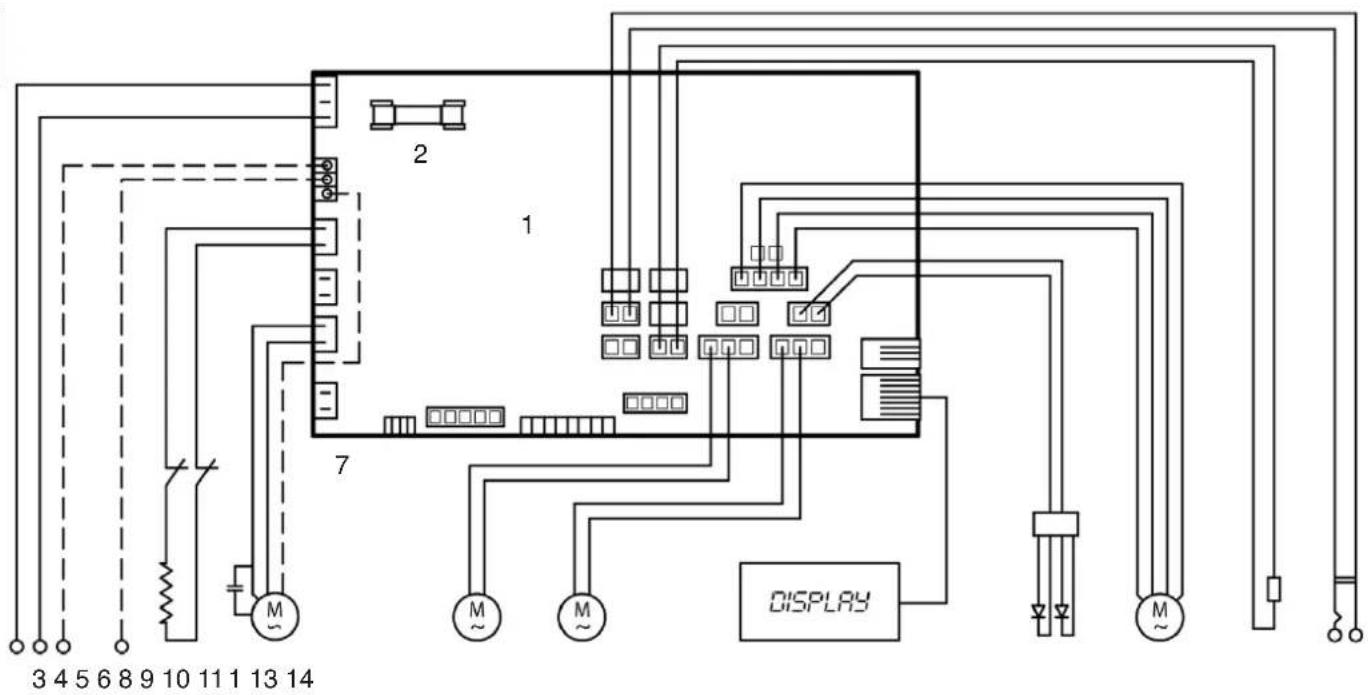
Fig.12 - Wiring diagram
| 1 Power board 8 Left condenser fan motor | |||
| 2 Fuse 9 Right condenser fan motor | |||
| 3 Plug (IEC) 10 | Display | ||
| 4 | Earth | 11 | LED |
| 5 | Heating element | 12 | Evaporator fan motor |
| 6 | Compressor | 13 Air probe | |
| 7 | Thermal cut-off | 14 | Core probe |
9. INFO
9.1 Service
9.2 Customer data
Technical support is offered by qualified faster and more efficient service can Service Centres; reference addresses for be provided if the customer promptly specific areas are given in the annex to this communicates the following purchase data: manual.
- invoice number;
- holder of the invoice;
- date of purchase;
- ID number of appliance;
GB