
FBC 345 TNF ED - Refrigerator Fulgor Milano - Free user manual and instructions
Find the device manual for free FBC 345 TNF ED Fulgor Milano in PDF.


| Product Type | Freestanding Refrigerator |
| Model | FBC 345 TNF ED |
| Brand | Fulgor Milano |
| Total Net Capacity | 345 Liters |
| Refrigerator Net Capacity | 245 Liters |
| Freezer Net Capacity | 100 Liters |
| Energy Class | E (EU 2019) |
| Annual Energy Consumption | 264 kWh |
| No Frost Technology | Yes (Freezer) |
| Climate Class | SN-ST |
| Noise Level | 42 dB |
| Height | 185 cm |
| Width | 60 cm |
| Depth | 65 cm |
| Weight | 68 kg |
| Power Supply | 220-240 V / 50 Hz |
| Refrigerant | R600a |
| Shelves | 4 Glass Shelves |
| Door Balconies | 3 |
| Crisper Drawers | 2 |
| Freezer Drawers | 3 |
| Control Type | Electronic with LED Display |
| Interior Light | LED |
| Defrosting | Automatic (Fridge), Manual (Freezer) |
| Cleaning | Clean with mild soap and water; avoid abrasive cleaners. |
| Safety | Child lock available; do not store explosive substances. |
| Spare Parts Availability | Contact authorized service centers or Fulgor Milano support. |
| Repair Index | Not assessed (EU regulation pending) |
Frequently Asked Questions - FBC 345 TNF ED Fulgor Milano
User questions about FBC 345 TNF ED Fulgor Milano
0 question about this device. Answer the ones you know or ask your own.
Ask a new question about this device
Download the instructions for your Refrigerator in PDF format for free! Find your manual FBC 345 TNF ED - Fulgor Milano and take your electronic device back in hand. On this page are published all the documents necessary for the use of your device. FBC 345 TNF ED by Fulgor Milano.
USER MANUAL FBC 345 TNF ED Fulgor Milano
natural_image
Simple geometric diagram with two vertical lines inside a larger rectangle (no text or symbols)FBC 345 TNF ED FBCD 346 TNF ED
FRIGORIFERI
FRIDGE
RÉFRIGÉRATEUR
FRIGORÍFICO
FRIGORÍFICO
IT MANUALE UTENTE
EN USER MANUAL
DE MODE D'EMPLOI
ES MANUAL DE USUARIO
PT MANUAL DE USUARIO
INDICE
PAG
natural_image
Pure geometric diagram showing two adjacent rectangles with an angle labeled 40°, no text or symbols present.FBC 345 TNF ED
FBCD 346 TNF ED
Aerazione
natural_image
Technical line drawing of a rectangular enclosure with directional arrows indicating movement or force (no text or symbols)2
natural_image
Pure mechanical assembly diagram showing a lever and pivot (no text or symbols)natural_image
Diagram showing a curved pipe or duct being inserted into a circular opening, with an arrow indicating direction (no text or symbols present)Guarnizione
Fig. 13

Fig 14


IMPORTANTE
natural_image
Line drawing of a mechanical device with supports and a bracket (no text or symbols)2
natural_image
Simple line drawing of a cabinet with an open door and a curved arrow indicating motion (no text or symbols)3
natural_image
Technical line drawing of a mechanical assembly with no visible text or symbols4
natural_image
Simple line drawing of a cabinet with a triangular structure and an arrow, no text or symbols present.5
natural_image
Line drawing of a device with arrows indicating motion or force (no text or symbols)6
natural_image
Line drawing of a monitor mounted on a stand with directional arrows indicating movement (no text or symbols)7
natural_image
Diagram showing two rectangular containers with internal compartments and a separate electrical component, no text or symbols present.natural_image
Pure technical diagram of a vertical frame with arrows indicating direction, no text or symbols present4
natural_image
Technical line drawing of a rectangular electronic component with mounting holes and a handle (no text or symbols)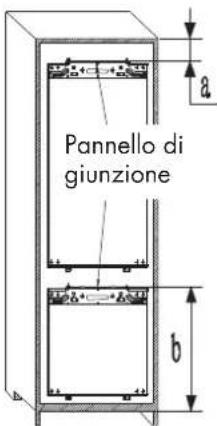
Scrapping old appliances 6
Conformity 6
Energy Saving 6
2 - Before first use 7
3 - Fridge use 8
4 - Freezer use 9
My Zone drawer humidity adjustment 9
Storage 9
5 - Control panel 10
6 - Care and cleaning 11
Defrosting 11
7 - Troubleshooting 12
8 - Installation preparation 13
Ventilation 14
Installation into the cabinet 15
Mounting the fascia door 16
Reversing the appliance door 17
Thank you for purchasing this product.
Before using your refrigerator, please carefully read this instruction manual in order to maximize its performance. Store all documentation for subsequent use or for other owners.
This product is intended solely for household use or similar applications such as:
The kitchen area for personnel in shops, offices and other working environments On farms, by clients of hotels, motels and other environments of a residential type At bed and breakfasts(B&B) For catering services and similar applications not for retail sale.
This appliance must be used only for purposes of storage of food, any other use is considered dangerous and the manufacturer will not be responsible for any omissions.
Also, it is recommended that you take note of the warranty conditions.
This guide contains many important safety information. Please, we suggest to keep these instructions in a safe place for easy reference and for a good experience with the appliance. The refrigerator contains refrigerant gas (R600a:isobutane) and insulating gas (cyclopentane), with high compatibility with the environment, that are, however, inflammable.
Caution: risk of fire

If the refrigerant circuit should be damaged:
- Avoid opening flames and sources of ignition.
• Thoroughly ventilate the room in which the appliance is situated

WARNING
- Care must be taken while cleaning/carrying the appliance to avoid touching the condenser metal wires at the back of the appliance, as you might injure your fingers and hands or damage your product.
- This appliance is not designed for stacking with any other appliance. Do not attempt to sit or stand on top of your appliance as it is not designed for such use. You could injure yourself or damage the appliance.

WARNING
• Make sure that mains cable is not caught under the appliance during and after carrying/moving the appliance, to avoid the mains cable becoming cut or damaged.
- When positioning your appliance take care not to damage your flooring, pipes, wall coverings etc. Do not move the appliance by pulling the lid or handle. Do not allow children to play with the appliance or tamper with the controls. Our company declines to accept any liability should the instructions not be followed.
- Do not install the appliance in humid, oily or dusty places, nor expose it to direct sunlight and to water.
- Do not install the appliance near heaters or inflammable materials.
- If there is a power failure do not open the lid. Frozen food should not be affected if the failure lasts for less than 10 hours. If the failure is longer, then the food should be checked and eaten immediately or cooked and then refrozen.
- If you find that the lid of the chest freezer is difficult to open just after you have closed it, don't worry. This is due to the pressure difference which will equalize and allow the lid to be opened normally after a few minutes.
- Do not connect the appliance to the electricity supply until all packing and transit protectors have been removed.

WARNING
- Leave to stand for at least 4 hours before switching on the product, to allow compressor oil to settle if transported horizontally.
- This freezer must only be used for its intended purpose (i.e. storing and freezing of edible foodstuff).
- Before performing any operation, unplug the power cord from the power socket.
- On delivery, check to make sure that the product is not damaged and that all the parts and accessories are in perfect condition.
- If in the refrigeration system a leak is noted, do not touch the wall outlet and do not use open flames. Open the window and let air into the room. Then call a service center to ask for repair.
- Do not use extension cords or adapters.
- Do not excessively pull or fold the power cord or touch the plug with wet hands.
- Do not damage the plug and/or the power cord; this could cause electrical shocks or fires.
- If the supply cord is damaged, it must be replaced by the manufacturer, its service agent or similarly qualified person in order to avoid a hazard.
- Do not place or store inflammable and highly volatile materials such as ether, petrol, LPG, propane gas, aerosol spray cans, adhesives, pure alcohol, etc. These materials may cause an explosion.

WARNING
- Do not use or store inflammable sprays, such as spray paint, near the refrigerator. It could cause an explosion or fire.
- Do not place objects and/or containers filled with water on the top of the appliance.
- We do not recommend the use of extension leads and multi-way adapters.
- Do not dispose of the appliance on a fire. Take care not to damage, the cooling circuit/pipes of the appliance in transportation and in use. In case of damage do not expose the appliance to fire, potential ignition source and immediately ventilate the room where the appliance is situated.
- The refrigeration system positioned behind and inside the refrigerator contains refrigerant. Therefore, avoid damaging the tubes.
- Do not use electrical appliances inside the food storage compartments of the appliance, unless they are of the type recommended by the manufacturer.
- Do not damage the refrigerant circuit.
- Do not use mechanical devices or other means to accelerate the defrosting process, other than those recommended by the manufacturer.
- Do not touch internal cooling elements, especially with wet hands, to avoid cracks or injuries.

WARNING
- Maintain the ventilation openings in the appliance enclosure or in the built-in structure, free of obstruction.
- Do not use pointed or sharp-edged objects such as knives or forks to remove the frost.
- Never use hairdryers, electrical heaters or other such electrical appliances for defrosting.
- Do not scrape with a knife or sharp object to remove frost or ice that occurs. With these, the refrigerant circuit can be damaged, the spill from which can cause a fire or damage your eyes.
- Absolutely avoid the use of open flame or electrical equipment, such as heaters, steam cleaners, candles, oil lamps and the like in order to speed up the defrosting phase.
- Never use water to wash the compressor position, wipe it with a dry cloth thoroughly after cleaning to prevent rust.
- It is recommended to keep the plug clean, any excessive dust residues on the plug can be the cause fire.
- The product is designed and built for domestic household use only.
- The guarantee will be void if the product is installed or used in commercial or non-residential domestic household premises.

WARNING
- The product must be correctly installed, located and operated in accordance with the instructions contained in the User Instructions Booklet provided.
- The guarantee is applicable only to new products and is not transferable if the product is resold.
- Our company disclaims any liability for incidental or consequential damages.
- The guarantee does not in any way diminish your statutory or legal rights.
- Do not perform repairs on this refrigerator. All interventions must be performed solely by qualified personnel.
- If you are discarding an old product with a lock or latch fitted to the door, ensure that it is left in a safe condition to prevent the entrapment of children.
- This appliance can be used by children aged from 8 years and above and by persons with reduced physical, sensory or mental capabilities or with a lack of experience and knowledge; provided that they have been given adequate supervision or instruction concerning how to use the appliance in a safe way and understand the hazards involved.
• Children should not play with the appliance. Cleaning and user maintenance should not be made by children without supervision.

WARNING
- Locks: If your Fridge/Freezer is fitted with a lock, to prevent children being entrapped keep the key out of reach and not in the vicinity of the appliance. If disposing of an old Fridge/Freezer break off any old locks or latches as a safeguard.
• Children aged from 3 to 8 years are allowed to load and unload this appliance.

WARNING
When positioning the appliance, ensure the supply cord is not trapped or damaged.

WARNING
Do not locate multiple portable socket-outlets or portable power supplies at the rear of the appliance. To avoid contamination of food, please respect the following instructions:
- Opening the door for long periods can cause a significant increase of the temperature in the compartments of the appliance.
- Clean regularly surfaces that can come in contact with food and accessible drainage systems.
- Store raw meat and fish in suitable containers in the refrigerator, so that it is not in contact with or drip onto other food.
- Two-star frozen-food compartments (if they are present in the appliance) are suitable for storing pre-frozen food, storing or making ice-cream and making ice cubes.

WARNING
- One-, two- and three -star compartments (if they are presented in the appliance) are not suitable for the freezing of fresh food.
- If the appliance is left empty for long periods, switch off, defrost, clean, dry and leave the door open to prevent mould developing within the appliance.

WARNING
WARNING! During using, service and disposal the appliance, please pay attention to symbol as left side, which is located on rear of appliance (rear panel or compressor). It 's risk of fire warning symbol. There are flammable materials in refrigerant pipes and compressor. Please be far away from fire source during using, service and disposal.
Scrapping old appliances


This appliance is marked according to the European directive 2012/19/EU on Waste Electrical and Electronic Equipment (WEEE).
WEEE contains both polluting substances (which can cause negative consequences for the environment) and basic components (which can be re-used). It is important to have WEEE subjected to specific treatments, in order to remove and dispose properly all pollutants, and recover and recycle all materials.
Individuals can play an important role in ensuring that WEEE does not become an environmental issue; it is essential to follow some basic rules:
- WEEE should not be treated as household waste;
- WEEE should be handed over to the relevant collection points managed by the municipality or by registered companies. In many countries, for large WEEE, home collection could be present.
In many countries, when you buy a new appliance, the old one may be returned to the retailer who has to collect it free of charge on a one-to-one basis, as long as the equipment is of equivalent type and has the same functions as the supplied equipment.
Conformity
By placing the C mark on this product, we are confirming compliance to all relevant European safety, health and environmental requirements which are applicable in legislation for this product.
Energy Saving
For better energy saving we suggest :
• Installing the appliance away from heat sources and not exposed to direct sunlight and in a well ventilated room.
- Avoid putting hot food into the refrigerator to avoid increasing the internal temperature and therefore causing continuos functionaliting of the compressor.
- Do not excessively stuff foods so as to ensure proper air circulation.
- Defrost the appliance in case there is ice to facilitate the transfer of cold.
- In case of absence of electrical energy, it is advisable to keep the refrigerator door closed.
- Open or keep the doors of the appliance open as little as possible
- Avoid adjusting the setting to temperatures too cold.
- Remove dust present on the rear of the appliance
You must allow the fridge to settle for at least four hours prior to switching the power on.
It is recommended that you clean the interior of the appliance prior to first use, using a solution of bicarbonate of soda and warm water and then thoroughly drying the interior. The fridge may have an odor to it at first use. This will disappear as the appliance cools.
Please note:
The appliance will start 5°C for fridge and -18°C for freezer and work continuously until it comes down to the correct temperature. If the appliance is switched off, you should allow five minutes before switching it on again to prevent unnecessary damage to the compressor. Never store inflammable or explosive items and strong corrosive acids or alkalis in the appliance. This fridge cools your food by making the inside back of the cavity cold. It is normal for frost to build up on this surface; it then dissipates and drains through a small drain at the bottom, where it evaporates harmlessly. The presence of frosting at the back is not a malfunction of the fridge.
EN 3 - Fridge use
• Never put liquids in the refrigerator uncovered.
- Never put hot foods in the refrigerator. Warm food should be allowed to cool to room temperature before being put into the refrigerator.
- Nothings should rest against therear wall of the refrigerator, as this will cause frost and possible condensation problems which will be difficult to remove.
- Make sure food is clean and any extra water is wiped away before putting into the fridge.
- Wrap or cover food before putting into the fridge. This will help prevent the loss of moisture, keep food fresh and avoid unpleasant odors.
- Sort foods prior to storing. Any foods to be used soon should be stored at the front of the shelf to prevent deterioration caused by the door being open for prolonged periods.
- Do not overfill the fridge. There should be sufficient space between the foods to allow the cool air to circulate.
- Thawing frozen foods in the fridge compartment will help to keep the temperature low and save energy.
- Never store raw meats on shelves above cooked meats or other produce. This will help to prevent juices from raw meat contaminating other foodstuffs.
- The freezer compartments are designed to store only frozen food.
- Never put hot or warm foods in the freezer, allow them to cool fully before putting them into the freezer.
- Follow the instructions on the food packaging for storage of frozen food. If no information is provided, foods should not be stored for more than three months after the purchase date.
- Store food in small packages (ideally less than 1kg). This reduces the freezing time and improves the quality of the food after thawing.
- Wrap food before putting into the freezer. To stop the wrapping sticking together, ensure it is dry.
- Label the food before freezing with information including type of food and dates of storage and expiry.
- Once food is thawed, it must not be refrozen. Only defrost as much food as is required to prevent wastage.
- Bottled or canned drinks should not be stored in the freezer compartments as they could explode.
- The maximum amount of fresh food that can be frozen within a 24 hour period is 2.6kg.
- Do not attempt to freeze more than the maximum amount.
My Zone drawer humidity adjustment
The temperature inside the My Zone drawer can be regulated from +3°C to -3°C. This is the ideal drawer to store meat and fish. Moreover you can regulate the humidity level:
- High humidity by keeping the adjustment slider closed (fully to the left).
- Low humidity by keeping the adjustment slider open (fully to the right).
Storage
The fridge section is for short term food storage. Although low temperatures can be maintained, extended periods of food storage is not recommended.
As the cold air circulates within the fridge, the temperature can vary between the different sections. As such, foods should be stored in different sections according to type.
Fig. 1

- Butter, cheeses etc.
- Food in jars and bottles
- Drinks, e.g. milk
- Cooked food
- Yogurts, preserves etc.
- 75cl bottles or ready meals etc.
- Fruit and vegetables
- Fresh meat and fish/fruit and vegetables
The fridge shelves can be moved according to the storage requirements within the fridge section. To move the shelf, lift up the rear section and then pull it outwards.
To replace, slide the shelf back into the slot, and then lower the rear section.
The most energy-saving configuration requires drawers, food box and shelves to be positioned in the product, please refer to the above pictures.
Fig. 3

- First time of switching on the appliance, this appliance always works at settings: 5°C for fridge, 0°C for My Zone and -18°C for freezer. If you want to adjust the temperature or functions manually, press the button to conduct the operations. Temperature ranges of adapt zone from -3°C to 3°C.
- Fridge temperature adjustment -press button on left part of control panel to achieve different temperatures from 2°C to 8°C.
- Freezer temperature adjustment -press button on right part of control panel to achieve different temperatures from -15^ to -25^ .
- My Zone drawer adjustment function: this button controls "My Zone" temperature. By pressing button, the digit will go from -3°C to +3°C. This function can be on/off by continuously pressing for three seconds (shows OFF).
- Fast cooling function -Press button, light of button illuminates and fast cooling function is turned on, fridge starts to work automatically at temperature setting 2°C and quits after 24 hours, light of symbol eliminates.
- Holiday function—Press button, light of button illumines, holiday function is turned on and whole appliance starts to work automatically at settings: fridge at 17°C and freezer at -18°C. My Zone works as previously set.
- Eco function – Press button on control panel, eco function is turned on and button illuminates, fridge compartment works at setting 5°C and freezer compartment works at setting of -18°C. The adapt zone works at setting of 0°C.
- Fast freezing function – Press button 📋, light of button illumines and freezer start to work at fast freezing function, temperature setting -25°C. After 24 hours, fast freezing function quits automatically.
-
Press button ① for 3 seconds to switch off your appliance and the button illumines, power is cut off. Internal lamps eliminate, compressor stops working. Press the button ① for 3 seconds to switch on your appliance, the symbol illumined and power is connected again.
-
On the no frost models, there is a function: compulsive defrosting. Press the buttons + 5 seconds to switch on the compulsive defrosting function to clean the freezer evaporator and digitals of freezer temperature shine. Press the button + 1 seconds to switch off the compulsive defrosting function, and the digitals of freezer temperature eliminate. 10 Fault display.
This appliance has 'fault display & alarm' function. Once the sensors got fault, there are alarms displayed on the temperature displaying, the appliance still cools but professional service engineer should be called and check the appliance.
F1 - Sensor of fridge evaporator
F2 - Sensor of adapt zone
F3 - Sensor of fridge apartment
F4this Sensor of freezer compartment
F5 - Sensor of defrosting
2E - Fault of fan/motor in freezer
CE – Communication fault between main panel and display panel.
The above Errors only show on display, no voice Over temperature alarm in freezer: after freezer temperature arrives at the set temperature, after that, if the temperature rises to >-1 °C, the alarm will start, accompany with flash of freezer temperature digit. Press any button to cancel the voice alarm. The flash will remain until the temperature is <-1 °C.
PS: Main board locates in compressor compartment
| Position Conditions | |
| 5 °C/-18 °C | Summer or ambient temperature between 25-35 °C |
| 5 °C/-18 °C | Spring, autumn or ambient temperature between 15-25 °C |
| 5 °C/-18 °C | Winter, or ambient temperature between 5-15 °C |
| Super freezing function | Quick freeze |
| Super cooling function | Super cooling |
Always disconnect the appliance from the power supply before any cleaning or maintenance.
The fridge and freezer sections should be cleaned using a solution of bicarbonate of soda and lukewarm water. Do not use abrasive products or detergents. After washing, rinse and dry thoroughly.
Clean the shelves and balconies separately by hand with a mild solution of washing up liquid and water. Do not put them in the dishwasher.
If the appliance is not to be used for prolonged periods of time, unplug and clean the appliance. The doors should be left slightly ajar to prevent the formation of mildew and unpleasant odors.
Defrosting
The product has a no frost system which is designed to prevent the heavy build up of ice. Under normal use, there should be no need to regularly defrost the freezer system.
Please note: If you are regularly finding a heavy build up of ice, or pools of water, in the freezer section then it is likely that the door is not sealing properly. This could be due to a defective door seal or an incorrectly fitted, or overly heavy, decor door.
For more information see the troubleshooting section about ice.
EN 7 - Troubleshooting
If you have any problems with your appliance, you should check the troubleshooting prior to calling Customer Care.
If the appliance is not working, check:
• That there is power to the appliance.
- The house fuses are intact and the fuse in the plug has not blown.
• The fridge has not been turned off.
- The plug socket is functioning fine. To check this, plug another electrical appliance in to see if the socket is faulty.
If the appliance is working, but not very well, check:
• The appliance is not overloaded.
• The thermostat is set to an appropriate temperature.
• The doors are closing properly.
- The cooling system at the rear of the appliance is clean and free of dust, and not touching the rear wall.
• There is enough ventilation at the side and rear walls.
If the appliance is noisy, check:
• The appliance is level and stable.
- The side and rear walls are clear, and there is nothing resting on the appliance.
- Note: The cooling gas in the refrigerator may make a slight bubbling or gurgling noise, even when the compressor is not running.
If the appliance is beeping, check:
- That the doors are closed. An alarm will sound after 60 seconds of a door being open.
If there's water in the base of the refrigerator compartment, check:
• The drain hole at the back of the compartment is clear.
If ice has formed on the back wall of the fridge:
- It is normal for some ice droplets to form on the back wall of the fridge. This does not constitute a fault with the appliance.
- Ensure that no items inside the fridge are in contact with the back wall.
- Check that there is some resistance when opening the door of the appliance. If it opens at the slightest touch it may mean that the door seal needs to be replaced.
- Check the door seal for any kinks, debris or damage. If you notice any, and are unable to resolve the issue yourself, contact Customer Care so that the seal can be replaced.
- This can be due to the decor door(s) not being properly fitted. If you are at all unsure, ask your fitter to check the décor doors.
If excessive ice has formed in the freezer:
- Check that there is some resistance when opening the door of the appliance. If it opens at the slightest touch it may
mean that the door seal needs to be replaced.
- Check the door seal for any kinks, debris or damage. If you notice any, and are unable to resolve the issue yourself, contact Customer Care so that the seal can be replaced.
- This can be due to the decor door(s) not being properly fitted. If you are at all unsure, ask your fitter to check the decor doors.
If one or more of the LED units within the appliance is not working:
- Contact Customer Care to arrange a service visit.
This appliance must never be installed close to heat sources, e.g. heating elements or cookers, nor in damp places.
Seek the help of another individual, or two, when installing this appliance. This appliance may have sharp edges. Wear adequate PPE for the task and environment.
- To ensure the appliance is level, you should use the height adjustable feet at the front of the appliance.
- The cooling system at the rear of the appliance must not touch the rear wall. The greater the gap, the better.
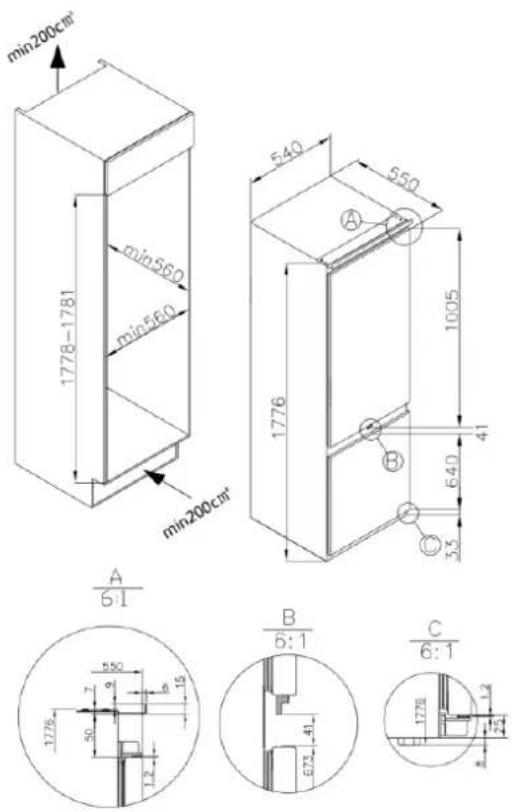
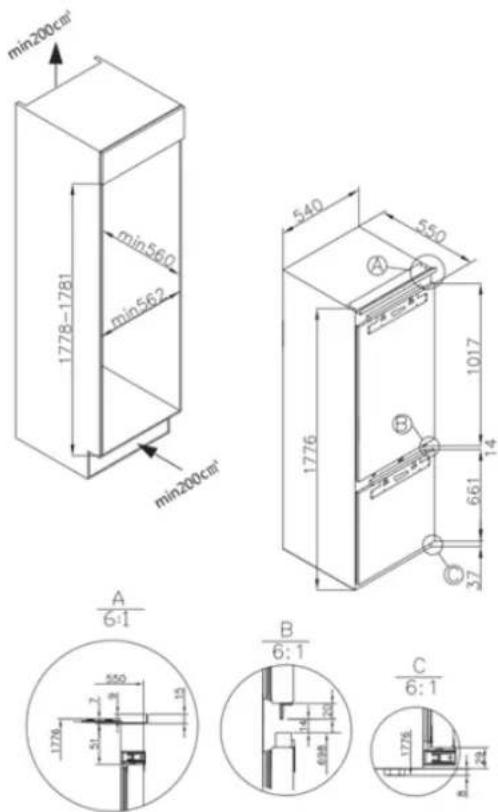
- The appliance must be installed with adequate ventilation. Ensure that there is clearance above the appliance to allow air to escape and that there is space between the rear of the appliance and the wall.
Fig. 6

FBC 345 TNF ED

FBCD 346 TNF ED
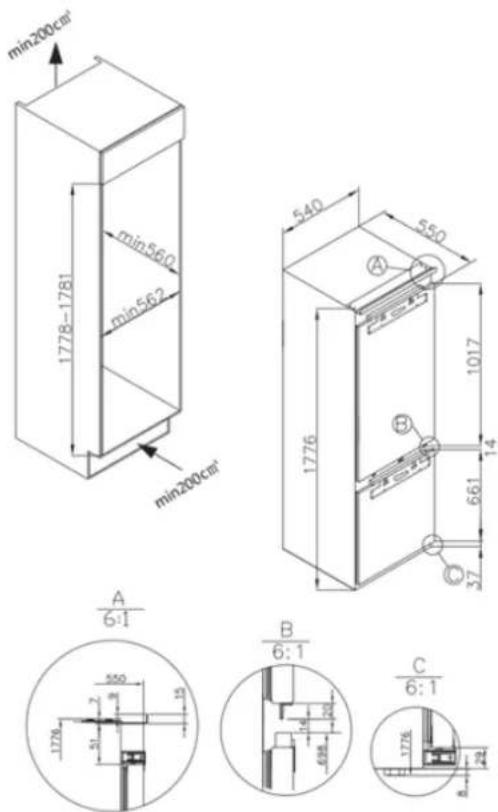
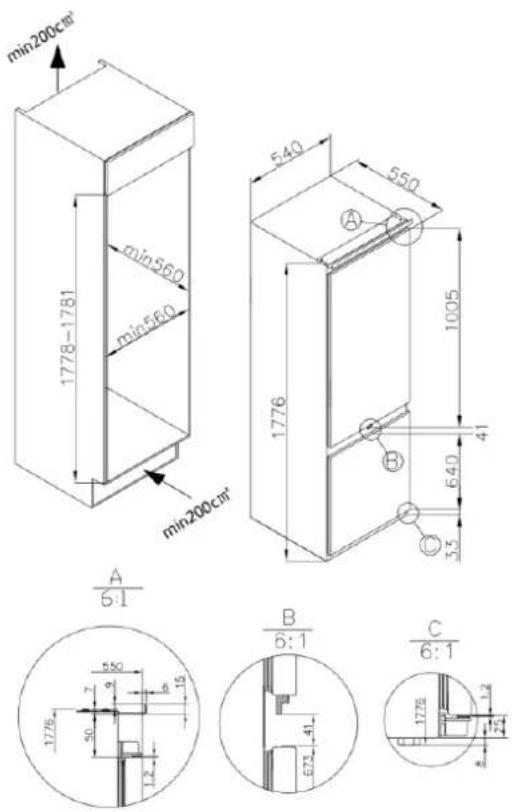
Ventilation
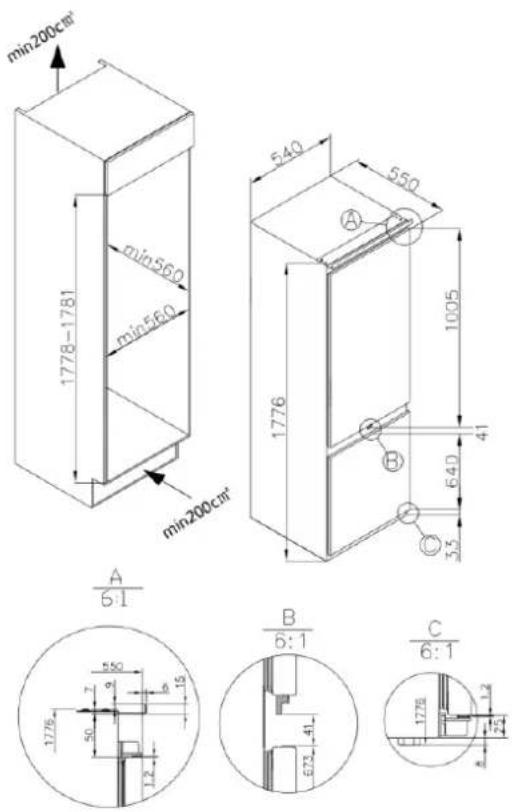
The main consideration when installing any refrigeration unit into a fitted kitchen is ventilation. The heat removed from the cooling compartment needs to be dissipated into the atmosphere. Incorrect ventilation can lead to premature compressor failure, excessive power consumption, total system failure and may invalidate the warranty provided with the appliance. For products intended to be installed into a tall housing unit, the following requirements need to be met:
Fig. 7
An air intake should be provided somewhere in the cabinet run to allow free air in. In this example, a plinth vent in shown underneath the refrigerator.
A cutout should be made in the plinth below the fridge/freezer and this finished neatly using the air vent grille.
Alternatively, a thin section on the plinth can be removed to allow air into the unit (recommended 600mm x 10mm).


natural_image
Simple rectangular frame with two vertical bars at top and bottom (no text or symbols)The top of the cabinet needs to be vented into the room.
Recommended size of vent opening: 500x30mm
If the furniture does not allow free air into the room then a plinth vent, or other means of ventilation needs to be provided to ensure a natural flow of air.
There should be space at the rear of the cabinet to allow cool air to be drawn over the condenser.
Recommended: 500x35
Plan view of rear ventilation gap
The open channel at the rear is clearly shown. For the correct operation of the appliance it is important that the top of the housing unit is not blocked off. A channel depth of 40-50mm is normal with most units.
A ventilation hole is required in the plinth of the unit; this allows air to be drawn over the compressor & heat exchange. As a rule, the more air that can get in and out, the better and more efficient the operation of the product.
Installation into the cabinet
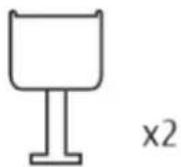
With the help of another individual, or two, move the appliance into the cabinet. There are two metal plates at the base of the appliance. Fit the supplied white spacers to these plates. Ensure that the lips of the cabinet base.
Fig. 8
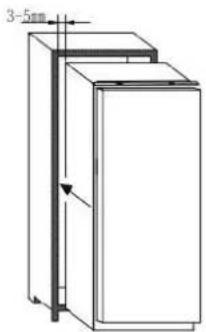
1
Insert the appliance into the column placing it on the opposite site of the hinges, and make sure 3-5mm distance gap.
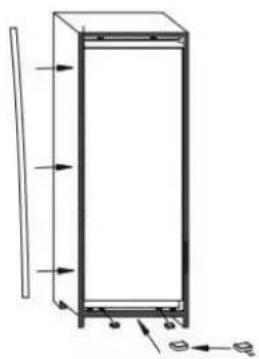
2
After ensuring the match between appliance door and column door, fix the plastic covers from accessories bag.

3
Screw the appliance lower part.

4
Fit the seal to the appliance, cut off the excessive part if necessary. Fit the bottom parts with plastic covers.
natural_image
Technical line drawing of a rectangular enclosure with internal components and directional arrows indicating movement (no text or symbols)5
Use a cross-screwdriver to loosen the connecting pin underneath the right middle hinge, and adjust to screw onto the right cabinet wall.

natural_image
Pure technical diagram of a mechanical assembly with no visible text, numbers, or symbolsMounting the fascia door
- Ensure that there is a gap of 3 to 4mm between the non-hinged side and the cabinet wall.
- Locate the slider in the bracket and fix the slider to the fascia door 20 to 22mm from the edge of the fascia as shown in following pic., ensuring that the slider is positioned centrally and horizontally within the bracket. Tighten securely by hand.
- Fill the gap on the non-hinged side with the gasket/seal strip provided.
- The finished look for the door sliders should be similar to those shown in following pic., which shows 2 sliders in place.
Ensure the appliance doors open, close and seal properly. Once complete, and if you are happy with the fit of the appliance in the cabinet, bend and snap the parts of the white spacers marked 'S' as shown by the dotted outline. Leave the rest of the spacer cover in place over the metal plates.
Fig. 11
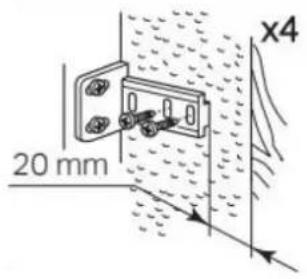
Fig. 12

natural_image
Diagram showing a curved pipe or duct assembly with an arrow indicating direction, no text or symbols presentGasket
Fig. 13

Fig 14


IMPORTANT
After completing the installation, check that the appliance is secured within the unit and that the door(s) close and open properly. If there is no resistance from the door seals when opening the doors, then it is probable that the appliance and/or decor doors are not fitted properly.
Reversing the appliance door
We recommend you seek the help of another individual to support the doors whilst performing this operation.
1
Remove the right upper hinge cover and hinge by screwdriver.

natural_image
Line drawing of a mechanical device with no visible text or symbols2
Remove the upper door.

natural_image
Simple line drawing of a cabinet with an open door and a curved arrow indicating motion (no text or symbols)3
Remove the middle hinge and its connecting pin underneath.

natural_image
Technical line drawing of a mechanical assembly with no visible text or symbols4
Remove the bottom door.
natural_image
Simple line drawing of a cabinet with a triangular structure and an arrow, no text or symbols present.5
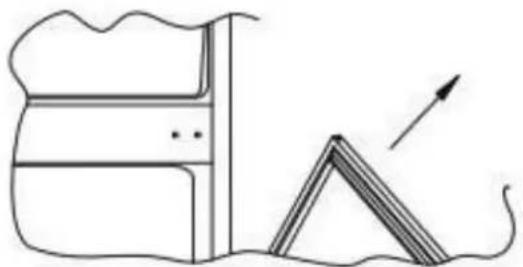
Remove the right bottom hinge and left plastic plugs, and refit them onto the opposite side.

natural_image
Line drawing of a device with arrows indicating motion or force (no text or symbols)6
Assembly the right upper hinge to the left bottom and fit the cover.

natural_image
Line drawing of a monitor mounted on a stand with directional arrows indicating motion (no text or symbols)7
Reassemble the doors and hinges workings from bottom to top, from 1-4.
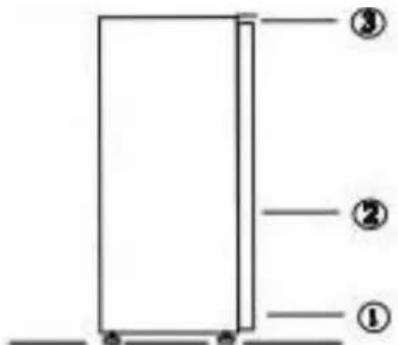
Ensuring the door seals correctly:
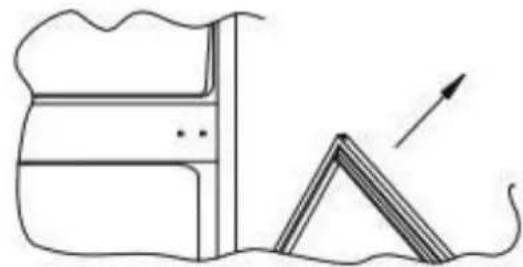
It is normal for the seal to be compressed after the door has been reversed. With the door closed, use a hair dryer to expand the seal and fill the gap between the door and the body of the appliance. Take care not to use the hair dryer too close to the appliance, which could damage the seal. A distance of approximately 10cm should be adequate. When completed, allow the seal and door to cool before touching them. Once done, the seal should remain in position.
| Tools & parts | |
 | Spacer for hinge A |
 | Spacer for hinge B |
 | Hinge cover |
 | Cross head screw3.9x12, T203.9x16, T20 |
 | Spanner |
 | Left cover forcontrol panel-spacer |
 | Right cover forcontrol panel-spacer |
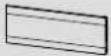
 | Decoration stripe |
1
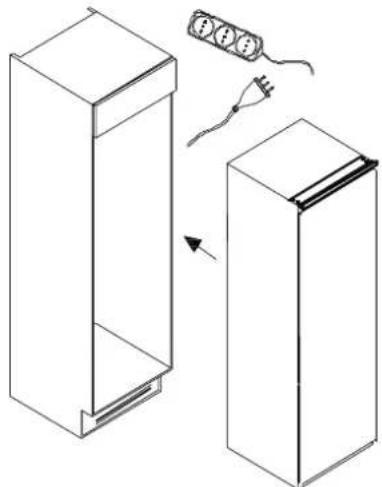
Push the appliance into the wooden furniture, the appliance should be better approach furniture left side.
natural_image
Diagram showing two rectangular containers with internal compartments and a separate electrical component, no text or symbols present.PS: The appliance must be plugged in before installation
2
Adjust the position of appliance, screw product top and bottom part on the furniture.

PS: Please remove the tail after fixing the bottom part cover.

Upper hinge cover
3
Fix the hinge on furniture by screw, attached the decoration stripe on the product left side.

PS: Fix the hinge on furniture with spacer.

natural_image
Pure technical diagram of a vertical structure with arrows indicating direction, no text or symbols present4
Measure the dimension of A and B.
Disassemble the junction panel before measuring.


5
Fix the junction panel on furniture door.
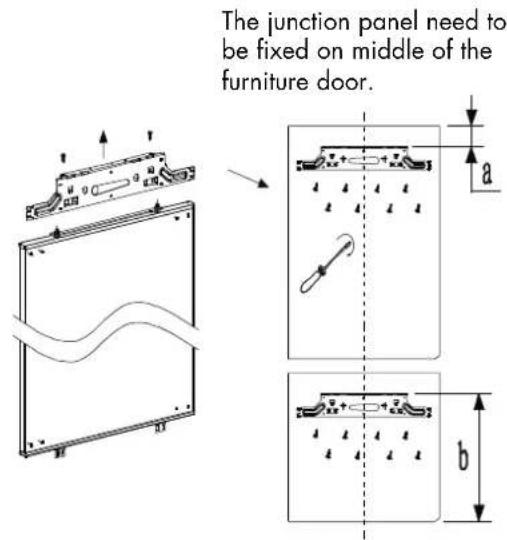
6
Fix the appliance door on furniture door.

flowchart
graph TD
    A["Fixing base"] --> B["Component 1"]
    B --> C["Component 2"]
    C --> D["Component 3"]
    D --> E["Final Packaging"]
TABLE OF CONTENTS PAGE
1 - Sicherheitsinformation 2
natural_image
Pure geometric diagram showing two adjacent rectangles with an angle labeled 40°, no text or symbols present.FBC 345 TNF ED
FBCD 346 TNF ED

Belüftung
natural_image
Technical line drawing of a rectangular enclosure with internal components and directional arrows indicating movement (no text or symbols)2
natural_image
Pure technical diagram of a mechanical assembly without any text, numbers, or symbols
WICHTIG
natural_image
Line drawing of a mechanical device with a handle and lever (no text or symbols)2
natural_image
Simple line drawing of a cabinet with an open door and a triangular support structure (no text or symbols)3
natural_image
Technical line drawing of a mechanical assembly with no visible text or symbols4
natural_image
Simple line drawing of a roof structure and a triangular structure with an arrow, no text or symbols present.5
natural_image
Line drawing of a computer monitor with base, legs, and control buttons (no text or symbols)6
natural_image
Line drawing of a monitor mounted on a stand with directional arrows indicating motion (no text or symbols)7
natural_image
Diagram showing two rectangular storage units with internal compartments and a cable being inserted (no text or symbols)PS: Please remove the tail after fixing the bottom part cover.
Upper hinge cover
3
natural_image
Diagram of a refrigerator interior showing a door, front panel, and internal compartments with a window and hanging items (no text or symbols)
natural_image
Pure technical diagram of a vertical structural frame with arrows indicating direction (no text or symbols)natural_image
Technical line drawing of a rectangular frame with mounting brackets and a handle, no text or symbols present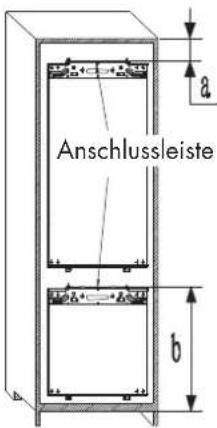
flowchart
graph TD
    A["Assembly Setup"] --> B["Montageplatte"]
    B --> C["Assembly Details"]
    C --> D["Final Packaging"]
TABLE OF CONTENTS PAGE
natural_image
Technical line drawing of a rectangular enclosure with internal components and directional arrows indicating movement (no text or symbols)2
natural_image
Pure technical diagram of a mechanical assembly with no visible text, numbers, or symbolsnatural_image
Line drawing of a mechanical device with no visible text or symbols2
natural_image
Line drawing of a cabinet with an open door and a triangular support structure (no text or symbols)3
natural_image
Technical line drawing of a mechanical assembly with no visible text or symbols4
natural_image
Simple line drawing of a roof structure and a triangular roof with an arrow indicating direction (no text or symbols)5
natural_image
Line drawing of a computer monitor with directional arrows indicating sound or sound flow (no text or symbols)6
natural_image
Line drawing of a monitor mounted on a stand with directional arrows indicating motion (no text or symbols)7
natural_image
Diagram showing two rectangular storage units with internal compartments and a cable being inserted (no text or symbols)natural_image
Pure technical diagram of a vertical frame with arrows indicating direction, no text or symbols present4
natural_image
Technical line drawing of a rectangular electronic device with mounting brackets and a handle (no text or symbols)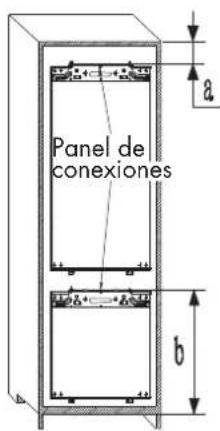
5
natural_image
Pure geometric diagram showing two tilted rectangles with an angle labeled 40°, no text or symbols present.FBC 345 TNF ED
FBCD 346 TNF ED

Ventilação
natural_image
Technical line drawing of a rectangular enclosure with internal components and directional arrows indicating movement (no text or symbols)5
natural_image
Pure mechanical assembly diagram showing a lever and pivot (no text or symbols)natural_image
Line drawing of a mechanical device with no visible text or symbols2
Remova a porta superior.

natural_image
Line drawing of a cabinet with an open door and a curved arrow indicating motion (no text or symbols)3
natural_image
Technical line drawing of a mechanical assembly with no visible text or symbols4
Remova a porta inferior.
natural_image
Simple line drawing of a roof structure and a triangular roof with an arrow indicating direction (no text or symbols)5
natural_image
Line drawing of a computer monitor with directional arrows indicating sound or sound movement (no text or symbols)6
natural_image
Line drawing of a monitor mounted on a stand with directional arrows indicating motion (no text or symbols)7
natural_image
Diagram showing two 3D rectangular containers with a cable and plug, one open and one closed, connected by an arrow (no text or symbols)natural_image
Diagram of a refrigerator interior showing a door, front panel, and internal compartments with a directional arrow indicating movement (no text or symbols present)natural_image
Diagram of a vertical shelf or cabinet with directional arrows indicating movement (no text or symbols)4
natural_image
Technical line drawing of a rectangular electronic component with mounting holes and a handle (no text or symbols)


- INDICE
- PAG
- Aerazione
- 2
- IMPORTANTE
- 4
- - Before first use 7
- - Fridge use 8
- - Freezer use 9
- - Control panel 10
- - Care and cleaning 11
- - Troubleshooting 12
- - Installation preparation 13
- WARNING
- Scrapping old appliances
- Conformity
- Energy Saving
- Please note:
- EN 3 - Fridge use
- My Zone drawer humidity adjustment
- Storage
- Defrosting
- EN 7 - Troubleshooting
- If the appliance is not working, check:
- If the appliance is working, but not very well, check:
- If the appliance is noisy, check:
- If the appliance is beeping, check:
- If there's water in the base of the refrigerator compartment, check:
- If ice has formed on the back wall of the fridge:
- If excessive ice has formed in the freezer:
- If one or more of the LED units within the appliance is not working:
- Ventilation
- Installation into the cabinet
- 1
- 3
- 5
- Mounting the fascia door
- IMPORTANT
- Reversing the appliance door
- Ensuring the door seals correctly:
- 6
- TABLE OF CONTENTS PAGE
- - Sicherheitsinformation 2
- Belüftung
- WICHTIG
- Ventilação
- 7
Brand : Fulgor Milano
Model : FBC 345 TNF ED
Category : Refrigerator