
SM 3593 - Blender CLATRONIC - Free user manual and instructions
Find the device manual for free SM 3593 CLATRONIC in PDF.
| Product type | Blender |
| Brand | Clatronic |
| Model | SM 3593 |
| Power supply | 220-240 V ~ 50 Hz |
| Power | 250 W |
| Maximum capacity | 600 ml |
| Net weight | Approx. 1.025 kg |
| Protection class | II (double insulation) |
| Bowl material | Plastic (tritan or similar) |
| Blades | Stainless steel, removable |
| Functions | Blending, ice crushing, smoothies, cold soups |
| Control type | Push button (momentary operation) |
| Safety | Safety switch preventing operation if the jar or blade unit is not properly attached |
| Maximum operating time | 30 seconds continuously, then 1 minute cool down |
| Included accessories | Lid, bottle (jar), blade unit, motor base |
| Cleaning | Jar, lid and blades by hand with warm water; base wiped with a damp cloth |
| Maximum temperature of liquid ingredients | 50 °C |
| Usage | Household use only |
| Warranty | 2 years (according to legislation) |
Frequently Asked Questions - SM 3593 CLATRONIC
User questions about SM 3593 CLATRONIC
0 question about this device. Answer the ones you know or ask your own.
Ask a new question about this device
Download the instructions for your Blender in PDF format for free! Find your manual SM 3593 - CLATRONIC and take your electronic device back in hand. On this page are published all the documents necessary for the use of your device. SM 3593 by CLATRONIC.
USER MANUAL SM 3593 CLATRONIC
Thank you for choosing our product. We hope you will enjoy using the appliance.
Symbols in these Instructions for Use
Important information for your safety is specially marked. It is essential to comply with these instructions in order to avoid accidents and prevent damage to the machine:
WARNING:
This warns you of dangers to your health and indicates possible injury risks.
CAUTION:
This refers to possible hazards to the machine or other objects.
iNOTE:
This highlights tips and information.
General Notes
Read the operating instructions carefully before putting the appliance into operation and keep the instructions including the
warranty, the receipt and, if possible, the box with the internal packing. If you give this device to other people, please also pass on the operating instructions.
- The appliance is designed exclusively for private use and for the envisaged purpose. This appliance is not fit for commercial use.
- Do not use it outdoors. Keep it away from sources of heat, direct sunlight, humidity (never dip it into any liquid) and sharp edges. Do not use the appliance with wet hands. If the appliance is humid or wet, unplug it immediately.
- The device and the mains lead have to be checked regularly for signs of damage. If damage is found the device must not be used.
- Use only original spare parts.
- In order to ensure your children's safety, please keep all packaging (plastic bags, boxes, polystyrene etc.) out of their reach.
WARNING!
Don't let small children play with foils for danger of suffocation!
Special safety instructions for the appliance
WARNING:
- Risk of cuts! The mixer blades are sharp!
- Before replacement of accessories or additional parts which move during operation, the device must be switched off and cut off from the mains.
- Do not touch moving parts.
- Always check that the accessories are seated solidly and securely before switching the device on.
- Always disconnect the appliance from the supply if it is left unattended and before assembling, disassembling or cleaning.
- Do not repair the device by yourself. Please contact authorized personnel. In order to avoid hazards, a damaged mains cable must be replaced with an equivalent cable by the manufacturer, our customer service or any other qualified specialist.

WARNING:
- This appliance shall not be used by children.
- Keep the appliance and its cord out of reach of children.
Children shall not play with the appliance. - Appliances can be used by persons with reduced physical, sensory or mental capabilities or lack of experience and knowledge if they have been given supervision or instruction concerning use of the appliance in a safe way and if they understand the hazards involved.
- This device must not be immersed in water for cleaning. Please follow the instructions provided in chapter "Cleaning".
- Do not use the appliance if the mixing vessel is empty.
- Do not operate the appliance for more than 30 seconds. Then allow it to cool for approx. 1 minute before using it again.
- After 5 uses in a row, let the unit to cool to room temperature before you use it again.
- The machine should only be used under supervision.
- Do not manipulate any of the safety switches!
- Do not remove the bottle during operation.
- Do not put your hands into the mixing blades.
Unpacking the appliance
- Remove the device from its packaging.
- Remove all packaging materials like foils, filling materials, cable holders, and carton packaging.
- Check the scope of deliveries for completeness.

TE:
There may still be dust or production remains on the device. We recommend that you clean the device as described under "Cleaning".
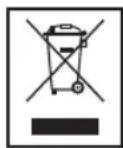
Overview of the Components
1 Lid
2 Bottle
3 Knife block
4 Base section with motor
Application
Follow our text and the pictures on page 3 and see how a smoothie can be made quickly from fresh ingredients.
Location
Set the appliance onto a solid, level surface.
Preparation of the appliance
- Fill your ingredients into the bottle and tighten the knife block by hand (Fig. A).
- Tum the bottle round and place it with the knife block onto the base unit. Note the markings on the appliance (Fig. B).
iNOTE:
- Because of the risk of burning, do not fill with liquids at a temperature of above 50^ .
NOTE:
- Do not fill the bottle above the 600ml mark.
- If the ingredients produce a lot of froth, do not overfill the bottle. Reduce the quantity accordingly.
Electrical Connection
- Check that the mains voltage is correct before you connect the plug to the socket. The specifications of the appliance are shown on the type label.
- Only connect the appliance to a tested socket.
Operation
Did you connect the plug? Next, press the button PUSH.
- You can press intermittently or until all ingredients have been mixed.

TE: Short-time operation
Let the motor run no longer than 30 seconds and then pause for 1 minute.

TE: Safety switch
Operation is prevented if the knife block or the bottle is not fitted correctly.
End of operation
Has your smoothie been mixed well?
- Then release the PUSH button and pull the plug from the socket.
- Remove the knife block with the bottle from the base unit and turn the bottle round.
- Now replace the knife block through the lid (Fig. C).
Tips and Recipes
- Cut large fruits in advance into smaller pieces.
- Use plenty of liquid to support the mixing process.
- The smoothie maker cannot crush hard fruits or ice.
Glasses Ingredients Preparation
| 4 Raspberry cream smoothie 200 g raspberries 150 g skimmed milk yogurt 100 g whipped cream 50 g powdered sugar | Mix the raspberries and the yogurt in the smoothie maker. Stir in the liquid cream. Season with powdered sugar and pour into glasses. Decorate with fresh raspberries. |

Asses Ingredients Preparation
4 Strawberry
mango smoothie
1 ripe mango
300 g strawberries
2 tbs. mango syrup
2 tbs. cranberry full-fruit syrup
200 ml soy drink calcium with vanilla
Peel the mango and cut off the pulp along the seed.
Weigh 250g of pulp. Rinse the strawberries thoroughly and dab them dry.
Put 4 strawberries and the remaining mango aside. Cut the remaining strawberries and the weighed mango into small pieces. Mix the fruits, both syrups, and the soy drink in the smoothie maker. Cut the remaining mango into small cubes, stir them in, and freeze in the freezer for at least 2 hours.
Fill the drink into glasses and decorate with strawberries.

Orange carrot smoothie
300 g carrots
-salt
4 juice oranges
1 pc. fresh ginger
(3cm)
1 pinch of red pepper
2 lbs. maple syrup
1 bunch coriander
1 lime
1 Tbs. rape seed oil
- freshly ground pepper
-lime slices for decoration
Peel the carrots and cook them in a little salt water for approx. 30 minutes. Then drain them and let them cool
Squeeze the orange and measure 250 ml juice. Peel the ginger and grate it.
Mix carrots, orange juice, ginger, red pepper, and maple syrup together in the Smoothie Maker and cool the mixture well.
Rinse the coriander, shake it dry, and pull off the leaves.
Squeeze the lime. Stir in the coriander, 1 to 2 tbs. lime juice, and oil. Pour the carrot mixture into glasses and add a little coriander. Season with salt and pepper and serve.
If desired, decorate with a slice of lime.
| Glasses Ingredients Preparation | |
| 4 Apple kiwi smoothie 1 pc. (approx. 40 g) fresh ginger 4 kiwi fruit 150 g salad cucum- ber 2 granny smith apples 5 to 6 leaves of mint 250 ml clear apple juice Crushed ice | Peel the ginger and grate it. Peel the kiwi fruit and cut them into pieces. Peel the cucumber and the apples, remove the seeds, and cut into small pieces. Wash the mint and dab it dry. Mix in the smoothie maker together with the apple juice. Together with the crushed ice, pour into four glasses and serve immediately. |
Do you also have recipes for soups, mixed drinks, shakes, or cocktails?
They can also be mixed easily in the smoothie maker.
Cleaning

WARNING:
- Always remove the plug before cleaning.
- Under no circumstances should you immerse the device in water for cleaning purposes. Otherwise this might result in an electric shock or fire.
- The blades on the knife block are very sharp. A risk of injury exists!

CAUTION:
- Do not use a wire brush or any abrasive items.
- Do not use any acidic or abrasive detergents.
Lid, bottle, knife block
- Clean these parts by hand in a bowl of hot water.
- Dry the parts before fitting them.
Housing
Only a moderately moist cloth should be used for cleaning the outside of the device.
Troubleshooting
Device is not working.
Remedy:
Check the mains connection.
Other possible causes:
The device is fitted with a safety switch.
This prevents the motor from starting up unintentionally.
Remedy:
Check for correct fitment of knife block and bottle.
Noise development
The sound pressure level in the ear of an operator (LpA) was measured according to DIN EN ISO 3744.
Sound pressure level detected: 81 dB(A) (no limit)
Technical Data
Model: SM 3593
Power supply: 220 - 240 V~50 Hz
Power rating: 250 W
Protection class: II
Capacity: max. 600 ml
Net weight: approx. 1.025 kg
The right to make technical and design modifications in the course of continuous product development remains reserved.
This device has been tested according to all relevant current CE guidelines, such as electromagnetic compatibility and low voltage directives, and has been constructed in accordance with the latest safety regulations.
Disposal
Meaning of the "Dustbin" Symbol
Protect our environment: do not dispose of electrical equipment in the domestic waste.
Please return any electrical equipment that you will no longer use to the collection points provided for their disposal.
This helps avoid the potential effects of incorrect disposal on the environment and human health.
This will contribute to the recycling and other forms of reutilisation of electrical and electronic equipment.
Information concerning where the equipment can be disposed of can be obtained from your local authority.
Instrukcja obstugi
I PIPIMITKA.3ano6ixhN BUMKau
Y pa3i HENpABINbHOrO BCTaHOBJIeHHa 6NOKy HOXIB Yauuip o60Ta HEMOXJIINA.
Kieheeknnyatauui
Yi do6pe 3amuihao cmy3i?
ToDi BiDnycTtB KhoNky PUSH Ta BnIMtB BNkny 3 p03ETK.
3HimItb 3 roIOBHorO 6nok 6Iok HOKIB i3 Yaueio Ta nepeBepHITb yawy DOROpn dHOM.
3HimItb 6nok HOXiB uepe3 KpuuK (pnc.C).
Iopadn Ta peeentn
Belenki fpyktn cnid 3a3daneirnb po3pi3aHn HebeNiki IIMaTOUKN.
- 106 noJenHHTn npocec 3miUyBaHH, npOBbTe NOro B BeNk kJIbKcOti piHN.
- 5nep nIy Cmy3i HnpuaTHn IIN noDpi6HeHH TBePdx pkyTIB Ta IbOy.
EMHicTb: .MAKc.600Mn
Bara HeTTo: npn6n. 1,025 Kr
IpaBOHaTexHHi3MiHN Ta 3MiHN y dN3aHi 36epiraTbcra npoobK npocecy po3pO6kn npOdykTy.
LcI npnad 6yNo nepeBipeHO 3riDHO BCix BiNObiHNx, AKTyaNbHnx DnpeKtNB CE, HapnKnad 0oDo eNeKTpOMarHiTHoi CymiOCTa Hn3bKOBoNTHoI DnpeKtNB, Ta 36yDobAo 3 a HOBITIM NOJNOEHHM INTEXHk 6e3neKn.
PykoBoDCTBO no 3KcnnyatauH
Cnacnbo 3a BbI6op Hauero npOyKta. Hadeemc, OH Bam noHpabNTc.
CnMBONJI npIMeHReMbIe B DaHHOM pyKOBOdCTBe NOJIb-3OBaTeJRA
BaxhIe peKOMHeDauHn DnI O6ecneueHnBaue 6eOnac-HocTn 063NaHeHb IIO OC6eHHOMy. O63aTeJIbHO CNeYHTe 3TNM peKOMHeDauHm, YTO6bl PpeOTbpaTb HecactHbI CNyHa NIN NIOJOMKy N3DeJIIN:

PENyIPEXXDEHNE:
IpeDynpexJaet o6 onaChOCTn IJRA 3dOpOBbI N BO3MOXHOM pncke POnyEnHr TpaBMbl.

BHIMAHNE:
Yka3bIbaet Ha BO3MOKHyIO ONaCHOCTb IINI INDJIENI IN dpyTNX OKpyKaIOUHX INpeDMETOB.

IPIMEYAHNA:
JaetcoBtBuNHOpMaHIO.
067aHnDopmaia
Ipeed nauJOM 3KcNpyatauyn npBopa BnHMaTeJIbHO npOuHTaIe TnpNarraemyIO HCTpyKUIO NO 3KcNpyatauyn COxpa
HHTe ee B HadeKHom MecTe, BMeCTe C rapaHTnHbIM TaIOHOM, KaccOBbIM YekOM N, NO BO3MOXHOCTN, KAPTOHHO KoPO6KOc CynAKOBoCHbIM MaTePnaIOM. Ecn daTe KOmyIn6o NOnONb3oBaTbc np6Opom, O8ra3aTeBHo DaIte BnpuDauy DaHHUo INCTpyKuIO IO 3KcPiIyatauIN.
Пльзутесь пибором тольк частным образим и понасанецю. Ппбор не прднэанеон дя кOMМерчECKOTO ИСПЛьзOBAHЯ.
He noIb3yInTeB np6Opom nOJ OTKpbITbIM He6OM. PpeOxpanrAte np6Op 0X Kapbl, pPmblxCnHeuHbIX Lyuei, BnaXHOCTN (Hn B KOem Cnyuae He nOgpyKaIe ero B BoUy) uYapOB 06 ocTpIe yrlbl. He npKacaiTeC k np6Opy BnaXHBIM pykam. Ecnn np6Op yBaXHNICr IIN HAMOK, TyT Xe BblHe TBe BNk Ky nO3eTKn.
- Pn6bop n Ka6eBcTeBOro nIaTHnH Heo6xoDmOp peryIaRPHO 06CneIOBaTb Ha HauNue CneIOB NOBpeXKeHnI. Pn O6hApUkeHn IOBpeXDeHn IOnb3OBAtbcra Pn6bOpom 3aIpeuqEETcR.
- IcnoJb3yIte ToJIbKO opIMHaJIbHbIe 3aIyactN.
- PtojnyiCTa, co6JIIOdaIte HnkeCJeIyIOUe "CneuIbHbIe yka3aHnI IO TexNIke 6eONaCHOCTN".

PENEYNPEXKDEHNE!
He no3BOJnIe TeTm INpTaB c nOIN3TNHeHOBo IneHko. Onachocb ydyuBa!
CneuaHbIe yka3aHnI IO TexHnke 6e3OpaCHocTn npi POnb3OBaHn 3Tm npu6Opom

ПЕДУПЕЖДЕНЕ:
- Onachoctb nope3OB! Ie3BnA MmKcepa ouehb ocTpbie!
- Перацламену ппнадлжноши ДОПОЛНТьны DeTaJIeN, KOTOPbIe DBIXyTcR BO BpeMpa6Otbl, Heo6XODIMOBbIKJIOuHTb yCTpoIcTBO N OTKJIIOUHTb erO OT 3JIeKTPOcETn.
He kacaitecboNDBnKhbIX DeTaJe. - Bcerda npOBepaIe npabINbHocTb yCTaHOBKn npHaJIeXHOCTei HaJeXHocTb KpeJIeHn IpeD BKJIoueHHeM yCTPOJCTBa.
Bcerda otknjuayte yctpoicTBO n3 cetn, korga C Hm HNKTO He pa6oTaET, a TaKxe nepei hauanom pa36opKn, c6opKn uHCTKN.
I P E D U N P E X D E H N E:
He nbitatec b cmoctoTeIbHO OTPeMOHTnpOBaTb yCTPOICTBO. O6paTntecb KaBtOpN3OBAHHomy npopeccnHaNy. Bo n36exaHne OnaCHOCTM MeHrTb NOBpeXdEHHb KaBeIb Ha aHaJIoNHybIdoJIkeH IpON3BOIDTeIb, Haa KJIneHTCKa CnyX6a IIIN JIO6oI pyroK BAlNiΦuCnPoBAHbI CneuaJIInCT.
-ДетямЗапецаETСЯПЛБ3OBaTBСАнHBIM yCTpoIcTBOM.
XpaHnTe yCTpOcTBo n shHyp noaJIbIe OT deTei.
-
3anpezaetcndetramnirpaTbCdaHHbIMyCTpOYCTBOM.
-
UcTpoIcTBa MOryt 6bITb NcNoJIb3OBAHbI JIOdBMN C OrpaHnueHbIMN cIN3NueCKIMN yMCTBeHHbIMN cNOcO6HOCTaMn, a TaKKe He IMeIoUe ONbITa pa6OTbI, TOJIbKO IOD IprNCmOTpOM nII NIOcJIe IOJyEHNr HNcTpykTaXa No 6e3OnacHoy 3KcNpyaTuINyCTPOIcTBa, eCIn 3TN JIOdN OCO3HaOT BCE pNCKN, CBraHHbIe C DaHHbIM np6Opom.
Bo Bpemy uNCTKn 3aIpeuaeTcR noRpykaTb npnbop B Body. Prc6b6a co6JIoDaTb nHcTpyKcU, KOTOpBie npNBODrTcR B pa3deJe "UncTkA".
He nCnoJIb3yIte yCTpoIcTBO,ecnMnKcePbI 6okaI Hnyem He 3aNoJIHeH.
He depknte yctpoCTBO BKIOueHHbIM 60one 12 MNHyT. Nocne 3TOrO daIte emy OCTbITb B TeueHne, npIMepHO, 1 MNHyT, UTO6bI NCIOJIb3OBaTB erO CHOBA.
- После 5 IncnoIb3OBaHn IOdprd, daiTe yCTpoiCTy OCTbITb Do KOMHaTHOH TemnepaTpybl NepeD Tem, KaK IncnoIb3OBaTb erO CHOBA.
- YcTpoIcTBo DoJIxHOb pa6OtaTb TOnbKO IOd npNCMOTpOM.
He MaHnPyIpyTe BbIKIOUaTeJMaM6e3OpaCHOTn!
He chimaTe KoI6y Bo BpeMa pa6Otbl annapata.
He BCTabTnIe pyKn B CMEcNTeHbIe IOnaCTn.
Pacnakobka yctpoicTBA
1.ИЗВЕКИТЕУСТЮСТВОИЗEROУПАКOBКИ.
2. YdaJIte BCE yIaNKOBOHbIe MaTePnJIbI, TakiE KAK NOnIH-TUNHeOBaII NeHka, MaTePnAI HAnOJIHNTeJIa, Ka6JIbHbIe CTJKKN KOpO6Kn.
3. Y6eIInTeCb, UTO B KOpO6Ke eCtB BeCb KOMPJIeKTI NOCTABKN.
ПРИМЕЧАнЯ:
Ha yctpoiCTBe BCE eue MOrY OCTaBaTbCRA MeKnKe YacTnCbI n PbInB, OCTaBUnIEcR NocE PPOIN3BOIDCTBEHHO IPOUeCCA. PeKOMeHNyETcR NOuCtNTb YcTPOIcTB, KAK OINCAHO B pa3dene "UncTkA".
063op DeTaeN np6opa
1 Kpbliuka
2 Kon6a
3 HoKeBaRa roJIOBka
4 Ba3a C D BnraTeJIeM
IcnoJb30BaHne
CneyuTe peKomeHdaqnarm TeKCTa nIINIOCTpaun Ha cTp.3, yTOb6bICTPO pNIROTOBNTcMcy3N N3 CBEXNX INHrpeJeHTOB.
YCTaHOBka
YcTaHOBIne annapaT ha TBepdyIO POBYIO NOBepxHocTB.
IodroTOBka annapaTa
- 3arpy3NTe INHpeJeNHTbI B KOJI6y N 3aTHeNTE pyKaMn HOKeBvOpaMy (ΦIr.A).
2.ПepeBepHnTe KOn6y n yCtahOBnTe ee HOKeBo pAmoB B OCHOBaHne annapata.ObpaauTe BHMmaHne Ha MapKnpoBky Ha annapate (ΦnR.B).
I PIMMEUAHNIA:
- 13-3a pUCKa OXOROB He 3aJIbAaTe KInKoCTn npI TempePaTy BbIe 50^
- He 3aONHЯ Te KOn6y BbIe OTMeTKn 600 Mn.
Ecnn INHrpEnHeTbI daOT MHOro neHbI, He nepenOnHnTe KOJ6y. N3MeHnTE KOINcHcTB COOTBcTCTBeHHO.
3NeKtpnueckoe noKnIouHeHne
IpepeMaTe MaHnHy n Horypt B annapate DnT npiroTOBNeHn Cmy3n.
3aemeWaaTe KJdkme cInBkn.
3anpaBte caxapno npdpoi npaaane ITO CTAKAHM.
Cenai Te ykpaueHne n3 CBexnX rOi MaJIINbI.
3Jektpnueeckoe noKnIOHeHne
biil 1 aoc pcl jlll j0s yos po
j 2
Lai yaiyaiyaiyaiyaiyaiyaiyaiyaiyaiyaiyaiyaiyaiyaiyaiyaiyaiyaiyaiyaiyaiyaiyaiyaiyaiyaiyaiyaiyaiyaiyaiyaiyaiyaiyaiyaiyaiyaiyaiyaiyaiyaiyaiyaiyaiyaiyaiyaiyaiyai
y laia 1 aal jell g wll paa Jgll 12
J 1
jL 1, a, j, j, j, j, j, j, j, j, j, j, j, j, j, j, j, j, j, j, j, j
jell jy jll jll jil jil jil jil
iL
j 1
aaiuui jaiil aaii
(1)
Jsluie jie 120 (la g jg jy jil gll g jy jil all y
m = 311
y
Lalal
jglal piauui jai liia i jiai ie
psssscls jga
Iie Ilaal laaiaeall cialgai all oiae lclde gian p
jglalali glallgao
A^ = =
a
a 2
a_1 = 2
jglll jn jydi aiaa jblg 2g jgjj
S2 = | S_1| = | S|
:abla
Cilgeall gillail 0gail jolll
jgljll iigaiiaaii aaiii
:
1
J 1
a5jai1c1j21waiy
J 1
Jg 1
- 与 k 倾 g( x) = h^ ( x) f( x)
aill lll aol g iisill aeg abw y Jil 5 jll
Jg
Jabj Jn jgall 1y
JbI Jgljooe jybjgjjgjj
jglly Jlsl
1
1
一
一
1
1
一
一
1
1
一
一
GARANTIEKARTE
warranty card · garantiekaart · carte de garantie · scheda di garanzia · tarjeta de garantia · cartao de garantia · garantikort · karta gwarancyjna · zaručni list · karta jamstva · carte de garantie · fapaunnoHa Kapra · zaručnly list · garancijski list · garanciajegy · rapahtiHmΦopMnyr · fapaHTnHbTanOH
jia 2
SM 3593
24 Monate Garantie gemäß Garantieerklarung - 24 months warranty according to warranty declaration - 24 maanden garantie volgens garantieverklaring - 24 mois de garantie selon la déclaration de garantie - 24 messi de garanzji seconde la dichiarazione di garanzia - 24 meses de garantie de acuero con la déclaracion de garantia - 24 meses de garantia de acuto com a déclaracion de garantia - 24 maneders garanti i henhold til garantibeteingelsene - 24 misiage gwarancji na podstawie odwiadzenia gwarancjynego - zaruka 24 mesiic podle prohlaseni o zaruke - 24 meseeno jamstvo u skladu s jamstvenom deklaracionj - 24 luni garantie conform declarejie de garaniej - 24 mecau rapanuB B cbotbetCTBe C rapaHnOHHATA deknapaua - 24-mesaCna zaruka podla vyhlasenia o zaruke - 24-meseCna garancija, skladno z garancjsko izavoj - 24 honap garancia a garanciafeelteteiekben lelrak szenint - rapaTnHa 24 Mcaui BiDIOHIOI Iani npo rapanlio - rapanlio 24 MeCAU cornaccho xanneHbMn rapanTHIMmpaBnam
Kaufdatum, Handlsterstempelt, Unterschrift - date of purchase, dealer stamp, signature - aankoepdatum, dealerstempelt, handtkeening - date d'achat, tampon du concessionaire, signature - data du acquiste, timbo del riveriditore, firma - fecha de compra, sellio del distribuidor, firma - data de compra, carimbe do distribuidor, assinatura - kipedeata, forhandstempelt, signatur - data zakupu, pieczec sorzedawy, podpis - datum zakoupei, nafizko prorjedce, podpis - datum kapovne, Big trovica, potos - data de achusite, pamlita furumileri, semnata - Dara na nekniakara, Levian na Tnpoana, Tnpoc - datum nukupu, pecliatia obchodnika/predajca, podpis - datum napoku. Big trovica, podisc - visdaris datuma, kereskedé belyegzjeie, aliaras - data npnoqbaenr, nevka npoqaanr, napiac - Dara npropebemir, Lharnn npoaasa, Npncik

CHATRONIC
INTERNATIONAL GMBH
www.clatronic.com
CTC
CLATRONIC
INTERNATIONAL GMBH
Internet: http://www.clatronic.de


- Symbols in these Instructions for Use
- WARNING:
- CAUTION:
- iNOTE:
- General Notes
- WARNING!
- Special safety instructions for the appliance
- Unpacking the appliance
- TE:
- Overview of the Components
- Application
- Location
- Preparation of the appliance
- NOTE:
- Electrical Connection
- Operation
- TE: Short-time operation
- TE: Safety switch
- End of operation
- Tips and Recipes
- Asses Ingredients Preparation
- Strawberry
- mango smoothie
- Orange carrot smoothie
- Cleaning
- Lid, bottle, knife block
- Housing
- Troubleshooting
- Device is not working.
- Remedy:
- Noise development
- Technical Data
- Disposal
- Meaning of the "Dustbin" Symbol
- Instrukcja obstugi
- I PIPIMITKA.3ano6ixhN BUMKau
- Kieheeknnyatauui
- Iopadn Ta peeentn
- PykoBoDCTBO no 3KcnnyatauH
- CnMBONJI npIMeHReMbIe B DaHHOM pyKOBOdCTBe NOJIb-3OBaTeJRA
- PENyIPEXXDEHNE:
- BHIMAHNE:
- IPIMEYAHNA:
- 067aHnDopmaia
- PENEYNPEXKDEHNE!
- CneuaHbIe yka3aHnI IO TexHnke 6e3OpaCHocTn npi POnb3OBaHn 3Tm npu6Opom
- ПЕДУПЕЖДЕНЕ:
- I P E D U N P E X D E H N E:
- Pacnakobka yctpoicTBA
- ПРИМЕЧАнЯ:
- 063op DeTaeN np6opa
- IcnoJb30BaHne
- YCTaHOBka
- IodroTOBka annapaTa
- I PIMMEUAHNIA:
- 3NeKtpnueckoe noKnIouHeHne
- 3Jektpnueeckoe noKnIOHeHne
- Lalal
- jgljll iigaiiaaii aaiii
- GARANTIEKARTE
- SM 3593
Brand : CLATRONIC
Model : SM 3593
Category : Blender