Partytent heater Sail - Heating Eurom - Free user manual and instructions
Find the device manual for free Partytent heater Sail Eurom in PDF.


Frequently Asked Questions - Partytent heater Sail Eurom
User questions about Partytent heater Sail Eurom
0 question about this device. Answer the ones you know or ask your own.
Ask a new question about this device
Download the instructions for your Heating in PDF format for free! Find your manual Partytent heater Sail - Eurom and take your electronic device back in hand. On this page are published all the documents necessary for the use of your device. Partytent heater Sail by Eurom.
USER MANUAL Partytent heater Sail Eurom
natural_image
Black industrial ceiling lamp with adjustable canopy and mesh grille (no text or symbols visible)EUROM®
POWERFUL PRODUCTS
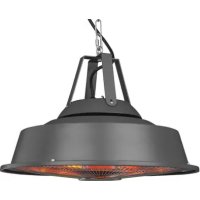
Partytent heater Sail
Art.nr. 33.601.6 (red) - 33.600.9 (grey) - 33.602.3 (white)

text_image
Prohibition sign with a document and checkmark, indicating no text or document.EN This symbol on your device means: do not cover!
VEILIGHEIDSWAARSCHUWINGEN
text_image
Technical diagram of a ceiling fan with numbered parts for identification- elektrokabel
- ophangketting
- ophangoog heater
- schroefsluiting
- controlebox
- afdekkap
- reflexiescherm
- carbonlamp
- rooster
INSTALLATIE
natural_image
Illustration of a twist drill bit with a circular motion arrow indicating rotational motion (no text or symbols)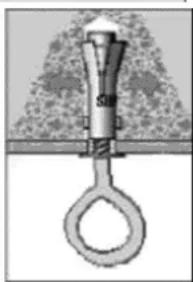
natural_image
Mechanical clamp or spring attached to a ring, with granular texture above (no text or symbols)Many thanks for choosing this EUROM party-tent heater: You have made a very good choice! We hope that you will be completely satisfied with the product.
In order to get the very best from your party-tent heater, we advise you to read these instructions carefully before using for the first time. Pay particular attention to the safety warnings. We also recommend you keep this booklet somewhere safe so that you can consult it in the future.
IMPORTANT
Your party-tent heater must be installed fully and fulfil all the relevant electricity regulations, requirements and rules. If you are in any doubt, have the device installed by a qualified electrician.
This equipment must be connected to a fully functional, undamaged, single-phase, earthed electrical socket which provides 230V/50Hz current. The installation must be equipped with a 30 mA earth leakage circuit breaker.
The plug must always be accessible when the device is connected to an electricity supply.
Read this instruction leaflet carefully and follow the instructions.
Before connecting the device, always check that:
√ the voltage to which you wish to connect the device corresponds the voltage indicated on the specification plate.
√ the socket and plug correspond to one another.
√ the socket is earthed.
√ the device is hanging securely, at the right height and with sufficient free space around it (see later in the booklet).
√ the electrical cable is located away from the vicinity of the heater so as to avoid it getting too hot.
SAFETY WARNINGS
- The party-tent heater must only be used in the manner for which it has been designed: as a hanging heater for party-tents, verandas and similar covered outdoor areas in a private setting. Never use it for other purposes such as drying clothing or textiles or other materials/products/people or animals. The party-tent heater is not intended to be used in commercial situations and must not be used at building sites or in greenhouses, stables etc.
- The carbon heating lamps are fragile so handle the party-tent heater with care. Avoid bumping the device, letting it fall etc.
- This party-tent heater must be installed according to the guidelines outlined later in this booklet.
- The party-tent heater emits a very intense heat. Do not expose people (particularly old people or children) to direct heat. This also applies to animals.
- The party-tent heater should never be installed or used in the vicinity of flammable objects. This may include curtains, furniture, tent canvases etc. It may not be located too close to a socket and should not be used in a damp area such as a bath/shower room, by a swimming pool etc.
- Never use the partytent heater in spaces which house explosive or flammable items.
- In order to reduce the risk of electrical shock or fire, the party-tent heater should never be used with a timer or another device that switches the device on or off automatically. Never leave the device unsupervised during use.
- Never cover the party-tent heater! Never hang anything over it!
-
Ensure that the electrical cable is laid without any kinks. If the cable comes into contact with parts of the heater or falls within the range of the radiation, it could melt. This poses a serious fire risk!
-
Do not run the cord underneath carpeting; do not cover it with mats, carpet strips, or similar and make sure it is not placed in any passageways. Make sure the cord cannot be stepped on and that no furniture is placed on top of it. Do not lead the cord around sharp corners and do not roll it up too tightly after use!
- Try to avoid the use of an extension cable. If this cannot be avoided, then choose a lead that is as short as possible with power of at least 10A and 2000W. The cable must be completely uncoiled if a cable-winding device is used.
- Ensure that the party-tent heater never falls into water or any other fluid and never submerse it. Never touch the device with wet hands.
- Do not use the patio heater outdoors during wet weather!
- Never stick your fingers, pencils or any other object into the party-tent heater grille.
- Some parts of this product can become very hot and cause burns. Particular attention has to be given where children and vulnerable people are present. do not let bare skin come into contact with hot surfaces. Do not touch any part of the device until the patio heater has cooled down!
- Make sure there is close supervision if this device is used when there are children, incapacitated persons or pets present. Do not allow children to play with the device. This device is not suitable to be operated by children or those with physical, sensory or mental disabilities or by anyone who does not have knowledge about or experience with the device. Ensure that every user has ready the instruction booklet. Keep children and pets out of the vicinity of the device.
- Switch the party-tent heater off and remove the plug from the socket - after every use of if you are leaving the location
- before moving or cleaning the device
- if it breaks down or needs maintenance
- Do not use the device if it has been subject to a fall, has been damaged or is not working properly. Switch the device off immediately, remove the plug from the socket and consult your supplier or a qualified electrician. Please request original parts if the device needs to be repaired. Never dismantle or repair the device, cable or plug yourself. The device does not contain any parts that you can replace or repair yourself.
The supplier, importer and manufacturer will not be held liable if you take any actions, other than those outlined in this booklet; the guarantee will also become null and void in this event.
Attention! This heater is not equipped with a device to control the room temperature.
Do not use this heater in small rooms
when they are occupied by persons not capable of leaving the room on their own, unless constant supervision is provided.
IMPORTANT COMPONENTS
text_image
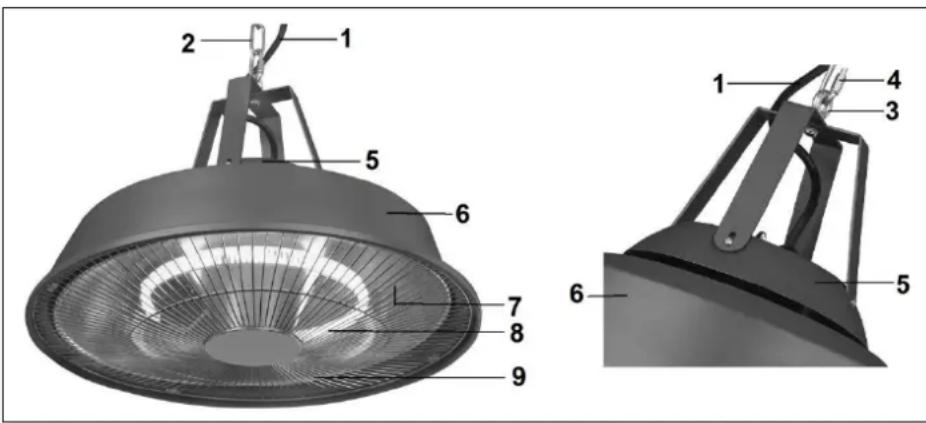
Technical diagram of a ceiling fan with numbered parts and exploded view, showing internal structure and mounting details.- electrical cable
- hanging chain
- hanging eye for
heater
- screw locking
- control box
- protective cover
- reflective screen
- carbon lamp
- grille
INSTALLATION
Mounting hardware included:
- Two suspension brackets with screw eye + nut and 4 screws
- key-bolt with hanging eye
- Standard attachment chain (50 cm.) with screw locking and ring
- Additional security chain (30 cm.)
- 2 karabiner hooks
- 3 tie wraps
Screw both suspension brackets with the screw eye and the nut perpendicularly to each other.
Screw the whole with the 4 screws to the appliance, see fig. on the front of the book.
The party-tent heater must be hung so that there is 50 cm of free space between the control box and any ceiling, tent canvas etc. The hanging chain measures 50 cm.
Additionally, at least 50 cm of space must be left at the sides, between the device and any side walls, tent canvas and other objects. There must also be at least 1.80 m between the ground and the underside of the party tent heater. The party-tent heater can never be hung on a hook in the wall as it could hang at a slant!
There are two methods of hanging:
- On the ceiling
- On a frame (e.g. a tent frame)
1. Hanging on the ceiling
The party-tent heater must be hung on a concrete ceiling. Never hang it on a ceiling made of wood, plaster or any other material! The attachment materials and fire safety measures are not suitable for this type of installation.
- Seek a location in the ceiling that fulfils all of the requirements;
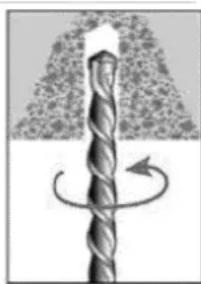
- Drill a sufficiently deep hole with a diameter of 8 mm;
- Knock the key-bolt with hanging eye into the hole; secure it by turning clockwise and check that the hanging eye is screwed into the key-bolt properly or that the bolt and eye is firmly attached. Ensure that the attachment kit can bear the weight of at least 10 kg.
- Attach the attachment chain with the screw locking at the Partytent heater.
- Hook a karabiner hook at the ring of the attachment chain
- Hang the party-tent heater on the hanging eye with the karabiner hook so that the party-tent heater is 40 cm from the ceiling.
- Check that the karabiner hook is correctly closed.
natural_image
Illustration of a twist drill bit with motion arrows indicating rotational direction (no text or symbols)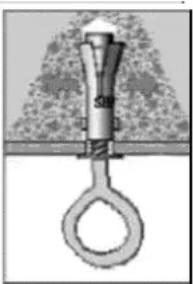
natural_image
Mechanical clamp or spring scale with a loop handle, shown against a textured background (no text or symbols)2. Hanging on a frame (e.g. a tent frame)
Make sure that the party-tent heater can hang freely from the attachment point you have selected and that it is sufficiently sturdy to bear the weight of the heater. Secure it properly so that it cannot sag, slide or move in any other way.
- Seek a location in the frame that fulfils all of the requirements;
-
Use the additional security chain with a karabiner hook at each end to secure effectively:
-
Hook the security chain to the ring on the hanging chain that is attached to the party-tent heater, using the karabiner hook;
- Wind the security chain around the frame once or twice;
- Then attach the second karabiner hook also to the ring at the hanging chain; this will ensure that the party-tent heater remains 50 cm from the frame.
- Check that the karabiner hook is closed properly and that the party-tent heater is securely attached. It should not slide, sag or move at all!
Take care! The control box must be positioned at least 50 cm from the tent canvas, cover or any other item!
The following applies to both methods:
- Run the electrical cable along the hanging chain and secure at multiple points with a tie-wrap. Make sure that the cable is tight along the chain but do not hang the device on the cable! Run the electrical cable from the (hot) party-tent heater to a socket.
- Your party-tent heater is now ready for use.
OPERATING
- Check that the wall socket you want to use supplies the voltage shown on the appliance's type plate (220/240 V-50 Hz) and that is is earthed. Then insert the plug in the socket and the appliance will start to work. To switch the appliance off, remove the plug from the wall socket.
- The party-tent heater is not equipped with a thermostat and will continue to emit heat for as long as it is switched on. For that reason, don't leave persons, who are not able to leave their position on their own, alone with a functioning Partytent heater! Never leave a functioning party-tent heater unsupervised!
MAINTENANCE AND CLEANING
Always remove the plug from the socket before carrying out maintenance or cleaning activities and leave to cool before performing maintenance or cleaning.
Clean the exterior of the party-tent heater with a soft, damp cloth and, if necessary, a little cleaning agent. Never use aggressive or abrasive products and ensure that water never penetrates the device itself!
You will not usually need to clean the reflective screen or the carbon lamps. If necessary, you could use a vacuum cleaner to suck dirt through the grille. If this is inadequate, engage a professional. Never open up the device yourself!
TECHNICAL SPECIFICATIONS
| Party-tent heater | Partytent heater Sail |
| Heating elements | Carbon |
| Number of elements | 1 |
| Heating capacity | 1500 W |
| Consumption max. | 1500 Watt |
| Connected power | 220-240V / 50Hz |
| Protection factor | IP24 |
| Operation | Handmatig |
| Dimensions | 43 x 28 cm. |
| Weight | 2,8 kg. |
DISPOSAL
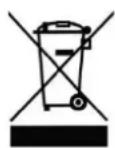
Your Partytent heater is not ordinary household waste. When you wish to dispose of it, please take the device to a municipal collection point for this type of item.
DE
DANK
text_image
Technical diagram of a ceiling fan with numbered parts and exploded view, showing internal structure and mounting details.natural_image
Two diagrams showing a twist drill bit and a hanging hook, illustrating the process of turning and lifting (no text or symbols present)text_image
Technical diagram of a ceiling fan with numbered parts for identificationnatural_image
Two diagrams showing a twist drill bit and a ring-shaped anchor mechanism, illustrating mechanical assembly (no text or symbols)text_image
Technical diagram of a ceiling fan with numbered parts for identificationnatural_image
Two diagrams showing a twist drill bit and a hanging hook, illustrating the process of turning and lifting (no text or symbols present)text_image
Technical diagram of a ceiling fan with numbered parts and exploded view, showing internal structure and mounting details.natural_image
Illustration of a twist drill bit with a circular motion arrow indicating rotational motion (no text or symbols)
natural_image
Simple line drawing of a hanging hook with a spring, no text or symbols presenttext_image
Technical diagram of a ceiling fan with numbered parts for identificationnatural_image
Illustration of a twist drill bit with a rotational arrow indicating clockwise motion (no text or symbols)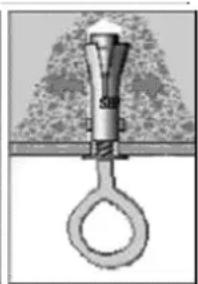
natural_image
Mechanical clamp or spring scale with a central rod and ring, no visible text or symbols2. Zavesenie na rám (stanu a pod.)
text_image
Technical diagram of a ceiling fan with numbered parts and exploded view, showing internal structure and mounting details.natural_image
Two diagrams showing a twist drill bit and a hanging hook, illustrating mechanical assembly (no text or symbols)Euromac bv., Genemuiden-NL hereby states that the Party-tent heater, brand EUROM, type r 1500 Sail fulfils LVD directive 2006/95/EC and EMC directive 2004/108/EC and fulfils the following norms: