
H2F220WSAA - Freezer HAIER - Free user manual and instructions
Find the device manual for free H2F220WSAA HAIER in PDF.
| Brand | Haier |
| Model | H2F220WSAA |
| Product type | Upright freezer |
| Dimensions (W x D x H) | Approx. 595 x 650 x 1850 mm (estimate) |
| Weight | Approx. 70 kg (estimate) |
| Power supply | 220-240 V AC, 50 Hz |
| Energy consumption | Approx. 150 kWh/year (estimate) |
| Temperature range | -14 °C to -26 °C |
| Factory setting | -18 °C |
| Freezing capacity | Approx. 10 kg/24h (estimate) |
| Defrost | Automatic (No Frost) |
| Main functions | Super freeze, Eco mode, Child lock, Door and temperature alarm |
| Control panel | Touch LED display |
| Door reversibility | Yes, adaptable door opening side |
| Interior light | LED |
| Ice maker | Yes, with ice cube system |
| Climate class | SN, N, ST, T (estimate) |
| Noise level | Approx. 40 dB (estimate) |
| Care and cleaning | Unplug before cleaning, soft cloth and warm water, no abrasives |
| Safety | Child lock, temperature alarm, door alarm, prolonged shutdown via button |
| Supplied accessories | Ice trays, shelves, drawers |
Frequently Asked Questions - H2F220WSAA HAIER
User questions about H2F220WSAA HAIER
0 question about this device. Answer the ones you know or ask your own.
Ask a new question about this device
Download the instructions for your Freezer in PDF format for free! Find your manual H2F220WSAA - HAIER and take your electronic device back in hand. On this page are published all the documents necessary for the use of your device. H2F220WSAA by HAIER.
USER MANUAL H2F220WSAA HAIER
Thanks for purchasing a Haier Product
Please read these instructions carefully before using this appliance. The instructions contain important information which will help you get the best out of the appliance and ensure safe and proper installation, use and maintenance.
Keep this manual in a convenient place so you can always refer to it for the safe and proper use of the appliance.
If you sell the appliance, give it away, or leave it behind when you move house, make sure you also pass on this manual so that the new owner can become familiar with the appliance and safety warnings.
INDEX
CAUTIONS 3
BEFORE USE 6
FUNCTIONS 8
MAINTENACE 14
TROUBLE-SHOOTING 15
CAUTIONS
Legend

Attention

Caution

Prohibit
Disposal
The presence of this symbol on the product, accessories or materials that goes with this information indicates that at the end of its useful life the product or its electronic accessories (ex. charger, headset, USB cable) should not be disposed with other household waste.
To prevent possible damage to the environment or human health from uncontrolled waste disposal, please separate these items from other types of waste and recycle them. This will promote the sustainable reuse of material resources.
Household users should contact either the retailer where they purchased the product or the relevant local authorities to find out how they can take this item for environmentally safe recycling and safe. Business users should contact their supplier and check the conditions of the purchase. This product and its electronic accessories should not be mixed with other commercial waste.
Before use...
This appliance use AC power supply.
Please connect the appliance to normal voltage. In case of voltage fluctuation, the appliance may fail to start up, the temperature controller or the compressor may be damaged or has abnormal voices. At this time, please add proper stabilizer.
① Three-hole socket must be used.
In any event, please ensure the socket is connected with ground wire and make no change on power cord and plug. The power cord plug shall be attached firmly with the socket, otherwise it may cause a fire. After the appliance is installed, the plug shall be easily accessible so that it can be detached in time in case of accidents.
Do not damage the power cord.
Do not pull the power cord to disconnect the plug. Please hold the plug to detach it directly from the socket. The body of the appliance shall not press on the power cord and do NOT stamp on the power cord.
When the power cord is damaged:
When the power cord is damaged or the plug is worn, do not use. The worn or damaged power cord must be replaced at the specified maintenance provider by the manufacturer or by the qualified personnel. If a longer power cord is needed, the cross-sectional area of the added power cord shall not be less than 0.75mm^2
① Keep ventilation openings, in the appliance enclosure or in the built-in structure, clear of obstruction.
When flammable gas such as natural gas leaks:
Close the valve which leaks the gas. Open house door and window. DO NOT unplug/plug the power plug of the appliance or other electrical appliances.
① Be careful of frostbite
Do not touch the inside surface of the freezer storage compartment when in operation, especially with wet hands as your hands may freeze onto the surface.
CAUTIONS
When the appliance falls into disuse:
Keep the appliance away from fire to avoid accidents. Remove the door of the appliance (open the door and hold it before removing the screws) to avoid children entering into the appliance and causing accident. Send the appliance to the designated place for disposal.
Open the door by the handle.
Do not store or use gasoline or other inflammable materials in the vicinity of the freezer to avoid a fire.
Never store inflammables, explosives or highly corrosive acids, alkalis and other chemicals in the freezer.
Never store bottled beer or beverages in the freezer, as these will burst during freezing.
Do not use electrical appliances inside the food storage compartments of the appliance, unless they are of the type recommended by the manufacturer.
Pay attention to your children
Children should be supervised to ensure that they do not play with the appliance.
Do not hang on the door to avoid personal injury as the door or the appliance may fall.
Make sure the hands or feet of the children do not enter holes and side seams of the metal parts such as the compartment or the back of the appliance to avoid personal injury.
Do not place unstable articles (heavy objects, containers filled with water) on the top of the appliance, to avoid personal injury caused by falling or electric shock caused by contact with water.
1 Keep away from water
Do not use water to spray on or flush the refrigerator, and do not place the refrigerator at wet place or the place which is easy to be splashed with water to avoid the impact to the electric insulation performance of the appliance or even electric shock or fire.
1 Do not damage the refrigerant circuit
Disassembly and alteration of the freezer must be authorized. Any agitated movement of the freezer may damage the cooling pipes. Repair of the appliance must be performed by professional personnel.
① Detach the power plug when:
Before cleaning and maintenance, or in case of failure of appliance or power off, please detach the power plug of the refrigerator. When unplugging the appliance allow at least 5 minutes before restarting, as frequent starting be damage the compressor.
This freezer is a household appliance for storing food only. Do not store blood, medicines, biological products or other products in the appliance.
① Keep ventilation openings, in the appliance enclosure or in the built-in structure, clear of obstruction.
This appliance is not intended for use by persons (including children) with reduced physical, sensory or mental capabilities, or lack of experience and knowledge, unless they have been given supervision or instruction concerning use of the appliance by a person responsible for their safety.
This appliance is intended to be used in household and similar applications such as
- staff kitchen areas in shops, offices and other working environments;
- farm houses and by clients in hotels, motels and other residential type environments;
- bed and breakfast type environments;
- catering and similar non-retail applications.
Energy Saving Tips
Install the appliance in a cool, dry room with adequate ventilation.
When installing the appliance, a space of at least 10cm must be kept above and around the freezer to ensure adequate ventilation around the freezer.
Allow warm food to cool down before placing it in the appliance.
Do not keep the door of the appliance open for too long when putting food in or taking food out. The shorter time, for which the door is open, the less ice will form in the freezer.
Clean the rear of the freezer regularly. Dust increases energy consumption.
Do not set temperature colder than necessary.
Do not cover air vent openings.
CAUTIONS
Freezing and storage of fresh food
Food shall be stored with a space in between, which is good for refrigeration cycle.
Food shall be stored in different categories so that you can find it more easily.
Food shall be sealed before stored in the freezer to avoid water loss and smell taint.
It's optional to pack food before putting it in the freezer. The outside of the packing must be dry to avoid bags sticking together. Packing materials should be odor-free, airtight, non-poisonous and non-toxic.
We suggest to identify portion noting down information as follow:
Name of food
Weight of portion
Quantity (number of pieces)
Freezing date
Limit date of storage
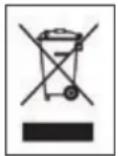
See the diagram inside the freezer for common food storage time limit:
PIZZA BOX
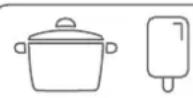
2-6

4-8


6-12
- stew, ice cream, sausages, bread
- Fish, shrimp, lamb, meat
- Vegetables, fruits, poultry, beef
Food should be fresh, mature and of good quality.
Fresh vegetables and fruits must be frozen, if possible, immediately after harvest to maintain the most nutrients, structure, texture, color and taste.
In case of meat and game, it is preferable to hang for a sufficiently long period before freezing.
Hot food should be cooled down to room temperature prior to placing it in the freezer.
① Only take the required amount of food from the freezer. Defrosted food cannot be re-frozen unless it is first cooked, otherwise it may be less edible.
Avoid placing fresh food directly in contact with deep frozen food. Deep frozen food could defrost and may not outlast the foreseen storage time.
To freeze very well, insert fast freezing function (see functions chapter) 2 hours before storing fresh food.
① Do not load excessive quantities of fresh food in the freezer. It is better to refer to the freezing capacity of the freezer.
Usually 24 hours are enough to bring the freezing process to an end. After this time, function will be disabled automatically.
For freezing small quantity of food, it's possible to stop the function manually after few hours to avoid useless energy consumption.
BEFORE USE
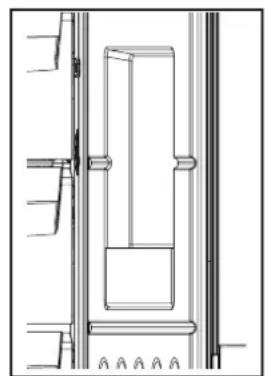
Description
This diagram may be slightly different from the layout of the freezer you have just purchased.
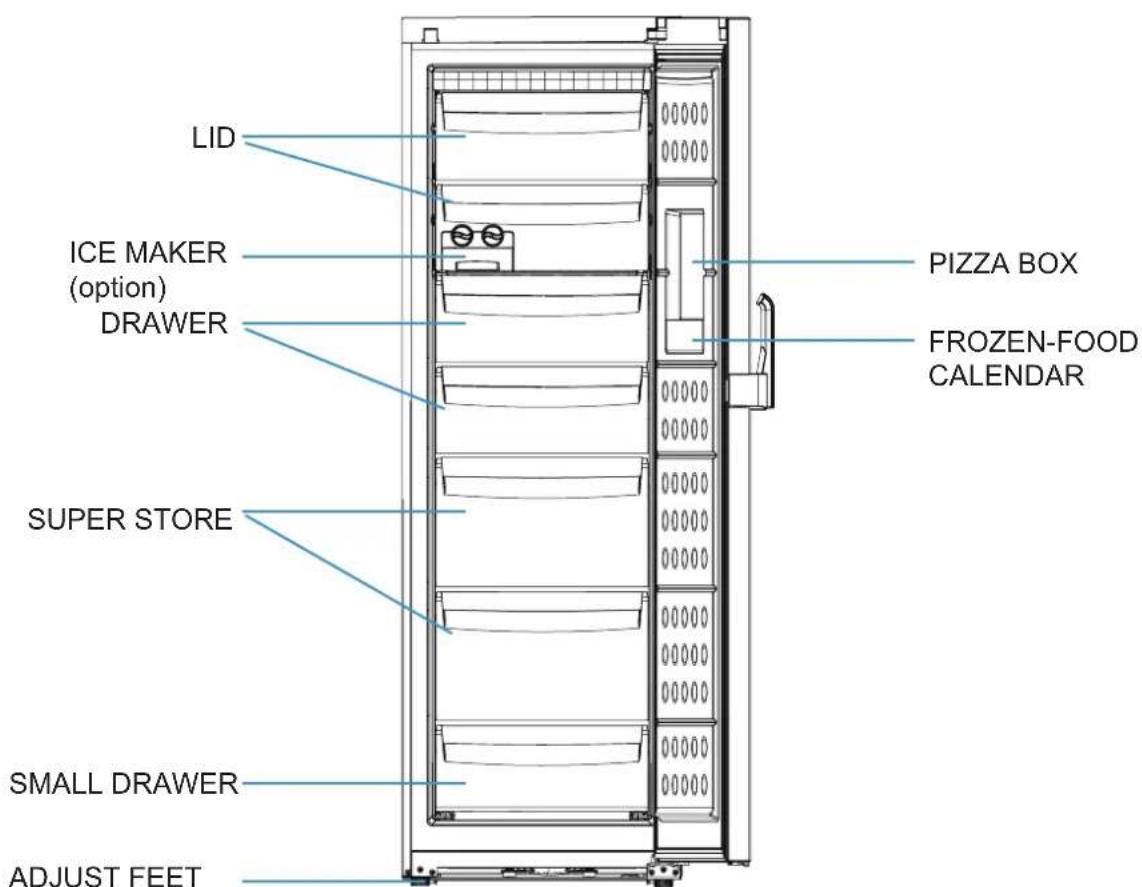
(trasport grips at front,trasport castors at back)
Large drawers, super stores and small drawer can be removed to increase freezer storage space.
BEFORE USE
Placing Environment
The freezer should be placed on a flat and solid surface. If the appliance is placed on a pedestal, flat strong and fire-resistant materials must be used. Never use the foam packing material as a pedestal. If the freezer is slightly unstable, you can prolong or shorten the adjustable foots of the freezer by turning them clockwise or counterclockwise to increase or decrease the height of the freezer. Do not place the freezer under the direct sunlight or in a place where it is exposed to heaters to ensure the performance

of the Freezer. Install the appliance in a well ventilated place and a space of at least 10cm must be kept above and around the freezer.
Never place the freezer in a damp area or location where it may be splashed with water. Clean and dry any water splashes and stains with soft cloth in time to prevent rust.
Do not place the freezer where the temperature is too low (under 5^ ). Do not keep freezer outside or under the rain.
Preparation prior to use
Remove all package parts, the foam base and the adhesive tape fixing accessories.
Place the freezer in a proper location (please refer to Placing Environment).
Clean the inside and outside of the freezer before use (please refer to Defrosting and Cleaning)
After the appliance has been leveled and cleaned, let it remain idle for at least 6h before switching it on so as to ensure its normal running.
FUNCTIONS
Controls panel
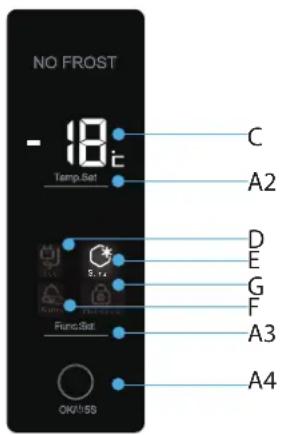
C Freezing temperature display icon
A2 Temperature setting button
D Eco function icon
E Fast freezing icon
G Child lock icon
F Alarm indicator icon
A3 Function selection button
(eco/ fast freezing/ alarm/child lock)
A4 OK button / Power button
Start-up
Insert the plug in the socket to switch on the freezer.
Display will show you code dF and it means that the freezer is in defrosting condition. After defrosting, display will show you code HH.
The alarm led F and acoustic signal will indicate that the temperature inside freezer is not sufficiently cold for storage of foodstuffs. Pressing the button A3 to choose the "Alarm" function then press the button A4, you can disable acoustic signal, but warning light will be on till freezer will reach the temperature of -12^ . When display show the temperature of -12^ , alarm condition will stop automatically and freezer will be ready for food storage.
Check the Controls Panel:
Touch any button on the display screen and check whether the temperature area and the selected icon can be lightened.
Set temperature:
To set temperature, push the button A2. During temperature setting two numbers on display show the point set in flashing mode. Additional pressing on this button modify the set-point in cycling and decreasing mode from -14^ to -26^ .
If no action is done on the OK button within 5 sec, the set point will be stored automatically.
After the temperature is set, the two numbers on display come back to the freezer temperature visualization.
Manufacturer setting of temperature is -18^
Power function:
Press the button A4 for 5 sec to turn off the power of the freezer; do it again the power will be turned on.
Before any cleaning operation, make sure to disconnect the appliance from the power supply by pulling out the plug, it isn't enough to turn off the appliance pushing power button.
FUNCTIONS
Freezer functions
FAST FREEZING: Press the button A3 to choose the "S.FRZ" function, then press the button A4, you can activate fast freezing of fresh food.
The dedicate light E switches on to indicate that the function is on, and activation of the function is achieved.
light will be on till function will be disabled.
For fast freezing a small amount of food, this function is recommended to be activated 2 hours before inserting food; if you have a large amount of food to freeze at one time, it is recommended that the function be activated 24 hours before inserting food. Function will stop automatically after 24 hours or manually.
Power consumption will increase when this function is on.
FUNCTION ECO: When the screen is unlocked, press the button A3 to choose the "ECO" function, then press the button A4, you can activate the function of energy saving, setting temperature within the range of -18^ and -14^ . If the temperature has been set at -19^ or lower, it will be set automatically at -18^ when the ECO function is on.
If this function is activated, led D will be on till the function will be unable.
You can press the button A3 to choose the "ECO" function, then press the button A4 to disable the function.
ECO function and Fast Freezing function can not be used simultaneously.
Child Lock: When the screen is unlocked, press the button A3 to select the Child Lock function and then press the button A4, the function will be on. Unlock: Touch any button on the screen, the display screen and the child lock button will be lightened; press the button A3, the child lock button flickers; press the button A4, the screen will be unlocked.
When the screen is locked, the button A2 is not effective; function selection is not available when pressing the button A3; power can be turned off by press the button A4 for 5 sec.
Alarm signals
TEMPERATURE ALARM: if temperature inside freezer is over -8^ , an intermittent buzzer and the flashing led F will indicate the temperature alarm. Display will show you code HH
After the screen is unlocked, press the button A3 to choose the "Alarm" function, then press the button A4, it's possible to stop acoustic sign, but alarm condition will continue till internal temperature will be colder than -12^ .
DOOR ALARM: If the door is left open for 60 seconds, the anomalous condition will be notified by intermittent buzzer. The alarm condition will stop by closing the door or by pressing button to select Alarm function and pressing the OK button, but in this second case alarm condition will restart after 60 seconds if door is still open. If the door is open for consecutive 7 minutes, the inner light will be off and there will be continuous alarm.
FAULT ALARM:Code F4 on display together with alarm led F flashing will indicate a faulty condition of freezer, but there is no danger for temporary food preservation.
Code Ed on display together with alarm led F flashing and acoustic signal, will indicate a grave faulty condition of freezer that must be switched off.
For both faulty conditions you must call after sales service as soon as possible.
FUNCTIONS
Insertion into a row of kitchen units
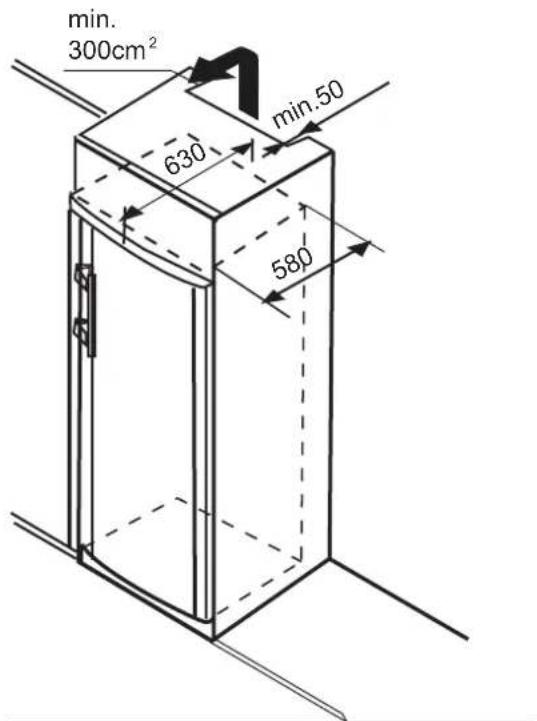
The appliance can be inserted into a row of kitchen units. To match the appliance to the height of the row of the units, a suitable stack cabinet can be added. When inserting the appliance into a row of standard kitchen units (max. depth 580mm ), the appliance can be installed directly next to the kitchen unit. The appliance door projects relative to the front of the kitchen unit by 34mm at the side and by 55mm in the middle of the appliance. It can be opened and closed perfectly as a result.
Important for the ventilation:
At the back of the stack cabinet, there has to be a ventilation duct of at least 50mm depth throughout the width of the stack cabinet.
The ventilation space under the ceiling has to be at least 300cm^2
The larger the ventilation space, the more energy-saving the appliance is in operation.
If the appliance is installed with the hinges next to a wall, the distance between appliance and wall has to be at least 55mm . This corresponds to the projection of the handle when the door is open.
FUNCTIONS
Use information
LID OPENING
To open upper lids, lift them slightly and turn inside out.
Open the lid to put the food into the drawer.
Close the lid to avoid contact with the door.
The lid can be removed to increase storage space.
NOTE: Two layers in the upper are furnished with lids, but no food placement is allowed in the front part of the glass plate; or otherwise lids may fail to be closed, and if so, please check the food items, adjust their locations, and then re-close the lids. Warning: check if the lids are closed before shutting the door, and be sure to shut the door after the lids are properly closed so that no squeezing on the lids may occur.
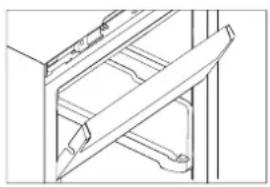
REMOVING DRAWERS
Pull the drawers out fully, then lift them up slightly in order to remove. Drawers (except the bottom drawer) can be removed in order to obtain increased storage space.
Slides available for some models.
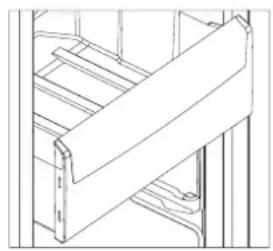
SUPER STORE DRAWER
Pull super store drawer out fully. Lift and pull it out of telescopic guides.
NOTE: Some models of the large drawer are set with slide structure. Proper way of drawer removing: first, take the food away from it and push it to the end; then lift its rear part and pull it out. Don't lift the drawer up until it is blocked, then it can be taken out easily; but if so failed, push it to the end and repeat the steps again.
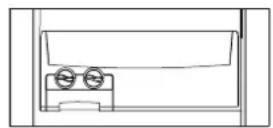
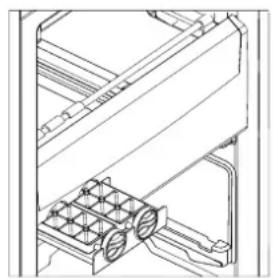
ICE CUBES PRODUCTION
Some models are equipped with an ice system including ice cube trays with removal device and ice bin.
Remove ice trays
Clean and fill with water Refit ice trays on its support.
Wait for a few hours for the ice to be ready, then turn the knobs to extract the ice cubes.
The ice cubes will fall directly into the ice container.
Boxes on the door may contain a packed PIZZA with a thickness of less than 30mm or other thin packaged food.
Eutectics available for some models. You can also buy eutectics and put them in the freezer, and the thickness of the eutectics shall be less than 30mm .

FUNCTIONS
Door reversibility: dismantling door from the right
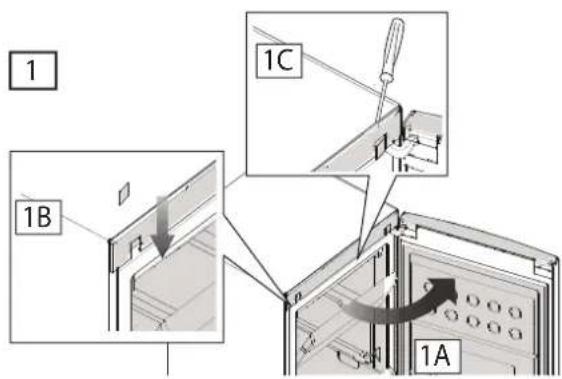


Disconnect power and empty the appliance before you start the operation.
A. Open the door
B. Force downward to remove the two small covers respectively on the left and right
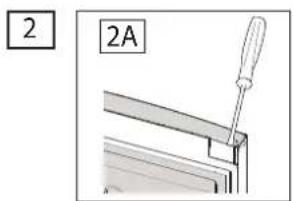
C. Pry the front cover outward
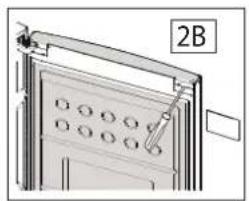
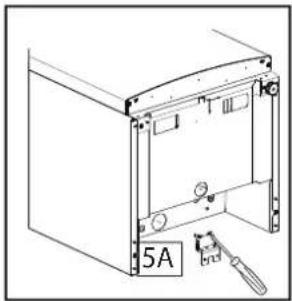
A.Use a screwdriver to remove the small cover on the right of the door body
B. Use a screwdriver to pry inward to remove the decorative strips
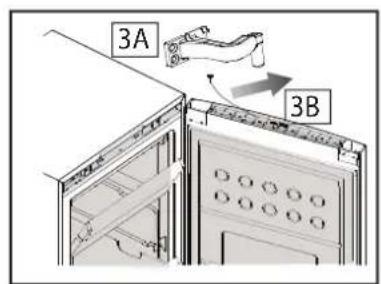
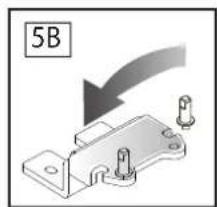
A. Use a crosshead screwdriver loosen the hinge screws, Remove the upper hinge
B. Disconnect the wiring terminal
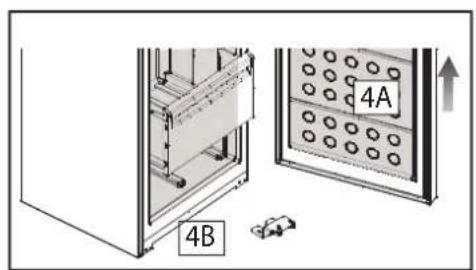
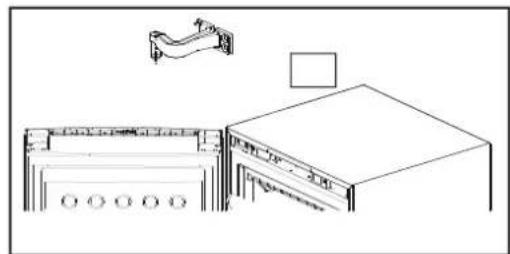
A Move the door body upward to remove the door body
B. Use a crosshead screwdriver to remove the lower hinge
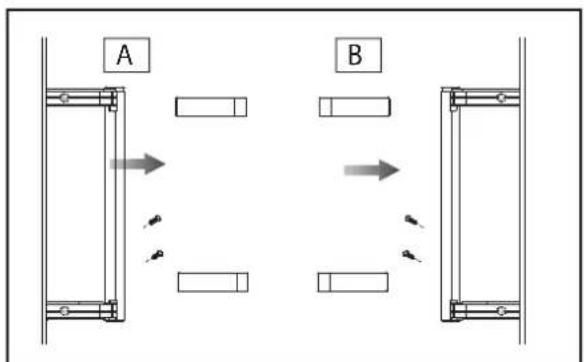
A. Use wrenches or pliers to remove the hinge shaft, and fix it in the hinge left hole.
B. Use a crosshead screwdriver to remove the screws on the left of the cabinet body, and mount the screws, on the right side of the cabinet. Mount the lower hinge on the left side.
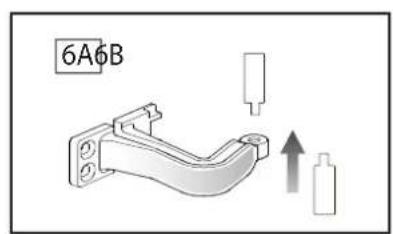
A. Use a flat-headed screwdriver to pry off the screw plug on the right of the door body.
B. Remove the upper hinge shaft and fix it reversely on the hinge. Move the screw plug to the left side and plug the screw hole.

FUNCTIONS


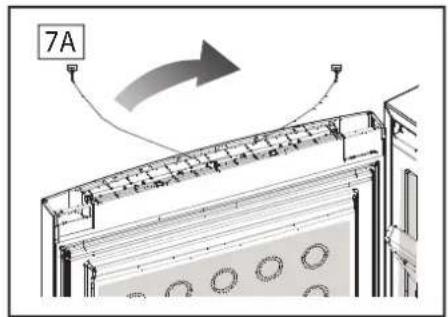
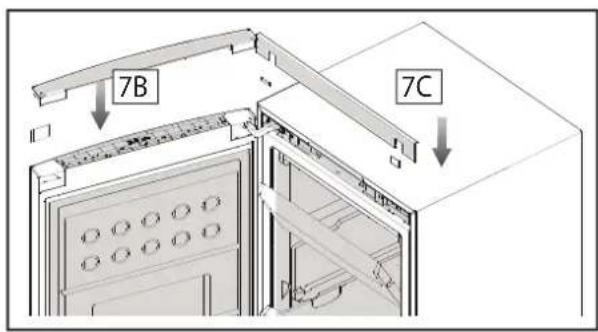


7 A. Connect the signal line in the door decorative strip to the terminal in the hinge.
Clear up the harness and place it into the decorative strip cover.
B. Fix the decorative strip and buckle its small cover on the right side.
C. Close the cabinet upper front cover. Insert the left and right small covers into the groove.
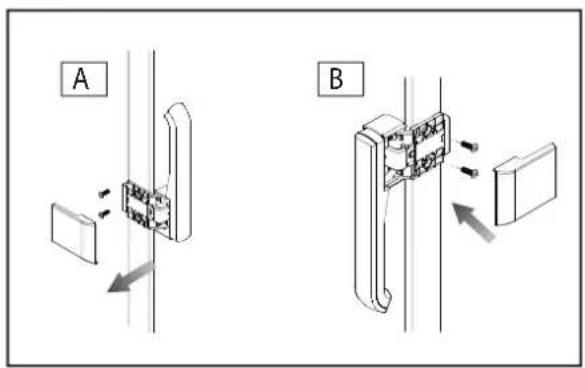
8 Direction for handle replacement: according to the different configurations (The figure is different).
8.1 Assist handle:
A. Use a flat-headed screwdriver to pry off the handle upper cover. Remove the two screws and then remove the handle.
B. Use a flat-headed screwdriver to pry off the screw plug on the right of the door body. Move the screw plug to the left side and plug the screw hole. Fix the handle on the right side and have it covered.
8.2 Ordinary handle:
A. Use a flat-headed screwdriver to pry off the handle upper cover. Remove the two screws and then remove the handle.
B. Use a flat-headed screwdriver to pry off the screw plug on the right of the door body. Move the screw plug to the left side and plug the screw hole.
C. Fix the handle on the right side and have it covered.
MAINTENACE
Defrosting and cleaning
DEFROSTING THE FREEZER: The freezer defrosts automatically. No manual operation is needed.
CLEANING: The appliance should be cleaned regularly to prevent bad stored food odors.
Unplug the power cord before cleaning the freezer.
Clean the refrigerator with a soft cloth or sponge with warm water (can be added with mild detergent).
Dry water droplets on the refrigerator surface with a dry cloth.
Always keep the door gasket clean.
The refrigerator is very heavy. When you are moving it for cleaning or repair, take care not to damage the floor. Keep the freezer upright during moving. Do not move the freezer by rocking it to avoid damage to the floor.
Do not spray or flush the freezer with water to avoid impact on its electrical insulation property.
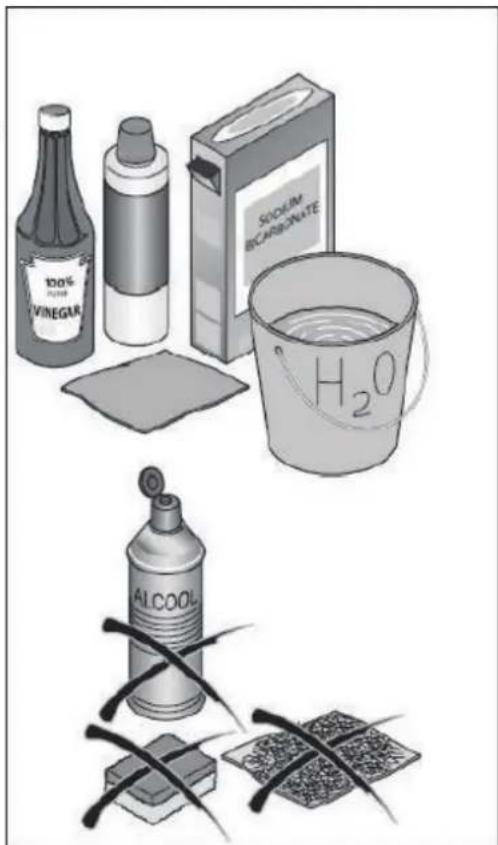
Do not clean with hard brush, wire brush, detergent powder, gasoline, amyl acetate, acetone and similar organic solutions, warm water or acid or alkaline solutions.
When cleaning the display screen and other electrical appliances, do use dry cloth.
Stopping use
If the freezer will not be used for an extended period, please unplug the power cord and clean it with the method described above.
Keep the freezer door open to prevent any food remaining in the compartment from producing bad odors.
To ensure the service life of the appliance, it is recommended that the freezer not be turned off unless it is necessary.
Moving the freezer
Detach the power plug and turn off the power.
Remove all food in the freezer.
Secure the drawers and other movable parts in the freezer with adhesive tape.
Close the door and secure with adhesive tape so that it will not be opened when moving.
Do not tilt the freezer more than 45 degrees (angle to vertical) to avoid damaging the refrigerating system when moving the freezer.
Wrap the feet of the freezer to avoid scratching the floor. Never move the freezer forcefully Do not move the freezer by its handle, lid or pipes to avoid property damage or personal injury.
Never place the refrigerating horizontally down.
TROUBLE-SHOOTING
Before calling for service, please read the following troubleshooting table first. This can save both your time and money. The table contains common problems except those caused by defects in workmanship or material of the refrigerator.
| PROBLEMS CAUSES SOLUTIONS | ||
| Freezer operation | ||
| The compressor does not work | Product is in defrosting cycle. Freezer is not plugged into a power outlet. Product is turned OFF. | □ This is normal for an automatic defrosting freezer. □ Check whether the plug, socket or fuse is damaged. Turn on the power when they are OK. □ Press the power button to start up the freezer again. |
| The freezer runs frequently or runs for too long period | The indoor or outdoor temperature is high. □ The freezer has been powered off for a period of time. □ The door is opened too frequently or for a long period at one time. □ The door of the freezer is not tightly closed. □ The temperature setting is too low. □ The door gasket is dirty, worn, cracked or mismatched. □ The condenser is dirty. | □ In this case, it is normal for freezer to run longer. □ Normally, it takes 8 to 12 hours for freezer to totally cool down. □ Warm air enters the freezer and causes it to start frequently. Please do not open the door too frequently. □ Ensure the freezer is located on a level ground and there is no food or container jarring the door. □ Set the temperature higher until a satisfactory freezer temperature is obtained. It takes 24 hours for freezer temperature. □ Clean or replace the door gasket. A leakage gap of door gasket can cause a longer running time of freezer in order to maintain desired temperature. □ Clean the condenser. |
| Too high temperature | ||
| Too high temperature inside product | The door is opened too frequently or for too long each time. □ Temperature is set too high. □ The door is not closed tightly. □ Condenser is dirty. | Warm air will enter the refrigerator whenever the door is opened. Try to open the door as less frequently as possible. □ Reset the temperature. □ Ensure the freezer is located on a level ground and there is no food or container jarring the door. □ Clean the condenser. |
| Water / moisture / frost on outside surface of the freezer | ||
| Moisture accumulates on the freezer's outside surface | □ Damp climate. □ The door is not closed tightly. This causes condensation of cold air in the freezer and the warm air outside it. | This is normal in damp climate. The moisture will decrease when the humidity drops. □ Make sure the ground is flat and no food or containers reach out of the door; close the door tightly. |
TROUBLE-SHOOTING
| PROBLEMS CAUSES | SOLUTIONS | |
| Bad odors in the freezer | ||
| The inside of the freezer is dirty | The inside of the refrigerator needs leaning. □ Food of strong odor is stored in the freezer. | Clean the internal of the refrigerator. (Please refer to Defrosting and Cleaning) □ Check whether the food is deteriorated. Take out deteriorated food or food of strong odor out of the freezer. |
| If you hear | ||
| Beeps | The freezer door is open. □ The temperature in the freezer is too high. □ Some parts may be damaged. | Close the door or silence the alarm manually. □ The alarm is normal when it is first started or the food is stored for the first time. You can silence the alarm manually. □ Contact the after-sale service personnel. |
| Abnormal sound | The freezer is not located on a level place. □ The freezer touches some object around it. | Adjust the feet to level the refrigerator. □ Remove objects around it. |
| Slight sound similar to that of flowing water | This is the sound of the refrigerating system. | Normal. |
| Heating of cabinet | The refrigerating system is working refrigerating system. | This prevents condensation and is normal. |
Nameplate
The nameplate is located inside the freezer compartment glued low down on the left side. The nameplate provides important information about the appliance and must not be tampered with or removed.
Valid capacity and rated power consumption shown on the nameplate is subject to relevant standards.
ELEMENTI
| Pizzafach | ||
| 2-6 | 4-8 | 6-12 |

- Thanks for purchasing a Haier Product
- INDEX
- CAUTIONS
- Legend
- Disposal
- Before use...
- Freezing and storage of fresh food
- PIZZA BOX
- BEFORE USE
- Description
- Placing Environment
- Preparation prior to use
- FUNCTIONS
- Controls panel
- Start-up
- Freezer functions
- Alarm signals
- Use information
- LID OPENING
- REMOVING DRAWERS
- SUPER STORE DRAWER
- ICE CUBES PRODUCTION
- Remove ice trays
- MAINTENACE
- Defrosting and cleaning
- Stopping use
- Moving the freezer
- TROUBLE-SHOOTING
- Nameplate
- ELEMENTI
Brand : HAIER
Model : H2F220WSAA
Category : Freezer