BC.350 - Deep fryer Beper - Free user manual and instructions
Find the device manual for free BC.350 Beper in PDF.
| Product type | Oil-free fryer (Air Fryer) |
| Brand | Beper |
| Model | BC.350 |
| Power supply | 220-240 V ~ 50/60 Hz |
| Power | 1300 W |
| Basket capacity | 2.5 L |
| Temperature range | 80 °C to 200 °C |
| Timer | 0 to 30 minutes |
| Operation | Hot air frying, automatic shut-off, cooking end bell |
| Preheating | Recommended (3 minutes empty) |
| Material of tray and basket | Metal with non-stick coating |
| Safety | Automatic timer shut-off, insulated handle, do not obstruct ventilation grille |
| Cleaning | Tray and basket dishwasher safe; exterior cleaned with a damp cloth |
| Heating element maintenance | Brush to remove food residues |
| Spare parts | Basket, tray, handle available via after-sales service |
| Repairability | Technical support from retailer or by email at assistenza@beper.com |
| Warranty | 2 years against material and manufacturing defects |
| General information | Use only with the provided basket, do not add oil, keep 10 cm free space around the appliance |
Frequently Asked Questions - BC.350 Beper
User questions about BC.350 Beper
0 question about this device. Answer the ones you know or ask your own.
Ask a new question about this device
Download the instructions for your Deep fryer in PDF format for free! Find your manual BC.350 - Beper and take your electronic device back in hand. On this page are published all the documents necessary for the use of your device. BC.350 by Beper.
USER MANUAL BC.350 Beper
For further information and/or for instructions for use in other languages, please visit: beper.com
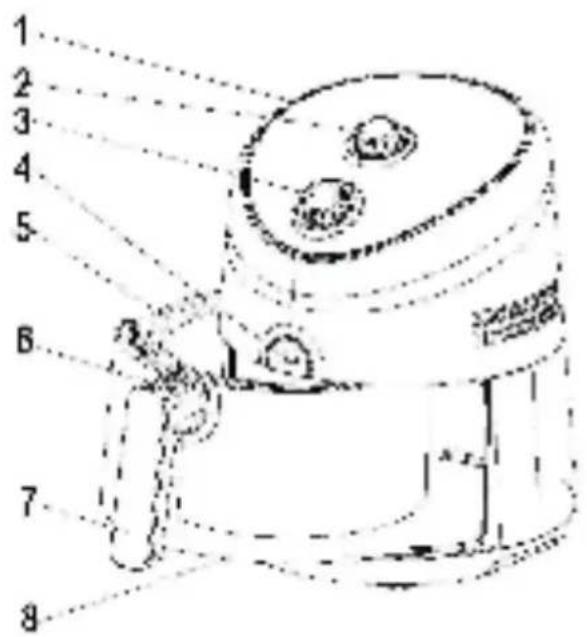
Fig.1
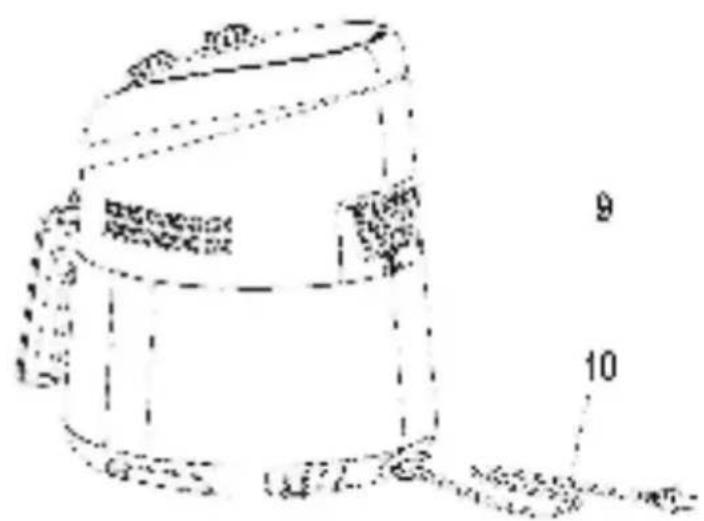
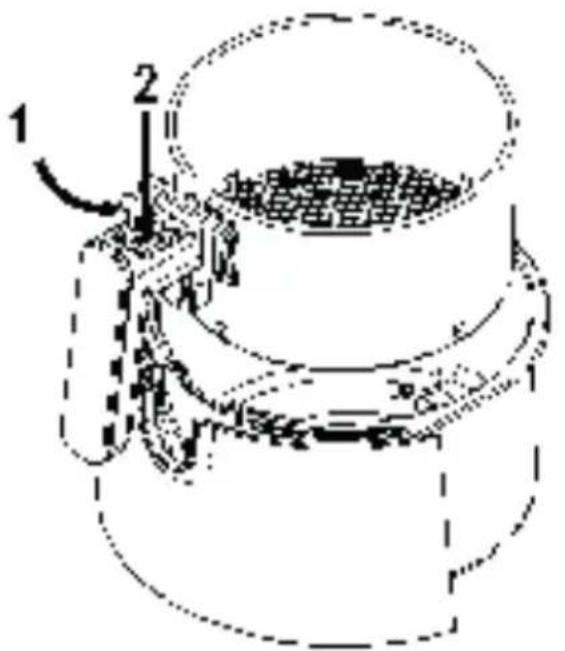
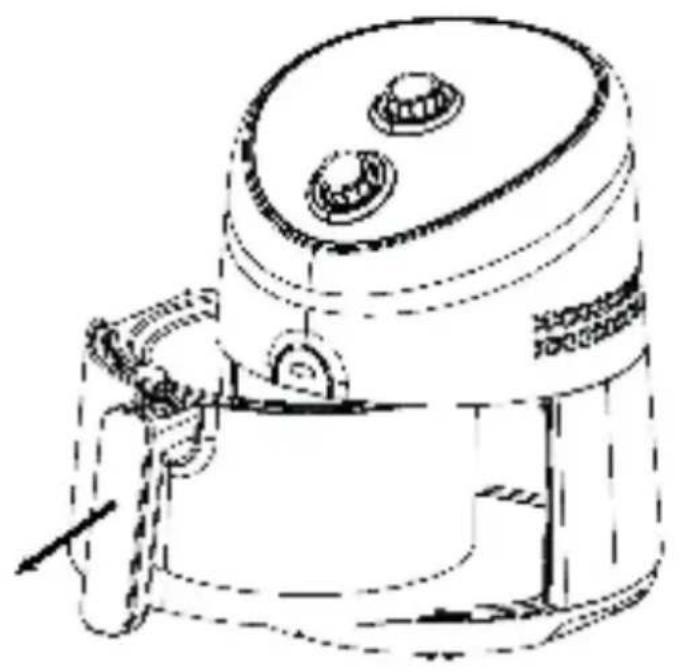
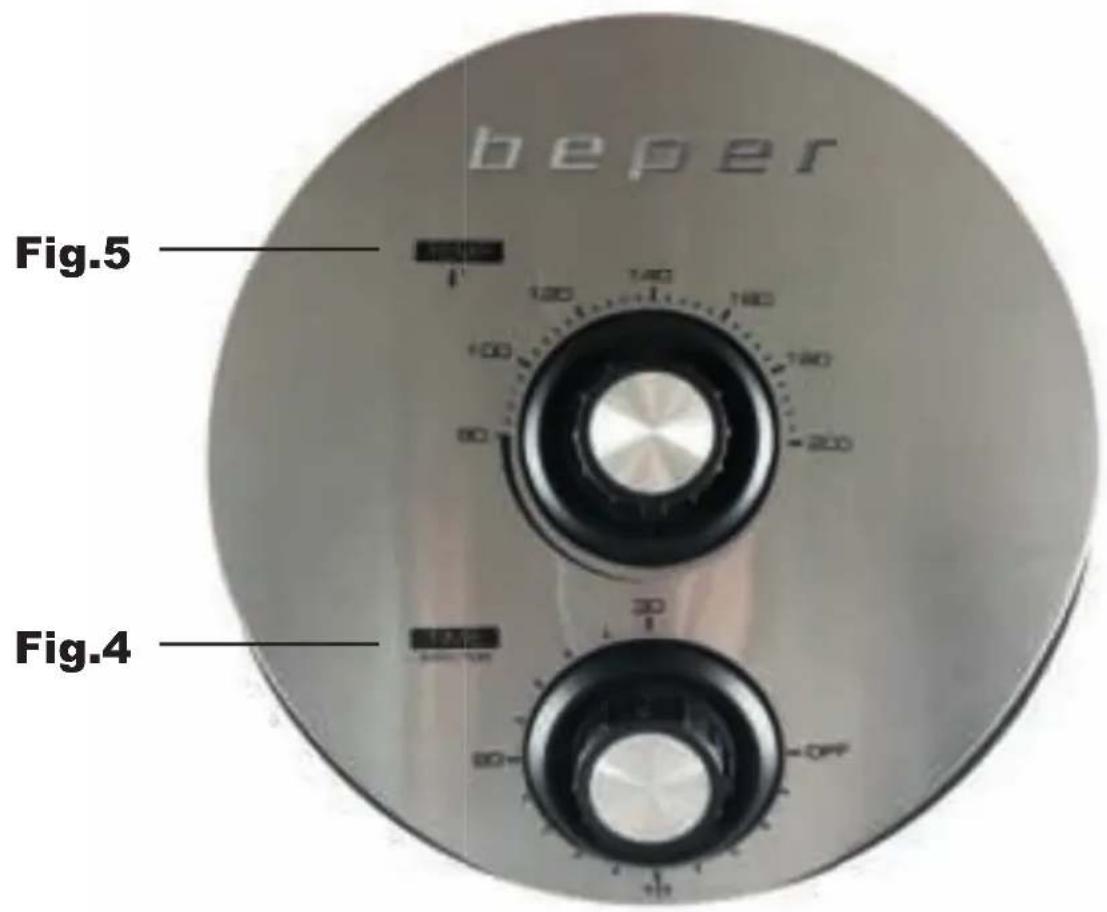
Fig.2 Fig.3
AVVERTENZE GENERALI
LEGGERE QUESTE ISTRUZIONI PRIMA DI USARE L'APPARECCHIO.
GENERAL SAFETY ADVICE
READ THE OPERATING INSTRUCTIONS CAREFULLY BEFORE FIRST USE OF THE APPLIANCE.
Read the following instructions carefully, since they give you useful safety information about installation, use and maintenance and help you avoid mishaps and possible accidents.
Remove the packing and make sure that the appliance is intact, with special attention to the supply cable. The elements of the packing (plastic bags, polystyrene, etc) do not have to be accessible to the children, in order to preserve them from danger sources.
It is recommended not to throw these packing material in the domestic waste, but to deliver them to the appropriate station of collection or destruction refusals, asking eventually information to the manager of the Sanitation Department of your own municipality.
Before connecting the appliance make sure that the mains voltage corresponds to the data specified on the label.
If the plug does not suit the socket, let it be replaced with another suitable plug by qualified personnel only, which shall also ensure that the section of the socket cables is suitable for your appliance power absorption.
Never pull the supply cord to unplug the appliance.
Make sure that the supply cord never comes into contact with hot or cutting surfaces
Do not use this appliance if the supply cord is damaged. In case of damage, it must be replaced by the manufacturer, its service agent or similarly qualified persons in order to avoid a hazard.
Only connect this appliance on alternating current
Generally, the use adaptors multiple plugs and/or extensions is not recommended; should they be necessary, please use only simple or multiple adaptors and extensions in compliance with the safety rules in force, making sure that the capacity absorption limit marked on the simple adaptors and the extensions and the maximum power limit marked on the multiple adaptor are not exceeded.
This appliance is to be destined to its special purpose only.
Any other use is to be considered as improper and thus dangerous. The manufacturer cannot be responsible for any damages deriving from improper, wrong or incautious use.
To avoid any heating risk, it is recommended to unroll completely the supply cord and to unplug the appliance, when not used.
Before cleaning, always unplug the appliance.
To protect against electric shock, do not immerse cord, plug or any parts of the appliance into water or other fluids.
Do not hold the appliance with wet hands or feet.
Do not hold the appliance with naked feet.
Do not expose the appliance to atmospheric agents such as rain, wind, snow, hail.
Do not use the appliance near explosives, highly flammable materials, gases, burning flames, heaters.
Do not allow children, disabled people or every people without experience or technical ability to use the appliance if they are not properly watched over. Close supervision is necessary when any appliance used by or near children.
Make sure that children do not play with this appliance.
If you decide not to use the appliance any longer, make it unserviceable by simply cutting the supply cable after disconnecting the plug from the socket.
ALSO MAKE ANY DANGEROUS PARTS UNSERVICEABLE, ESPECIALLY FOR CHILDREN WHO COULD PLAY WITH THE APPLIANCE.
DESCRIPTION Fig.1
- Housing
- Temperature control knob
- Timer knob
- Power-on light
- Basket
- Basket release button
- Basket handle
- pan
- Air outlet openings
10.Power cord
WARNING:
Never immerse the housing, which contains electrical components and the heating elements, in water or rinsing under the tap
Avoid any liquid enter the appliance
Do not cover the air inlet and the air outlet when the appliance is working.
Keep all ingredients in the basket or prevent any contact from heating elements.
Never fill the pan and or the basket with oil
Don't touch the appliance while it is operating. Danger of scalding.
Do not place the appliance against a wall or against other appliances. Leave at least 10cm free space on the back and sides and 10cm free space above the appliance while in use.
During hot air frying, hot steam is released through the air outlet openings, Keep your hands and face at a safe distance from the steam and from the air outlet openings.
Also be careful of hot steam and air when you remove the pan from the appliance.
Immediately unplug the appliance if you see dark smoke coming out of the appliance. Wait for the smoke emission to stop before let the appliance cool down before use again.
TIMER:
This appliance is equipped with a timer, when the timer has counted down to 0, the appliance produces a bell sound and switches off automatically. To switch off the appliance manually, turn the timer knob anticlockwise to 0.
Caution
- Ensure the appliance is placed on a horizontal, even and stable surface.
- Check if the voltage indicated on the appliance fits the local mains voltage.
FIRSTUSE:
Remove all packaging materials and check that all parts will be inside and not damaged.
"Wash all parts by following the instruction shown on section" CLEANING
USAGE:
Place the appliance on a stable, horizontal, even and hot resistant surface.
Check if the voltage indicated on the appliance fits the local mains voltage and plug in.
Carefully pull the pan out of the Hot-air fryer while pushing the special button (Fig.2).
Put the ingredients in the basket.
Determine the required preparation time for the ingredient (see the setting table). You can prepare different ingredients at the same time, important thing is that they must have the same cooking time.
Slide the pan back into the Hot-air fryer (Fig.3). Noting to carefully align with the guides in the body of the fryer. Never use the pan without the basket in it.
Do not touch the pan during and immediately after use, as it gets very hot. Only hold the pan by the handle.
To switch on the appliance, turn the timer knob to the required preparation time (Fig.4)
Turn the temperature control knob to the required temperature. (see the setting table) (Fig.5).
You can also let the appliance preheat without any ingredients inside. In that case, turn the timer knob to 3 minutes and wait until the heating-up light goes out. Then fill the basket and turn the timer knob to the required preparation time.
The timer starts counting down the set preparation time. During the hot air frying process, the heating-up light comes on and goes out from time to time. This indicates that the heating element is switched on and off to maintain the set temperature.
Excess oil from the ingredients is collected on the bottom of the pan.
Some ingredients require shaking halfway through the preparation time (see the setting table). To shake the ingredients, pull the pan out of the appliance by the handle and shake it. Then slide the pan back into the fryer.
When you hear the timer bell, the set preparation time has elapsed. Pull the pan out of the appliance and place it on a trial framework. Check if the ingredients are ready. If the ingredients are not ready yet, simply slide the pan back into the appliance and set the timer to a few extra minutes.
Empty the basket into a bowl or onto a plate, do not turn the basket upside down with the pan still attached to it, as any excess oil that has collected on the bottom of the pan will leak onto the ingredients.
Settings
This table below will help you to select the basic settings for the ingredients. Keep in mind that these settings are indications. As ingredients differ in origin, size, shape as well as brand, we cannot guarantee the best setting for your ingredients.
Smaller ingredients usually require a slightly shorter preparation time than larger ingredients.
A larger amount of ingredients only requires a slightly longer preparation time, a smaller amount of ingredients only requires a slightly shorter preparation time.
Shaking smaller ingredients halfway through the preparation time optimizes the end result and can help prevent unevenly fried ingredients.
Do not prepare extremely greasy ingredients in the Hot-air fryer.
You can also use the Hot-air fryer to reheat ingredients. To reheat ingredients, set the temperature to 150^ for up to 10 minutes.
| Min-max Amount (g) | Time (min.) | Temperature °C | Shake Extra information | |
| Thin frozen fries 300 | 400 18-20 200 shake | |||
| Thick frozen fries 300 | 400 20-25 200 shake | |||
| Potato gratin 500 20 | 25 200 shake | |||
| Steak 100-500 10-15 | 180 | |||
| Pork chops 100-500 | 10-15 180 | |||
| Hamburger 100-500 | 10-15 180 | |||
| Sausage roll 100-500 | 13-15 200 | |||
| Drumsticks 100-500 | 25-30 180 | |||
| Chicken breast 100-500 | 500 15-20 180 | |||
| Spring rolls 100-400 | 3-10 200 shake | Use oven-ready | ||
| Frozen chicken nuggets | 100-500 6-10 200 shake Use oven-ready | |||
| Frozen fish fingers 100 | 00-400 6-10 200 | Use oven-ready | ||
| Frozen bread crumbed | 100-400 8-10 180 Use oven-ready | |||
| cheese snacks | 100-400 10 | 160 | ||
| Stuffed vegetables | 100-400 10 | 160 Use baking tin | ||
| Cake | 300 20-25 160 | Use baking tin/oven | dish | |
| Quiche | 400 20-22 180 | Use baking tin | ||
| Muffins | 300 15-18 200 | Use baking tin/oven | dish | |
| Sweet snacks | 400 20 | 160 | ||
Note: Add 3 minutes to the preparation time when you start frying while the Hot-air fryer is still cold.
Cleaning:
Clean the appliance after every use.
Remove the mains plug from the wall socket and let the appliance cool down, remove the pan to let the Hot-air fryer cool down more quickly.
Do not use metal kitchen utensils or abrasive cleaning materials to clean the pan and the basket, to prevent damages.
Wipe the outside of the appliance with a moist cloth.
Clean the pan and the basket with hot water, some washing-up liquid and a non-abrasive sponge.
You can use degreasing liquid to remove any remaining dirt.
The pan and basket are dishwasher-proof.
Clean the inside of the appliance with hot water and non-abrasive sponge.
Clean the heating element with a cleaning brush to remove any food residues.
Before replace the appliance make sure all parts are clean and dry.
TECHNICAL DATA:
Power: 1300W
Power supply: 220 - 240V 50 - 60Hz
Capacity of basket:2.5Litre
Adjustable temperature: 80^ - 200^
Timer (0-30 min)
For any improvement reasons, Beper reserves the right to modify or improve the product without any notice.

The European directive 2011/65/EU on Waste Electrical and Electronic Equipment (WEEE), requires that old household electrical appliances must not be disposed of in the normal unsorted municipal waste stream. Old appliances must be collected separately in order to optimize the recovery and recycling of the materials they contain, and reduce the impact on human health and the environment. The crossed out "wheeled bin" symbol on the product reminds you of your obligation, that when you dispose of the appliance, it must be separately collected.
GUARANTEE CERTIFICATE
This appliance has been checked in the factory. From the date of original purchase a 24 month guarantee applies to material and production defects. The purchase receipt and the guarantee certificate must be submitted together in case of claim to guarantee.
The guarantee is valid only with a guaranty certificate and proof of purchase (fiscal receipt) indicating the date of purchase and the model of the appliance
For any technical assistance, please contact directly the seller or our head office in order to preserve the appliance's efficiency and NOT TO void the guarantee. Any intervention on this appliance by non-authorized persons will automatically void the guarantee.
GUARANTEE CONDITIONS
If the appliance shows defects as a result of faulty material and/or production during the period of guarantee, we guarantee repair free of charge on condition that:
- The appliance has been used properly and for the purpose for which it has been intended.
- The appliance has not been tampered with, otherwise it is not maintainable.
- The purchase receipt shall be presented.
- The appliance showing a fair wear and tear shall not be covered by this guarantee.
Therefore, any part that could be accidentally broken or having visible signs of use in consumable products (such as lamps, batteries, heating elements...) the aesthetic parts are excluded from the guarantee, and any defect whatsoever resulting from non-respect of the rules for use, negligence in usage and/or maintenance of the appliance, carelessness, wrong or improper installation, damage during transport and any other damage not attributable the supplier.
For every defect that could not be repaired within the guarantee period, the appliance will be replaced free of charge.
In any case, if the part to be replaced for defect, breakage or malfunction is an accessory and/or a detachable part of the product, Beper reserves the right to replace only the very part in question and not the entire product
TECHNICAL ASSISTANCE
Even after the guarantee period we will always pay attention to repairs for defected appliances.
For technical assistance and/or repairs after the guarantee period you can directly contact the below address:
CONTACT YOUR DISTRIBUTOR IN YOUR COUNTRY OR ATER SALES DEPARTMENT BEPER. E-MAIL assistenza@beper.com WHICH WILL FORWARD YOUR ENQUIRIES TO YOUR DISTRIBUTOR.
PRECAUTIONS GENERALES
LIRE ATTENTIVEMENT LES INSTRUCTIONS SUIVANTES AVANT LA PREMIÈRE UTILISATION DE L'APPAREIL.