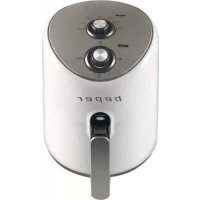
90.495N - Deep fryer Beper - Free user manual and instructions
Find the device manual for free 90.495N Beper in PDF.

| Product type | Electric deep fryer |
| Brand | Beper |
| Model | 90.495N |
| Power | 2000 W |
| Power supply | 220-240 V ~ 50/60 Hz |
| Oil capacity | Between MIN and MAX marks |
| Non-stick coating | Yes (non-stick container) |
| Filter | Yes, replaceable |
| Viewing window | Yes |
| Temperature adjustment | Yes (adjustable thermostat) |
| Thermal safety | Device with reset button |
| Anti-slip feet | Yes |
| Carrying handles | Yes |
| Basket handle | Removable, to assemble |
| Cleaning | Parts washable in soapy water (except control unit) |
| Warranty | 24 months |
Frequently Asked Questions - 90.495N Beper
User questions about 90.495N Beper
0 question about this device. Answer the ones you know or ask your own.
Ask a new question about this device
Download the instructions for your Deep fryer in PDF format for free! Find your manual 90.495N - Beper and take your electronic device back in hand. On this page are published all the documents necessary for the use of your device. 90.495N by Beper.
USER MANUAL 90.495N Beper
For further information and/or for instructions for use in other languages, please visit: www.beper.com
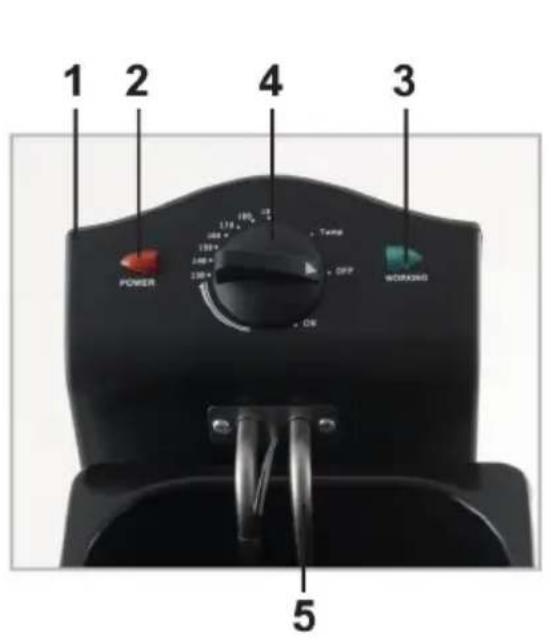
Fig.1
AVVERTENZE GENERALI
LEGGERE QUESTE ISTRUZIONI PRIMA DI USARE L'APPARECCHIO.
Please read the instructions for use carefully before using your fryer for the first time.
Never leave the fryer (whether or not it is in use) within reach of children without supervision. Never allow children to use the fryer on their own. The use of this appliance by disabled persons must be made under supervision.
Check that the voltage rating of your fryer corresponds to that of your electrical system, and that your electricity supply can support at least 10 amps.
Any connection error will render the guarantee null and void.
It is essential that your fryer is connected by means of an earthed plug. Non compliance with this obligation can cause an electric shock and may lead to serious injury. It is vital for your own safety that the earth plug corresponds to the electrical installation standards in force in your country. If your wiring system does not include an earthed socket, it is vital that you call in a qualified electrician before plugging in the appliance, in order to bring your electrical system up to standard.
Never use your fryer if it is not working properly, or if it has been damaged.
Any intervention other than cleaning intended exclusively for domestic use and within the home.
Unplug your fryer once you have stopped using it and when you are cleaning it.
Never put the fryer, the power cable or the plug into water or any other liquid.
Never allow the power cable to hang down within reach of children. Always keep the fryer well away from children.
The power cable must never be close to or touching the hot parts of the appliance, near a source of heat or rest on a sharp edge.
If the power cable or the plug are damaged, do not use the fryer. To avoid any risk, these must be replaced by an approved service centre.
Install your fryer on a worktop well away from any source of heat and from any risk of water splashes. A safety cut-out switch prevents the fryer from working if the removable tank, the external casing or the control panel are not in place.
Never operate your fryer without putting in the removable tank filled with oil.
Check that the oil level is above the "min" indicated in the tank.
Oil and fat are flammable products. If the oil or fat catches fire, unplug the fryer, cover it with its own lid or a plate to stifle the flame, but never use water.
The fryer is protected by a thermostat and an overheating safety appliance which automatically cuts off the electrical power in the event of accidental over-heating. However, if the appliance is used incorrectly (no oil, or insufficient oil, or failure to comply with the instructions for melting fat), it is possible to reset the safety switch. If the safety switch cuts off the power for other reasons, it is vital that you consult your retailer or an approved service centre.
Always observe the mini/maxi levels indicated inside the removable tank.
Never move your fryer while it is in use or while the oil is still hot. Hot oil can cause very serious burns.
It is essential that you wait until the oil has cooled down before removing the tank.
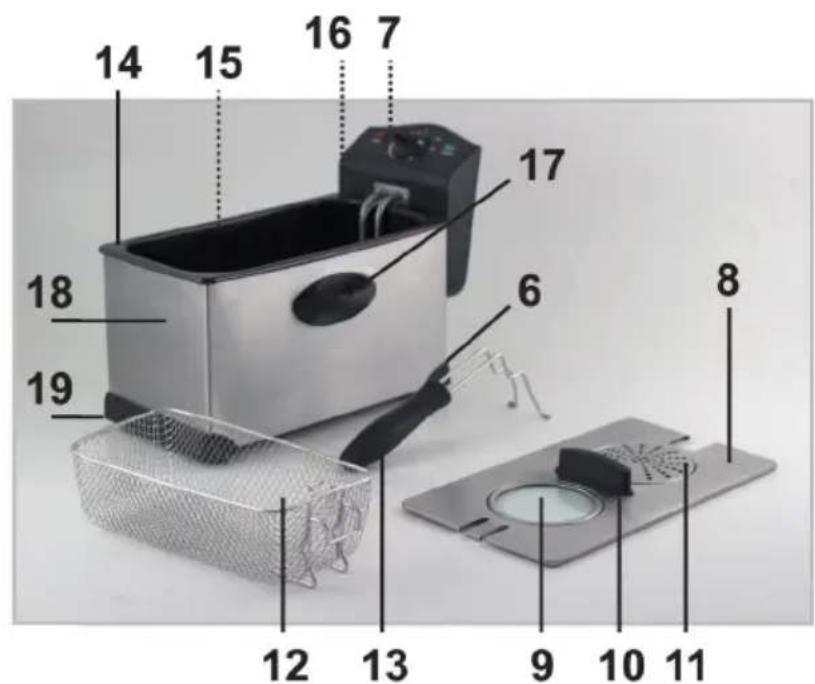
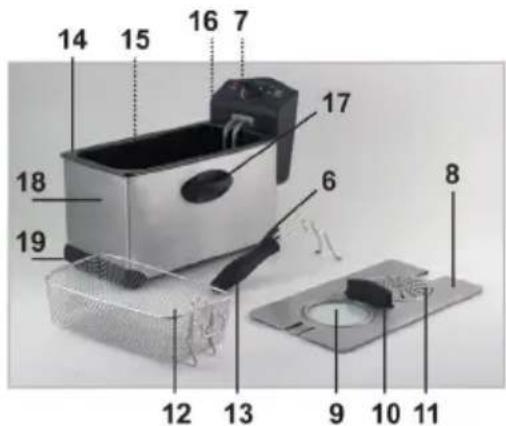
DESCRIPTION OF PRODUCT Fig.1
1 - Control Panel
2 - Power indicator light (red)
3 - Oil temperature indicator light (green)
4 - Temperature control knob
5 - Electrical resistance
6 - Power Cord
7 - Key reset thermal safety device
8 - Cover
9 - Window for cooking
10 - Handle of the lid
11-Filter
12-Basket
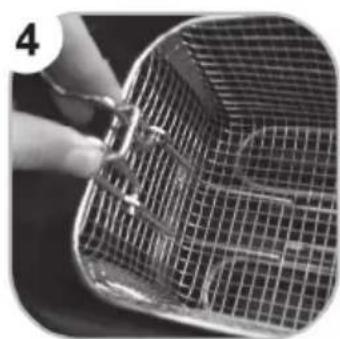
13 - Pull handle of the basket
14 - Removable container
15 - Indication of the level of oil MIN and MAX
16 - See for attaching the control panel
17 - Carrying handles
18 - Body of the fryer
19 - Non-slip feet

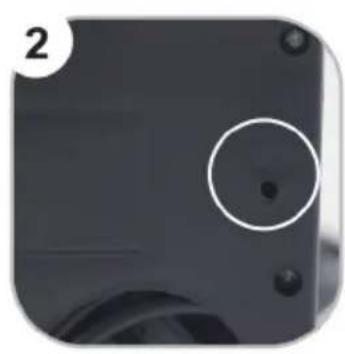
THERMAL SAFETY SWITCH
A thermal safety switch automatically cuts off the electrical power to the appliance in case of accidental overheating as the result of incorrect use of the appliance (no oil, or insufficient oil or failure to comply with the instructions for melting fat), or as the result of some kind of functional failure of the appliance (for example: defective thermostat).
If the appliance is used incorrectly, and after allowing the appliance to cool down, using a toothpick or similar object, all you need to do is press gently on the reset button behind the control panel.
BEFORE FIRST USE
Unpack your fryer and read the instructions for use carefully.
Open the lid
Fold down the handle until it locks.
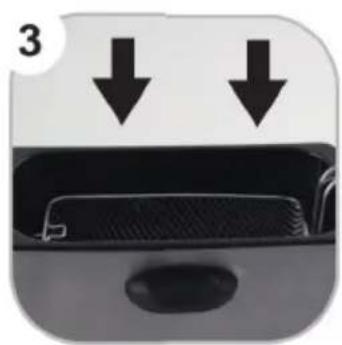
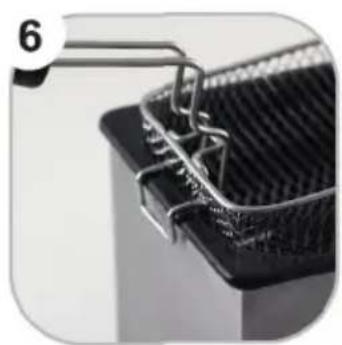
1-Remove the basket by lifting the handle
2-Remove the control panel and the removable bowl by lifting them vertically.
Wash the oil container and the basket with hot water and washing up liquid, rinse and dry carefully.
Replace the oil container
USING THE FRYER
1. Adding oil or fat
Open the lid
Remove the basket by raising the handle. If you are using oil, pour the oil into the removable oil container up to the «Maxi» level never exceed the «Maxi» level indicated in the removable bowl, as you run the risk of the oil overflowing during frying.
If you are using blocks of fat, cut them into pieces, melt them in a container and pour the melted fat into the container. Never melt the blocks of fat in the basket or on the element.
Now you can start cooking.
Note: When the level of fat in its solid state falls below the "mini" level, add 250 g.
- Frying food
Set the thermostat to the required setting, then set the timer to the required setting. The control light comes on. When the oil has reached the required temperature, the control light goes out.
Open the lid by lifting it with the handle.
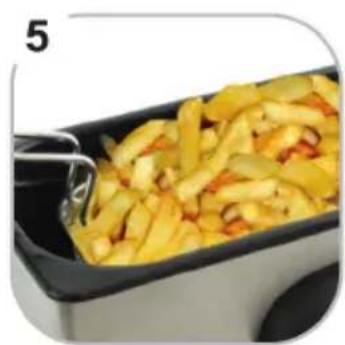
Place the food in the basket.
Slowly lower the basket into the oil from the draining position.
Close the lid
When the cooking is finished, open the lid, raise the basket and place it in the draining position.
Do not forget to turn off your fryer.
Notes:
If you need to fry several batches of food in succession, wait each time until the indicator light has gone out before putting food into the oil.
PRACTICAL TIPS
1. Oil or fat
Never operate your fryer without oil.
Always use an oil which can withstand high temperatures.
Do not mix oils of different qualities.
Change the oil when it becomes brown after cooking (after 10 to
20 uses, depending on the type of cooking done).
Important: Before each use, make holes in the solid fat with a non-metallic spatula to the bottom of the tank, in order to allow any water trapped under the fat to escape in the form of steam.
In order to preserve your oil or fat for longer, the small particles of food will fall into a cool zone which is located at the bottom of the tank beneath the heating element.
Preparing foods for frying
No matter what the recipe, food must be perfectly dry to prevent overflowing and to extend the life of the oil.
1-When dishes include raw potatoes (chips, crisps and potato straws), wash them in cold water to get rid of the starch after chopping them. Dry them carefully, and this will prevent them from sticking together.
2-When preparing frozen foods, remove any ice crystals before cooking by shaking the basket over the sink.
Cooking
Do not overfill the basket, or you will cause the temperature in the fryer to drop, and this will make the food too greasy. The safety capacity of your fryer (provided that you slowly lower the basket into the oil to prevent any risk of overflowing) and the optimum cooking capacity are limited to:
For fresh or frozen chips Do not leave your fryer heating unnecessarily: your oil will last longer. Set the temperature selector to the "low" setting while waiting between two batches of frying. Do not leave your fried preparations in the basket in the draining position for too long, as the steam may soften them and take away their crispness.
COOKING CHARTS
Cooking times are given by way of indication.
You can adjust them according to your own tastes and the quantities.
| Setting of temperature selector | Foods Time (min) | |
| 150 Onions 3-4 | ||
| 170 Mushrooms 6-8 | ||
| 180 Vegetable fritters 6-8 | ||
| 180 Cod fillets 6-8 | ||
| 170 Fried smelt 6-8 | ||
| 160 Prawns 6-8 | ||
| 170 Fish balls 6-8 | ||
| 170 Breaded pork chops 8-10 | ||
| 170 Veal cutlets 8-10 | ||
| 160 Fish fillets 6-8 | ||
| 170 Sardines 8-12 | ||
| 170 Apple fritters 4-6 | ||
| 170 Chips-1st immersion | 6-9 | |
| 190 Chips-2nd immersion 2-4 | ||
| 190 Chips-one immersion 13-15 | ||
| 180 Chicken portions 5-6 |
Please note: When cooking chips, lower the basket slowly to prevent overflowing. This risk is increased if you are using new potatoes, pre-cooked chips available from the chill cabinet or defrosted chips (see preparation of food for frying). For frozen foods, set the thermostat & the timer.
Weight and cooking times frozen products
| FOOD OPTIMUM WEIGHT (g) | TIME (min) | |
| Chips (pre-cooked) 900 11-15 | ||
| Mini potato croquettes 800 8-12 | ||
| Potato pancakes 300 6-8 | ||
| Cod in breadcrumbs 400 4-6 | ||
| Hake in bredadcumbs 400 4-6 | ||
| Fried smelt 400 4-6 | ||
| Fish fillets in batter 400 4-6 | ||
| Scampi 500 4-6 | ||
| Squid rings 500 4-6 | ||
| Apple fritters 300 5-7 | ||
| Breaded chicken escalopes 400 | 8-10 | |
| Breaded pork chops | 400 8-10 | |
| Breaded veal chops | 400 8-10 |
CLEANING
Unplug your fryer and allow it to cool down.
Clean the exterior of the fryer with a damp cloth. Do not use an abrasive pad or alcohol.
Never immerse the fryer in water and never wash it under running water.
1- To clean the inside of the lid, use a damp sponge with washing up liquid, rinse and dry. Do not use abrasive pads as you will risk damaging it.
2- To clean the basket, remove it. Wash the basket in hot water with washing up liquid, rinse and dry.
3- The basket must not be put into the dishwasher.
When you change the oil, take the opportunity to clean the removable bowl in the dishwasher or in hot water with washing up liquid. Rinse and dry.
TECHNICAL DATA
Power: 2000W
Power supply: 220-240V ~ 50/60Hz
For any improvement reasons, Beper reserves the right to modify or improve the product without any notice.
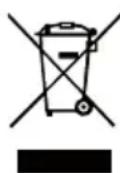
The European directive 2011/65/EU on Waste Electrical and Electronic Equipment (WEEE), requires that old household electrical appliances must not be disposed of in the normal unsorted municipal waste stream. Old appliances must be collected separately in order to optimize the recovery and recycling of the materials they contain, and reduce the impact on human health and the environment. The crossed out "wheeled bin" symbol on the product reminds you of your obligation, that when you dispose of the appliance, it must be separately collected.
GUARANTEE CERTIFICATE
This appliance has been checked in the factory. From the date of original purchase a 24 month guarantee applies to material and production defects. The purchase receipt and the guarantee certificate must be submitted together in case of claim to guarantee.
For any technical assistance, please contact directly the seller or our head office in order to preserve the appliance's efficiency and NOT TO void the guarantee. Any intervention on this appliance by non-authorized persons will automatically void the guarantee.
Guarantee conditions
If the appliance shows defects as a result of faulty material and/or production during the period of guarantee, we guarantee repair free of charge on condition that:
- The appliance has been used properly and for the purpose for which it has been intended.
- Repairs are professionally carried out by qualified persons who are appointed by the supplier.
- The purchase receipt shall be presented.
- The appliance showing a fair wear and tear shall not be covered by this guarantee.
Therefore, any part that could be accidentally broken or having visible signs of use in consumable products (such as lamps, batteries, heating elements...) is excluded from the guarantee, and any defect whatsoever resulting from non-respect of the rules for use, negligence in usage and/or maintenance of the appliance, damage during transport and any other damage not attributable the supplier.
For every defect that could not be repaired within the guarantee period, the appliance will be replaced free of charge.
Technical assistance
Even after the guarantee period we will always pay attention to repairs for defected appliances. For technical assistance and/or repairs after the guarantee period you can directly contact the below address:
CONTACT YOUR DISTRIBUTOR IN YOUR COUNTRY OR AFTER SALES DEPARTMENT
BEPER. E-MAIL assistenza@beper.com
WHICH WILL FORWARD YOUR ENQUIRIES TO YOUR DISTRIBUTOR.