
Pedelec Speed - Electric bike PANASONIC - Free user manual and instructions
Find the device manual for free Pedelec Speed PANASONIC in PDF.

Frequently Asked Questions - Pedelec Speed PANASONIC
User questions about Pedelec Speed PANASONIC
0 question about this device. Answer the ones you know or ask your own.
Ask a new question about this device
Download the instructions for your Electric bike in PDF format for free! Find your manual Pedelec Speed - PANASONIC and take your electronic device back in hand. On this page are published all the documents necessary for the use of your device. Pedelec Speed by PANASONIC.
USER MANUAL Pedelec Speed PANASONIC
Thank you for choosing a Pedelec (pedal electric cycle) from us. This bike is equipped with an electric drive that assists you when you are cycling. This will make your trip much more enjoyable if you are riding up hills, carrying loads or riding into the wind. You can decide yourself how much you want to use it. The purpose of this User Manual is to help you get the most out of your fast Pedelec and use it correctly.
Although this vehicle looks like a normal bike and can also be used as such, there are a number of important differences. It is for example viewed from a legal point of view as a L1e moped. You must have a moped test certificate and an insurance plate in order to ride it.
Structure of User Manual
If you want to get started right away, refer to the brief introduction in Chapter 1 "Quick start"
The individual steps are subsequently explained in detail, supplemented by illustrations and diagrams.
For more detailed information on your fast Pedelec, refer to Chapter 11 "Technical data".
The information in this User Manual specifically refers to your fast Pedelec only. For general information, on the bike technology that features in your Pedelec for example, refer to the General User Manual.

Even if you can't wait to go for your first ride, in the interest of your own safety you should read Chapter 1 "Quick start" carefully without fail before use.
In addition to texts and tables, the User Manual contains the following symbols that denote important information or dangers.
WARNING about possible physical injury, increased risk of falls or other injuries

IMPORTANT ADDITIONAL INFORMATION or special information on using the bike

NOTE about possible damage to property or the environment
Content
1 Quick start
2 Fast Pedelec/fundamental legal principles
2.1 Legal principles
2.1.1 Meaning for the rider
2.1.2 Fast Pedelecs and cycle paths
2.1.3 Travel speed switch
3 Charging the battery

3.1 Charging operation
3.2 Fitting the battery
4 LCD control panel
4.1 Function of control panel
4.1.1 On/Off button
4.1.2 Selector button for display panel 10
4.1.3 Changing the assist level 11
4.1.4 Resetting recorded data 11
4.1.5 Switching the display on and off 11
4.1.6 Deleting all data 11
4.1.7 Reprogramming the language, wheel circumference and LCD contrast 12
4.1.8 Automatic switch-off 13
4.1.9 Measurement and display ranges 13
4.1.10 Battery charge state indicator 13
4.1.11 Power output indicator 13
4.1.12 Switching the light on and off 14
5 Assistance by the electric motor 14
5.1 Operating principle of assistance 14
5.2Distance15
5.3 Riding your Pedelec efficiently 16
6 Battery 17
6.1 Straightforward charging 17
6.2 High degree of safety due to battery management 17
6.3 Straightforward storage 17
6.4 Battery information system 18
6.4.1 Checking the battery charge state 18
6.4.2 Checking the battery capacity 18
6.5 Service life and warranty 19
6.5.1 of battery 19
7 Charger 20
8Troubleshooting20
8.1 Problems/solutions: Flash patterns and their meaning 21
8.1.1Nodisplay21
8.1.2 Battery charge state indicator flashing or not visible 21
8.1.3Display"E1"21
8.1.4Display"E9" 22
8.1.5 Assistance control indicator flashing 22
8.1.6 Additional possible sources of errors 22
9Cleaning 22
10Warnings 23
11 Technicaldata 24
12 Replacing components of the fast Pedelec 25
12.1 Components that can only be replaced by equivalent parts or approved parts 25
12.2 Spare tyres 26
12.3 Components that do not require a certificate of approval 27
1 Quickstart
- Charge the battery completely before riding for the first time.
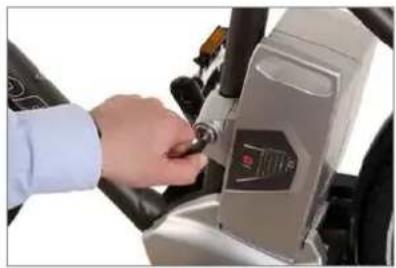
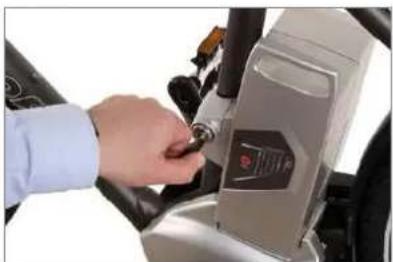
Unlocking the battery
- To remove the battery, grip the handle, insert the key into the lock and turn it anticlockwise. The battery is now unlocked.
- Tilt the battery sideways and lift it with both hands out of the holder.
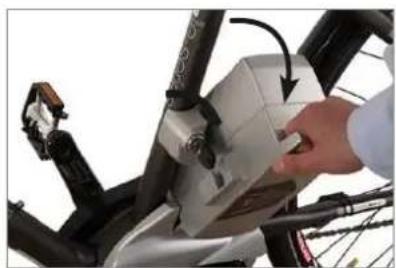
Tilt to remove
- Put the battery in the docking station of the charger. The battery LEDs light up or flash. You must fully charge the battery before using it for the first time.
- Once all LEDs have gone out, take the battery out of the docking station.
- Reinsert the battery into the holder on the Pedelec from the left-hand side. Move the battery outwards at an angle of roughly 45^ as you do so, as you did when you took it out of the holder. Move the battery into the upright position until the locking mechanism engages. If the key is still in the lock, you will need to turn it clockwise and pull it out to allow the battery to lock in place.
- Make sure that the battery is securely positioned and that the key is no longer in the lock.
- Push the "On / Off" button on the control panel on the handlebar. Wait for 2 seconds before turning the pedals. The drive system requires this time
when no force is applied to the pedals to adjust the power sensor correctly.
Press the "Assist" button to select the power assist mode. This works in both directions. The assistance output increases or decreases depending on which "Assist" button you press. If you select the most powerful setting then press the button again, you return to a mode without assistance.

Always operate one of the brakes before putting one of your feet on a pedal as the motor pulls your bike away immediately. This starting assistance is very convenient, especially when starting on hills. If you start off in road traffic or on unsurfaced roads without controlling your speed, you could come off your bike and seriously injure yourself.
- You can now ride off.
2 Fast Pedelec/fundamental legal principles
The essential idea behind the fast Pedelec is not only to be able to cover greater distances more quickly, but also more comfortably. You can choose to relax and let the bike do the work, exert yourself more physically, or simply get from A to B as fast as possible. You can decide this yourself by choosing an appropriate assist level.
This gives you more confidence on the road, as the powerful acceleration gives you more control and a greater degree of security. Your fast Pedelec assists you with 300 watts of power which takes you up to a speed of 45km / h
2.1 Legalprinciples
The fast Pedelec is classed from a legal point of view as a L1e moped. In some EU countries, like all other bikes, it must comply with certain regulations, the Road Traffic Licensing Regulation in Germany (StVZ0) for example. Please observe the relevant explanations and general information provided in the General User Manual.
- When riding with the power assist only, the fast Pedelec must not travel faster than 20km / h . You will therefore reach a speed of between 15 and 18km / h on the flat.
- The power assist switches itself off once you have reached a speed of roughly 45km / h . You will require 700 watts to reach this speed and you cannot do this with the assistance of the electric motor alone. You can reach speeds of 35 - 45km / h by combining a motor output of 300 watts with your own physical effort.
2.1.1 Meaning for the rider
- You do not legally have to wear a helmet. In the interest of your own safety, however, you should never ride without a helmet.
- You legally have to have a driving license. The moped test certificate is mandatory.
- If you have a German driving licence, you are automatically exempt from this requirement.
-
In Germany, if you were born before 01.04.1965, you may also ride a fast Pedelec without a driving licence.
-
You legally have to have insurance. In Germany, you can obtain the small registration mark from any insurance company.
- Use on cycle paths is restricted.

These regulations apply to you wherever you are in the European Union. It is possible that different regulations exist in other countries, also inside the EU in individual cases. Before using your fast Pedelec abroad, find out about the legal situation in the relevant country.
2.1.2 Fast Pedelecs and cycle paths
If you use your fast Pedelec as you would use a bike, i.e. without assistance from the electric motor, you can use all cycle paths without restriction. In some EU countries, restrictions apply if you use the motor on a cycle path. In Germany an amendment to the Road Traffic Ordinance (StV0) states that: You must use your fast Pedelec on cycle paths outside built-up areas, as is the case with mopeds. In exceptional cases where this is not permitted, the cycle path will also be marked with the sign "No mopeds" in accordance with Paragraph 2 Section 4 of the Road Traffic Ordinance (StV0). Inside built-up areas on the other hand, you can only use your Pedelec on cycle paths if the cycle path is marked accordingly in accordance with Paragraph 41, Sctn. 2, No. 5.
2.1.3 Travel speed switch
Your fast Pedelec is equipped with a travel speed switch. The bike is designed so that it cannot go faster than 20km / h when you press the travel speed switch without pushing the pedals. This is why wearing a helmet is not mandatory for the fast Pedelec.
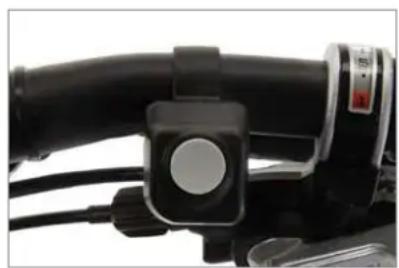
Travel speed switch
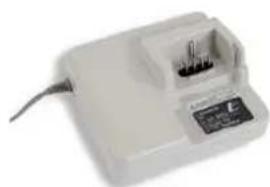
3 Charging the battery
To charge the battery, you have to take it out of the holder on the Pedelec.
Grip the battery by the handle, insert the key into the lock and turn it anticlockwise. The battery is now unlocked and can be removed from the Pedelec by tilting it sideways. In doing so, hold on tight to the battery to prevent it from being dropped.
Unlocking the battery
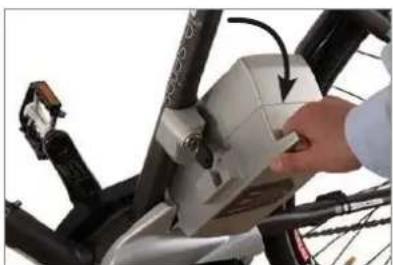
Tilt to remove
You should now remove the key and keep it in a safe place to prevent it from breaking off or being lost.
3.1 Chargingoperation
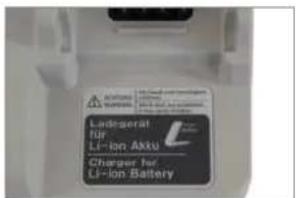
Before charging the battery, read the information on the charger carefully.
- Take the charger provided out of its packaging and plug the mains plug into a socket (230 V, observe type plate on the charger).
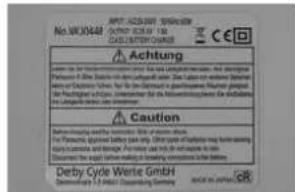
Type plate on charger: Front and back
- Put the battery in the docking station of the charger.
- The charging operation starts. The battery LEDs light up or flash. Once all five LEDs have gone out, the battery is fully charged. You can leave the battery standing in the charger. However, the charger always draws some current if you leave it plugged in.
- To save power, pull the charger plug out of the socket once the charging operation is complete.
3.2 Fitting the battery
- Insert the battery into the battery holder of the Pedelec from the left by tilting it outwards at roughly 45^ .
- In doing so, you must insert the lateral guides at the bottom of the battery into the guides of the holder.
- Tilt the battery towards the bike until it engages in the locking mechanism. If the key is still in the lock, turn it clockwise then pull it out to lock the battery in place.
- Make sure the battery is firmly in place.
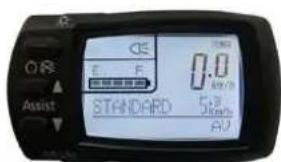
4 LCD control panel
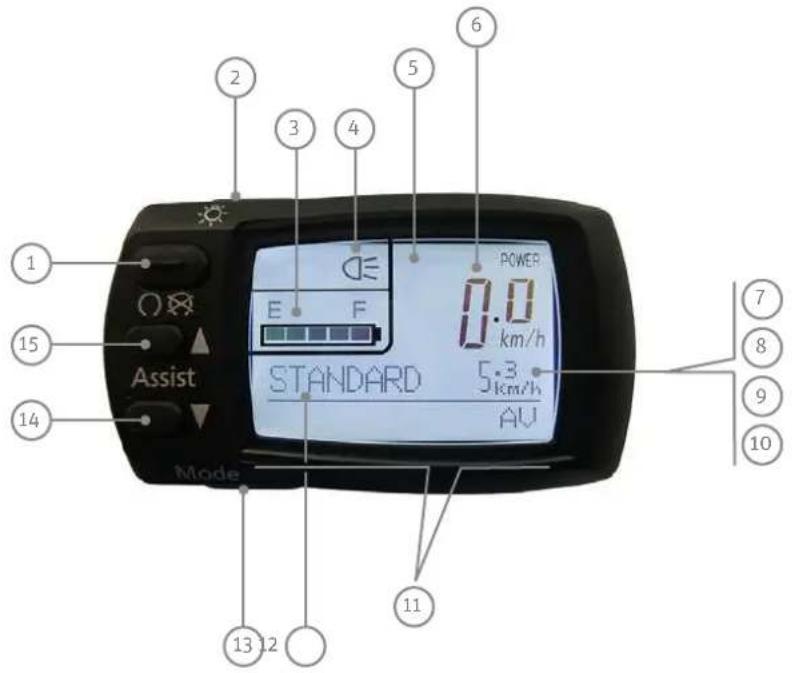
1On/Off
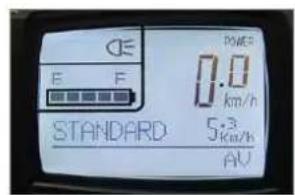
2 Light switch
3 Charge state indicator
4 Indicator for headlight
5 Power output indicator
(only visible when the bike is in motion)
6 Speed
7 Display of actual journey length
8 Average speed
9 Top speed
10 Total journey length
11 Display panel
12 Assist level
13 Selector button for display panel ("Mode")
14 Reduce assist level
15 Increase assist level
Display switched off
Display switched on
4.1 Function of control panel
4.1.1 On/Off button
Press the "On/Off" button to switch on the control panel and drive.
The assist level that was active at the time the control panel was switched off is automatically reinstated. The back-lit display is turned on briefly then goes out. All recording of data (trip, actual journey length, average speed, top speed, total journey length) starts as soon as you switch the control panel on and stops when you switch it off.
4.1.2 Selector button for display panel
You can display the information "Trip", "Average speed", "Top speed" and "Total journey length" consecutively by pressing the selector button for the display panel ("Mode").
The setting that was selected when you switched off is also displayed first in this case.
4.1.3 Changing the assist level

Increase power assist
The following assist levels are displayed one by one when you press the button for selecting a more powerful assist level: "NO ASSIST/no assistance", "ECO/low assist level", "STANDARD/medium assist level", "HIGH/high assist level", followed once again by "NO ASSIST/no assistance". This means that the assistance increases each time you press the button until you reach the highest power level. If you subsequently press the button, the assistance switches off.

Reduce power assist
If you press the button that reduces the assist level, the assistance reduces each time the button is pressed and returns to the most powerful assist level when it reaches the end of the loop.
In the "NO ASSIST/no assistance" mode, you ride the bike normally without the assistance of the motor.
4.1.4 Resetting recorded data
If you press the selector button for the display panel for longer than three seconds with the control panel switched on, this resets the trip, average speed and top speed to zero. You cannot delete the total journey length using this method.
4.1.5 Switching the display on and off
The back-lit display and LCD control panel display can also be switched on even if the drive is not enabled. To do this, press the button that switches the lights on. The drive remains in "NO ASSIST / no assistance" mode. Now you cannot change the assist level.
If you press the light button when the control panel is switched on, the back-lit display turns on.
If you press the light switch when the light is on, the backlit display turns off. The power assist is still available and you can change the assist level.
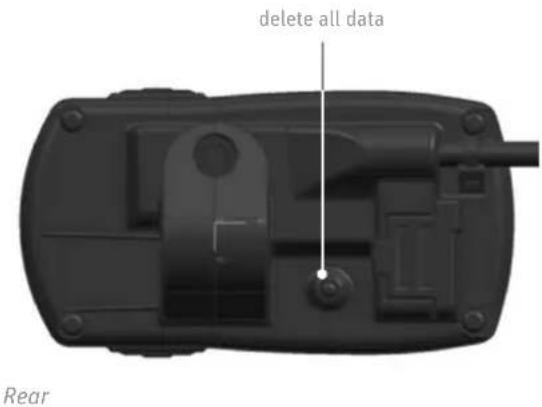
4.1.6 Deleting all data
Press the display ("Mode") selector button and the button that deletes all data on the rear of the control panel at the same time to delete all the data stored, including the total journey length. The display then automatically switches to settings mode for language, LCD contrast and wheel circumference.
4.1.7 Reprogramming the language, wheel circumference and LCD contrast
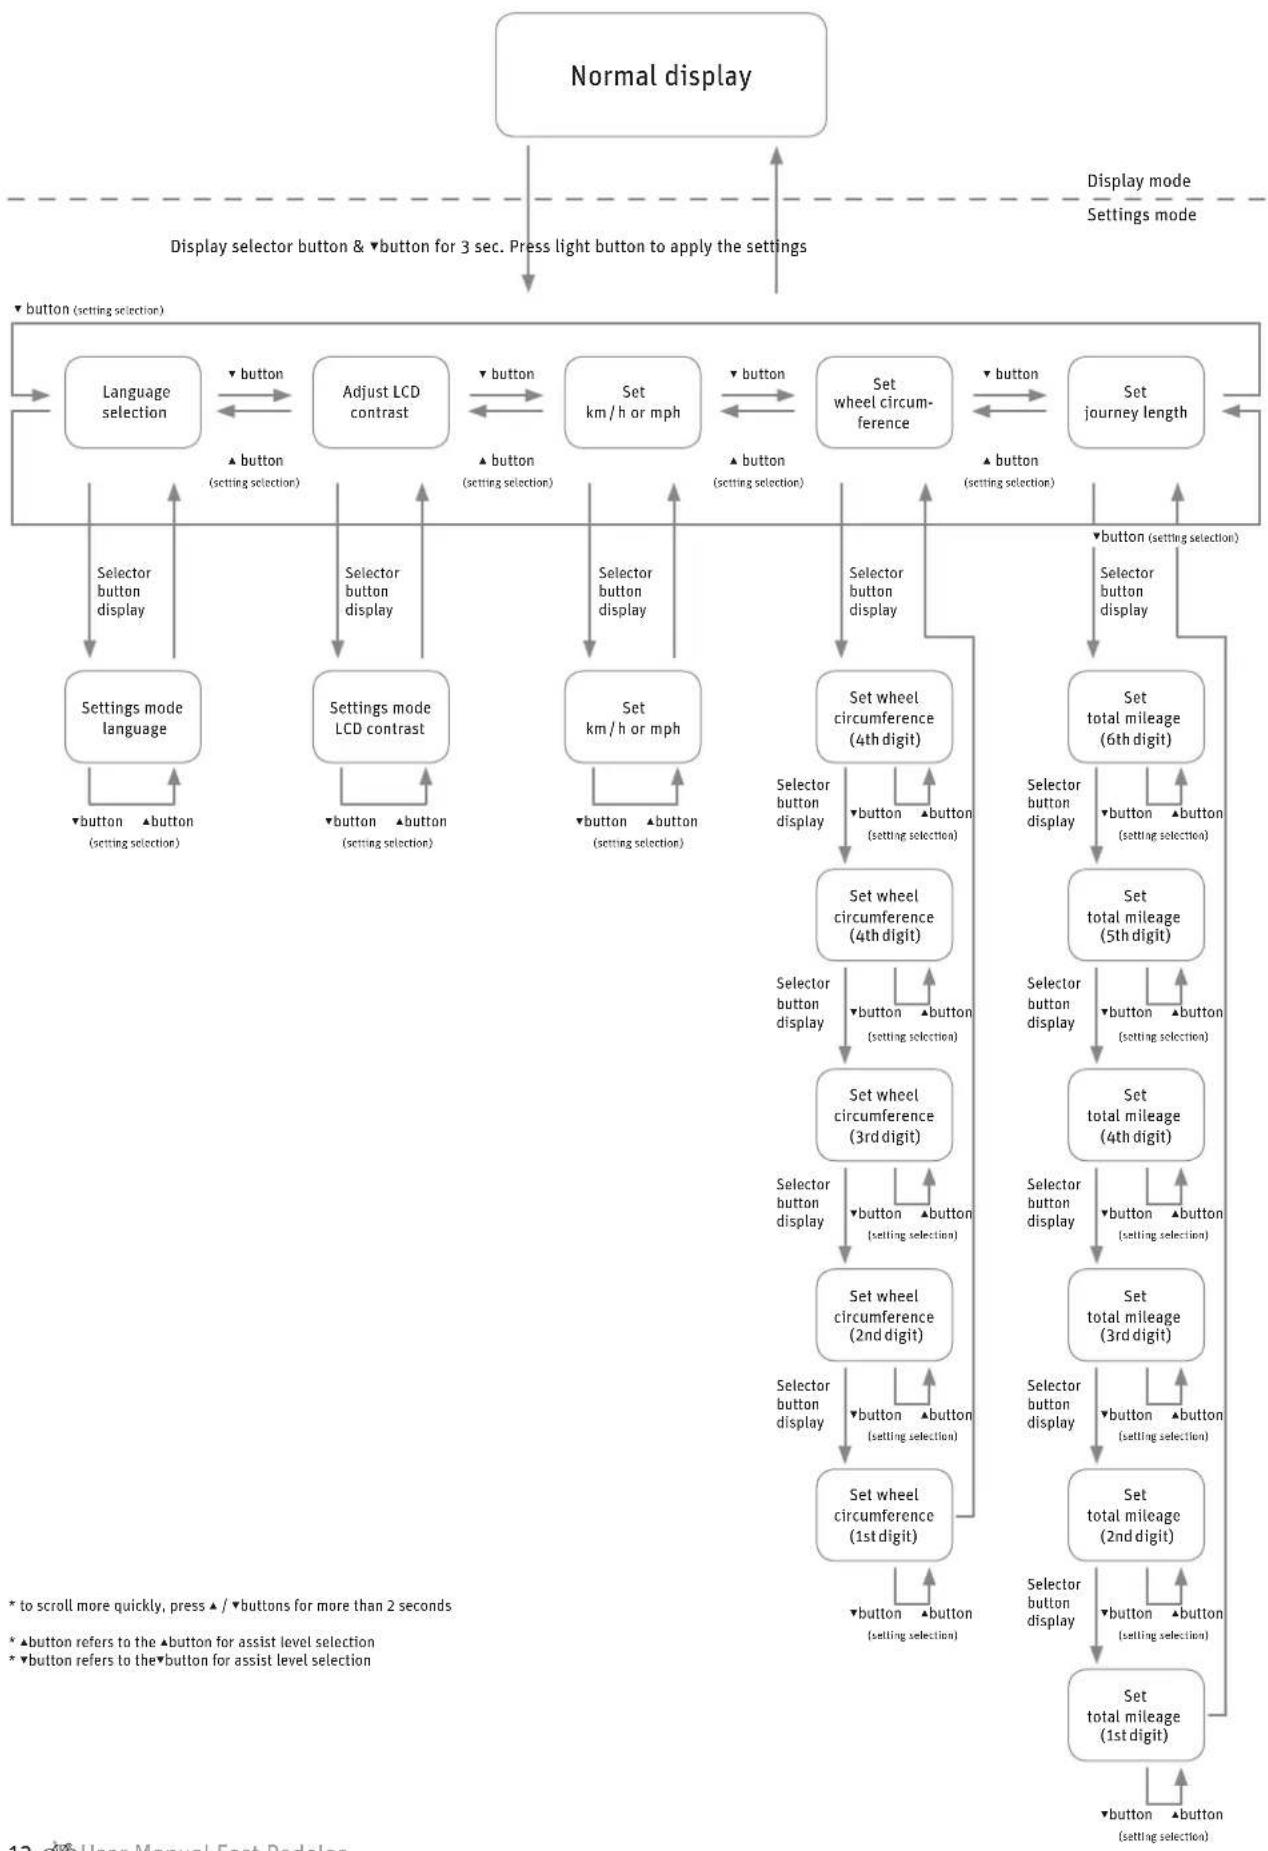
4.1.8 Automaticswitch-off
If you stop your Pedelec and it does not move for 10 minutes, the system switches off automatically. If you want to use the assistance again, you will have to switch it back on via the control panel.
4.1.9 Measurement and display ranges
DESCRIPTION DISPLAY RANGE
Speed 0.0 - 99.9km / h
Journey length 0.0 - 99999 km
(once the distance reaches 9999.9 km, this is displayed without a decimal place.)
Average speed 0 - 99.9km / h
Top speed 0.0-99.9 km/h
Total journey length 0.0 - 99999 km
(once the distance reaches 9999.9 km, this is displayed without a decimal place.)
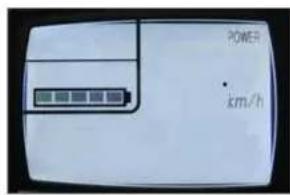
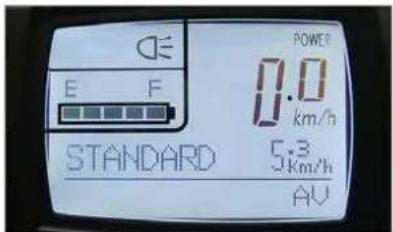
4.1.10 Battery charge state indicator
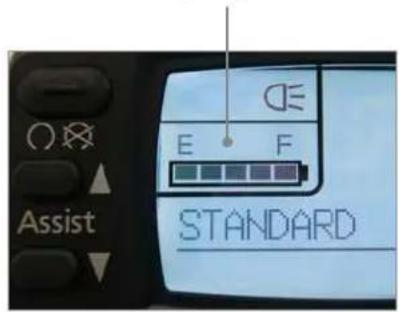
Battery charge state indicator
This indicator helps you save power when riding which means you can travel further.
The remaining battery charge is shown in 5 stages.
DISPLAY BATTERY CHARGE STATE
| 1 LED flashes | < 10% |
| no display – | 0% |
E: Battery is empty
F: Battery is full
4.1.11 Power output indicator

The power output indicator shows the actual power output being requested and the actual power consumption in 6 stages (bars).
This indicator helps you save power when riding which means you can travel further.
The fewer of the 6 bars that are displayed, the lower the actual power output of the motor and the consumption. If more bars are visible, the power output and consumption of the motor is higher.
| IF YOU CAN SEE... | THE BATTERY IS SUPPLYING A CURRENT OF |
6 bars more than 20 amperes
5 bars up to 16 - 20 A
4 bars up to 12-16 A
3 bars up to 8-12 A
2 bars up to 2 - 8 A
1 bar up to 0 - 2 A

If the power consumption is very low, no bars are displayed.
4.1.12 Switching the light on and off
If you are using the assistance and press the light switch, this switches the lighting of the fast Pedelec on and off.
If you are riding with the lights on and switch off the system, the lights also switch off automatically. You must therefore switch the lights on again.

You must always take the battery with you, even if you want to ride without assistance as the lights will only work with the battery.
5 Assistance by the electric motor

If your Pedelec is equipped with hub gears, you may have to take more load off the pedals when changing gears than you would normally do when riding your conventional bike. This is due to the additional power output of the electric motor. The hub gear system contains a device that protects it against gear shifting operations under excessive loads in order to preserve the gear unit in the hub.
5.1 Operating principle of assistance
The motor provides support as soon as you switch the assistance on and start pedalling.
The thrust delivered by the motor depends on three factors:
- Your own pedalling effort
The motor adapts to the force you apply. If you pedal harder, e.g. uphill or when setting off, the power sensor detects this and increases the thrust accordingly. However, the thrust is limited by the maximum motor output.
- The assist level you have selected
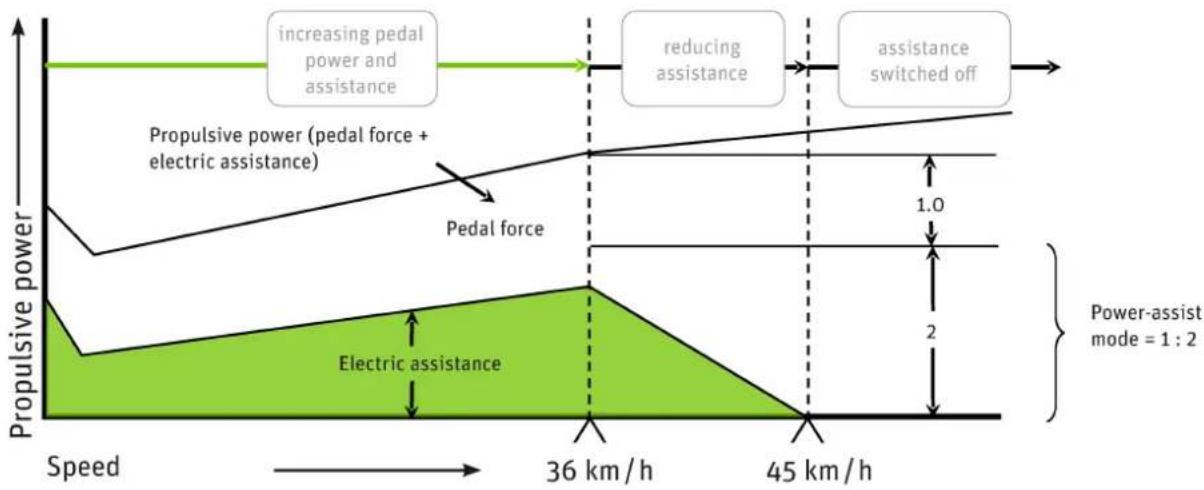
With the "high assist level / HIGH" setting, the power delivered by the motor is double your own effort (1:2).
With the "medium assist level/Standard" setting, the power delivered by the motor increases your effort in a ratio of 1:1.3.
With the "low assist level / ECO" setting, the power delivered by the motor is more than half your own effort (1:0.75).
The speed at which you are currently travelling
When you set off on your Pedelec, the assistance increases as you build up speed until the bike reaches its maximum speed of roughly 36km / h . The assistance then reduces automatically until you reach a speed of 45km / h when it switches off. This applies for the largest gear only. In all other gears, the motor switches off earlier, depending on the gear ratio.
Fast Pedelec 28"
Variation in electric assistance
5.2 Distance
The distance you can travel using the power assist with the battery fully charged depends on several factors:
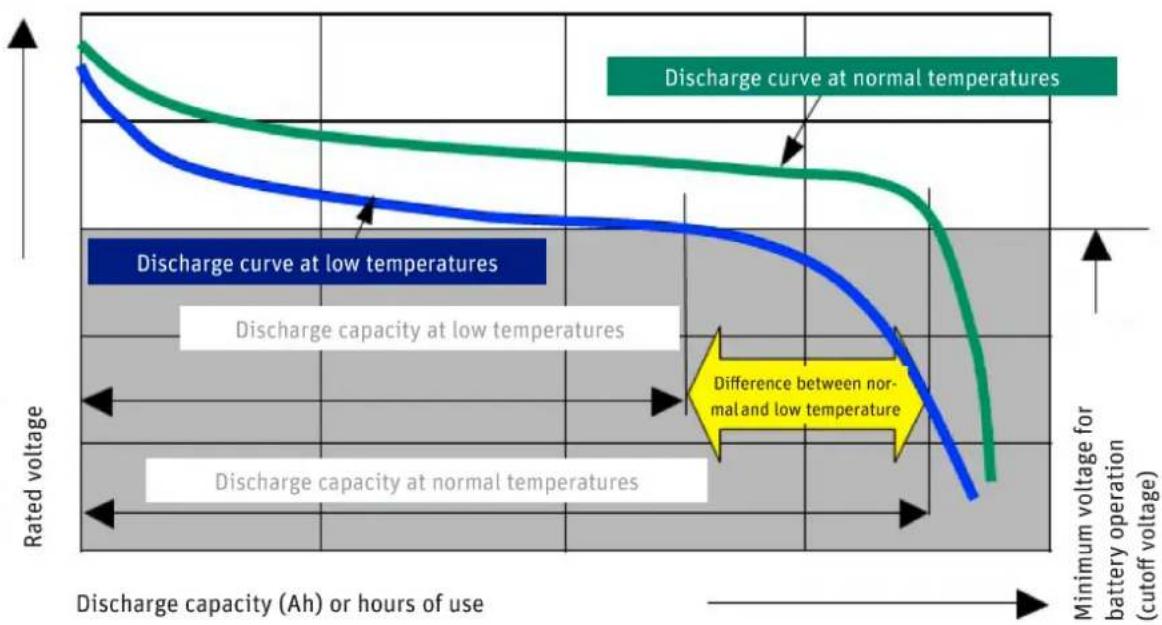
- Ambient temperature
If it is colder, you will travel a shorter distance with the same battery charge.
To maximise the distance you can travel, keep the battery in a heated room so that it is at room temperature when you fit it on your Pedelec.
As the battery discharges when the motor is in use, it generates enough heat to not lose too much of its power at low ambient temperatures.
Selected assist level
If you want to cover a large distance assisted by the motor, select the lower gears, i.e. the ones that are easier to pedal. Also select a low assist level. "ECO" then appears on the control panel.
Rate of discharge at different temperatures
Handling
If you are riding in gears that are harder to pedal and select a high assist level, e. g. when riding uphill, the motor will support you with plenty of power. However, this leads to higher consumption, as with driving a car at high speed on the motorway. You will therefore have to recharge the battery sooner. You can conserve energy when riding your bike not just by turning the pedals, but also by applying even pressure throughout each crank revolution.
- Technical condition of your fast Pedelec
Make sure the tyre pressure is correct. If you ride your bike with too little air in the tyres, this can significantly increase the rolling resistance. The distance you can travel also decreases if the brakes are rubbing.
- Ascents
You pedal harder when riding uphill. This is detected by the power sensor which then allows the motor to work harder.
Under ideal conditions, you can cover roughly 60 kilometres with the battery fully charged (18 Ah). You can expect to cover a distance of roughly 35 kilometres using different modes of operation.
DISTANCE COVERED (1:2 ASSISTANCE, 32 KM / H ON AVERAGE UNDER FAVOURABLE CONDITIONS)
8 Ah battery 22 km
12 Ah battery 35 km
18 Ah battery 60 km
Distance covered using different batteries
5.3 Riding your Pedelec efficiently
You can monitor and influence the cost of your journeys with the Pedelec yourself. You can reduce your consumption and therefore costs by following the tips for increasing the travel distance.
The operating costs for power assist with an 18 Ah battery are calculated as follows:
- A new battery costs roughly 599 euros.
- You can cover 48km on average with one battery charge.
- You can charge the battery roughly 1,100 times.
1100 charging cycles × 48km = 82,800km - 599 euros: 82,800 ~km = 1.13 euro cents / km
- You use roughly 0.620kWh to fully charge the battery. Assuming a unit price of 20 euro cents / kWh, it costs you 12.4 euro cents to fully charge the battery and cover a journey length of 60km .
- It costs you 0.20 euro cents / km to travel a distance of 60 km.
- This means the cost of consumption and the battery is a maximum of 1.33 euro cents / km.
As Derby Cycle is a German manufacturer, the sample calculation is based on German energy prices. The operating costs may therefore be different in locations where other energy prices apply.
6 Battery
Your battery is a lithium cobalt battery, the ideal type of lithium-ion (Li-ion) battery for this application. One of the main benefits of this type of battery is its low weight combined with a high capacity. Li-ion batteries only weigh half as much as comparable nickel metal hybride or nickel-cadmium batteries.
This means you carry less battery weight and more battery power.
6.1 Straightforwardcharging
There is no memory effect. You can therefore fully recharge your battery after every trip.
Recharge the battery after every trip. This means you can set off immediately the next time you use your bike and you also increase the service life of the battery.
If you are not using the battery, you must recharge it after 6 months at the latest.
6.2 High degree of safety due to battery management
The battery cannot be damaged as a result of a short-circuit. If this were to happen, the battery management would switch off the battery.
You can simply leave the battery standing in the charger as it prevents overcharging.
6.3 Straightforwardstorage
If you do not need your battery for a while, store it at a temperature of +10^ at three quarters of its full charge capacity.
The battery enters sleep mode to prevent it from totally discharging.
These benefits are available due to highly effective battery management that has been adapted to this specific application and by tuning the battery for operation with a 300 watt motor.

Observe the following points to increase the service life of your Pedelec battery:
Make sure that the battery is fully charged before you ride your bike for the first time or after you have not used it for a while.
You should run the battery all the way down to empty for the first three charging cycles. This allows the battery to reach its maximum capacity. If you continuously run the battery to empty during normal operation, this reduces its service life.
If you partially recharge the battery frequently during normal operation, this has a favourable effect on its service life.
You should therefore partially recharge the battery whenever possible: Do not run the battery all the way down to empty and recharge it even after a short period of operation.
In the as-delivered condition, the battery is not fully charged and is in what is referred to as sleep mode. Sleep mode minimises the rate at which the battery discharges itself. If the battery is allowed to discharge unchecked for an extended period this can lead to total discharging which damages the battery. To "wake up" the battery, simply place it in the charger for one minute.
If you are having problems with the battery, place it in the charger for one minute. A reset occurs, during which the battery management disables sleep mode for example. After this, the battery will work again.
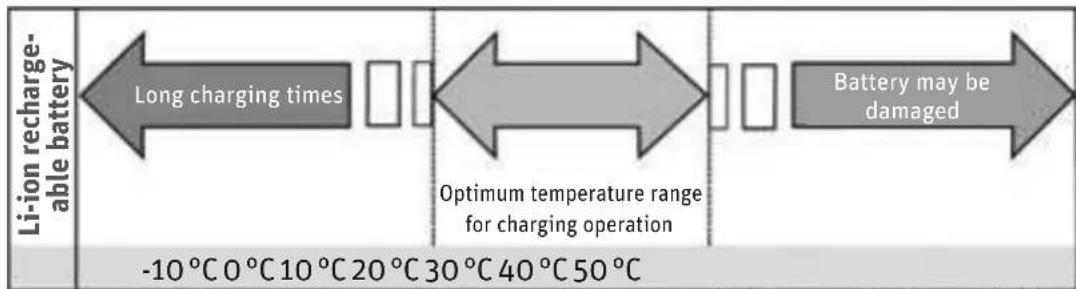
Ideally you should charge the battery at a temperature of between +10^ and +30^ . It takes longer to charge the battery at low temperatures, the battery will not charge up at temperatures higher than +30^ . Ideally, you should charge and store the battery inside your house or in a warm garage when the outside temperature is low. In this case you should only fit the battery on your bike just before using it.
If you are transporting your Pedelec by car, take the battery out of its holder and transport it separately.
The battery should ideally be stored for longer periods charged to 75% of its capacity at a temperature of +10^ .
Charging times at different temperatures
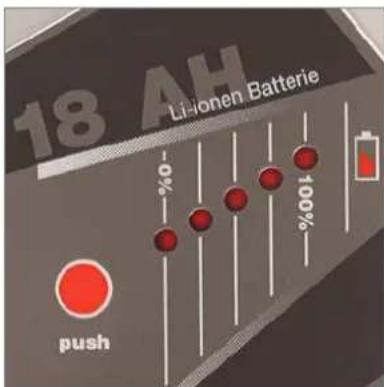
6.4 Battery information system
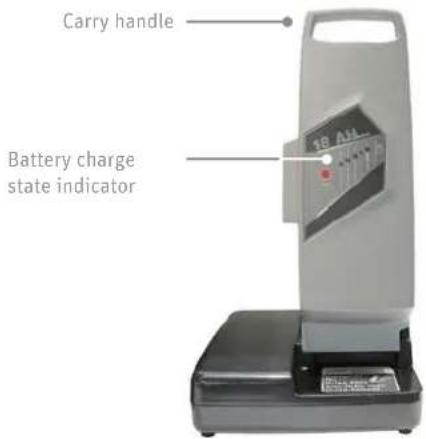
There is a control panel with five LEDs and a button ("Push") on the side of the battery that faces outwards. The LEDs light up if you press the "Push" button. Information about the battery and its charge state is provided based on the number of LEDs that light up and the way in which they light up.
Charge state and battery capacity indicator
6.4.1 Checking the battery charge state
Press the "Push" button briefly, the LEDs light up and display the current battery charge.
| DISPLAY BATTERY CHARGE STATE | |
| 1 LED flashes 。 | < 10% |
| no display - | 0% |
| E: Battery is empty | |
| F: Battery is full | |
6.4.2 Checking the battery capacity
If you press the "Push" button for longer than five seconds, the LEDs show the current capacity of the battery.
Capacity indicator
Check there is sufficient charge in the battery for the journey you intend to make before setting off.
In winter the distance you can normally cover with the battery operating normally is less. Only move the battery from the warm room where you store it and fit it on your Pedelec just before you set off. This prevents low temperatures from reducing the distance you can normally travel. A corresponding diagram is provided in Chapter 11 "Technical data".
The distance you can cover can vary depending on the topography, your handling, the condition of the battery and the assist level you are using.
If all diodes flash consecutively, or several flash at the same time (2-3 diodes), the battery is damaged.

Before taking the battery to your specialist cycle shop to have it checked, put the battery in the charger for one minute then test it again.
| BATTERY | REMAINING CAPACITY | ~ DISTANCE COVERED |
| 8 Ah 4.8 Ah 19,360 km | ||
| 12 Ah 7.2 Ah 30,800 km | ||
| 18 Ah 10.8 Ah | 52,800 km | |
From the technical standpoint above therefore, the battery is exhausted at this point. It also goes without saying that the battery ages. Even if you do not use your battery, its capacity reduces.
Providing you can still cover the journey distances with this remaining battery capacity, you can of course continue using it. If the capacity is no longer sufficient, you can take your battery to a specialist cycle shop who will dispose of your battery and sell you a new one.
You can extend the service life of the battery by fully recharging it after every journey, however short. The Panasonic li-ion cobalt battery has no memory effect.
You can also extend the service life of the battery by using the assistance selectively. Avoid, for example, using gears that make pedalling difficult with the highest assist level activated.
6.5 Service life and warranty
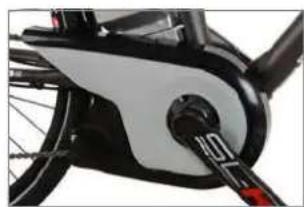
The Panasonic centre motor is a fully-developed durable and maintenance-free drive. It is a wear part with a two-year warranty. As its power output is higher, wear parts such as the drive and brakes are subject to higher loads than they would be on a normal bike which is why they wear out more quickly.
6.5.1 ofbattery
Batteries are wear parts. Wear parts also come with a two-year warranty.
If the battery develops a fault during this period, your specialist cycle shop will of course replace it. Normal ageing and battery wear do not constitute a fault.
The service life of the battery depends on different factors. The most important wear-relevant factors are
the number of charge cycles and
the age of the battery.
When you have fully charged and discharged your battery 1,100 times, it will still have 60% of its initial capacity, providing it has been well looked after:
7 Charger
Read the two stickers on the charger before using it for the first time.

Do not use other chargers. Only charge the battery using the charger provided, or a charger approved by Derby Cycle.
If a fault develops or if the battery is in sleep mode, you might be able to solve this problem by placing the battery in the charger for one minute. The battery management then checks the battery and can eliminate any faults that have occurred.

If used incorrectly, the device may be damaged or inflict injuries.
Before cleaning the charger, always pull the plug out of the socket to avoid a short-circuit and/or physical injury.
Only use the charger in dry rooms.
Only place the charger in a secure stable position on a suitable surface.
Do not cover the charger or place any objects on it as otherwise it could overheat and catch fire.
8 Troubleshooting
The control panel also indicates when faults and technical errors are present. A fault code appears in the LCD display.
Control panel display
Have the electric drive inspected regularly by your specialist cycle shop. Do not carry out any work on the electric drive or battery yourself. Unless you have sufficient expertise this could lead to a serious accident. As a basic rule, always consult your specialist cycle shop if you have a problem with the electric drive or the battery.

You should only have the electrical components of your Pedelec replaced with genuine parts. This makes it safer for you and avoids problems when processing warranty claims.
8.1 Problems/solutions: Flash patterns and their meaning
If a problem occurs in the electrical system of your Pedelec, you should initially try to solve it by referring to the following list which describes possible causes of errors and provides corresponding solutions.
If you cannot solve the problem, consult your specialist cycle shop.
8.1.1 Nodisplay
If nothing is shown in the LCD display, one of the following reasons/solutions may apply:
Is the battery sufficiently charged? Charge the battery if necessary.
Is the battery capacity still sufficient? Check the capacity. If the remaining capacity is not enough, the battery must be replaced.
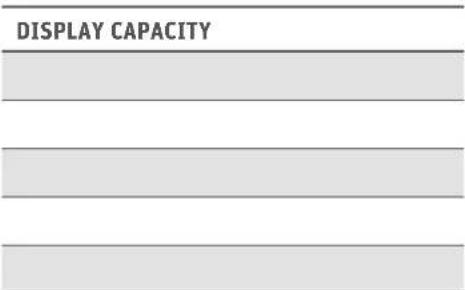
Check the actual battery capacity
If you press the "Push" button for longer than five seconds, the LEDs show the capacity of the battery at present.
DISPLAY CAPACITY

Capacity of 18 Ah battery (example)
8.1.2 Battery charge state indicator flashing or not visible
If the battery charge state indicator is flashing or not visible at all, one of the following causes/solutions may apply:
Is the battery sufficiently charged? Charge the battery if necessary.
The second and fourth LEDs of the battery indicator flash when you press the button on the battery. The battery management has switched the battery off. Put the battery in the charger and charge it.
If you continue to press the button on the battery (test for battery capacity) and no LED lights up, the battery management has switched the battery off. Put the battery in the charger and charge it.
8.1.3 Display"E1"
If "E1" is displayed, the following cause/solution may apply:
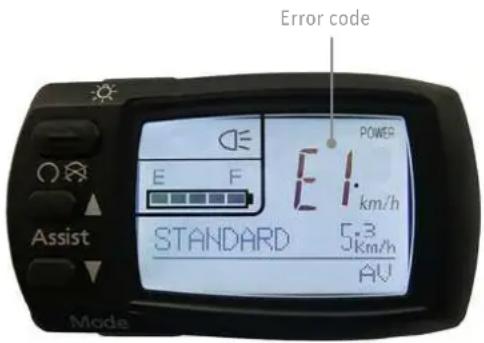
You have pushed down on the pedals shortly after pressing the "Power" button. Switch the display off then switch it back on and do not push down on the pedals for roughly 2 seconds.
If "E1" is displayed the distance covered will not be recorded. It will therefore no longer be possible to adjust the assistance control and the power assist will no longer work.
8.1.4 Display"E9"
If "E9" is displayed, the following cause/solution may apply:
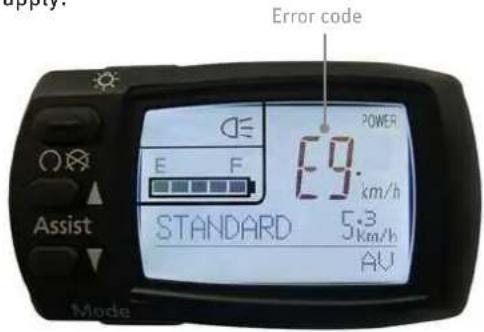
A problem occurred with the drive unit. Contact your specialist cycle shop if this occurs.
If "E9" is displayed the distance covered will not be recorded. It will therefore no longer be possible to adjust the assistance control and the power assist will no longer work.
8.1.5 Assistance control indicator flashing
If the assistance control indicator is flashing although the battery charge is sufficient, the following cause and solution may apply:
The drive unit is overloaded / overheated. The battery management has switched itself on and reduced the assistance. A short period follows in which the drive recovers after which the full assistance output is available once again.
If this does not happen, contact your specialist cycle shop.
8.1.6 Additional possible sources of errors
If you only pedal very gently, the power assist is not enabled.
If the motor is not running and you cannot pinpoint the cause, check the buttons, cables and plugs of the electrical system.

If you find a break or a crack, do not try to repair the fault yourself. Take your Pedelec to a specialist cycle shop.
9 Cleaning

Remove the battery before you clean your Pedelec.
We recommend you clean your Pedelec with a damp cloth, a sponge or a brush. You can obtain suitable cleaning agents and additional information from your specialist cycle shop.
Make sure when cleaning that water does not enter the battery. Although the electrical components are sealed, it is not advisable to clean the bike by spraying it with a hose or a high-pressure cleaner. This could damage your bike.
When wiping down the battery, be careful not to touch and connect the contacts on the underside. This could cause the battery to switch off.
10Warnings
As this motor is more powerful, you may be riding at a much higher speed than you are used to on your normal bike. Take this into account when familiarising yourself with your fast Pedelec.
Bear in mind that the Pedelec motor can heat up on long ascents. Be careful not to touch it with your hands, feet or legs as you could burn yourself.
The Pedelec operates using low voltage (25.2 volts). Never attempt to operate the Pedelec using power from a source other than a suitable genuine battery. The designations of approved batteries are listed in Chapter 11 "Technical data".
Live parts may be exposed when you open covers or remove parts. Connection points may also be live. Maintenance or repairs on the device when it is open and connected to the power supply must only be carried out by the specialist cycle shop.
When carrying out adjustments and maintenance or when cleaning the Pedelec, avoid crushing cables or damaging them with sharp edges.
If risk-free operation of your Pedelec cannot be assumed, take it out of operation and make sure it cannot be used until you have it checked by a specialist cycle shop. Risk-free operation is no longer possible if live parts or the rechargeable battery show signs of damage.
Keep children away from electrical appliances. If children are present, keep a close eye on them, especially if they could insert objects into the appliance through apertures in the housing as this poses the danger of fatal electric shock.
11 Technicaldata
| MOTOR | |
| Brushless electric motor | |
| Output 300 watts | |
| Maximum torque at drive pinion 17 Nm | |
| Gross weight of electric drive, battery, control unit | 7.8 kg (12 Ah battery) |
| Control via power sensor | |
| Maximum speed only possible with travel speed switch | 20 km/h |
| Assist levels | 1:0.75 | 1:1.3 | 1:2 |
| PANASONIC LI-ION BATTERY |
| Voltage 25.2 V |
| Capacities 8/10/12/18 Ah |
| Energy quantity 200/250/300/450 Wh |
| DCW ITEM NO. | ITEM NO. | CAPACITY [AH] | WEIGHT [KG] | POSSIBLE APPLICATION | ||
| CENTRE FAST FRONT | ||||||
| 17017002 | NKY226B02 | 10 | 2.4 | X | 250 W | - |
| 17017012 | NKY226B02 | 10 | 2.4 | X | 250 W | - |
| 17019018 | NKY252B02 | 10 | 2.4 | - | - | X |
| 17019103 | NKY252B02 | 10 | 2.4 | - | - | X |
| KD170110010 | NKY266B02 | 10 | 2.4 | X | 250 W | - |
| 170110010 | NKY266B02 | 10 | 2.4 | X | 250 W | - |
| 170110003 | NKY265B02 | 10 | 2.4 | - | 300 W | - |
| 170110016 | NKY267B02 | 10 | 2.4 | - | - | X |
| 170111002 | NKY284B2 | 10 | 2.4 | X | 300 W | X |
| 170111200 | NKY306B2 | 8 | 1.9 | X | 300 W | X |
| 170111201 | NKY304B2 | 12 | 2.6 | X | 300 W | X |
| 170111202 | 14069 | 18 | 3.1 | X | 300 W | X |
Possible applications of batteries
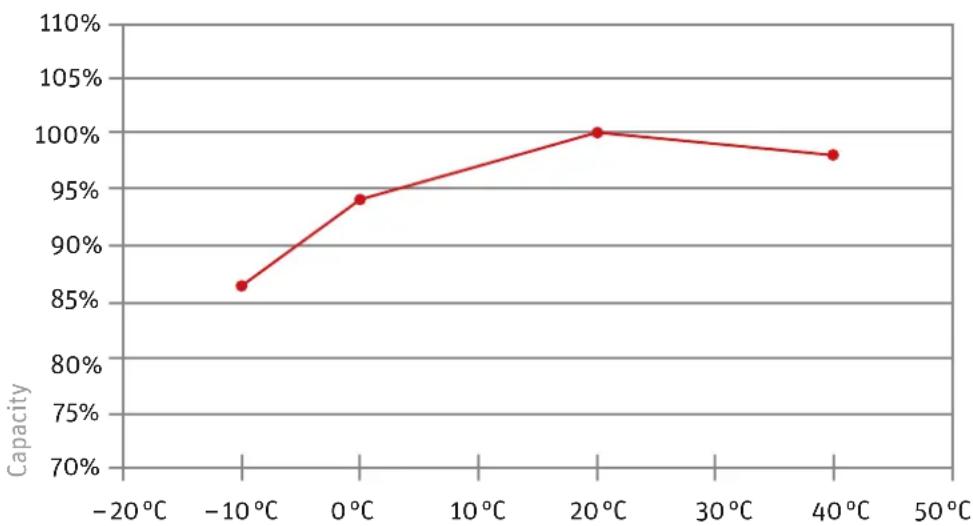
Capacity curve at different temperatures
12 Replacing components of the fast Pedelec
As your fast Pedelec is a Category L1e moped. As is the case with other motor vehicles in Germany, it is necessary to obtain a permit from the Federal Motor Transport Authority and the technical inspection authority (TÜV). This fast Pedelec has such a permit.
During the approval process, specific components were defined as being suitable for use with this vehicle. This means that the permit for your fast Pedelec only remains valid if exactly the same components in the approved model are used.
If components are subsequently modified, the same requirements that apply with other motor vehicles take effect. You must only use replacement parts that are certified as approved for your fast Pedelec. Alternatively, you can have components approved individually by the technical inspection authority (TÜV).
The following lists show which components of your fast Pedelec can be replaced and what provisions apply.
12.1 Components that can only be replaced by equivalent parts or approved parts
- Frame
Fork - Motor unit
Battery
Tyres
Rims - Brake system
- Front light
- Back light
- Licence plate holder
- Side stand
- Handlebar
Stem
12.2 Spare tyres
To make it easier for you to choose a suitable spare tyre if you need to, refer to the following list by the German manufacturer Schwalbe. These tyres can be fitted on a low-power category L1e moped:
MODEL LINE VERSION SIZE MAX. LOAD*
| Marathon Supreme Evolution folding / wired 37-622 110 kg (6 bar) | ||||
| Marathon Supreme Evolution folding / wired 50-559 140 kg (5 bar) | ||||
| Marathon Dureme Evolution folding / wired 37-622 110 kg (6 bar) | ||||
| Marathon Dureme Evolution folding / wired 50-559 140 kg (5 bar) | ||||
| Marathon Extreme Evolution folding 37-622 115 kg (6 bar) | ||||
| Marathon Extreme Evolution folding 50-559 140 kg (5 bar) | ||||
| Marathon Plus | Performance | wired | 37-622 | 110 kg (6 bar) |
| Marathon Plus | Performance | wired | 47-559 | 125 kg (5 bar) |
| Marathon | Performance | wired | 37-622 | 110 kg (6 bar) |
| Marathon | Performance | wired | 50-559 | 140 kg (5 bar) |
| Big Apple | Performance | folding / wired | 50-622 | 150 kg (5 bar) |
| Big Apple | Performance | folding / wired | 50-559 | 125 kg (5 bar) |
| Big Apple | Performance | wired | 50-305 | 70 kg (5 bar) |
| Big Apple | Performance | wired | 50-203 | 70 kg (4 bar) |
| Kojak | Performance | folding / wired | 35-622 | 110 kg (6.5 bar) |
| Smart Sam | Performance | wired | 42-622 | 120 kg (6 bar) |
| Smart Sam | Performance | wired | 54-559 | 140 kg (4 bar) |
| Crazy Bob | Performance | wired | 60-507 | 130 kg (4.5 bar) |
| Energizer | Active | wired | 37-622 | 85 kg (6 bar) |
| Energizer | Active | wired | 40-622 | 95 kg (6 bar) |
| Energizer | Active | wired | 47-559 | 90 kg (5 bar) |
- max. load with specified tyre pressure
12.3 Components that do not require a certificate of approval
- Cranks
- Pedals: providing type-approved pedal reflectors are used.
- Mudguard: the front edge of the front mudguard must be rounded.
Pannier rack
Saddle - Handlebar grip
Gear-shift components: Only if the largest gear ratio is not modified. - Seatpost
- Bell: Can be replaced with an equivalent bright-sounding bell.
- Rear-view mirror: Can be replaced with a different type-approved rear-view mirror.
- Chain
- Headset
- Inner tube
Hubs
We hope you thoroughly enjoy using your new fast Pedelec.
Copyright © 2012 Derby Cycle Werke GmbH
Reproduction in whole or in part is not permitted without the consent of Derby Cycle Werke GmbH. Subject to misprints, errors and technical modifications.
Chere cliente, cher client,
Se si utilizes la Pedelec velocce come una bicyclicetta, ossia除去 the motor of the motor. In this case, it is possible to use a motorless vehicle. The motor is used in the car to drive the motor. This motor is also used for the motor of the motor of the motor.
| MODELLO LINEA VERSION | DIMEN-SIONE | PORTATA MAX.* | ||
| Marathon Supreme Evolution Folding / Wired 37-622 110 kg (6 bar) | ||||
| Marathon Supreme Evolution Folding / Wired 50-559 140 kg (5 bar) | ||||
| Marathon Dureme Evolution Folding / Wired 37-622 110 kg (6 bar) | ||||
| Marathon Dureme Evolution Folding / Wired 50-559 140 kg (5 bar) | ||||
| Marathon Extreme Evolution Folding 37-622 115 kg (6 bar) | ||||
| Marathon Extreme Evolution Folding 50-559 140 kg (5 bar) | ||||
| Marathon Plus | Performance | Wired | 37-622 | 110 kg (6 bar) |
| Marathon Plus | Performance | Wired | 47-559 | 125 kg (5 bar) |
| Marathon | Performance | Wired | 37-622 | 110 kg (6 bar) |
| Marathon | Performance | Wired | 50-559 | 140 kg (5 bar) |
| Big Apple | Performance | Folding / Wired | 50-622 | 150 kg (5 bar) |
| Big Apple | Performance | Folding / Wired | 50-559 | 125 kg (5 bar) |
| Big Apple | Performance | Wired | 50-305 | 70 kg (5 bar) |
| Big Apple | Performance | Wired | 50-203 | 70 kg (4 bar) |
| Kojak | Performance | Folding / Wired | 35-622 | 110 kg (6,5 bar) |
| Smart Sam | Performance | Wired | 42-622 | 120 kg (6 bar) |
| Smart Sam | Performance | Wired | 54-559 | 140 kg (4 bar) |
| Crazy Bob | Performance | Wired | 60-507 | 130 kg (4,5 bar) |
| Energizer | Active | Wired | 37-622 | 85 kg (6 bar) |
| Energizer | Active | Wired | 40-622 | 95 kg (6 bar) |
| Energizer | Active | Wired | 47-559 | 90 kg (5 bar) |
5.1 Understands of functions
SasnartDekoblerunderstottelsentilogbegynderat trade,vil motoren hjelpe dem.