
DG 3665 - Steamer CLATRONIC - Free user manual and instructions
Find the device manual for free DG 3665 CLATRONIC in PDF.

| Brand | Clatronic |
| Model | DG 3665 |
| Product type | Steam cooker |
| Power supply | 220-240 V~, 50 Hz |
| Power | 800 W |
| Net weight | Approx. 1.27 kg |
| Water tank capacity | 1.5 liters (MAX) |
| Package contents | Base with tank, 3 numbered steaming bowls, rice bowl, juice tray, steam tube, lid |
| Main functions | Steaming, rice cooking, reheating, multi-bowl cooking |
| Timer | Mechanical, adjustable |
| Indicators | LED operation light, water level indicator |
| Safety | Overheat protection, automatic shut-off at end of cooking, audible beep |
| Bowl material | Transparent plastic (food-safe) |
| Cleaning | Wipe base with a damp cloth; bowls, tray and lid wash by hand with soapy water (not dishwasher safe) |
| Descaling | Every 7-10 uses with vinegar (run for 30 minutes, then rinse) |
| Protection class | I |
| Warranty | According to manufacturer's conditions |
Frequently Asked Questions - DG 3665 CLATRONIC
User questions about DG 3665 CLATRONIC
0 question about this device. Answer the ones you know or ask your own.
Ask a new question about this device
Download the instructions for your Steamer in PDF format for free! Find your manual DG 3665 - CLATRONIC and take your electronic device back in hand. On this page are published all the documents necessary for the use of your device. DG 3665 by CLATRONIC.
USER MANUAL DG 3665 CLATRONIC
WAARSCHUWING: Verbrandingsgevaar!
Thank you for choosing our product. We hope you will enjoy using the appliance.
Symbols in these Instructions for use
Important information for your safety is specially marked. It is essential to comply with these instructions in order to avoid accidents and prevent damage to the machine:

WARNING:
This warns you of dangers to your health and indicates possible injury risks.

CAUTION:
This refers to possible hazards to the machine or other objects.

NOTE: This highlights tips and information.
General Notes
Read the operating instructions carefully before putting the appliance into operation and keep the instructions including the warranty, the receipt and, if possible, the box with the internal packing. If you give this device to other people, please also pass on the operating instructions.
- The appliance is designed exclusively for private use and for the envisaged purpose. This appliance is not fit for commercial use.
- Do not use it outdoors. Keep it away from sources of heat, direct sunlight, humidity (never dip it into any liquid) and sharp edges. Do not use the appliance with wet hands. If the appliance is humid or wet, unplug it immediately.
- When cleaning or putting it away, switch off the appliance and always pull out the plug from the socket (pull the plug itself, not the lead) if the appliance is not being used and remove the attached accessories.
- Do not operate the machine without supervision. If you leave the room you should always turn the device off. Remove the plug from the socket.
- The device and the mains lead have to be checked regularly for signs of damage. If damage is found the device must not be used.
- Use only original spare parts.
- In order to ensure your children's safety, please keep all packaging (plastic bags, boxes, polystyrene etc.) out of their reach.

WARNING:
Do not allow small children to play with the foil. There is a danger of suffocation!
Special Safety Instructions for this Appliance
You will find the following symbol with warning character on the appliance:

WARNING: Risk of scalding!
- Hot steam escapes from the steam holes, filling openings and when opening the lid!
-
Always use pot holders or oven mitts when handling or removing hot components!
-
Place the device on a flat surface. Never place the mains cable or device on hot surfaces or near heat sources.
- Never switch on the steamer without water!
-
This appliance can be used by children aged from 8 years and above if they have been given supervision or instruction concerning the safe use of the appliance understand the hazards involved.
-
Cleaning and maintenance by the user shall not be made by children unless they are older 8 years and supervised.
- Keep the appliance and its cord out of reach of children less than 8 years.
Children shall not play with the appliance. - Appliances can be used by persons with reduced physical, sensory or mental capabilities or lack of experience and knowledge if they have been given supervision or instruction concerning use of the appliance in a safe way and if they understand the hazards involved.
- Do not try to repair the appliance on your own. Always contact an authorized technician. If the supply cord is damaged, it must be replaced by the manufacturer, its service agent or similarly qualified persons in order to avoid a hazard.
-
Do not use the device for any other purpose than cooking food. It is intended for use in households and similar fields of application such as in staff kitchens of stores, offices, and other commercial areas. It is not intended for the following applications:
-
in agricultural estates;
- by guests in hotels, motels, and other accommodations;
- in bed and breakfasts.
We will not be liable for any damage resulting from improper use or operation!
- Do not immerse the base unit in water for cleaning. Please follow the instructions as stipulated in the chapter "Cleaning".
Overview of the Components / Delivery Scope
1 Lid
2 Rice bowl
3 Biggest steam bowl
4 Medium steam bowl
5 Smallest steam bowl
6 Condensation collection tray
7 Steam tube
8 Heater
9 Base unit / Water container
10 Timer
11 LED control lamp
12 Water indicator
13 Water inlet
Unpacking the Appliance
- Remove the packaging of the appliance.
- Remove all packaging material such as plastic film, filler material, cable ties and box packaging.
- Check that all parts are in the box.
- If the packaging content should be incomplete or if damages should be noticeable, do not operate the appliance. Return it to the distributor immediately.
NOTE:
Dust or production residues may still be found on the appliance. We recommend that you clean the appliance as described under "Cleaning".
Installation and Notes on Operation
Position
Install the device near a wall socket. Choose a flat, dry, non-slip and heat-resistant surface with sufficient clearance to the wall or furniture.
CAUTION:
- Do not place the steamer under wall cabinets!
- The steamer and accessories are not suitable for use in stoves (microwave, convection or conventional) or on stovetops!
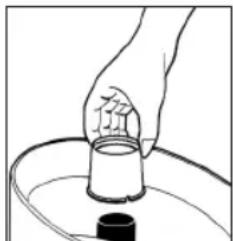
Instant Steam Function
The special steam pipe will release steam after a few seconds. This component covers the heating element and regulates the subsequent water flow.
IMPORTANT NOTE:
Pay attention to the correct assembly!
Put the steam tube with the wide side and the small notch facing down over the heating element.
Filling with Water
NOTE:
Note the markings MIN (Minimum) and MAX (Maximum).
- Fill the water reservoir with clear and clean water only. Do not put any other liquids or add any salt, pepper, etc. in the water reservoir.
- The water level indicator shows the water level in the water reservoir.
- Fill the reservoir till the maximum level (1.5 liter).
- When steaming longer than 15min , always fill the reservoir till the maximum level.
Condensation Collection Tray
Place the collection tray with the recess facing in the direction of the timer in the base unit. The collection tray must sit flush with the base unit.
Using One Steam Bowl
NOTE:
- In order to simplify the use, the bowls are marked with 1, 2 and 3.
-
Only the steam bowl marked "1" fits on the collection tray.
-
Place steam bowl "1" on top of the collection tray.
- Place vegetables, fish or other foods without sauce or liquids into the steam bowl. Do not completely cover the steam openings!
- Cover the upper bowl with the lid.
Using Two or Three Steam Bowls
- Place steam bowl "1" on top of the collection tray.
- Place the biggest piece of food with the longest cooking time into the lower steam bowl.
- Place steam bowl "2" on top of steam bowl "1".
- Place the desired food into the bowl.
- Place steam bowl "3" on top of steam bowl "2".
- Place the desired food into the bowl.
- Cover the upper bowl with the lid.
Using the Rice Bowl
- Put rice or other foods with sauce or liquid in the rice bowl.
- Place the rice bowl into a steam bowl.
- Finally, put the lid on.
NOTE:
Please continue observing our "Cooking instructions". There you will find suggestions on water quantities for different rice grades.
Mains Connection
- Check if the mains voltage that you want to use matches that of the appliance. You will find the information about this on the type plate of the basic unit.
- Make sure the timer is switched off.
- Connect the device to a properly installed isolated ground receptacle.
Using the Device
After filling with water, first place the collection tray and then the steam bowls and the lid.
- Position the lid with the steam opening on the back.
- Do not cover the steam openings during operation. Allow the steam to escape unhampered.
Switching On
Use the timer switch to set the desired cooking time. Please observe our "Cooking instructions". The control lamp indicates the operating mode.
Terminating Operation
Turn the timer switch anti-clockwise till the end. Disconnect the mains plug from the mains.
Overheat Protection
When the water is used up, the device will turn off after some time. The control lamp goes out. But the mechanical timer continues running.

WARNING:
The device is still connected to the mains!
- Terminate operation by disconnecting the plug.
- If you want to continue the operation, refill cold water. Set the steaming time again.
Adding More Water
At maximum water level (1,5 litre) the water will be used up after approx. 75 minutes.
Please observe the water level indicator. We recommend to already refilling with water as soon as the water reaches the MIN marking. It is possible to do so during operation.
- Use a measuring cup.
- Add water through the water inlet.
- Fill the reservoir till the MAX level.
Stop Operation
When the time has expired, the heating process will stop automatically. You hear a beep. The control lamp turns off. You may still hear the timer ticking for a few minutes.
- Disconnect the plug from the mains.
2.

WARNING:
Always use pot holders or oven mitts when handling or removing hot components in order not to get burned by hot steam!
- The liquid in the collection tray is hot!
Remove the steam bowls first and the collection tray last.
Cooking Instructions
General
- The following time settings are for reference only and may vary under different circumstances.
- When using several steam bowls, the total cooking time will be extended by approx. 5 minutes.
Always place large pieces of food with empirically long cooking time into the lowest bowl. - Do not cook too big or too many pieces of food in order for the steam to escape through the uncovered steam openings.
- Defrost meat and poultry before cooking.
- You may use liquids collected in the tray for soups or sauces.
Rice
- There are different rice grades. Observe the individual cooking instructions of each grade.
- Put rice and water with the exact measured amounts in the rice bowl. Note the ratio of the quantity of rice to water, as indicated in the following table. Cover with the lid and switch the steamer on.
- For each rice grade, check after the given minimum cooking time if the rice has been evenly cooked. Stir the rice.
- When checking / stirring the rice, make sure no condensation water will drop into the rice bowl. This would change the texture and taste of the rice.
After cooking you may season the rice with salt, pepper or butter.
| Rice grade | Together in the rice bowl | Approximate time (minutes) | |
| Rice | + Water | ||
| Brown rice | |||
| - normal | 1/2 cup | 1 cup | 42-45 |
| - half done ("parboiled") | 1 cup | 1 1/2 cups | 45-50 |
| Mixture of long grain and wild rice | |||
| - normal | 1 cup | 1 1/2 cups | 56-58 |
| - fast-cooking | 1 cup | 1 3/4 cups | 18-20 |
| Instant rice 1 cup | 1 1/2 cups | 12-15 | |
| White rice | |||
| - normal | 1 cup | 1 1/2 cups | 45-50 |
| - long grain | 1 cup | 1 2/3 cups | 50-55 |
Vegetables/Fruits
- Thoroughly clean vegetables and cut off the stem. Clean, peel and cut as desired. Smaller pieces cook faster than bigger ones.
-
Amount, quality, freshness, size / uniformity and the temperature of frozen food might influence the cooking time. Amount of water and cooking time are variable, depending on the desired result.
-
Do not defrost frozen vegetables before cooking.
| Vegetables/fruits | Weight or amount in pieces | Approximate time (minutes) |
| Artichokes, whole 4 w h ole pieces 30-32 | ||
| Asparagus, heads 50 g 12-14 | ||
| Beans | ||
| -green / waxed | 250 g | 12-14 |
| -cut or whole | 500 g | 20-22 |
| -thick beans | 500 g, shucked | 12-13 |
| Beetroot | 500 g, cut | 25-28 |
| Broccoli, flowers 500 g 20-22 | ||
| Brussels sprouts | 500 g 24-26 | |
| White cabbage | 500 g, cut | 16-18 |
| Celery | 250 g, sliced | 14-16 |
| Carrots 500 g, sliced 18-20 | ||
| Cauliflower, whole 500 g 20-22 | ||
| Corn on the cob 3-5 cobs 14-16 | ||
| Eggplant 500 g 16-18 | ||
| Champignons, whole | 500 g 10-12 | |
| Onions 250 g, thinly sliced 12-14 | ||
| Pepper, whole medium, up to 4 12-13 | ||
| Potatoes (approx.) 500 g 30-32 | ||
| Rutabagas | 1 medium, sliced | 28-30 |
| Spinach | 250 g 14-16 | |
| Pumpkin | 500 g 16-18 | |
| Beets | 500 g, sliced 20-22 | |
| Frozen vegetables 285 g 28-50 | ||
| Apples | 500 g, pieces | 10-15 |
| Pears | 500 g, pieces | 10-15 |
Fish and Seafood
- The cooking time settings in the above table refer to fresh, frozen and defrosted seafood and fish. Clean fresh seafood and fish before steaming.
- Most of the fish and seafood cooks fast. Cook smaller servings or the mentioned amounts.
- Big and smaller scallops or oysters open at different times. Check the shell in order to avoid pre-cooking. Do not eat scallops the shell of which did not open after cooking, in order to avoid possible fish poisoning!
You may cook fish filet in the rice bowl also. - Set appropriate cooking times.
| Seafood / fish | Weight or amount in pieces | Approximate time (minutes) |
| Big scallops in shells | 500g 10-12 | |
| Shrimps | 250g 20-22 | |
| Lobster | ||
| -tail | 2-4 | 16-18 |
| -cut | 500-600g | 18-20 |
| Small scallops (fresh, in shell) | 500g 14-16 | |
| Oysters (fresh, in shell) | 1500g | 18-20 |
| Queen scallops (fresh) | 500g | 16-18 |
| Prawn | ||
| -medium, in shell | 500g | 10-12 |
| -big / large, in shell | 500g | 16-18 |
| Seafood / fish | Weight or amount in pieces | Approximate time (minutes) |
| Fish | ||
| - whole | 250 - 375g | 10 - 12 |
| - fillet | 500g | 10 - 12 |
| - steak | 500g, 2.5cm thick | 16 - 18 |
Meat
| Kind of meat | Weight or amount in pieces | Approximate time (minutes) |
| Beef | ||
| - pieces | 500 g | 28-30 |
| - hamburger | 500 g | 16-18 |
| - meatballs | 500 g | 22-24 |
| Poultry | ||
| - pieces/slices | 2-4 | 24-26 |
| Lamb | ||
| - pieces/slices | 500 g | 26-28 |
| Pork | ||
| - pieces/slices | 500 g | 26-28 |
| Hot dogs / sausages | 500 g | 14-18 |
Eggs
You may place up to 6 eggs onto the egg holder on the bottom of a steam bowl.
If you wish to cook more eggs, place them directly on the bottom of a steam bowl.
| Eggs | Amount in pieces | Approximate time (minutes) |
| Not peeled | ||
| - soft | 1-12 | 15-18 |
| - hard | 1-12 | 19-22 |
| Poached | ||
| 1. step:Pour 2 cups of water into the rice bowl;steam to heat water.2. step:Crack an egg and pour into a bowl; place the bowl into the steam bowl with hot water until egg is poached. | 7-8 | |
| 7-8 | ||
| Egg drop | ||
| Mix 6 eggs with 2 spoons of milk in the rice bowl; season with salt and pepper. | 20-22 | |
Cleaning

WARNING:
- Before cleaning, always disconnect the mains plug and wait until the device has cooled down completely.
- Do not immerse the base unit of the steamer in water for cleaning. This might otherwise cause electric shock or fire.

CAUTION:
- Do not use wire brushes or other abrasive objects.
- Do not use sharp or abrasive cleaning agents.
Surface of Base Unit
Wipe the surface of the base unit only with a damp cloth and dry with a soft cloth afterwards.
Reservoir
- Pour the remaining water from the reservoir.
- Use a cloth to wipe the reservoir dry.
Accessories

CAUTION:
Do not clean these parts in the dishwasher. The clear plastic surfaces could otherwise tarnish.
Clean these parts manually in soapy water.
- Rinse under clear water and dry afterwards.
Dscaling
In hard water areas scale might build up on the heating element. This might result in the steam turning off before the food is cooked.
- To avoid that, after 7 - 10 uses, pour 3 cups of vinegar in the reservoir and fill up with water till the "MAX" level.
- Do not place the lid, steam or rice bowls and collection tray on the steamer.
- Plug the mains plug into a socket and turn on the appliance. Set the steaming time to 30 minutes.
- When the time has expired, disconnect the mains plug from the mains. Let the device cool down completely.
- Only then pour the water from the reservoir. Rinse the water reservoir several times with cold water.
Storage
- Only store the appliance when cooled down and clean.
- We recommend storing the appliance in its original packaging if out of use for a long period of time.
Always keep the appliance out of reach of children and in a well-ventilated, dry place.
Technical Data
Model: DG 3665
Power supply: 220-240V\~,50Hz
Power input: 800 W
Protection class:
Net weight: approx. 1.27 kg
The right to make technical and design modifications in the course of continuous product development remains reserved.
This device has been tested according to all relevant current CE guidelines, such as electromagnetic compatibility and low voltage directives, and has been constructed in accordance with the latest safety regulations.
Disposal
Meaning of the "Dustbin" Symbol
Protect our environment: do not dispose of electrical equipment in the domestic waste.
Please return any electrical equipment that you will no longer use to the collection points provided for their disposal.
This helps avoid the potential effects of incorrect disposal on the environment and human health.
This will contribute to the recycling and other forms of re-utilisation of electrical and electronic equipment.
Information concerning where the equipment can be disposed of can be obtained from your local authority.
Instrukcja obslugi
m = 311
IcnoJIb3ObaHHe OJHO npOBo EMKoCTn

ПРМЕЧАнЯ:
-ПЯ ПОСТOTы NOИСКА EMKOCTN ПОМAPКINPOBAHыцфамн 1,2и3.
ToIbKO npoBaA emKoCTb COTMeTKoN "1" NOxOHT IJIa Notka c6opa KOHeHcata.
- NocTaBbTe napOBaemKoCTb cOTMeTKoH "1" Ha BepXHOH Yactb NotKa C6opa KOHeHCata.
-
ПложитБ в napOBую EMKocTb OBOUи, рБуИДугпе npodyKTb 6e3 coycob ИИн xINdkoCTe. He nepekpblaite noHOCtBu OTBepCTnI dIЯ napa!
-
3aKpoTe BepXHIOE MKOCTb KpbIJKoN.
IcnoJIb3OBAHHe dyx nIITpex npoBbIX qaw
- NocTaBbTe napOBaemKoCTb "1"Ha BepXHIOU qactb Notka c6opakOHDeHcata.
2.ПОJOKHTE B HIXHHO npoBOyIO EMKOCtB 6OJIbUyIO qACTb npOdyKTOB C 6OJIbUeI npOdoJXnTeJIbHOCTbIO pNIRTOBNEHIN. - NocTaBbTe npoBaer emKocTb "2" Ha BepXHIOU qAcTb npaBoi emKocTn "1".
4.ПлохкTe npodyKTbIВ napOByIO emKoCTb. - NocTaBbTe npoBaer EMKocTb 3"Ha BepxHIOU qAcTb npaOBn EMKOCTN "2".
6.ПолoxиTe npOdyKTbI BnapOByEO mKocTb. - 3aKpOte BepXHIO EMKoCTb KpbIJKoN.
IcnoIb3ObaHne emKoCTn IpaPca
1.ПОLOJOKHe pnc nnn dpyrne npOdykTbI 6e3 coycob nnn KINDKOCTeB EMKOCTb Dnra pnca.
2. NocTaBbTe EMKoCTb DnA pNcBa B npOByIO EMKOCTb.
3. 3aTe 3akpoTe KpbIkwKoI.

ПРИМЕЧАЦА:
IopkaIyIcTa,co6nOaIte Haun "HnctpykUnn pnpiroTOBHeHIO nuiu." B Hn npBeHb COBeTb O KOJIueCTBe BObl Ipa3HbIX BNIOB pica.
IoiKJIIOUcHHe N K 3JNeKTpNueckO cETn
- Поберьт cootbetCTBne habprжehи npi6opa habprjxehnIO B CETN əJIeKtpoNTaHnI, K KOtopoN npednoIaraeTc nOdkIIOHTb npi6op. Habprjxehne nITaHnI npi6opa yka3aHO B Ta6NIuKe OINcaHnI TIna Ha 6a3OBom 6noke.
- Y6eDHTECb, YTO TaIMep OTKHouen.
3.Подкнючite npиборКправиьноустановленhoe po3eTke COTdJIbHbIM KOHTaKToM 3a3eMnEHHI.
3Kcnnyataaia
- Pocne 3aONHeHn BOoI, Chauana NocTaBbTe NOTOK c6OpKn KOHeHcata, 3aTeM NapOBbIe EMKoCTN KpbIikKy.
- YctahOBHTe KpbIiUKy OTBepCTnRAmNДЯnapaHa3a.
- He nepekpbaIaTe OTBepTna Inpa BO Bpemra pa60-TbI. ObecneYbTe CBO6OdbH bblnyck npa.
BknouyHne
Дя Вьбopa HeobxOIMOro BpeMeHn npiroTOBneHn IcnoIb3yIte nepeKIOUaTeIb Taimepa. IoxaanyIcTa, co6IIoJaIe HauN "INCTpyKuIN IO npiroTOBHeHIO NIIu". KoHTpOBHaJ lamNoOKa yka3bIbAet Ha peKIM pa60TbI.
3aBepeHne pa6oTbI
NobepnTe nepeKnOuTaTe b TaMepa npOTNB YacBOB CTpeKN. BbITaUNTe BNJky n3 cTeBOv po3ETKn.
3aunta ot nepereba
Iocne IcnoIb3oBaHnB CBe BObl np6op BByKIOuHTcC He6oIbwo 3aepkko. KOnTpoIbHaN IamNoUka BByKIOuHTcR. MexAHueckn TaMep npoDoJIKnt pa60TaB.

IPEyIPEJKDEHNE:
Pp6op octaHETcnoKIOUeHHbIM K 3JeKToPiTuHaHIO!
- 3aBepuHte pa60Ty 3a CHT OTKIIOUeHnBAuIK.
- EcIN Bbl XOTIne npOOnJXnTb paOTo, 3aJIeTe B 6aOK XoIOdHyO Body. YCTaHOBIne BpEmr IpnIroTOBJIeHnR nIuN Ha napy.
DobablenHe BObl
OTMAKcIMMaJIbHOrO yPOBn(1,5JITp)BOa6yETNCNoIb-3OBaTbCnPIMePHo 75 MNHT.
IoxaJyIcTa, cIeIte 3a nHdkaTOpOM yOBoH BODbl. Mbl peKoMeHdyem cpa3y DoJIbB OBy, KaK ToJIbKO yOBoHb BObl DOCTnHET OTMeTKM MIN. DoJIbTB OBy MOxHO BO BpEma pa60bl np60opa.
- Icnojbl3yIte MepeHyu yaIky.
-ДобавてБоучep3залнhoe roрьшko.
-Доелte body do ypoBnO TmTeKN MAX ha pe3epByape.
OctahOBka pa6oTbI
IIO nCTeueHn BpeMeHn IpoceC HArpeBa OCTaHOBITcA BtOMaTHuCeKn. Pa3daTcra 3ByKOBo CnHaJ. KoHTpOJIbHaJ lamNoUka Norachet. B TeueHne HeCKoNbKnx MmHyT Bbl MoKeTe CbIaTaB TnKaHBe TaMepa.
TObepxHocTh6a3oBOrO 6noka
IpoTnpaTe NOBepxHocb 6a3oBOro 6Ioka TOnbko BnAajHOI TkaHbIO C NOCJeDyUOzMM BbICyuINBaHNem MraKo CyXOITpAnKO.
Pe3epByap
- BbIeTe octabuioCBOy n3 pe3epByapa.
- VcnoJb3yIe TkaHb, yTO6bl BbItepeTb pe3epByap Hacyxo.
Akceccyapbi

BHIMAHINE:
He ouuauTe 3TN dTaB INocydomoeHm MaunHe.
Ihaue notyckheet npo3paHn pnaCTNKOBa NOBepxHOCTb.
OuHauTe 3Tu DeTaN BpyHyo BMbIbHOM pactBope.
Cnoiochnte HCTOIN BOIO IN BbITpIte HAcyxo.
YdaJIeHneHaKnN
Bpaohax c XeCTKO B0OJ BO3MOXHO OTIOKeHne HaKnnn Ha HarpBeBaTeNbHom 3JeMeHte. 3TO MOxET npNBecTN K npExdEBpeMeHHOMy npekpaueHIO NOaHn npa do rTOBOHOCTN NIIuN.
-Дяустравенянakи,在послкждьx7-10npimehen npi6opa,3aJIeTe 3uaшкynkycаВpe3epByapДЯ BObl,3aTeMdoJeiteBOyDyoypOBH“MAX”.
- He yctaHabnBaIte Ha napOBapKy kpbIuKy,napOBbIe EMKoCTN,notOK nIra c6opa KOHdeHcata NIN eMKocTb dIpaPICA.
BcTaBbTe BmKy Bpo3eKky 3neKtpoNTaHn INBKnOHTe np6op. YcTaHOBtE 30 MInHyT dIpy npiroTOBHeHn PnUHa napy.
IIO nCTeueHn BpeMeHn npiroTOBneHn BbItaUHTe BnIKy n3 CeTeBOH pO3eTKn. DoXdntecb NOHOrO OCTbIBaHn npi6opa.
ToIbKO 3aTEM BJIeNeTe BOyu n3 pe3epByapa. HeckoIbKO pa3 npOMOIte pe3epByap BXOIOHOI BOJe.
XpaHeHne
XpaHnTe np6op TOnbko nocne noHoro oxJaXeHnaIy I NCTK.
- Ecn np60p He nCnOJIb3yETc dIITeJIbHoe BpeM, Mbl peKOMeHnyem XpaHNTb erO B opuHnHaBHO 3aBOdCKo ynakOBke.
Bcerda xpanHTe npb6p B xopoWo BeHTnIpyemom HeoCTynHom dner DeTei MecTe.
TexHnueckne daHHbIe
MoeJIb: DG 3665
3JIeKtpoNTaHHe: 220-240B\~,50Tg
Iotpe6JraMaMoUHocTb: 800BT
Klacc 3auntbI:
Bec HETTO: npM.1,27 K
CoxpaHeNo npaBO Ha Texnueckne n KOHCTpyKIOHOHbIe
m3MeHeHnB pAMkax npoDoJIkaHOUeICr pa3pa6OTKn
npOyKTA.
3To n3dJIeNIE npOJIO BCE Heo6xOaIMbIe I aKtYaJIbHbIe npOBepKn, npEdncaHNbIe DnpeKTbBOI CE, K npIM. Ha 3JIeKTPOMaHHTHyIO COBMeCTUMOCbI N COOTBeTCTBNE Tpe6oBaHnM K Hn3KOBoIbTHOH TexHnke, OHO bIIO TaKKe CkOHCTpyIpOBAHO I NOcTpoEHO C yUeTOM NocJeDnIX Tpe6oBaHnI NO TexHnke 6e30NaCHOCTN.
1
y 1
pabal gab jiljll jiljll jilj
10-7 1
"MAX" all alal alal alal
·
jIy jie 1
J 1
30 1c
-
a = 21 jǎ 1. a = 21
-
3x - 2y - 3z - 4
#
.
j 1
:jgl 1
a. i.e. (i)
DG 3665
50~240-220
800
1
1,27
y j 1
Lilssii jaiwali
CE 1
k = 2k - 1 so
.
2j = 1
·olal ybi
.
jglal yu la lal,olall jyral aai sclj 1
j1i jy 1
AaBjS1p8jia 1234567890
aill jll clj yolall lcll
$$ \bullet \overrightarrow {a} \cdot \overrightarrow {b} \cdot \overrightarrow {c} $$
1
aaii aiee 15
aill Jaiil .slwai jieall jglai 2gjo Jlal
J 1
Jb
$$ \cdot \mathrm {j a v i s} $$
Jlalll lIb Jia aaiil 1yall g jiall
a
:
$$ - \dot {s} \dot {a} \dot {c} 1, j j 1 $$
$$ i j \left{g, g _ {i} \right} = \left{j, j _ {i} \right} = \left{m, m _ {i} \right} = \left{u, u _ {i} \right} - i a l e y 1 j s l $$
$$ - \cdot J _ {1} = 1, g \in $$
1aibla a bpaal g 100000000000000000000000000000
aaii i 1
"..."
:
aaii iiai jiall alil aai jai lal
"jjll" jgiell "i i gai 80 yos Ls jiagil
J 1
jia jie yu ci gao laow jial bai quan jiu jil
aalal aalal alalal
4
1
pilisiilll jieoie ciaellall jizlll gellj
3g 1 (4a2gill gall g 1 1111111) gall
isall
(20
- 36 36 36 36 36 36 36 36 36 36 36 36 36 36 36 36 36 36 36 36 36
aall aall jbi jbi jbi jbi jbi jbi
puii i 1i / ciisai ie aie s jbi
1
2j = d 这个。
3
I 4
j5
6
7
8
clallcog/saclllssg
10
LED 11
12
olal 13
a
jie=1i jai 1
gaii jao gaiyai liai jia iai jia 2
iiill 5g iio 1o
. 3
jai 2. jalbi li g jai ai yai ci k
jg 2
子
J 1234567890
J 1234567890
J 1234567890
J 1234567890
J 1234567890
J 1234567890
J 1234567890
J 1234567890
J 123456
J 1000000000000000000000000000000000000000000000000000000000000000000000000000000000000000000
jgljll i: aolil aoyl laljai
y
1

1
A
j 1 j 1 j 1 j 1 j 1 j 1 j
a
J 1
y
aiaaiialjblaln jy
8 1 j 1 j 1 j 1 j 1 j 1 j
8 8 8 8 8 8 8 8 8 8 8 8 8 8 8 8 8 8 8
J 1
1
1
一
一
GARANTIEKARTE
warranty card · garantiekaart · carte de garantie · scheda di garanzia · tarjeta de garantia · cartao de garantia · garantikort · karta gwarancyjna · zaručni list · karta jamstva · carte de garantie · fapaunuzhna Kapta · zaručný list · garancijski list · garanciajegy · rapahtinHHΦopMnyap · fapaHTHbI tanoh
juluo@12.com
DG 3665
24 Monate Garantie gemäß Garantieerklarung - 24 months warranty according to warranty declaration - 24 maanden garantie volgens garantieverklaring - 24 mois de garantie selon la déclaration de garantie - 24 mesi de garania seconda la dichiarazione di garania - 24 meses de garantia de accordo con la déclaration de garantia - 24 manedors garanti
1 henhold til garantibetingensene - 24 misescagwarancjna podstawtie owiadzcnia gwarancjnego - zaruka 24 mesi ci podle prohlaseni o zaruke - 24 mesecno jamstvo u skladu s jamstvenom declaracionj - 24 luni garantie conform declaratiei de garantie - 24 meeca rapanuH b crotteBNCrapanuHHATA deknapauH - 24-meacna zaruka podla vyhlasenia o zaruke - 24-mesecna garancija, skladn o garancjsko izavoj - 24 honap garancia a garancifeltetelekben leirtak szerint - rapanuHa 24 Miciuji BIDIOHIOI 3aII npo rapanio - rapanuH 24 meca cornACHO ZAHNEHbM rapanTHeHMnpaAaM
Kaufdatum, Handlsterwert, Unterschied - date of purchase, dealer stamp, signature - sankoepdatum, dealerwert, handelkening - date d'achat, tampon du concessionaire, signature - data de acquiste, timbre del rivenditore,irma - fecha de compa, sella del distribuidor, firma - data de compa, carimbo do distribuidor, assinatura - kopsdata, forhandsterwert, signature - data zakupi, piezec spredawcy, podis - datum zakupenl, naziko projezej, podis - datum kapovine, zig trovica, potis - datum achizhne, jstampia furnuzileri, semnatura - da na knokmara, lueva na Ijogosana, Iopnac - datum nakuke, pehtatka obchodnika/ predajcu, podis - datum napka, zig trovica, podis - vassanas datuma, kserkeiod beleyegjde, alaisra - da para npkdoan, ne-ata npdoanu, pinkic - da npnoepetenri, ulamn npdoanu, npdoanu.

CATRONIC INTERNATIONAL GMBH
www.clatronic.com