SEAD 1800 B1 - Other kitchen appliances SILVERCREST - Free user manual and instructions
Find the device manual for free SEAD 1800 B1 SILVERCREST in PDF.
Frequently Asked Questions - SEAD 1800 B1 SILVERCREST
User questions about SEAD 1800 B1 SILVERCREST
0 question about this device. Answer the ones you know or ask your own.
Ask a new question about this device
Download the instructions for your Other kitchen appliances in PDF format for free! Find your manual SEAD 1800 B1 - SILVERCREST and take your electronic device back in hand. On this page are published all the documents necessary for the use of your device. SEAD 1800 B1 by SILVERCREST.
USER MANUAL SEAD 1800 B1 SILVERCREST
Operating instructions
FR BE
Before reading, unfold the page containing the illustrations and familiarise yourself with all functions of the device.
DE AT CH
GB/IE Operating instructions Page 1
Information for these operating instructions 2
Proper use 2
Warnings 3
Safety instructions 4
Items supplied 6
Operating elements 7
Setting up and connecting to the mains power supply 7
Unpacking 7
Appliance set up and making ready for use 7
Preparing food/preserve jars 8
Using the appliance 8
Switching the appliance on and off 8
Preserving 9
Heating and keeping liquids warm 11
Overheating protection 12
Cleaning and Care 12
Cleaning the pouring tap 13
Scale removal 13
Storage 14
14
Coarse liver sausage 14
Pumpkin, sweet and sour 14
Caramel Pears 15
1 Strawberry Jam 15
Disposal 16
Disposal of the appliance 16
Disposal of the packaging 16
Technical data 17
Kompernass Handels GmbH warranty 17
Service 19
Importer 19

Read these operating instructions carefully before using the appliance for the first time and retain them for future reference. Please pass these operating instructions for the appliance on to any future owner(s).
Introduction
Information for these operating instructions
Congratulations on the purchase of your new appliance.
You have selected a high-quality product. The operating instructions are part of this product. They contain important information about safety, use and disposal. Before using the product, please familiarise yourself with all operating and safety instructions. Use the product only as described and for the range of applications specified. Please also pass these operating instructions on to any future owner
Proper use
This Preserving Boiler is suitable for:
- Preserving
- Heating and keeping drinks warm, and for their pouring
- Heating and keeping boiled sausages, or their like, warm
- Heating and keeping soups warm
The appliance is intended for domestic use only, it is not suitable for commercial or industrial applications.

WARNING
Risks from unintended use!
Risks can be caused by the appliance if it is used for unintended purposes and/or other types of use.
- Use the appliance exclusively its for intended purposes.
Observe the procedures described in these operating instructions.
Warnings
In these operating instructions the following warnings are used:

DANGER
A warning at this danger level indicates a threatening dangerous situation.
If the dangerous situation is not avoided, it could result in death or serious physical injury.
- Follow the instructions given in this warning notice to avoid the risks of death or serious injury to people.

WARNING
A warning at this danger level signifies a possible dangerous situation.
If the dangerous situation is not avoided it could lead to physical injuries.
Observe the directives given in this warning to avoid personal injuries.
IMPORTANT
A warning at this danger level signifies possible property damage.
If the situation is not avoided it could lead to property damage.
Observe the directives given in this warning to avoid property damage.
NOTICE
A notice signifies additional information that can assist you in the handling of the appliance.
Safety instructions
In this chapter you receive important safety information regarding the handling of the appliance.
This appliance complies with the statutory safety regulations. Incorrect usage can, however, lead to personal injury and property damage.
For safe handling of the appliance observe the following safety information:

RISK! ELECTRIC SHOCK!
Before taking it into use, check the appliance for signs of visible external damage. Do not take into operation an appliance that is damaged or has been dropped.
To prevent accidents, have defective plugs and/or power cables replaced immediately by an authorised specialist, or our Customer Service or a similarly qualified person.
Repairs should only be carried out by authorized specialist companies or by the Customer Service Department. Incorrect and/or incompetent repairs can result in significant risks for the user. In addition, warranty claims will become void.
- Ensure that the base with the electrical connections NEVER comes into contact with water! If it has unintentionally come into contact with water, first allow it to dry out completely before taking it into use.
- Ensure that the power cable NEVER becomes wet or damp during operation. Lay the cable so that it cannot become trapped or damaged in any way.
Always remove the plug from the mains power socket after use. Simply switching the appliance off is not sufficient, because the appliance remains under power for as long as the plug is connected to the mains power socket.
- Ensure that the power cable does not come into contact with parts of the appliance that are hot.

VER submerse the appliance in water or other liquids! The appliance could bye irreparably damaged!

WARNING! RISK OF INJURY!
This appliance may be used by children over the age of 8 and by persons with reduced physical, sensory or mental abilities or by those without experience and/or knowledge, if they are supervised or have been instructed in the safe use of the appliance and have understood the potential risks.
Children must not play with the appliance.
- Cleaning and user maintenance should not be performed by children unless they are older than 8 years of age and are supervised.
Children younger than 8 should be kept away from the device and the mains cable.
Children should be supervised to ensure that they do not play with the device.
- Bursts of hot steam may be released. The container also becomes extremely hot during use. Therefore, wear heat-resistant gloves. Touch the appliance only on the heat-insulated handles.
- Ensure that the appliance is stable and vertical before switching it on.
- Do not move the preserve maker after it has heated up!
Boiling water could splash out if the water boiler is overfilled.
After use, the surfaces of the heating element will still have some residual heat.
- Do not allow any liquid to run over the appliance connector.
- Misuse may result in physical injury! Use the appliance only as described in the instructions!
WARNING! PROPERTY DAMAGE!
Defective components may only be replaced with original replacement parts. Only by using original replacement parts can it be assured that the safety requirements are being complied with.
- Ensure that the appliance, the power cable and the plug cannot come into contact with sources of heat such as hot plates or open flames.
- Do not use an external timing switch or a separate remote control system to operate the appliance.
Never leave the appliance unattended while it is being used.
The appliance must not be cleaned using a water jet.
NOTICE
A repair to the appliance during the warranty period may only be carried out by a customer service department authorised by the manufacturer, non-compliance will mean that successional warranty claims for subsequent damages cannot be considered.
Items supplied
The appliance is delivered with the following components as standard:
Electric Fruit Preserver & Jam Maker
Preserving grill
Lid
- Operating instructions
NOTICE
- Check the contents to make sure everything is there and for visible damage.
- If the contents are incomplete or have been damaged due to defective packaging or through transportation, contact the Service Hotline (see chapter Service).
Operating elements
Lid
Heat insulated handles
3 Control dial for "Minutes" (MIN) and, at the same time, TIMER button
4 Preserving grill
Display indicator "Minutes" (MIN)
Display indicator "Current Temperature" (CURRENT TEMP)
Display indicator "Set Temperature" (SET TEMP)
8 Cable storage
9 Control dial for "Temperature" ( ^ C ) and, at the same time, START/STOP button
Pouring tap
1 Top lever
Setting up and connecting to the mains power supply
Unpacking
Remove all parts of the appliance and the operating instructions from the packaging.
Remove all packing material.
Appliance set up and making ready for use
Completely unwind the power cable from the cable storage 8.
Place the appliance on a level and slip-free surface. Ensure that a mains power socket is easily accessible.
Clean the appliance as described in the chapter "Cleaning and Care".
Insert the plug into a mains power socket. The display lights up, a signal tone is heard.
WARNING PROPERTY DAMAGE!
- NEVER operate the appliance in a no-load condition! The appliance could be irreparably damaged!
WARNING! RISK OF INJURY!
-
When it is hot, take hold of the appliance ONLY by means of the heat insulated handles ②. Risk of Burns!
-
Add about 5 litres of water to the appliance and leave it to boil at 100^ for 20 minutes (see section "Switching the appliance on and off"). After the water has boiled, pour it away.
NOTICE
On the first use the generation of a slight smell may occur, this is due to residues from the production. It is completely harmless and disperses after a short time. Provide for sufficient ventilation, for example, open a window.
Preparing food/preserve jars
Preferably use preserving jars with a rubber seal and a lever clamp. The preserving jars must be free of damage.
1) The preserving jars must be free of germs and bacteria, otherwise the preserve could spoil prematurely. Preferably, boil the preserving jars for 5-7 minutes before adding the food.
2) Use a funnel when filling the preserving jars, if available. The edges of the preserving jars must be clean when the jars are sealed.
3) Seal the jars as quickly as possible after filling:
- Place the rubber seal on the upper rim of the preserving jar and place the glass lid on the preserving jar. The rubber seal is between them.
- Fasten the glass lid with the clamps: Fit the locking clamps opposite each other.
The preserving jars are now ready for preserving.
Using the appliance
Switching the appliance on and off
1) Using the control dial "Temperature" 9, set the desired temperature. You can set the temperature in 1^ steps. A signal tone sounds for every 5^ . The set temperature appears in the display indicator "Set Temperature" 7.
2) Using the control dial "Minutes" set the desired cooking time in minutes. You can set the time in 1 minute steps. A signal tone sounds for every 5 minutes. The set time appears in the display indicator "Minutes"
NOTICE
The background lighting of the display goes out after about 5 minutes after the last activation of one of the dials if you do not start the heating process. The settings on the display remain visible. Turning one of the dials will reactivate the background lighting in the display.
3) Press the START/STOP heating button. The heating begins. The heating progress in indicated through the continuous beam "11111". The momentary heating temperature is shown in the display indicator "Current Temperature" 6. Once the heating up is complete, signal tones sound, "X" appears in the display and the time set in the display indicator "Minutes" 5 begins to count down.
NOTICE
The background lighting in the display remains switched on while the appliance is working.
As soon as the set time period has expired, signal tones sound. The appliance switches itself off. "X" and "1" extinguish in the display.
NOTICE
- To stop a heating process or a boiling process, press the heating START/ STOP ⑨ button.
4) When the appliance is not in use, ALWAYS remove the plug from the mains power socket.
Preserving
NOTICE
To be understood under the term preserving is the conservation of foodstuffs by, amongst others, the effects of heat. Dependent upon the type and mass of the items to be preserved, a differentiation is made between the processes of sterilisation and pasteurisation. In sterilisation, the items to be preserved are heated to a temperature of at least 100^ .
With pasteurisation, the heating temperature lies at around 80^
For domestic purposes, pasteurisation is sufficient.
For this, one needs the appropriate preserving jars, with screw-tops or lids with rubber rings.
NOTICE
- Preserve only fresh foods. Overripe fruits or vegetables are not suitable for preserving.
Pay heed to the cleanliness of the jars! Ideally, boil the jars for around 5-7 minutes before filling them with foodstuffs. This will ensure all germs and bacteria have been killed.
1) Place the preserving grill in the preserving boiler. Ensure that the preserving grill does not come into contact with the temperature sensor inside the appliance.
2) Place the filled and tightly sealed jars on the preserving grill 4. Stack the preserving jars on top of each other if required.
3) Add water to the preserve maker until the upper preserving jars are around 3/4 covered. However, do not exceed the MAX marking. Ensure that the preserving jars on the lower level are properly closed so that no water can get in.
4) Close the preserving boiler with the lid 1.
WARNING! RISK OF INJURY!
- When it is hot, take hold of the appliance ONLY by means of the heat insulated handles ②. Risk of Burns!
5) Using the control dial "Temperature" 9, set the desired temperature. Use the following tables when selecting a temperature setting:
| Meat Temperature in °C Time in minutes | |
| Roast meat, in pieces, (cooked well) | 100 (MAX) 85 |
| Broth 100 (MAX) 60 | |
| Game / Poultry (cooked well) | 100 (MAX) 75 |
| Goulash ( cooked well) | 100 (MAX) 75 |
| Minced meat, Sausage meat (raw) | 100 (MAX) 110 |
| Fruit Temperature in °C Time in minutes | ||
| Apples soft/hard | 85 | 30/40 |
| Apple sauce | 90 | 30 |
| Cherries | 80 | 30 |
| Pears soft/hard | 90 | 30/80 |
| Strawberries/Blackberries | 80 | 25 |
| Rhubarb | 95 | 30 |
| Raspberries/Gooseberries | 80 | 30 |
| Red- and Blackcurrants/Cranberries | 90 | 25 |
| Apricot | 85 | 30 |
| Mirabelle/Greengages | 85 | 30 |
| Peach | 85 | 30 |
| Plums/Damsons | 90 | 30 |
| Quince | 95 | 30 |
| Blueberries | 85 | 25 |
| Vegetables | Temperature in °C | Time in minutes |
| Cauliflower | 100 (MAX) 90 | |
| Asparagus | 100 (MAX) 120 | |
| Peas | 100 (MAX) 120 | |
| Pickled gherkin | 85 | 30 |
| Carrots/Baby carrots | 100 (MAX) 90 | |
| Vegetables Temperature in °C Time in minutes | ||
| Pumpkin 90 30 | ||
| Kohlrabi 100 (MAX) 95 | ||
| Celeriac 100 (MAX) 110 | ||
| Brussel sprouts/Red cabbage 100 (MAX) 110 | ||
| Mushrooms 100 (MAX) 110 | ||
| Beans 100 (MAX) 120 | ||
| Tomatoes/Tomato puree 90 30 | ||
NOTICE
The time periods specified in the tables refer to the actual cooking time. The time period begins therefore first when the preserving boiler has reached the set temperature. With a completely full appliance this can take up to 90 minutes!
6) Using the control dial "Minutes" 3, set the cooking time specified in the table.
7) Start the appliance by pressing the heating START/STOP 9 button. Signal tones sound and the heating begins. Once the heating up is complete, signal tones sound, "X" appears in the display and the time set in the display indicator "Minutes" 5 begins to count down. As soon as the set time period has expired, signal tones sound. The appliance switches itself off. "X" and "11111" extinguish in the display.
8) Position a heat resistant container under the pouring tap ⑩ and press the pouring lever ⑪ down. The water drains itself.
9) When the water has drained away allow the preserving jars to cool down.
Heating and keeping liquids warm
WARNING! PROPERTY DAMAGE!
- Fill it with liquids to NO FURTHER that the MAX level marking! Otherwise, the liquid could overflow!
1) Pour the liquid (for example, mulled wine or cocoa) into the preserving boiler.
2) Place the lid onto the preserving boiler.
WARNING! RISK OF INJURY!
- When it is hot, take hold of the appliance ONLY by means of the heat insulated handles ②. Risk of Burns!
3) Using the control dial "Temperature" 9, set the desired temperature.
4) Press the button TIMER ③. "OO" appears in the display. It now not necessary to set a cooking time. The appliance heats up continuously until it is switched off.
5) Regularly stir the liquid so that the heat is evenly distributed.
6) When the desired temperature has been reached, signal tones will sound.
You can drain off liquids without solid particles through the tap 10.
WARNING! PROPERTY DAMAGE!
- Do not pour off liquids with solid constituents, for example, soups. The solids will block the pouring tap ⑩!
1) To do so, hold a cup or similar under the tap ⑩ and press the dispensing lever ⑪ downwards.
2) When the desired amount of liquid is in the cup, release the dispensing lever 1. The pouring tap 10 is now closed.
NOTICE
- You can also keep stews warm in the preserving boiler. They do however need to be stirred regularly to prevent them sticking to the bottom of the appliance.
Overheating protection
This appliance is fitted with an overheating protector.
Overheating may occur if there is too little or no liquid in the preserving boiler. In this case, signal tones sound and the symbol "U" blinks in the display. In this case, immediately pour some liquid into the appliance.
If no liquid is added, the appliance switches itself off after 5 minutes. Once you have topped it up with liquid you can restart the appliance.
Cleaning and Care
WARNING! RISK OF INJURY!
Before cleaning, ALWAYS remove the plug from the mains power socket! Otherwise, there is the risk of receiving an electric shock!
Let the appliance cool down before cleaning it. Risk of Burns!
WARNING! PROPERTY DAMAGE!

NEVER submerse the appliance in water or other liquids! The appliance could be irreparably damaged!
The appliance must not be cleaned using a water jet.
- Do not use abrasive or aggressive cleaning materials. These could attack the upper surfaces and irreparably damage the appliance.
Clean the appliance with a lightly moist cloth. For stubborn soiling use a mild detergent on the cloth.
Clean the display with a soft, lint-free cloth.
Clean the preserving grill in a mild soapy solution and rinse it well with clear water.
Cleaning the pouring tap
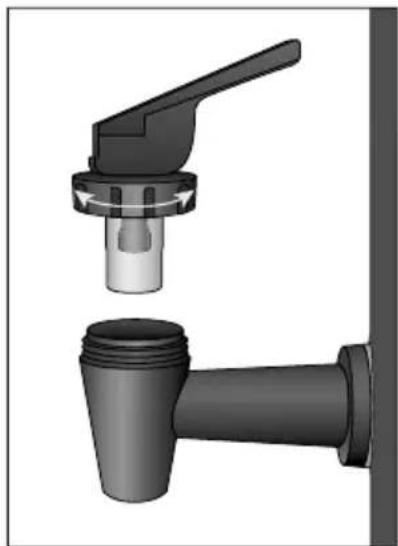
To clean the tap 10 thoroughly, you can unscrew the tap lever 11. The tap 10 cannot be unscrewed as this could lead to problems with the seal.
1) Screw the tap lever ① anticlockwise off the tap ⑩.
2) Place the pouring lever 1 in a mild soapy solution and swirl it back and forth.
3) Rinse it off with clear water.
4) To clean the pouring tap 10 allow a mild soapy solution to flow through it. Should there be stubborn soiling on the inside of the pouring tap 10 use a pipe cleaner or similar to remove it.
5) Afterwards, rinse the pouring tap 10 through with clear water.
6) Screw the tap lever 10 clockwise back onto the tap 10.
Scale removal
Deposits of scale on the bottom of the appliance lead to increased energy consumption and reduce the service life of the appliance.
Descale the appliance as soon as scale deposits become apparent.
1) Use a standard commercial descaling product. Proceed as described in the instructions for usage of the descaler.
2) After descending, rinse the appliance with lots of clean and clear water.
NOTICE
At a low level of calcification (limescale), it is usually sufficient to wipe out the inside of the appliance with a cloth soaked with vinegar. Afterwards, rinse out the appliance with clean water and dry it.
Storage
Wind the cable around the cable retainer 8 and insert the plug into the plug holder in the middle of the appliance base.
Store the preserving boiler at a cool and dry location.
Recipes
Coarse liver sausage
2 kg Bellypork with rind
500 g Pig liver
500 g Onions
100 g Pork dripping
2 Tsp crushed Allspice
1 Tbsp Thyme and Marjoram, dried
1 Tsp white Pepper
1 Tbsp Salt
Preparation
Boil the bellypork for 1.5 hours in salt water and then allow it all to cool.
Subsequently, turn it through a mediem meat grinder disc. Turn the liver through a fine hole grinder disc.
Dice the onions and cook them in dripping until glassy. Add the meat, liver, spices and a 1/4 liter of the pork belly broth and then stir it all vigorously. Immediately fill the mixture into prepared jars. Fill the jars only to 1/3!
Boil the jars for about 2 hours at about 98^
This recipe can be varied in different ways: for example, add various herbs, garlic or cubed bacon.
Pumpkin, sweet and sour
2 kg Pumpkin
1/2 | Vinegar
1 Water
1/4 Wine vinegar
1 kg Sugar
Juice and rind of one Lemon
a Ginger root ( fresh ginger cut into slices)
a stick of Cinnamon
a few Cloves
Preparation
Halve the pumpkin and remove the pith. Peel the pumpkin and cut it into small cubes. Weigh the pumpkin cubes and wash them. Cover them in a bowl with a diluted vinegar solution (use a 1/2 liter of vinegar and 1 liter of water for 2kg of pumpkin flesh). Let the pumpkin cubes stand in it for 12 hours. On the next day, pour the solution away and leave the pumpkin cubes to drain well.
Prepare the decoction out of:
1/4 liter wine vinegar, 1 kilogram of sugar, the juice and rind of 1 lemon, 1 sliced fresh ginger root - as a substitute, 1/2 teaspoon ginger powder, 1 stick of cinnamon, some cloves (about a tablespoon full, as a substitute, ground).
Boil the decoction up and cook the pumpkin cubes in it until glassy.
Fill the pumpkin cubes into preserving jars. Bring the decoction to the boil and then thicken it. Pour it over the pumpkin cubes and seal the preserving jars.
The preserving jars may only be filled to 1/3!
Let the pumpkins cook at 90^ for about 30 minutes in the preserving boiler.
Caramel Pears
1.5 kg pears (firm/ripe)
150 g sugar
750 ml water
Preparation
Peel the pears. Quarter them and remove the cores. Caramelise the sugar in a pan. Pour the water into the pan and boil it until the sugar is dissolved. Place the pears into the pre-prepared glasses.
Pour the caramel juice into the glasses so that the pears are covered. Leave some space to the top edge of the glass jars and seal them well.
Let the pears boil in the preserver at 90^ for about 30 minutes.
Strawberry Jam
Remove the stalks and wash the strawberries. Puree the strawberries. Sprinkle them with preserving sugar at a ratio of 1:1 (1000 g of strawberries to 1000 g of sugar). Let it stand overnight and stir it occasionally.
Fill the strawberries into preserving jars (fill them to only only 2/3 full) and seal the jars well.
Let the strawberries cook at 80^ for about 25 minutes in the preserving boiler.
Disposal
Applies only to France:


The product, its packaging and the operating instructions are recyclable. They are subject to an extended manufacturer responsibility and will be collected separately.
Disposal of the appliance
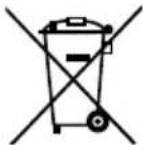
The adjacent symbol of a crossed-out dustbin means that this appliance is subject to Directive 2012/19/EU. This directive states that this appliance may not be disposed of in the normal household waste at the end of its useful life, but must be taken to specially set-up collection locations, recycling depots or disposal companies.
The disposal is free of charge for the user. Protect the environment and dispose of this appliance properly.
If your old appliance has stored any personal data, you are responsible for deleting it yourself before returning it.

Your local community or municipal authorities can provide information on how to dispose of the worn-out product.
Disposal of the packaging

The packaging materials have been selected for their environmental friendliness and ease of disposal and are therefore recyclable. Dispose of packaging materials that are no longer needed in accordance with applicable local regulations.

Dispose of the packaging in an environmentally friendly manner. Note the labelling on the packaging and separate the packaging material components for disposal, if necessary. The packaging material is labelled with abbreviations (a) and numbers (b) with the following meanings: 1-7: plastics, 20-22: paper and cardboard, 80-98: composites.
Technical data
| Power supply 220 - 240 V ~ (alternating current), 50 Hz | |
| Nominal power 1800 W | |
| Power consumption in off mode | 0.4 W |
| Capacity ca. 27 Liter | |
| Temperature range 30 - 100 °C | |
| Protection type IPX3 (protection against water spray) | |
| All of the parts of this appliance which come into contact with food are food-safe. | |
This appliance has a 3-year warranty valid from the date of purchase. If this product has any faults, you, the buyer, have certain statutory rights. Your statutory rights are not restricted in any way by the warranty described below.
Warranty conditions
The warranty period starts on the date of purchase. Please keep your receipt in a safe place. This will be required as proof of purchase.
If any material or manufacturing fault occurs within three years of the date of purchase of the product, we will either repair or replace the product for you or refund the purchase price (at our discretion). This warranty service requires that you present the defective appliance and the proof of purchase (receipt) within the three-year warranty period, along with a brief written description of the fault and of when it occurred.
If the defect is covered by the warranty, your product will either be repaired or replaced by us. The repair or replacement of a product does not signify the beginning of a new warranty period.
Warranty period and statutory claims for defects
The warranty period is not prolonged by repairs effected under the warranty. This also applies to replaced and repaired components. Any damage and defects present at the time of purchase must be reported immediately after unpacking. Repairs carried out after expiry of the warranty period shall be subject to a fee.
Scope of the warranty
This appliance has been manufactured in accordance with strict quality guidelines and inspected meticulously prior to delivery.
The warranty covers material faults or production faults. The warranty does not extend to product parts subject to normal wear and tear or to fragile parts which could be considered as consumable parts such as switches, batteries or parts made of glass.
The warranty does not apply if the product has been damaged, improperly used or improperly maintained. The directions in the operating instructions for the product regarding proper use of the product are to be strictly followed. Uses and actions that are discouraged in the operating instructions or which are warned against must be avoided.
This product is intended solely for private use and not for commercial purposes. The warranty shall be deemed void in cases of misuse or improper handling, use of force and modifications / repairs which have not been carried out by one of our authorised Service centres.
Warranty claim procedure
To ensure quick processing of your case, please observe the following instructions:
Please have the till receipt and the item number (IAN) 444431_2307 available as proof of purchase.
■ You will find the item number on the type plate on the product, an engraving on the product, on the front page of the operating instructions (below left) or on the sticker on the rear or bottom of the product.
If functional or other defects occur, please contact the service department listed either by telephone or by e-mail.
You can return a defective product to us free of charge to the service address that will be provided to you. Ensure that you enclose the proof of purchase (till receipt) and information about what the defect is and when it occurred.

You can download these instructions along with many other manuals, product videos and installation software at www.lidl-service.com.
This QR code will take you directly to the Lidl service page (www.lidl-service.com) where you can open your operating instructions by entering the item number (IAN) 444431_2307.
Service
GB Service Great Britain
Tel.: 0800 404 7657
E-Mail: kompernass@lidl.co.uk
IE Servicelreland
Tel.: 1800 101010
E-Mail: kompernass@lidl.ie
IAN444431_2307
Importer
Please note that the following address is not the service address. Please use the service address provided in the operating instructions.
KOMPERNASS HANDELS GMBH
BURGSTRASSE 21
44867 BOCHUM
GERMANY
www.kompernass.com
Inhaltsverzeichnis
Einführung 22
KOMPERNASS HANDELS GMBH
BURGSTRASSE 21
44867 BOCHUM
DEUTSCHLAND
www.kompernass.com
Sommaire
Introduction 42
Installation et raccordement
Déballage
Confiture de praises
Chere cliente, cher client,
Chere cliente, cher client,
KOMPERNASS HANDELS GMBH
BURGSTRASSE 21
44867 BOCHUM
ALLEMAGNE
www.kompernass.com
Inhoud
Inleiding 66
WAARSCHUWING! LETSELGEVAAR!
WAARSCHUWING! LETSELGEVAARI!
WAARSCHUWING! LETSELGEVAAR!
WAARSCHUWING! LETSELGEVAAR!
WAARSCHUWING! LETSELGEVAAR!
KOMPERNASS HANDELS GMBH
BURGSTRASSE 21
44867 BOCHUM
DUITSLAND
www.kompernass.com
Obsah
Uvod. 86
Informace k tomuto nadvodu k obsluze 86
Pouziti dle prdepisu 86
KOMPERNASS HANDELS GMBH
BURGSTRASSE 21
44867 BOCHUM
NEMECKO
www.kompernass.com
Spistresci
Wstep 104
KOMPERNASS HANDELS GMBH
BURGSTRASSE 21
44867 BOCHUM
NIEMCY
www.kompernass.com
Obsah
Uvod. 124
KOMPERNASS HANDELS GMBH
BURGSTRASSE 21
44867 BOCHUM
NEMECKO
www.kompernass.com
Indice
Introduccion 144
KOMPERNASS HANDELS GMBH
BURGSTRASSE 21
44867 BOCHUM
ALEMANIA
www.kompernass.com
Indholdsfortegnelse
Introduktion 164
KOMPERNASS HANDELS GMBH
BURGSTRASSE 21
44867 BOCHUM
TYSKLAND
www.kompernass.com
Indice
Introduzione 184
KOMPERNASS HANDELS GMBH
BURGSTRASSE 21
44867 BOCHUM
GERMANIA
www.kompernass.com