Ceramix Pro 626 - Lawn mower VALERA - Free user manual and instructions
Find the device manual for free Ceramix Pro 626 VALERA in PDF.
| Product type | Clipper |
| Brand | Valera |
| Model | Ceramix Pro 626 |
| Blades | Ceramic (blade set included) |
| Speeds | 2 speeds (slow and fast) |
| Battery life | 50 minutes cordless |
| Charging time | First charge: 14 hours; subsequent charges: 12 hours |
| Battery type | NiMH rechargeable |
| Mains power | Works on mains with provided transformer |
| Cordless use | Yes |
| Included accessories | Small adjustable guide comb, large adjustable guide comb, mustache comb, barber comb, set of separation clips, barber scissors, cleaning brush, maintenance oil, deluxe organizer case |
| Height adjustment | 13 positions via selector (1 mm without comb) |
| Charge indicator | Indicator light (red while charging, lit when operating) |
| Cleaning | Included brush, avoid water; oil motor shaft regularly |
| Blade replacement | Removable ceramic blades, no lubrication necessary |
| Safety | Turn off and unplug before maintenance; do not use near water |
| Operating temperature | 0°C to 40°C; avoid direct sunlight |
| Disposal | Do not dispose of with household waste; recycle via WEEE collection |
| Warranty | Not specified in the manual |
Frequently Asked Questions - Ceramix Pro 626 VALERA
User questions about Ceramix Pro 626 VALERA
0 question about this device. Answer the ones you know or ask your own.
Ask a new question about this device
Download the instructions for your Lawn mower in PDF format for free! Find your manual Ceramix Pro 626 - VALERA and take your electronic device back in hand. On this page are published all the documents necessary for the use of your device. Ceramix Pro 626 by VALERA.
USER MANUAL Ceramix Pro 626 VALERA
Valera is a registered trademark of Ligo Electric S.A. - Switzerland
Valera+
Professional Hair Clipper
D Professioneller Haarschneider
Tondeuse a cheveux professionel
Taqliacapelli Professionale
E Cortacabellos profesional
NL Professionele Tone
PT Maquina deURTcARcabo profissiOnal
H Professzionalis hajvagó
CS Profesionalni zastihhvaac vlasu
RO Maşină de tuns profesională
PL Profesjonalna maszynka do strzyzenia
EL ENIATEMATIKH KOYPEYTIKH MHXANH
UK PpoeciHa MaunHkA dIa CTpHKBONOCs
RU PnpocchoHaBhaMaunHkDnCTpnKBOLOC
SA
Ceramix Pro
ENGLISH 3
DEUTsCH 7
FRANCAIS 11
ITALIANO 15
ESPANOL 19
NEDERLANDS 23
PORTUGUES 27
MAGYAR 31
CESKY 36
ROMAN40
POLSKI 44
EaAnvika 49
YKPAIHcbKA 53
Pycckn 57
62
ENGLISH
USER INSTRUCTIONS
Please read this instructions leaflet carefully: it contains valuable information on the safe use of the appliance. Keep these instructions for future reference.
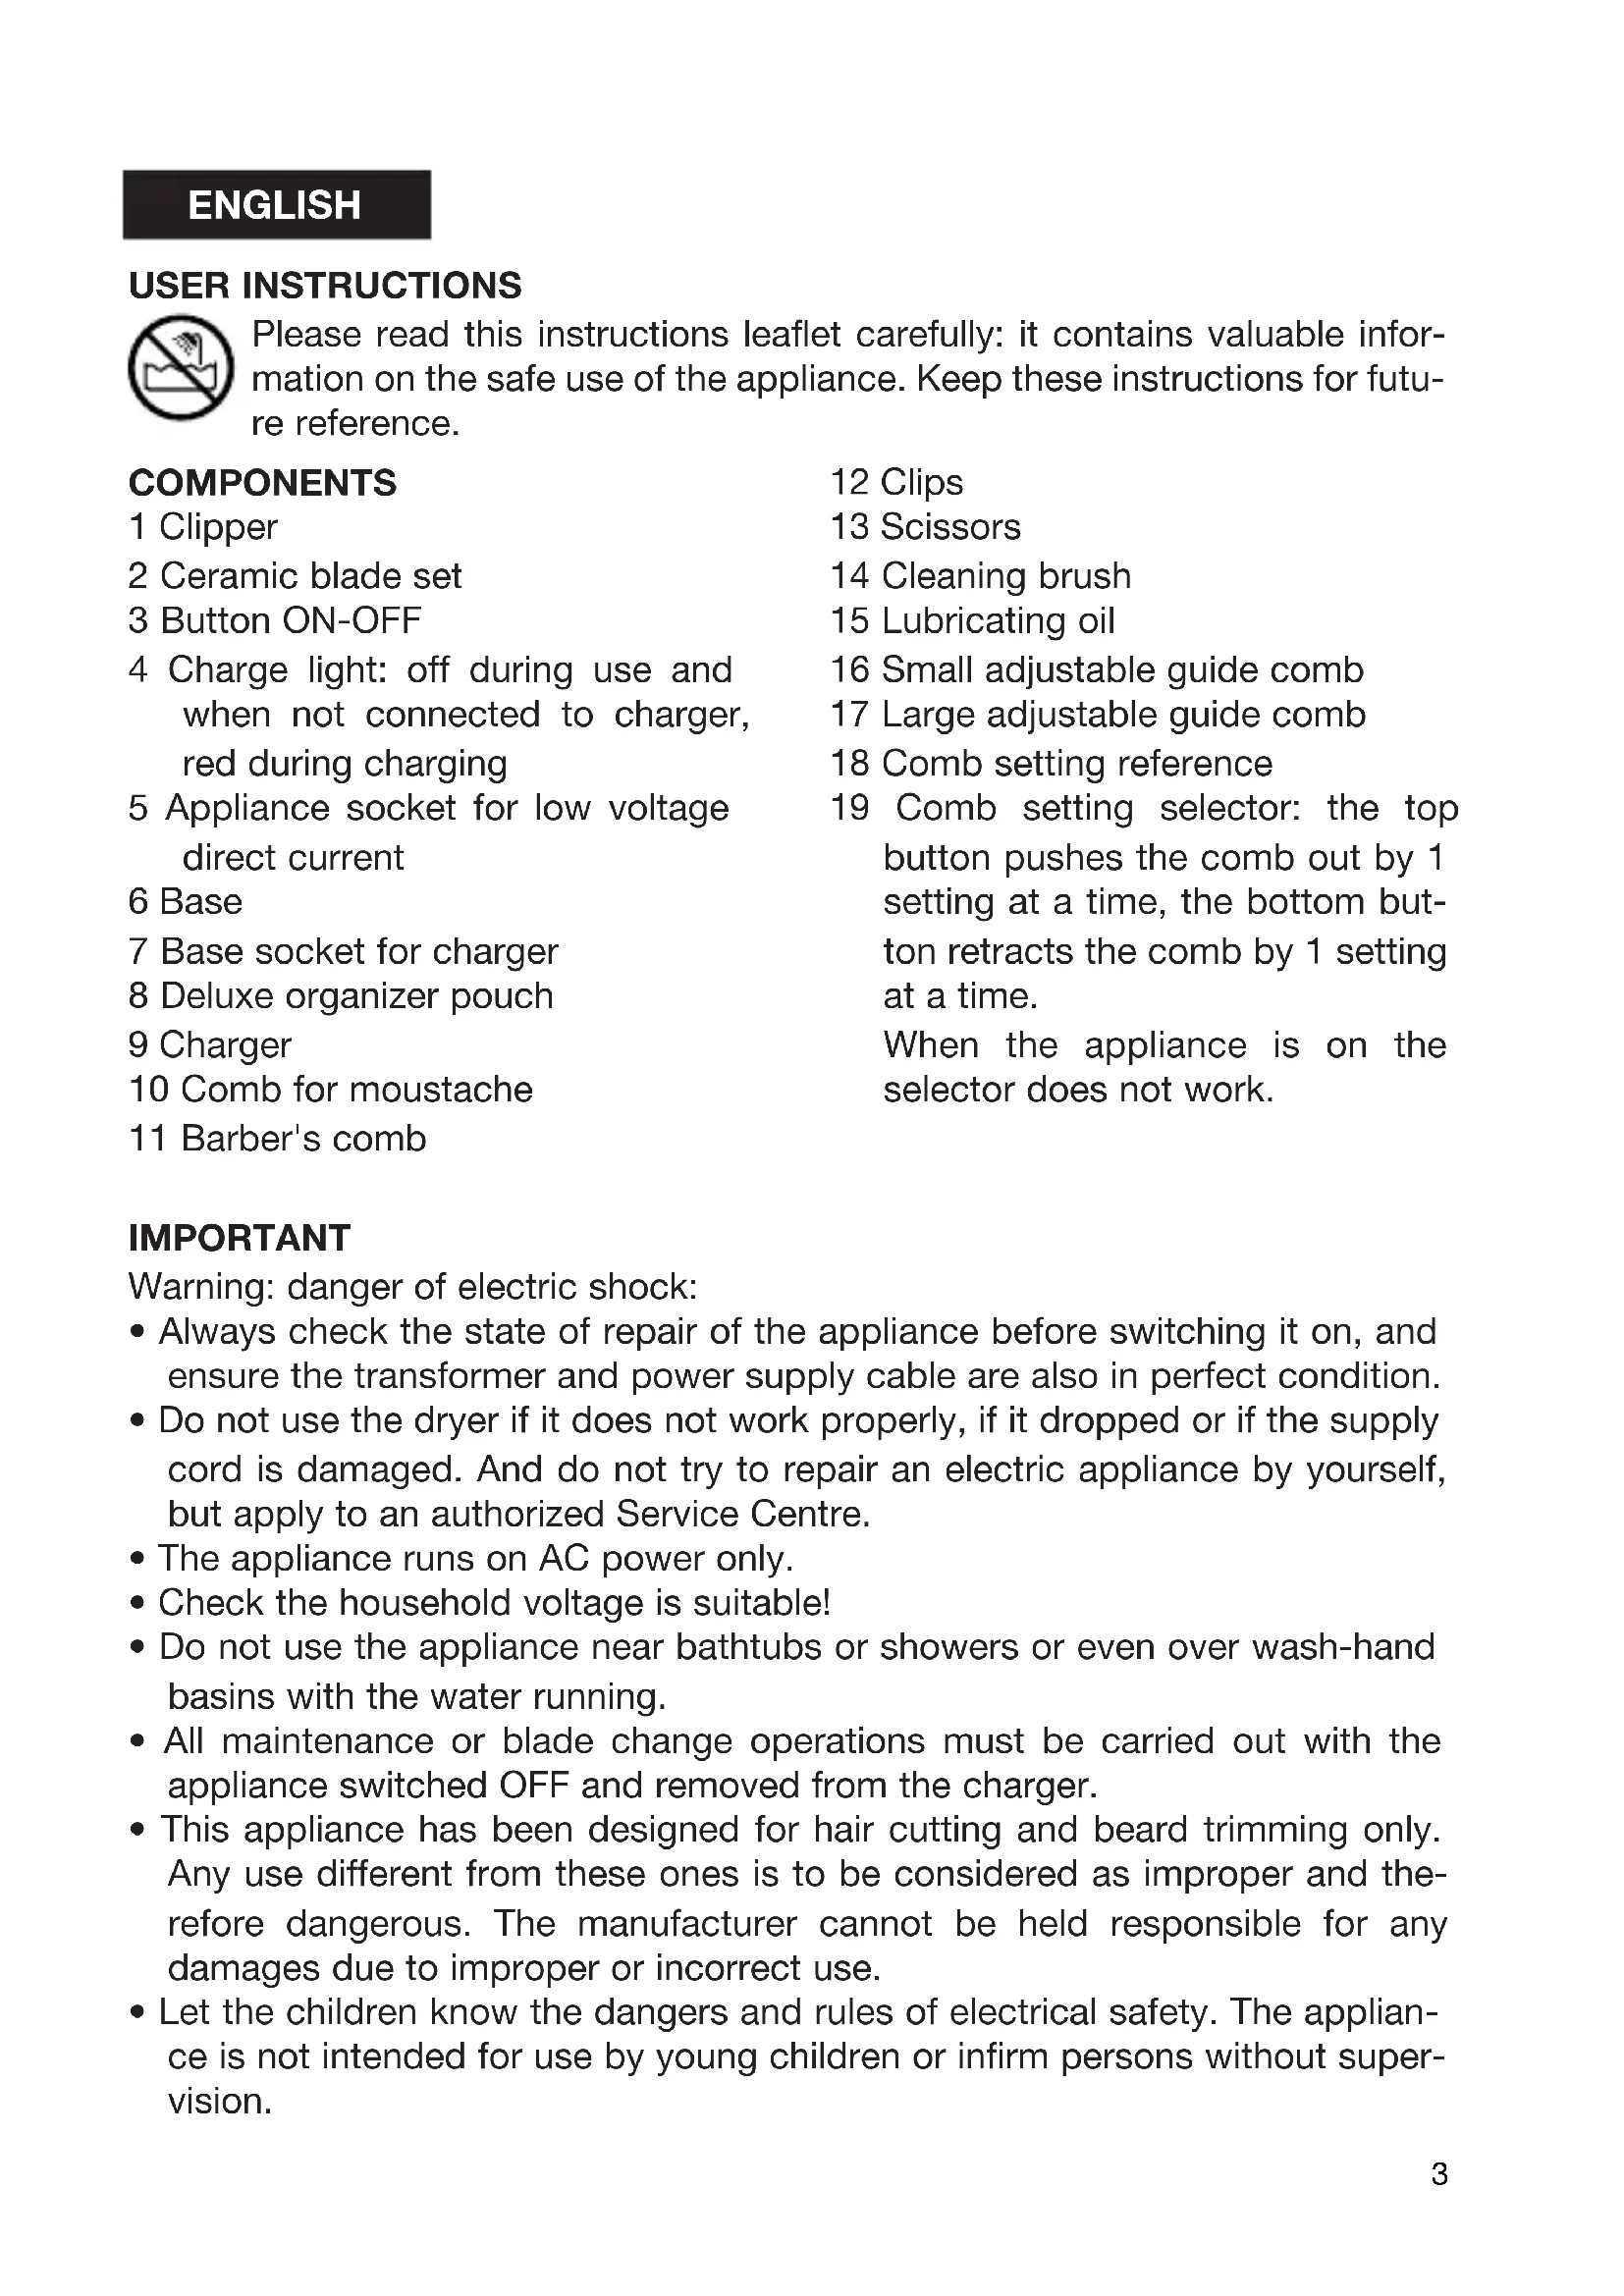
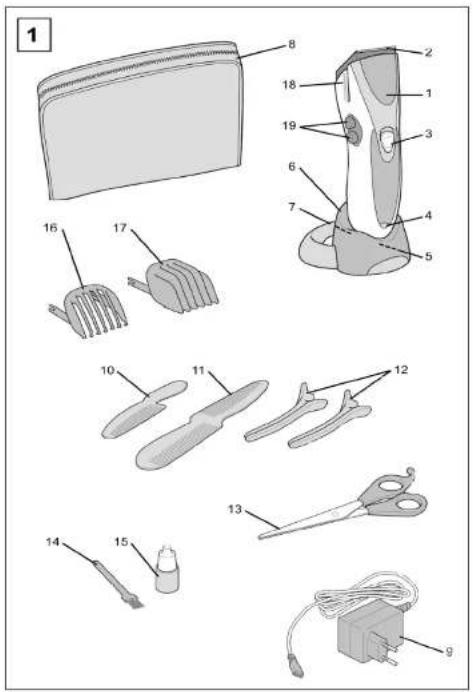
COMPONENTS
1 Clipper
2 Ceramic blade set
3 Button ON-OFF
4 Charge light: off during use and when not connected to charger, red during charging
5 Appliance socket for low voltage direct current
6 Base
7 Base socket for charger
8 Deluxe organizer pouch
9 Charger
10 Comb for moustache
11 Barber's comb
12 Clips
13 Scissors
14 Cleaning brush
15 Lubricating oil
16 Small adjustable guide comb
17 Large adjustable guide comb
18 Comb setting reference
19 Comb setting selector: the top button pushes the comb out by 1 setting at a time, the bottom button retracts the comb by 1 setting at a time.
When the appliance is on the selector does not work.
IMPORTANT
Warning: danger of electric shock:
- Always check the state of repair of the appliance before switching it on, and ensure the transformer and power supply cable are also in perfect condition.
- Do not use the dryer if it does not work properly, if it dropped or if the supply cord is damaged. And do not try to repair an electric appliance by yourself, but apply to an authorized Service Centre.
- The appliance runs on AC power only.
- Check the household voltage is suitable!
- Do not use the appliance near bathtubs or showers or even over wash-hand basins with the water running.
- All maintenance or blade change operations must be carried out with the appliance switched OFF and removed from the charger.
- This appliance has been designed for hair cutting and beard trimming only. Any use different from these ones is to be considered as improper and therefore dangerous. The manufacturer cannot be held responsible for any damages due to improper or incorrect use.
-
Let the children know the dangers and rules of electrical safety. The appliance is not intended for use by young children or infirm persons without supervision.
-
The appliance must only be used for cutting hair and trimming beards. Any other use is considered improper and not in compliance with the uses prescribed by the manufacturer.
- Do not expose the appliance to temperatures below 0^ or above 40^ . Avoid exposing the appliance to direct and prolonged sunlight.
- Do not leave the appliance on charge in wet places and do not recharge the appliance when it is wet.
- Before using the appliance for the first time, charge the battery for 14 hours.
- The appliance comes equipped with a NiMH battery. To safeguard the environment, do not dispose of the battery along with household refuse, but deliver it to a disposal point for batteries.
- Danger of scratches or cuts. Do not use a comb or a set of blades if they are damaged. Replace them immediately, as they may cause injury.
- Take care not to scratch the skin when handling the appliance with the set of blades without combs.
USE
MAINS POWER SUPPLY
Connect the transformer (fig.1 - ref. 9) to the appliance by inserting the plug into the appliance socket (fig.1 - ref.5). Plug the transformer into the mains.
Switch the appliance on using the switch (fig.1 - ref.3).
Switch it off after use.
Warning: if the appliance does not work with mains power when the battery charge has run down completely, switch it off, recharge the battery for about five minutes and then switch back on again, running on mains power.
SWITCHING ON AND SWITCHING OFF
To switch on the appliance turn the switch (fig. 1 - ref. 3) on position 1. To switch it off move the switch back to position 0.
RECHARGING THE BATTERY
- Before using the appliance for the first time, charge the battery for 14 hours. For subsequent charges, allow the appliance to charge for at least 12 hours.
- Switch the appliance off using the switch (fig.1 - ref.3).
The battery can only be charged with the appliance switched off.
-
Connect the transformer (fig.1 - ref.9) to the appliance by inserting the plug into the appliance socket (fig.1 - ref.5).
-
Or connect the transformer to the base (fig.1 - ref.6) by inserting the plug into the base plug (fig.1 - ref.7), then sit the appliance on the base.
-
Plug the transformer into the mains.
- During charging the led (fig.1 - ref.4) lights up to indicate charging in progress.
- Only recharge the battery when you note a clear reduction in appliance power.
- When the battery is fully charged, the appliance can be used for 50 minutes without connection to the mains.
CUTTING WITH GUIDE COMBS
Depending on the type of cut desired, the appliance can be used with or without a guide comb. The guide combs can be adjusted to 13 different settings by means of the comb setting selector (fig.1 - ref.19) in order to allow different cutting lengths. The setting is visible on the comb setting reference (fig.1 - ref.18). Without a guide comb, the appliance has a cutting length of 1mm .
FITTING AND REMOVING THE GUIDE COMB
- Switch the appliance off.
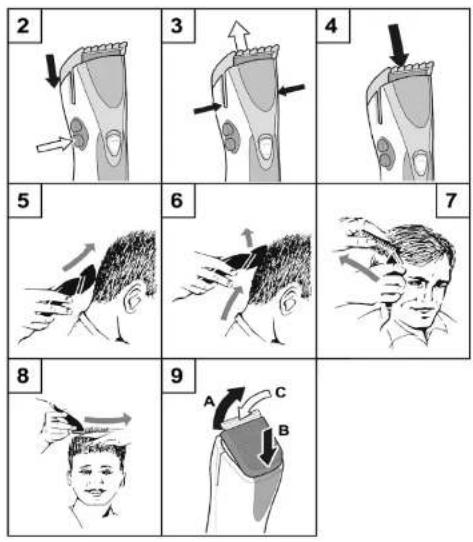
- Use the bottom button of the comb setting selector (fig.1 - ref.19) to retract the guide comb fully (fig.2) to setting 1, shown on the comb setting reference (fig.1 - ref.18).
- Grip the comb and pull as indicated in (fig.3) to remove it.
- To replace the comb, again with the appliance switched off and the selector to setting 1, fit the comb in the guide and click it into place (fig.4).
CERAMIC BLADE SET
The ceramic blade set guarantees a perfect hair cut for long time without oiling.
CHANGING BLADES
- Switch the appliance off.
- To remove a blade, push to release from the seat as shown in (fig.9).
- To refit a blade, follow the instructions in (fig.10): first insert the rear section in the seat (A), then push the front to secure in place (B).
STYLING TIPS
SHORT STYLES
- Choose the guide comb and, using the selector (fig.1 ref.19), adjust it to the best setting for the desired length of cut. We advise you begin from a higher setting and then move on to a lower setting as required.
- Cut hair while dry, using short strokes and progressing slowly.
- Comb the hair as you proceed in order to remove cut hair and check the results.
- NECK: Starting from the midpoint of the bottom of the neck (fig.5) work upwards using short strokes towards the middle of the head (fig.6), gradually working outwards to the sides.
- SIDES: We advise you use a lower setting, working in the same way as with the neck.
To finish sideburns and the area around the ears, use the appliance without a guide comb, holding it turned downwards.
- TOP OF HEAD: Use a higher setting. Start from the forehead working backwards towards the middle of the head.
LONGER STYLES
- Use the same method, starting from the neck and working upwards, followed by the sides and then the top of the head.
- To adjust the cutting length, use the barber's comb (fig.7), or else your fingers to help (fig.8), using the appliance without a guide comb.
- The appliance comes supplied with a set of clips (fig.1 - ref.12) for sectioning very long hair and for cutting fringes.
CARE AND MAINTENANCE
- The cleaning and maintenance procedure must be carried out after every use.
- All maintenance or blade change operations must be carried out with the appliance switched OFF and removed from the charger.
- Never immerse the appliance in water!
- After every use, remove the guide comb then use the small brush to eliminate any hair from the cutting head and its seat.
- Clean the outside of the appliance with a soft cloth (slightly damp if necessary). Never use solvents or abrasive detergents!
- Remove the cutting head (fig.9) and evenly oil the seat of the motor pin which is located on the inside.
- If after prolonged use, and despite regular cleaning and lubrication, the cutting ability of the appliance appears to be diminished, the cutting head must be replaced.
- Once the appliance has been cleaned, the guide comb can be fitted back in place since it also helps to protect the blade.
- Do not oil the ceramic blade set.
DISPOSAL
- Dispose of the appliance in accordance with all regulations governing waste disposal and the safeguarding of the environment.

This appliance complies with the Directive on Electromagnetic -compatibility 89/336/CEE and the Low Voltage Directive 73/23/CEE.
DEUTSCH
SET KEPAIKON AENI△ON
Oeapikcs aeipdecs eyyuovtai tealeio koupepa yia eyaloxpovxwiclaa.
AAAAH AENI△ON
- 2Bnote n ouakeun.
Ia va y e iia aenia oipwTe yia va byei an' tn theon tnc onwcg paivetar otynv (EK.9).
Tia va toTtoeTeiote deite (Eik. 10): Tpwa aIte To Tiow Mepoc otyn V Eon (A) kai tmeTo ptpoovo Mepoc va Kouptwoe (B).
HPOΦOPIE Σ TYA KOYPEMATO
KONTO ΣTYA
AiaaleTe Tn xteva-08nyo kai e ToV EIIAOyEA (EIK. 1 0eon - 19) puOioTe nV EITIOUHTN TEa. Suviotoupe va EekivnoTe e pia uynlotepn Teon kai pTa va BalaTe Tnv EITIOUHTN.
KoTt a paAia evw eivai oTeYv, oe pKpec dooeic kai npoxpnoTe apy.
XTeviEe Ta maAia kata n diapkeia yia va diowxveTE TIG pixes kai va EeYxETO aTOTeAeOa.
AYXENA: Apxiovtac aTTO Kevtpo Tou kATW epouc (EIK.5) TPOXwPnoTe TPOC ta Tavw (EIK.6) KAI tA KAVTE ta Tladyia.
IAEYPE: Uviotoue va xpnoipootieiote mia xaunlotepn theon, douevovtac 10v iio tpanto oTWCOTOV auEVA. Tia tic akpcg kai yupw ato ta autia n baTe XTEva-odnyo kai Koupetye TPOC TA KAATW.
KOPYH KEPAIOY: XpnoiopoioieoiE iia uynlotepn 8eO. EkvnoTe aT O pOoTa PPOs Ta Tioo PPOs TO eov Tou Kepaiou.
MAKPY ΣTYA
Xpnoiopoioieote nvi 1oia e0o, kivwta aTO tv auvva TPOC ta TAVW, tataa kai taynv Kopu.
Tia va puθμiσεTE TO μnkoc koupéμatos xpnoipotoiieioTE Tn xTeva kOpμwtn (Eik.7) n ta daxtua aac (Eik.8) xpnoipotoiwVtac tn ouokeun xwpic xTeva-obnyo.
H ouokun ouvodueetai aT o kAITc (Eik.1 - 0eon 12) yia xwipua TOnu paakiw v aalwv n ia pavtce
ΦPONTIΔA KAI ΣYNTHPHΣH
KaapiaoC kai ouvtipno nppei va yivovta a no kae xpon.
OAEc oI ouvtnpnoeic kai aalayec aeTIDowv TpeTTIva yivovtai ME tn OuaKEun 0Bnotn kai EKTOS BaoNS FOPTIOs.
NotE Boutate Tn ouakeun oTo vepo.
Meta aTIO KAeXpOAn,ByaAte Tn XTeVA-0bnyo KAI ME TO MIKPO BouptaoKaiBapioTe Tc TpiEs c ATO TNV KEpaAln KAI Tn BaoN Tns.
KaapioTe to eWTEPIKO Tns oukeunc me aakoo navi (eAaepwuc ypo av xpeiaZeta).Mn xpnoipotoiite atoppuattiká.
ByaAte Tnv Kepaa (EK.9) kai aawate otn baoi tou aovatou potep.
Eav ta aio kaipo xpangs kai napolouc touc kaapioouc kai to adomegaa n ikavotnta tns ouakeungsaivetai neeyn aaalete nvy kepaan.
Apoou kaapiaete tn ouakeun gavaaalete tn xteva-oyo yia va Tpootateuovtai oI eTIOEc.
Mn aaowve Tc Kepaikic i
NETARMA THE Σ YΣKEYH
BBIMKHEHHRA BUMKHEHH
Дя BBIMKHeHЯ npnady nobepHiB BMKaU B noNoxKeHHa (kap.1-no3.3) 1.ДЯ BIMKHeHHЯ npnady nobepHiB BMKaU Ha3aB NnoNoxKeHHa 0.
3APRAKA AKYMUTOPA
IpeepnBnKOpncTahHm 3apxkaTe npnaHe MeHwe 14 roHN. nOanbwoi 3apxkmoXnBO 3apxkATn aKKymyJrTOP npOTrOM 12 roHN.
BnMkaIte npnaD BnKOpncTOByOuH BnMkaU (kap.1 - no3.3).
AkymynTop 3apraJkaeTbc Ta TInbKn npu BmKHeHomy npncptoi.
- PnueHaIte TpaHcΦopMaTOp (kap.1 - no3.9) do npnnay wnxom npncdHaHHa po3'emy do rhi3da npnady (kap.1 - no3.5).
A6o npueiHaIte TpaHcΦopMaTOp Do 6a3n (kap.1 - no3.6) wJnxOM npueiHaHH po3'Emy do rHi3da 6a3n (kap.1 - no3.7), Ta po3TaWyIe npuJaB TprMaui 6a3n.
BbIMKHTb TpaHcΦopMaTOp Do Mepexi.. - IpoTgrom 3apRkn lamna (kap.1 - no3.4) 6yde cBITnCRA, demOHCTpyuOu n o iDe 3apRkka.
Ii3apraIb akymyIaTOp, kkuo Bn BiDyBaTe naIHnNoTyKHOCTi npuna.
Pn noBnic 3apdxKeHomy akymyntopipnpnaM oKe npaioBaTn do 50 xBNHH 6e3 niknoueHHdo mepeki..
BVKOPNUCTAHH HACADOK
B 3aIexKHOCTi BiD TnHy 6aKaHOI 3aYickN, MoXHa KOpNCyBaTncb npIpaIOM 3 HacaKaMn, a6o 6e3 Hnx. HacaKn MoKyTB 6ytN HanaWTOBaHI Ha 13 pI3Hnx peXmIB 3a Donomoro o ceNeKTopa Hacadok (kap.1 - no3.19), 0o Do3BOJnE MiHrT N DOBXnHY cTpIXKn BONCCr. HanaWtYBaHH HacaDOK MoXHa No6aHTn Ha (kap.1 - no3.18). Be3 BnKOpNCtaHH HacaDOK npIpa IooBONRe 3po6HTn 3aUcKy 3 DOBXnHOO BONCCr 1 MM.
PnEHaHHaBID'EDHAAHHAHACAOK
BumkhItb npnna.
HaTnCHiTB HnKHe KhoNky caleKTopa HacaKn (kap.1 - no3.19) Ta nobHicTIO 3HiMItb HacaKy (kap.2) B noLoKeHHra 1, Ike noka3aHo Ha (kap.1 - no3.18).
TpmaTe HacaKy Ta Ta rHtB II, kNoka3aHo Ha (kap.3) dna BuaaneHHA.
-ДяЗamHn HacaKn, BmKHiTb npHa Ta noCTaBTe ceNeKTOp B nONoXeHHr 1, BCTaBTe HacaKy Ha II Micue (kap.4).
KEPAMIyHn BJOK-JE3O
KepamiuHn 6nok-Ne3o rapaHTyec DOBROtpuBany BiMInHy CTpNkky BONoc8 6e3 DoaTKOBORO 3MaUyBaHH MaCTNJOM.
3AMIHA BJOK-JE3A
BIMKHiTb npnla.
- Dnra BuaaneHHa 6noK-Ne3a, HATNCHTb 06 3BInbHHTN Ioro 3 rhi3da, Ra Noka3aHO Ha (kap.9).
- Inra noBepHeHHa 6nok-Je3a B rHi3do, BnKohyIte IHCTpyKcII, kNoka3aHO Ha (kap.10): cnoatky BCTaBte 3aHIO qactHy B rHi3do (A), notim npHTncHt b fpoHTaJIbHy qactHy (B).
MODEJIIOBAHH
KOPOTKIN CTNJIb
Bn6epitb hacaiky i BHKopncTObyOuH ceneKtOp (kap.1 no3.19), o6epitb hainkpauy yctahOBky dna Heo6xIDHOI DOBXHH ctpnxKn. Mn paIMo Bam noHNATn 3 6inbwoi ycTaHOBKn, a notim po6ntm MehSy yCTaHOBky.
Bonocra Ma6 6ytn cyxim, ctpnTn noTpioHO KOpOTKmM NOBInbHMm pyxamn.
Perynpho 3aicyte Bonoocr rpe6incem dna BndaneHHra 3piaHoro BOnocra Ta dna KOHTPOIO 3a pe3ynbTaTAMN.
IINRA:NouHaOuH 3 cepeHNn HxKhboi YactHHn u (kap.5) cTpNrtn Doropn KOpOTKNMpyxAMn Do cepeHNn rONOBn (kap.6), Ta 3 60kIB.
CKPOHI:PaIMo Bam 3po6nTm Mehby yCTaHOBky Ta cTpHrTaKIM camM HHom, kI uHIO.
ДяЗавершенистпжknбиЯByxВNKOPNCTOBYte npnana6e3 Hacadkn, NOBepHyBwH NOrOdoHN3y.
BEPXH YACTINHA TOLOBN: 3po6itb 6inbwy yctaHOBY. NounHaTe ctpnTn cnpepy pyxaOuHcB Ha3ad Do cepeHNr TOnOBN.
DOBmCTnIb
BnKOpncToByte Toi camn MeToD, nouHaIOUH 3 uH, pyXaOuNcB DorOpn, notim 6OKn Ta BepxH YActnHa rOIOBn.
-Дя yctaHOBKn DOBXHH 3p3aHOrO BNOCCB BnKOpNCTOByIte rpe6iHeCb dna BNOccs (kap.7), a6o po6itb ue nalbucmN (kap.8), BnKOpNCTOByUOn npnilad 6e3 Hacaikn.
- Ppnaad Maec B KomnneKti Ha6ip 3axmib (kap.1 - no3.12) dny po3noiny dyke DOBRoro BOLOCCs Ha OKpeMi YactHH.
DORJAD TA OBCNYROBYAHHH
- Ynctka Ta o6cnyroByBaHHa NOBHHI 6ytu 3po6neHi nicra KOxHoro BUKOpuctaHHa.
Byb-ke 06cnyroBaHHa, afo 3miHa HacaKn, nn 6noK-ne3a Mae 6ytn npoBOHNTncb npn BmKHeHomy 3 MepeKi Ta BiDOKpemneHomy Bi
3apndoro npnctropo npnanaidi.
Hi B ykomy pa3i He 3aHypioTe npnad y Body! - Iicna Koxnoro BnKOpuctaHn BIDOKpeMIOHe HacaKy Ta BuaNITb 3piaHe BONOCs 3 Ne3a Ta NOro rH3da 3a DonOMORO MaJeHkoI uTKn.
- Iocntb Kopnyc npnay M'koTo raHnnpko (3nerka BOnoro, kUo Heo6xidno). HikonHe BVkOpncToByte po3HHNKn a60 abpa3NBHi MMouci 3acob!
3HIMITb 6nok-Ne3o (kap.9) Ta 3nerka 3MaCTiTb ciINO npNBOy MOTopa, po3TaWOBaHe BCEpeHi.
KIO nicJIOBROTEPMiHOBOBOPNCtAHN, Ta He3BaXaOuH Ha peryIpy HCTKy Ta 3MaUyBaHH, pIXyA cnpOMOXHICTb npnA dy Buaetbcr He3aIOBInbHOIO, 6nOK-Ne30 NOBHHo 6Ty 3AmHeHO.
Iicra YnCTK npnaay Tpe6a npncHaTu DO HbOro HacaKy, TOMy 0 BOHa TaKox Donomara3axncttu ne30.
He 3mauye Te KepamHn 6Jok-Ne30.
3HnueHH
3HnuyTe npnad y BiinobiHocti 3 ycima BmOramn 3aKoHoaBCTBa 0do 3HnueHHcMTT Ta 3axNCTy HABKOINHbOro cepeOBuHa.
HCTPYKUNI NO INCNOJB3OBAHNIO
IoxanyiTa BnMaTeNbHO npOHTe 3Ty HNCTpyKcHIO: OHa coDepxHr Heo6xOaMyIO nHΦopMauio no 6e3onacHocTn np6opa. CoXpaHrTe HHCTpyKcHIO DnA NcNoB3OBaHnB DaJIbHeJWeM.
COCTABHbIE 3JEMEHTbl
- MaunHka dIa cTpNkB0nOc
- Ha6op KepaMuecknx Ne3Bn
- Khonka
BKJIIOUeHn/ByIKJIIOUeHn
4.ИндikatopЗapdkn6atapen:
OTKJIIOUeH BO BpeM
NCN0JIb3OBaHHN I B He
NODKNIUOeHHOM K 3aprHOMy
yCTPOBCTBY COCTOHHN
5. Pa3bem dnn npamoro
NoKIOUeHn3NeKTpONnTaHn
HN3KORHANpXeHHN
6. Ba3a
7. Pa3bem Ha 6a3e dna
3apdHOrO yCTpoNCTBa
8.Футлар Deluxe dny
HHCTpyMeHTOB
9. 3apraHoe yctpoiCTBO
10. Pacyecka dny ycoB
- Pacyecka napikmaxepa
- 3aXmbl
- HOxHnUbI
- KntbДЯ CMaxuBaHnBBOJOC
15.Cma30HoeMacno - Manaj peryniyemar hacaika
17.Бовшаяperyniyemah hacaKa - Yka3aTeIb nOIOKeHn HacaIKN
- IpeeknioyateIb noIOxKeHna HacadK: BepXHra KhONka nepeBODNT HacdKy Ha ODo
NIOJKeHHe BBepx, HIXKHA
KHONKa nepeBODnT HacaDky
Ha OndHO NIOJXKeHne BHN3.
Korda npnbop haxoNTcB pa6oem coCTOHN,
nepeknioyataenbHe pa6oTaet
BAKHO
PpeynpeXdHne. Onacnoctb ydapa TOKOM:
Bcerda npOBepaTe COCTOHNHe NCnPaBHOCTH npnbOpbl nepeB BKIOUeHnEM B cetb. Y6eNTecb yTO TpaHCΦopMaTOp, a TaK JKe cTeBOI Ka6eNb HaxoJrTCB NcnpaBHOM COCTOHN.
B cnyuae noBpeXeHnra coeHHntbHoro npoBaOna o6paauTecb TOnbKO B Te MaCTepckne, KOtOpbIe peKOMeHnyet npOdaBeu, TaK KaK dNppeMOHTa Tpe6yETc CneuaNbHoe 6OpUdoBaHne.
- Pn6op pa6oTaet ot cetn nepemehHoro Toka.
- PpOBepbTe, noDxOHT nHn HnprjKeHne B BaWe Cetn dna HCNoIb30BaHn r np6opa.
He nCnoJb3yIe np6Op B6n3n BaHHbl, dywa nn paKOBHbl.
Bce texnueckne pa60tbI nn pa60tbI no cmeHe Je3BnA DOJXHbI BbIOHNHTcI pN BBIKIOUeHHOM pN6Ope
3TOT np6op 6bl pa3pa6o7an TOnbKO dna cTpNkB OJoc N 60pOdbI. IIO6oe dpyroe nCnoNb3OBaHne np6opa raBnEeTcR HeHaDnEkaunm n, CNEIOBaTeNbHO, PpeCTabnRrT onachocTB. Ppon3BOInTeNB He Hecet OTBETCTBEHHOCTH 3a HeHaDnEkauee nCNoNb3OBaHne np6opa. - HΦopMnpyTe dete o6 3neMeHTapHbIX Hopmax 6e3OnaCHOCTn npN NOB3OBAHm 3NeKTPoPnp6Opamn. He pa3pewaTe nM BkIIOuATb φeH 6e3 BaWero npNCMOtpa.
XpaHnTb npn TemnepaType oT 0^ do 40^ .N36eratb nonadHna npraMbix cOnHeuHbIX nyuei.
He 3apkaTe np6Op B MeCTax NOBbIeHHoB BnaXHOCTN.
Ipeed nepBbIM hCNOJb3OBaHHeM, NOCTaBBTe aKKymyTOp 3apjkaTbc8 Ha 14 yacob. - Pn6bOp Ochaen HkeJIb-KaMneBOB 6atapee. Ira coxpanenu YnCTOTbl OkpykaIOUe Cpebl He Bbl6paCbBAaTe aKKymyJrTOp. DoCTaBBte erO B ceHTP yTIN3aUN.
- Onachoctb nope3OB n cepaannn. He nCnoB3yTe rpe6eHb nIe3Bna, ecnn OHn NOBpeKdEhbl. HemeJeHHO 3aMeHHTe nx, T.K. OHN MOVT pNCHHTb BPeI.
BybTe BnMaTeIbHbI BO BpEmr NcNoIb3OBAHn np6opa 6e3 HacadOK, T.K. 3TO MOKeT pNBeCTn K NOpe3aM I TpaBMam.
NCHOJIb3OBAHNE NOKJIIOUcEHNE K 3JEKTPOCETN
IodcoeHnHe TpaHcΦopMaTOp (pnc.1 - n.9) K npnbopy BCTaBbB BNky Ba3bem npnbopa (pnc.1 - n5)
IodcoeHInTe TpaHcΦopMaTOp B 3JIekTpOceTb
BknIOuHTe np6Op, nCnOJb3yra nepeKJIouaTeIb (pnc.1 - n.3)
IocneNCN0Nb3OBaHnBbIKIOHTe
BhimaHne: ecn 6aTape np6opa nonHOCTbIO pa3pXeHa n OH He pa6oTaET ot nHTAHnCeTn, nepe3apJnte 6aTapeo (npmepHo 5 mH.) n BkIOUHTe np6Op CHOBA B cTb
BKNIOUOYEHNE N BbIKIOUOYEHNE
YTo6bI BKIOuHTb np6Op, nepeBeIte nepeKIOUaTeIb B no3nIO 1 (pnc.1 - n.3).ДЯ BBIKIOUeHnA np6Opa, Heo6xOIMo nepeBecTn nepeKIOUaTeIb B no3nIO 0.
NEPE3APRAKABATAPEN
BpeMa 3apJxHn6bTapeN nepei nepBbIM nCNoIb3OBaHHeM coCTabnEeT 14 yacob. IInn noCneDyUoX 3apAOK Heo6xOdHMO MNHMym 12 yacob.
BbIKIOueHne np6opa npo3BOOHTCn nocpeIcTBOM nepeKIOUaTeJIa (pnc.1 - n.3). 3apJka 6atapen npo3BOOHTCn TOnbKO npn BbIKIOueHHom np6ope
- IopcoeHHTe TpaHcΦopMaTOp np6opa, BCTaBnB BNky B pa3bem np6opa (pnc.1 - n.5), NIO NOcOeHNHe TpaHcΦopMaTOp K 6a3e (pnc.1 - n.6) NocpeDCTBOM NOcOeHHeHnK Hei BNKn (Ka6en), KaNOKa3aHO Ha pnc.1 - n.7, 3aTeM yCTaHOte np6op Ha 6a3y.
- PoiKIOHTe TpaHcOOPMaTOp B 3JIeKTPoCeTB
- INHdkatop CBnTeBcTByeTo npoecce 3apAdkn (pnc.1-n.4)
B cnyuae chnkeHHa MOUHocTN npu6opa, nepe3apndte 6aTapeo.
- Pn noHocTbO 3apXeHHoB 6aTapeN, np6op MOKeT HenpepbIBHO pa60TaB 50 MNHyT.
CTPNUKKAC HACADKAMN
B 3aBnCmOCTn OT BnDa CtpnxKn, np6op MoXeT nCNoJb3OBaTbcra KaK C HacaKaMn TAK N 6e3 HnX. HacaKn MoryT 6bItb yCTaHOBneHb B 13 pa3nUhbx noLoXeHn (pnc.1 - n.19). NoLoXeHn HaCaKn noka3aHbHa pnc.1 - n.18. Ppn OTCyTCTBnH hacaDok dInHa ctpnxKn coCTabIaTe 1 MM.
YCTAHOBKA I CHRTNE HACADKN
BbIKIOUHTe np6Op
- IcnoIb3yIte KhoNky BHN3y, NOKa3aHHyHO Ha pnc.1 - n.19, YTo6bl npNBecTN HacaIKy B noNoJKeHne 1 (pnc.2), NOKa3aHHyHO Ha pnc.1 - n.18
CHIMITE HacaKy (pnc.3)
-Дя yctaHOBKn Hacadkn, Heo6xOdHMo npnbecn DepeKataIb B noJoxeHne 1, yCTaHOBNTb Hacadky B pa6oyee noloxeHne do o6pa3OBaHnA uenyka (pnc.4)
KEPAMNUECKNEJI3BNA
Kepamnueckne ne3Bna rapaHTnpyOT dnteHbHbYxOd 6e3 cMa3bIBAHnne ne3Bn
CMEHA JIe3Bn
BbIKIOUHTe npu6op
- Ira CHaTna Ne3BnA, HadaBnTe Ha Hero KaK noka3aHO Ha pnc. 9.
IyctaHOBKn ne3BnA cneDyTe HNCTpyKcH, noka3aHHoHa pnc. 10
MODEJIINPOBAHNE KOPOTKNX BOJOC
BbIbePte HacaKy n Otperynpyte ee, nCnoJb3yra nepeKIOuataIb (pnc.1 - n.19), Ha Heo6xOaMHy o dInHy. Mbl peKOMeHdyem hauatb c 60nbJero noLoXeHry, noCTeNEHHO nepexOJa K MehbWeMy.
-Делаite ctpnKky Ha cyxnx BOJOCax KOPOTKIMN ПlaBHBIMN DBIXeHnA M
IcnoJb3yIte paCyecky dnn npuecbiBaHn ydaJIeHnA OTCTpIXHHbIX BOIOC
- WER: HauHna C cepeINbI HxKHe yactn Wei (pnc.5) nepexoDnte BBePx KOpOTKIMN PnABHbIMN DBNXKeHNMA N O HappaBNeHIO K cepeInhe rOIObl (pnc.6), noHEMHORY o6pa6aTbIBaJeByIO n npabyIO CTOPOHbl
TOJOBA:MbI peKOMeHdyem CTpNHy rOIOBy NOTOMy Je npHcunny, YTO N WEO
-Дястпжкбakehбapниоблactn BOKpyr ywei pekomeHnyetc ChЯтв Haacdkn HanpaBnTb np6op no HanpaBneHnIO CBepxv Bn3
MAKUJKA: NcnoB3yTe Hau6oJbWyo dInHy. HaunHaTe co 16a, nepexoJr Ha3ad no HapabHeHIO K cepeHne rOIOBbl
MODEJIINPOBAHNEIINHHbIXBOJOC
IcnoJb3yIte aHaONrHbI MeTOd, HauHnA C WEN DBNraCb no HappaBHeHIO K MaKyUke
-Дяperулроваядннынспь3уITEpacheckу napikmaxepa (pnc.7) ninn naibcbl (pnc.8), ecn Bbl nconlb3yete np6op 6e3 Hacaikn
-Пибор noctabnayetcna habopom 3axmOB (pnc.1 - n.12) dny 3akpenneHnB0noc
YNCTKA N YXOD
YnCTka DOnJxHa 6bITb npOBeHe nocNe KaXdOro NcNoJb3OBaHn.
Bce onepaun no cmeHe Je3Bn DoJXHbI npoBOAnTbcra npn BbIKIOUeHHOM np6ope,OTKIOUeHHOM OT 3NeKTPOcETn.
He onyckaIte npnbop B Body
- Iocne KaKdoRo HcNoIb3OBAHnHa Heo6xOaHMo CHrTb HaCaKnY n OuHCTnTb peKyuTo rONOBky OT B0NOC
OuHCTnTe NOBepxHOCTb np6opa MmKoBnAxxHO TpnoKo. He nCNoJIb3yIe pAcTBOpHTeIN MOUcne CpeDCTBa
- ChnmaTe peKyuTo roNoBky (pnc.9) n peryIpaHcMa3bBaIte rHe3do Bana MOTopa, pacNOJKeHHoro C BHyTpEHHe CTOpOHbl
Ecnn noCne dInTeBHorO nCnOJb3OBaHna peKyuza cNoCo6HoCTb roIOBkn yMeHbWntcra, HeCMOTpa Ha peryIarphyU qNCTky I Cma3bIBaHne,peKyuTO RoIOBky Heo6xOdmo CMeHNTb
Iocne uNCTkn npnbopa MOxHO yCTaHOBnTB HacaKy, T.K. 3TO NOMOKeT 3aunTb ne3Bn
He cma3bBaIe kepaMueckne ne3BnA
YTNIN3AUIN
- YTNIN3aun npn6opa dONXHa 6bItb npOn3BeDeHa B COOTBeTCTBm C HOpMaMn, perynpuyuOUMN yTNIN3aun OTxODOB IN COxpaHeHne OKpykaIOUe cpebl
CE 3TOT np60p OTBeyaet Bcem Tpe6oBaHnM DnpeKTHBbI 06 3JIeKTPOMaHHTHOJ COBMeCTnMOCTn 89/336/CEE n DnpeKTHBbl Hn3KOrO HanpXeHHa 73/23/CEE
i 10000000000000000000000000000000000000000000000
14 2y jll jll jll Jia
a 1
aai aaii aai i 1
y 1
aal 1
.
.
.
。
.
.
.
.
:
.
.
m = 311
.
.
.
.
.
m = 311 ;
m = 311
.
.
.
m = 311
1 2
y
.(5-1)(9-1)
Jy
(3 1-1)
Jnnn nn nnnn
jai jai aaiy y jay sll jaii aaiy y jay gai gai ai iai ai ay jai ai ciis 1:
J 5
jolalol,
1(3-1)
0 1
yjbln
12 14 14 jll
Jbjie Cieuw
.(3-1)
jai jilao jyLae jqll J
(5g-1)j(9-1)
(7g-1)(6j-1)
y
(4-1)
jaiy jaii jaii iie bia jil
50 50
aill baiy
13 13 13 13
g 19 1
1 1 1 1 1 1 1 1 1 1 1 1 1 1 1 1 1 1 1 1 1 1
4gill bia 1
j411 cibly
(2)(19-1)
(18gj-1)
(3)
J 1
(4)(20 1
aalg
y 1
jglalolpa
(9)(j)ggs
(A)j(10)
(B)
aai
y
19 1 1
g
aayy bany bann yy y
a 1
aI 5
(6)
GB - The symbol on the product or on its packaging indicates that this product may not be treated as household waste. Instead it shall be handed over to the applicable collection point for the recycling of electrical and electronic equipment. By ensuring this product is disposed of correctly, you will help prevent potential negative consequences for the environment and human health, which could otherwise be caused by inappropriate waste handling of this product. For more detailed information about recycling of this product, please contact your local city office, your household waste disposal service or the shop where you purchased the product.