Titanium & Ceramix Pro 627 - Lawn mower VALERA - Free user manual and instructions
Find the device manual for free Titanium & Ceramix Pro 627 VALERA in PDF.

| Product Type | Hair Clipper / Trimmer |
| Model | Titanium & Ceramix Pro 627 |
| Brand | Valera |
| Blade Material | Titanium-coated and Ceramic |
| Blade Width | Approx. 40 mm |
| Power Supply | Corded (AC 100-240V, 50/60Hz) |
| Motor Type | Rotary motor |
| Cutting Lengths | Adjustable from 0.5 mm to 25 mm with guide combs |
| Guide Combs Included | 4 combs (1.5, 3, 6, 9 mm) or similar |
| Speed Settings | 2 speeds (low/high) |
| Cord Length | 2.5 meters |
| Weight | Approx. 250 g |
| Dimensions (L x W x H) | 18 x 4 x 4 cm |
| Maintenance | Oil blades after each use; clean with brush |
| Cleaning | Detachable blades for thorough cleaning |
| Safety Features | Overheat protection, ergonomic non-slip grip |
| Spare Parts Available | Blade sets, guide combs, power cord |
| Warranty | 2 years standard |
| Country of Origin | Switzerland |
Frequently Asked Questions - Titanium & Ceramix Pro 627 VALERA
User questions about Titanium & Ceramix Pro 627 VALERA
0 question about this device. Answer the ones you know or ask your own.
Ask a new question about this device
Download the instructions for your Lawn mower in PDF format for free! Find your manual Titanium & Ceramix Pro 627 - VALERA and take your electronic device back in hand. On this page are published all the documents necessary for the use of your device. Titanium & Ceramix Pro 627 by VALERA.
USER MANUAL Titanium & Ceramix Pro 627 VALERA
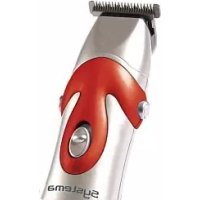
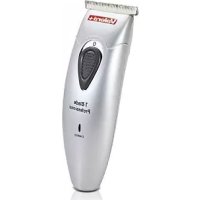
Professional Hair & Beard Clipper
Professioneller Haar-Bartschneider
Valera is a registered trademark of Ligo Electric S.A. - Switzerland
ENGLISH
USER INSTRUCTIONS

Please read this instructions leaflet carefully: it contains valuable information on the safe use of the appliance. Keep these instructions for future reference.
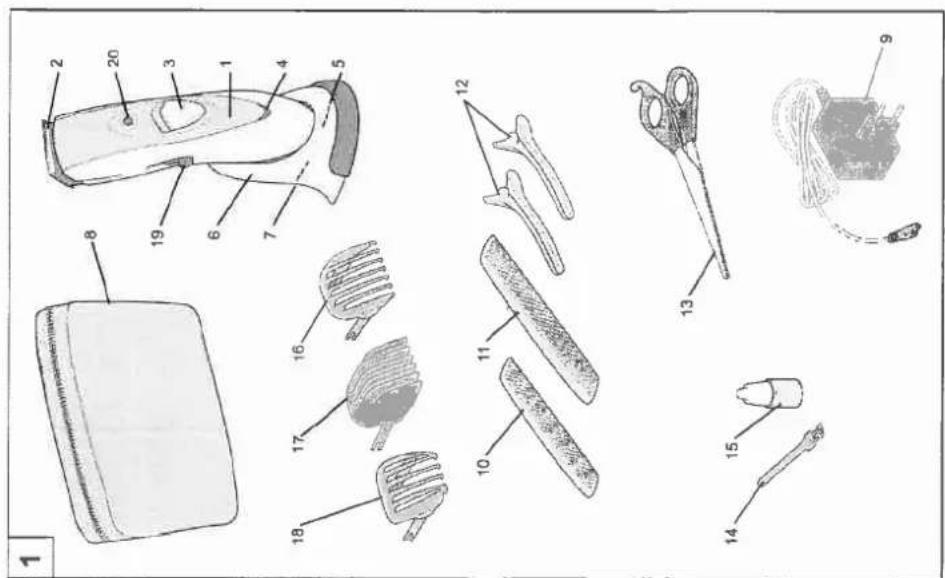
COMPONENTS
1 Clipper
2 Titanium and ceramic blade set
3 Button ON-OFF
4 Charge light: off during use and when not connected to charger, on during charging
5 Appliance socket for low voltage direct current
6 Base
7 Base socket for charger
8 Deluxe organizer pouch
9 Charger
10 Comb for moustache
11 Barber's comb
12 Clips
13 Scissors
14 Cleaning brush
15 Lubricating oil
16 Small adjustable guide comb
17 Large adjustable guide comb
18 Adjustable guide comb for beards and moustaches
19 Comb setting selector: adjusts cutting length when the appliance is switched off; remains fixed at set position when the appliance is on
20 Comb setting indicator
IMPORTANT
Warning: danger of electric shock:
- Always check the state of repair of the appliance before switching it on, and ensure the transformer and power supply cable are also in perfect condition.
- Do not use the dryer if it does not work properly, if it dropped or if the supply cord is damaged. And do not try to repair an electric appliance by yourself, but apply to an authorized Service Centre.
• The appliance runs on AC power only. - Check the household voltage is suitable!
- Do not use the appliance near bathtubs or showers or even over wash-hand basins with the water running.
- All maintenance or blade change operations must be carried out with the appliance switched OFF and removed from the charger.
- This appliance has been designed for hair cutting and beard trimming only. Any use different from these ones is to be considered as improper and therefore dangerous. The manufacturer cannot be held responsible for any damages due to improper or incorrect use.
-
Let the children know the dangers and rules of electrical safety. The appliance is not intended for use by young children or infirm persons without supervision.
-
The appliance must only be used for cutting hair and trimming beards. Any other use is considered improper and not in compliance with the uses prescribed by the manufacturer.
- Do not expose the appliance to temperatures below 0°C or above 40°C. Avoid exposing the appliance to direct and prolonged sunlight.
- Do not leave the appliance on charge in wet places and do not recharge the appliance when it is wet.
• Before using the appliance for the first time, charge the battery for 14 hours. - The appliance comes equipped with a NiMH battery. To safeguard the environment, do not dispose of the battery along with household refuse, but deliver it to a disposal point for batteries.
- Danger of scratches or cuts. Do not use a comb or a set of blades if they are damaged. Replace them immediately, as they may cause injury.
• Take care not to scratch the skin when handling the appliance with the set of blades without combs.
USE
MAINS POWER SUPPLY
Connect the transformer (fig.1 - reference 9) to the appliance by inserting the plug into the appliance socket (fig.1 - ref.5).
Plug the transformer into the mains.
Switch the appliance on using the switch (fig.1 - ref.3).
Switch it off after use.
Warning: if the appliance does not work with mains power when the battery charge has run down completely, switch it off, recharge the battery for about five minutes and then switch back on again, running on mains power.
SWITCHING ON AND SWITCHING OFF
To switch on the appliance turn the switch (fig. 1 - ref. 3) on position 1. To switch it off move the switch back to position 0.
RECHARGING THE BATTERY
- Before using the appliance for the first time, charge the battery for 14 hours. For subsequent charges, allow the appliance to charge for at least 10 hours.
- Switch the appliance off using the switch (fig.1 - ref.3).
The battery can only be charged with the appliance switched off.
Connect the transformer (fig.1 - ref.9) to the appliance by inserting the plug into the appliance socket (fig.1 - ref.5).
Or connect the transformer to the base (fig.1 - ref.6) by inserting the plug into the base plug (fig.1 - ref.7), then sit the appliance on the base. - Plug the transformer into the mains.
- During charging the led (fig.1 - ref.4) lights up to indicate charging in progress.
- Only recharge the battery when you note a clear reduction in appliance power.
- When the battery is fully charged, the appliance can be used for 50 minutes without connection to the mains.
CUTTING WITH GUIDE COMBS
Depending on the type of cut desired, the appliance can be used with or without a guide comb. The guide combs can be adjusted to 7 different settings by means of the comb setting selector (fig.1 - ref.19) in order to allow different cutting lengths. The setting is shown on the comb setting indicator (fig.1 - rif.20). Without a guide comb, the appliance has a cutting length of 1mm .
FITTING AND REMOVING THE GUIDE COMB
- Switch the appliance off.
- Use the comb setting selector (fig.1 - ref.19) to retract the guide comb fully (fig.2) to setting 1, displayed on the comb setting indicator (fig.1 - ref.20).
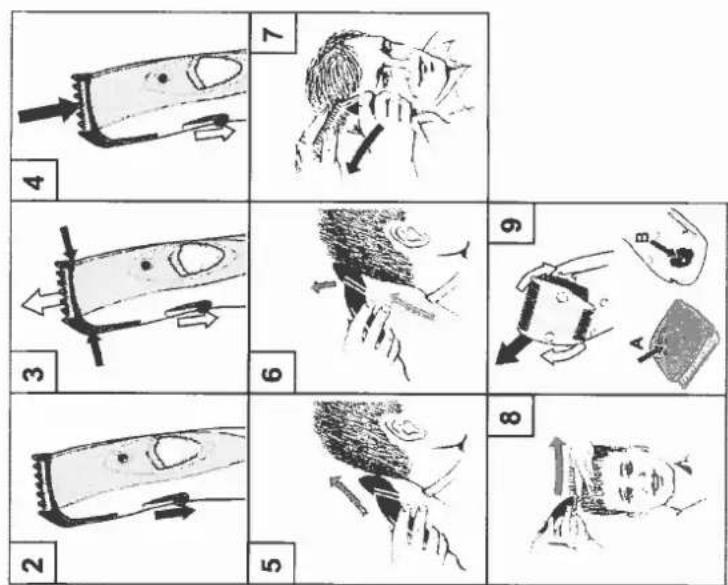
- Holding the selector still (fig.1 - ref.19), grip the comb by the tabs and pull as indicated in (fig.3) to remove it.
- To replace the comb, again with the appliance switched off and the selector to setting 1, fit the comb in the guide and click it into place (fig.4).
USING THE VARIOUS BLADES
The cutting head is fitted with a set of dual sided titanium & ceramic blades. The broad side is for cutting hair, while the short side is for trimming beards and moustaches, used in conjunction with the specific comb (fig.1 ref.18).
TITANIUM & CERAMIC BLADES
The combination of titanium coated blades and ceramic blades guarantees a perfect hair cut for long time without oiling.
CHANGING BLADES
- Switch the appliance off.
- To remove the blades, turn the blade set through 45^ in a clockwise direction (fig.9) and pull to remove.
- To refit the blade set, position it to the desired side, fit it into its seat at an angle of 45^ and turn it anticlockwise. Align the motor pin and the blade guide in the centre to facilitate refitting the blade (fig. 9)
STYLING TIPS
SHORT STYLES
- Choose the guide comb and, using the selector (fig.1 ref.19), adjust it to the best setting for the desired length of cut. We advise you begin from a higher setting and then move on to a lower setting as required.
- Cut hair while dry, using short strokes and progressing slowly.
-
Comb the hair as you proceed in order to remove cut hair and check the results.
-
NECK: Starting from the midpoint of the bottom of the neck (fig.5) work upwards using short strokes towards the middle of the head (fig.6), gradually working outwards to the sides.
- SIDES: We advise you use a lower setting, working in the same way as with the neck.
To finish sideburns and the area around the ears, use the appliance without a guide comb, holding it turned downwards. - TOP OF HEAD: Use a higher setting. Start from the forehead working backwards towards the middle of the head.
LONGER STYLES
- Use the same method, starting from the neck and working upwards, followed by the sides and then the top of the head.
- To adjust the cutting length, use the barber's comb (fig.7), or else your fingers to help (fig.8), using the appliance without a guide comb.
- The appliance comes supplied with a set of clips (fig.1 - ref.12) for sectioning very long hair and for cutting fringes.
CARE AND MAINTENANCE
- The cleaning and maintenance procedure must be carried out after every use.
- All maintenance or blade change operations must be carried out with the appliance switched OFF and removed from the charger.
- Never immerse the appliance in water!
- After every use, remove the guide comb then use the small brush to eliminate any hair from the cutting head and its seat.
- Clean the outside of the appliance with a soft cloth (slightly damp if necessary). Never use solvents or abrasive detergents!
- Remove the cutting head (fig.9) and oil the seat of the motor pin which is located on the inside.
- If after prolonged use, and despite regular cleaning and lubrication, the cutting ability of the appliance appears to be diminished, the cutting head must be replaced.
- Once the appliance has been cleaned, the guide comb can be fitted back in place since it also helps to protect the blade.
- Do not oil the titanium and ceramic blade set.
DISPOSAL
- Dispose of the appliance in accordance with all regulations governing waste disposal and the safeguarding of the environment.
CE This appliance complies with the Directive on Electromagnetic -compatibility 89/336/CEE and the Low Voltage Directive 73/23/CEE.
DEUTSCH
BEDIENUNGSANLEITUNG