Systema - Lawn mower VALERA - Free user manual and instructions
Find the device manual for free Systema VALERA in PDF.
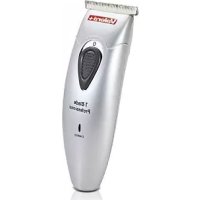
| Product type | Multipurpose trimmer (hair, beard, body, nose/ears, shaving) |
| Brand | Valera |
| Model | Systema |
| Power supply | Mains (adapter) or rechargeable NiMH battery |
| Battery life | 50 minutes cordless |
| Charging time | First charge 24 h, subsequent charges 12 h |
| Cutting heads | 5 interchangeable heads: hair, body, nose/ears, beard/mustache, shaver |
| Guide combs | 2 adjustable hair (2-8 mm and 10-16 mm), 1 adjustable body (2/5/9 mm) |
| Blades | Stainless steel for shaver head |
| Charge indicator | Red when charging, green when charged |
| Main functions | Hair, beard, mustache, body hair, nose/ears trimming, shaving |
| Maintenance and cleaning | Brush provided, lubricating oil included; do not immerse |
| Included accessories | 5 heads, 3 guide combs, adapter, charging base, oil, brush, scissors |
| Weight | Approximately 200 g (estimated) |
| Dimensions | Approximately 18 x 4 x 4 cm (estimated) |
| Safety | Switch, automatic stop while charging?; do not use near water |
| Warranty | 24 months domestic use, 12 months professional |
| Standards | European directives 2004/108/EC, 2009/125/EC, 2006/95/EC |
Frequently Asked Questions - Systema VALERA
User questions about Systema VALERA
0 question about this device. Answer the ones you know or ask your own.
Ask a new question about this device
Download the instructions for your Lawn mower in PDF format for free! Find your manual Systema - VALERA and take your electronic device back in hand. On this page are published all the documents necessary for the use of your device. Systema by VALERA.
USER MANUAL Systema VALERA
natural_image
Illustration of a pair of shoes with bandages and cutouts (no text or symbols)INSTRUCTIONS FOR USE
00050689-11/14
Distributed by Ligo Electric SA - 6853 Ligornetto / Mendrisio - Switzerland Valera is a registered trademark of Ligo Electric S.A. - Switzerland

EN Total system for hair, beard & body Translation from original instructions 6
DE Trimmer-Kompletset für Haare, Bart und Körper
Überleitung der Originalanforderungen 10
Set complet tondeuse à cheveux, barbe et poils
14
IT Set completo tagliacapelli, barba e peli
instrumenti original 18
ES Juego completo para corte de cabello, barba y vello
Inducción de las instrucciones originales 22
NL Complete set haar-, baard- en lichaamshaartrimmer
Vertaling van de originele instructies 26
Set completo para cortar o cabelo, a barba e os pelos
Tradução dos insoluções originais 30
Yhdistetty hiustenleikkuu-, parranajo- ja ihokarvojen leikkuukone
A superiában kéjtízonyan készlet 34
Teljes készlet - Hainyiró, szakáll- és szörzetnyiró
HU Az eredeti utashások fordítása 38
CS Kompletní souprava strojku na střihání vlasů, holení a zastřihování chloupků
Překladní originsních pokyns 42
Set Complet Aparat de tuns și ras
Troduces instructions originele 46
PL Kompletny zestaw do przycinania włosów, zarostu i owlosienia ciała
50
HE
Sistem trimera za kosu, bradu i telo
Prasad se originahrog upstatu
58
EL Πλήρες σετ κουρευτικής μηχανής για μαλλιά, γένια και τρίχεις σώματος επαφράσεις από τις αρχακής οδητός 62
TR Komple Saç Kesme Makinesi Seti, sakal ve tüyler Original salmadın çestriki 66
Повний набір для підстригання волосся,
бороди і окремих волосин
Покредит з охрілніньних інсплуати 70
RU Универсальный набор для стряжки волос,
бритья и удаления волосков
74
AR
PTPFM KAML JGEAT FCSI SHGR. WILHOBY WILSHGIRAT
78
ZH 理发、刷须及刷毛套套装
82
FA مجموعه کامل ماشین موزنی، ریش و موي بدن
مجره ماشین موزنی حرفی 89
English
OPERATING INSTRUCTIONS - Type. 654.01
Read these instructions carefully before using the appliance.
Available also on www.yuier.com
WARNINGS
- For additional protection, the installation of a residual current device (RCD) having a rated residual operating current not exceeding 30mA is advisable in the electrical circuit supplying the bathroom. Ask your installer for advice.
• Make sure the unit is perfectly dry before using it.
WARNING: Do not use this appliance near bathtubs, showers, basins or other vessels containing water. - This appliance can be used by children from 8 years of age and over, and by persons with limited physical, sensory or mental abilities or who lack the relevant experience and knowledge, if they are suitably supervised or have been educated to use the appliance safely and made aware of the associated risks.
- Do not allow children to play with the appliance.
- Children must not perform cleaning and maintenance procedures unless supervised.
- Do not use your unit if it is not working properly. Do not try to repair this electrical unit yourself, rather contact an authorized technician. If the supply cord is damaged, it must be replaced by the manufacturer, its service agent or similarly qualified person in order to avoid a hazard.
- When the appliance is used in a bathroom, unplug it after use since the proximity of water presents a hazard even when the appliance is switched off.
- Only connect this unit to alternating current and check that the mains supply voltage corresponds to that indicated on the unit.
• Always switch off the appliance after use and disconnect the plug from the mains power socket. Do not remove the plug from the mains power socket by pulling the cable. - Do not pull the plug out of the power supply socket when your hands are wet.
- Before switching on the appliance, always check its conditions and also control the transformer and power cable.
- The elements used to pack the unit (plastic bags, cardboard box, etc.) must be kept out of reach of children as they are a potential danger to them.
Valera
HAIR SPECIALISTS
Ligo Electric SA - 6853 Ligornetto ; Mendrisio - Switzerland
- This unit must only be used for the purposes for which it is expressly intended. Any other use is to be considered improper and therefore dangerous. The manufacturer accepts no responsibility for damage caused by improper or erroneous use.
- Do not expose the appliance to temperatures below 0^ or above 40^ . Avoid exposing the appliance to direct and prolonged sunlight.
- Do not leave the appliance on charge in wet places and do not recharge the appliance when it is wet.
- The appliance comes equipped with a NiMH battery. To help protect the environment, the batteries should not be included with ordinary domestic waste, but should be taken to a special collection point instead.
- Have the battery removed by qualified technical personnel or by the treatment and recycling centre.
- Do not expose the battery to liquid, moisture or high humidity.
- Keep the battery away from magnetic fields, sources of heat and naked flames.
- When using the head for trimming nose and ear hair, do not push the unit hard into the nose or ears. Only the metal tip of the head should be inserted delicately into the nose and ear cavities.
- Risk of scratches or cuts. If there is any damage to a comb, set of blades or the nose and ear hair trimmer, do not use them: replace them immediately, since they could cause injury to the skin, nose or ears.
• Take care not to scratch the skin when handling the appliance with the set of blades without combs
OPERATING INSTRUCTIONS
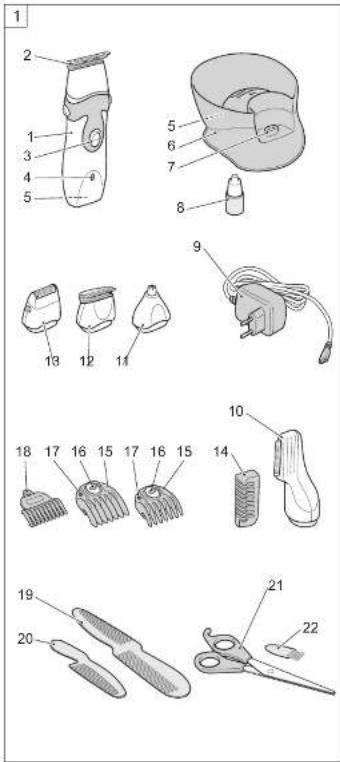
PARTS
1 Appliance
2 Hair cutting head
3 Switch
4 Charge light: red when charging, green when fully charged
5 Socket for transformer
6 Base
7 Charging contact
8 Lubricant
9 Transformer
10 Head for body hair
11 Head for nose and ear hair
12 Head for beard and moustache
13 Shaver head
14 Adjustable guide comb for body hair
15 Adjustable guide comb with 4 settings
16 Guide comb adjustment button
17 Guide comb setting indicator
18 Graduated comb
19 Barber's comb
20 Moustache comb
21 Scissors
22 Cleaning brush
The appliance can operate either using mains power or in cordless mode, as it has a rechargeable battery.
MAINS POWER SUPPLY
Connect the transformer the (fig.1 - ref. 9) by inserting the plug into the appliance socket (fig.1 - ref.5).
Plug the transformer into the mains.
Warning: if the appliance does not work with mains power when the battery charge has run down completely, switch it off, recharge the battery for about five minutes and then switch back on again, running on mains power.
RECHARGING THE BATTERY
- Before using the appliance for the first time, charge the battery for 24 hours. For subsequent charges, allow the appliance to charge for at least 12 hours.
- Switch the appliance off using the switch (fig.1 - ref.3). The battery can only be charged with the appliance switched off.
- Connect the transformer (fig.1 - ref.9) by inserting the plug into the appliance socket (fig.1 - ref.5). Or connect the transformer to the base (fig.1 - ref.6) by inserting the plug into the base plug (fig.1 - ref.5), and rest the appliance on the contact (fig. 1 - ref.7).
- Plug the transformer into the mains.
- The charge light (fig.1 - ref. 4) turns red while the appliance is charging and reverts to green when charging is complete.
- When the battery is fully charged, the appliance can be used for approximately 50 minutes without connection to the mains.
- In order to optimise the lifetime of the battery, never charge the appliance for more than 24 hours.
- Discharge the battery completely every few months, then recharge it again. This optimises the lifetime of the battery.
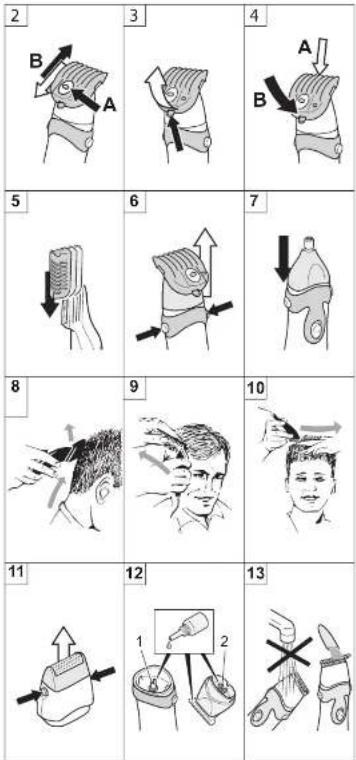
ADJUSTABLE GUIDE COMBS
The appliance is supplied with two hair/beard and moustache trimming combs, which can be adjusted to offer different cutting lengths: from 2 to 8 mm and from 10 to 16 mm.
To adjust the guide comb, press the adjustment button (fig.1 ref.16) and slide the comb in or out until it reaches the desired cutting length, as illustrated in fig. 2.
The various positions can be seen on the comb setting indicator (fig.1 ref.17).
The comb attachment can be removed by lifting the tab at the rear (fig.3); in this case the cutting length is 1 mm.
To refit the comb attachment, slot the front in first (fig.4 - A), then press down on the rear (B).
The appliance is also supplied with an adjustable comb for body hair, with three different cutting lengths: 2, 5 or 9 mm. For cutting length adjustment guidelines, see fig.5.
FITTING AND REMOVING THE HEAD
Please refer to fig.6 when removing the head. For instructions on re-fitting the appliance head, see fig.7.
USING THE HEADS
The appliance is supplied with 5 heads.
- Hair cutting head (fig.1 ref.2) - For trimming hair, can either be used alone or in conjunction with the relevant combs (fig.1 ref.15).
- Body hair head (fig.1 ref.10) - For trimming body hair, can either be used alone or in conjunction with the relevant comb (fig.1 ref.14).
- Nose and ear hair head (fig.1 ref.11) - For removing unwanted hair from these areas.
- Beard and moustache head (fig.1 ref.12) - For tidying beards, can either be used on its own or in conjunction with the relevant combs (fig.1 ref.15).
- Shaver head (fig.1 ref.13) - With fine stainless steel foil for supreme hygiene and narrow design for easier shaving.
STYLING TIPS
SHORT STYLES
- We recommend starting with the longest cutting length and subsequently adjusting to a shorter length, if desired.
- Cut hair while dry, using short strokes and progressing slowly.
- Comb the hair as you proceed in order to remove cut hair and check the results.
- NECK: Starting from the midpoint of the bottom of the neck work upwards using short strokes towards the middle of the head (fig. 8), gradually working outwards to the sides.
- SIDES: We recommend using a shorter cutting length, using the same method as for the neck area.
To finish sideburns and the area around the ears, use the appliance without a guide comb, holding it turned downwards. - TOP: Use a longer cutting length. Start at the front and move backwards, towards the centre of the head.
LONGER STYLES
- Use the same method, starting from the neck and working upwards, followed by the sides and then the top of the head.
- To adjust the cutting length, use the barber's comb (fig.9), or else your fingers to help (fig.10), using the appliance without a guide comb.
BEARD AND MOUSTACHE TRIMMING
- Decide on the kind of look you want to obtain, based on your face and the length of beard and moustache.
- When trimming beard and moustache, start off with the comb attachment adjusted to a high setting, and then move onto a shorter setting if so desired. A weekly trim will suffice to maintain the look.
- Define edges using the beard and moustache head (fig.1 ref.12), then use the shaver head (fig.1 ref.13) to finish.
- For best results, beard and moustache can be dampened (not wet), and brushed in the direction of growth.
- Proceed to trim, working upwards from the bottom, beginning at the jaw and moving towards the ears.
CARE AND MAINTENANCE
The cleaning and maintenance procedure must be carried out after every use.
- Switch the appliance OFF and disconnect it from the mains supply before performing any maintenance or changing any parts.
- Never immerse the appliance in water!
• After every use, remove the guide comb then use the small brush to eliminate any hair from the cutting head and its seat. - The guide comb must be removed from the appliance before being washed (fig. 13).
- After each use, remove the shaver head (fig.11) and clean the inside using the brush (fig.1 ref.22).
- Clean the outside of the appliance with a soft cloth (slightly damp if necessary). Never use solvents or abrasive detergents!
- Remove the cutting head (fig. 6) and evenly oil the blades and the seat of the motor pin which is located on the inside (fig. 12).
- If after prolonged use, and despite regular cleaning and lubrication, the cutting ability of the appliance appears to be diminished, the cutting head must be replaced.
DISPOSAL
- Dispose of the appliance in accordance with all regulations governing waste disposal and the safeguarding of the environment.
This appliance conforms to European Directives 2004/108/EC, 2006/95/EC, 2009/125/EC, and Regulation (EC) No. 278/2009.

GUARANTEE
VALERA guarantees the appliance you have bought at following conditions:
- The guarantee conditions for this appliance are as defined by our dealer in the country of sale. In Switzerland and in the countries subject to the European directive 44/99/CE the guarantee period is 24 months for domestic use and 12 months for professional or similar use. The guarantee period starts from the date of purchase as stated on the present guarantee card regularly filled out and stamped by the dealer or on the sale's invoice.
- The guarantee is applicable only against submission of the present guarantee card or the sale's invoice.
- The guarantee covers the elimination of all defects arisen during the guarantee period resulting from proven faults in material or workmanship. The elimination of the defects will be made either by repairing the appliance or exchanging it. The guarantee does not cover any damage arising from incorrect connection to the power supply, improper use, breakage, normal wear and non-compliance with the Instructions for Use.
- All other claims of any nature, including those for eventual damages outside of the appliance, are excluded, unless our liability is legally mandatory.
- The guarantee service is carried out free of charge; it does not affect the expiry date of the guarantee.
- The guarantee becomes void if repairs are undertaken by unauthorized persons.
For UK only: this guarantee in no way affects your rights under statutory law.
In case of defect, please return the appliance well packed and together with the guarantee card regularly dated and stamped to one of our Valera Service Centres or to the dealer who will send it to the official importer for the guarantee service.

The symbol ☐ on the product or on its packaging indicates that this product may not be treated as household waste. Instead it shall be handed over to the applicable collection point for the recycling of electrical and electronic equipment. By ensuring this product is disposed of correctly, you will help prevent potential negative consequences for the environment and human health, which could otherwise be caused by inappropriate waste handling of this product. For more detailed information about recycling of this product, please contact your local city office, your household waste disposal service or the shop where you purchased the product.
CE/2004/108 2006/95/CE,
(CE) 278/2009 'on כרִיְה אַל' 2009/125/CE

תְרָה
River International S.A.
C / Beethoven 15, Ático
08021 - BARCELONA
Tel: +34 93 201 3777
Fax: + 34 93 202 3804
www.riverint.com