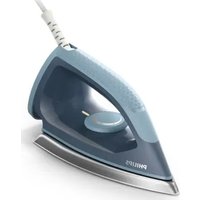
PerfectCare Elite GC9614 - Iron PHILIPS - Free user manual and instructions
Find the device manual for free PerfectCare Elite GC9614 PHILIPS in PDF.
Frequently Asked Questions - PerfectCare Elite GC9614 PHILIPS
User questions about PerfectCare Elite GC9614 PHILIPS
0 question about this device. Answer the ones you know or ask your own.
Ask a new question about this device
Download the instructions for your Iron in PDF format for free! Find your manual PerfectCare Elite GC9614 - PHILIPS and take your electronic device back in hand. On this page are published all the documents necessary for the use of your device. PerfectCare Elite GC9614 by PHILIPS.
USER MANUAL PerfectCare Elite GC9614 PHILIPS
DES: ENSURFANT: Patient-dualizing approach for general health and disease screening. The patient is asked to read the blood and complete a, before you receive the results, blood sample.
PR:POST-APPROVAL: A separate judgment, review, or modification of the report.
See above for further information.
The following table is based on 2007 CE-KGALC Listing as adjusted at time of listing.
Ko079 PnO216 45300000000000000000000000000000000000000000000000000000000000000
10
W. We obtain the following result: If is a closed subset of a finite set S , then every point in S has at most one open ball.
ZH7.国事事限:实际险-以结售,经国商公
(1)在文件中指定文件及相应格式的属性,如:A0:B0:C0,则该文件的值为:
23. 任意数据,无论大小和类型,都必须以A0:B0:C0为单位进行计算。
(2)在文件中指定文件及相应格式的属性,如: A0:B0:C0,则该文件的值为:
1000000000000000000000000000000000000000000000000000000000000000


ENGLISH 6
FRANÇAIS 12
INDONESIA 18
HahKoH 24
BAHASAMELAYU 29
PORTUGUES 35
mIn 41
TIENG VIET 46
繁體中文 51
简体中文 56
alw65
aui 70
Introduction
Congratulations on your purchase and welcome to Philips! To fully benefit from the support that Philips offers, register your product at www.philips.com/welcome.
Read the separate important information leaflet and the user manual carefully before you use the appliance. Save both documents for future reference.
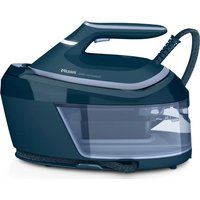
Product overview (Fig. 1)
1 Steam supply hose
2 Iron platform
3 First supply hose storage compartment
4 Mains cord with plug
5 ECO button with light
6 On/off button with safety auto off light and TURBO setting
7 'Water tank empty' light
8 EASY DE-CALC light
9 EASY DE-CALC knob
10 Cord storage compartment
11 Second supply hose storage compartment
12 Detachable water tank
13 Carry lock
14 Carry lock release button
15 Soleplate
16 Steam trigger
17 'Iron ready' light
18 Filling hole
Preparing for use
Type of water to use
This appliance has been designed to be used with tap water. However, if you live in an area with hard water, fast scale build-up may occur. Therefore, it is recommended to use distilled or demineralized water (50% demineralized/distilled water mixed with water could be used as well) to prolong the lifetime of the appliance.
Do not use perfumed water, water from the tumble dryer, vinegar, starch, descaling agents, ironing aids, chemically de scaled water or other chemicals, as they may cause water spitting, brown staining or damage to your appliance.
Filling the water tank
Fill the water tank before every use or when the 'water tank empty' light flashes. You can refill the water tank at any time during use.
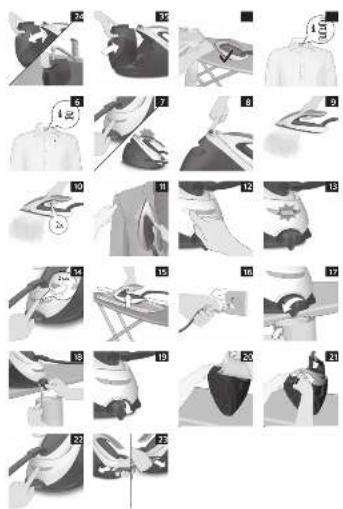
1 Remove the water tank from the appliance and fill it with water up to the MAX indication (Fig. 2).
2 Put the water tank back into the appliance by fitting the bottom part into the appliance first (Fig. 3).
3 Push in the top part of the water tank until it locks into place ('click').
'Water tank empty' light
When the water tank is almost empty, the 'water tank empty' light flashes. Fill the water tank and press the steam trigger to let the appliance heat up again. When the 'iron ready' light lights up continuously, you can continue steam ironing.
OptimalTEMP Technology
The Optimal TEMP Technology enables you to iron all types of ironable fabrics, in any order, without adjusting the iron temperature setting.
It is safe to just rest the hot soleplate directly on the ironing board (Fig. 4) without putting back to the iron platform. This will help reduce the stress on your wrist.
- Fabrics with these symbols are ironable, for example linen, cotton, polyester, silk, wool, viscose and rayon (Fig. 5).
- Fabrics with this symbol are not ironable. These fabrics include synthetic fabrics such as Spandex or elastane, Spandex-mixed fabrics and polyolefins (e.g. polypropylene), but also prints on garments (Fig. 6).
Using your appliance
Ironing
1 Place the steam generator on a stable and even surface.
2 Make sure that there is enough water in the water tank (see section 'Filling the water tank').
3 Put the mains plug in an earthed wall socket and press the on/off button to switch on the steam generator. The blue power-on light on the appliance and the 'iron ready' light start to flash to indicate that the appliance is heating up (this takes approx. 2 minutes) (Fig. 7).
- When the appliance is ready for use, the 'iron ready light' and the power-on light stop flashing and light up continuously. Additionally you hear a short beep.
4 Press the carry lock release button to unlock the iron from the iron platform (Fig. 8).
5 Press and hold the steam trigger to start ironing. (Fig. 9)
Never direct steam at people.
Steam boost function
The steam boost function is designed to help tackle difficult creases.
Double press the steam trigger for a continuous shot of steam (Fig. 10). It is not necessary to press and hold the steam trigger continuously when the steam boost function is activated. To stop the steam boost function, press the steam trigger once.
Vertical ironing
Hot steam is emitted from the iron. Never attempt to remove creases from a garment that someone is wearing. Do not apply steam near your or someone else's hand.
You can use the iron in vertical position to remove wrinkles from hanging fabrics.
1 Hold the iron in vertical position, press the steam trigger and touch the garment slightly with the soleplate (Fig. 11).
Energy saving
ECO mode
- By using the ECO mode (reduced amount of steam), you can save energy without compromising on the ironing result. The green light is on (Fig. 12).
- You can deactivate the ECO mode by pressing the ECO button. The green light goes off.
Safety auto-off mode
- To save energy, the appliance switches off automatically when it has not been used for 10 minutes. The auto-off light in the on/off button starts to flash (Fig. 13).
8 ENGLISH
To activate the appliance again, press the on/off button. The appliance then starts to heat up again.
Note: The appliance is not switched off completely when it is in safety auto-off mode. To switch off the appliance, press the on/off button.
Turbo steam
For faster ironing and a higher amount of steam, you can use Turbo steam.
1 Press and hold the on/off button for 2 seconds until the light turns white. (Fig. 14)
To deactivate Turbo steam, press and hold the on/off button again for 2 seconds until the white light turns blue.
Ironing tips
Minimising wrinkles while drying
Start wrinkle removal early in the drying process by spreading out your laundry properly after washing and by putting garments on hangers to make them dry naturally with fewer wrinkles.
Best practice shirt ironing
Start with the time-consuming parts like collar, cuff links and sleeves. Next, iron the bigger parts like front and back to prevent wrinkling the bigger parts when you are busy ironing the time-consuming parts.
Collar: When you iron a collar, start on its underside and work from the outside (the pointy end) inwards. Turn over and repeat. Fold down the collar and press the edge for a more crisp finish.
Buttons: Iron on the reverse side of the buttons for more effective and faster ironing.
Cleaning and maintenance
To properly maintain your appliance, clean the iron and the appliance regularly.
1 Clean the appliance with a moist cloth. To remove stubborn stains, you can use a small amount of washing-up liquid.
2 To easily and effectively remove stains from the soleplate, switch on the appliance and let it heat up. When the appliance has heated up, move the iron over a moist cloth while you press the steam trigger (Fig. 15).
Tip: Clean the soleplate regularly to ensure smooth gliding.
IMPORTANT - DESCALING
It is very important to perform the descending procedure as soon as the EASY DE-CALC light starts to flash and the appliance beeps continuously.
The EASY DE-CALC light flashes and the appliance beeps continuously after about a month or 10 ironing sessions to indicate that the appliance needs to be descaled. Perform the following descaling procedure before you continue ironing.
To avoid the risk of burns, unplug the appliance and let it cool down for at least two hours before you perform the descending procedure.
1 Remove the plug from the wall socket (Fig. 16).
2 Place the appliance on the edge of the tabletop.
Hold a cup (with a capacity of at least 350ml) under the EASY DE-CALC knob and turn the knob anticlockwise (Fig. 17).
4 Remove the EASY DE-CALC knob and let the water with scale particles flow into the cup (Fig. 18).
5 When no more water comes out of the appliance, reinsert the EASY DE-CALC knob and turn it clockwise to fasten it. (Fig. 19)
IMPORTANT - Descaling the soleplate
If you do not use the EASY DE-CALC function regularly, scale particles may build up in the soleplate and brown stains may come out of the soleplate during ironing. In this situation, you need to descale the soleplate by following the procedure below. We advice you to repeat the procedure twice to better clean the soleplate.
To avoid the risk of burns, unplug the appliance and let it cool down for at least two hours before you descale the soleplate.
1 Remove the plug from the wall socket (Fig. 16).
2 Place the appliance on the edge of the tabletop.
3 Make sure that the water tank is empty.
4 Hold a cup (with a capacity of at least 350ml) under the EASY DE-CALC knob and turn the knob anticlockwise (Fig. 17).
5 Remove the EASY DE-CALC knob and let the water with scale particles flow into the cup (Fig. 18).
Hold the appliance in the position that EASY DE-CALC opening is facing up and pour 900ml distilled water into the opening (Fig. 20).
Note: Be mindful on the heavy weight of the appliance when you tilt it.
7 Keep the EASY DE-CALC opening facing up, reinsert the EASY DE-CALC knob and turn it clockwise to fasten it (Fig. 21).
8 Put the appliance back on a stable and even surface. Plug in the appliance and switch it on (Fig. 22).
9 Wait for 5 minutes for the appliance to heat up.
10 Keep the steam trigger pressed continuously while you move the iron on a piece of thick cloth for 3 minutes (Fig. 15).
Warning: hot, dirty water comes out of the soleplate.
11 Stop moving the iron when no more water comes out or when steam starts coming out.
12 You can continue to use the appliance immediately. Otherwise unplug the appliance after the.
descaling is completed.
Storage
Switch off the appliance and unplug it.
2 Remove the water tank and empty it.
3 Put the iron on the iron platform. Push the carry lock to lock the iron onto the platform.
4 Fold the supply hose and mains cord. Put them in their respective storage compartments. (Fig. 23)
5 You can carry the appliance with one hand by the handle of the iron.
Do not carry the appliance by holding the water tank release lever.
Troubleshooting
This chapter summarises the most common problems you could encounter with the appliance.
If you are unable to solve the problem with the information below, visit www.philips.com/support for a list of frequently asked questions or contact the Consumer Care Centre in your country.
10 ENGLISH
| Problem Possible cause Solution | ||
| The ironing board cover becomes wet or there are water droplets on the garment during ironing. | Steam has condensed on the ironing board cover after a long ironing session. | Replace the ironing board cover if the foam material has worn out. You can also add an extra layer of felt material under the ironing board cover to prevent condensation on the ironing board. You can buy felt in a fabric shop. |
| You have an ironing board cover that is not designed to cope with the high steam rate of the appliance. | Put an extra layer of felt material under the ironing board cover to prevent condensation on the ironing board. You can buy felt in a fabric shop. | |
| Water droplets come out of the soleplate. | The steam that was still present in the hose has cooled down and condensed into water. This causes water droplets to come out of the soleplate. | Steam away from the garment for a few seconds. |
| Steam and/or water come out from under the EASY DE-CALC knob. | The EASY DE-CALC knob is not tightened properly. | Switch off the appliance and let the appliance cool down for 2 hours. Unscrew the EASY DE-CALC knob and screw it back onto the appliance properly. Note: Some water may escape when you remove the knob. |
| The rubber sealing ring of the EASY DE-CALC knob is worn. | Contact an authorised Philips service centre for a new EASY DE-CALC knob. | |
| Dirty water and impurities come out of the soleplate or the soleplate is dirty. | Impurities or chemicals present in the water have deposited in the steam vents and/or on the soleplate. | Clean the soleplate with a damp cloth. |
| Too much scale and minerals have accumulated inside the appliance. | Descale the appliance regularly (see chapter 'Important - DESCALING'). | |
| The iron leaves a shine or an imprint on the garment. | The surface to be ironed was uneven, for instance because you were ironing over a seam or a fold in the garment. | PerfectCare is safe on all garments. The shine or imprint is not permanent and will come off if you wash the garment. Avoid ironing over seams or folds or you can place a cotton cloth over the area to be ironed to avoid imprints at seams and folds. |
| The appliance does not produce any steam. | There is not enough water in the water tank (the 'water tank empty' light flashes). | Fill the water tank (see chapter 'Using your appliance', section 'Filling the water tank'). |
| The appliance is not hot enough to produce steam. | Wait until the 'iron ready' light on the iron lights up continuously. | |
| You did not press the steam trigger. | Press the steam trigger and keep it pressed while you iron. | |
| The water tank is not placed in the appliance properly. | Slide the water tank back into the appliance firmly ('click'). | |
Problem Possible cause Solution
| The appliance is not switched on. Insert the plug in the wall socket and press the on/off button to switch on the appliance. | ||
| The appliance has switched off. The light in the on/off button flashes. | The auto-off function is activated automatically when the appliance has not been used for more than 10 minutes. | Press the power on/off button to switch on the appliance again. |
| The appliance produces a pumping sound. | Water is pumped into the boiler inside the appliance. This is normal. | If the pumping sound continues nonstop, switch off the appliance and remove the plug from the wall socket. Contact an authorised Philips service centre. |
12 FRANÇAIS
Introduction
www.philips.com/welcome@eepf
賊者用承用告其前要中,足定有,实,实,实,实,实,实,实,实,实,实,实,实,实,实,实,实,实,实,实,实,实,实,实,实,实,实,实,实,实,实,实,实,实,实,实,实,实,实,实,实,实,实,实,实,实,实,实,实,实,实,买,买,买,买,买,买,买,买,买,买,买,买,买,买,买,买,买,买,买,买,买
``` 제목개요(그름 1)
wunwnnnaanana w nwnnnnnaaonu nnauwauwauwauwauwauwauwauwauwauwauwauwauwauwauwauwauwauwauwauwauwauwauwauwauwauwauwauwauwauwauwauwauwauwauwauwauwauwauwauwauwauwauwauwauwauwauwauwauwauwau
42 mIn
innulat OptimalTEMP
| jlllgljllgljllgljllgljllgljllgljllgljllgljllgljllgljllgljllgljllgljllgljllgljllgljllgljllgljllgljllgljllgljllgljllgljllgljllgljllgljllgljllgljllgljllgljllgljllgljllgljllgljll | |||
| jllgljllgljllgljllgljllgljllgljllgljllgljllgljllgljllgljllgljllgljllgljllgljllgljllgljllgljllgljllgljllgljllgljllgljllgljllgljllgljllgljllgljllgljllgljllgljllgljllgl | |||
| jllgljllgljllgljllgljllgljllgljllgljllgljllgljllgljllgljllgljllgljllgljllgljllgljllgljllgljllgljllgljllgljllgljllgljllgljllgljllgljllgljllgljllgljllgljllgljllgl | |||
| ecl2lgljllgljllgljllgljllgljllgljllgljllgljllgljllgljllgljllgljllgljllgljllgljllgljllgljllgljllgljllgljllgljllgljllgljllgljllgljllgljllgljllgljllgljllgljllgljllgljllglj | |||
| EASYDE-CALC | gill EASY DE-CALC | gill EASY DE-CALC | |
| EASYDE-CALC | gill EASY DE-CALC | gill EASY DE-CALC | |
| EASYDE-CALC | gill EASY DE-CALC | gill EASY DE-CALC | |
| EASYDE-CALC | gill EASY DE-CALC | gill EASY DE-CALC | |
| EASYDE-CALC | gill EASY DE-CALC | ||
| EASYDE-CALC | gill EASY DE-CALC | ||
| EASYDE-CALC | gill EASY DE-CALC | ||
| EASYDE-CALC | gill EASY DE-CALC | ||
| EASYDE-CALC | gill EASY DE-CALC | ||
| EASYDE-CALC | gill EASY DE-CALC | ||
| EasyDE-CALC | gill EASY DE-CALC | ||
| EASYDE-CALC | gill EASY DE-CALC | ||
| EASYDE-CALC | gill EASY DE-CALC | ||
| EASYDE-CALC | gill EASY DE-CALC | ||
| EASYDE-CALC | gill EASY DE-CALC | ||
| EASYDE-CALC | |||
| EASYDE-CALC | |||
| EASYDE-CALC | |||
| EASYDE-CALC | |||
| EASYDE-CALC | |||
| EASYDE-CALC | |||
| EASYDE-CALC | |||
| EASYDE-CALC | |||
| EASYDE-CALC | |||
| EASYDE-CALC | |||
| EASYDE-CALC | |||
| EASYDE-CALC | |||
| EASYDE-CALC | |||
| EASYDE-CALC | |||
| EASYDE-CALC | |||
| EASYDE-CALC | |||
| EASYDE-CALC | |||
| EASYDE-CALC | |||
| EASYDE-CALC | |||
| EASYDE-CALC | |||
| EASYDE-CALC | |||
| EASYDE-CALC | |||
| EASYDE-CALC | |||
| EASYDE-CALC | |||
| EASYDE-CALC | |||
| EASYDE-CALC | |||
| EASYDE-CALC |
62J
| gill | # |
| g | 1 |
| . | 2 |
| . | 3 |
| . | 4 |
| . | 5 |
| . | 6 |
| . | 7 |
| . | 8 |
| . | 9 |
| . | 10 |
| . | 11 |
| Journals | |
| ... | 1 |
| ... | 2 |
| ... | 3 |
| (23 JU) | 4 |
| ... | 5 |
| JHK# |
| ### |
100000000000000000000000000000000000000000
J 1
Jj gol/ jwqdoos,olss
g
.0sloa|gjgljdlg jno, jbji jda g gjw gil sl
(14J)
g 2
J
Joo Jg
a 1gil, gssw j sag, ssu Jd a uueb g b a Lggrs il
1jglwUg 1JwUg
Jn
aill aasil ay lal y
cogjg ggsgdsgbsgdsg EASY DE-CALC g
sulpailjulsjgwsd
jui g i jg y ggs o iu g ij EASY DE-CALC gl jgl 10 l ofo j
aaiilj j j uusj wj Jal oJwsgil ayolj Jl Jgwhuujwj yolssd
g j 1 g g g g g g g g g g g g g g g g g g g g g g g g g g g g g g g g g g
.
.(16J)jjjIaLwgs 1
2
3
(17J)
(18J) 4
5
(19J)
64
OptimalTEMP
Juiji jai gil jla sllgil gil slosd jui jol la Optimal TEMP jglia
.
.(8J)g giloljglgill J J J J J J 4
(9J) .gil ay gjw wss, djl g oJ jy J
olssll ocl aaylill lalw yslj s, pbluy EASY DE-CALC abg plssl j
glil jll no oIgsooll xscln no wssll allj, aall o sna nll elil oIgsoill oxla no ay gai gbi
J 1
aillj Ja Jaill jucn cclw oosd s u aig aalblg gjjll jlgall, gljlll
.ogSall oxlla j0 wSll
.(16jgll) blll aalbll sdo no jll lcl 1
alglbll jgl 2
3
yolil 350 a) 4
.(17jgall) aclll
.(18g)gSII gSII aIgSII IaIgSII gO alloEASY DE-CALC 5
6
.(20 8jgall) aai
.1j jgll aai jglal allo! 1i jn:abdo
aEALIg EASY DE-CALC aIJIg EASY DE-CALC 7
.(21 oJgAJI) a
8
(22djgall)
jglll 5doa 9
3 0sA aI aI IaI gba nla oal alol jai Jau Jau Jau Jau Jau
.(15 0 j g
olgoll oxla jdsallg aiisll olll e:
gdsully lsslloisie g jwlln oolall aagttloic ogkoll k
ailllll aljla loc gail aalll jglll lssgai jgall lgc jglllsaae
j
.aaallljaglgljagg 1
.2
.ajiall jlc olgssll cuiiuiuuii Jaa uie baiiaaiall juc olgssll g 3
Ogall).logy jnnn nn nnnn nn nnnnnnnnnnnnnnnnnnnnnnnnnnnnnnnnnnnnnnnnnnnnnnnnnnnnnnnnnnnnnnnnnnnnnnnnnnnnnnnnnnnnnnnnnnnnnnnnnnnnnnnnnnnnnnnnnnnnnnnnnnnnnnnnnnnnn
(23.aa)
.5
.(16j)ll) blll lalall 1
alglbll jlc jglg 2
acllll joc oil jill l 350 a) lig
.170g
.(18g)gl 4
acllll jac ojiy jrg EASY DE-CALC alao Jlae, jgall no jswlln oolall aaggt losic 5
(19.ραβjδgαll)di
OptimalTEMP
a a a a a a a a a a a a a a a a a a a a a a a a a a a a a a a a a a a a a a a a a a a a a
oIolgsall oIe! 1Iaia IaI (4 aagll) oJwUgll gIle aiIwIoll ogssll oxla gngnIill no
JU JIO, 111111111111111111111111111111111
(5jgJgJgJgJgJgJgJg
auii g aia jaojol Joo joi Jai aaaill loi
aalul, (nuggulll joo) nolgl uugll g, siiilall go aagjaoaillg, iuill gl, uusil
.6 (6 o jgall) 1111111111
-ogalgl
- jio auioll
jglg: pdsai
sll
.1
.(oall jai aaij)aai jai jai oaiai 2
olssll jj j 1/ jj jlc bdo g do yo bila da aas fll aoaao
<0jolg>Jl jll jll jll jll jll jll jll
.70gll) (2 2 gglg aalg glaas) clal jgll al lgljwll
sallgllg 0jolgall> jlll lssll gall aagai, alssll ojmal ogall uai tioic
aag aajgaww, jll aalj yjw yog jolgsall j
.
.(8jgall) aiai jno o lgolll cui tcll j j 4
(9.0j0gall). 5
a 1
jull joi aohg
aaleall xclllnnae xclal jall joe aabg
hduallgjgl.10oogll) jll no ojaaaalb Jgannl jll Joo Jc gjo hdo
a a a a a a a a a a a a a a a a a a a a a a a a a a a a a a a a a a a a a a a a a a a a a a a a a a a a a a a a a a a a a a a a a a a a a a a a a a a a a aaa
olll jla aui
J 1
.2
3